Prerequisites for Creating a Connection
You must satisfy the following prerequisites to create a connection with the REST Adapter.
OAuth Security Policies
If you are using one of the OAuth security policies, you must already have registered your client application to complete the necessary fields on the Connections page. The Basic Authentication and No Security Policy security policies are exempted.
Before a client application can request access to resources on a resource server, the client application must first register with the authorization server associated with the resource server.
The registration is typically a one-time task. Once registered, the registration remains valid, unless the client application registration is revoked.
At registration time, the client application is assigned a client ID and a client secret (password) by the authorization server. The client ID and secret are unique to the client application on that authorization server. If a client application registers with multiple authorization servers (for example, Facebook, Twitter, and Google), each authorization server issues its own unique client ID to the client application.
@ref: http://tutorials.jenkov.com/oauth2/authorization.htmlFor OAuth configuration, read the provider documentation carefully and provide the relevant values.
SSL Endpoints
For SSL endpoints, obtain and upload a server certificate. For more information, see Upload an SSL Certificate.
Amazon Web Services (AWS) REST API Consumption
Before you can create a connection that consumes an Amazon Web Services (AWS) REST API, you must obtain the necessary access and secret keys. See Understanding and Getting Your Security Credentials.
OCI Signature Version 1 Security Policy Use
-
Create an API signing key. You then specify the signing key in Oracle Cloud Infrastructure.
- Create the signing key in
Oracle Cloud
Infrastructure using
openssl. The key must be in RSA (PKCS1) format. During creation, you also create a pass phase to protect the key. Both the key and pass phrase are required when configuring the OCI Signature Version 1 security policy on the Connections page. See Creating a Key Pair.If the key downloaded from the Oracle Cloud Infrastructure Console is in PKCS8 format, it must be converted to RSA (PKCS1) format. See Convert a Private Key from PKCS8 to RSA (PKCS1) Format for the OCI Signature Version 1 Security Policy.
Existing connections already using the OCI Signature Version 1 security policy do not need to be upgraded because they continue to work.
- Sign in to the Oracle Cloud Infrastructure Console to upload the public key.
- In the upper left corner, select
 .
.
- Click Home.
- Select Identity & Security, then select Users.
- On the Users page, click the link of the user name to use.
- In the Resources section, click API Keys.
- Click Add API Key.
- In the Add API Key dialog, add
the public key you created, and click Add.

- Copy the finger print value generated by Oracle Cloud Infrastructure. You need this value when configuring the OCI Signature Version 1 security policy on the Connections page.
- Create the signing key in
Oracle Cloud
Infrastructure using
- Obtain the tenancy OCID and user
OCID details in the Oracle Cloud
Infrastructure Console. When you sign up for Oracle Cloud
Infrastructure, Oracle creates a tenancy for your company,
which is a secure and isolated partition within
Oracle Cloud
Infrastructure where you can create, organize, and administer
your cloud resources.
- Sign in to the Oracle Cloud Infrastructure Console.
- In the upper left corner, select
 , and search for Tenancies.
- Click Tenancies.
- For your tenancy, go to the Tenancy Information section and click Show to display the OCID tenancy value.
- Copy the value. You need this value when configuring the OCI Signature Version 1 security policy on the Connections page.
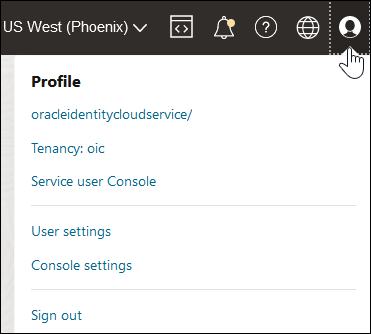
- In the upper right corner, click
the Profile icon and select User
settings.

Note:
You can also select in the upper left corner, then select Identity &
Security, and then select User settings to
access the user profile.
- Click Show to display the OCID user value.
- Copy the value. You need this value when configuring the OCI Signature Version 1 security policy on the Connections page.