Insert or Update Records Using the Upsert Operation

This use case provides an overview of how to use the upsert operation in an integration.

You can use the upsert operation to insert a new record or update an existing record in the Salesforce application. To determine if the record is already present, the upsert operation uses a unique key for matching the record. The unique key is a custom field declared as External Id field in the Salesforce application.
  • If the key does not match, a new object record is created.
  • If the key matches once, the existing record of the object is updated automatically.
  • If the key matches more than once, an error is generated, and the object record is not inserted or updated.
  1. Create SOAP Adapter and Salesforce Adapter connections.
  2. Create an app-driven orchestrated integration.
  3. Drag a SOAP Adapter connection into the integration as a trigger connection.
  4. Configure the SOAP endpoints.
  5. Drag a Salesforce Adapter into the integration canvas.
  6. Configure the Salesforce Adapter as follows.
    1. On the Basic Info page, provide an endpoint name.
    2. On the Action page, select Create, Update or Delete Information.
    3. On the Operations page, select the Upsert operation, and then select the business object (for this example, Account).
    4. Review your selections on the Summary page, and click Done.
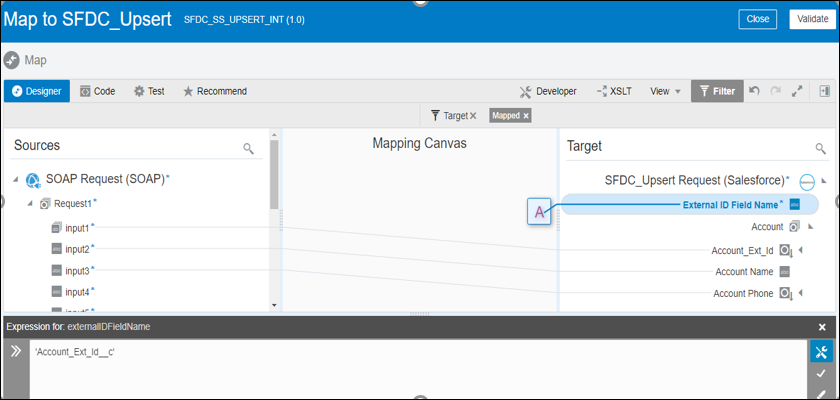
  7. In the mapper, map the source SOAP Request (SOAP) input element nodes to the target SFDC_Upsert Request (Salesforce) input payload. For this example, map input1 to Account_Ext_Id and input2 to Account Name.

    The mapper shows Designer, Code, Test, and Recommend tabs. To the right are the Developer, XSLT, View, Filter, and four links. Below is the Sources, Mapping Canvas, and Target sections. Below this is the Expression Builder section. The actual source-to-target mappings are described above the image.

  8. Click External ID Field Name, and then click Create target node. The Expression Builder is displayed.
  9. Add the same field API name that is set as External Id field in Salesforce. For this example, the following value is added to the Expression Builder:
    Account_Ext_id_c

    Ensure that you use the same field name that you created/specified as an external ID field in the Salesforce application.

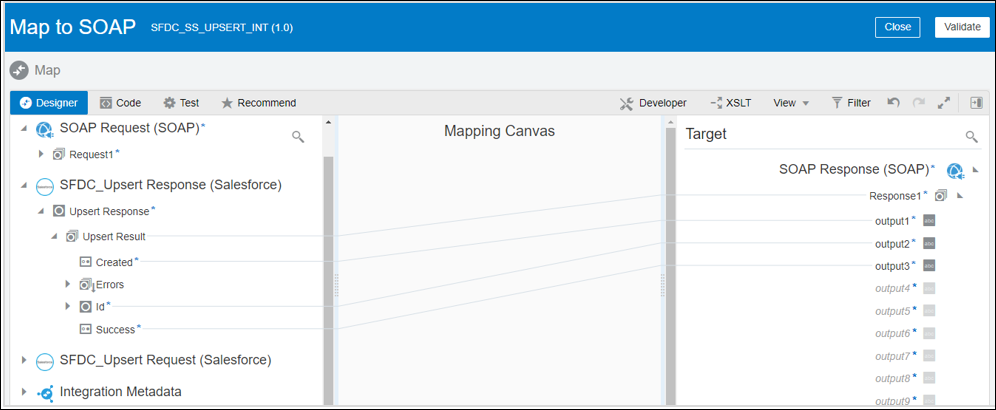
  10. In the mapper, map the SFDC_Upsert Response (Salesforce) element nodes to the SOAP Response (SOAP) element nodes:
    • Created to output1 (returns true if a new account is created and false if an account is updated)
    • Id to output2 (returns an account ID that is created or updated)
    • Success to output3 (returns true if the operation is performed successfully)


    The mapper shows Close and Validate buttons in the upper right. Below at the lower left are the Designer, Code, Test, and Recommend tabs. To the right are the Developer, XSLT, View, Filter, and four links. Below is the Sources, Mapping Canvas, and Target sections. Below this is the Expression Builder section. The actual source-to-target mappings are described above the image.

  11. Click Validate, and then click Close. The completed integration looks as follows.

    The integration shows a SOAP Adapter, mapper, Salesforce Adapter, mapper, and return icon.

  12. Specify the tracking variable.
  13. Activate the integration.