Synchronize New Employee Records Between Oracle Taleo Business Edition (TBE) and Oracle NetSuite

You can use the Oracle Taleo Business Edition (TBE) Adapter to create an integration between Oracle Taleo Business Edition (TBE) and Oracle NetSuite.

The integration can periodically check for new employees in Oracle Taleo Business Edition (TBE) and create the new employee in Oracle NetSuite.
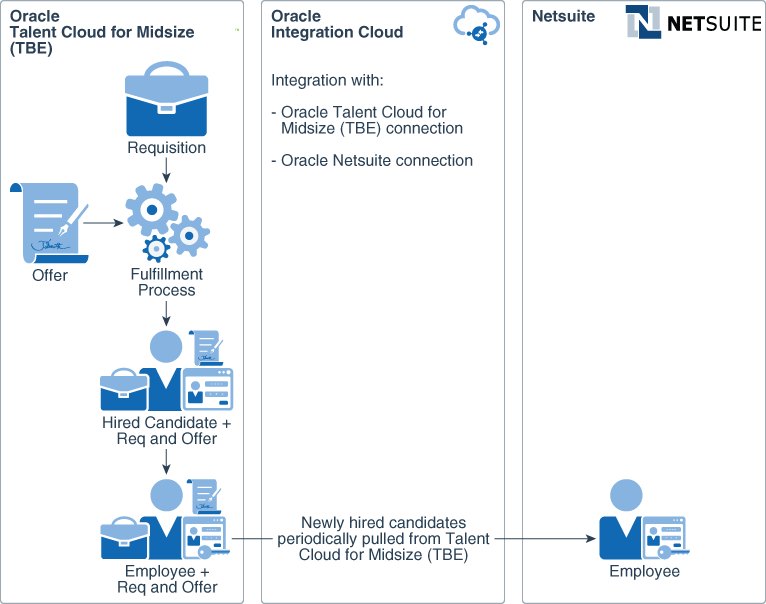

Description of tbe2netsuite.png follows
Description of the illustration tbe2netsuite.png

Add the Oracle Taleo Business Edition (TBE) Connection to an Integration

Now that you have created a connection to Oracle Taleo Business Edition (TBE), you can add it to your integration.

What you need:

If you haven’t already done so, create a new connection to Oracle Taleo Business Edition (TBE). See Create an Oracle Taleo Business Edition (TBE) Adapter Connection.

  1. In the navigation pane in Oracle Integration, click Integrations, then Integrations.
  2. Create an integration.
    1. Click Create.
    2. In Create Integration — Select a Style, select Scheduled Orchestration.
      The Oracle Taleo Business Edition (TBE) connection can only be a target(invoke) connection so it needs something to trigger it. A scheduled orchestration enables you to trigger daily data transfer from Oracle Taleo Business Edition (TBE) to another application.
    3. In Create New Integration , specify a name for your integration along with a description if desired and click Create.
  3. Add the Oracle Taleo Business Edition (TBE) connection to your integration.
    1. In the Integration Designer, select Invokes on the right, find the connection you created for Oracle Taleo Business Edition (TBE), and drag it to the line coming from Schedule.
    2. In the Basic Info page, specify a meaningful name as this name is displayed in your integration and you cannot change it after.
    3. In the Operations page, select the business object and the corresponding operation that you want to perform and click Next.

      For example, to get new employee records from Oracle Taleo Business Edition (TBE), select the Employee object, and the operation Search Employee .

    4. At the Summary page, click Done.

      Your integration now includes the Oracle Taleo Business Edition (TBE) connection you have added and configured.

  4. In this example, you need to limit records returned from Oracle Taleo Business Edition (TBE) to employees that were recently added to the system. You can accomplish this with the mapper.
    1. Select the Map to icon between the schedule icon and the Oracle Taleo Business Edition (TBE) connection, and then click Edit.
    2. In the Target pane, expand the SearchEmployee and QueryParameters elements.
    3. Set the value of the addedWithin attribute to 1.

      This limits the response to employees that have been added within the last day.

Map the Oracle Taleo Business Edition (TBE) Data to Another Application

Once you add the Oracle Taleo Business Edition (TBE) connection to your integration, you need to add the connection to the other application to your integration and map data between the applications.

For example, you are configuring an integration in which you get new employee records from Oracle Taleo Business Edition (TBE) and create new employee records in Oracle NetSuite. You want the integration to check for new employee records every day at midnight. You need to map Oracle Taleo Business Edition (TBE) data to Oracle NetSuite.

To create a new connection to the application to which you want to map data from Oracle Taleo Business Edition (TBE)

  1. In the navigation pane in Oracle Integration, click Integrations, then Integrations.
  2. Search for the integration that you created that contains Oracle Taleo Business Edition (TBE), and click Edit.
  3. Add the connection to your other application to your integration.
    1. In the Integration Designer, select Invokes on the right, find the connection you created, and drag it to the line between NewEmployeesfrom and Stop.
    2. In the Basic Info page, specify a meaningful name as this name is displayed in your integration.
    3. In the Operations page, select the business object and the corresponding operation that you want to perform, and then click Processing Options. Select the Insert record on Update if not Exist option.

      For example, to add new employee records to Oracle NetSuite, select the Basic, Add operation, and the object Employee.

    4. At the Summary page, click Done.

      Your integration now includes the connection you have added and configured.

  4. Map data from Oracle Taleo Business Edition (TBE) to another application.
    1. Select the Map to icon between the Oracle Taleo Business Edition (TBE) connection and your other application connection and click Edit.
    2. In the Map page, click the source and the target fields, and then click Map+.
      For example, to send employee data from Oracle Taleo Business Edition (TBE) to Oracle NetSuite, you might want to map the following fields:
      • Employee first and last name, address, department, hire date, address.

      • IDs are assigned by each application so you would not map Employee ID.

  5. Test your mappings.
    1. In the mapper toolbar, click Test.
    2. In the Input panel, click Generate Inputs to automatically generate the payload.
    3. Click Execute to generate results in the Output panel.
    4. Review the results in the Output panel to ensure that your input was processed correctly.

      Return to the mapper to make any mapping changes and keep testing until you get the desired results.

Assign Business Identifiers

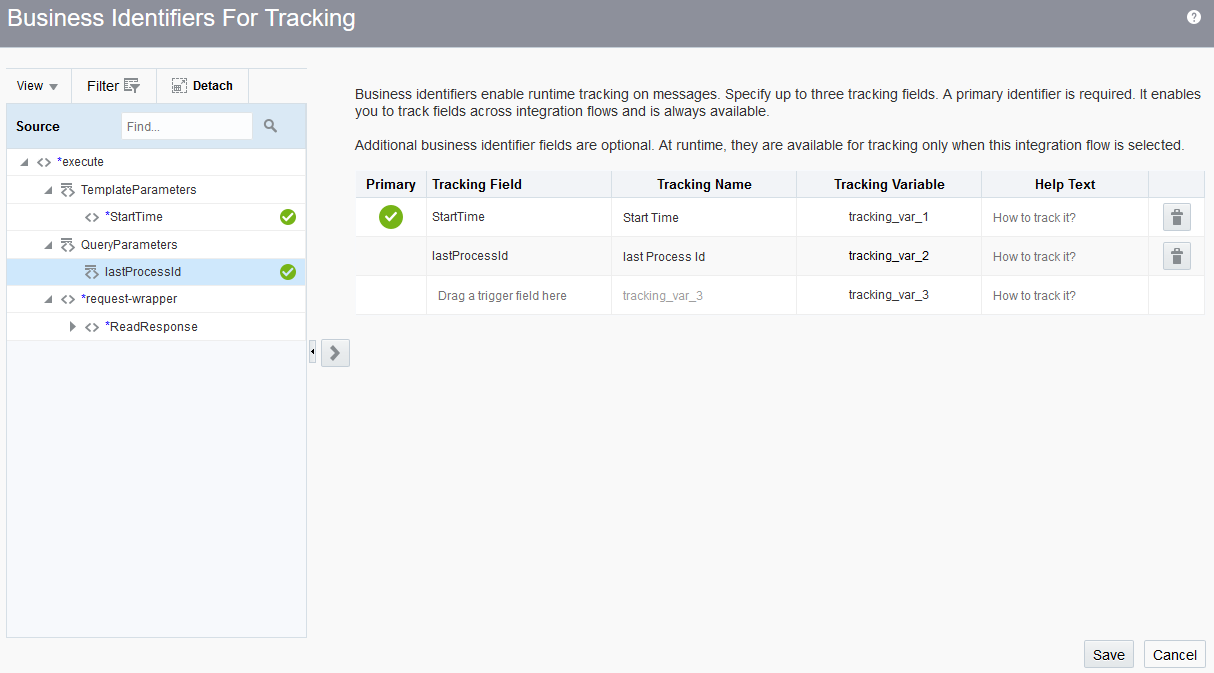
Business identifiers enable you to track payload fields in messages during runtime. You can specify up to three business identifier fields for tracking during design time. One of these fields must be selected as the primary business identifier field. The primary business identifier enables you to track fields across integration flows during runtime, and is always available. At runtime, the status of business identifiers is visible on the Track Instances page and (if integration errors have occurred) the Errors page. If you created scheduled parameters, they are available for assignment as business identifiers.

If you have not yet configured at least one business identifier tracking field in your integration, an error icon is displayed in the design canvas. See Assign Business Identifiers.

To assign business identifiers:

  1. In the navigation pane in Oracle Integration, click Integrations, then Integrations.
  2. Click the specific integration to which to add business identifiers. You can only add business identifiers to integrations that are not active. If an integration is active, you can only view its existing business identifiers.
  3. From the Actions Actions menu menu, select Tracking.
    The Business Identifiers For Tracking dialog is displayed. The source payload for the selected integration is displayed on the left side. You can only assign business identifiers to fields of source payloads. You cannot assign business identifiers to fields of target payloads.
  4. From the Source section, drag the payload field that you want to track to the Drag a trigger field here section. A green checkmark indicates that this is the primary business identifier. At least one identifier is required. If you only add one, it is automatically selected as the primary key. If you created scheduled parameters, they are available for assignment as a primary or secondary business identifier.

    You can filter the display of source structures by clicking the Filter link. This enables you to filter on whether or not fields are used and on the type of field (required fields, custom fields, or all fields).
  5. In the Tracking Name field, optionally enter a descriptive name to track during runtime (for example, OrgId). The name is displayed when this field is used to filter messages on the Track Instances page or (if there is an integration error) the Errors page during runtime.
  6. In the Help Text field, optionally enter instructions to enable users to know what to enter in this field during runtime (for example, Enter a valid organization number). These instructions are displayed inside the empty field when it is used on the runtime Track Instances page to filter messages.
  7. Click Done.

Activate an Integration

Once you create an integration and the progress indicator shows 100 percent, you can activate that integration to the runtime environment. An integration shows as 100% and is eligible for activation after you have specified the source connection, the target connection, the data mappings, and the tracking fields.

To activate an integration:

Note:

If you activate a new version of an existing integration, tracking instances or logs of the old version are not deleted. However, related artifacts are deleted and redeployment is performed on the back end. Monitoring data is also removed.
  1. In the left navigation pane, click Home > Integrations > Integrations.
  2. Go to the row of the integration to activate.
  3. Click the Activate icon icon to activate the integration.
    The Confirmation dialog is displayed.
  4. Select options appropriate to your integration.
    Element Description

    Contribute integration mappings to Oracle Recommendations

    Click to enable the Oracle Recommendations Engine.

    Uses the collective intelligence to recommend which fields should be mapped while developing an integration. These recommendations are built based on the mappings contributed to Oracle Recommendations Engine anonymously. You can change this on the Recommendations page by selecting Settings > Recommendations in the navigation pane.

    Enable Asserter Recording

    Click to capture payloads and record instances for playing back and testing,

    Enable tracing

    Click to enable detailed tracing information in the activity stream.

    When this checkbox is selected, detailed logging information about messages processed by this integration flow at runtime is collected. This can aid in troubleshooting issues. However, detailed tracing may also impact performance. To disable tracing, you must deactivate the integration, then reactivate it without selecting the Enable tracing checkbox.

    If you do not enable tracing, minimal logging details are created in ics-flow.log to indicate when the activated integration begins and completes execution (regardless of execution success or failure). You can download the logs on the Dashboard page.

    If you want to enable payload tracing to log input and output payloads to the activity stream, click the Include payload checkbox.

    When this checkbox is selected, information from the payload is also written to the log files, which can be downloaded and viewed. For example, you see more detailed logging information about payload activity at several points in the integration flow, such as the payload prior to data mapping and the payload after data mapping. This action can present a security risk and also impact the performance of your system. This setting is not recommended for a production environment.

  5. Select an activation option. The options available are based on the type of integration you are activating:
    1. Click Activate (if you are activating a nonscheduled integration).
    2. Click Activate and Schedule (if you are activating a scheduled integration).
      The Run integration_name page is displayed. Create a schedule for running this integration, and click Save. See Define the Integration Schedule.
    A status message is displayed in the banner at the top of the page. For example:
    Description of integration_activation.png follows
    Description of the illustration integration_activation.png
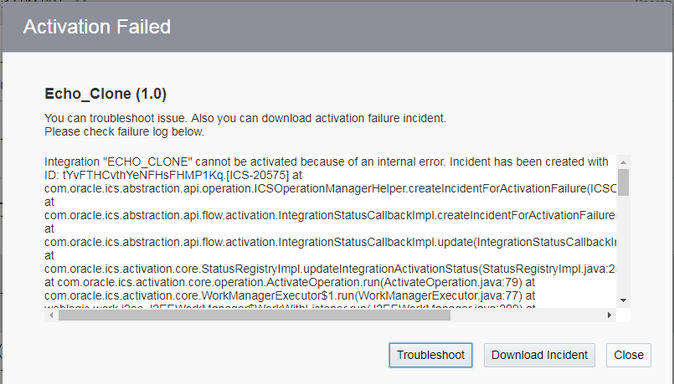
  6. If integration is unsuccessful, an Activation Failed warning icon is displayed in the banner. If you click the icon, a dialog is displayed with the option to download details about the activation failure incident.
    Description of integration_active_fail.png follows
    Description of the illustration integration_active_fail.png
    1. If your integration includes a function that is not completely configured, an error message is displayed in the banner. You must complete configuration of this function before you can activate the integration. Click inside the integration and note the following errors/warnings:
      • An error icon is displayed on the function call action that uses the incomplete function. The Error panel on the right side of the integration canvas provides specific details about the incomplete function.

      • A warning icon is displayed on the mapper that uses the inputs and outputs of this function. After completing function configuration, you must verify the input and output mappings before activating the integration.

    If activation is successful, the status of the integration changes to ACTIVE in the row.
  7. Click the How to Run link icon to display details about how to run, test, and track instances for this integration.
    For example:Endpoint URL and How to run, Test, and Track Instances links.

    If you selected to enable tracing, the words TRACE ENABLED are displayed under the icon you clicked to activate the integration. If you click the integration instance on the Track Instances page, the hamburger menu menu includes an option called View Activity Stream for viewing payload details.

    To access the detailed trace logging information:

    1. In the left navigation pane, click Home > Monitoring > Integrations > Dashboards.

    2. Click Download Diagnostic Logs to download Oracle Integration logs and diagnostics logs.

  8. View active integrations by clicking the integration name or selecting View from the Actions menu menu. The active integration is displayed with a message saying View Only in the banner at the top.
Note the following details about read-only mode:
  • No Save button is displayed.

  • There are no Invokes, Actions, or Errors icons.

Run and Monitor a Scheduled Integration

You can monitor scheduled integration runs on the Track Runs page. You can view the total number of messages processed, the number of successfully processed messages, and the number of failed messages. Scheduled integrations can be those with a defined schedule or those submitted ad-hoc through the Submit Now option.

To run a scheduled integration:

  1. In the navigation pane, click Integrations, then Integrations.
  2. Hover over the integration, then click Actions Actions icon and select Schedule.
    The Schedule and Future Runs page is displayed.
  3. From the Actions menu menu, select Submit Now.
    If the submittal was successful, a message is displayed with an ID number.
  4. Click the ID number.

    The Track Runs page is displayed. If the submitted integration does not appear, click the Refresh icon. Details about the run are displayed.

Define the Integration Schedule

You can define a schedule for running orchestrated integrations, such as the frequency at which to run the integration, whether to run the schedule based on an iCal expression, whether the schedule run should never expires, whether the schedule should have a fixed expiration date, and so on.

To define an integration schedule:

Note:

  • You cannot separately export the schedule of an integration.
  • When the user that created and scheduled an integration is locked or deleted, the schedule does not run. Ensure that this user is not locked or deleted.
  1. Go to the Integrations page.
  2. Find the scheduled integration.
    These integrations are identified by a Scheduled trigger icon schedule trigger icon in the far left column. There are several ways in which to create a schedule on an integration.
  3. If you want to first design and activate the integration and then create the schedule:
    1. Click the Activate icon icon. The Activate Integration dialog box is displayed.
    2. Click Activate and Schedule.
  4. If you want to first create a schedule for an integration that you design and activate later:
    1. Select Add Schedule from the Actions icon menu.

      Note:

      For integrations with no defined schedules, the menu shows Add Schedule. For integrations that have a defined schedule, the menu switches to Schedule.

    The page for defining the schedule execution details is displayed.

  5. If you want to schedule basic integration runs, click Simple. For this type, there is a minimum frequency limit of ten minutes. If you try to define a schedule frequency of under ten minutes, a validation error occurs.
    1. In the Frequency section for a Simple schedule, click the icon to display a dropdown list for selecting the frequency with which to run the integration. As you define one frequency, you can specify additional values by clicking the icon to the right of the Frequency section.
      • Only Once: This is the default selection. This selection clears all settings except for the From field.

      • Hours and Minutes: Specify the hours and minutes at which to run the integration.

      • Days: Specify the days on which to run the integration.

      • Weeks: Specify the weeks during which to run the integration.

      • Months: Specify the months during which to run the integration.

  6. If you want to schedule integration runs with an iCal expression, click iCal.

    Note:

    • There is a one minute limitation on how frequently you can run scheduled integrations with an iCal expression. Anything below this limit is not supported.
    • You cannot use lookups in iCal expressions.
    1. Enter an iCal expression, and click Validate Expression. For example:
      • The following expression indicates that this integration runs each month on the 1st, 10th, and 15th days of the month at 5:15 AM, 10:15 AM, 3:15 PM, and 8:15 PM.


      • You can also define multiple schedule frequencies. The following schedule runs every day between the hours of 5:30 PM – 7:30 PM, and during these hours it executes every 10 minutes. This configuration requires three schedules separated by the & sign:
        FREQ=DAILY;BYHOUR=17;BYMINUTE=30,40,50;BYSECOND=0;
        &FREQ=DAILY;BYHOUR=18;BYMINUTE=0,10,20,30,40,50;BYSECOND=0;
        &FREQ=DAILY;BYHOUR=19;BYMINUTE=0,10,20,30;BYSECOND=0;
        Description of ical_expression2.png follows
        Description of the illustration ical_expression2.png
      • The following schedule runs daily at 8 AM and also monthly at 12 PM on day 1 and day 2.

        FREQ=DAILY;BYHOUR=8;&FREQ=MONTHLY;BYMONTHDAY=1,2;BYHOUR=12;

        Validate Expression button and field with expression FREQ=DAILY;BYHOUR=8;&FREQ=MONTHLY;BYMONTHDAY=1,2;BYHOUR=12;

      If validation is successful, the following message is displayed at the top:

      iCal expression is valid.
  7. In the This schedule is effective section, click the link to the right of From.
    A menu is displayed for defining the start date of the schedule.
  8. If you want to start the integration run when the schedule is activated:
    1. Click When schedule starts.
  9. If you want to explicitly set an integration run start date:
    1. Select Modify start date.
    2. Click the Calendar icon to select the month, year, and day and the hour, minute, and second at which to start the integration run.
    3. Click OK.
  10. If you want the schedule run to never expire:
    1. Select Never (repeat indefinitely).
  11. If you want the integration run to have a fixed expiration date:
    1. Select Choose expiry date.
    2. Click the Calendar icon to select the month, year, and day and the hour, minute, and second at which to end the integration run.
    3. Click OK.
  12. From the Time zone list, select a value. By default, this field shows the value you selected on the Preferences page.
    The
  13. Click Save, then click Update & Save when prompted.
    If successful, a message is displayed in the upper right corner.
    Schedule Run name saved successfully
    If there are any errors, a validation message is displayed in the upper right corner that describes how to resolve the errors.
  14. Click Back button.
    The Schedule and Future Runs page is displayed.
    There are two sections on the Future Runs page:
    • Schedule section: This section is collapsed by default. Clicking the top bar (showing schedule name and buttons) expands the section and shows the schedule.
    • Future Runs table: This remains empty until the schedule is started. Once you start the schedule, you can see data.
  15. If you have already activated the integration, select an option to run the integration:
    1. Select Submit Now from the hamburger menu to run the integration. menu.
    2. If you are a user with the ServiceAdministrator role, you can change the user with which to submit the schedule.
      Clicking Submit Now triggers the integration immediately. Clicking Start Schedule triggers the integration using the defined schedule. (with frequencies and other definitions).
    3. Select how to initiate an instance of the integration when prompted. Otherwise, click Cancel.
      • Ad hoc request: The instance is executed independently of the scheduled run for the integration (if any).
      • As part of schedule: The instance runs in sequence with the scheduled run and shares schedule parameters (if any).
    4. Click Submit Now.
    or
    1. Select Start Schedule on the Schedule and Future Runs page to activate the integration schedule.
    2. If you are a user with the ServiceAdministrator role, you can change the user with which to submit the schedule.
    3. Click Start when prompted. Otherwise, click Cancel.
  16. If you have not yet activated the integration, return to the Integrations page and click Activate icon.
  17. Run the scheduled integration as described in the previous steps.