- Using Processes in Oracle Integration Generation 2
- End User Tasks
- Work on Tasks
- Complete Your Assigned Tasks
- How do I work on tasks?
How do I work on tasks?
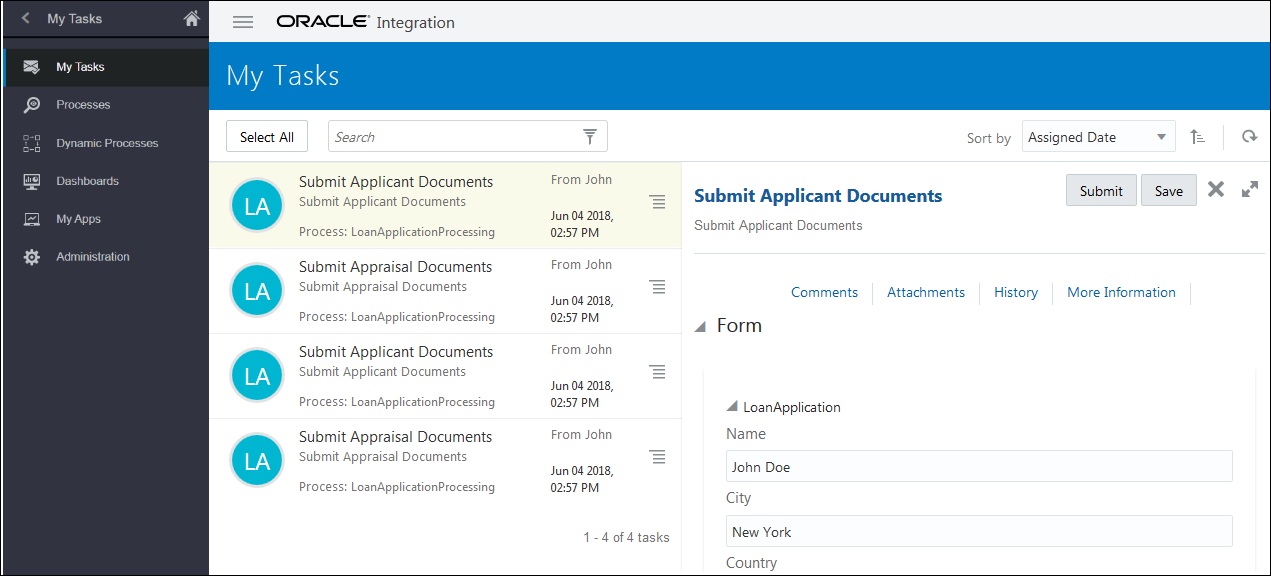
You can act on tasks, view details about the task, modify the task form, and add information to a task. When you take action on a task, it moves to the next step in the process application.
- In the Integration Cloud navigation pane, click My Tasks.
- Click the title for the task you want to work on. Now you can see all the details about the task.
- Click Resize
 if you want to view both your list of tasks and the details pane for the currently selected task.
- Optionally, expand the sections you want to review or modify:
-
Form: View, print, or modify the task form.
-
Comments: View or add a comment explaining your decision or information about the task.
-
Attachments or Documents: Depending on how the application was designed, you add attachments in one of two ways. See How do I add a document to a task?
-
History: View the history of the task to understand why it was assigned to you, why it took so long to get to you, and so on.
-
More Information: View general information about the task or change the task priority. High priority tasks have a red circle with an exclamation mark.
-
- Click the action you want to take, or select an action from the More menu if it’s available.The available actions depend on the application. For example, in a travel request application, the actions may be approve or reject. The More actions are:
-
Request Info: You can request more information from the task creator or any of the previous assignees.
-
Escalate: In case you’re unable to complete a task, you can escalate it by adding an optional comment in the Comments section and reassign it to your manager (up one level in a hierarchy).
-
Withdraw: You can withdraw the task. This results in the process moving to the next activity inline and the task is skipped from the approval process.
-
Reassign: If you’re a manager, you can delegate a task to reportees.
-
Claim: If a task is assigned to multiple users or a group, you can claim the task to act upon it. After a user claims a task, other assignees won't be able to access the task.
However, after claiming a task if the user doesn't act upon it for a certain period of time (for example, 72 hours), then the task will be automatically available to other users of the group. Any other user of the group can claim the task and perform actions on it. The time period when a claimed but not acted upon task becomes automatically available to other users in the group is determined by the task priority and is not configurable. If the task priority is set to P1, the task becomes available after 24 hours; if priority is P2 after 48 hours, if priority is P3 after 72 hours, and if priority is set to P4 then the task is available after 96 hours.
For a task with multiple assignees, if an assignee performs any action on the task (such as saving the form, adding comments/attachments, or approving/rejecting the form) without claiming the task, then the task is considered as auto-claimed, and all other assignees won't be able to view the task. However, initially, all applicable actions for a task—including Claim—are displayed to all assigned users.
-
Suspend: You can suspend a non relevant task only if you have been assigned the manager role. A suspension is indefinite. It doesn’t expire until Resume is used to resume working on the task.
The selected action is performed on the task and it moves to the next step in the application. Unless you’re assigned to the next step, the task no longer appears in your task list.Note:
To perform an action such as Submit or Approve on multiple tasks in the task list, select them by clicking on their icons (for example,
 ) and choose an action in the toolbar. The color and initials of the icons vary by application.
-
