Use OAuth 2.0 Grants
To use an OAuth 2.0 grant type with the Oracle Utilities Adapter in Oracle Integration, you must perform the following prerequisites.
Prerequisites for All Grants
Perform the following tasks for each grant type you use.
- Obtain the Oracle Identity Cloud
Service URL.
- Go to the URL for your Oracle Utilities application. You are
redirected to a URL such
as:
https://idcs-c2881.identity.myhost.example.com/ui/v1/signin - Replace
/signinwith/adminconsoleto access Oracle Identity Cloud Service.For example:https://idcs-c2881.identity.myhost.example.com/ui/v1/adminconsoleYou'll be prompted to sign in again to the Oracle Identity Cloud Service Console.
- Log in to the Oracle Identity Cloud Service Console with your identity domain administrator credentials.
- Go to the URL for your Oracle Utilities application. You are
redirected to a URL such
as:
- Check the Oracle Utilities application in Oracle Identity Cloud
Service.
When an Oracle Utilities application instance is provisioned, an Oracle Identity Cloud Service application is created for that application instance. The application name is composed as follows:
product-domaintenantsuffixsequential_numberFor example:CCS-PRODC12345CMETERDATA0CCS-PRODC12345FIELDSERVICE1- To request creation of a new OAuth client application,
create a cloud operations service request and provide the following
information:
- Environment(s) where the OAuth client application is needed (for example, PROD, TEST01, or DEV).
- Client name suffix: Use a distinct name that may suggest the functional purpose of the integration.
- Provide a meaningful description of the integration point.
- Client type (trusted or confidential) and client certificate: The integration requirements may call for a trusted client and the external application may also supply its own certificate. Otherwise, Oracle Identity Cloud Service creates a trusted client with its internal native certificate.
- OAuth flow for your intended integration: Client credentials, JWT assertion, and authorization code flows are currently supported. For the authorization code flow, you can also supply your own redirect URL.
- Scope: You can define the OAuth client application with access to either REST or SOAP APIs or both REST and SOAP APIs.
The Oracle Utilities Cloud Operations team creates the OAuth client using the input provided in the service request.- Log in to Oracle Identity Cloud Service to get your application.
- Go to Oracle Cloud Services and find the application with the above name to access the application.
- To request creation of a new OAuth client application,
create a cloud operations service request and provide the following
information:
Prerequisites for Resource Owner Password Credentials
Perform the following tasks.
- Validate the Oracle Integration application and user roles:
- Go to Configuration, and then Client Configuration of the Oracle Identity Cloud Service application.
- Verify that Resource Owner and Refresh Token for Allowed Grant Types are enabled.
- Go to Configuration, and then Resources of the Oracle Identity Cloud Service application.
- Verify that the Is Refresh Token
Allowed option is enabled.
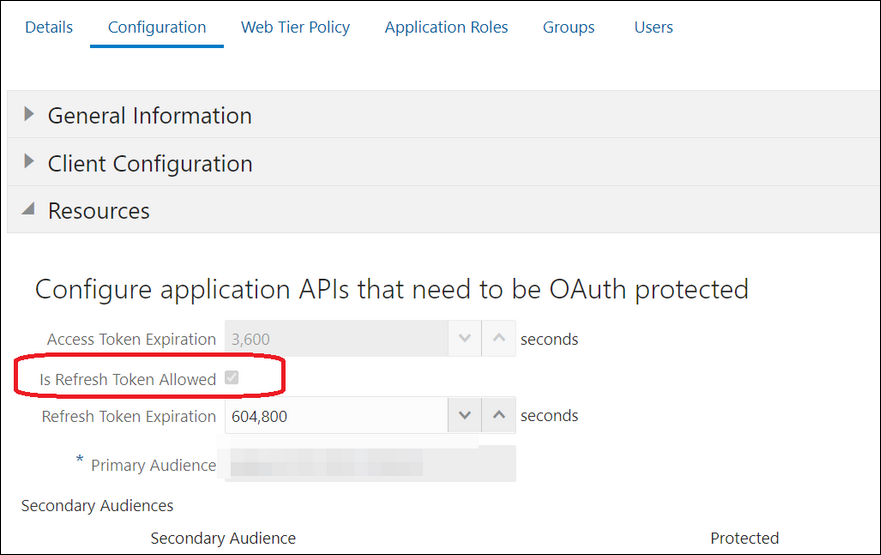
The scope with access to either REST or SOAP APIs or both REST and SOAP APIs is provided.

- Add the appropriate user(s) to the various Oracle Application roles. For standard/production configurations, use the ServiceUser role. (See Oracle Integration Service Roles in Provisioning and Administering Oracle Integration Generation 2.)
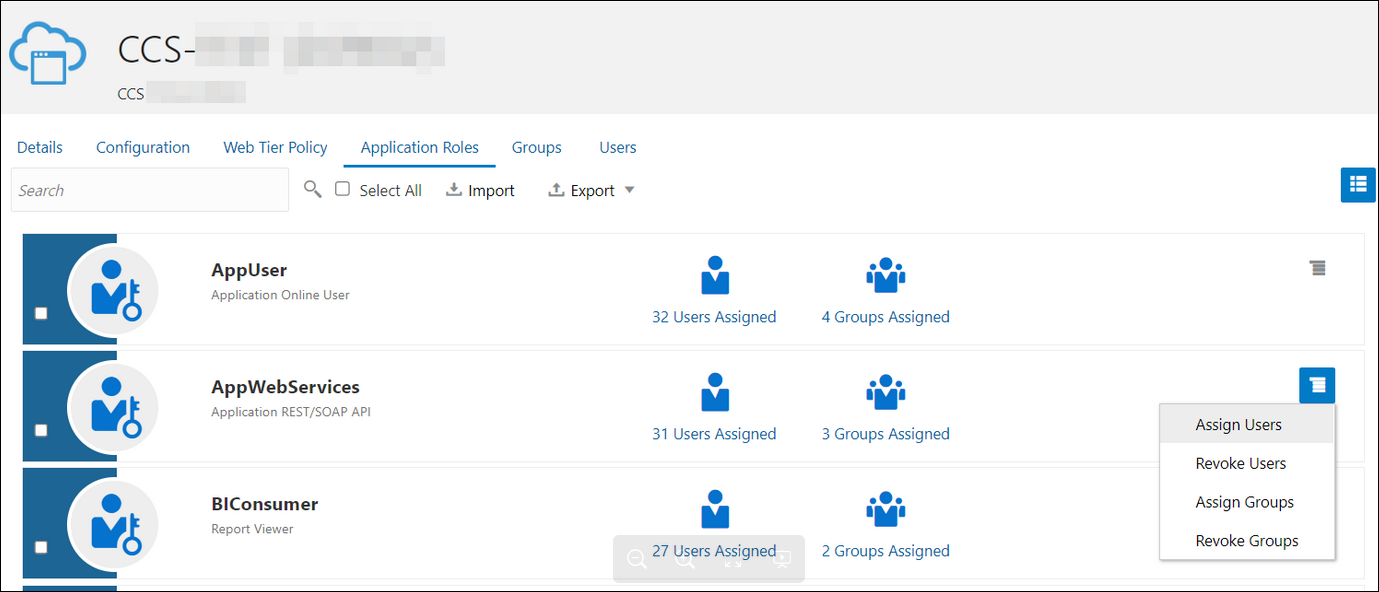
- To assign the user, go to the Application
Roles section of the application and assign the user for
AppWebServices.
- Configure the client application:
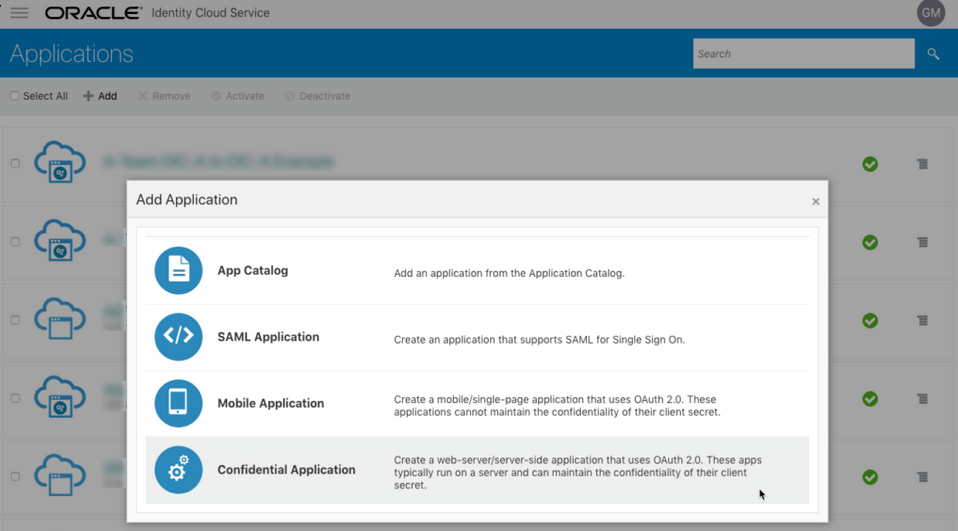
- In the Oracle Identity Cloud Service Console, go to the Applications section to create a new application that allows you to invoke an Oracle Utilities application with an OAuth Utilities Connection. Add this application as a confidential application.
- Click Add.
- Select Confidential Application.
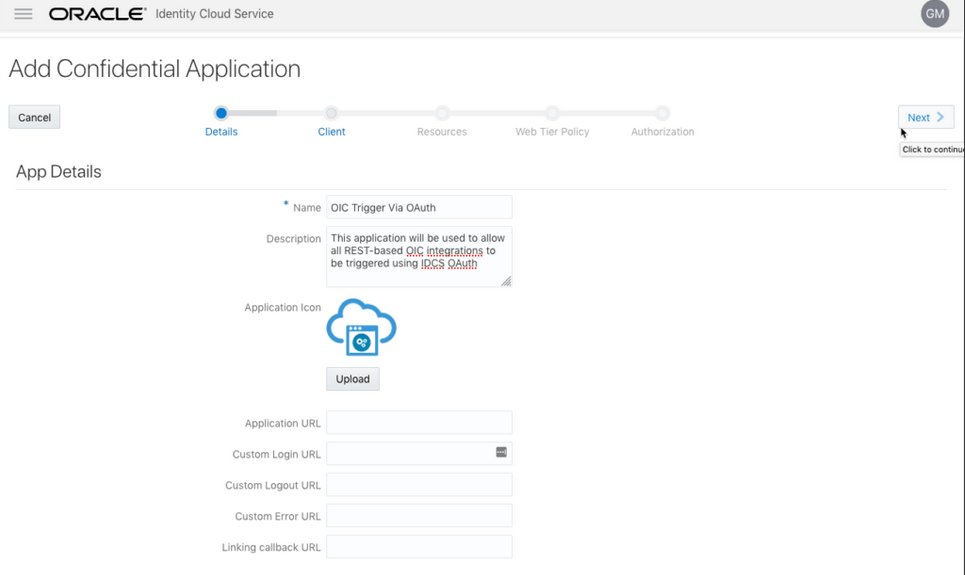
- Complete the Details page, and go to the Client page.
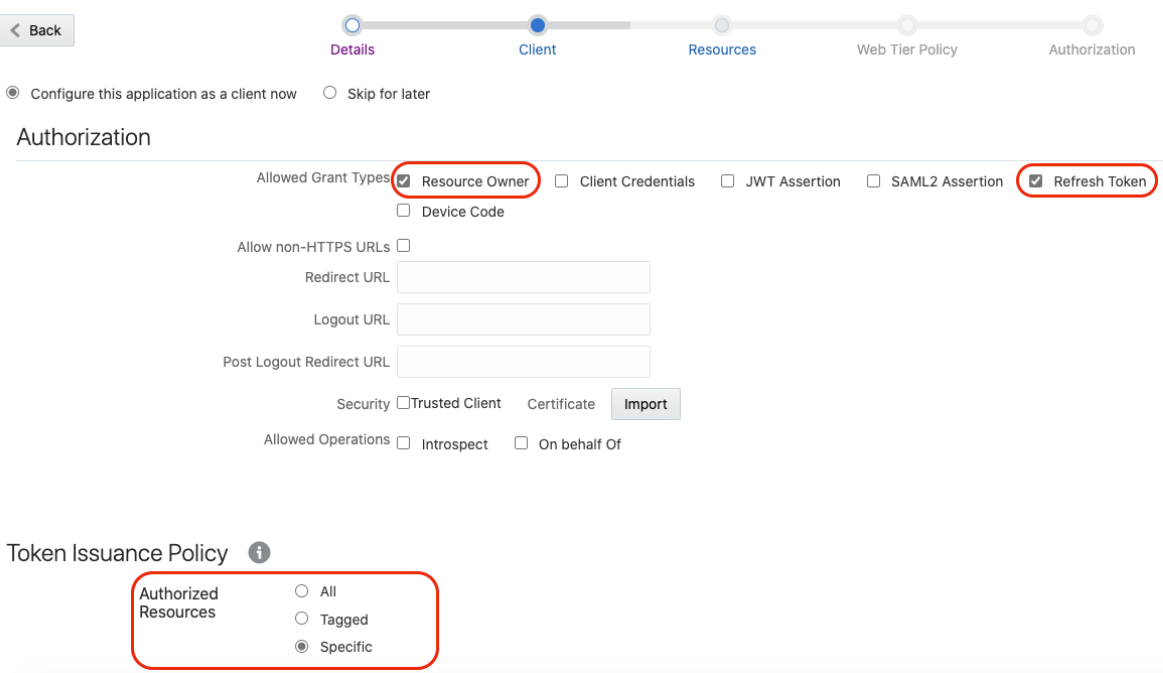
- On the Client page, select
Configure this application as a client now
and add the following.
- Select Resource Owner and Refresh Token for Allowed Grant Types.
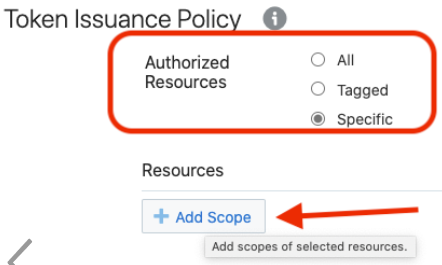
- Select Specific in the Authorized Resources section.
- Click Add Scope under the
Resources section.
- Find the Oracle Utilities application.
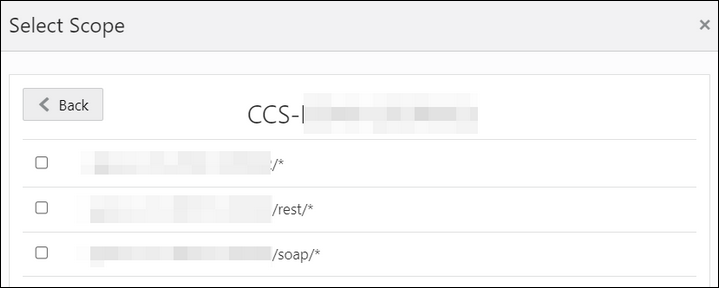
- Add the scope containing access to either REST
(/rest/*) or
SOAP(/soap/*) APIs or both REST and
SOAP APIs (/*), and click
>.

- Save your changes.
- Click through the remaining wizard pages without making changes and save the application.
- Activate the application for use.
- Validate the client application:
- To fetch the access client, make a request to Oracle Identity Cloud
Service with the user name and password in the
payload.
Note:
Addoffline_accessin the scope to fetch the request refresh token as part of the response.##Syntax curl -i -H 'Authorization: Basic <base64Encoded_clientid:secret>' -H 'Content-Type: application/x-www-form-urlencoded;charset=UTF-8' --request POST https://<IDCS-Service-Instance>.identity.oraclecloud.com/oauth2/v1/token -d 'grant_type=password&username=<user-name>&password=<password>&scope=<App_Scope>%20offline_access' ###where #### <base64-clientid-secret> - Base 64 encode clientId:ClientSecret #### <username> - user for token needs to be issued (must be in serviceuser role). #### <password> - password for above user #### <app_scope> - Scope added while creating application in client configuration section ##Example curl -i -H 'Authorization: Basic OGQyM...ZDA0Mjcz' -H 'Content-Type: application/x-www-form-urlencoded;charset=UTF-8' --request POST https://<idcs_host>/oauth2/v1/token -d 'grant_type=password&username=sampleUser&password=SamplePassword&scope=https://<Resource_APP_Audience>/rest/*%20offline_access' - Capture the
access_tokenandrefresh_tokenfrom the response.{ "access_token": "eyJ4NXQjG...dfsdfsFgets2ed", "token_type": "Bearer", "expires_in": 3600, "refresh_token": "AQAgY2MzNjVlOTVhOTRh...vM5S0MkrFSpzc=" } - Use the
access_tokenin the authorization header to invoke the Oracle Utilities application endpoint.curl --location --request GET 'https://<Utilities_Application_API_ENDPOINT>' \ --header 'Authorization: Bearer eyJ4NXQjG...dfsdfsFgets2ed' - To update the access token, use the refresh token and make a request to Oracle Identity Cloud Service.
- Capture the
access_tokenandrefresh_tokenfrom the response for further use.curl -i -H 'Authorization: Basic <base64-clientid-secret>' -H 'Content-Type: application/x-www-form-urlencoded;charset=UTF-8' --request POST https://<IDCS-Service-Instance>.identity.oraclecloud.com/oauth2/v1/token -d 'grant_type=refresh_token&refresh_token=<refresh_token>' ##Example curl -i -H 'Authorization: Basic OGQyM...ZDA0Mjcz' -H 'Content-Type: application/x-www-form-urlencoded;charset=UTF-8' --request POST https://<IDCS-Service-Instance>.identity.oraclecloud.com/oauth2/v1/token -d 'grant_type=refresh_token&refresh_token=AQAgY2MzNjVlOTVhOTRh...vM5S0MkrFSpzc='
- To fetch the access client, make a request to Oracle Identity Cloud
Service with the user name and password in the
payload.
Prerequisites for OAuth Client Credentials
Perform the following tasks.
- Validate the Oracle Utilities application and user roles:
- Go to Configuration, and then Client Configuration of the Oracle Identity Cloud Service application.
- Verify that Client Credentials for Allowed Grant Types is enabled.
- Go to Configuration, and then
Resources of the Oracle Identity Cloud
Service application. The scope with access to either REST or SOAP APIs
or both REST and SOAP APIs is provided.

- Add the appropriate user(s) to the various Oracle Utilities application roles. For standard/production configurations, use the ServiceUser role. (See Oracle Integration Service Roles in Provisioning and Administering Oracle Integration Generation 2.)
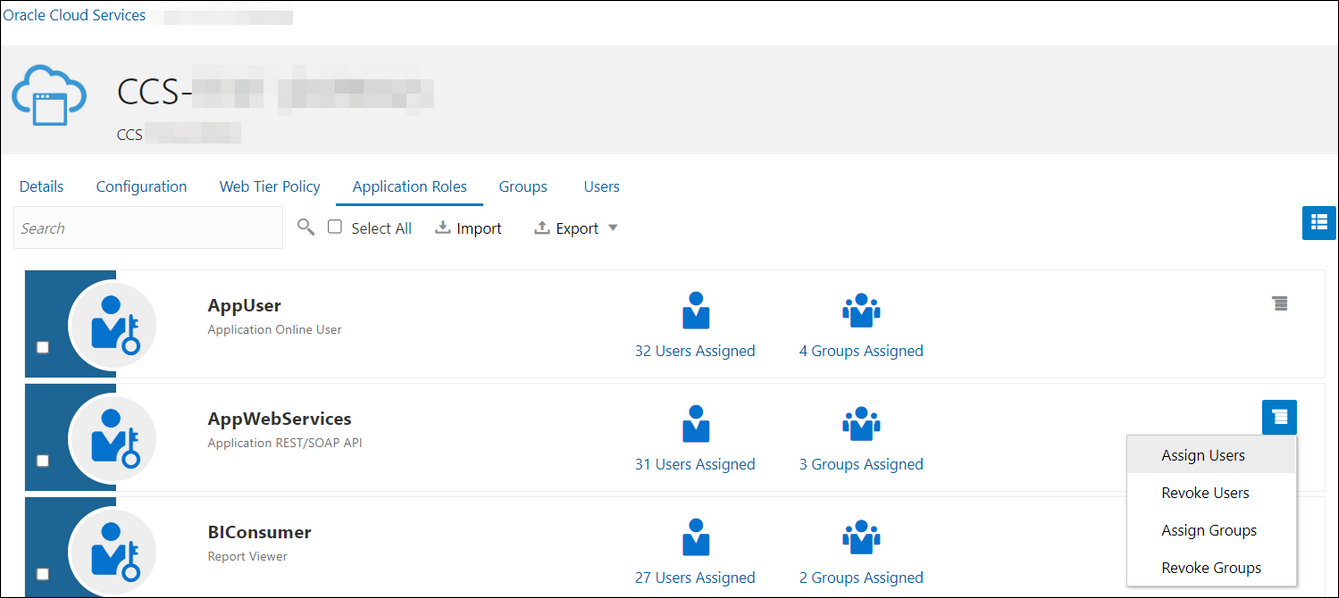
- To assign the user, go to the Application
Roles section of the application under
AppWebServices.
- Configure the client application:
- In the Oracle Identity Cloud Service Console, go to the Applications section to create a new application that allows you to invoke an Oracle Utilities application API with an OAuth Utilities Connection. The application is added as a confidential application.
- Complete the Details section, and go to the Client section.
- On the Client page,
select Configure this application as a client
now, and complete the following:
- Select Client Credentials from the Allowed Grant Types list.
- Select Specific in the Authorized Resources area of the Token Issuance Policy section.
- Click Add Scope under the Resources section.
- Find the Oracle Utilities application.
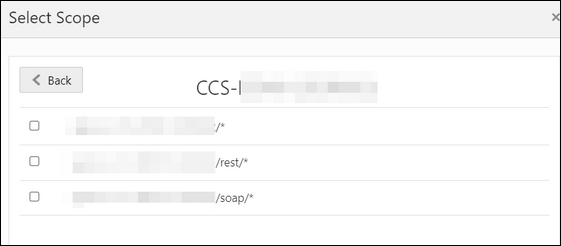
- Add the scope containing access to either REST or
SOAP APIs or both REST and SOAP APIs, and click
>.

- Save your changes.
- Click through the remaining wizard pages without making changes and save the application.
- Activate the application for use.
The next step is to create an application user in the appropriate Oracle Utilities Cloud Service (such as Oracle Utilities Meter Solution Cloud Service). Access the appropriate Oracle Utilities Cloud Service application, and navigate to the User portal.- Create a new user corresponding to the OAuth Client created
above:
- Enter the OAuth client ID as the user’s login ID.
- Select OAuth Client from the User Type drop-down list.
- Assign User Groups that provide the integration with access to the appropriate functionality.
- Assign To Do Roles and
appropriate Access Security to the
created user.
The OAuth Client credentials are now ready to use.
- Validate the client application.
- Fetch the access client to make a request to Oracle Identity
Cloud Service with the client ID and client secret of the client in the
payload.
##Syntax curl -i -H 'Authorization: Basic <base64Encoded_clientid:secret>' -H 'Content-Type: application/x-www-form-urlencoded;charset=UTF-8' --request POST https://<IDCS-Service-Instance>.identity.oraclecloud.com/oauth2/v1/token -d 'grant_type=client_credentials&scope=<App_Scope>' ###where #### <base64-clientid-secret> - Base 64 encode clientId:ClientSecret #### <app_scope> - Scope added while creating application in client configuration section ##Example curl -i -H 'Authorization: Basic OGQyM...ZDA0Mjcz' -H 'Content-Type: application/x-www-form-urlencoded;charset=UTF-8' --request POST https://<idcs_host>/oauth2/v1/token -d 'grant_type=client_credentials&scope=https://<Resource_APP_Audience>/rest/*' - Capture the
access_tokenfrom the response.{ "access_token": "eyJ4NXQjG...dfsdfsFgets2ed", "token_type": "Bearer", "expires_in": 3600 } - Use the
access_tokenin the authorization header to invoke the Oracle Utilities Application APIs.curl --location --request GET 'https://<Utilities_Application_API_ENDPOINT>' \ --header 'Authorization: Bearer eyJ4NXQjG...dfsdfsFgets2ed' - To update the access token when it is expired, make the same request to Oracle Identity Cloud Service.
- Fetch the access client to make a request to Oracle Identity
Cloud Service with the client ID and client secret of the client in the
payload.
