11 View and Edit Data Using an Excel Workbook
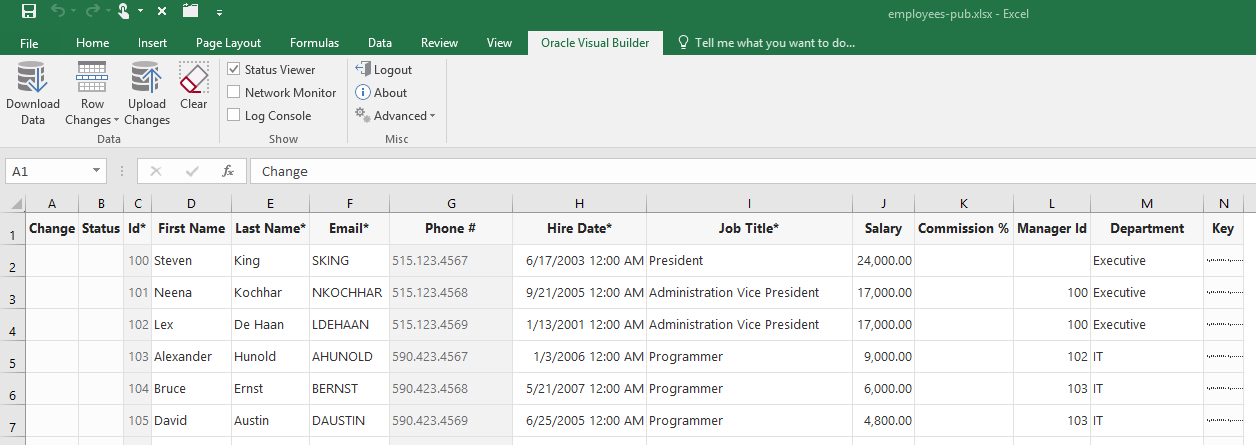
In Microsoft Excel, select the Oracle Visual Builder tab and use the buttons it exposes to work with the data that the workbook accesses.

Description of the illustration excel-download.png
Users can perform the following operations in a layout if the REST service business object associated with the layout supports the operation:
- Edit existing rows
- Create new rows
- Delete existing rows
See REST Service Support for more detail about REST operations.
Users can remove all data from the workbook, including any pending changes that have not yet been uploaded to the REST service by clicking the Clear button. This button does not make any calls to the REST service and does not change data in the REST service.
Downloading Data to the Workbook Table
Users download data to the workbook using the Download Data button in the Oracle Visual Builder tab. The workbook prompts users for a user name and password the first time that they connect to the REST service that the workbook is configured to use.
For REST services of type Oracle RAMP REST Service that support pagination, the add-in retrieves the first 499 rows by default and then prompts you if you want to continue to download more than 499 rows. You can view if the business object exposed by the Oracle RAMP REST Service supports pagination, and change the default download limit of 499, in the Download tab of the Business Object Editor.

Description of the illustration excel-download-data-png.png
If you configured search options for download, a window or windows appear where users specify the value(s) to search on, as shown in the following example where data for the Sales department will be downloaded. Configure Search Options for Download describes how you configure search options for the workbook.

Description of the illustration excel-basic-filter-lov.png
On successful connection to the REST service and completion of prompts for input values to search data (if configured), the add-in populates the table in the worksheet with data retrieved from the service.

Description of the illustration addin-download.png
Editing Downloaded Data in the Workbook
Users edit the editable cells that contain
the downloaded data. The following image shows three examples where a user has
edited data in the table. The Change column for the first row displays an
Update message that indicates the user has updated this row
with required and valid values. The Change column for the second row also displays
an Update message, but its Status column displays an
Invalid message and a red border appears around the Hire Date*
column’s cell to indicate that a value is required in that cell’s field. Finally, in
the third row, the user attempted to input Software in the field
for Department. As Software is not a value in the underlying list
of values that this cell displays in its list of choices, a red border appears
around this cell.

Description of the illustration edit-data-val.png
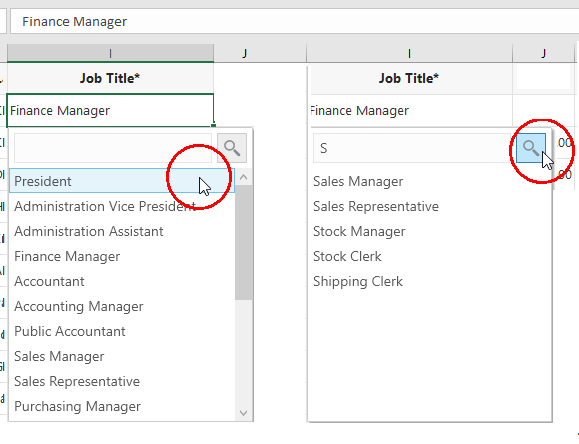
For columns that are associated with a field configured to use a
list of values, users can select a value in a search box that displays available
values. A user can select one of the displayed values. In this case, the Change
column displays Update. Alternatively, the user can type one or
more of the starting characters for other values and then click the Search icon so
that the search box filters the values it displays based on the user input. The
following composite image displays both of the just-described scenarios. For the
latter scenario, the user typed S in the search box next to the
Search icon to find all the display values that start with S
(Sales Manager, Sales Representative, and so
on).

Description of the illustration excel-lov1.png
Note:
You can alter the search behavior of the list of values using the Business Object Field Editor described in Use Lists of Values in an Excel Workbook.Users can update the form fields in a Form-over-Table layout if the business object for the form fields supports update. The add-in performs data entry validation before it attempts to upload a user's updates. Data entry failures need to be addressed by the user before the add-in uploads changes. For a form field configured to use a list of values, the behaviour is the same as described for the Table layout. That is, a search box appears when the user selects the form field. In a published workbook or when worksheet protection is enabled, read-only form fields as defined in the service description cannot be edited. You can make a form read-only by clearing the Form fields are editable for update checkbox in the Form tab of the Layout Designer.
Creating New Rows to Upload to the REST Service
Users can create new rows in the table by using the Insert Rows option in the add-in’s Row Changes drop-down list or by using Excel’s context menu to insert a full Excel row inside the current table boundaries.
Users can use one of the following methods to insert new rows in the table for subsequent upload to the REST service:
- Choose the option that you want to use to create a new row:
- To use the add-in's Insert Rows options, select a cell inside the current table boundaries, click the Row Changes drop-down list, and select Insert Rows.
- To use Excel's context menu, click the Download Data button to download data from the REST service and insert a full Excel row into the table inside the current table boundaries.
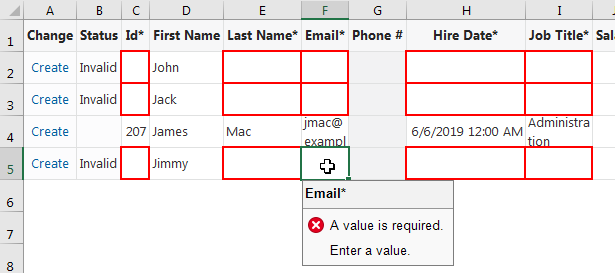
The following example shows where three new Excel rows have been inserted inside the current table boundaries. A message (
Create) appears on the left of each new row to indicate this row is new and has not yet been uploaded to the web application that exposes the REST service. Edit the cells in these new rows with the data changes that you want to make. AnInvalidmessage appears in the Status column rows until you enter required values or valid values, as indicated by the red border that surrounds a number of cells in Rows 5 and 6. Required values and valid values have been entered in the newly-inserted Row 4, so it does not display theInvalidmessage or the red border cells.
Description of the illustration excel-insert1.png -
You can also insert new rows by selecting the row immediately below the last downloaded row in the table, right-click and choose Insert from the context menu that appears. The add-in inserts a new row in the table. A
Createmessage appears in the Change column and anInvalidmessage will appear in the Status column if the newly-created row requires you to specify valid or required values. -
Click the Upload Changes button to upload the newly-created rows to the REST service.
-
For non-published workbooks, type in the empty row (placeholder row) that appears below the table header row before they download data. In the following image, users can enter data in the row cells for Name, Email*, Hire Date, and Department as these row cells accept data input. The other cells in the empty row are read-only. Once a user enters a value in a row that accepts data input, a
Createmessage appears in the Change column. AnInvalidmessage appears in the Status column if the row contains a cell where the user is required to enter a value and has yet to do so, or has entered an incorrect value, such as an unexpected data type. A red border also appears around the cell where a value is required or invalid.
Description of the illustration excel-placeholder.pngOnce the user enters data in the row, the row below the current row becomes a row where data values can be entered, and so on. This method is not available in published workbooks due to worksheet protection. For published workbooks, users can enter data in the row that appears below the table header row after they click Clear in the Oracle Visual Builder tab.

Description of the illustration excel-placeval.png
Deleting Data from the REST Service
Users can mark rows for deletion from the REST service using the Row Changes drop-down list’s Mark for Delete menu option.
To mark a row for deletion from the REST service:
-
Select the table row that you want to delete from the REST service. If you want to select a range of table rows to mark for deletion, hold down your keyboard’s Shift key and select the first and last row in the range of table rows that you want to delete.
-
Click the Row Changes drop-down list and click Mark for Delete.
A
Deletemessage appears in the Change column and the add-in changes the style applied to the data in the table rows, as illustrated by the following image where the user marked selected the first three rows in the table for deletion.
Description of the illustration markdelete.png -
Click the Upload Changes button.
-
In the Upload confirmation window that appears with a message that the table has pending deletions, click Yes to continue.
The add-in uploads the changed rows from the table, which includes the request to delete the rows that you marked for deletion. The table in the Excel workbook refreshes so that the deleted rows no longer appear, as illustrated in the following image.

Description of the illustration excel-deletedrows.png
Tip:
If you change your mind about deleting one or more rows among the rows that you have marked for deletion, select these rows and use the Row Changes drop-down list’s Unmark Pending Changes option so that the add-in does not include these rows in the rows that it sends to the REST service for deletion. Use the Unmark Pending Changes option before you upload changes from the Excel workbook. The Unmark Pending Changes option does not work after you upload changes.Uploading Changes to the REST Service
Once you complete the edits that you want to
make, be that updates to existing rows, creating new rows, or deleting existing
rows, click the Upload Changes button to upload all the changes to the REST
service. The Oracle Visual Builder Add-in for Excel
uploads all the rows marked as changed (those rows with Create or
Update in the Change column). The add-in also deletes the rows
marked for deletion (rows with Delete in the Change column). Review
the Status column to see which rows succeeded and failed. The Status column displays
a Create Failed message or an Update Failed
message in the cell of a row that the Oracle Visual Builder Add-in for Excel failed to upload and the Table Row Status appears
in Excel’s task pane to provide additional information on the failure, as in the
following example where the user did not enter a required value (Hire Date). In the
following example, the user needs to enter a hire date and click the Upload
Changes button to attempt to upload the modified data again. Successfully
deleted rows are removed from the Excel worksheet while failed attempts to delete a
row result in the row remaining in the Excel worksheet. You can inspect the reason
for the failure to delete in the status in Excel's task pane.

Description of the illustration excel-upload-error.png
How the add-in uploads modified rows depends on the type of REST service that your workbook uses. For workbooks that use the Oracle RAMP REST Service, the add-in uploads the modified rows in batches. For other types of service, the add-in uploads modified rows one row at a time.
Tip:
If you change your mind about uploading changes for a particular row to the REST service, select these rows and use the Row Changes drop-down list’s Unmark Pending Changes option so that the add-in does not include these rows in the rows that it send to the REST service for update, creation, or deletion.View and Edit Data in a Form-over-Table Layout
Viewing and editing data in a Form-over-Table layout is similar in many ways to viewing and editing data in a Table layout. For example, users use the Download Data button to download the data that the Form-over-Table layout’s business objects reference. There are differences, such as the fact that users need to input a search term in a Search dialog to determine the parent item in the Form-over-Table layout that the add-in downloads.
Users can also update the form fields in a Form-over-Table if the business object for the form fields supports update. The add-in performs data entry validation before it attempts to upload a user’s updates. Data entry failures need to be addressed by the user before the add-in uploads changes. For a form field configured to use a list of values, the behaviour is the same as described for the Table layout. That is, a search box appears when the user selects the form field. In a published workbook or when worksheet protection is enabled, read-only form fields as defined in the service description cannot be edited. You can make a form read-only by clearing the Form fields are editable for update checkbox in the Form tab of the Layout Designer.
Data Consistency
When a workbook uses an Oracle RAMP REST Service that supports data consistency verification using an entity tag (Etag) mechanism, the add-in detects and reacts to the following scenario:
- User A downloads information from a business object into a table in their integrated workbook.
- User B downloads the same information into a table in their integrated workbook, edits it, and uploads changes.
- User A then edits the same information (downloaded in Step 1) and uploads the changes.
- The add-in provides the REST service with the necessary information
(entity tags) to prevent User A's changes from overwriting those changes made by
User B. Instead, when the server detects such a change, its response allows the
add-in to display an error message similar to the following for any such rows in
the table:
This row has been modified by another user. Please download before editing.
For information about the entity tag (ETag) mechanism, see Data Consistency Tasks in Accessing Business Objects Using REST APIs.
If your workbook uses other types of REST service, the last writer wins. So, for the scenario just outlined, User A’s changes in Step 3 will overwrite the changes of User B in Step 2.