10 Publish an Integrated Excel Workbook
Once you complete configuration of an Excel workbook, you can publish it for users to do data entry work. Publishing creates a copy of the workbook with the design tools hidden and worksheet protection turned on for each worksheet with a layout.
The recommended steps to take before you publish an Excel workbook are:
- Complete configuration of the workbook.
- Test the configuration thoroughly.
- Use Excel’s Inspect Workbook feature to review and remove personal information from the workbook.
- In the Oracle Visual Builder tab, click Clear for each layout in the workbook.
- Save this source version of the workbook.
Tip:
Publishing is optional. All the data editing features of an integrated workbook are available in both published and un-published copies of the workbook.Once you complete configuration and testing of your workbook, make a backup copy of
the un-published (source) workbook in case you need to make any further configuration
changes at a later date post-publication. Consider adding a filename suffix of
–src for the source workbook. Then, remove the suffix in the
published copy. Excel will not allow you to use the same filename for both workbooks.
You click the Clear button to remove all downloaded data from the workbook before
you publish it.
Use Excel's Inspect Workbook feature to review and remove your personal information from the workbook before you distribute it. You access the Inspect Workbook feature from Excel's File menu. Clear the checkbox beside the Hidden Worksheets entry in the Document Inspector where you choose the content to inspect and potentially remove. You must not remove hidden worksheets from the Excel workbook that you distribute. The Oracle Visual Builder Add-in uses hidden worksheets to integrate the Excel workbook and the REST service.
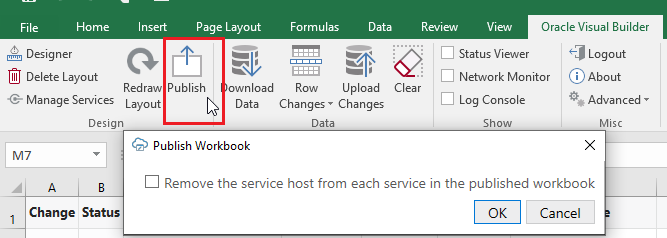
Once you are ready to distribute the workbook to users, click Publish. In the Publish Workbook window that appears, select the Remove the service host from each service in the published workbook checkbox if you want users to enter the service host when they open the published workbook, and click OK.

Description of the illustration excel-ribbon-publish.png
Accept the default file name and directory location values for the published workbook or select alternative values in the subsequent window, then click Save. A confirmation window appears with a message to say that the workbook has been successfully published to the directory location with the file name that you specified. You can now distribute the published workbook to users.
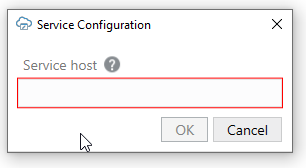
When a user performs an action that requires access to the REST service in a published workbook where you removed the service host value, a Service Configuration window first appears that prompts the user to enter their service host value before the action can be executed. Actions that require access to the REST service include the Download Data and Upload Changes ribbon commands.

Description of the illustration excel-input-service-host.png
There are a number of differences with the source workbook:
-
The design tools do not appear in the Oracle Visual Builder tab of the Excel ribbon (Designer, Delete Layout, and Publish buttons), as shown in the following image.
-
Excel's sheet protection is on. This mode enables true read-only behavior for cells that should be read-only. It also prevents the user from performing various other Excel actions that might disrupt the integration with the REST service.

Description of the illustration excel-ribbon-pub.png