- Developing Applications with Oracle Internet of Things Cloud Service
- Integrate with External Services
- Integrate Oracle IoT Cloud Service with JD Edwards EnterpriseOne IoT Orchestrator
Integrate Oracle IoT Cloud Service with JD Edwards EnterpriseOne IoT Orchestrator
You can integrate Oracle IoT Cloud Service with an already existing JD Edwards EnterpriseOne instance with IoT Orchestrator by defining a new integration in your IoT Application.
Before setting up the integration, you must already have the access information for the JD Edwards EnterpriseOne Internet of Things (IoT) Orchestration that you want to integrate.
- From your IoT Application’s page, click Integration on the left navigation area.
- If you don’t have any integration defined yet, click Create Integration. If you already have an existing integration, click the + icon to add a new one.
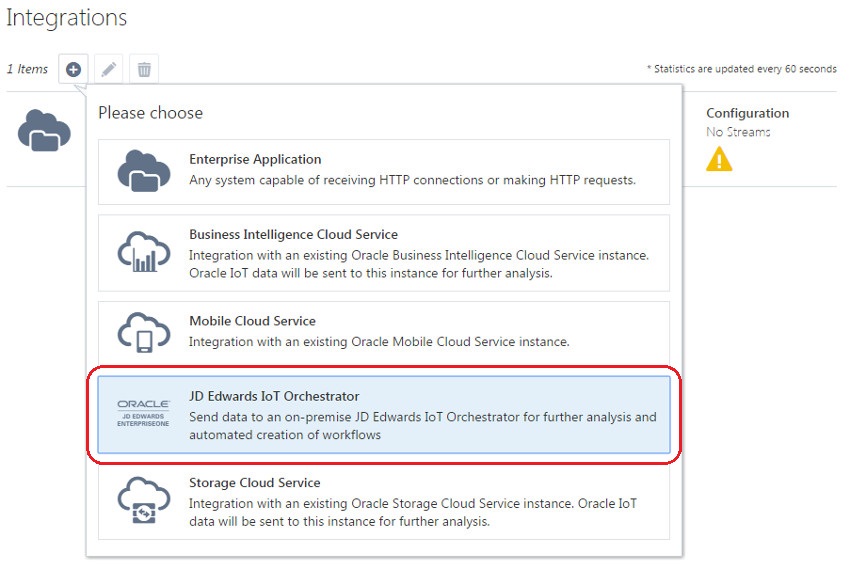
- From the pop-up dialog, click JD Edwards IoT Orchestrator, as shown in the image below.
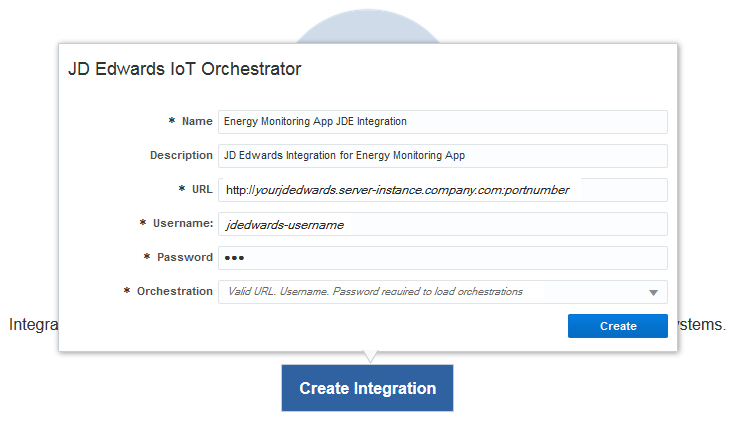
- Enter the mandatory values for the following fields. These fields are required to obtain the list of available orchestrations to use with the integration you’re configuring.
-
Name - This is a unique name of your choice for your JD Edwards IoT Orchestrator integration.
-
URL - This value is the URL and port number that you need to access the JD Edwards EnterpriseOne instance with IoT Orchestrator features that you want to integrate with your IoT Application.
-
Username and Password - These are the user credential values required to access the JD Edwards IoT Orchestrator instance.
After you entered the valid URL, username, and password values for your JD Edwards EnterpriseOne instance, Oracle IoT Cloud Service makes an attempt to connect to that specified JD Edwards EnterpriseOne instance. It tries to retrieve the list of available orchestrations that you can use for the integration. The list retrieved is used to populate the Orchestration drop list..Note:
Only the orchestrations that have been designed using the generic input message format are retrieved from your JD Edwards EnterpriseOne instance. See Understanding the JD Edwards EnterpriseOne Internet of Things Orchestratorin JD Edwards EnterpriseOne Tools Internet of Things Orchestrator Guide for more information about the supported input message formats and designing an orchestration. -
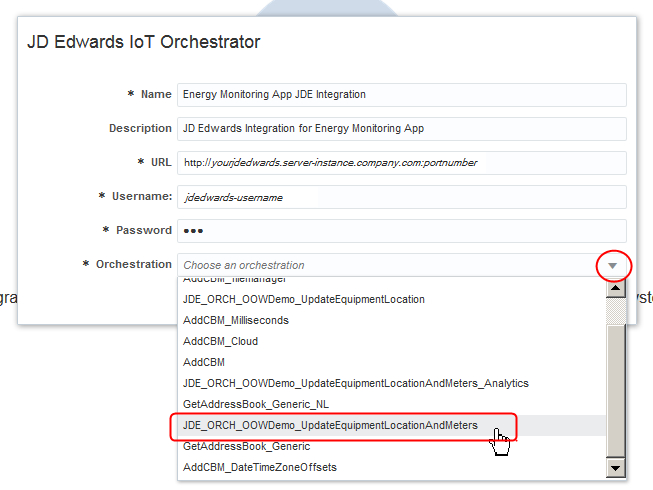
- Click in the Orchestration text field and choose an orchestration from the displayed list, as illustrated in the image below.
- (Optional) Click Verify Connectivity to test the connection between theOracle Internet of Things Cloud
Service instance and the target service or application.The connectivity test can include:
-
DNS Resolution Test: Checks whether the server name resolves to an IP address.
-
Connectivity Test: Checks whether the IP address is reachable.
-
IP/Port test: Checks whether you can talk to the target URL on the specified port.
-
SSL Verification Test: Checks whether you have a secured, or trusted, connection to the target. Applies only if the target is an SSL endpoint.
-
Authentication Test: Checks whether you can exchange messages with the target.
-
- Click Create.The new integration is created and added to the table in the Integrations page, as illustrated in the image below.
The leftmost column shows the type of integration, which is JD Edwards EnterpriseOne. The next column shows the name and description, if any, that you assigned to the integration. The next column shows the number of messages received in the last 7 days through this integration and the next column gives the average latency in the last 24 hours. Currently, these columns don’t have any numbers since this is a new integration. The last column, which is circled in red in the above image, gives information about the status of the integration. It shows whether the integration is complete or not. In this case, the yellow warning icon indicates that the configuration is incomplete because there were no data streams set up for the integration.
- Examine the integration you just created.
- With the row for the integration selected in the Integrations page, click the pencil icon, located above the table, to edit the integration.
- Notice that the upper half of the integration page does not have any data displayed since you just created the integration.
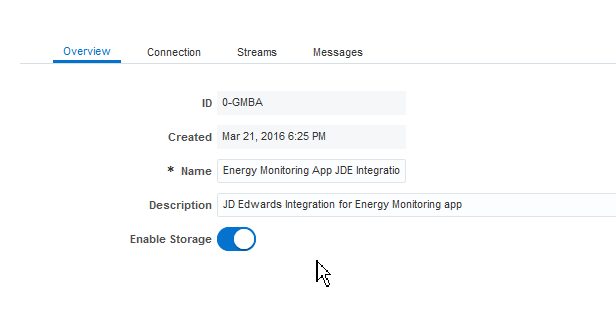
- On the bottom half of the page, the Overview tab is displayed, as illustrated by the image below:
-
ID is the unique ID assigned to this JD Edwards EnterpriseOne Tools IoT Orchestrator . integration.
-
Created is the date when the integration was created..
-
Name and Description are the values you provided when you defined the integration.
-
The Enable Storageswitch is turned on by default. This means that all data messages sent through this integration, via a pre-defined stream, are saved in storage in your Oracle IoT Cloud Service instance. This enables you to see all the data messages that were sent by a particular stream. If you turn the Enable Storage switch off, you can no longer ask for messages that were previously sent to your JD Edwards EnterpriseOne instance via the pre-defined stream.
-
- Check the connection information.
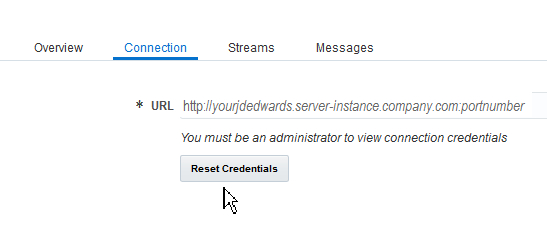
- Click the Connection tab.You will see information similar to the following image:
The URL is the one you provided when you defined the integration.
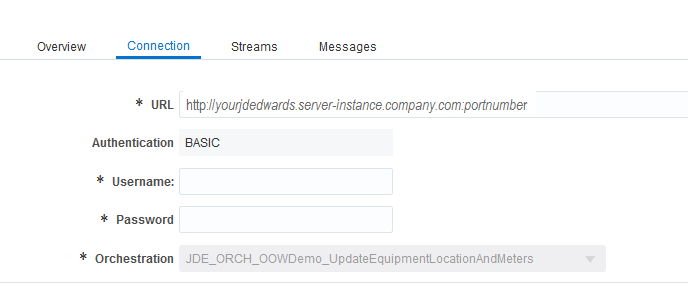
- Click Reset Credentials. Additional text fields for Authentication, Username, Password, and Orchestration are displayed, as shown in the image below. You can modify the values that are currently used, if you want.
- Re-type the Username and Password values you entered when you defined the integration, or enter new valid values.
- Click the Connection tab.
- Complete the configuration by creating a stream for the integration.
- Click Streams.
- Click Create a Stream, as illustrated in the image below.
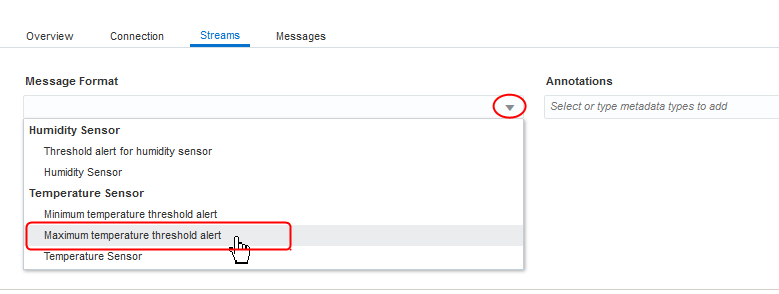
- Click in the Message Format text field and select the message format from the list of available displayed, as illustrated in the image below.
- (Optional) If you want to add annotations to the stream, click in the Annotations text field and choose one or more items from the list.
If you previously created custom metadata keys for your devices and streams, then these also appear in the list of annotations.
You can also type a new annotation name and select the data type for the annotation.
- Select Messages to view the messages that have been sent through this integration, if any.
- Check the Auto Refresh Interval check box to refresh the table of messages being sent or received using the integration and pre-defined stream.
- Change the frequency of the refresh, if you want, by clicking the drop list arrow and choosing a new time interval. The default interval is every 5 seconds.Notice that the table flashes as it updates.
- Deselect Auto Refresh Interval.
- Click Save.The Integrations page is displayed. Notice that the right-most column in the new JD Enterprise integration’s row is updated, as shown in the image below. The green circle with the check mark indicates that the integration is now configured properly. In this case, however, no data has been received yet.
