1 Get Started with Oracle IoT Intelligent Applications Cloud

After you sign up for an Oracle Cloud Account and log in to the Service Management Console, you can start using your Oracle Cloud services.

For detailed information on getting started with Oracle Cloud, refer to Getting Started with Oracle Cloud.

This chapter covers the following topics:

Order Oracle IoT Intelligent Applications Cloud

You can order Oracle IoT Intelligent Applications Cloud by contacting Oracle Sales. After your order is processed, you can then activate your services.

To order a subscription to Oracle IoT Intelligent Applications:

  1. Go to the Oracle Cloud website and browse the Oracle Cloud Applications.

    For example, select Supply Chain Management under Applications, and then select Oracle IoT Intelligent Applications under Products.

  2. Review the features and capabilities of the service.

    The following IoT application are available:

    • Oracle IoT Asset Monitoring Cloud Service
    • Oracle IoT Fleet Monitoring Cloud Service
    • Oracle IoT Production Monitoring Cloud Service
    • Oracle IoT Connected Worker Cloud Service
  3. When you’re ready to order, select the Pricing tab.

    The website provides some basic pricing information.

  4. Click Contact or Call or Start Chat to contact Oracle Sales.

Later, after you have worked with Oracle Sales to order the Oracle IoT Intelligent Application cloud, you will receive an email, which contains a link you can use to activate the service you’ve ordered.

Activate Your Order from Your Welcome Email

If you are a new Oracle Cloud Applications user, you'll likely receive a Welcome email after your order is processed.

When an Oracle Sales representative purchases Oracle Cloud services on your behalf, you’ll receive a welcome email and you’ll be designated as an activator of the services. To activate your services, you must provide your details and set up your account with us. Review the instructions in the email to create an account and start using your services.
  1. Open the email you received from Oracle Cloud.
  2. Review the information about your service in the email.
  3. Click Activate My Services.
  4. Fill out the form to sign up for your new Oracle Cloud Account.

    You will be asked to:

    • Create a new account name, which will be used to identify your Cloud Account.

    • Provide your email address if prompted. You must provide the same email address at which you received your welcome email. Instructions for logging in to your new Cloud Account will be sent to this address. You’ll be prompted for the email ID only if you don’t already have a Cloud Account.

    • Provide Cloud Account Administrator details. The person you specify here will be both a Cloud Account Administrator and a Service Administrator and can create other users as required. This person will manage and monitor services in the specified Cloud Account.

    • When you have entered all the required information, click Create Account to submit your request for an Oracle Cloud Account.

After successful provisioning and activation, you’ll receive another email with your login credentials. Use this information to sign into your account and change your password on initial login.

Sign In to Oracle Cloud For the First Time

After you sign up for the free Oracle Cloud promotion or sign up for a paid account, you’ll get a welcome email. The email provides you with your cloud account details and sign in credentials.

  1. Open the welcome email and scroll down to the Access Details section.
  2. Note the user name and password, and then click the application URL.
  3. Enter the user name and temporary password from the welcome email, and then click Sign In. The temporary password is valid only for 60 days.
  4. You’ll be prompted to change your password the first time you sign in.
You're directed to the Service Management Console dashboard. You can customize the dashboard to view your services. See Discover Oracle Cloud Applications on Applications Console in the Getting Started with Oracle Cloud guide for more information.
Next: Complete all the tasks mentioned in the Service Administrator Action List. See https://download.oracle.com/tutorials/docs/Service-Administrator-Action-List.pdf.

Access Your Oracle IoT Intelligent Applications

Access your Oracle Internet of Things Intelligent Application from the Service Management Console dashboard.

As an administrator when you sign in to the Service Management Console, you are redirected to a single window to access all the Oracle IoT Applications.

  1. Sign in to your Oracle Cloud URL.
  2. From the Service Management Console dashboard, click the name of the Oracle Internet of Things Cloud Service application that you wish to access.

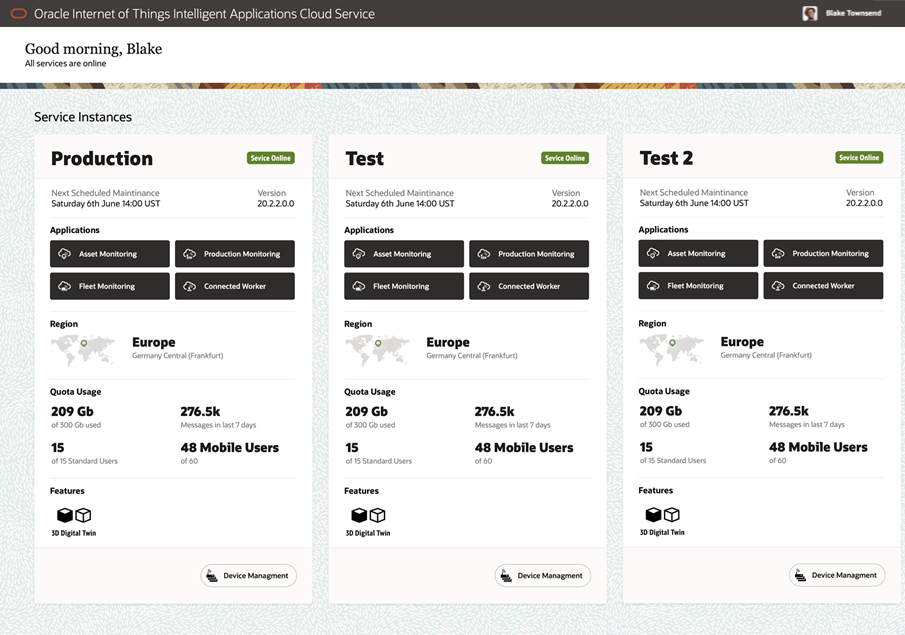
    Oracle IoT Intelligent Applications Service Management Console

    The following Oracle IoT applications are available:
    • Oracle Internet of Things (IoT) Asset Monitoring Cloud Service

      The URL format used by this application is: <iot instance name>.<domain name>/am

      For example: https://myiotcs.mydomain.oraclecloud.com/am or https://myiotcs.mydomain.oracleiotcloud.com/am.

    • Oracle Internet of Things (IoT) Fleet Monitoring Cloud Service

      The URL format used by this application is: <iot instance name>.<domain name>/fm

      For example: https://myiotcs.mydomain.oraclecloud.com/fm or https://myiotcs.mydomain.oracleiotcloud.com/fm.

    • Oracle Internet of Things (IoT) Production Monitoring Cloud Service

      The URL format used by this application is: <iot instance name>.<domain name>/pm

      For example: https://myiotcs.mydomain.oraclecloud.com/pm or https://myiotcs.mydomain.oracleiotcloud.com/pm.

    • Oracle Internet of Things (IoT) Connected Worker Cloud Service

      The URL format used by this application is: <iot instance name>.<domain name>/cw

      For example: https://myiotcs.mydomain.oraclecloud.com/cw or https://myiotcs.mydomain.oracleiotcloud.com/cw.

    The URL format to access the IoT management console is: <iot instance name>.<domain name>/ui

    For example: https://myiotcs.mydomain.oraclecloud.com/ui or https://myiotcs.mydomain.oracleiotcloud.com/ui.

About the Service Instances Dashboard:
  • By default an administrator can view a Production instance and a Test instance. If a customer has purchased additional test instances, they are displayed on the service management console.

  • The administrator can share the URL of the IoT Applications with the users, for them to access the instance.

  • The Scheduled Maintenance Window area displays the next scheduled downtime for maintenance, which occurs once every quarter. Customers can raise a service request (SR) to provide their preferred month for upgrade. The test instances are upgraded on the first Friday and the production instance is upgraded on the third Friday of the specified month of a quarter.

  • Currently Europe and North America are supported for Region, which is automatically determined from the order booked by the sales personnel.

  • The Quota Usage is updated in real-time. Refresh the page to view the latest quota usage.

  • The dashboard also displays the current version, the online/offline status, the 3D digital twin feature enabled if selected, and a link to the device management page for the instances.