Before you Begin
This 20-minute tutorial shows you how to set up the environment in Log Analytics to collect data from the tables or views of Oracle Autonomous Database. Log Analytics collects the data from the tables or views by connecting to the database and running the SQL query that you provide.
Background
Perform the steps described in this tutorial for collecting data from the tables or views from your autonomous database entity such as creating the log source, creating autonomous database entity, downloading the wallet files, registering the credentials, registering the wallet information, and finally associating the log source with the autonomous database entity to start collecting the logs.
What Do You Need?
- Set up service policies for Oracle Cloud Log Analytics. See Enable Access to Log Analytics and Its Resources and Prerequisite IAM Policies in Oracle Cloud Infrastructure Documentation.
- Create the IAM policies for setting up continuous log collection. See Allow Continuous Log Collection Using Management Agents in Oracle Cloud Infrastructure Documentation.
- Use an existing log group or create at least one log group to store logs that you collect from your autonomous database. See Create Log Groups to Store Your Logs in Oracle Cloud Infrastructure Documentation.
- Familiarize with the SQL Query Guidelines to write the SQL queries for extracting log data. See SQL Query Guidelines in Oracle Cloud Infrastructure Documentation.
- Ensure that you have access to the compartments in which your autonomous databases reside in Oracle Cloud Infrastructure.
- Optionally, you can configure Management Dashboard to create and use dashboards, which are data visualization tools that provide a quick insight into the health and performance of your IT infrastructure and applications, and help identify outliers and take corrective action. See Configure Management Dashboard in Oracle Cloud Infrastructure Documentation.
- For the management agent to collect the logs from the autonomous database entity, you must provide the credentials to access the autonomous database. To know more about the credentials that must be registered with the management agent, see Management Agent Source Credentials: DBTCPSCreds in Oracle Cloud Infrastructure Documentation.
- You will need to provide the service name while creating the autonomous database entity. For information about the predefined service names for autonomous databases, see Predefined Database Service Names for Autonomous Database in Oracle Database Documentation.
- Install management agents on any host that can have JDBC connectivity to the ATP-S or ADW-W. For steps to establish JDBC connectivity with ATP and ADW, see Java Connectivity with Autonomous Database (ATP or ADW) using 19c and 18.3 JDBC.
Deploy the Log Analytics plug-in when installing the agent. Ensure to also perform the prerequisites for deploying the management agents. See Management Agent: Introduction in Oracle Cloud Infrastructure Documentation.
As part of the installation process, you will need to create a response file in which you must include the following line about enabling Log Analytics plug-in:
Service.plugin.logan.download=true
If you want to enable Management Agent plug-in in the Oracle Cloud Agent, then ensure that the JVM heap size is at least 512 MB.
Download the Wallet Files
The Management Agent requires Java Key Store (JKS) or Oracle wallets to connect to ATP or ADW. Management Agent connectivity to an Oracle Autonomous Database requires the use of Oracle wallets. Ensure that the agent user has read access to wallet files.
On Unix-based hosts, the agent user that installs the management agent is mgmt_agent for the manually installed standalone management agent, and oracle-cloud-agent when the management agent is a plugin enabled with Oracle Cloud Agent.
Sign in to Oracle Cloud with your cloud credentials. Navigate to the home page of your autonomous database.
Click DB Connection tab. Download the wallet zip file
wallet_<dbname>.zip.Unzip the zip to a directory securely so that only authorized users have access to them. The contents of the zip file are described below:
tnsnames.oraandsqlnet.ora: Network configuration files storing connect descriptors and SQL*Net client side configuration.cwallet.oraandewallet.p12: Auto-open SSO wallet and PKCS12 file. PKCS12 file is protected by the wallet password provided in the UI.keystore.jksandtruststore.jks: JKS Truststore and Keystore that is protected by the wallet passport provided while downloading the wallet.ojdbc.properties: Contains the wallet related connection property required for JDBC connection. This should be in the same path astnsnames.ora.
The predefined service names are available in the tnsnames.ora file that you downloaded. The property value is of the format dbName_predefinedServiceName.
Create the Autonomous Database Entity
Create the autonomous database entity to reference your database instance and to enable log collection from it.
- Open the navigation menu and click Observability & Management. Under Log Analytics, click Administration.
The administration resources are listed in the left hand navigation pane under Administration. Click Entities.
The Entities page opens. Select the compartment for this new entity in the search bar. Click Create.
- Under Entity Type menu, select Autonomous Transaction Processing or Autonomous Data Warehouse.
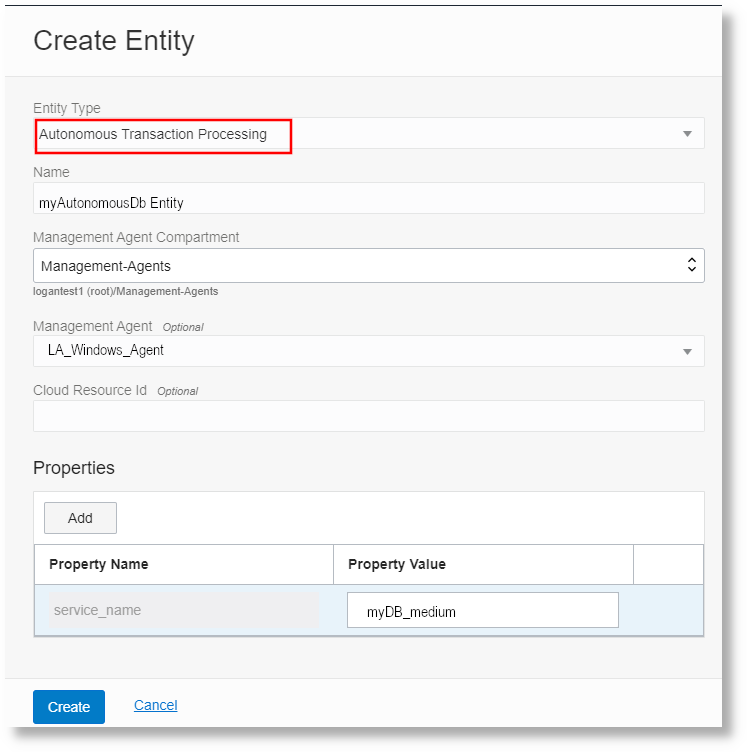
Description of the illustration Create_Entity.png Provide a Name for the entity and note it for future reference. You will need it to register the database details with the management agent.
- Select Management Agent Compartment in which the agent is installed.
- In the Management Agent menu, select the management agent installed on your host that has JDBC connectivity to the ATP-S or ADW-W.
- Optionally, in the section Cloud Resource ID, provide the OCID of your autonomous database instance.
- Under Properties, specify the value of the property
service_name.Predefined service names are available in the
tnsnames.orafile that you downloaded in the previous step. The property value is of the formatdbName_predefinedServiceName. - Click Create.
Register the Database Credentials and Wallet Details with Management Agent
For the management agent to collect the logs from the autonomous database entity, you must provide the credentials to access the autonomous database. Use the following steps to add the credentials or update the existing credentials. Also register wallet details with the agent.
- Collect the following information about the database:
Database_Entity_Name: The entity name that you specified earlier while creating the ATP / ADW entityDatabase_User_Name: Database user nameDatabase_Password: Database password- Database user's role (optional)
- Collect the following information about the wallet files:
SSL_Truststore_Location: SSL Truststore locationSSL_Truststore_Password: SSL Truststore passwordSSL_Keystore_Location: SSL Keystore locationSSL_Keystore_Password: SSL Keystore password
- Create a JSON file with the information of your database:
{ "source": "lacollector.la_database_sql", "name": "LCAgentDBCreds.<Database_Entity_Name>", "type": "DBTCPSCreds", "usage": "LOGANALYTICS", "disabled": "false", "properties":[ {"name":"DBUserName","value":"<Database_User_Name>"}, {"name":"DBPassword","value":"<Database_Password>"}, {"name":"ssl_trustStoreType","value":"JKS"}, {"name":"ssl_trustStoreLocation","value":"<SSL_Truststore_Location>"}, {"name":"ssl_trustStorePassword","value":"<SSL_Truststore_Password>"}, {"name":"ssl_keyStoreType","value":"JKS"}, {"name":"ssl_keyStoreLocation","value":"<SSL_Keystore_Location>"}, {"name":"ssl_keyStorePassword","value":"<SSL_Keystore_Password>"}, {"name":"ssl_server_cert_dn","value":"yes"}] }Update the fields
ssl_trustStoreLocationandssl_keyStoreLocationwith absolute file paths incuding file names. For example:{"name": "ssl_trustStoreLocation", "value": "/usr/local/wallet/truststore.jks"}, {"name": "ssl_keyStoreLocation", "value": "/usr/local/wallet/keystore.jks"}For Windows paths, use back slash
\and for UNIX-like paths use forward slash/inside the JSON. - To register the database credentials and wallet details with management agent, log in to the management agent host and run the following command by specifying the path to the JSON file that you created in the previous step:
-
On UNIX-like host:
cat <path_to_JSON_file> | sh /opt/oracle/mgmt_agent/agent_inst/bin/credential_mgmt.sh -o upsertCredentials -s logan
For example:
cat /net/example.com/scratch/imp/my_atp/Wallet_ATP/my_logan_creds.json | sh /opt/oracle/mgmt_agent/agent_inst/bin/credential_mgmt.sh -o upsertCredentials -s logan
Note:
For Management Agents running on compute instances using the Oracle Cloud Agent plugin, thecredential_mgmt.shscript location is under/var/lib/oracle-cloud-agent/plugins/oci-managementagent/polaris/agent_inst/bin. -
On Windows host:
type <path_to_JSON_file> | <path_to_credential_mgmt.bat> -o upsertCredentials -s logan
For example:
type C:\Oracle\my_logan_creds.json | C:\Oracle\mgmt_agent\agent_inst\bin\credential_mgmt.bat -o upsertCredentials -s logan
-
Provide Privileges to the Management Agent User to Read Wallet Files
Ensure that the management agent user has the correct privileges to read the wallet files. Provide READ and EXECUTE access to the wallet directory and READ access to the wallet files. For example commands that you can use, see Grant READ Access of the Logs to the Agent User on Your Host in Log Analytics Documentation.
Create a Source for the Autonomous Database Entity Type
- Open the navigation menu and click Observability & Management. Under Log Analytics, click Administration.
The administration resources are listed in the left hand navigation pane under Administration. Click Sources.
The Sources listing page opens. Click Create Source.
- In the Name field, enter the name of the source.
Optionally, add a description.
- From the Source Type list, select Database.
- Under Entity Type menu, select Autonomous Transaction Processing or Autonomous Data Warehouse.
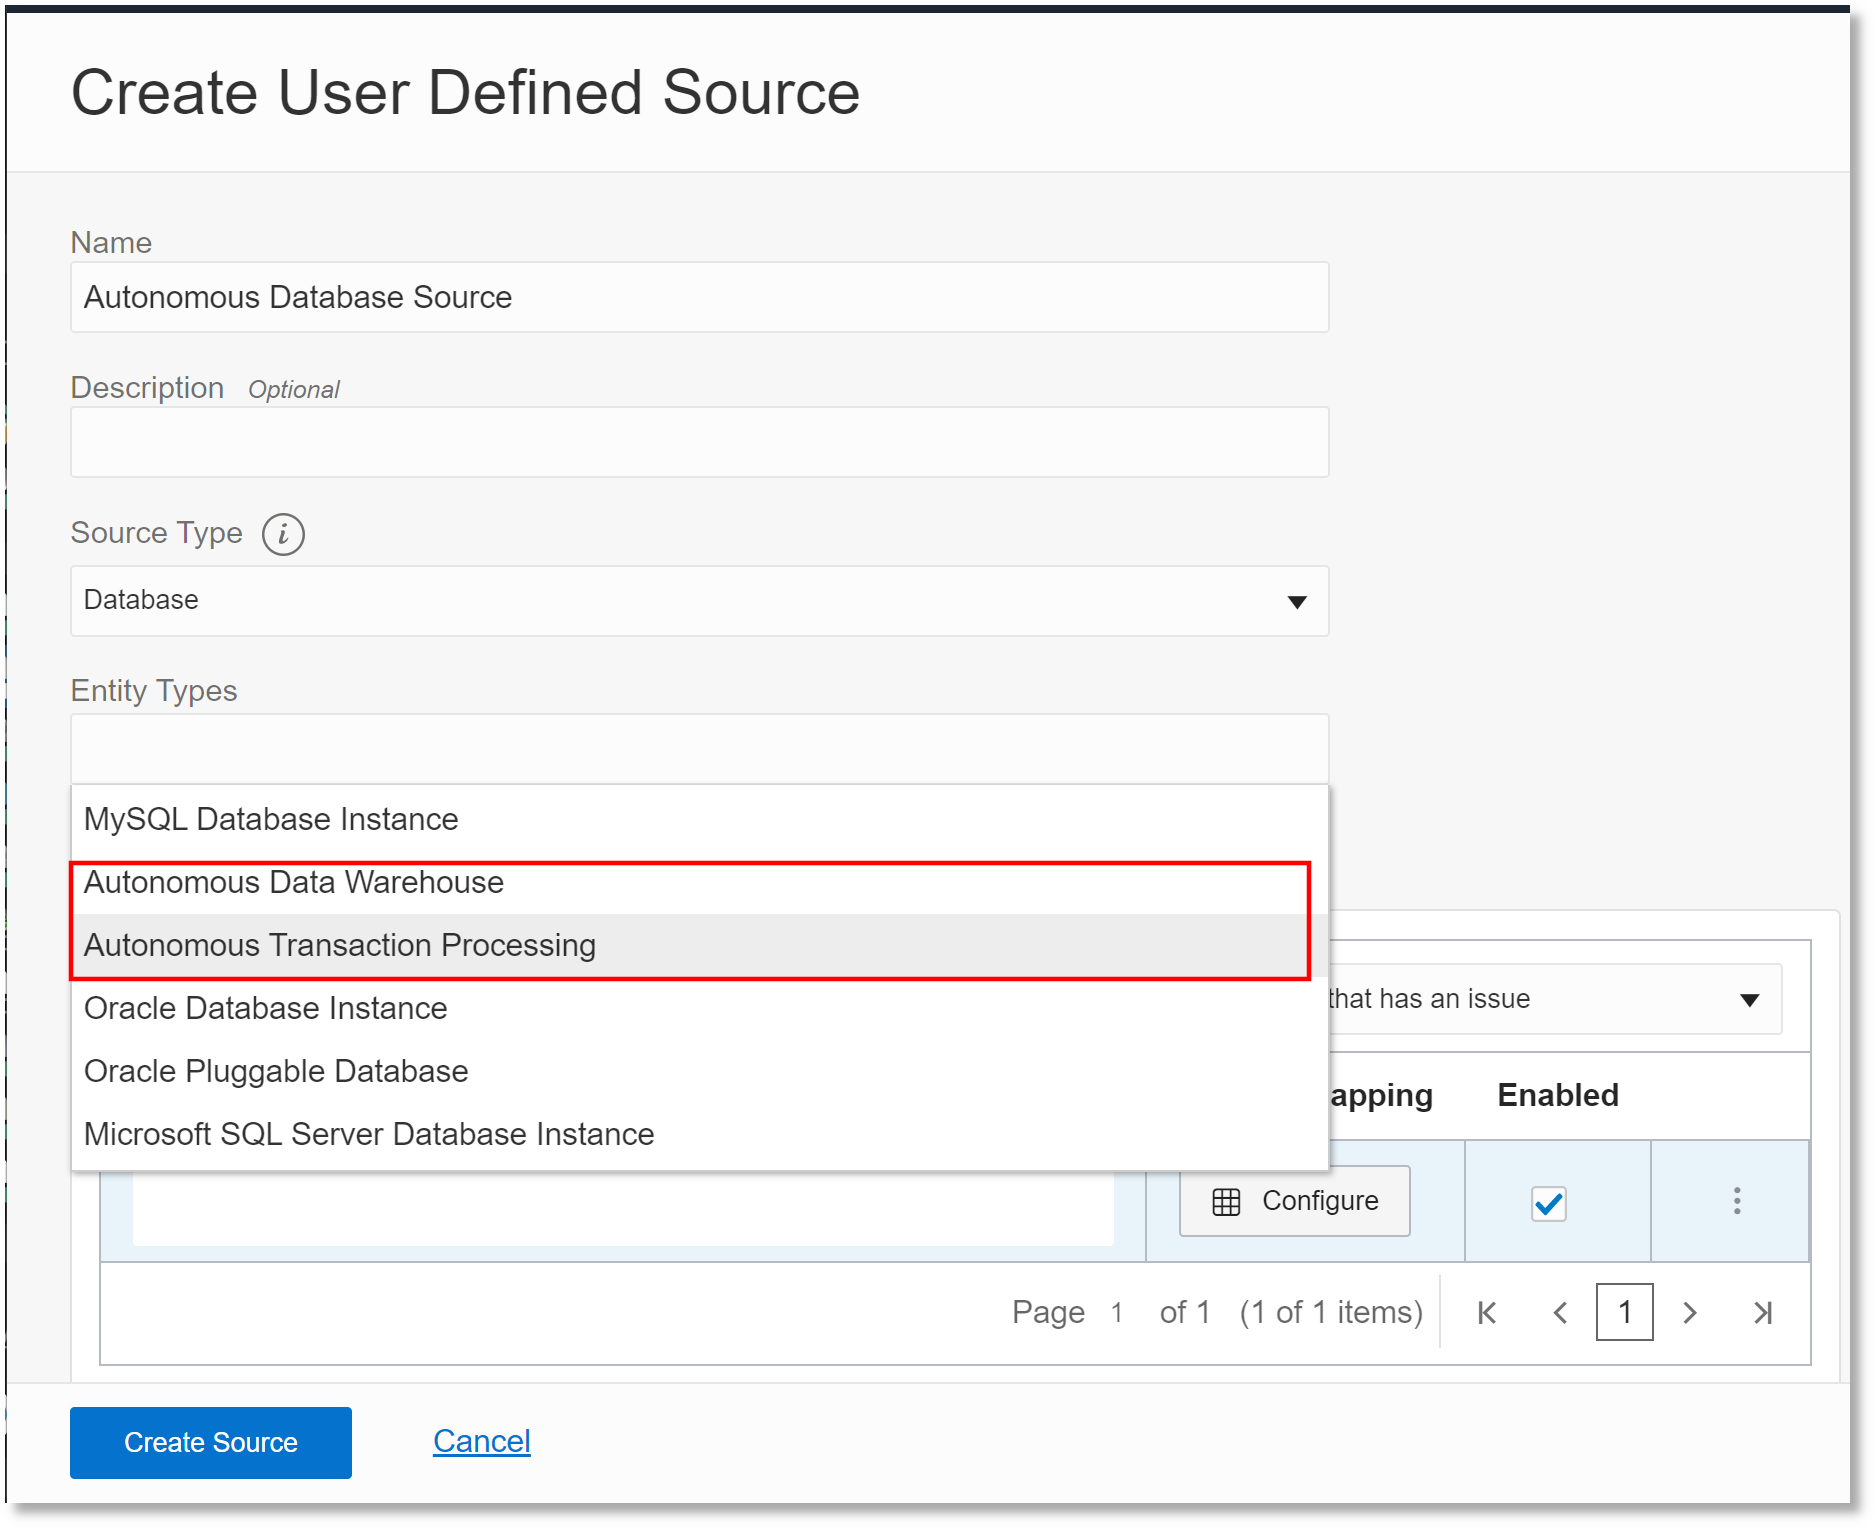
Description of the illustration Create_Source.png - Click the Database Queries tab and specify the SQL statements based on which Log Analytics collects autonomous database logs:
- Enter the SQL statement in the SQL Query field.
You may want to run the SQL queries outside of Log Analytics to verify the results first.
- Click Configure and map the SQL table columns to the field names that would be displayed in the actual log records.
- Specify a Sequence Column. The value of this field must determine the sequence of the records inserted into the table. It must have unique incremental value.
Note:
- The first mapped field with a data type of
Timestampis used as the time stamp of the log record. If no such field is present, then the collection time is used as the time of the log record. - When the logs are collected for the first time after you created the log source (historic log collection):
If any field in the SQL query is mapped to the
Timefield , then the value of that field is used as reference to upload the log records from previous 30 days.If none of the fields in the SQL query are mapped to the
Timefield, then a maximum of 10,000,000 records are uploaded.
Click Done.
To add multiple SQL queries, click Add and repeat this step.
- Enter the SQL statement in the SQL Query field.
- Select Enabled for each of the SQL queries and then click Save.
The sources listing page opens and shows all Oracle-defined and custom defined sources, including the one that you just created.
Associate the Log Source with Autonomous Database Entity
- In the sources listing page identify the source that you created in the previous step. Click the source name. The source details page opens.
- Click on the Unassociated Entities tab to view the entities that are eligible for association with this source. Use the compartment filter to narrow down the search for the entity. Select the entity that you created earlier to associate with this source and click Add Association.
The Add Association dialog box opens.
- Select the compartment that contains the log group in which the log data should be located after it is collected and indexed.
- Select the log group that you created earlier during the setup.
- Click Submit.
The selected entity is now moved to the Associated Entities section in the Details tab where the status of the association is displayed. If the source-entity association task failed, then click Retry Association.
Collection instructions will be sent down to the agent that is monitoring this entity as defined earlier and the log collection will start. Go to Agent Collection Warnings tab to view the warnings for log collection. Note that the list of warnings correspond to all the associated entities for this source.
If you have any issues with the management agent collecting the data, then ensure that the user name that you provided in the credential store has READ access to the tables or views being queried. Wait for a few minutes to view the logs in the Log Explorer. After the agent has collected the historic logs, you will start seeing only newer logs being collected.
Learn More
The following sections in the Oracle Cloud Infrastructure Documentation:
Tutorial: Collect Logs from Tables or Views in Oracle Autonomous Database
F42261-12
December 2025
Learn how to set up the environment in Log Analytics to collect logs from the tables or views of Oracle Autonomous Database.
This software and related documentation are provided under a license agreement containing restrictions on use and disclosure and are protected by intellectual property laws. Except as expressly permitted in your license agreement or allowed by law, you may not use, copy, reproduce, translate, broadcast, modify, license, transmit, distribute, exhibit, perform, publish, or display any part, in any form, or by any means. Reverse engineering, disassembly, or decompilation of this software, unless required by law for interoperability, is prohibited.
If this is software or related documentation that is delivered to the U.S. Government or anyone licensing it on behalf of the U.S. Government, then the following notice is applicable:
U.S. GOVERNMENT END USERS: Oracle programs (including any operating system, integrated software, any programs embedded, installed or activated on delivered hardware, and modifications of such programs) and Oracle computer documentation or other Oracle data delivered to or accessed by U.S. Government end users are "commercial computer software" or "commercial computer software documentation" pursuant to the applicable Federal Acquisition Regulation and agency-specific supplemental regulations. As such, the use, reproduction, duplication, release, display, disclosure, modification, preparation of derivative works, and/or adaptation of i) Oracle programs (including any operating system, integrated software, any programs embedded, installed or activated on delivered hardware, and modifications of such programs), ii) Oracle computer documentation and/or iii) other Oracle data, is subject to the rights and limitations specified in the license contained in the applicable contract. The terms governing the U.S. Government's use of Oracle cloud services are defined by the applicable contract for such services. No other rights are granted to the U.S. Government.
This software or hardware is developed for general use in a variety of information management applications. It is not developed or intended for use in any inherently dangerous applications, including applications that may create a risk of personal injury. If you use this software or hardware in dangerous applications, then you shall be responsible to take all appropriate fail-safe, backup, redundancy, and other measures to ensure its safe use. Oracle Corporation and its affiliates disclaim any liability for any damages caused by use of this software or hardware in dangerous applications.
Oracle and Java are registered trademarks of Oracle and/or its affiliates. Other names may be trademarks of their respective owners.
Intel and Intel Inside are trademarks or registered trademarks of Intel Corporation. All SPARC trademarks are used under license and are trademarks or registered trademarks of SPARC International, Inc. AMD, Epyc, and the AMD logo are trademarks or registered trademarks of Advanced Micro Devices. UNIX is a registered trademark of The Open Group.
This software or hardware and documentation may provide access to or information about content, products, and services from third parties. Oracle Corporation and its affiliates are not responsible for and expressly disclaim all warranties of any kind with respect to third-party content, products, and services unless otherwise set forth in an applicable agreement between you and Oracle. Oracle Corporation and its affiliates will not be responsible for any loss, costs, or damages incurred due to your access to or use of third-party content, products, or services, except as set forth in an applicable agreement between you and Oracle.