23 ICS Connector APIs
Oracle Mobile Cloud Enterprise (OMCe) enables you to create Integration Cloud Service (ICS) connector APIs to access on-premises and cloud services through ICS. You can then call these connector APIs from the implementations of your custom APIs.
You can also use SOAP connector APIs to connect to enterprise services. However, using ICS together with ICS connector APIs has the following advantages:
-
You write far less code.
-
You connect to services more because the integrations are done for you.
-
You let the connector API handle the details of interacting with Oracle Integration Cloud Service.
ICS also makes it easy to map business objects from one application to another. For example, a service can be created that synchronizes data from a purchase order between Oracle Sales Cloud to an Oracle CPQ (Configure, Price, and Quote) Cloud application.
How ICS Connector APIs Work
ICS connector APIS enable you to access services that you have exposed in Integration Cloud Service (ICS).
ICS itself is a service designed to simplify connectivity between your services and applications, both cloud-based and on premises. When you work with ICS, you work with integrations that connect applications and map data between them.
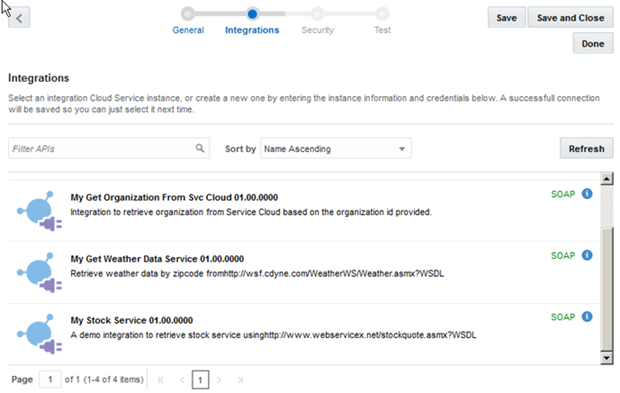
You create an ICS connector API with the ICS Connector wizard, in which you enter the SOAP proxy for the integration. Once you have done so, you are shown a list of integrations that correspond with that proxy and can select one. For each ICS integration, there is a single operation per endpoint. After you select the integration, you can proceed to test the endpoint.
Once you have created an ICS connector API, you can call it from the implementation of a custom API.
Note:
Only SOAP-based integrations are supported.ICS Connector API Flow
-
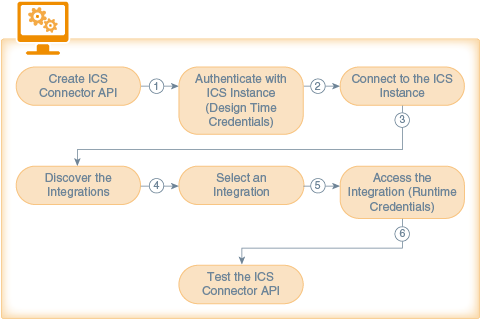
Create ICS Connector API. You create an unbound ICS connector API with the Integration Cloud Service Connector API wizard.
-
Authenticate with ICS Instance (Design Time Credentials). You pass design time credentials to connect to the ICS instance. These credentials are the username and password received when you subscribe to the Oracle Integration Cloud Service.
-
Connect to the ICS Instance. OMCe locates the ICS instance via the service URL provided.
-
Discover the Integrations. When authentication is confirmed, a list of active integrations in the ICS instance is displayed.
-
Select an Integration. You select an integration instance from a list of the integrations.
-
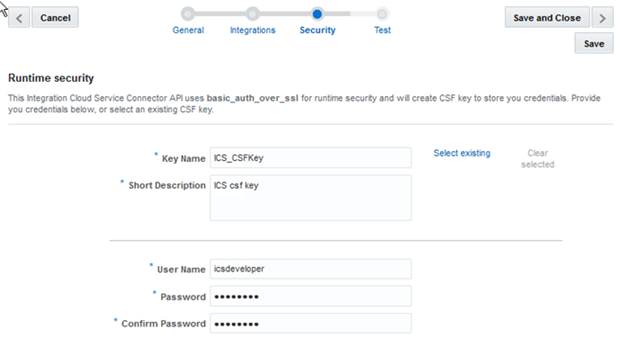
Access the Integration (Runtime Credentials). You pass credentials to allow access to the runtime instance of the integration. Runtime credentials are the username and password you received from the ICS administrator that allow you to run the integration.
-
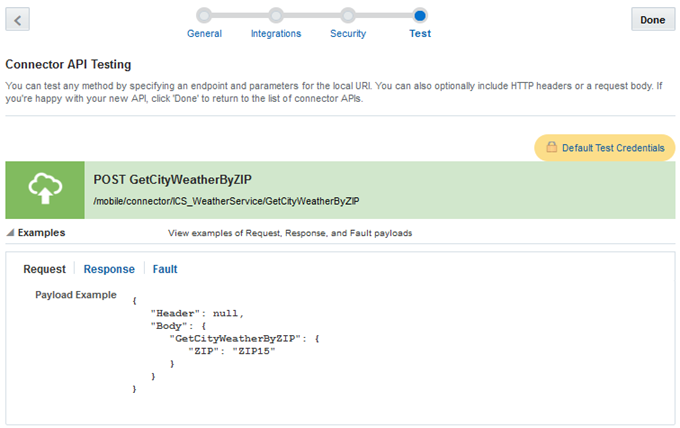
Test the ICS Connector API. You test the endpoint using mobile user credentials.
-
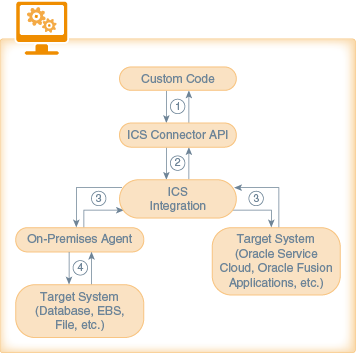
The custom code implementation of one of your custom APIs calls the connector API. Information is then passed to the connector implementation, and the implementation extracts the payload from the request.
-
A connection is made to the ICS service via the service URL. The service verifies the design-time credentials passed to it and the active integrations are exposed.
-
Runtime credentials are passed from ICS to either the on-premises agent or to a single cloud service to access the selected service integration.
-
Information is passed back through the integration (and, for on-premises applications, via the on-premises agent) to the connector API and back to the custom API.
How Do I Create an ICS Connector API?
Creating an ICS Connector API consists of four stages:
-
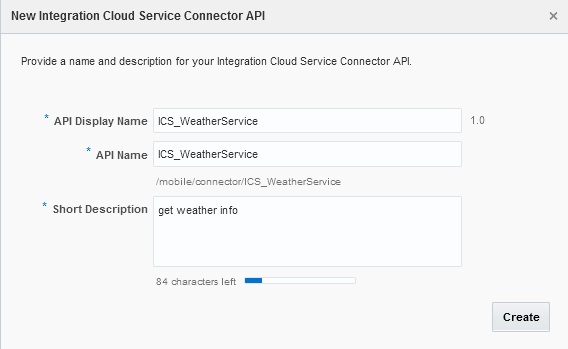
Creation: You’ve named the API and provided a description. Once created the API exists in a Draft state.
-
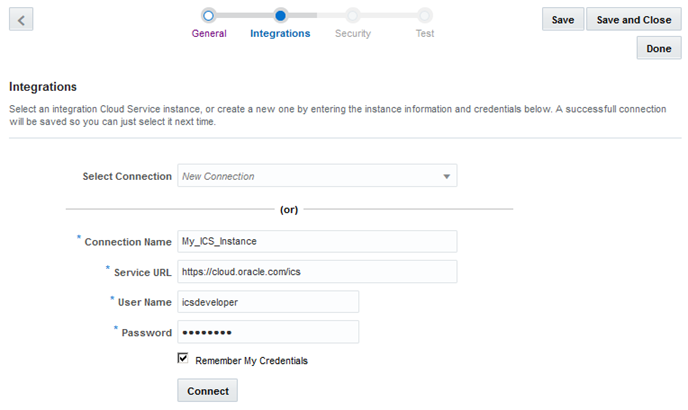
Connection: You’ve provided the URL to the ICS service and your design time credentials, which give you access to the ICS service.
Note:
The design time credentials can be saved so you only need to do it once per ICS instance. It’s important to note that you can only use the credentials that you saved. That is, if other developers want to access this instance, they’ll have to enter their own credentials at least once themselves. -
Discovery: OMCe locates the ICS service and obtains instances of the active integrations available from the service.
-
Configure: You’ve selected (or created) a CSF key for the security policy and provided your runtime credentials.
-
Test: Now you can test your endpoint to validate the connection to the service.
Setting the Basic Information for Your ICS Connector API
Connecting to an Integration Cloud Service Instance
This is where you select the Integration Cloud Service (ICS) instance that you want or create a connection to an ICS instance. If this is the first time that you’re creating an ICS connector API, the Select Connection drop-down list won’t be available and you’ll have to create a connection to the instance.
Making a connection consists of the following phases:
-
Selecting or creating an ICS instance and authentication
-
Connecting to the server hosting the active integrations
-
Selecting the active integration
You perform or observe these operations on the Integrations page of the Integration Cloud Service Connector API wizard.
Selecting or Creating an ICS Instance Connection
Selecting an Active Integration
Editing the ICS Connector API
Note:
Once you’ve moved on to the Test page, you won’t be able to go back to the Integrations page to select a different integration. If you return to the Integrations page from the Test page, you’ll see only the integration that you’ve selected.Setting Runtime Security for the ICS Connector API
Provide a CSF Key in one of the following ways:
-
Click Select Existing and select an existing key from the Available Keys list in the Select or Create a New API Key dialog. A description of the selected key is displayed below the list. The list displays only the keys supported by the client policy, which could be
http_basic_auth_over_ssl_client_policy,wss_http_token_over_ssl_client_policy,orwss_username_token_over_ssl_client_policy.When you select the key, its name appears in the Key Name field. Click Select to add the key. The other fields in the CSF Key Details pane are used only when creating a key.
-
Create a new basic (CSF) credentials key directly on the Security page.
For the steps on creating a key, see Creating a New CSF Key. Alternatively, you can click Select Existing and create the key in the Select or Create a New API Key dialog.
Regardless of which security policy is used, the ICS adapter API determines the correct authentication mode. Once you’ve configured the ICS Connector API for a given ICS instance, the runtime credentials that you provided for that instance are remembered the next time you configure an ICS Connector API.
To learn about security policies for the ICS Connector, see Security and ICS Connector APIs.
Creating a New CSF Key
If you want to edit some aspect of an existing CSF key, select it from the Available Keys list and modify the fields as needed.
If you’ve already selected a key but then decide to create a new key, click Clear Selected to clear all the fields.
To learn about CSF Keys, see CSF Keys.
Testing the ICS Connector API
Getting the Test Results
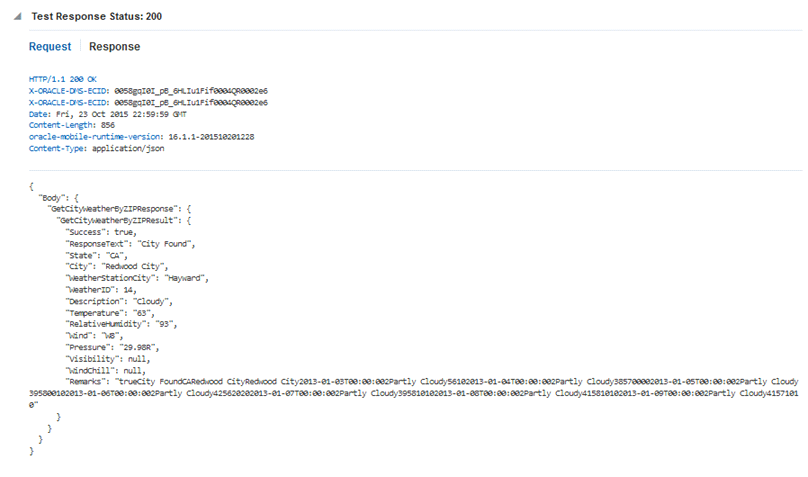
Test results are displayed at the bottom of the Test ICS API page. The result indicator is the response status:
-
2xx: indicates a successful connection
-
4xx: indicates a user error occurred
-
5xx: indicates a server error occurred
The following table lists the most common status messages you’ll see:
| Status Code | Description |
|---|---|
| 200 OK | Successful connection. |
| 400 BAD REQUEST | General error when fulfilling the request, causing an invalid state, such as missing data or a validation error. |
| 401 UNAUTHORIZED | Error due to missing or invalid authentication token. |
| 403 FORBIDDEN | Error due to user not having authorization or if the resource is unavailable. |
| 500 INTERNAL SERVER ERROR | General error when an exception is thrown on the server side. |
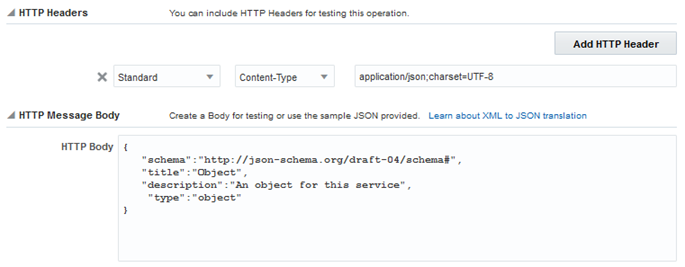
Click Request to see the metadata for the transaction, such as header information and the body of the request.
Click Response to see the details of the response returned. The response code tells you whether or not the connection was successful.
After your connector API is tested, published, and deployed, you can go to the Connectors page to see analytical information about it, such as how often the connector is being called and what apps are using the connector. See Managing a Connector.
Getting Diagnostic Information
You can view the response code and returned data to determine if your endpoints are valid. A response status other than 2xx doesn't necessarily mean the test failed. If the operation was supposed to return a null response, a response should show a 4xx code.
For every message that you send, OMCe tags it with a correlation ID. A correlation ID associates your request with other logging data. The correlation ID includes an Execution Context ID (ECID) that’s unique for each request. With the ECID and the Relationship ID (RID), you can use the log files to correlate messages across Oracle Fusion Middleware components. By examining multiple messages, you can more easily determine where issues occur. For example, you can retrieve records from Oracle Fusion Middleware Logging using the call's ECID. From the Administration page, you can click Logs to view logging data: the connector API call received by a single MBE outbound connector API call.
Depending on your OMCe access permissions, you or your mobile cloud administrator can view the client and server HTTP error codes for your API's endpoints on the Request History page allowing you to see the context of the message status when you're trying to trace the cause of an error. Every message sent has a set of attributes such as the time the event occurred, the message ID, the Relationship ID (RID), and the Execution Context ID (ECID).
To obtain and understand diagnostic data, see Diagnostics.
Security and ICS Connector APIs
HTTP Basic Authentication is used for runtime security. Basic authentication allows an HTTP user agent to pass a user name and password with a request and is often used with stateless clients, which pass their credentials on each request.
ICS Connector APIs use one of the following security policies:
-
http_basic_auth_over_ssl_client_policy. It includes the username and password credentials in the HTTP header for outbound client requests. This policy verifies that the transport protocol is HTTPS. -
wss_http_token_over_ssl_client_policy. The username and password credentials are included in the HTTP header for outbound client requests. Also a timestamp is sent to the SOAP security header. If the connector detects that the ICS integration that’s being connected to is protected by thewss_http_token_over_ssl_service_policy, the connector uses the corresponding client policy. This policy verifies that the transport protocol is HTTPS. -
wss_username_token_over_ssl_client_policy. The username and password credentials are passed as SOAP headers and are added automatically by the connector. If the security policy is defined in the WSDL for a SOAP-based integration, this is the policy that’s used. This policy verifies that the transport protocol is HTTPS.
Although you can set the Oracle-Mobile-External-Authorization header in custom code to configure a secure connection, it isn’t necessary since authorization to connect to a service is set when configuring the ICS Connector API.
CSF Keys
In OMCe, the Oracle Credential Store Framework (CSF) is used to manage credentials in a secure form. A credential store is a repository of security data (credentials stored as keys) that certify the authority of users and system components. CSF lets you store, retrieve, update, and delete credentials (security data) for a web service and other apps.
A CSF key is a credentials key. It uses simple authentication (composed of the user name and the password for the system to which you’re connecting) to generate a unique key value. You can select an existing CSF key or create one through the Select or Create a New API Key dialog. To select or create a CSF key, see Creating a New CSF Key.
CSF keys and their values are specific to the environment in which they’re defined. That is, if the Development environment is selected, then only the CSF keys and certificates for the security policies in use by artifacts in that environment are listed in the CSF Keys dialog. A different set of keys and certificates will be displayed in another environment, such as Staging. It’s also possible for keys with the same key name but with different values to exist in multiple environments.
A CSF key can be deployed to another environment, however, because CSF keys are unique to an environment, only the key name and description are carried over to the target environment. You won’t be able to use that key in the new environment until it’s been updated with user name and password credentials by the mobile cloud administrator.
Using Your Connector API in an App
To use a connector in a mobile app, you need to have a custom API that can call the connector API. Such a custom API could also contain additional logic to process the data returned from the call to the connector.
The syntax for a call to a connector API is the same as you would use when calling any other API from custom API implementation code. See Calling Connector APIs from Custom Code.
When you implement a custom API, you can view the available connectors in the API Catalog tab in the API Designer. While creating your custom API, you might find it beneficial to open the Test page of the connector API so that you can refer to any headers, parameters, and schemas that you’ve configured for the connector API.
Troubleshooting ICS Connector APIs
System message logs are great sources for getting debugging information. Depending on your role, you or your mobile cloud administrator can go to the Administration view and click Logs to see any system error messages or click Request History to view the client (4xx) and server (5xx) HTTP error codes for the API's endpoints and the outbound connector calls made within a single mobile backend.
Here are some areas of particular interest when troubleshooting:
-
Security Errors are Occurring
Take a look at the integration WSDL and see if you can determine what security policy is being used. Use the SOAP connector directly to create a connector API and test with different security policies.
-
An Integration Isn’t Showing Up
Go to Oracle Integration Cloud Service and look at your integrations there. The status must be activated, and the source connection type should be SOAP.
-
Constructing a Valid ICS Instance URI
Your instance URI must begin with
https://and should end in/ics. Look for the Email that you received when your user account was provisioned for the ICS instance. From there, you can find the URI to reach the ICS UI. The same URI should be used to create the connection in OMCe. -
Identifying Where the Failure Is Occurring
As with other connectors generally finding where a fault was thrown can be difficult. A 401 or 404 for instance could be returned by the test endpoint, OMCe itself, the ICS instance that OMCe is connecting to, or the system to which ICS is connecting.
401 and 404 errors are difficult because they return no message body that might indicate where the error occurred. However, the headers associated with a 401 and 404 error can sometimes act as a signature to indicate where it originated from. Likewise, trace the end-to-end flow by searching for corresponding log entries at each step in the flow.
-
Can’t Make a Connection Using Default Protocols
By default, only TLSv1.1 and TLSv1.2 protocols are used for outbound connections. If you need to use an older version of a SSL protocol to connect to an external system that doesn't support the latest versions of SSL, you can specify the SSL protocol to use for the connector by setting the
Security_TransportSecurityProtocolsenvironment policy. The policy takes a comma-separated list of TLS/SSL protocols, for example: TLSv1, TLSv1.1, TLSv1.2. Any extra space around the protocol names is ignored. You can use the SSLv2Hello protocol to debug connectivity issues with legacy systems that don't support any TLS protocol. Note that this policy can’t be used to enable SSLv3 endpoints. See OMCe Policies and Values for a description of the policy and the supported values. Be aware that this policy must be manually added to apolicies.propertiesfile that you intend to export.Caution:
Be aware when setting the policy that older protocols are vulnerable to security exploits.
