26 Packages

Oracle Mobile Cloud Enterprise (OMCe) lets you share and move bundles of related artifacts built in OMCe to another instance of OMCe. You do this by exporting artifacts along with their dependencies, which creates a package, and importing that package to other instances of OMCe.

The export process creates a package file (package-name.zip) containing a copy of the artifact, its dependencies, and their local policies. You can also use the package file as an archive for a set of related artifacts and store it outside of OMCe. If artifacts in the current instance of OMCe are changed or accidentally deleted, you can retrieve their original state from the package.

If you’re a mobile or service developer, you can export artifacts such as mobile backends, collections, APIs and API implementations. You or another developer can then import the artifacts into the target environment.

What’s a Package?

A package is a container for one or more artifacts. If an artifact has dependencies, they’re also included in the package. For example, when you export a mobile backend, a package is created that contains the mobile backend and its dependencies, such as an API and its implementation, the connectors that the implementation calls, and collections. If the artifact you export is an API that has only one dependency, its implementation, then the package would contain just the API and its implementation.

Note:

While you can’t explicitly add roles to a package, if an artifact has roles associated with it, they’ll be included in the package

Artifacts can be in Draft or Published states. When an artifact is imported, it retains the state it had when the package was created (the source environment). That is, when an artifact in Draft state is imported, it’s still in the Draft state in the new instance. The same is true for artifacts in the Published state.

For information on exporting a package, see Adding Artifacts to the Package. For information on importing a package, see Uploading the Package.

Why Do I Want a Package?

With packages, you can easily share artifacts across different instances of OMCe. For example, you might find that you can use the same set of configured artifacts for different apps. Instead of having to recreate the same set of artifacts with the same configurations in another instance of OMCe, you can export the artifacts (that is, create a package) in the current instance and import them into the target instance of OMCe where work on the other app is being done.

Lets say Jeff, the service developer for Fix It Fast, has created a mobile backend that lets a technician look up the latest service requests and find the location and contact details for each customer. Fix It Fast has a subsidiary business called Restore It Fast, which provides restoration services to customers with fire or water damage. It would be helpful if the team at Restore It Fast could use that same mobile backend.

Jeff exports the mobile backend and all of its dependencies. He then notifies Jane, the service developer at Restore It Fast, that the package is ready to import. Jane locates and imports the package. She edits the environment policies for her OMCe environment. She saves significant time by having the essentials of the mobile backend completed. She can begin testing right away and have the app ready to use by Restore It Fast technicians.

Exporting a Package

Use the Export Package wizard to easily create a packaged set of artifacts that you can export to other instances of OMCe. The wizard shows you the dependencies associated with artifacts and includes those dependencies in the package for you. In addition to adding artifacts to the package, you’ll have the opportunity to modify local environment policies.

The Export Package wizard walks you through the following steps to export a package:

Adding Artifacts to the Package

  1. Click open the side menu icon and select Applications > Packages from the side menu.

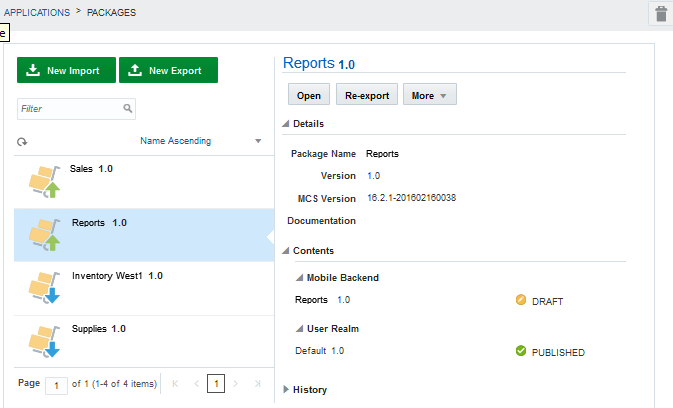
    If there are existing import and export packages, you’ll see a list of packages.

    Uup arrow icons denote export packages. Down arrow icons denote import packages.

    Alternatively, you can go to an artifact’s landing page, select an artifact and choose More > Export. That artifact is automatically added to the list of selected artifacts. You can add more artifacts on the Content page of the Export wizard.

  2. Click New Export.
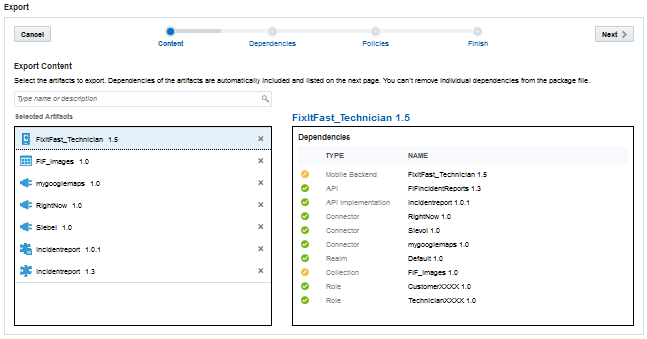
  3. On the Contents page of the Export wizard, click in the artifact Search field and select an artifact from drop-down list to add it to the package.

    You can also enter a name in the field. All artifacts with that character string are displayed in the Selected Artifacts list. Click X to remove an artifact that you don’t want included in the package.

  4. Select an artifact to see its dependencies in the right panel.

    Note:

    If you’re exporting a client, the mobile backend that it references and any dependencies of the mobile backend are automatically added. However, if you export a mobile backend, the client that references it isn’t automatically added. Because a mobile backend can be referenced by multiple clients, you’ll have to manually add the client you want by entering its name in the Search and selecting it.

    Also be aware that notification profiles associated with the client are not included in the export or import package. You’ll have to manually create the profiles in the target environment and associate them with the client.

  5. Click Next (>) to go to the next step.

Reviewing Dependencies During Export

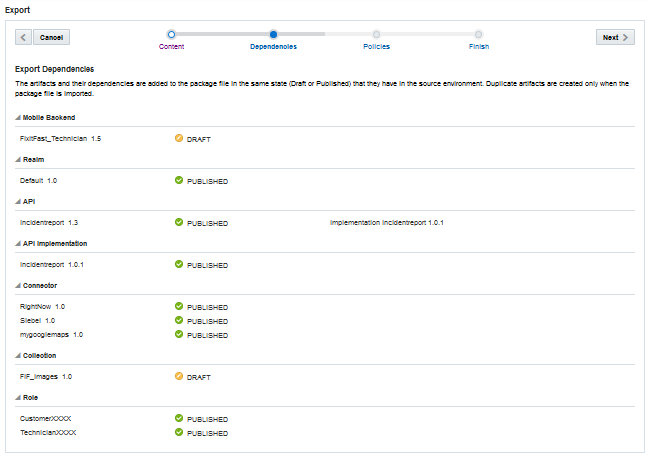
Here’s where you can examine everything that’s included in the export package. You can expand the view of each artifact type to see all the artifacts and their status.

All artifacts are displayed under their respective types and top-level (root) artifacts are not distinguished. That is, a custom API that’s listed could be a dependency of a mobile backend or a top-level artifact itself.

  1. Click Dependencies in the navigation links.
    Description of export_mbe_depends.png follows
    Description of the illustration export_mbe_depends.png

    If the call to the mobile backend that’s being exported is rerouted, the name and version of the target mobile backend (as defined in the Routing_RouteToBackend policy for the mobile backend being exported) is shown. The target mobile backend isn’t a dependency of the original mobile backend and won’t be automatically exported. You must manually export the target mobile backend to the target environment if it doesn’t exist there already.

  2. If you’re exporting APIs, expand API to see the associated API implementation for each custom API.
  3. Click Expand All or Collapse All to see the full list of artifacts or just the artifact types.
  4. Click Next (>) to go to the next step.
The Draft or Published state of the artifact and its dependencies are retained when the package is imported to the target environment.

Setting Environment Policies During Export

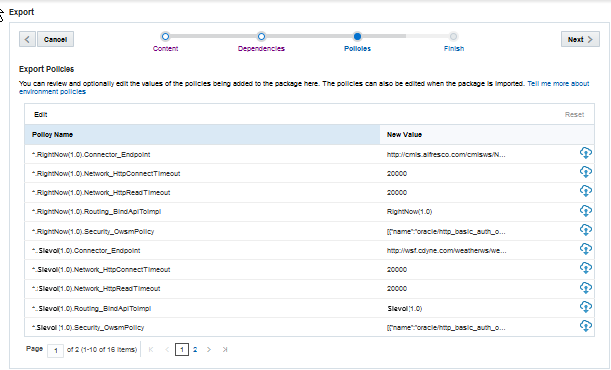
Setting or changing policy values is an optional step during export. You don’t have to change policy values here. Policies can be modified during import or from the Administration page afterwards.

You can save some time by setting values now if you know what values will be required. For example, if a connector API is in the package, you may want to change the security policy. If a mobile backend is being exported, you may want to reset the Sync_CollectionTimeoutToLive policy. Another example is if the call to the mobile backend that’s being exported is rerouted to another mobile backend and you want to ensure the rerouting occurs, you should set the Routing_RouteToBackend policy here and specify the name and version of the original and target mobile backends. You’ll also want to check if the intended target mobile backend exists; otherwise, you’ll need to export it.

Note:

If a policy in the export package doesn’t already exist in the target, it will be added during the import.
  1. Click Policies in the navigation links and review the current policy values for the artifacts in the package.
    Policies values with a cloud icon indicate the value is taken from source environment. Pencil icons denote custom values.
  2. (Optional) Select a policy and edit its value in one of the following ways:
    • Click Edit above the policy table. In the Edit Policy dialog, you can select the value that the policy currently has (Package file value) or enter a custom value (Custom value). Click Null to set the custom value to null. Click Save to enact the change.

    • Right-click a policy in the table and select Set custom value to null or Edit to enter a value in the Custom value field in the Edit Policy dialog.

    Click Reset to revert back to the original value for that policy.

    If you change your mind or make a mistake after modifying the policy values, click Reset All to revert back to the original policy values.
  3. Click Next (>) to go to the next step.

For descriptions of policies, see OMCe Policies and Values.
Completing the Export

Now that you’ve selected all the artifacts you want to export (and optionally, set any environment policies), it’s time to create the package.

Note:

When you click Export, artifacts are added to the package in their current state at that time. For example, if someone publishes an artifact while you’re creating the export package, the package will contain the published instance of that artifact.
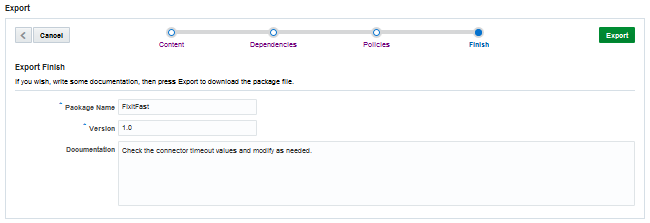
  1. Click Finish in the navigation links.
  2. Enter a name for your package.
    The default name is the name of the top-level artifact. The package name and version must be a unique combination. No other package name can have the same name and version number.
  3. Enter a version number.

    For example, enter 1.0 to designate it as the first version of this package.

  4. Enter documentation about this package.

    Add documentation that informs whoever is importing the package about what it contains and what tasks need to be performed before and after the package is imported. The Export wizard automatically enters information about which roles must exist in the target environment before the package can be imported.

    You can manually write documentation for your export package using Markdown syntax in the Documentation field or copy and paste your documentation into the field. Markdown syntax lets you write an easy to-read plain text that can easily be converted to structurally valid XHTML for viewing in a browser. See How Do I Write in Markdown?

    Click Preview below the field to see the formatted output.

  5. Click Export.
  6. Select the location to place the package from the file chooser.

    You can edit the name of the package here. The file name has the format package-name.zip.

Re-exporting a Package

Re-exporting lets you create a new package based on an existing package. Select a package and select Re-export, which takes you through the Export Package wizard where you can select more artifacts to include or remove some of the current artifacts.
  1. Click open the side menu icon and select Applications > Packages from the side menu.
  2. Select an export package and click Re-export.
  3. Follow the steps for exporting a package: selecting artifacts, reviewing dependencies, optionally setting environment polices, naming the package and providing documentation about the package. For steps on creating an export package, see Exporting a Package.

    Note:

    Remember that the new package must have a unique package name and version combination. That is, if the original package is MyPackage 1.0, the new package must have either a different name or version number.

Importing a Package

Importing a package puts copies of the artifacts from the source environment into the target environment. Before you proceed with the import, make sure the package name and version are unique in the target environment. You won’t be able to import it if a package with the same name and version already exists. During the import, you’ll be able to verify the contents of the package, read the package documentation, and you’ll also be able to set the values for policies being added to the target environment or modify existing policies.

The Import Package wizard walks you through the following steps for importing a package:

Uploading the Package

When you upload the package, the contents of the package are immediately installed in the target environment unless a conflict or some other error occurs during the import. You can view the contents of the package and whether or not all of the contents were successfully imported on the next page of the Import wizard.
  1. Go to the environment where you want to import the package.
  2. Click side menu icon and select Applications > Packages from the side menu.
    If there are existing packages, you’ll see them listed here. Packages with a green up arrow denote export packages. Packages with a blue down arrow denote import packages.
  3. Click New Import.
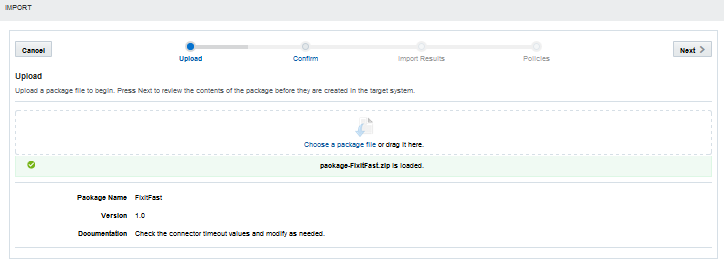
  4. Copy and paste (or drag) the package to the Upload page of the Import wizard.

    After the package is uploaded, you can see the package name, version, and information about the package. If you’ve uploaded the wrong package, click Cancel to exit the import operation.

  5. Click Next (>) to go to the next step.

Examining the Contents of the Import Package

On the confirmation page, you can see a list of the artifacts being imported and which artifacts already exist in the target environment. You can also see what dependencies are also being imported.

Note:

The notification profiles associated with a client are not included in the import package. If you’re importing a client, you’ll have to re-create the notification profiles in the target environment and associate them with the client. See Notification Profiles and Client Apps.
  1. Click Confirm in the navigation links.
  2. Review artifacts the list of artifacts to be installed. Remember if there are roles in the package that will be created in the target environment, you must have Oracle Cloud identity domain administrator permissions to do the import. Only team members with Oracle Cloud identity domain administrator permissions can create roles.
    If you don’t want the listed artifacts imported to the target environment, click Cancel now. No changes will be made to the target environment.

    If the call to the mobile backend that’s being imported is rerouted, the name and version of the target mobile backend (as defined in the Routing_RouteToBackend policy for the mobile backend being imported) is shown. The target mobile backend isn’t a dependency of the original mobile backend and isn’t included in the package. You must manually import the target mobile backend to the target environment if it doesn’t exist there already.

  3. Click Next.

    The process of installing the contents of the package in the target environment begins.

    A conflict occurs when an artifact with the same name and version (but with a different Universally Unique Identifier (UUID) value) exists in both the import package and in the target environment. The import process can’t proceed if an error occurs. Close the import wizard and resolve the issue by moving the existing artifact in the target environment to the trash, changing its name or version, and then try importing the package again. Alternatively, you can import the package to a different instance of OMCe.

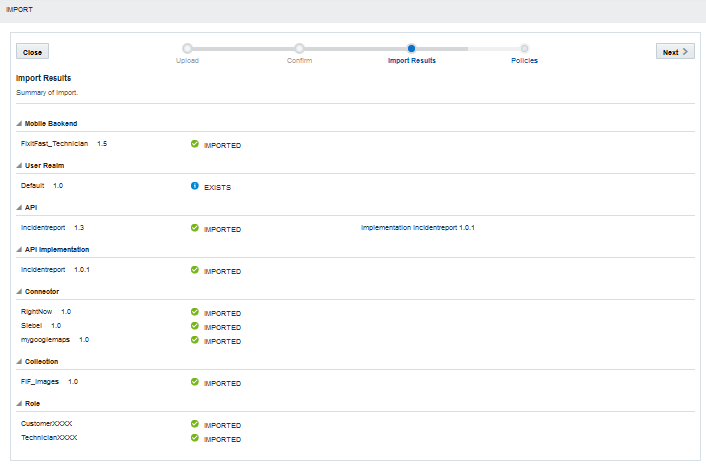
    The Import Results page shows the artifacts that have been installed.

    When an artifact in the package has the same name, version, and UUID value as one in the target environment, the artifact is marked as EXISTS on the results page and is not imported.

Setting Environment Policies During Import

Here is where you can set or modify the environment policies in the target environment for the packaged artifacts. Although the mobile cloud administrator can modify these policies later, to ensure that operations can be performed correctly in the target environment, you should update the policies here.

Even if you don’t modify values for existing environment policies, any policies associated with the artifacts in the package that are new to the target environment are added for you when you update.

Check the documentation included in the package to see if any recommended values or policies are described. For descriptions of policies, see OMCe Policies and Values.
  1. Click the Policies navigation link.
    If you really don’t want to modify environment policies, click Skip. Be aware though that the import operation completes without updating any policy values or adding any policies to the target environment.
  2. Filter the policies displayed by selecting Mobile Backends or API/Implementations from the selection list, or enter a policy name in the Search field.
    Select All Policies (the default value) to list all the environment policies associated with the artifacts.
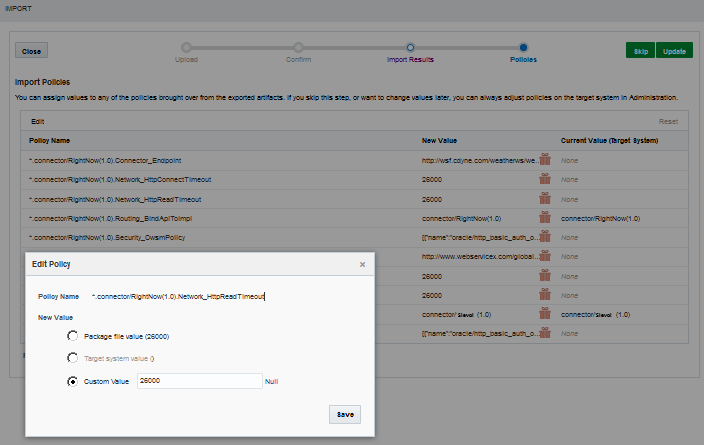
  3. (Optional) Select a policy and edit its value in one of the following ways:
    • Click Edit above the policy table. In the Edit Policy dialog, select Package file value, Target system, or Custom value. If you want to set the value to null, click Null next to the Custom value field.

      Click Save to enact the change.

    • Right-click a policy in the table and select Use value from target system, Set custom value to null or Edit to enter a value in the Custom value field in the Edit Policy dialog.

      Click Reset to revert back to the original policy value.

    If you change your mind or make a mistake, click Reset above the table to revert all the policies to their original values. A package icon indicates the policy takes the value it has in the package, a pencil icon indicates the policy has a custom value, and a target icon indicates the policy takes its value from the target environment.

  4. Click Update to apply the changes to the policies and add any new policies to the target environment.

    Any policies in the policies list that don’t already exist in the target environment are added. If you need to change any of the policy values after the import, your mobile cloud administrator can change them through the Administration view.

A blue dot by a policy name indicates that it has been modified. Icons in the Update Value column indicate if the value is taken from the package or if it was manually changed. You can the values of existing policies in the Current Value column.

What Happens When You Import a Package?

Similar to deploying an artifact from one environment to another, when importing artifacts from one instance of OMCe to another, conflicts or errors can occur.

Some situations in which you can have a successful import:

  • If all the artifacts being imported to the target environment in the new instance of OMCe are unique in name and version from any existing artifacts in that environment, the import will be successful.

    For example, a package contains the MyIncidentReports 1.1 API. The target environment has a MyIncidentReports 1.5 API. There is no conflict because the two APIs are different and MyIncidentReports 1.1 is successfully imported.

  • Another successful import occurs even if some of the artifacts in the package already exist in the target environment. That is, duplicate artifacts are in the target environment.

    For example, a package contains RightNow 1.1 connector. During the import process, it’s determined that a duplicate connector already exists in the target environment. It has the same name, version, and UUID values. The connector is skipped and the rest of the artifacts are successfully imported

Here are instances where potential problems can occur:

  • If a role associated with the artifacts in the package doesn’t exist in the target environment, then it is added when the package is imported, but to do so requires that you are a team member with Oracle Cloud identity domain administrator permissions. If you don’t have Oracle Cloud identity domain administrator permissions, the import will fail.

  • If some of the artifacts in the package are similar to existing artifacts in the target environment, that is they have the same name, version, but different UUID values, the import process can’t complete.

    For example, the package contains the published RightNow 2.0 connector and the target environment also has a published RightNow 2.0 connector. They both have the same name, version, but have different UUID values. You see a CONFLICT message by the artifact and the import operation fails. When an import fails, all changes made to the target environment are rolled back. All artifact attributes and policy values are returned to their original values prior to the import.

    You have two choices. You can create a new version of the connector in the source environment, resolve any dependency issues, export the connector, and then import it to the target environment. Otherwise, you can move the RightNow 2.0 connector that’s in the target environment to the trash and then proceed with the import.

For descriptions of the possible results of importing a package, see Import Results.

Import Results

The import results that can occur are described here:

Import State Descriptions

Imported

The artifact didn’t exist in the target environment and was imported successfully.

Not Imported

The artifact wasn’t imported because of conflict occurred or a missing artifact was detected.

The import process was stopped and any changes made prior to the error were rolled back. The target environment is back to its original state before the import.

Exists

A duplicate artifact already exists in the target environment, therefore, the artifact in the package was skipped.

Privileges

A required role or realm didn’t exist in the target environment and the current user doesn’t have Oracle Cloud identity domain administrator permissions to create the role or realm automatically during import.

Conflict

A similar artifact (same name and version but different UUID) exists in the target environment.

The import process was stopped and any changes made prior to the conflict were rolled back. The target environment is back to its original state before the import.

Exporting Updated Artifacts

What happens if you make upgrades to artifacts in your instance of OMCe and you want those upgrades in another instance of OMCe? Lets say Jeff, at Fix it Fast, makes some changes to MyIncidentReports1.1 API, which is in Draft state. Samir, who works at Restore It Fast, would like to get the improved API.

When you import updated artifacts, you need to take steps to prevent a conflict. The actions you take depend on the Draft or Published state of the artifacts. That could mean you’ll have to move existing artifacts to the trash in the target environment or create a new version of the artifact to export and then resolve any resulting dependency issues with the new version of the artifact.

Following our example, Jeff exports MyIncidentReports1.1 API and its implementation. However, before Samir can import the package, he moves his Draft instance of MyIncidentReports1.1 to the trash to avoid a conflict during import.

Examining a Package

You can view the contents of a package from the Packages page. You can also re-export a package, create a new version of an existing package, or move an export package to the trash or the contents of an import.
  1. Click open the side menu icon and select Applications > Packages from the side menu.
  2. Select a package and click View.
    From the View page, you can look at the details, contents, and policies of a package. You can also see the package details and content information on the packages landing page.
  3. Click Details to see the package metadata. the contents, policy settings, and the version of OMCe that contains the package.

    Note:

    You can only view the policy settings. You can’t change them.
  4. Click Contents to see the package contents.
  5. Click Policies to view the environment policies and associated with the package contents and the policy values.
  6. On the packages landing page, click History to see who created the selected package and when.

Moving a Package to the Trash

When you move an export package to the trash, you’re moving just the record of the package, to the trash. The artifacts remain in the source environment.

However, when you move an import package to the trash, what you’re actually doing is moving the package (that is, the record of the package) and all the artifacts in the package to the trash. Even artifacts in the Published state are moved to the trash. You can manually restore each artifact if you need them.

  1. Click open the side menu icon and select Applications > Packages from the side menu.
  2. Select a package and then select More > Move to Trash.

    Note:

    Roles can’t be deleted. Any roles associated with artifacts in the package are revoked and remain in the target system.
  3. Review the information in the confirmation dialog.
    If an artifact is a dependency of several other artifacts, click More in the dialog to see the full list.

    You won’t be able to deploy any artifacts that have dependencies on an artifact in the package that was moved to the trash.

    Also if an artifact that’s in the package is a dependency of a published artifact that’s not in the package, the move to the trash operation will fail.

  4. Click Yes to move the package to the trash.
If you decide you need some or all of the artifacts that you’ve moved to the trash, you can restore them as needed. Just go to the artifact’s landing page (for example, to restore a mobile backend, go to the Mobile Backends page), click on Trash (open the trash list icon) and select the item you want to restore. Select Restore from the Trash menu. Your mobile cloud administrator can also restore these items from the Administration view.

Environment Policy Settings for Packaged Artifacts

When you export artifacts, you save their configurations in a portable file (the package) that can be sent to various instances. Only local policies are included in the package. That is, only policies scoped for an artifact are available for editing and exporting. For example, if you’re exporting a mobile backend called FIF_Technician 1.0 and an environment policy has been defined for it that’s called FIF_Technician(1.0).*.Logging_Level. That policy will be available for editing. Environment-wide policies are not included in the package file. For example, if the mobile backend uses *.*.Logging_Level, that policy won’t appear on the Policies page. The mobile backend will be subject to the Logging_Level policy in the target environment.

The environment policy settings for the artifacts are the values they have in the current instance. Because environment policies are specific to each environment in each instance, you might need to edit some of the policies before they can be used in their new location.

During export and import, you’ll have the option to edit these values for the target environment. If someone other than you is performing the import, you should document which policies might need to be modified, and which might be overwritten, and which might need to be added. You might also want to alert them to any roles or realms that are required. To ensure the required policies are added to the target environment.

If a policy that you set during export or import doesn’t exist in the target environment, it’s added when you import the package.

Any required roles or realms that don’t exist in the target environment are automatically created during the import but only if the person performing the import operation is a team member that has been granted an Oracle Cloud identity domain administrator role.

For descriptions of policies, see OMCe Policies and Values.