Configure Identity Browser Fields
Add an Identity Browser control to allow users to search and select individuals to be notified or assigned tasks downstream in the process.
Use identities to search for users, groups, or roles. You can add single or multiple entries to the Identity Browser based on the configuration you select. Use options in the search filter to restrict the scope of the search.
To configure an Identity Browser control:
-
From the Advanced Palette, drag the Identity Browser control onto the canvas.
-
Select the control and edit its properties on the Properties pane's General tab.
Field Description Name
An internal identifier that you will use to identify the control.
Label
Specifies the control name that displays to a user.
Binding
Defines a link between the control and a data attribute.
Placeholder
Text that will appear in the control until any text is entered. If text is removed from the control, the text specified in this field reappears.
Hint
Hint text that will display to users when a user clicks into the control.
Help
Help text that will appear for the control. If you specify help text, a help icon appears next to the name of the control and displays the help text when a user hovers over it or clicks it.
Default Scope
Specifies the default scope for the identity search. Available options in the drop-down menu are All, User, Group, and Role. The value of this field is set to User by default.
Required
Set this property to require users to complete the control in order to successfully submit the form.
Multiple
Set this property to allow multiple entries to the control.
Disabled
Set this property to display the control as inactive.
Hide
Set this property to hide the control. For example, you might hide a control by default, but configure another control that when selected triggers an event that displays the hidden control.
Scope Filter
Set this property to allow filtering of results in the control.
Auto Focus
Set this property to automatically select the control when the web form loads.
Events
Allows you to configure events for the control. You can assign actions or If/Then/Else conditions to the control based on a selected event. See Add Dynamic Behavior to Forms.
Note:
Except for assigning a constant value, you cannot trigger any changes to the Identity Browser using other controls. Actions such as assigning function results, connector call values, or data from the payload or another control are not applicable in the context of Identity Browser. -
On the Styling tab, edit the control's styling properties.
-
Click Preview to try out using the control.
Retrieving a List of User Identities
An identity object contains several fields, such as title, ID (user identity), type, e-mail, first name, last name, and contact number.
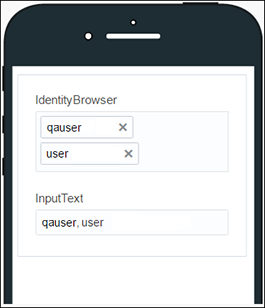
Using a combination of Identity Browser and Text controls, you can retrieve a comma-separated list of user identities (IDs), which can be used by other process activities.
To fetch a list of IDs:
-
Add an Identity Browser control to the form canvas.
-
Edit the control’s properties as required. Make sure to select the Multiple checkbox to allow multiple entries to the control.
-
Drag the Input text control onto the canvas. You may also use the Text Area control.
-
Configure an event to populate data in the Input text control field based on the data entered into the Identity Browser control. See Add Dynamic Behavior to Forms for details on creating events.
-
Select Identity Browser, and in the Properties pane's General tab, scroll down until you see Events.
-
Click Add
 to define an event.
-
Select an event option, for example, On Change; this event is activated when an end user changes the control’s value.
-
After selecting the event option, click the editing icon next to the events drop-down menu to specify the action. An event window appears.
-
In the event window, click +Action to add an action.
A solid red Action indicator appears. Below it, configure the action.
-
In the Control Name field, select the control the action will affect, in this case select InputText.
-
In the Action field, select Value.
-
In the Type field select Control, and in the resulting Control Name field, select IdentityBrowser.
-
Finally, select Identities in the Property field. This fetches the data in the ID fields of entries in the Identity Browser control to the Input text field.
-
Click OK, then Save.
-
-
Click Preview to test the controls.
-
On the Preview page, search for and select multiple identity objects in the Identity Browser control.
-
The Input text field is populated automatically with the list of user identities, that is, the data in the ID fields of these entries.
