Example of Using Correlation with Send and Receive

Correlations are typically used with send and receive activities to communicate between processes. Send and receive activities use correlations to make sure that incoming messages are properly correlated with the right process instances at run time.

Let's explore with a simple use case how we can use correlation with send and receive activities to design processes that communicate with each other. Suppose we configure two processes: Order process and Vendor process. The Order process initiates order for an item. It calls the Vendor process to check if the ordered item is available and gets a quote for the item. If the ordered item is available in the vendor's inventory, then the Vendor process sends a message to the Order process with a quote for the item. To ensure that the response sent by the called process is received by the correct calling process instance, correlation is set up.

Overview of the flow:
  • When the Order process is started, the correlation key with the order id is initialized. The order id is a data object of the Order process. The engine will store the key for that instance of the Order process.
  • The Order process uses a Send activity to send the order id to the Vendor process.
  • The Vendor process uses a Send activity to callback with the order id.
  • A Receive activity in the Order process checks if the order id that was sent by the Vendor process matches the correlation key that was initialized when the Order process instance was started. If the order id matches the correlation key then that confirms that the response received by the Order process instance is from the corresponding Vendor process instance that was called.
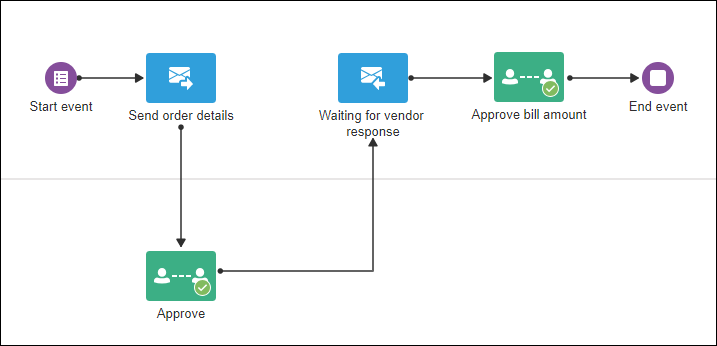
  1. Create the Order process with the following activities:
    • a form start event (Start event)
    • a send activity (Send order details)
    • an approve human task activity (Approve)
    • a receive activity (Waiting for vendor response)
    • a second approve human task activity (Approve bill amount)
    • an end event (End event)

    Description of cor-order-process.png follows
    Description of the illustration cor-order-process.png

  2. Create the Vendor process with the following activities:
    • a message start event (Start vendor process)
    • a submit human task activity (Provide quote)
    • a send activity (Send confirmation)
    • an end event (End event)

    Description of cor-vendor-process.png follows
    Description of the illustration cor-vendor-process.png

  3. Implement a start form for the form start event in the Order process.

    The form should have at least two fields: Order Id and Description. When you add these two fields in the form, notice that two data objects orderId and description get listed under the Data section in the properties pane of the form.

    You can implement the same form but with different presentations in the Approve and Approve bill amount activities.

  4. Define input arguments for the message start event in the Vendor process.

    Open the properties pane of the message start event (Start vendor process) to specify the input arguments. Define two input arguments: order_id and desc.

    Description of cor-vendor-start.png follows
    Description of the illustration cor-vendor-start.png

  5. Use the send activity in the Order process to call the Vendor process.
    1. Open the properties pane of the send activity (Send order details).
    2. In the Type drop-down field, choose Process call.
    3. In the Process drop-down field, select the Vendor process.
    4. In the Target node drop-down field, choose the message start event (Start vendor process) of the Vendor process.
  6. Define data associations in the Order process' send activity (Send order details) to map orderId and description to order_id and desc.
    • orderId and description are the start form's data objects.
    • order_id and desc are the message start events input arguments.
    Description of cor-order-da-send.png follows
    Description of the illustration cor-order-da-send.png
  7. Define input arguments that you want to receive in the callback from the Vendor process.
    1. Open the properties pane of the receive activity (Waiting for vendor response) in the Order process.
    2. In the Type drop-down field, select Define interface as the implementation type.
    3. In the Operation name field, define the operation: waitingForVendorResponse.
    4. Under Arguments Definition, define the input arguments: orderid and quote.
  8. Implement correlation in the receive activity of the Order process so that the response message from the Vendor process is mapped to the correct Order process instance.
    1. Open the properties pane of the receive activity (Waiting for vendor response) in the Order process.
    2. Define the correlation key.
      1. Under the Correlation section, click the arrow > next to Key.
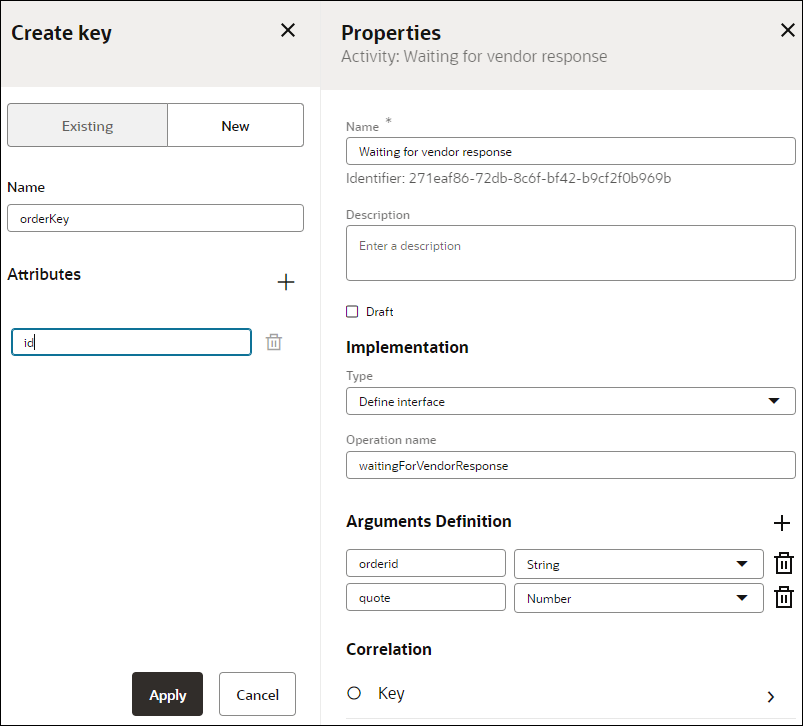
      2. In the resulting Create key pane, click the New tab.
      3. In the Name field, enter a name for the key (orderKey).
      4. Add a property id to the key. Enter id in the Attributes field.

        Description of cor-create-key.png follows
        Description of the illustration cor-create-key.png

        If required, you can add more than one property to the key. Use + to add more properties.

      5. Click Apply.

      A green check mark next to Key indicates that the correlation key has been defined.

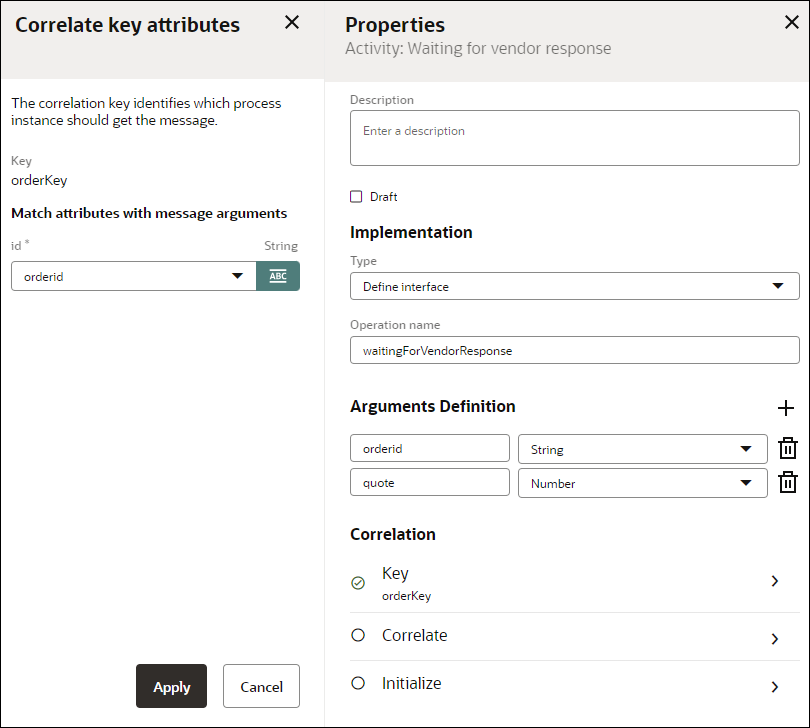
    3. Correlate or match the correlation key to the input argument that will be received from the Vendor process in its response message. In our example, we'll match id (the attribute of the correlation key) to the input argument attribute orderid.
      1. Click the arrow > next to Correlate.
      2. In the resulting Correlate key attributes pane, switch to literal mode in the drop-down field, and choose orderid from the list.

        Description of cor-correlate.png follows
        Description of the illustration cor-correlate.png

      3. Click Apply.

      A green check mark next to Correlate and id: orderid indicates that the key has been correlated.

    4. Initialize the correlation key.
      1. Click the arrow > next to Initialize.
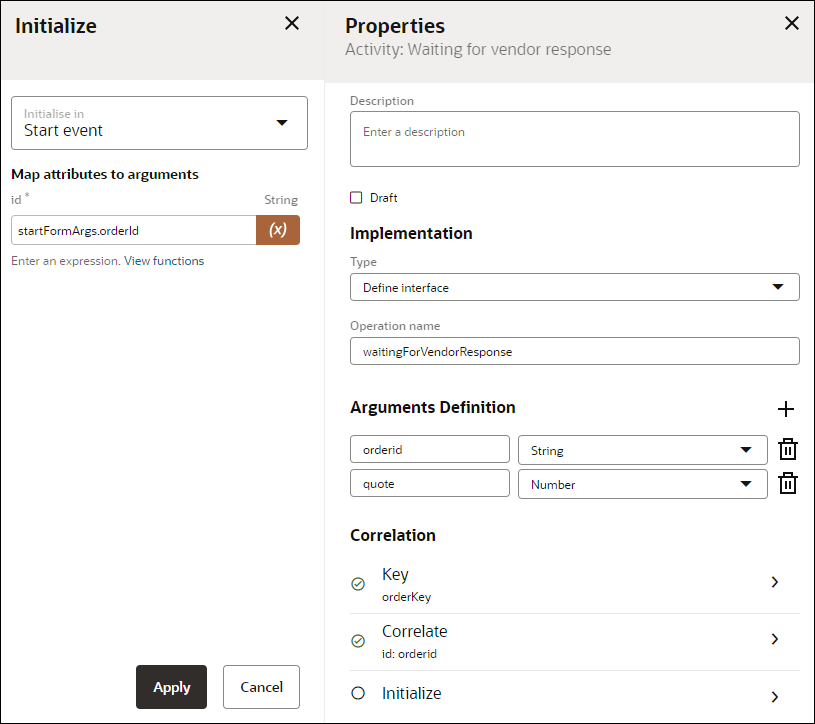
      2. In the resulting Initialize pane, choose Start event in the Initialize in drop-down field.
      3. Under Map attributes to arguments, map the correlation key property id to the start form's data object orderId. Use the expression mode to form the expression startFormArgs.orderId in the given field.

        Description of cor-initialize.png follows
        Description of the illustration cor-initialize.png

      4. Click Apply.

      When we initialize the key in the start activity, we assign a value to the correlation key. The value comes from the form's data object orderId.

  9. Implement a form for the submit human task activity (Provide quote) in the Vendor process.
    This form should have at least the following fields: Order Id and Quote amount.
  10. Define data association for the message start activity (Start vendor process) in the Vendor process, so that order_id is mapped to the submit form's data object orderId. This ensures that the order id value is passed into the submit activity (Provide quote) of the Vendor process.
  11. Use the send activity in the Vendor process to callback the Order process.
    1. Open the properties pane of the send activity (Send confirmation).
    2. In the Type drop-down field, choose Process call.
    3. In the Process drop-down field, select the Order process.
    4. In the Target node drop-down field, choose the receive activity (Waiting for vendor response).
  12. Define data associations in the send activity (Send confirmation) of the Vendor process to map the orderId and quoteamount from the Vendor process to the input arguments orderid and quote. Optionally, you can also map the process input order_id to orderid instead of the form data object orderId.

    Description of cor-vendor-da-send.png follows
    Description of the illustration cor-vendor-da-send.png

    This ensures that the correlation key value matches the value in the orderid input argument and the quote amount for the requested item is passed onto the correct Order process instance.

Now that the processes are set up, you can activate and test the process application in Workspace. Track the running of the Order and Vendor process instances from the Tracking page, and check if the response message from the Vendor process instance is received by the corresponding Order process instance. See Track Processes.