Execute Loops in Events

Use loops within Events in form controls to execute actions that need to iterate. The iterator can be a number or an array. Loops are a way to execute the same action multiple times in a form.

Let us explore with some examples how loops work in forms.
Example of a Simple Loop

In this example, let us add multiple rows to a table by configuring a simple loop with a number iterator.
  1. Drag and drop a table control onto your form’s canvas. Then drag and drop an InputText control in the table’s column.
  2. Select the table control, and in the properties pane that displays scroll down till you find Events. Click Add to configure an event for the control.
  3. Select On Load from the drop-down list, and then click the editing icon.
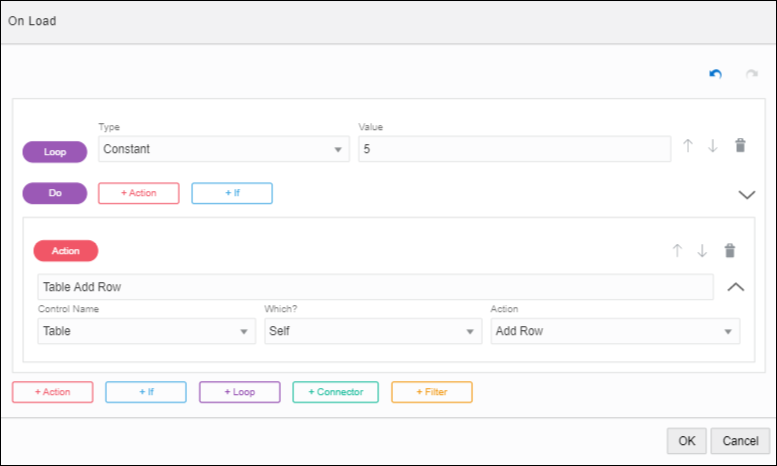
  4. In the event On Load window, click Loop. Select Constant in the Type drop-down list, and enter a number in the Value field, for example: 5. This value determines the number of times looping occurs when the form loads.
  5. Click +Actions. In the Control drop-down list select Table, and in the Action drop-down list select Add Row.

    Description of loop-example1.png follows
    Description of the illustration loop-example1.png

    When the loop executes (on form load), the Add Row action gets executed 5 times.

  6. Click OK.
  7. Preview the form and see how it works.

Note that 5 rows get added to the table as the form loads.

To see how the loop executed, click Log in the Preview window.

.

Example of a Loop with an Array

In this example, let us configure a loop with an array of strings.
  1. Drag and drop a table control onto your form’s canvas. Then drag and drop an InputText control into the table’s column.
  2. Select the table control, and in the properties pane scroll down till you find Events. Click Add to configure an event.
  3. Select On Load from the drop-down list, and then click the editing icon.
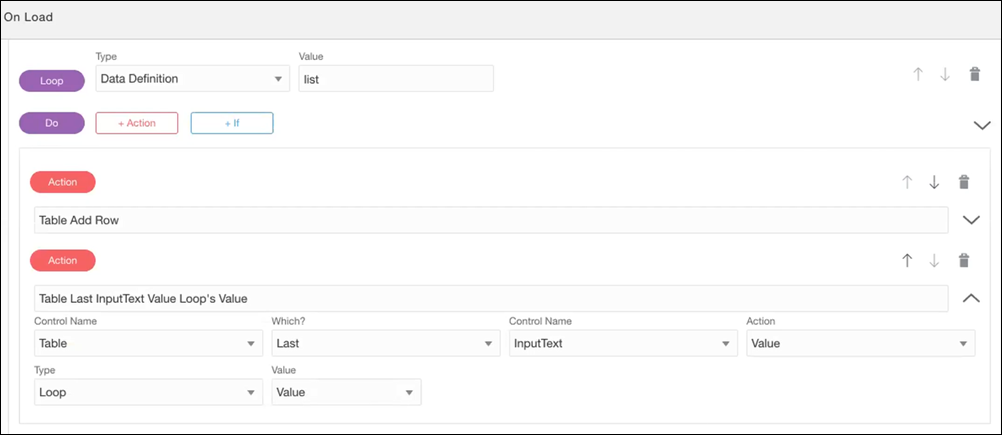
  4. In the event On Load window, click Loop. Select the type as Data Definition in the Type drop-down list, and enter the value as list in the Value field.

    Note that list is already defined as an array of strings.

  5. Click +Actions. From the Control drop-down list, select Table. From the Action drop-down list, select Add Row.
  6. Configure another action. Click +Actions.
    1. Select Table in the Control Name drop-down list, and specify Last in the Which? field.
    2. In the Control Name that displays, select InputText, and then select Value in the Action drop-down list.
    3. In the Type field that displays, select Loop, and then select Value from the Value drop-down list.

      Description of loop-example2.png follows
      Description of the illustration loop-example2.png

      Note that the Loop type can have three options as value.

      • Index: 0-based index of the iteration (0, 1, 2, 3...)
      • Position: 1-based index of the iteration (1, 2, 3, 4...)
      • Value: The value of the current iteration. If the iterator is a number, this value will be same as Index.
  7. Click OK.
  8. Preview the form and see how the loop works.
    1. In the Preview window, click Reload with Payload.
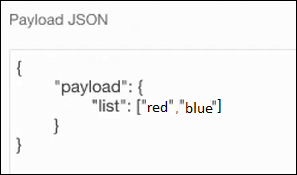
    2. In the Custom Payload window, specify an array, and click OK.
    3. You can see that the loop executes with the specified array.

      On form load, the table displays two rows with the values (red, blue) specified in the array.