Work with Roles in Designer

Learn about working with roles in Process Automation Designer.

Create an Application or Global Role

In Designer, you can create and define a role such as set it's scope as either application or global, assign users/groups, and add permissions.

  1. In Designer, open a process application.
  2. Click Add in the upper corner. The Add component pane appears.
  3. Expand Roles, and click New.
  4. Under Create role options, complete these fields. Note that these entries can’t be changed later.
    • Title: Enter a name that describes who is assigned the role or what they can do (for example, Subscriber or Approver).

    • Identifier: You can leave this unique identifier that’s created for you, or change it. You can’t change this identifier later.

    • Scope: Choose Application to use the role in this application only. Choose Global to allow this role to be used in other applications.

  5. Click Create. The role is created.
  6. Open the role from the Roles tab.
  7. Assign users, groups and/or external applications to the role.
    1. In the Category field, select Users, Groups, or External applications from the drop-down list.
      The search field displays the appropriate text depending on the category that you selected.
    2. Click the search field, a list of available users, groups, or external applications are displayed.
    3. Select the user, group, or external application to add it to the role. The selected user, group, or external application gets listed on the roles page indicating that it has been assigned to the role.

    You can assign a combination of users, groups, and external applications to a role. Process Automation Administrators can also select users, groups, external applications later in Workspace to add to the role.

  8. Under Choose permission, choose a level. The default is Use.
    Permission Allows Users to... Example Use

    Inspect

    List resources, but not read them

    Allow a user to review of a list of pending tasks without going into individual tasks and seeing their details.

    Read

    View resource details, but not edit them

    • View details for tasks and structured and dynamic processes, including attachments and comments

    • View structured and dynamic process definitions and task audits.

    Use

    Perform actions on resources

    • Start a structured and dynamic process instance.

    • Complete an activity.

    Manage

    All the above plus delete processes, withdraw, release or reassign tasks, alter the flow of a process, and view as well as work on analytics data of instances.

    • Withdraw, reassign, or release tasks

    • Terminate structured or dynamic processes

    You can now use the role in structured and dynamic processes. See:

Link a Global Role to Your Application

You can link to a global role instead of creating a new one for an application. Linking means finding an existing global role and bringing it into your application to use in a structured or dynamic process, or to define permissions for this application.

Note that a global role must be activated (exist in an application that’s been activated) or created in Workspace to be available for linking.
  1. In Designer, open a process application.
  2. Click Add in the upper corner. The Add component pane appears.
  3. Expand Roles, and click Global.
  4. Under Link role options, click the Search field. Search for and select a global role to use in your application.
  5. Click Link.
    The role is added to your application. You can now use it in structured and dynamic processes, or to define permissions for this application. Process AutomationAdministrators can change the global role’s users and groups, and permissions in Workspace.

Assign Roles to User Tasks in Structured Processes

When selecting assignees for user tasks, you have multiple options. When the task executes, users’ assigned tasks display under My Tasks in Workspace.

You can select assignees based on:
  • The role assigned to the swimlane
  • The selected assignee (user, role, or expression)
To select an assignee:
  1. In Designer, open a process application.
  2. In a structured process, open the Properties pane of an activity and make a selection in the Select Participants field.
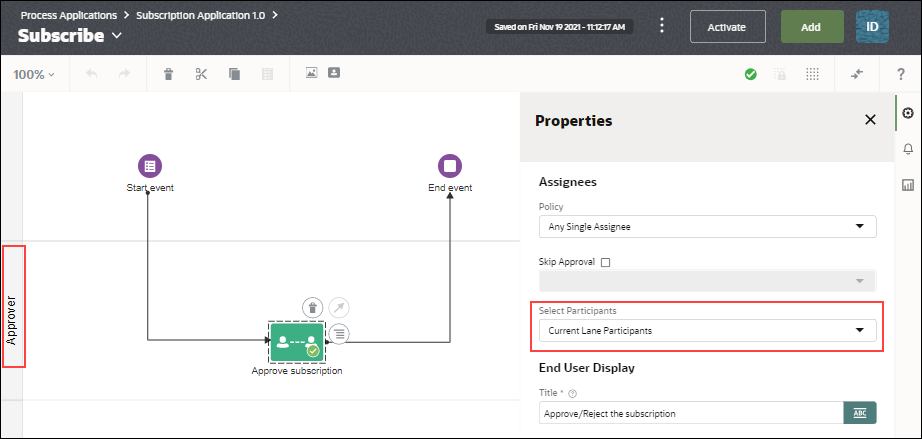
    1. Choose Current Lane Participants to assign based on the swimlane’s role.

      In the example below, users or groups assigned to the Approver role will be assigned the Approve subscription task.

      Description of roles-sp.png follows
      Description of the illustration roles-sp.png
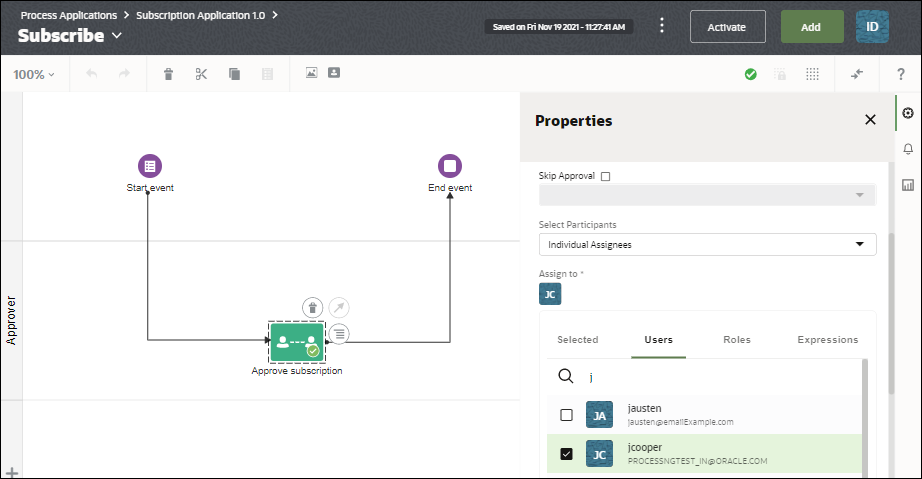
    2. Choose Individual Assignee under Assignees to select a specific assignee. Click Assign to, then choose a role, roles, or expression. Use the search field to search for specific user or role.

      In the example below, the user jcooper is assigned to the Approve subscription task.

      Description of roles-sp-assignee.png follows
      Description of the illustration roles-sp-assignee.png

Assign Roles to User Tasks in Dynamic Processes

When selecting assignees for user tasks, you can select a local or global role. When tasks execute in runtime, users’ assigned tasks display under My Tasks in Workspace.

Note that you can also assign a task directly to a specific user on the Users tab, or use an expression to specify the user.
  1. In Designer, open a process application.
  2. In a dynamic process, add or open a human task activity and edit its properties.
  3. In the Properties pane, click Assign to under Assignees.
  4. Click the Roles tab and select a local or global role for the task.
    Note that tasks assigned to a role display under Team Tasks in Workspace. Task directly assigned (single-user assignment) display under My Tasks.

Enable Users to Start Your Application

A process application starts when its structured or dynamic process starts. Typically, a process starts by a user who selects the process under Start Requests in Workspace, and submits an associated form. In the process start, enable users to start the application.

When specifying who can start the process, you can specify:

  • All users and external applications

    This setting enables any authenticated user who can access Workspace or a Process Automation embeddable component (snippet) can start the process.

  • Role members with at least Use permission

    To assign a role's permissions, see Create an Application or Global Role.

To specify who can start the process:

  1. In Designer, open a process application.
  2. Create or open a process.
    An application can start with a structured or dynamic process.
  3. Open the process start properties.
    1. In a structured process, drag a Form Start or a Message Start activity onto the canvas as the process start. Select the start event and choose Open Properties.
    2. In a dynamic process, click Start Process at the top of the canvas.
  4. Select who can start the process.
    1. In a structured process, select from the Who can start the process? field of the Properties pane.
    2. In a dynamic process, select from the Who can start the process? field in the Start Process dialog.
    In either type of process, select one of these options:
    • Role members with at least Use permission Allows any user assigned a role with Use or Manage permission to see and start the application. Note that in a structured process, a user does not need to be assigned to the swimlane to start the process.

    • All users and external applications Allows any user or external application with access to Process Automation to see and start the application.

Remove Roles in Designer

You can remove a role if it is no longer needed in your application. Removing a role removes it from any dynamic or structured processes in which it is used.

Removing a role is different for application versus global roles:
  • You delete an application role from your application.
  • You unlink a global role from your application. The global role can still be used in other applications. Global roles must be deleted by Process Automation Administrators in Workspace.
To remove a role:
  1. In Designer, open a process application.
  2. Select the Roles tab. If you have application and global roles, notice that their icons are different.
  3. Click menu for the role you want to remove, and choose Delete (for an application role) or Unlink (for a global role).
  4. Confirm that you want to remove the role.
    The role is removed.