Set Up and Administer Oracle Sales Accelerator
Introduction
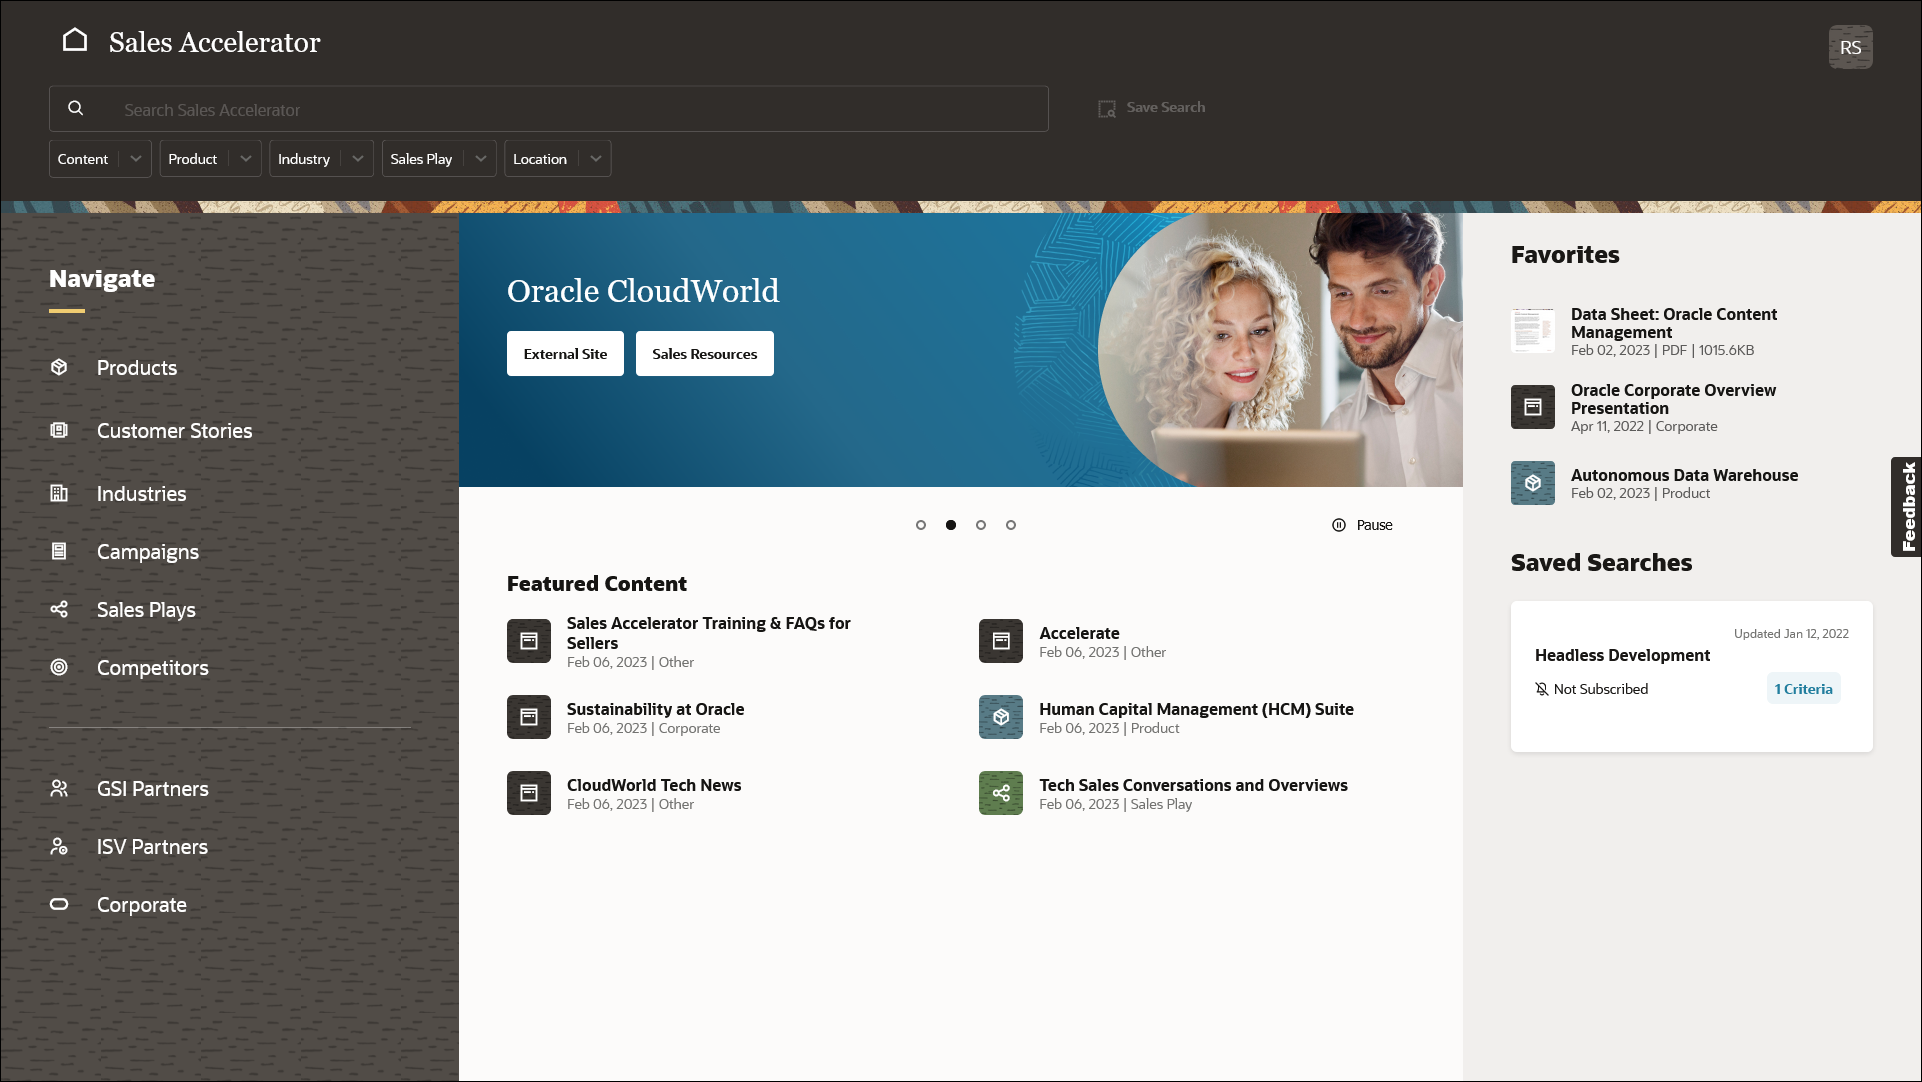
Oracle Sales Accelerator provides a one-stop shop for sales enablement content. It allows sales teams to readily view a wide variety of information and resources that make selling your products and services easier. Assigned contributors can upload and publish new assets, manage pages and assets, and customize the view experience for sellers.
Oracle Sales Accelerator is an application built on top of Oracle Content Management, taking advantage of its extensive asset management capabilities and robust access control.
Purchase Oracle Sales Accelerator
Oracle Sales Accelerator is currently available to Oracle SaaS customers. To purchase an Oracle Sales Accelerator subscription, contact your sales representative.
URLs and Login Information
After purchasing and setting up Oracle Sales Accelerator, you’ll receive two welcome emails: one for Oracle Content Management and another for Oracle Sales Accelerator. Each of these emails includes the instance URLs and your administrator login credentials. Save this information as you’ll need it to set up and access Oracle Sales Accelerator and its backend Oracle Content Management instance.
When you roll out Oracle Sales Accelerator to your sales teams, your users will also need the Oracle Sales Accelerator URL and their login information. They’ll receive separate welcome emails for each Sales Accelerator role they’ve been assigned.
Supported Web Browsers
Oracle Sales Accelerator supports recent versions of these web browsers:
- Google Chrome
- Firefox
- Microsoft Edge
- Safari on Mac
Application Roles
What users can do in Sales Accelerator depends on the application role(s) that they’ve been assigned. You assign user privileges while adding them to Sales Accelerator. Users may need several roles to perform all their tasks in Sales Accelerator.
| Task | Application Admin (SAAdmin) |
Viewer (SAUser) |
Contributor (SAContributor) |
Content Admin (SAContentAdmin) |
Report Admin (SAReports) |
|---|---|---|---|---|---|
| Set up the Oracle Sales Accelerator application | |||||
| Customize content categories (taxonomies) | |||||
| Customize content types | |||||
| Configure Sales Accelerator | |||||
| Add and assign users | |||||
| Configure Oracle Content Management | |||||
| Change the branding | |||||
| Configure user dimensions | |||||
| View published content | |||||
| View unpublished content | Only content that you own yourself. |
Also content owned by other people. |
|||
| View content properties and analytics | |||||
| Create assets and pages | |||||
| Manage your own assets and pages (edit, publish, deactivate) | |||||
| Manage other people’s assets (edit, publish, deactivate) | |||||
| Update assets in bulk | |||||
| Configure home pages | |||||
| View system-wide analytics and reports |
User Groups
User groups allow you to manage access privileges for users collectively rather than individually. While setting up Sales Accelerator, you create user groups in your identity domain (either IAM or IDCS). It’s recommended that you create different user groups for each of the application roles. You can name the user groups whatever you want, but it might be good to use meaningful names for Sales Accelerator, for example by starting them with ‘SA’. After creating a group, you’ll need to assign roles to the group, which will then automatically be given to all users who are part of the group.
Admin group—Users in this group can modify the overall application configuration and manage user access. They’ll see the Administration option in their user menu. Your Sales Accelerator environment will typically only have a very limited number of users in this group.
Assign these application roles to this group: CECEnterpriseUser, CECServiceAdministrator, SAUser, SAContributor, SAAdmin.
This tutorial mostly focuses on what these users can do.Content administrator group—Users in this group help with content administration and maintenance. They can access and manage all content in Sales Accelerator, including content that they don’t own themselves. In addition, they can modify the Sales Accelerator home page and also update asset metadata and taxonomy values in bulk.
Assign these application roles to this group: CECEnterpriseUser, SAUser, SAContributor, SAContentAdmin.
See Manage Content in Oracle Sales Accelerator for details on what these users can do in Sales Accelerator.Report administrator group—Users in this group can access system-wide usage analytics for all content in Sales Accelerator, including content that they don’t own themselves. They’ll see the Analytics and Reports option in their user menu.
Assign these application roles to this group: CECEnterpriseUser, SAUser, SAContributor, SAReports.
See View Analytics and Reports for details on what these users can do in Sales Accelerator.Contributor group—Users in this group can add and manage assets and pages in Sales Accelerator. They’ll see the Create Content option in their user menu.
Assign these application roles to this group: CECEnterpriseUser, SAUser, SAContributor.
See Manage Content in Oracle Sales Accelerator for details on what these users can do in Sales Accelerator.Viewer group—Users in this group can find and view content in Sales Accelerator with read-only access (search, browse, filter, view, and download).
Assign the SAUser application role to this group. Every Sales Accelerator user should be assigned this role.
See Use Oracle Sales Accelerator for details on what these users can do in Sales Accelerator.
To make someone a ‘super-administrator’, give them all application roles for Sales Accelerator.
View Modes
Users can access Oracle Sales Accelerator in different view modes:
As the system administrator, you add users and assign application roles to users that determine which view mode(s) they have access to. All users can view content, but they need special contributor privileges to manage content and pages in the system.
Seller View
Most users will access Sales Accelerator in seller view, which allows them to access sales enablement information and resources in Sales Accelerator that make selling products or services easier. They search for content, navigate to content, filter content, view assets and pages, share assets, and more.
If users are in seller view, they can’t add new assets or manage pages in the system. To do that, they need to be in contributor view.
See Use Oracle Sales Accelerator for full details on what users can do in seller view.
Partner View
Partner view is basically like seller view, but what users can see is limited to content whose visibility is set to ‘Partner and internal’ and ‘Public’. Partners won’t see any content marked as ‘Internal only’. This allows content contributors to make some content available to people outside the organization, but restrict access to confidential information and other content not intended for third parties.
Partner view limits content access in the following ways:
- The user menu for partners is limited to My Content, Help, and Sign Out.
- Partners can only find and view assets and pages whose visibility has been set to ‘Public’ or ‘Partner and Internal’. Anything set to ‘Internal only’ won’t be available to them.
- On pages, partners won’t see any content that’s not available to them.
- Partners can only see the categories in the navigation menu which have content that’s available to them.
- Partners don’t have access to customer stories, competitor information, and analyst reports.
- Partners can’t filter content by asset type and visibility.
- Partners can’t download analytics reports for assets and pages.
- Partners may see a different home page than other users. This is configured by content administrators.
Contributors can restrict the visibility of assets and pages for partners by setting them to ‘internal only’. That essentially makes the items invisible to partners on pages and in searches.
The table below shows content visibility to partners for a number of scenarios.
| Page | Page Section | Asset | Partner View |
|---|---|---|---|
| Internal Only | Internal Only | Internal Only | The page, page section, and asset aren’t visible to partners. |
| Internal Only | Internal Only | Partner and Internal / Public | The page and page section aren’t visible to partners. The asset will appear via search. |
| Internal Only | Partner and Internal | Internal Only | The page and asset aren’t visible to partners. Also, the page section isn’t visible to partners, since the page isn’t tagged as Partner and Internal. |
| Internal Only | Partner and Internal | Partner and Internal / Public | The page isn’t visible to partners. Also, the page section isn’t visible to partners, since the page isn’t tagged as Partner and Internal. The asset will appear in searches. |
| Partner and Internal | Internal Only | Internal Only | The page is visible to partners via navigation and search. The page section and asset aren’t visible to partners. |
| Partner and Internal | Internal Only | Partner and Internal / Public | The page and asset are visible to partners via navigation and search. The page section isn’t visible to partners. |
| Partner and Internal | Partner and Internal | Internal Only | The page and page section are visible to partners. The asset isn’t visible to partners. |
| Partner and Internal | Partner and Internal | Partner and Internal / Public | The page, page section, and asset are visible to partners. |
See Manage Content in Oracle Sales Accelerator for full details on what users can do in partner view.
Contributor View
If users are assigned the contributor role, they can manage content in Sales Accelerator, including:
- create, publish, and edit assets
- create, publish, and edit pages
- view asset and page properties and analytics
- deactivate assets and pages, and more.
There will typically only be a limited number of contributors compared to other users in Sales Accelerator.
See Manage Content in Oracle Sales Accelerator for full details on what users can do as contributors and content administrators.
Deployment Process
The deployment process for Oracle Sales Accelerator consists of these tasks:
- Set up the Oracle Sales Accelerator application
- Customize content categories (taxonomies)
- Customize content types
- Configure Sales Accelerator
- Perform advanced configuration tasks (if necessary)
- Add and assign users
- Configure Oracle Content Management
- Roll out Oracle Sales Accelerator to your users
It’s recommended that you don’t add and assign any users until you’ve completed setting up and customizing Oracle Sales Accelerator. Otherwise users might have access to an environment that’s not ready for use.
Once Oracle Sales Accelerator has been deployed and is in full use, you may want to monitor its usage and view analytics and reports.
Administration Environments
You perform the various deployment and administration tasks in different places:
| Task | Performed In… |
|---|---|
| Set up the Oracle Sales Accelerator application | Oracle Cloud Console |
| Customize content categories (taxonomies) | Oracle Content Management |
| Customize content types | Oracle Sales Accelerator |
| Configure Sales Accelerator | Oracle Sales Accelerator |
| Add and assign users | Oracle Cloud Console |
| Configure Oracle Content Management | Oracle Content Management |
| Configure user dimensions | Oracle Sales Accelerator |
| View analytics and reports | Oracle Sales Accelerator |
Set Up the Oracle Sales Accelerator Application
To get started with Oracle Sales Accelerator, you first need to create an Oracle Content Management instance for use with Oracle Sales Accelerator. This instance is used as the backend content storage and management environment for Oracle Sales Accelerator.
Oracle Sales Accelerator automatically comes with an Oracle Content Management license, which allows you to set up and use Oracle Sales Accelerator.
For full details on creating an Oracle Content Management instance, see Administering Oracle Content Management.
Sign in to your Oracle Cloud account as a cloud administrator. Make sure to use the tenancy where you want to set up Oracle Sales Accelerator. If necessary, change the region where you want to set up the instance (in the top right corner).
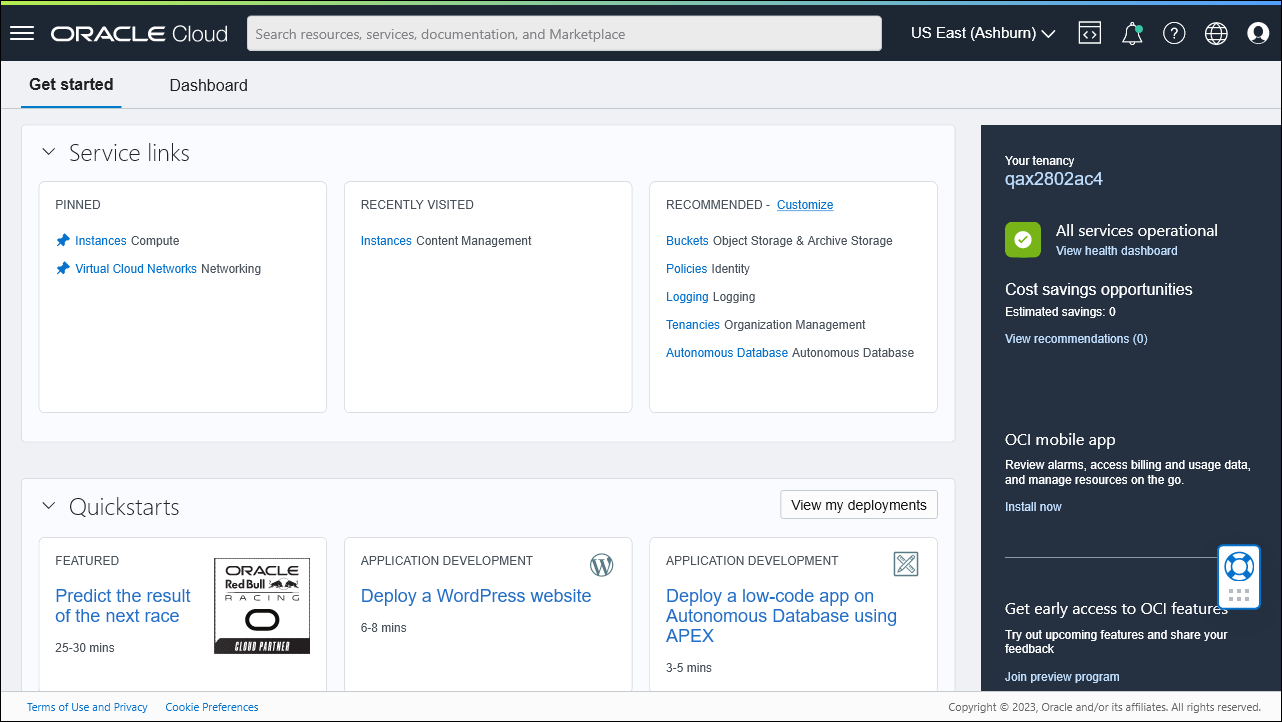
Click
 to open the navigation menu, click Developer Services, and then, under Content Management, click Instances. This opens the Oracle Content Management page.
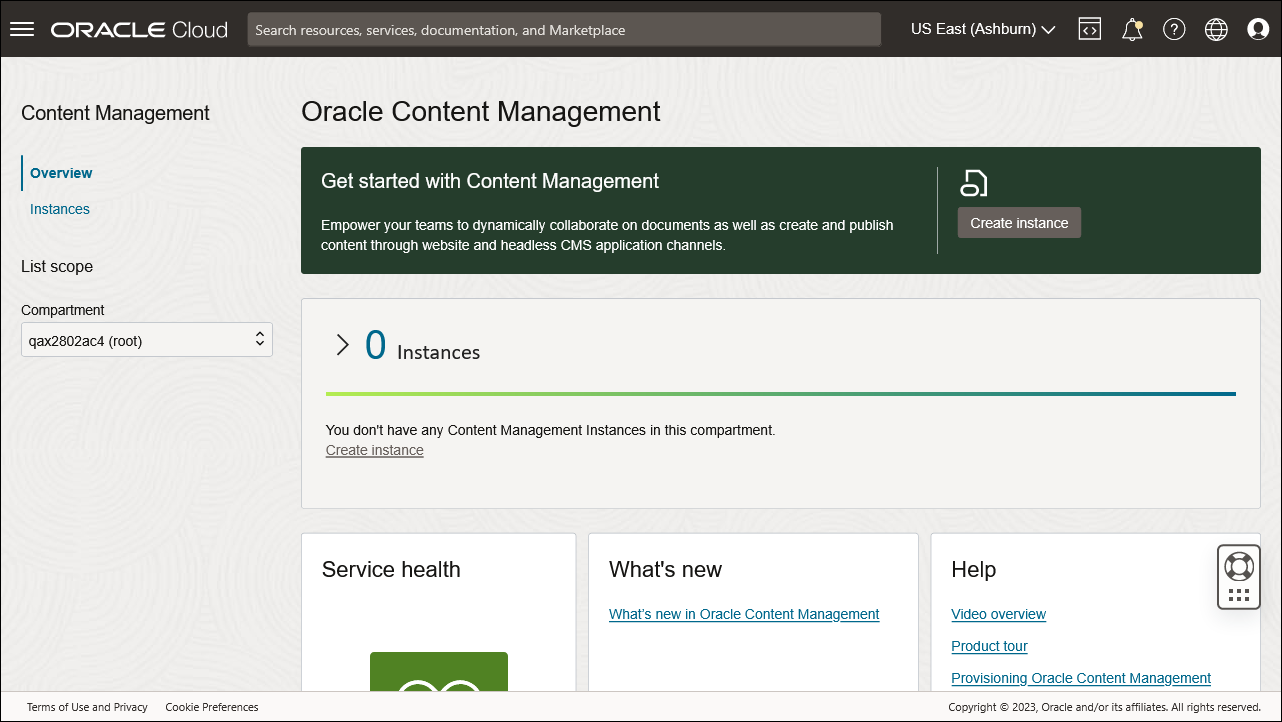
In the Compartment menu on the left, select the compartment where you want to create your Oracle Content Management instance for Oracle Sales Accelerator. It’s recommended that you don’t use the root compartment. If necessary, create a compartment first.
Click Create instance. This opens the Create Oracle Content Management Instance panel.
Provide an instance name and, optionally, a description. Make sure the correct (non-root) compartment is selected and provide an email address where notifications will be sent to.
Choose Premium edition as the license type and select Sales Accelerator as a license option.
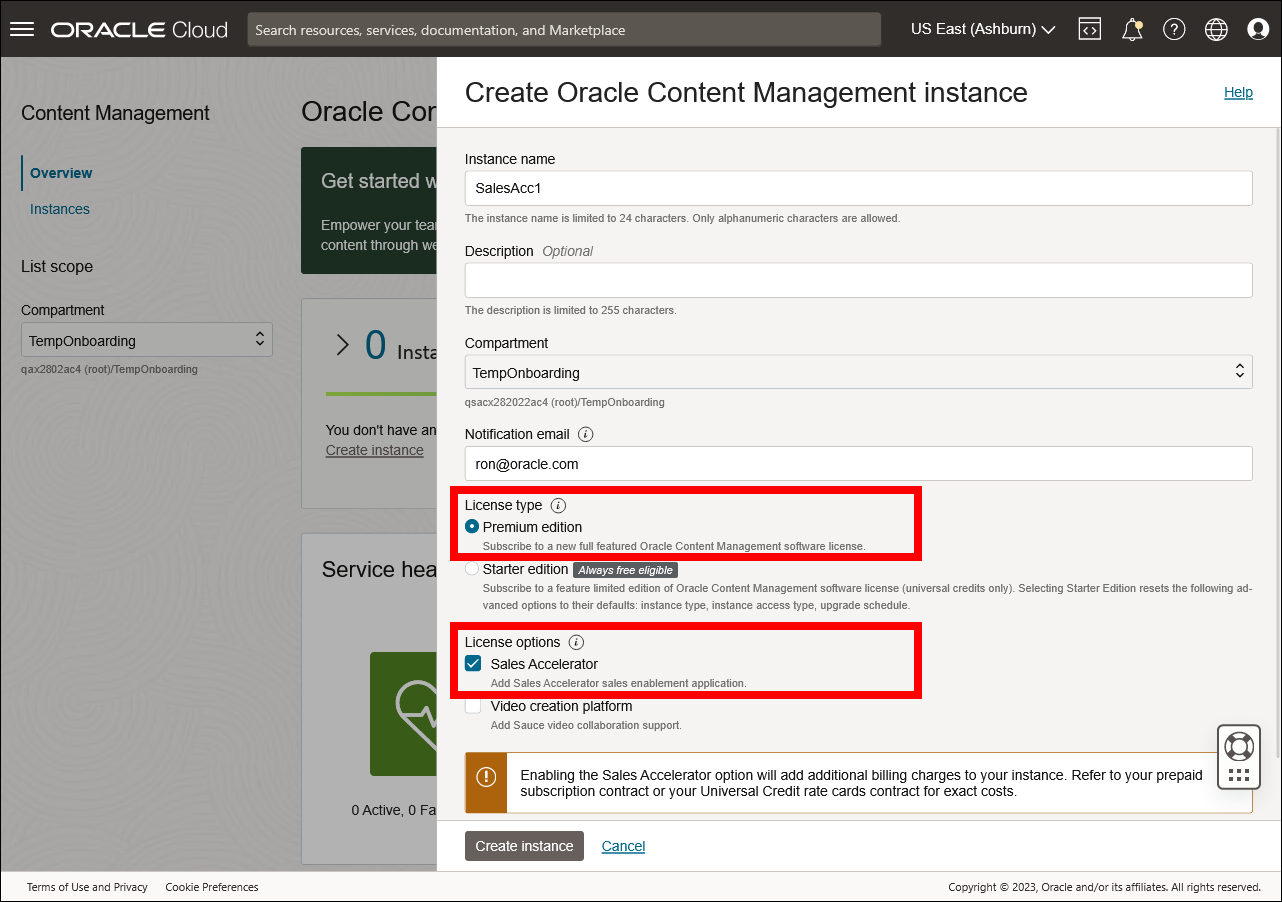
When you’re ready, click Create instance.
If you’re logged in as an unfederated user, you need to create an access token before you can create an Oracle Content Management instance.
The Oracle Content Management instance is now provisioned, including the required Sales Accelerator repository and resources (publishing channel, taxonomies, asset types, and so on). This may take some time, so please be patient. While the system is being provisioned, its status will show that:

After the system has been provisioned, its status changes to ‘Active’:

You’ll receive two welcome emails: one for Oracle Content Management and one for Oracle Sales Accelerator. These emails contain important information that you’ll need to set up and access Sales Accelerator, including URL and login credentials, so make sure to keep these emails for future reference.
You can also edit an existing Oracle Content Management instance to enable Oracle Sales Accelerator. Be aware, though, that if you disable Sales Accelerator on an existing Oracle Content Management instance, all associated assets and content will also be removed from that instance.
After provisioning Sales Accelerator, you’ll have an empty instance that you can configure and customize to suit your needs.
Customize Content Categories
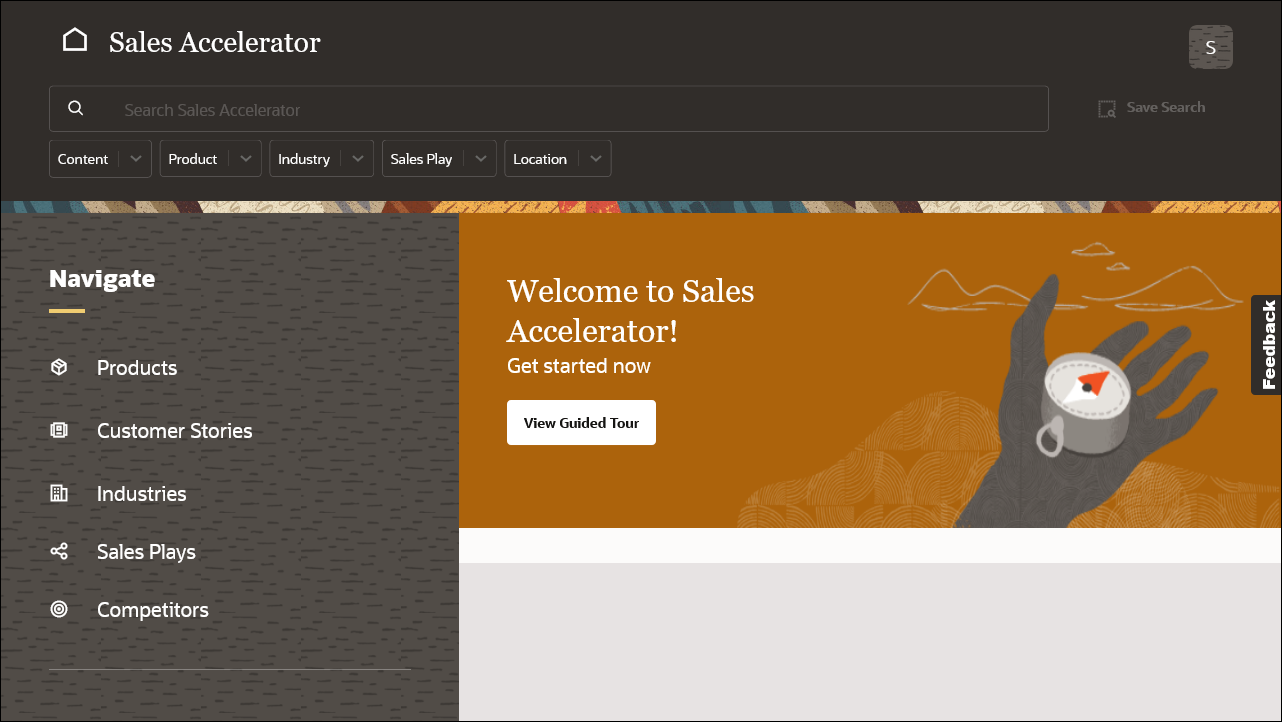
Oracle Sales Accelerator comes with a predefined content model that’s based on taxonomies. You can’t change the overall content model, but you can customize how your content is categorized, which will help your sales teams find the content they want. This is done by modifying taxonomy values in Oracle Content Management to suit your specific needs.
Important! Carefully consider your content categorization (taxonomy values), as they’re critical in your users’ ability to find the sales enablement content they need.
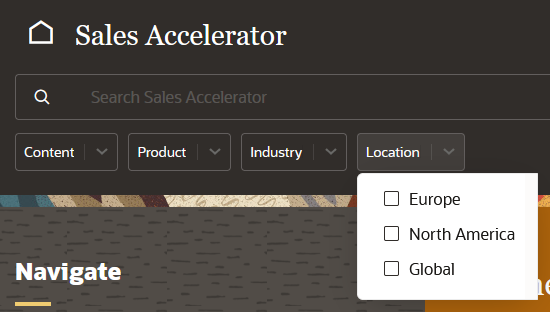
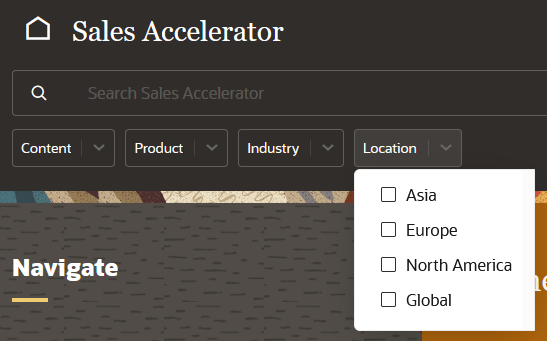
For example, there’s a predefined taxonomy called ‘SA-Location (LOC)’, which defines how users can filter content in Sales Accelerator by location. Add or change the categories of this taxonomy to show the locations suited to your needs.
To customize taxonomy values:
Log in to Oracle Content Management as an application administrator. (You can use the link in your welcome email.)
Open the left navigation menu and click Content under Administration.
If you don’t see the Content option, then you don’t have the required user privileges.Choose Taxonomies from the dropdown menu in the page header. You’ll see a list of all predefined taxonomies associated with Oracle Sales Accelerator.
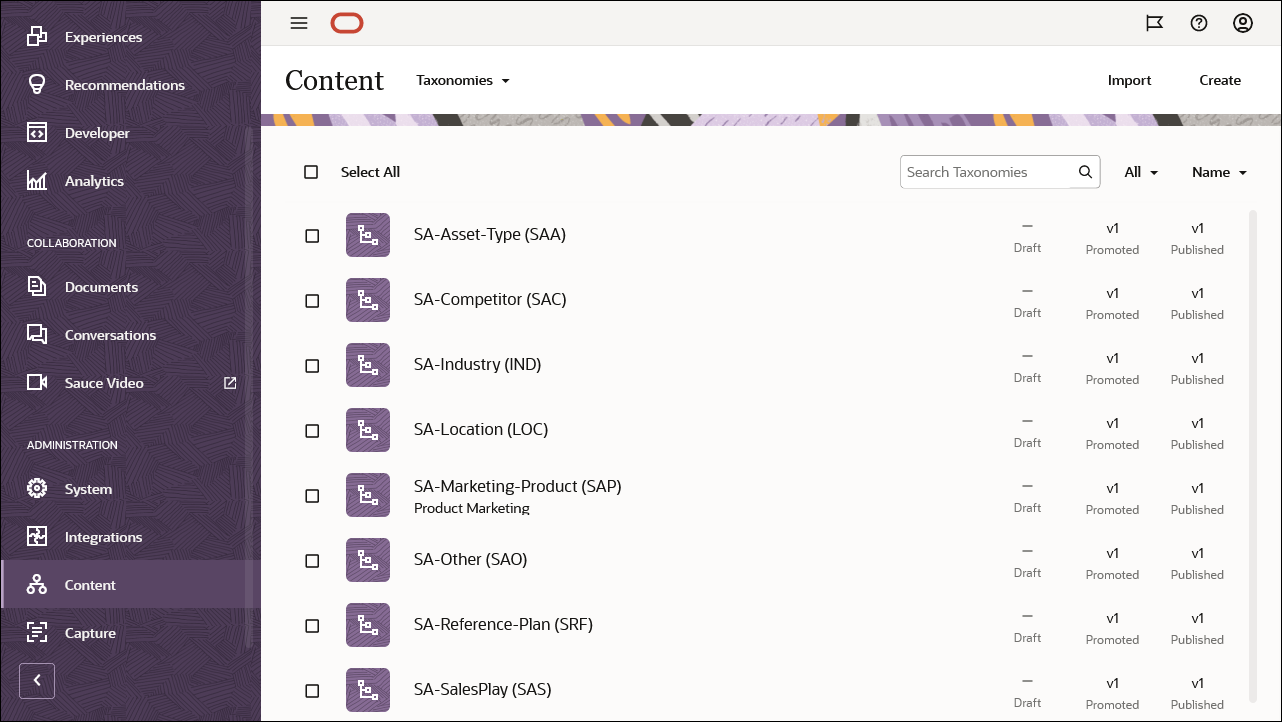
Select the taxonomy for which you want to add or modify values, and click Edit in the actions bar.
To add a new value, click Add Category and enter a name and API name for the new value. The API name is used internally to reference the taxonomy value, but it’s recommended that you give it a meaningful name. If you want, you can also add child categories to create a hierarchy of filters.
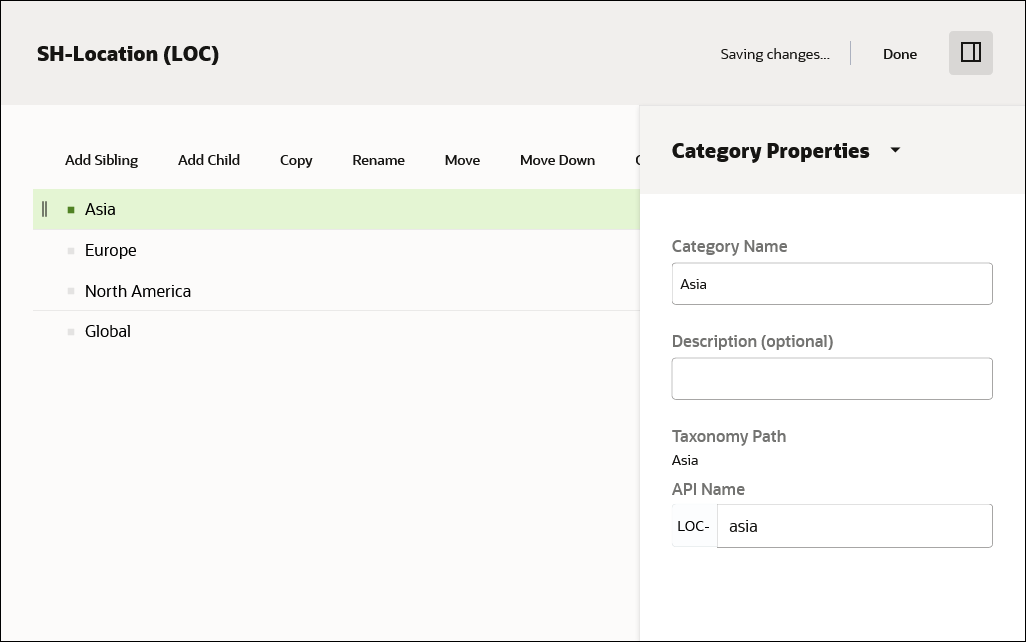
To edit an existing value, click
 for the appropriate taxonomy value and modify it as needed.
Click Done in the top right corner when you’re done.
The updated taxonomy values won’t be available in Sales Accelerator until you promote and publish the taxonomy:
- Select the taxonomy in the list.
- Click Promote in the actions bar, confirm the action, and then click the Promote button. This makes the updated taxonomy available for use in your Sales Accelerator asset repository.
- Click Publish in the actions bar. Make sure the publishing channel is set to ‘Sales Accelerator’, confirm the action, and then click the Publish button. This makes the updated taxonomy available through the Content Delivery API.
The Oracle Sales Accelerator user interface now shows the updated taxonomy values. (You may need to clear your web browser cache and/or log out and back in to see the changes.)
Repeat this process for all taxonomies to customize the environment to your needs.
These are the predefined taxonomies that come with Oracle Sales Accelerator:
| Taxonomy | Purpose |
|---|---|
| SA-Asset-Type (SAA) | Defines the available values for the Asset Type filter for assets. Some typical values could be ‘Data Sheet’, ‘Customer Presentation, or ’Analyst Report’. |
| SA-Competitor (SAC) | This taxonomy is currently not exposed in the user interface as a hierarchy. |
| SA-Industry (IND) | Defines the available values for the Industry filter. You can use any values that make sense for your needs, for example ‘Financial’, ‘Healthcare’, or ‘Government’. |
| SA-Location (LOC) | Defines the available values for the Location filter. Some typical values could be ‘Global’, ‘Europe’, or ‘North America’. |
| SA-Marketing-Product (SAP) | Defines the available values for the Product filter. You can use any values that make sense for your needs. |
| SA-Other (SAO) | Defines the available values for the Subtype filter for custom items. You can use any values that make sense for your needs. |
| SA-Reference-Plan (SRF) | Defines the available values for the reference plan for customer stories. |
| SA-SalesPlay (SAS) | Defines the available values for the Sales Play filter for sales plays. For example, you could group sales plays by year or some other category. |
| SA-Usecase (SAU) | Defines the available values for the use case for customer stories. |
| SA-Vendor (SVN) | Defines the available values for the vendor for customer stories. |
| SA-Visibility (SAV) | Defines the available values for the Visibility filter. Some typical values could be ‘Internal only’, ‘Partners and internal’, and ‘Public’. |
Customize Content Types
As an application administrator, you can customize the content types used to create Sales Accelerator content, so they include new, custom fields that are available to contributors when creating new content.
To customize content types:
Log in to Oracle Sales Accelerator as an application administrator.
Open your user menu in the top-right corner and choose Administration.
If you don’t see this option, then you don’t have the required privileges.Click Customize Content Type to open the configuration page.
Open the Content Type dropdown menu and choose the content type you want to customize. If any custom fields already exist for the selected content type, they’re displayed.

Click Add Field to create a new custom field to be added to the content type.
Select the field type, which can be either ‘Textbox’ (one-line, plain-text field) or ‘Rich text’ (multi-line text box with text formatting options).
Enter a display name and (optionally) a default value, and specify whether the field is required.
The field display name can’t be modified after you create the field, so choose the name carefully.
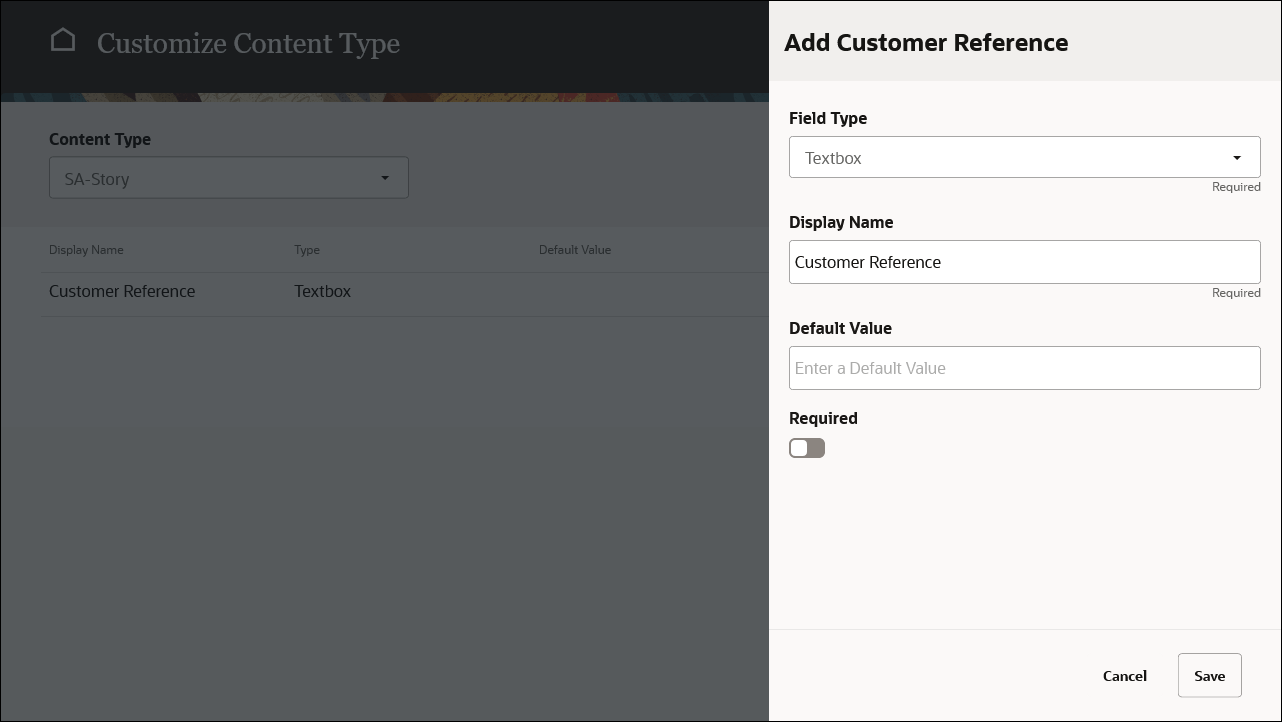
Click Save when you’re done.
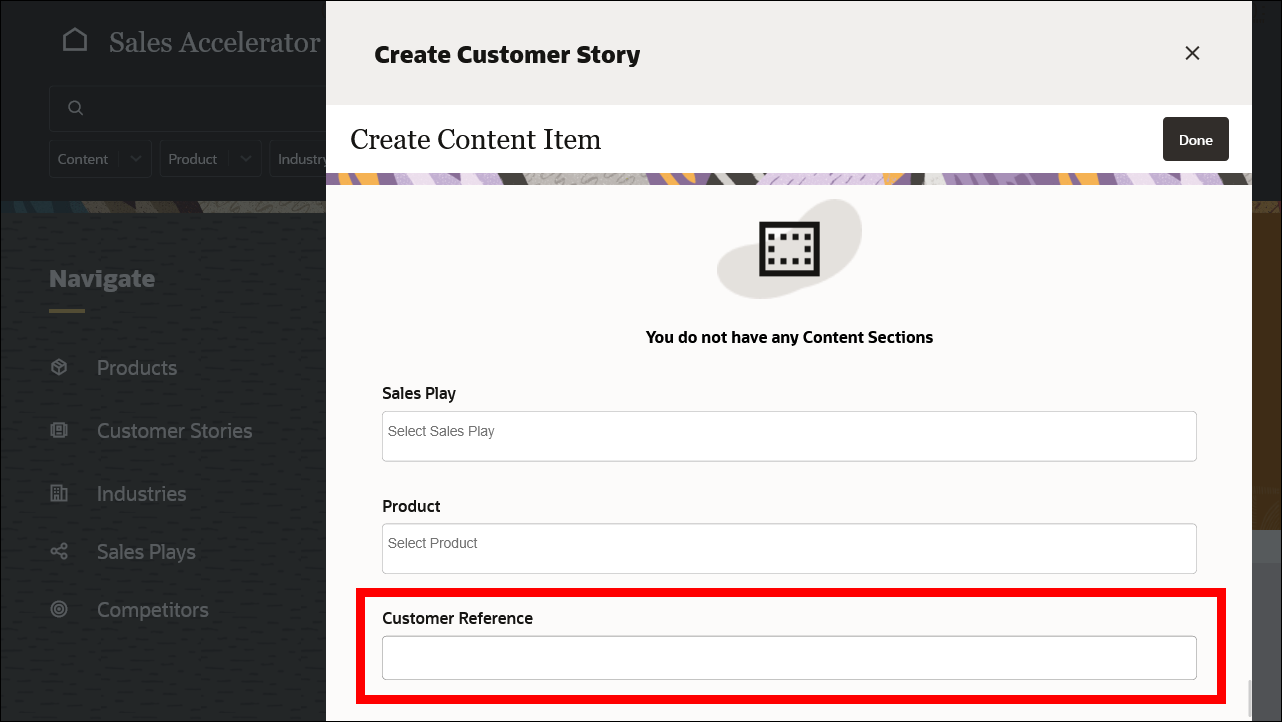
The new field is now included in the list of custom fields for the content type.

If a contributor now creates a new asset in Sales Accelerator based on that content type, the custom field is included on the data entry form.
Configure Sales Accelerator
As an application administrator, you can set a number of configuration options in Oracle Sales Accelerator to customize your sales enablement environment to your needs.
There are essentially two configuration levels:
- Basic configuration—These configuration options typically control how the application behaves at the user level. For example, you can set some notification and report defaults, or configure some basic search and filtering options. As such, they’re less risky to modify as they don’t tend to affect the inner workings of the whole application.
- Restricted configuration—These configuration options are generally lower-level and often interact with the backend Oracle Content Management server. For example, you can map user groups, configure search filters, or limit content types available to users. This makes these configuration options more dangerous to modify as they may cause the application to malfunction if not set correctly. Only change these restricted configuration options if there’s a need to, and use extreme caution.
Tip: It’s good practice to make a note of any parameter value that you change, so you can revert back to its previous value if necessary. This is particularly important for the restricted configuration options.
Here’s the basic process of modifying configuration options:
Log in to Oracle Sales Accelerator as an application administrator.
Open your user menu in the top-right corner and choose Administration.
If you don’t see this option, then you don’t have the required privileges.Click Application Configuration to open the configuration page. This page shows a number of parameters, grouped by category, which allow you to configure the appearance and behavior of Oracle Sales Accelerator to suit your needs.
Click to change the sort order of any column.
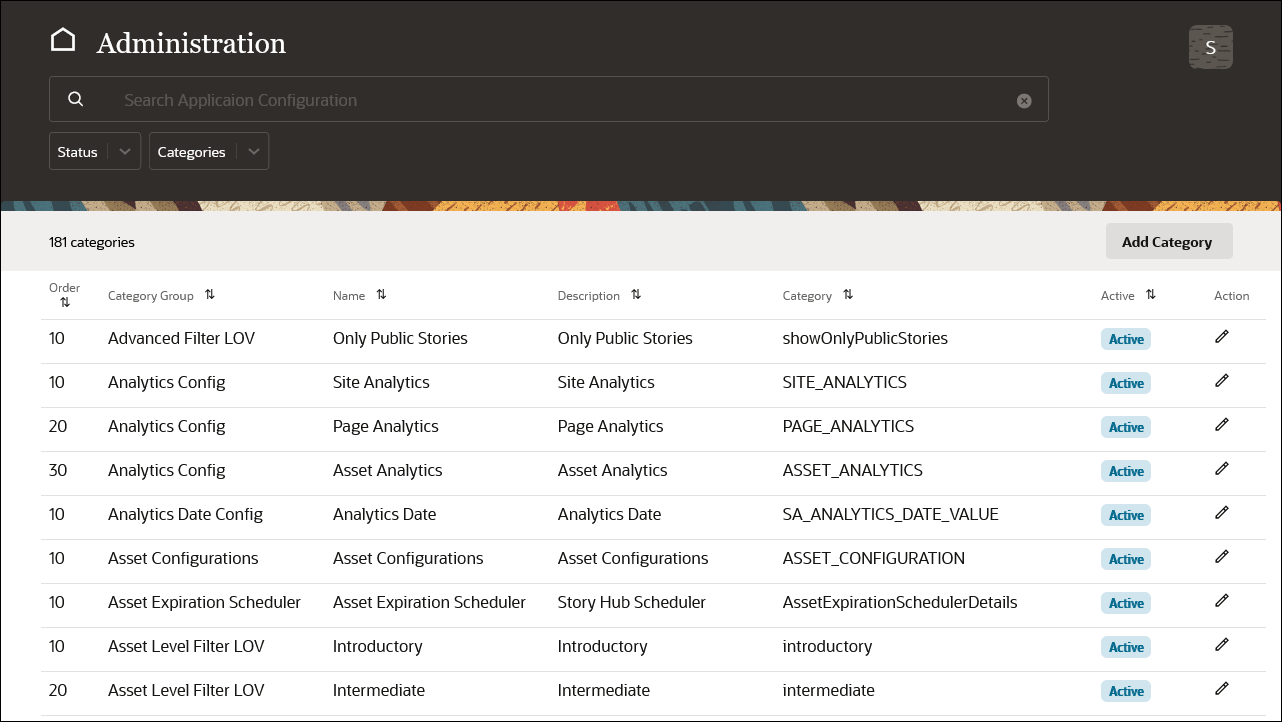
To modify a configuration parameter value, click
 on its line.
For example, the ‘Analytics Date’ (SA_ANALYTICS_DATE_VALUE) parameter defines the default time period for reports. The default value is 30 days, but you can modify that if you want.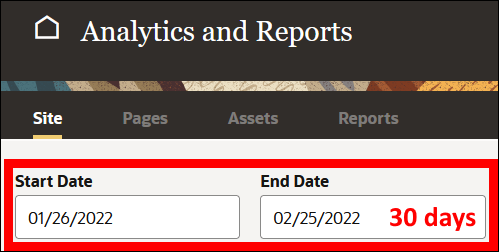
Make changes to the configuration parameter as necessary.
For example, you could change the SA_ANALYTICS_DATE_VALUE value to, say, 14 days (two weeks).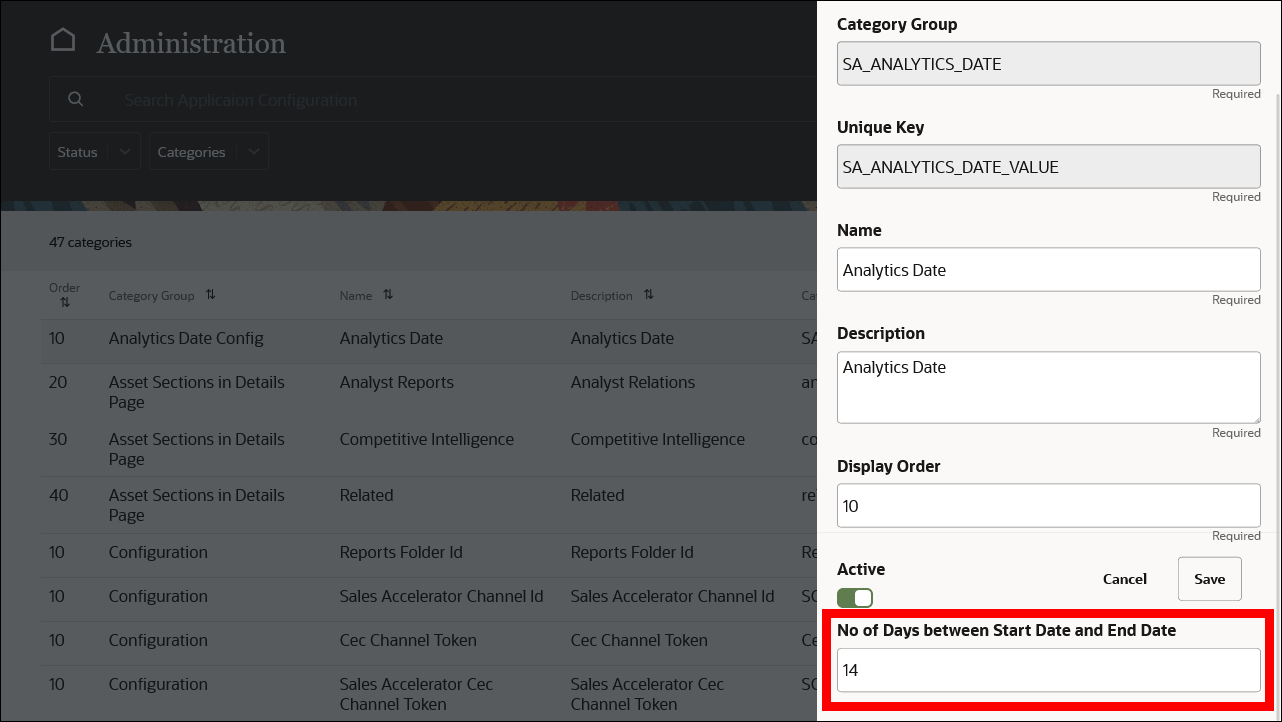
Click Save when you’re done.
The new configuration value will take effect immediately, but users may need to refresh their web browser or log out and back in.
For example, if you changed the SA_ANALYTICS_DATE_VALUE to 14 days, then the default date range for reports will reflect that: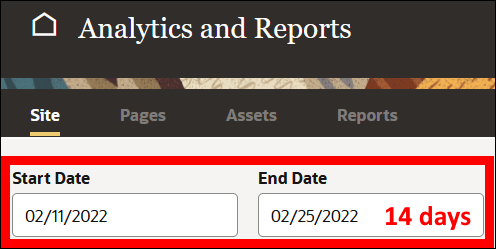
Repeat this process for all configuration values that you want to customize for your Sales Accelerator environment.
You can enable or disable any configuration option by toggling its Active switch to on or off.
Basic Configuration
These are the basic configuration options (alphabetized by category group):
| Analytics Date Config | |
|---|---|
| SA_ANALYTICS_DATE_VALUE |
This defines the default time period for reports. (Users can override this in the user interface.) |
| Asset Configurations | |
| ASSET_CONFIGURATION |
This specifies how long an asset is considered new or updated.
In addition, you can set the number of years after which an asset expires. |
| Avatar Menu Options | |
| helpLink | This specifies the URL to be called for the Help link in the user menu. You can modify the default value if you have customized help content for your users. |
| Collection Configurations | |
| COLLECTION_CONFIGURATION |
This specifies the number of years after which an asset collection expires (default: 10 years). |
| Dynamic Field Types | |
|
largetext text |
These configuration options are used to populate values for dynamic content types for customer stories. At present, the only valid options are ‘text’ (one-line, plain-text field) or ‘largetext’ (multi-line text box with text formatting options). You can change the display names or display order for these field types, but there’s typically no reason to change any of the other settings. |
| Expiration Details | |
| SA_ASSET_EXPIRATION |
This defines the number of days that assets are considered to be expiring and are marked as such on the My Content page. Default value: 30 days. |
| Feedback Topic | |
|
application_feature content_missing content_organization content_quality |
These define the available topics for users to choose from when providing feedback (if that feature is enabled). Add new categories to create additional feedback topics. For each feedback topic, specify the topic display name as well as the email addresses to send the feedback to. You can specify multiple email addresses as comma-separated values. |
| History Details | |
| SA_HISTORY_DETAILS |
This defines the number of rows to be displayed in My History on the My Content page. Default value: 100 rows. |
| Max Publish Wait Time | |
| MAX_PUBLISH_WAIT_TIME | This specifies the maximum duration of a publish operation of an asset or collection. If the operation takes longer than the specified time (in hours), then it’s considered to have failed. The publish operation won’t be tried again automatically, but the user can manually reinitiate the publish operation on the same asset or collection and check if the operation goes through. |
| Portal Header Text | |
| PORTAL_HEADER_TEXT | This entry allows you to modify the header logo or text. Set the SA Text field to change the title in top banner. In addition, you can point to a custom logo in Oracle Content Management to override the default icon. |
| Preview Config | |
| PREVIEW_CONFIG |
This defines whether the asset information panel should be displayed automatically when a user previews an item. Set the option to ‘Y’ or ‘N’. |
| SA Notification Config | |
| NotificationConfig |
This configures the notifications sent out by Sales Accelerator. You can specify the following:
|
| SA Scheduler Frequency | |
|
AssetExpirationScheduler AutoCreateStoryCleanUpScheduler SSNotificationScheduler |
These define some settings for the various schedulers. For each scheduler, you can enable host checks and error notifications, and also provide one or more email addresses (comma-separated) that should be notified in the event of any errors. |
| SA Stories Types | |
|
go_live_story sales_story |
These define the tabs to be shown in customer story details pages. Add new categories to create additional story types. You can also add custom buttons to the tabs. For each story type, specify the following:
|
| SS Notification Scheduler | |
|
daily monthly weekly |
These set some configuration options for various notification schedules. Deactivate an option to disable email notifications for a schedule altogether. For each schedule, you can configure the following:
|
| Subscription Frequency | |
|
daily monthly weekly |
These define the values available for the subscription notification frequency for saved searches. You can enable or disable any of them as needed, and also select one to be the default. This is when the notifications are sent out (this is not configurable):
|
| Subtypes Filter LOV | |
|
sao-ar sao-oth |
These define the options available for the Subtypes filter for custom assets. For each subtype filter option, specify the user role(s) for which the subtype should be displayed (or ‘All’ for all roles). |
| User Feedback Sentiment | |
|
happy okay unhappy |
These define the available sentiments for users to choose when providing feedback. You can change the display name or deactivate the option. Add new categories to create additional sentiments. |
| Visibility Filter LOV | |
|
internal_only partner_and_internal public |
These configure the available values of the Visibility filter for assets. Add new categories to create additional visibility levels. For each level, specify the role(s) for which the visibility level should be available (or ‘All’ for all roles). There will typically be no reason to change the query. |
Restricted Configuration
These are the restricted configuration options (alphabetized by category group):
Warning! Use extreme caution when modifying these options as they may cause the application to malfunction if not set correctly.
| Advanced Filter LOV | |
|---|---|
| showOnlyPublicStories |
This configures the available values of the Advanced filter for customer stories. Add new categories to create additional advanced filter options. For each filter, specify the role(s) for which the filter should be available (or ‘All’ for all roles). There will typically be no reason to change the query. |
| Analytics Config | |
|
ASSET_ANALYTICS PAGE_ANALYTICS SITE_ANALYTICS |
This enables and configures the analytics section and details for assets, pages, and sites. For each of these items, specify the following:
|
| Asset Expiration Scheduler | |
| AssetExpirationSchedulerDetails |
This configures when email notifications will be sent out about expired or expiring assets. Deactivate this setting to disable email notifications altogether.
Default value: This value consists of five elements, which (from left to right) stand for minute, hour, day of the month, month, day of the week. An asterisk (*) stands for any value.
Here are some more valid parameter values: In addition, you can set some other options, including:
|
| Asset Level Filter LOV | |
|
advanced intermediate introductory |
This configures the available values of the Asset Level filter for assets. Add new categories to create additional asset levels. For each level, specify the role(s) for which the asset level should be available (or ‘All’ for all roles). There will typically be no reason to change the query. |
| Asset Sections in Details Page | |
| analyst_relations |
This defines any additional sections to be shown for assets. Add new categories to create additional dynamic sections. For each section, specify the following:
|
| Content Types For Search | |
|
asset clear competitor industry other product salesplay sastory |
These define and configure the content types that are available in the Content dropdown list for searching. For each content type, specify the following:
|
| Content Update Admin Access | |
|
FieldsUpdate ProductMapping Taxonomy UserDimension |
These define the options that users with the content administrator role have access to in the Content Update area of the administration interface. To disable an option, toggle its Active switch to the off position. You can also specify which role(s) can perform the action. |
| Dynamic Content Types | |
|
SA-Customer SA-Partner SA-Story SA-Story-Content |
These define the available content types when customizing content types for customer stories. You can change the display name for each content type, but there’s typically no reason to change any of the other settings. |
| Employee IDCS Groups | |
|
SAAdmin SAContentAdmin SAContributor SAReports SAUser Sales Accelerator |
These map the identity domain groups that are considered employees. Specify the user groups assigned in the identity domain (IAM or IDCS) that correspond to each Sales Accelerator role. |
| Format Filter LOV | |
|
doc excel image link mp4 ppt zip |
These configure the static list of options for the format filter for assets. For each format type, specify the following:
|
| Language Filter LOV | |
|
de en es fr it ja ko ot pt ru zh |
These configure the static list of options for the language filter for assets. For each language, specify the following:
|
| Maintenance Roles | |
|
ADMIN CONTENT_ADMIN REPORT_ADMIN |
These define which (comma-separated) identity domain user groups (created in IAM or IDCS) have the application administrator (SAAdmin), content administrator (SAContentAdmin), and report administrator (SAReports) roles in Sales Accelerator. |
| My Content Filter LOV | |
| myContent |
This option enables or disables the contributor switch in the user profile based on the logged-in email identity. You can specify the role(s) for which the contributor switch should be available to (‘Contributor’) by default. There will typically be no reason to change this. |
| Navigate Items | |
|
competitor demo industry product salesplay sastory |
These configure the options available in the Navigate menu on the left. To hide any category, deactivate the corresponding configuration parameter by toggling its Active switch off. You can also change the display names and sort order. For each navigation item, specify the following:
|
| OCE Content Types | |
|
SA-Asset SA-Collection SA-Competitor SA-Industry SA-Product SA-Sales-Play SA-Story |
These configure the Oracle Content Management content types used in the Sales Accelerator application. For each content type, specify:
|
| Partner IDCS Groups | |
| SalesacPartner | This defines the identity domain group(s) assigned in the identity domain (IAM or IDCS) that are considered partners, which limits the content they can see in the system (no content marked as internal-only). If you specify multiple groups, use commas to separate them. |
| Profile Dropdown Action Lov | |
|
create-asset create-competitor create-custompage create-industry create-product create-salesplay create-story |
These configure the options available in the Create Content menu in the user profile or on the My Content page. To disable creation of any of these content types, deactivate the corresponding configuration parameter by toggling its Active switch off. For each item, specify the following:
|
| Published Status Filter LOV | |
|
active expiringwithin30days inactive published publishedanddraft unpublished |
These define the options available for the Published Status filter in the search section (in contributor mode). For each published status filter, specify the following:
|
| Report Configuration | |
| ReportConfig |
This configures the actions that should be included in contributor-based and search-based reports. The access types for contributors include:
The access types for search utilization include:
|
| SA MPulse Config | |
| MPulseConfig |
This option is used to validate application security and bug tracking using MPulse component. The MPulse key value should match the Oracle Content Management security key. There will typically be no reason to change this value. |
| SA Portal Theme Config | |
|
DETAILS_PAGE_THEME HOME_PAGE_THEME MYCONTENT_PAGE_THEME PREVIEW_PAGE_THEME REPORT_PAGE_THEME STORY_DETAILS_PAGE_THEME |
These specify the content IDs of a number of CSS files in Oracle Content Management, which are used to control the look-and-feel of various pages in Sales Accelerator. There’s generally no reason to update these values as they’re set automatically when Sales Accelerator is deployed. For details on how to change the Sales Accelerator interface look-and-feel, see Modify the Styling. |
| SA Search Sort Options | |
|
byCreatedDate byLastUpdatedDate byName byRelevance |
These configure the search sort options available to users. For each option, specify the following:
|
| SA Tenant Application Config | |
| AppConfig |
This configures various settings for the Sales Accelerator application, including:
Warning! These are critical settings for the application to start and run successfully. Use extreme caution when modifying any of them as they may break the application if set incorrectly! |
| Search Filters | |
|
advanced assetLevel assetType format industry language location myContent product publishedstatus referenceplan salesplay storyAssetVisibility storyType subtype usecase visibility |
These configure the filters to be used for searching. For each item, specify the following:
|
| Search Predictive Filters | |
|
all assetType competitor customers industry location partners product usecase vendor |
These configure the predictive filters to be used for searching. For each item, specify the following:
|
| Subscription Notification Types | |
|
NEW_DRAFT NEW_PUBLISHED UPDATED_DRAFT UPDATED_PUBLISHED |
These define the static list of events that should be in the subscription scope for saved searches. For each event type, specify the following:
|
| User Feedback Action | |
| SA_USER_FEEDBACK_ACTION_VALUE |
This defines the URL that users should be redirected to when clicking the Feedback link on the various pages. Enter the URL to open in the Feedback URL field. You can specify different URLs for the various user types. For example:{"Employee":"https://www.example-1.com","Partner":"https://www.example-2.com"}Disable the feedback link altogether by setting the Enable User Feedback field to ‘N’. |
| User Types | |
|
Employee Others Partner |
These configure the various user types in Oracle Sales Accelerator and which identity domain user group (created in IAM or IDCS) they should be associated with, which controls their access to the application. Configure a redirect URL for users who don’t have access (Others). Partners don’t have access to content that’s marked as internal-only. You can also specify whether interactions by a particular user type should be included in analytics. |
| Visibility Filter LOV | |
|
internal_only partner_and_internal public |
These configure the available values of the Visibility filter for assets. For each level, specify the role(s) for which the visibility level should be available (or ‘All’ for all roles). There will typically be no reason to change the query. |
Add and Assign Users
Your Oracle Sales Accelerator environment won’t be available to anyone until you add users and assign access privileges (application roles) to them. You do this in the Oracle Cloud Console.
Oracle is in the process of updating Oracle Cloud Infrastructure (OCI) regions to use Identity and Access Management (IAM) identity domains. The process of adding and assigning users for Oracle Sales Accelerator depends on whether your account has already been updated to use IAM or whether it still uses Oracle Identity Cloud Service (IDCS) domains.
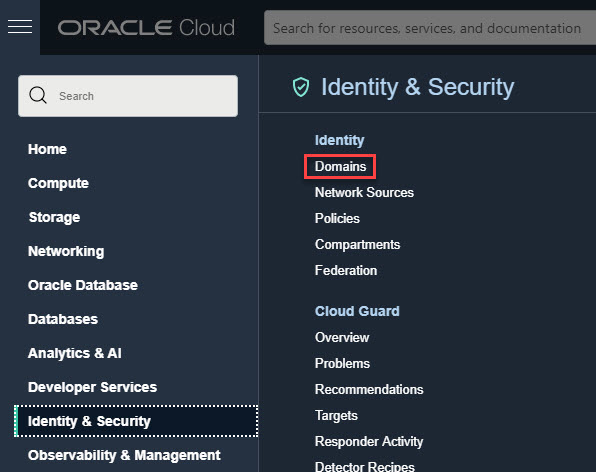
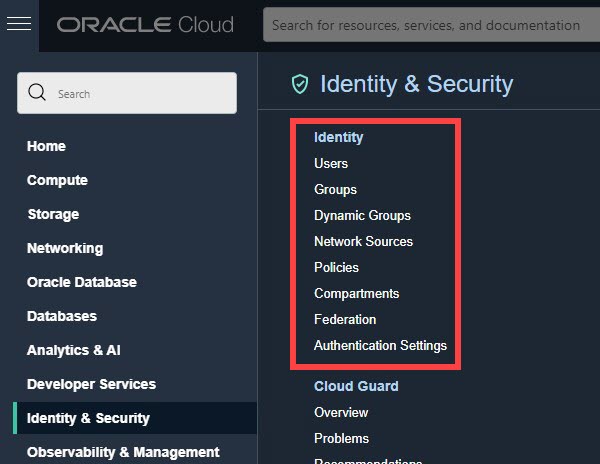
To check, sign in to your Oracle Cloud account as a cloud account administrator. In the navigation menu, click Identity & Security. Under Identity, check for Domains. If you see Domains, then your cloud account has been updated.
| IAM (updated) | IDCS (not updated) |
|---|---|
 |
 |
| Follow the steps in Add and Assign Users with IAM. | Follow the steps in Add and Assign Users with IDCS. |
All new Oracle Cloud accounts will automatically use Identity and Access Management (IAM) identity domains.
For full details on managing users in Oracle Content Management, see Administering Oracle Content Management.
Add and Assign Users with IAM
Follow the steps below to add and assign users to Oracle Sales Accelerator if your cloud account has been updated to use Identity and Access Management (IAM) identity domains.
This process consists of five steps:
- Create user groups
- Assign application roles to groups
- Add users
- Assign users to groups
- Map roles in Sales Accelerator
Create User Groups with IAM
The first step is to create user groups for Oracle Sales Accelerator. After that, you’ll assign application roles to these groups and add and assign users.
It’s recommended that you add user groups to cover each of the application roles in Sales Accelerator: viewers, contributors, report administrators, content administrators, and application administrators.
To create user groups for Oracle Sales Accelerator:
Sign in to Oracle Cloud as the cloud account administrator. You can find your account name and login information in your welcome email. Make sure to use the tenancy where you want to set up Oracle Sales Accelerator.
In the Oracle Cloud Console, click
 in the top left to open the navigation menu, click Identity & Security and then, under Identity, click Domains.
On the Domains page, click your identity domain name to open it. In most cases, this will be Default.
In the navigation menu on the left, click Groups.
Click Create group to create a new user group for Oracle Sales Accelerator.
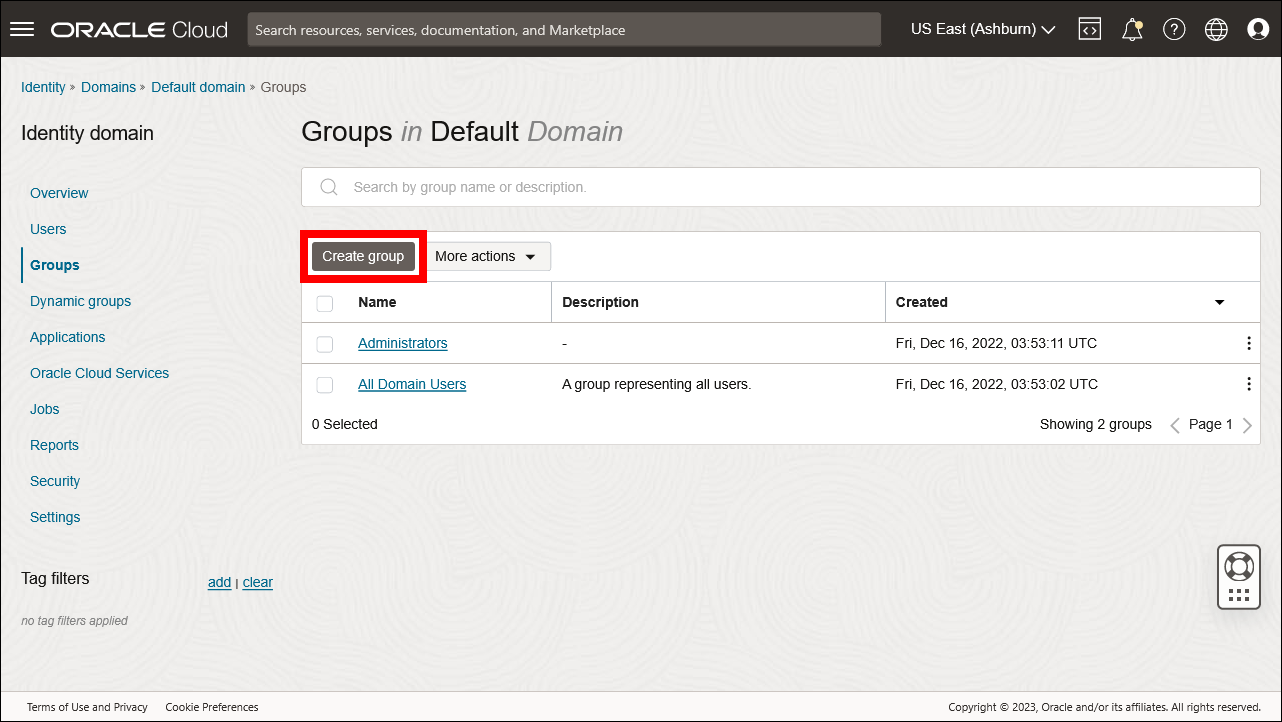
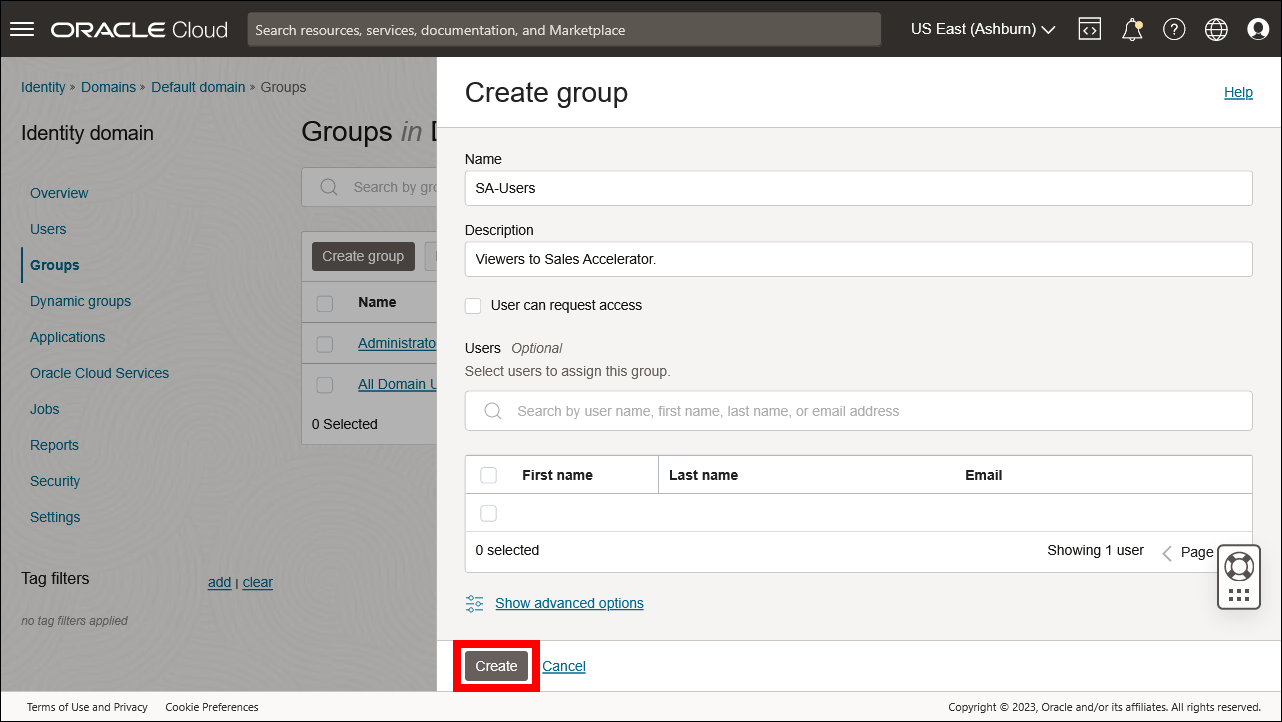
Enter the group name and, optionally, a description, and click Create when you’re done.
A details page for the new group is displayed.
You can now return to your domain page.In addition to creating individual groups, you can also import a batch of groups. First, create a comma-separated values (CSV) file (sample file), then open the More actions menu on the identity domain page and click Import groups.
Repeat this process for all user groups for Oracle Sales Accelerator. There should be a user group for each of the application roles.
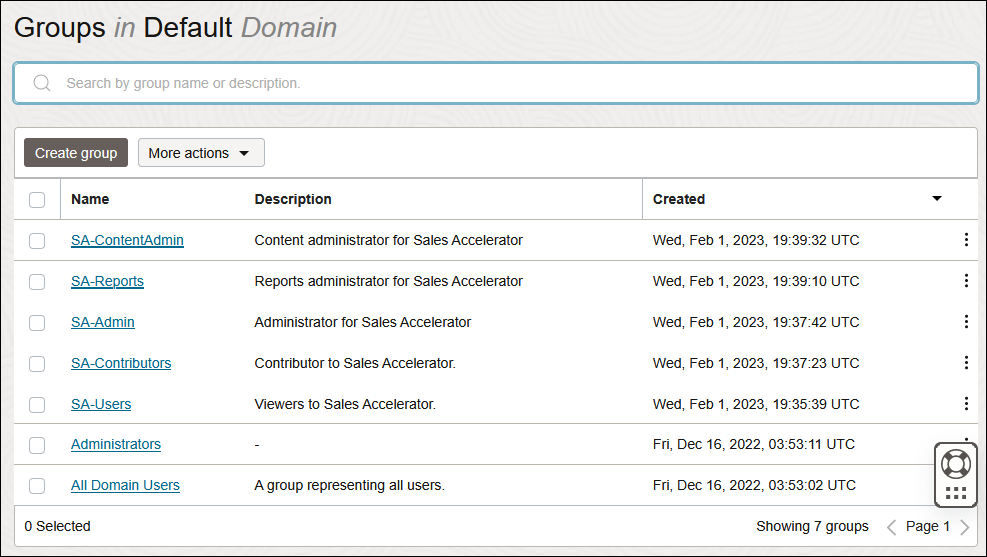
For further details on managing groups, see Administering Oracle Content Management.
Assign Roles to Groups with IAM
After creating user groups for Oracle Sales Accelerator, assign the appropriate application roles to those groups to give them access to the Oracle Sales Accelerator features they need.
To assign roles to Oracle Sales Accelerator groups:
In the Oracle Cloud Console, click Identity & Security in the left navigation menu and then, under Identity, click Domains.
On the Domains page, click your identity domain name to open it. In most cases, this will be Default.
In the navigation menu on the left, click Oracle Cloud Services.
On the Oracle Cloud Services page, find the CECSAUTO_instanceCECSAUTO application (where instance is the name of the instance you created), and click its name to open it.
On the CECSAUTO_instanceCECSAUTO application details page, click Application roles in the navigation menu on the left, under Resources.
Select the CECEnterpriseUser role, click its
 icon, and then click Manage next to Assigned groups.
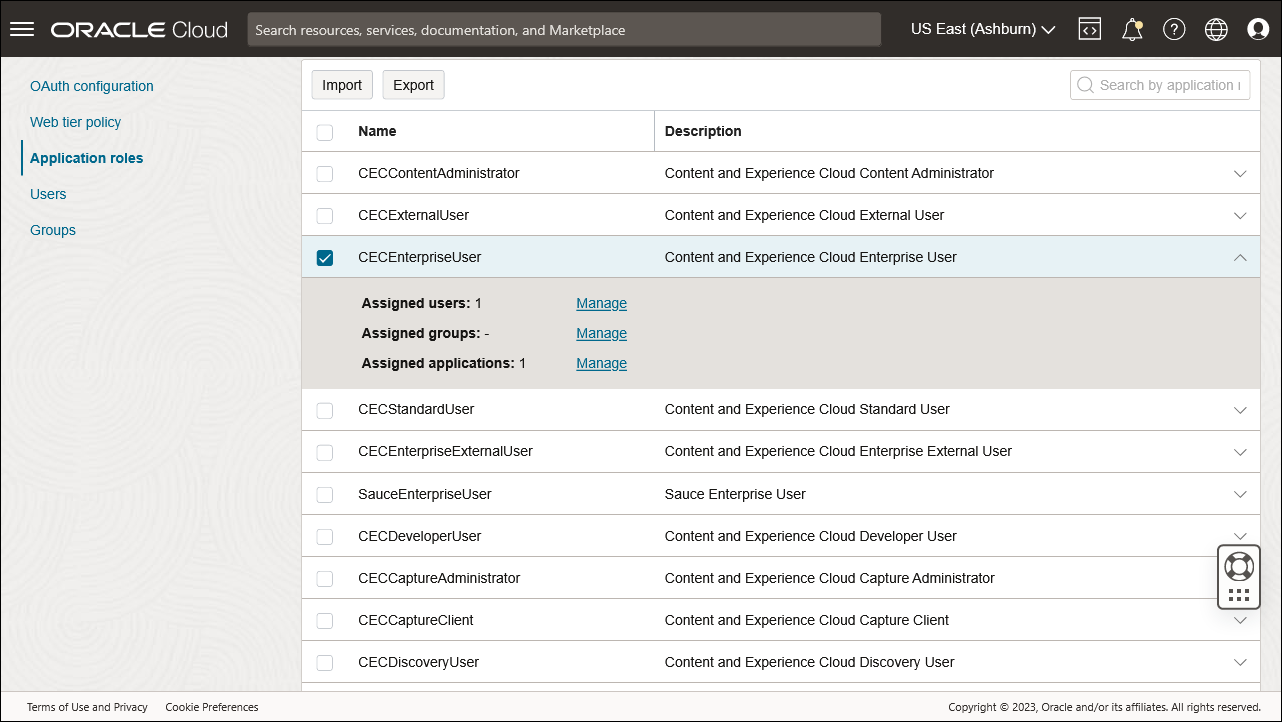
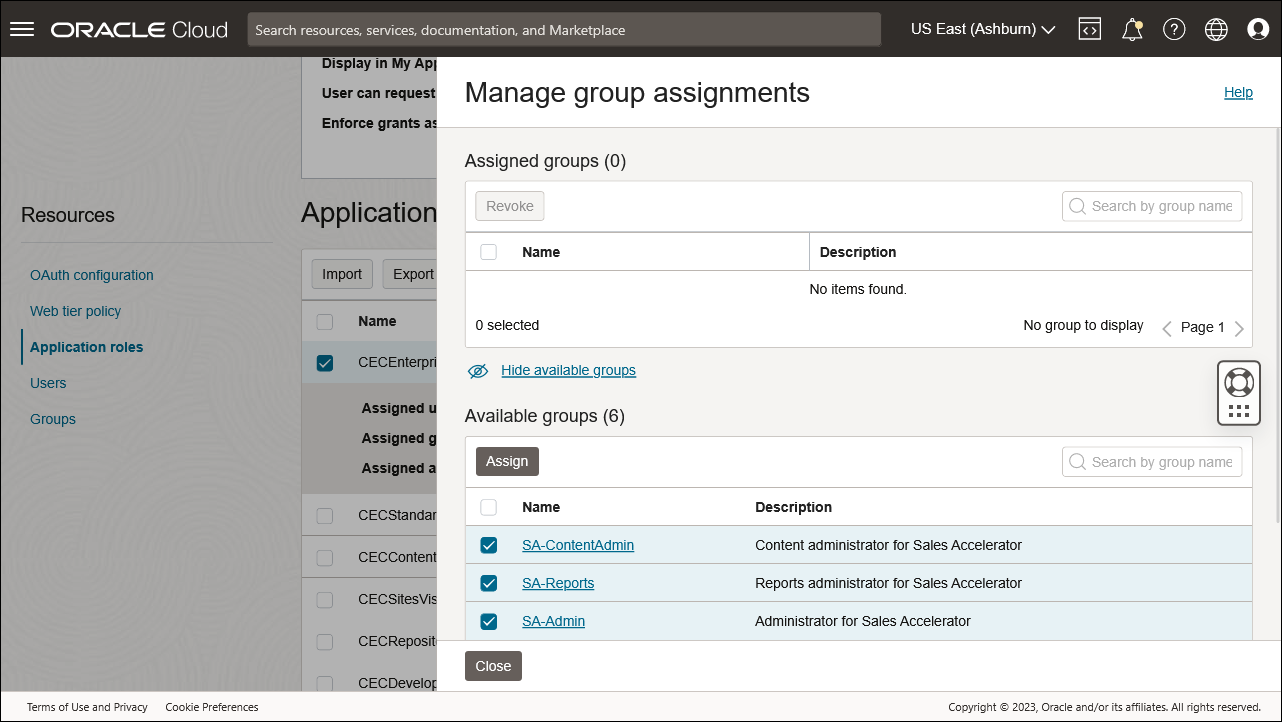
Click Show available groups.
Select the user groups you want to give contributor access to, click Assign, and then Close. This will typically be all user groups except for the viewer group (SA users).
On the Oracle Cloud Services page, find the CECSAUTO_instance_salesaccelerator_client application (where instance is the name of the instance you created), and click its name to open it.
On the CECSAUTO_instance_salesaccelerator_client application details page, click Application roles in the navigation menu on the left, under Resources.
Select the role you want to assign to a group, click its
 icon, and then click Manage next to Assigned groups.
Click Show available groups.
Select the group(s), click Assign, and then Close.
Assign roles to the various groups as follows:
For further details on managing groups, see Administering Oracle Content Management.
Add Users with IAM
Next, add users to the system so you can set up their access privileges to Oracle Sales Accelerator:
In the Oracle Cloud Console, click Identity & Security in the left navigation menu and then, under Identity, click Domains.
On the Domains page, click your identity domain name to open it. In most cases, this will be Default.
In the navigation menu on the left, click Users.
Click Create user to add a user to the system.
Enter the user information and click Create when you’re done.
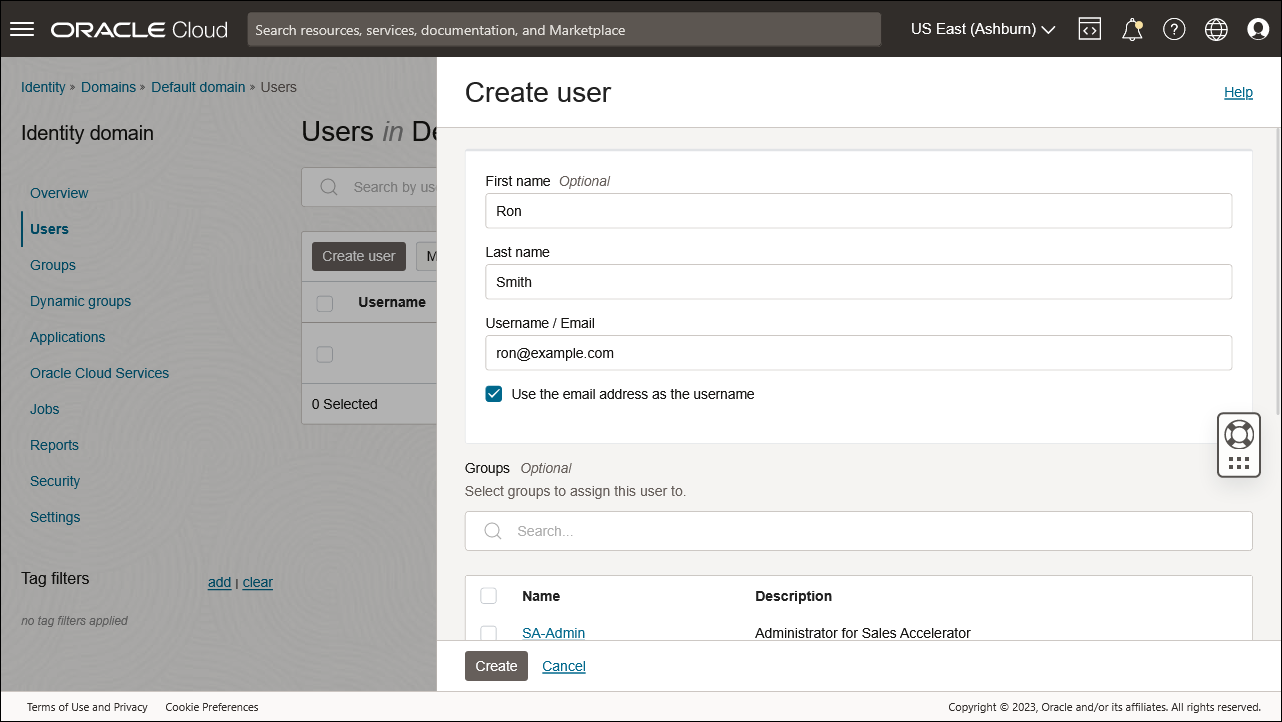
When you add users, they’ll receive an email asking them to activate their Oracle Cloud account. The Oracle Cloud user account must be activated before the link expires so it can be used.
In addition to adding individual users, you can also import a batch of users. First, create a comma-separated values (CSV) file (sample file), then open the More actions menu on the identity domain page and click Import users.
For further details on managing users, see Administering Oracle Content Management.
Assign Users to Groups with IAM
Next, assign users to the Sales Accelerator groups, so the users get the access privileges associated with their assigned group(s).
To assign users to the Oracle Sales Accelerator groups:
In the Oracle Cloud Console, click Identity & Security in the left navigation menu and then, under Identity, click Domains.
On the Domains page, click your identity domain name to open it. In most cases, this will be Default.
In the navigation menu on the left, click Groups.
Open the group you want to assign users to.
In the Users section, click Assign user to groups.
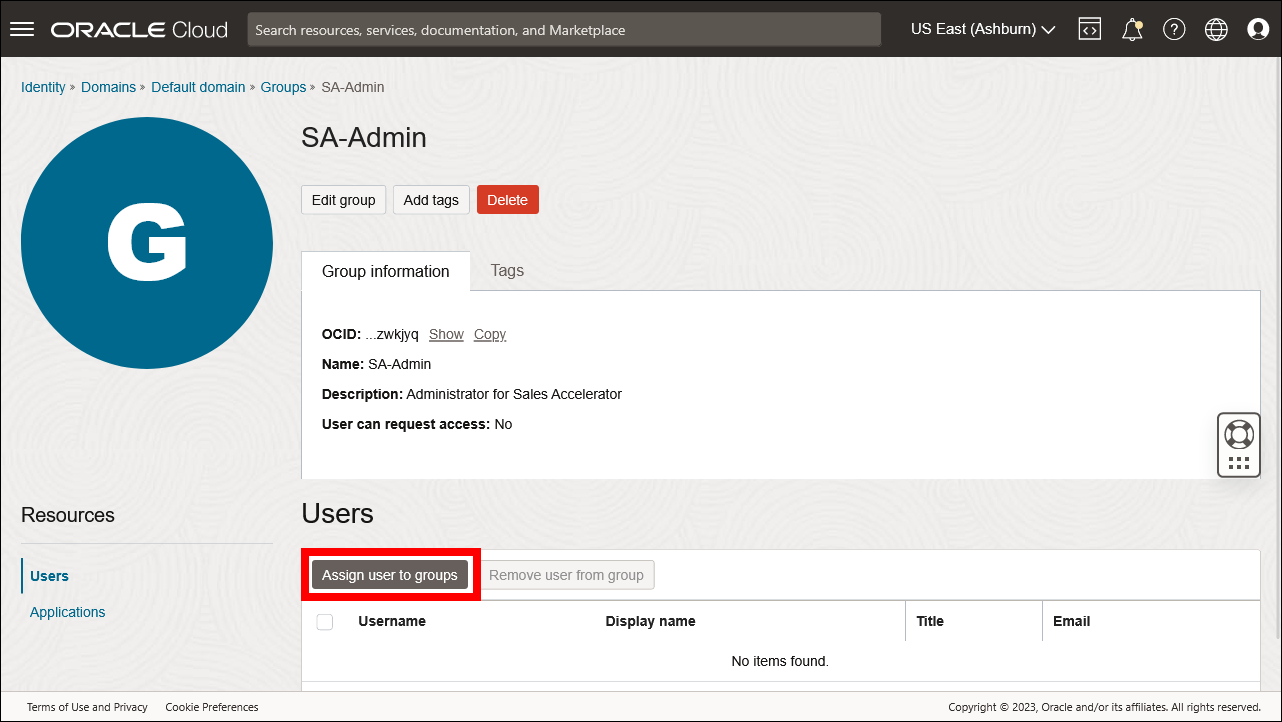
Select the user(s) you want to add to the group, and then click Add.
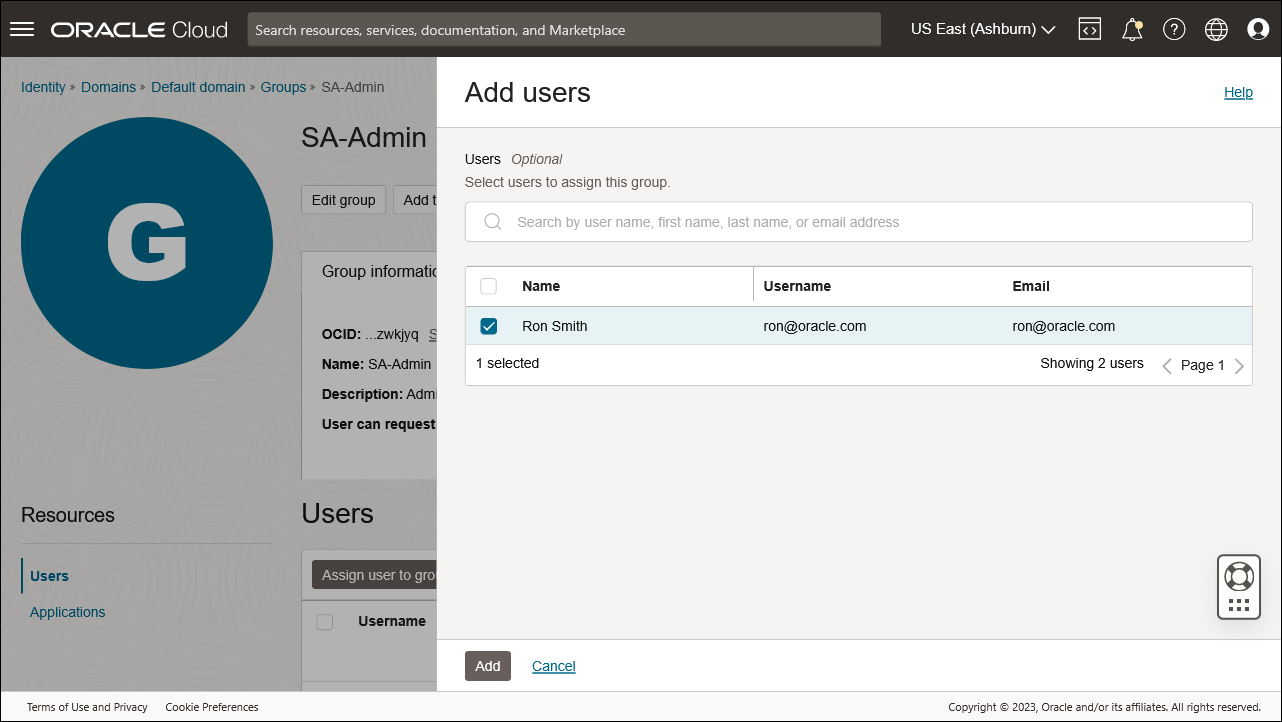
Repeat this process for all user groups you created for Oracle Sales Accelerator.
For further details on managing groups, see Administering Oracle Content Management.
After users have been added to the system, it may take some time before they can actually access Sales Accelerator.
Map Roles in Sales Accelerator
The final step is to configure Sales Accelerator so it knows which user groups in IAM are associated with the various application roles:
Log in to Oracle Sales Accelerator as an application administrator.
Open your user menu in the top-right corner and choose Administration. If you don’t see this option, then you don’t have the required privileges.
Click Application Configuration under System Administration to open the configuration page.
Find the Maintenance Roles category group.
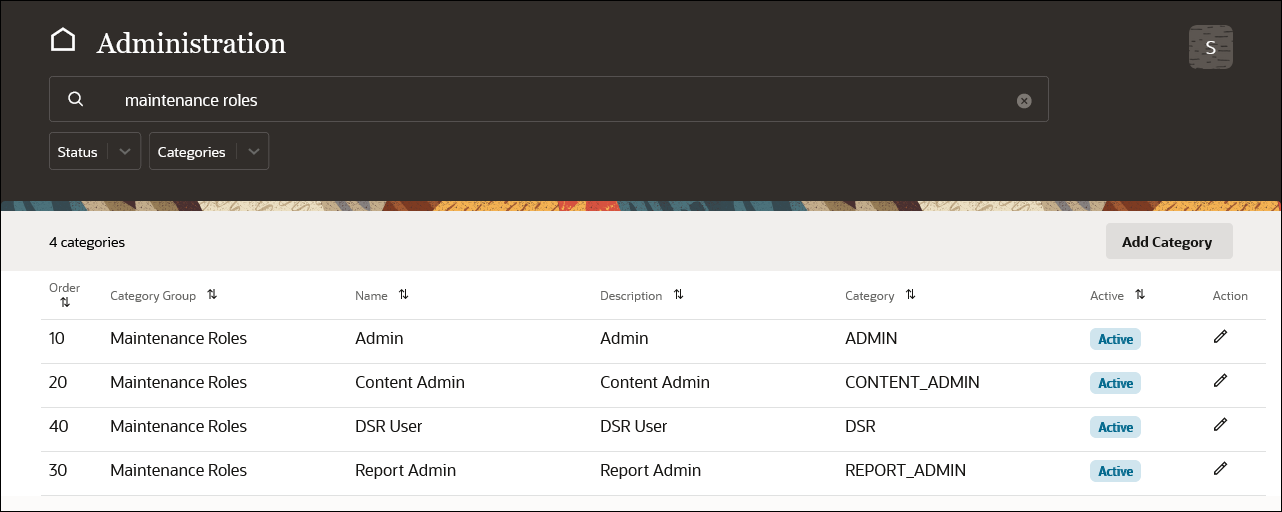
Edit these parameters and set their Groups (CSV) value to point to the associated group name:
- ADMIN: Map this to the service administrator user group that you created earlier.
- CONTENT_ADMIN: Map this to the content administrator user group that you created earlier.
- REPORT_ADMIN: Map this to the analytics and reports user group that you created earlier.
You can specify multiple groups, separated by commas, for example “SAAdmin,CorpAdmins.”
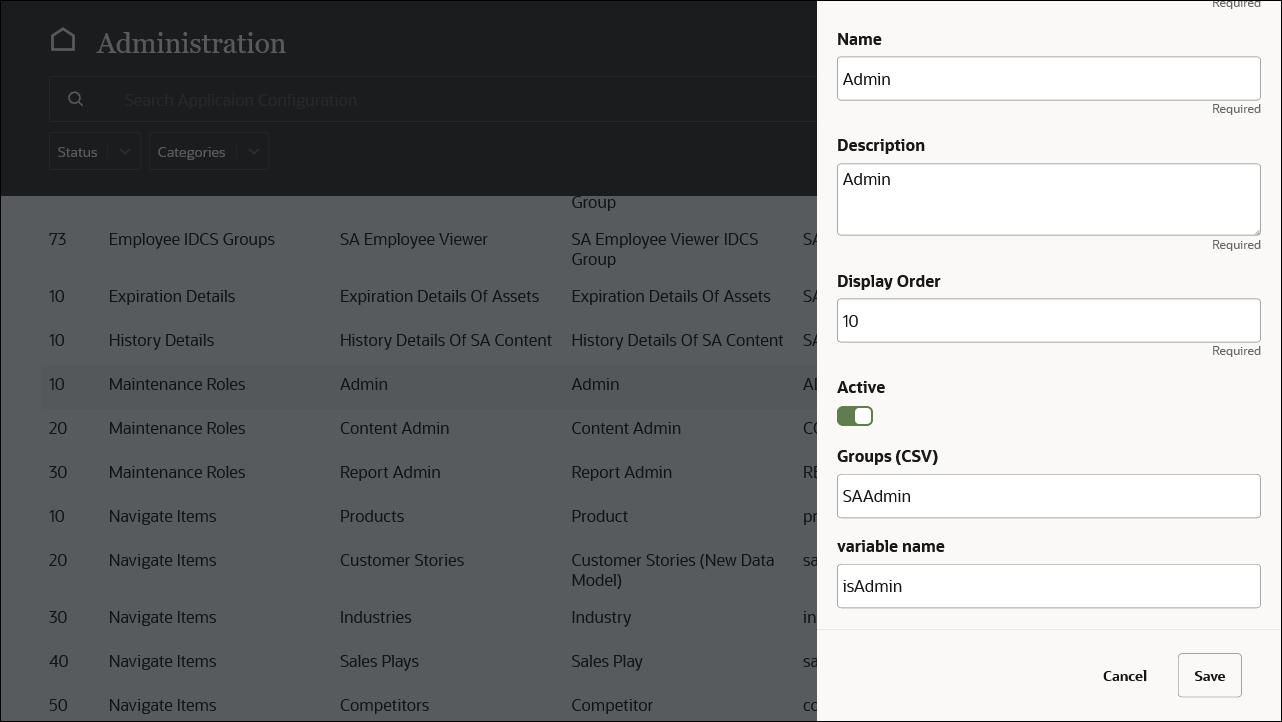
Click Save when you’re done.
Add and Assign Users with IDCS
Follow the steps below to add and assign users to Oracle Sales Accelerator if your cloud account still uses Oracle Identity Cloud Service (IDCS) domains.
This process consists of five steps:
- Create user groups
- Assign application roles to groups
- Add users
- Assign users to groups
- Map roles in Sales Accelerator
Create User Groups with IDCS
The first step is to create user groups for Oracle Sales Accelerator. After that, you’ll assign application roles to these groups and add and assign users.
It’s recommended that you add user groups to cover each of the application roles in Sales Accelerator: viewers, contributors, report administrators, content administrators, and application administrators.
To create user groups for Oracle Sales Accelerator:
Open the Oracle Identity Cloud Service (IDCS) Console. You can find the URL and your login information in your Oracle Cloud welcome email.
Click the Access your Cloud Services link in your welcome email. To sign in, use the cloud account and login information in your email.
In the dashboard, under Active Services, click Identity Cloud.
Scroll down the Oracle Identity Cloud Service details page and click the Service Instance URL.
If your account is set up for federated access (using single sign-on, or SSO), then you can also get to your IDCS Console from the Oracle Cloud dashboard by clicking Identity & Security in the left navigation menu and then Federation (under Identity).
In the IDCS Console, click
 to open the left navigation menu, and then click Groups.
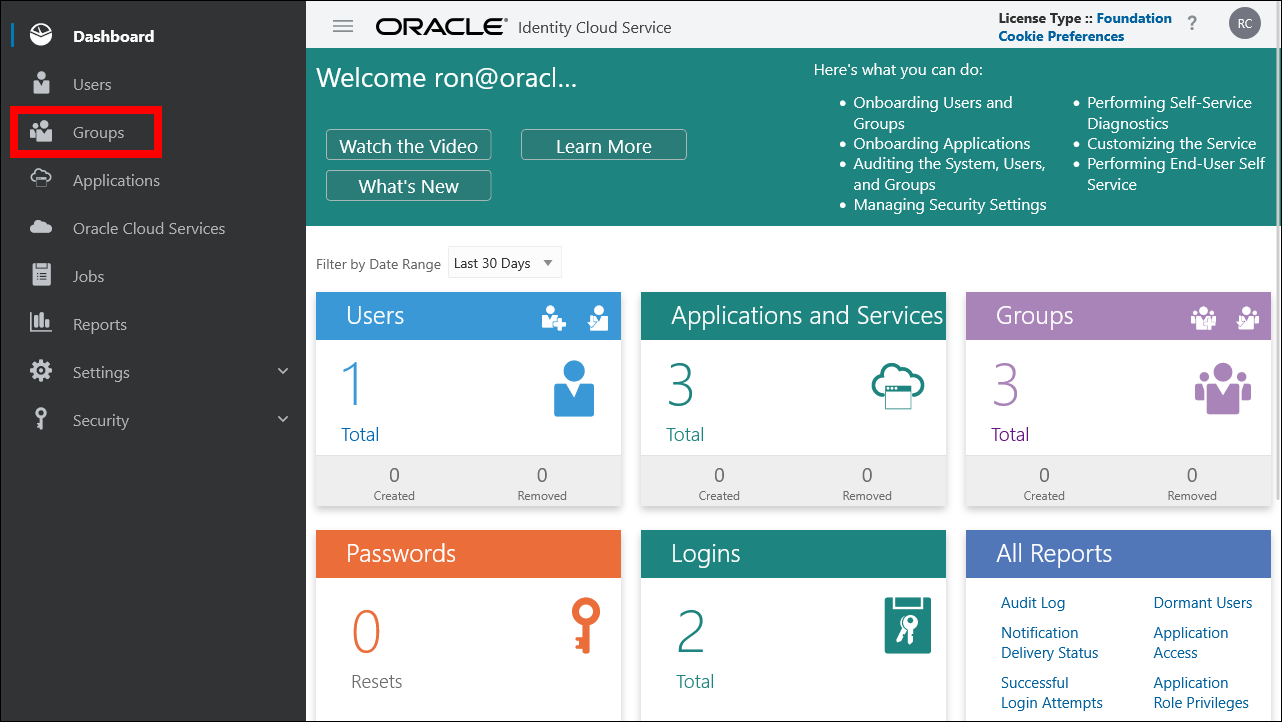
In the list of groups, click Add in the actions bar to add a new group to the system.
Enter the group name and, optionally, a description, and click Finish when you’re done.
It’s recommended that you give your Sales Accelerator groups easily identifiable names, for example by starting them with ‘SA’.
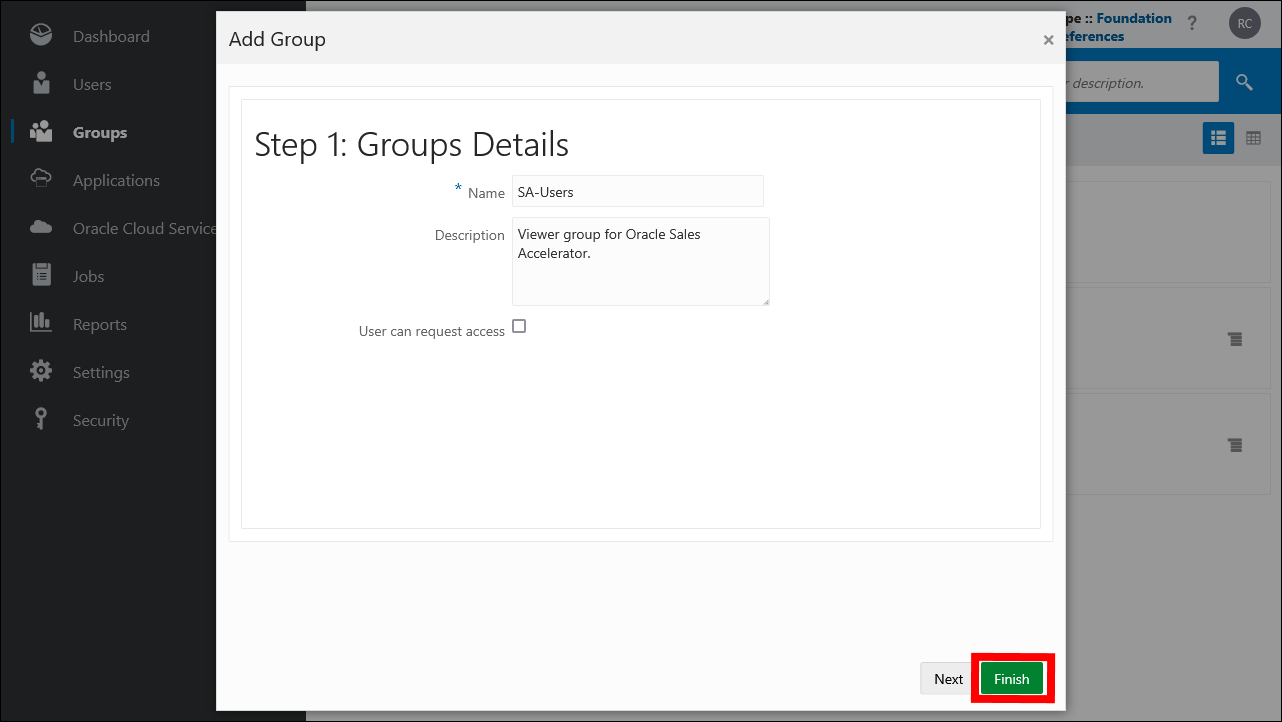
The group details page is displayed.
Repeat this process for all user groups for Oracle Sales Accelerator. There should be a user group for each of the application roles.
For further details on creating groups, see Administering Oracle Content Management.
Assign Roles to Groups with IDCS
After creating user groups for Oracle Sales Accelerator, assign the appropriate application roles to those groups to give them access to the Oracle Sales Accelerator features they need.
To assign roles to Oracle Sales Accelerator groups:
In the IDCS Console, click Oracle Cloud Services in the left navigation menu.
On the Oracle Cloud Services page, find the CECSAUTO_instanceCECSAUTO application (where instance is the name of the instance you created), and click its name to open it.
On the CECSAUTO_instanceCECSAUTO application details page, click Application Roles in the actions bar.
Select the CECEnterpriseUser role, click its
 icon, and then choose Assign Groups.
Select the user groups you want to give contributor access to, and then click OK. This will typically be all user groups except for the viewer group.
On the Oracle Cloud Services page, find the CECSAUTO_instance_salesaccelerator_client application (where instance is the name of the instance you created), and click its name to open it.
On the CECSAUTO_instance_salesaccelerator_client application details page, click Application Roles in the actions bar.
Select the role you want to assign to a group, click its
 icon, and then choose Assign Groups.
Select the group(s) and then click OK.
Assign roles to the various groups as follows:
For further details on managing groups, see Administering Oracle Content Management.
Add Users with IDCS
Next, add users to the system so you can set up their access privileges to Oracle Sales Accelerator:
In the IDCS Console, click Users in the left navigation menu.
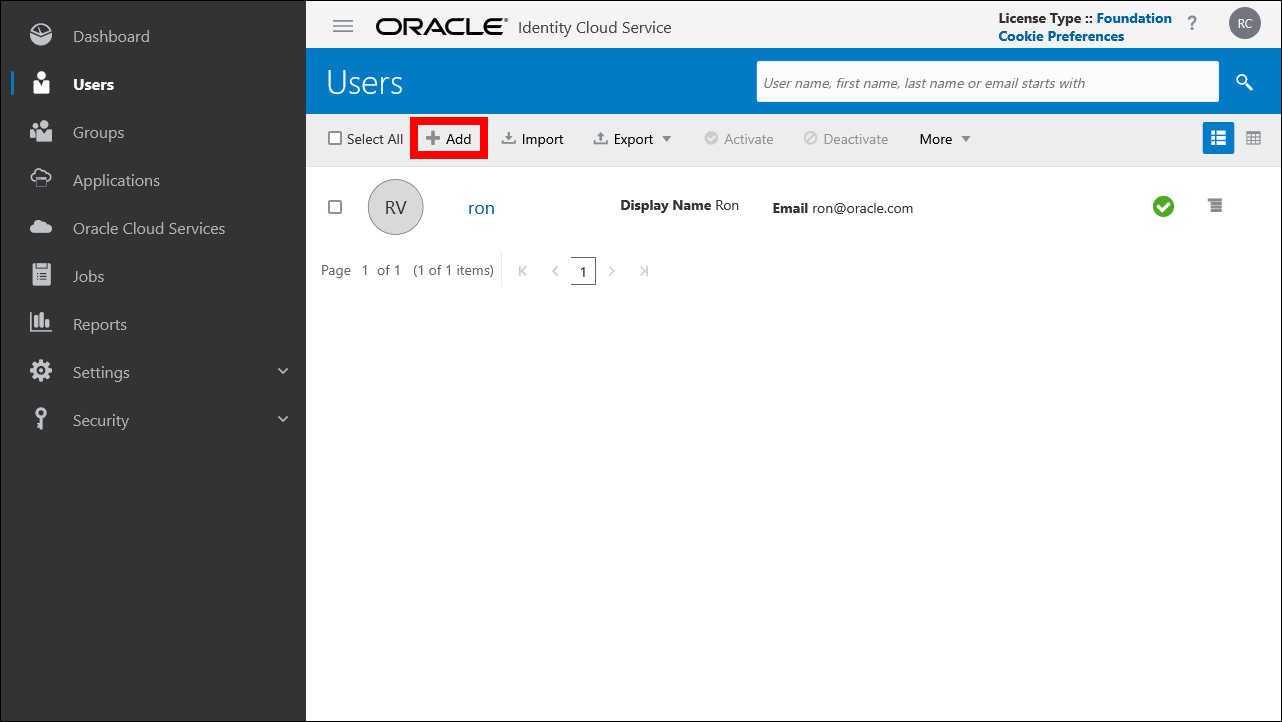
Click Add in the actions bar to add a new user to the system.
Enter the user information and click Finish when you’re done.
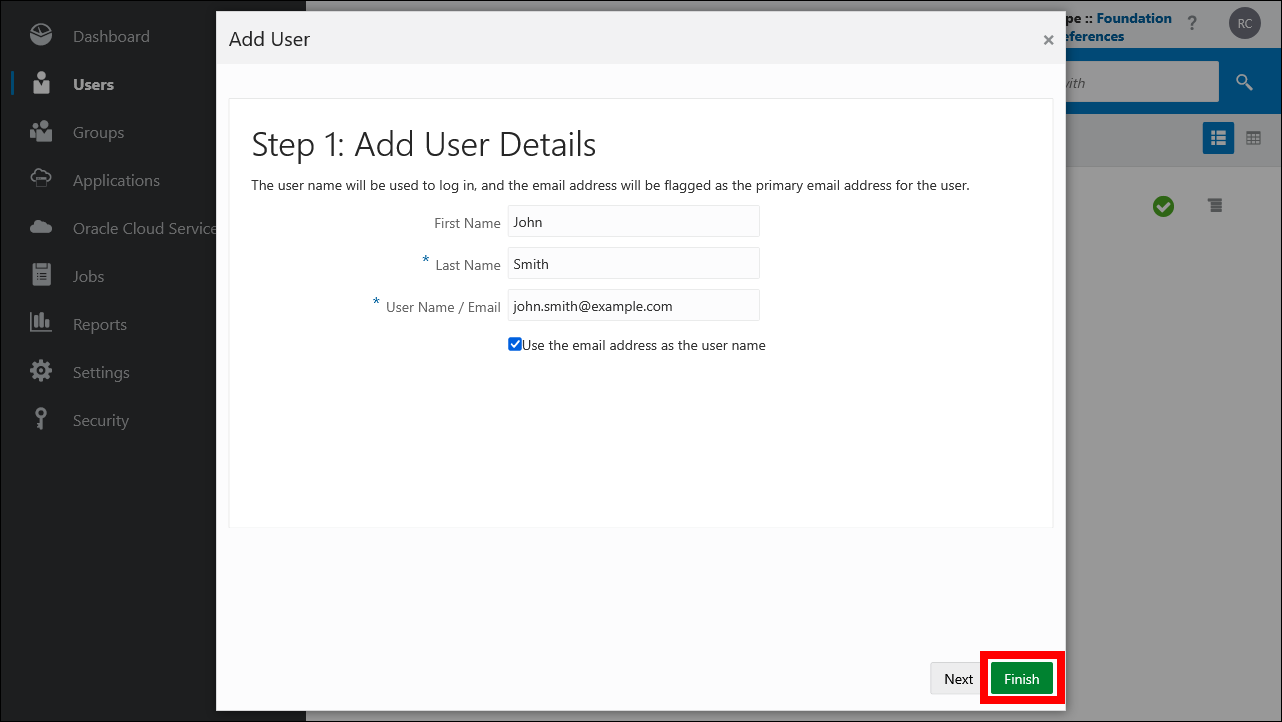
When you add users, they’ll receive an email asking them to activate their Oracle Cloud account. The Oracle Cloud user account must be activated before the link expires so it can be used.
In addition to adding individual users, you can also import a batch of users. First, create a comma-separated values (CSV) file (sample file), then open the Users page in the Oracle Identity Cloud Service Console and click Import.
For further details on managing users, see Administering Oracle Content Management.
Assign Users to Groups with IDCS
Next, assign users to the Sales Accelerator groups, so the users get the access privileges associated with their assigned group(s).
To assign users to Oracle Sales Accelerator groups:
In the IDCS Console, click Groups in the left navigation menu.
Open the group you want to assign users to.
On the group details page, open the Users tab and click + Assign.
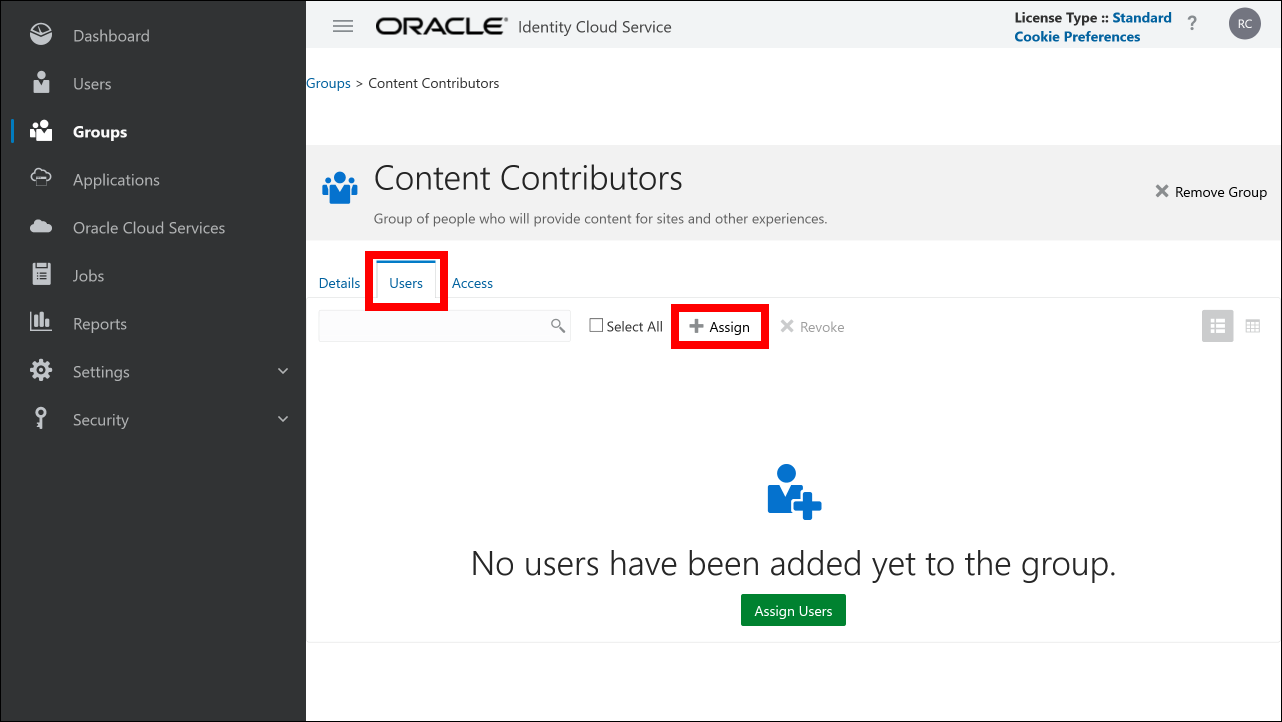
In the Assign Users window, select the user(s) you want to add to the group, and then click OK.
Repeat this process for all user groups you created for Oracle Sales Accelerator.
For further details on managing groups, see Administering Oracle Content Management.
After users have been added to the system, it may take some time before they can actually access Sales Accelerator.
Map Roles in Sales Accelerator
The final step is to configure Sales Accelerator so it knows which user groups in IDCS are associated with the various application roles:
Log in to Oracle Sales Accelerator as an application administrator.
Open your user menu in the top-right corner and choose Administration. If you don’t see this option, then you don’t have the required privileges.
Click Application Configuration under System Administration to open the configuration page.
Find the Maintenance Roles category group.

Edit these parameters and set their Groups (CSV) value to point to the associated group name:
- ADMIN: Map this to the service administrator user group that you created earlier.
- CONTENT_ADMIN: Map this to the content administrator user group that you created earlier.
- REPORT_ADMIN: Map this to the analytics and reports user group that you created earlier.
You can specify multiple groups, separated by commas, for example “SAAdmin,CorpAdmins.”

Click Save when you’re done.
Configure Oracle Content Management
As a final step, you need to adjust some configuration settings in the Oracle Content Management instance that you created when setting up the Oracle Sales Accelerator application:
- Synchronize users
- Add contributors to the Sales Accelerator repository
- Add contributors to the Sales Accelerator publishing channel
- Configure allowed domains
Synchronize Users
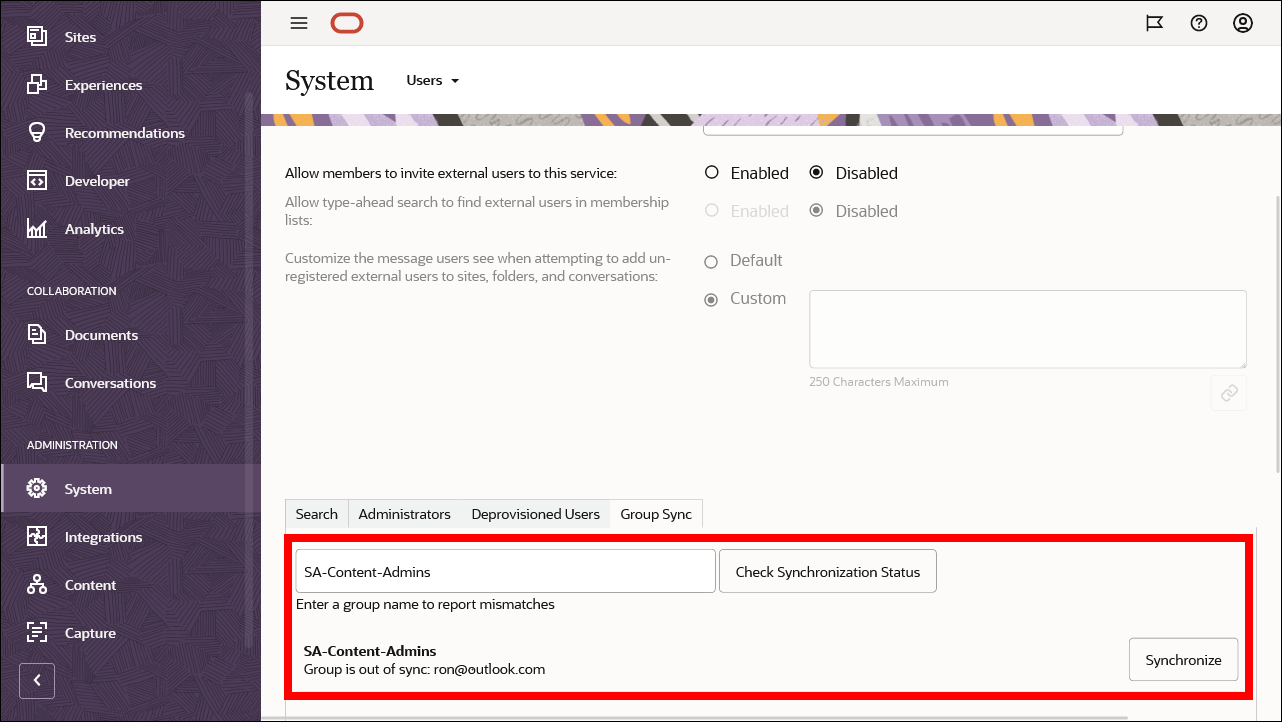
After you create new groups or add new users for Sales Accelerator, it’s recommended that you synchronize your groups in Oracle Content Management to make sure they propagate to Sales Accelerator correctly:
Log in to the Oracle Content Management instance as an application administrator.
Open the left navigation menu and choose System.
Choose Users from the dropdown menu in the page header.
At the bottom of the page, open the Group Sync tab.
Enter a user group name and click Check Synchronization Status.
If the groups is out of sync, click Synchronize. The synchronized changes will take effect immediately. Refresh the page to see the updated sync status.
Repeat this for all Sales Accelerator groups that you created in IAM or IDCS.
Add Contributors to the Sales Accelerator Repository
Sales Accelerator users won’t be able to add assets to the Sales Accelerator repository until they’re added as members to the repository with contributor access. This means you’ll need to assign Sales Accelerator user groups as repository members in Oracle Content Management:
Log in to the Oracle Content Management instance as an application administrator.
Open the left navigation menu and choose Content.
Choose Repositories from the dropdown menu in the page header.
Select the Sales_Accelerator repository, and click Members in the actions bar.

On the Add Members tab, enter the name of a user group that you want to give the contributor role for the Sales Accelerator repository. As soon as you start typing, available groups are listed to choose from.
Set the role to Contributor, and click Add.
Make sure to give the user groups with the following Sales Accelerator application roles contributor access to the Sales Accelerator repository: CECEnterpriseUser, SAContributor, SAContentAdmin, SAReports, and SAAdmin.
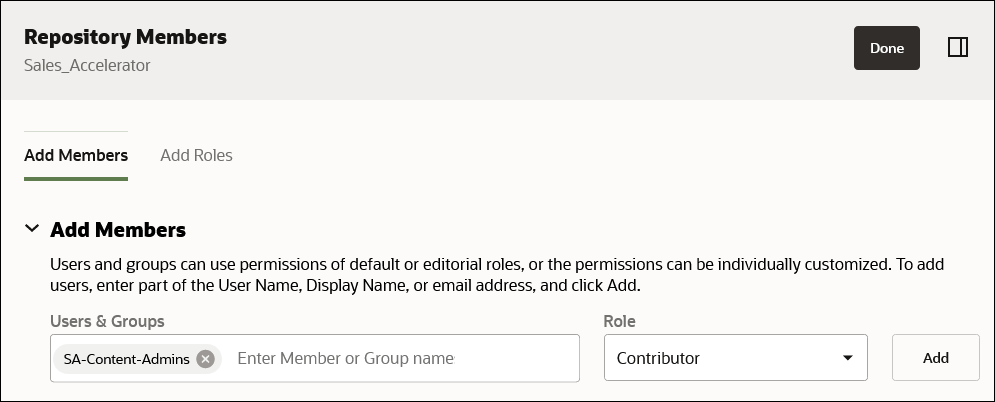
When you’re done, click Done.
Add Contributors to the Sales Accelerator Publishing Channel
Sales Accelerator users won’t be able to publish content to the Sales Accelerator channel unless they’re added as members to the publishing channel with contributor access. This means you’ll need to assign Sales Accelerator user groups as channel members in Oracle Content Management:
Log in to the Oracle Content Management instance as an application administrator.
Open the left navigation menu and choose Content.
Choose Publishing Channels from the dropdown menu in the page header.
Select the Sales Accelerator channel, and click Members in the actions bar.
In the Members panel, click Add Members.
Enter the name of a user group that you want to give the contributor role for the Sales Accelerator publishing channel. As soon as you start typing, available groups are listed to choose from.
Under ‘What can these people do?’, choose Contributor and click Add.
Make sure to give the user groups with the following Sales Accelerator application roles contributor access to the Sales Accelerator publishing channel: CECEnterpriseUser, SAContentAdmin, SAReports, and SAAdmin.
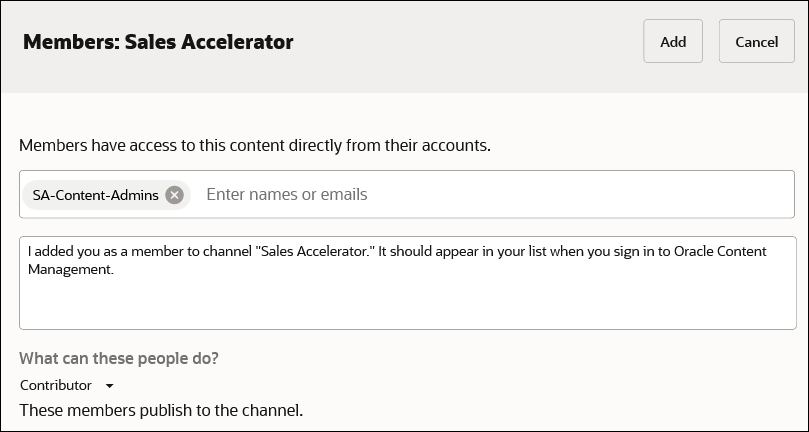
When you’re done, click Done.
Configure Allowed Domains
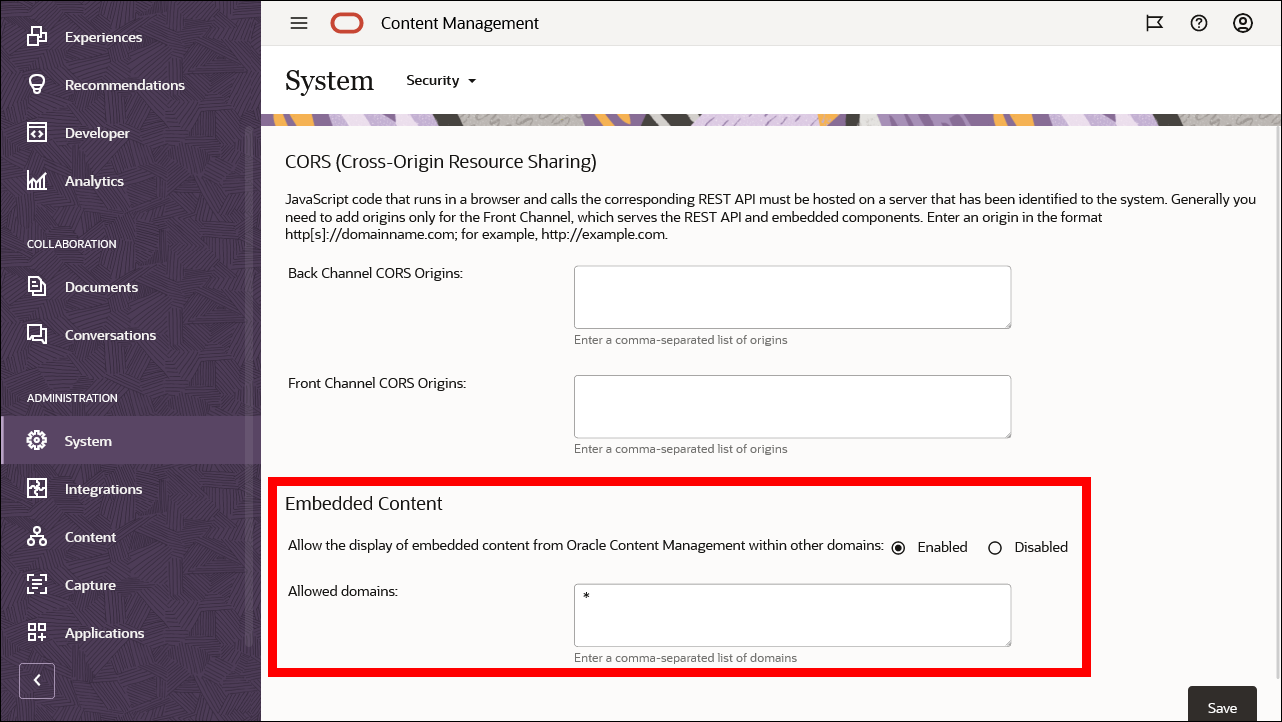
You must also configure Oracle Content Management to allow embedded content to be displayed within other domains, including Oracle Sales Accelerator:
This is required only if you’ve configured a vanity domain or friendly URL for your Sales Accelerator instance.
Log in to the Oracle Content Management instance as an application administrator.
Open the left navigation menu and choose System.
Choose Security from the dropdown menu in the page header.
Make sure the setting to allow the display of embedded content from Oracle Content Management within other domains is set to ‘Enabled’.
Make sure the allowed domains is set to * (asterisk).
When you’re done, click Save.
Roll Out Oracle Sales Accelerator
After setting up and configuring Oracle Sales Accelerator, it’s time to roll out the application to your users. Oracle Sales Accelerator users will typically have one of these roles:
Viewers (or sellers), who can access, view, and download content that’s available in your Sales Accelerator portal. They can browse to content, search for content, or filter content. For full details, see Use Oracle Sales Accelerator.
Partners, who can also access, view, and download content in Sales Accelerator, but with more limited access (no content marked as internal-only). For full details, see Use Oracle Sales Accelerator.
Contributors, who can also add new assets, deactivate obsolete content, and design and manage pages in your Sales Accelerator portal. For full details, see Manage Content in Oracle Sales Accelerator.
In addition, users may be granted special privileges to manage content they don’t own themselves (content administrators) or view analytics and reports (report administrators).
You may want to consider disabling email notifications to users in Oracle Content Management to avoid unnecessary system emails to Sales Accelerator users.
Provide Information to Users
Before informing your users about Oracle Sales Accelerator, make sure that you’ve added users and assigned them the required application roles. Otherwise they won’t be able to access Oracle Sales Accelerator.
This is the information your users will need to access Oracle Sales Accelerator:
The URL (which will end in
/sa). It’s included in all Oracle Sales Accelerator welcome emails that users receive, but you can also send it to them separately.Their user login name and password, which were assigned when you added the users to the system.
After you add users to the system and assign their roles, they’ll receive welcome emails for each role they’ve been assigned. These welcome email include the URL and login information. You may also want to point your users to the Oracle Help Center to help them get up and running with Oracle Sales Accelerator.
View Analytics and Reports
You may want to monitor access and usage information for the content in Oracle Sales Accelerator. This may help you analyze your users’ needs and optimize their user experience. You need the SAReports application role to be able to see system-wide analytics and reports in Oracle Sales Accelerator.
In addition to system-wide analytics and reports, you can also view analytics for individual assets and pages.
To view analytics and reports:
Log in to Oracle Sales Accelerator as a report administrator.
Open your user menu in the top-right corner and choose Analytics and Reports.
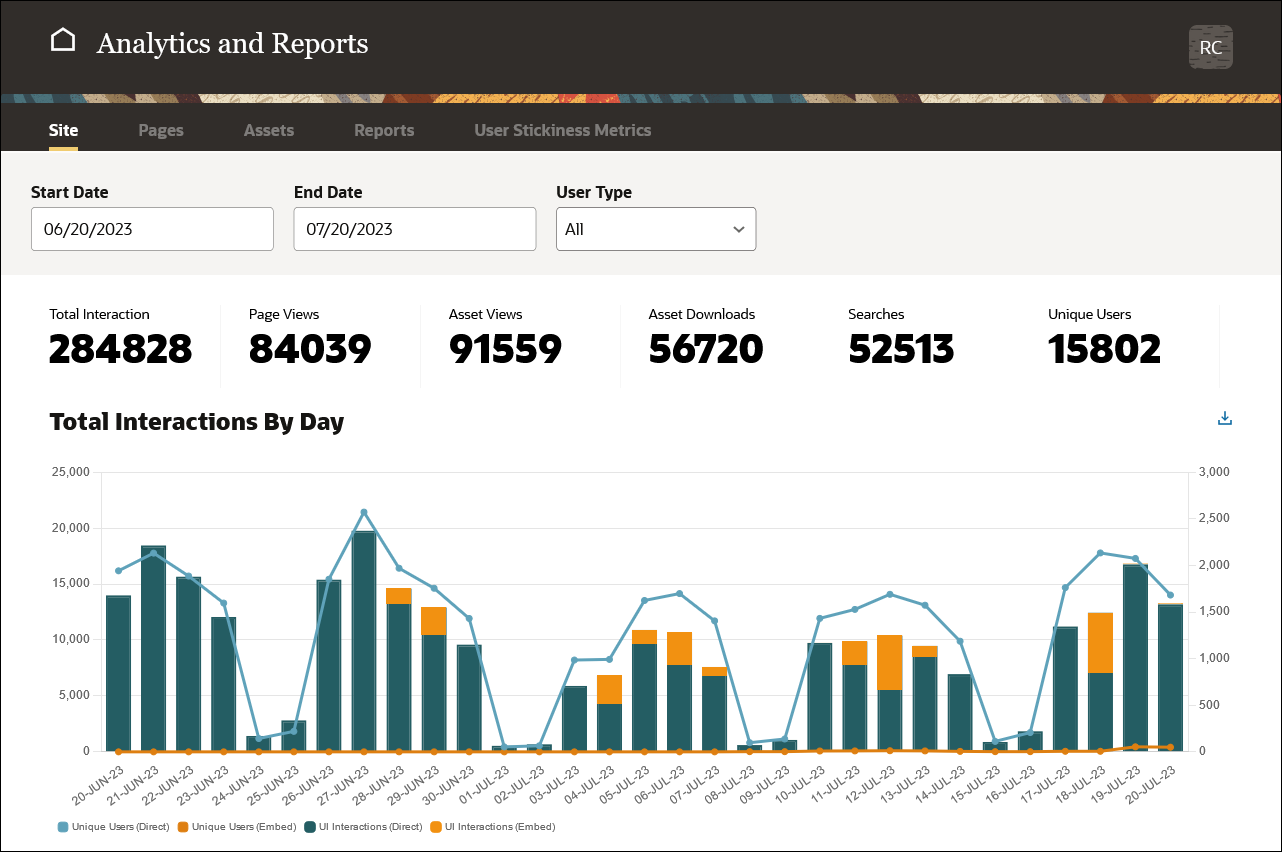
If you don’t see this option, then you don’t have the required privileges.The Analytics and Reports page provides a lot of useful information that will help you track how Oracle Sales Accelerator is being used. There are various tabs, each focusing on different areas:
- Site
- Pages
- Assets
- Reports
- User engagement (stickiness) metrics
You can see access information for the site as a whole, as well as its individual pages and assets, including:
- total interactions per day (with different colors for direct and embedded interactions)
- page and asset views by day
- asset downloads by day
- searches by day
- top assets viewed
- top assets viewed and downloaded
Click the ![]() icon to download the data of any graph as a comma-separated values (CSV) file, which can be opened in a spreadsheet application for viewing or further processing.
icon to download the data of any graph as a comma-separated values (CSV) file, which can be opened in a spreadsheet application for viewing or further processing.
If you’re a partner, then you won’t be able to download graph data.
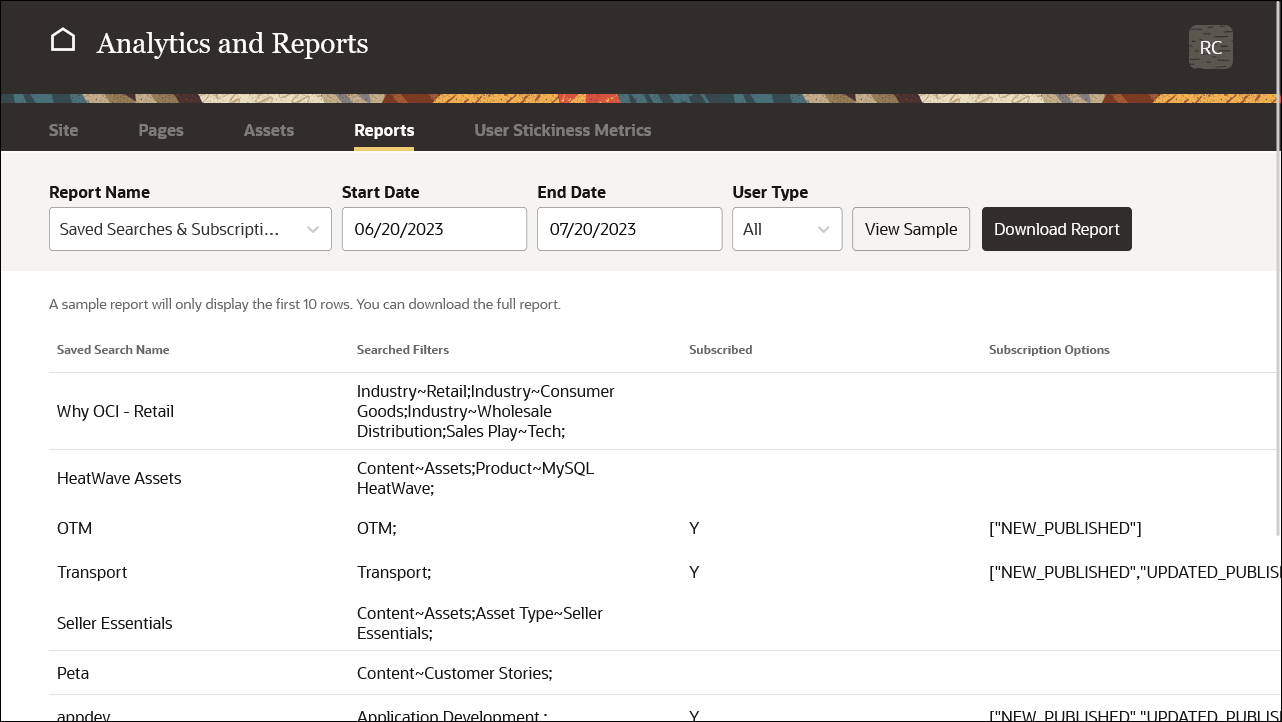
In addition to site, pages, and assets analytics, you can also view and download reports on various metrics, including content usage, favorites, and searches.
Select the report type you want to create and then click View Sample to see the first ten entries in the report. To view the entire report, click Download Report and open the comma-separated values (csv) file on your computer.
You can create a metrics report for a time period of no more than thirty days.
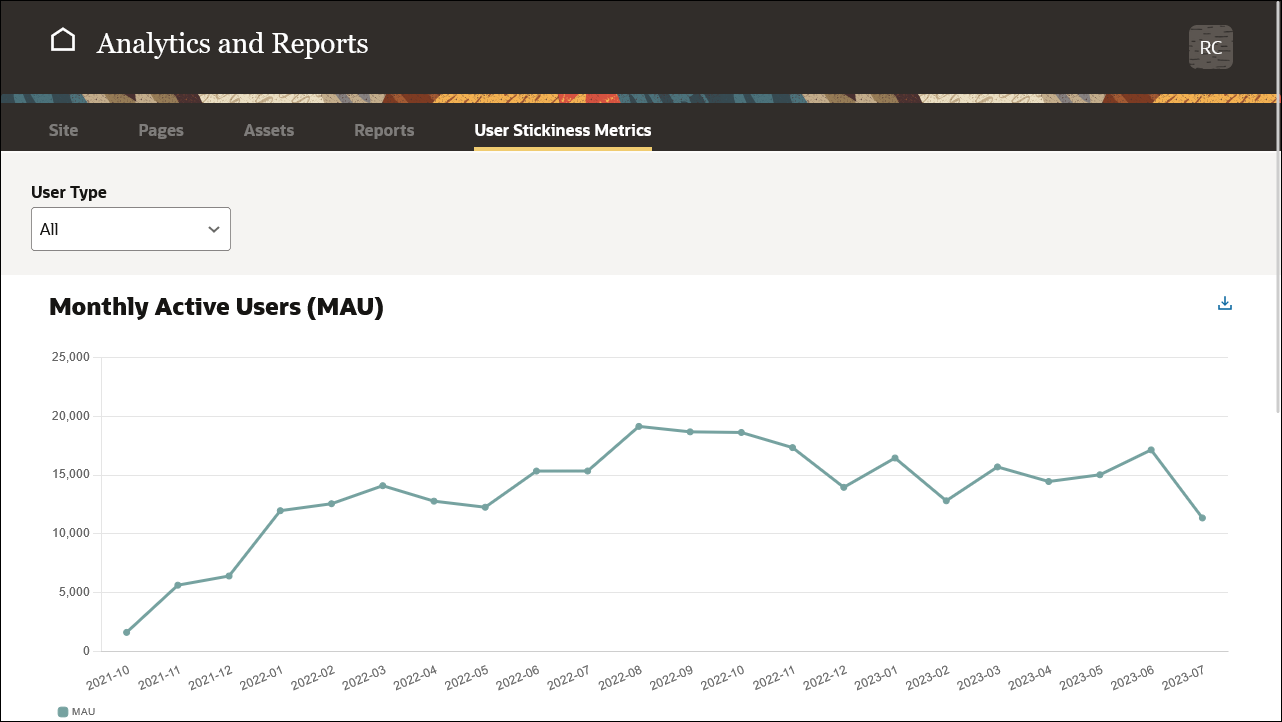
You can track how much your users interact with Oracle Sales Accelerator over time, if necessary differentiated by employees and partners. Information is available for these metrics:
- Daily active users (DAU)
- Monthly active users (MAU)
- Weekly active users (WAU)
In addition, you can see the ratios over time between daily and monthly users (DAU/MAU), weekly and monthly users (WAU/MAU), and daily and weekly users (DAU/WAU). These ratios help you track how frequently your users engage with the Oracle Sales Accelerator platform—in other words, its “stickiness” level.
Click the ![]() icon to download the data of any graph as a comma-separated values (CSV) file, which can be opened in a spreadsheet application for viewing or further processing.
icon to download the data of any graph as a comma-separated values (CSV) file, which can be opened in a spreadsheet application for viewing or further processing.
If you’re a partner, then you won’t be able to download graph data.
Advanced Configuration
Here are some additional configuration tasks for Oracle Sales Accelerator:
- Configure user dimensions
- Modify the styling
- Modify the branding logo or text
- Configure custom buttons
- Embed Sales Accelerator into other applications
Configure User Dimensions
As users work in your Oracle Sales Accelerator portal, you’ll likely want to keep track of how exactly they access, view, and download the assets and pages in the system. You can’t do this at the individual user level for privacy reasons, but you can group users together to monitor anonymized access patterns. Define user dimensions (characteristics) to create user categories, so you can learn that, say, North American users in the presales department viewed and downloaded particular assets more than other groups last year. This will help you optimize the content and user experience of your Sales Accelerator portal.
To configure user dimensions:
Log in to Oracle Sales Accelerator as a content administrator.
Open your user menu in the top-right corner and choose Administration.
If you don’t see this option, then you don’t have the required privileges.Click Content Updates.
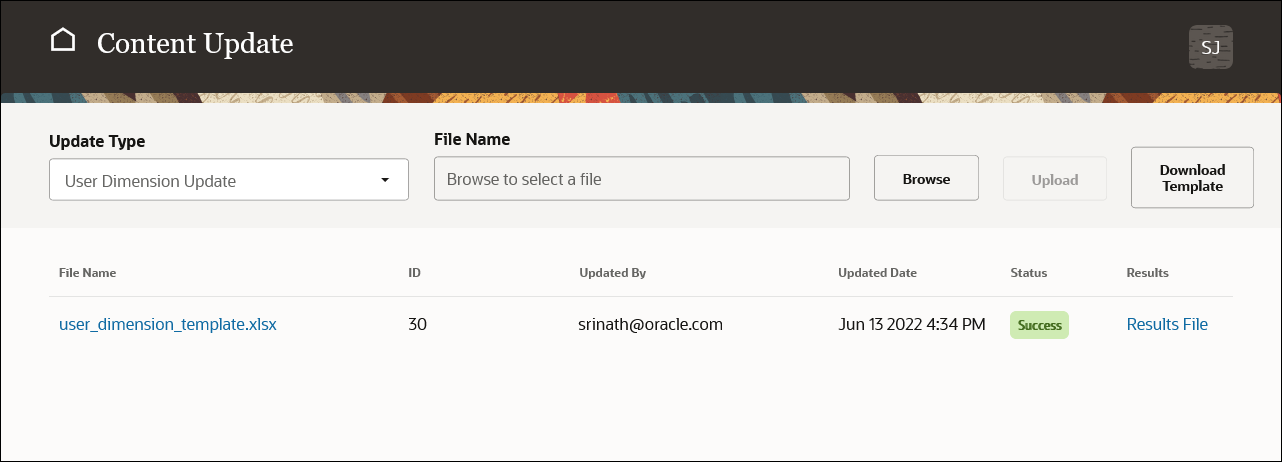
Under Update Type, choose User Dimension Update.
Click Download Template to get a sample Excel file that you can use to assign user dimensions to your users in the system.
Don’t change the worksheet name in the spreadsheet.
The template spreadsheet contains these columns:
Email id: This is the email address of a registered user for your Sales Accelerator environment.
User Dimension 1: This is the first user characteristic (dimension) that can be used to group users together for metric and analytical purposes. You can choose whatever dimension you want, such as department, location, or job code.
User Dimension 2: This is the second user characteristic (dimension) that can be used to group users together.
User Dimension 3: This is the third user characteristic (dimension) that can be used to group users together.
For example, in the sample file below, the user who logs in as john.smith@example.com is classified as someone in the presales department in the field in North America.

Once you’ve created the Excel file that contains all the user information, click Browse to select that Excel file and then click Upload.
Click Continue to confirm the operation.
The spreadsheet is now processed and the defined user dimensions are assigned to the specified users in the system.
After all actions in the spreadsheet have been completed, the Content Update page is refreshed to show the file that was processed, along with a status indicator. If everything was processed without any errors, then you’ll see the status ‘Success’ in green (this may take a few minutes). You can download the results file to have a closer look at the changes that were made in the system. This may also be helpful when troubleshooting any issues, for example if some of the specified users don’t exist in the system.
Modify the Styling
The look and feel of the Sales Accelerator portal is controlled by a number of cascading style sheets (CSS), each covering different pages in the user interface:
- saHomeTheme.css — controls styling of the home page components, including header, footer, search results, and navigation.
- saDetailsTheme.css — controls styling of all collection pages (Products, Sales Plays, Competitors, etc.) and the 404 (Page Not Found) page.
- saStoryDetailsTheme.css — controls styling of the story details pages.
- saMyContentTheme.css — controls styling of the My Content page.
- saPreviewTheme.css — controls styling of the asset preview page.
- saReportTheme.css — controls styling of the analytics and reports page.
This is how to modify the styling, for example the background color of the header:
Log in to Sales Accelerator as a system administrator.
Identify the interface element whose styling you want to change.
Right-click on that element and choose Inspect. (In some browsers this option may be named slightly differently).
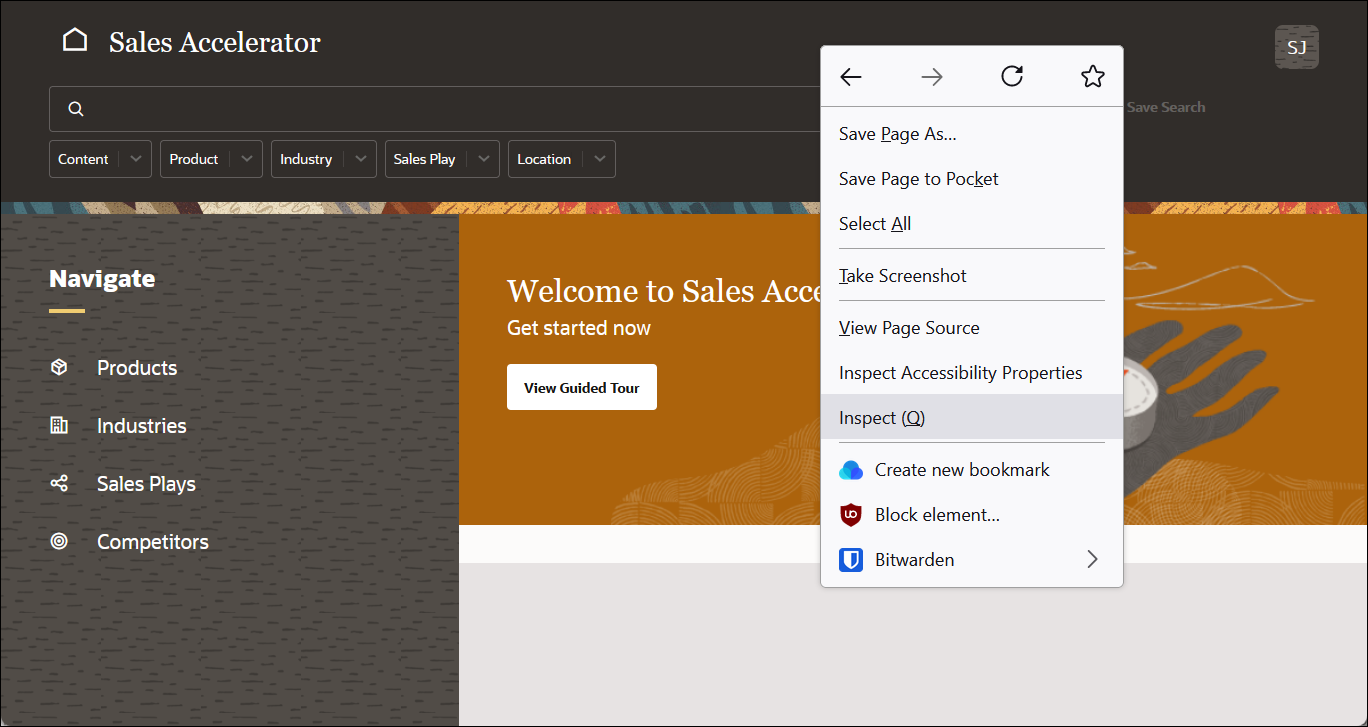
A developer console opens, where you can select the element in the HTML code inside the console. You’ll also see the CSS styling that’s applied to the element you selected.
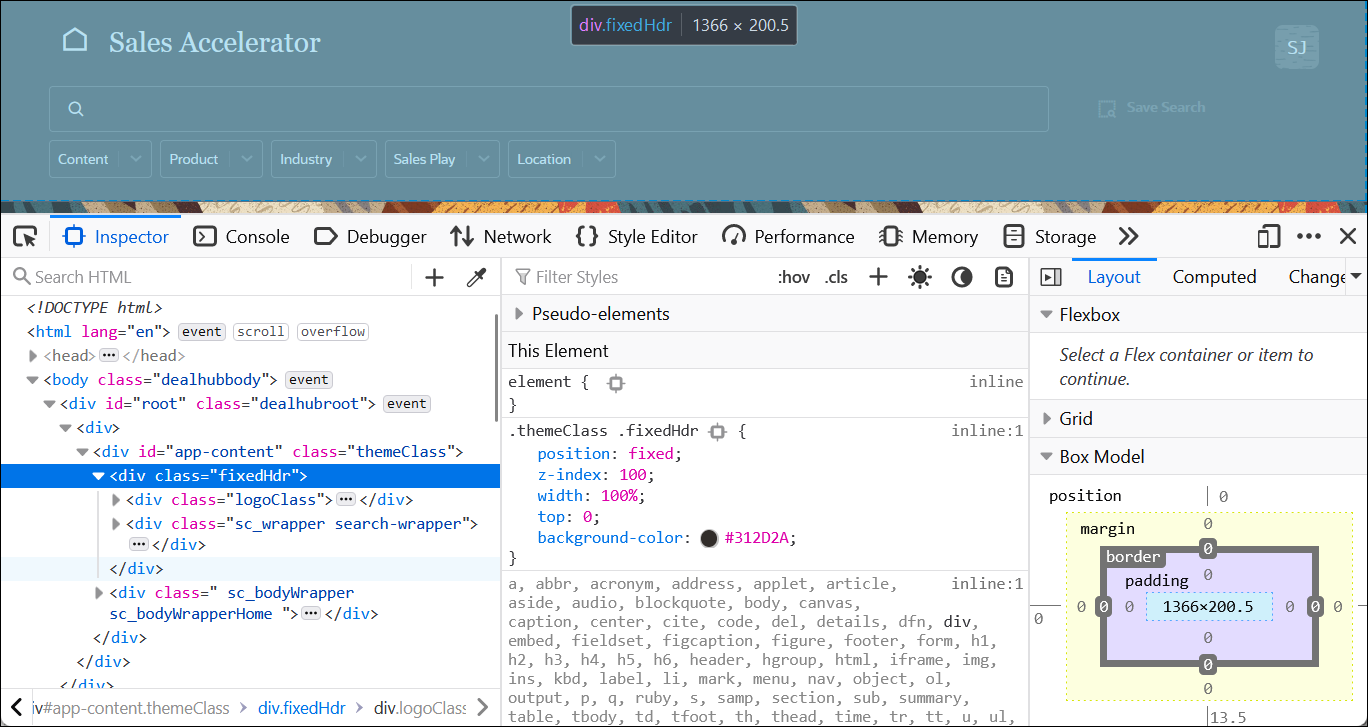
Now make the CSS change in the element style section. You’ll see the change reflected in the interface immediately (for example, the background color).
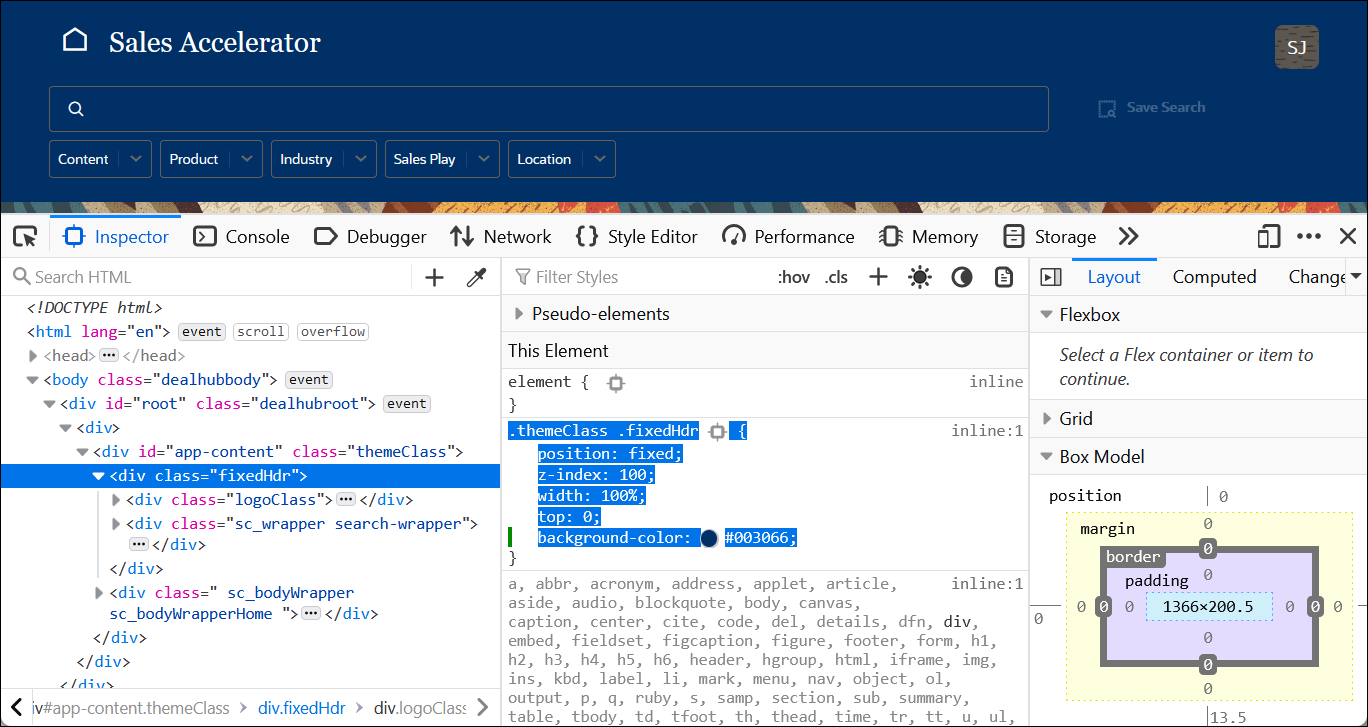
Select and copy the CSS information. Make sure to include the parent selector and only those attributes that you’ve changed. In the example above, we only changed the background color of the header.
 .themeClass .fixedHdr {
     background-color: #003066;
 }
Now log in to the Oracle Content Management web interface as an administrator, and open the Assets page.
In the Filters section, go to Asset Types and search for ‘SA-Portal-Theme’.
You’ll see a list of all custom theme styling CSS files. Download the CSS file that you want to modify. In our example, that would be saHomeTheme.css (for changes to the home page).
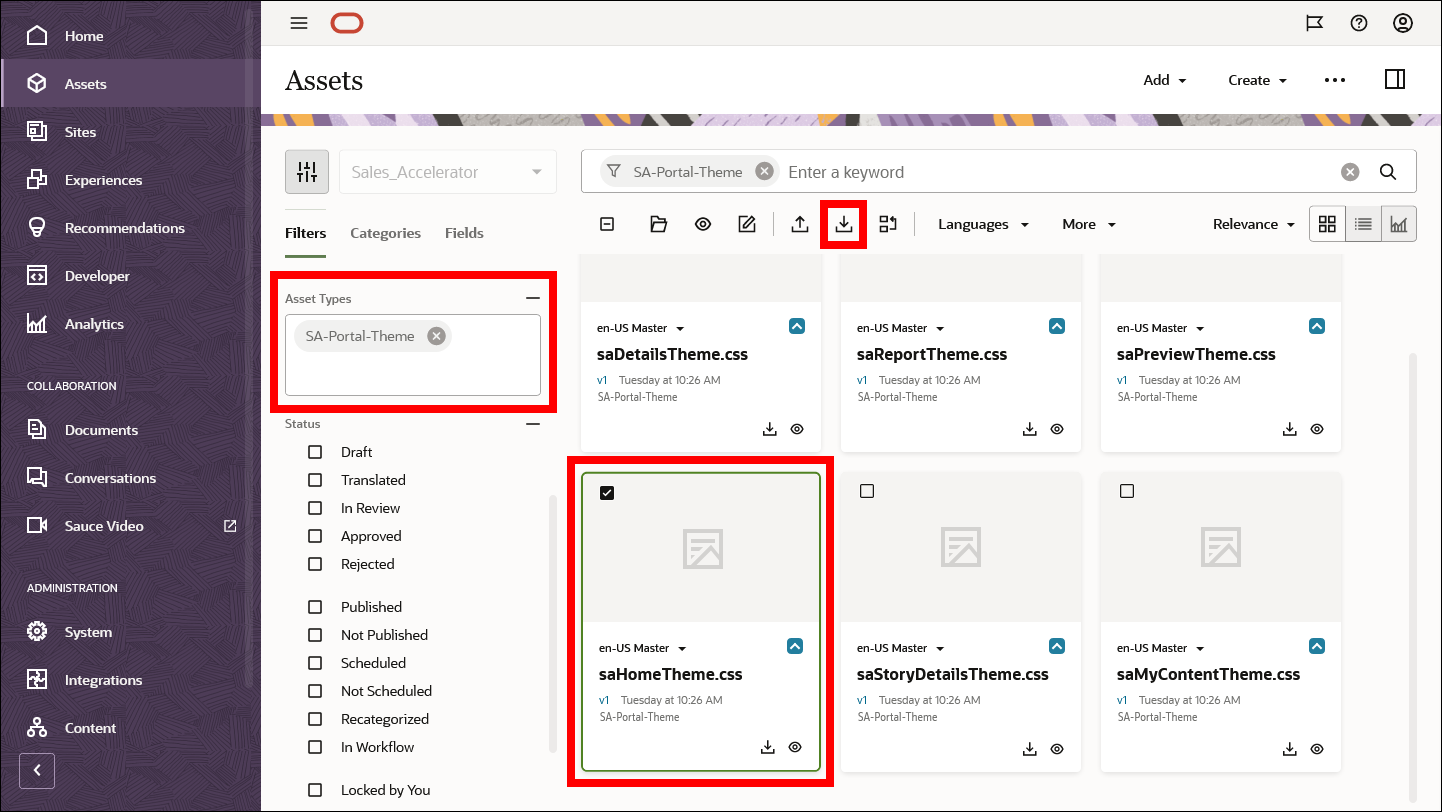
Open the downloaded CSS file in a text editor and paste the CSS code you copied earlier.
.themeClass .fixedHdr {
    background-color: #003066;
}
Save the CSS file and upload it to Oracle Content Management as a new version of the original CSS file.
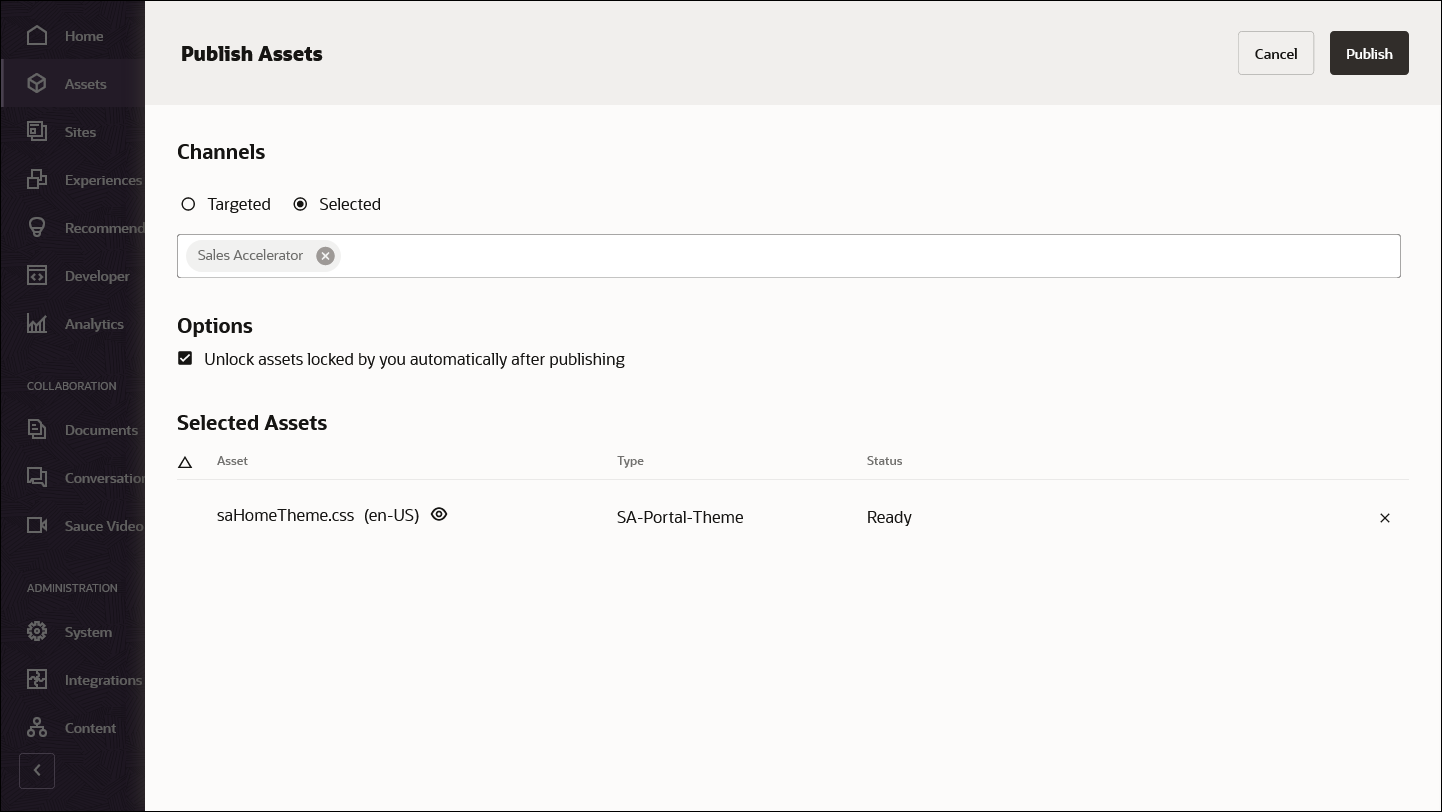
Choose Publish Now from the More menu for the updated CSS file that you just uploaded.
On the Publish Assets page, choose Selected in the Channels section and select Sales Accelerator as the publishing channel, then click Publish.
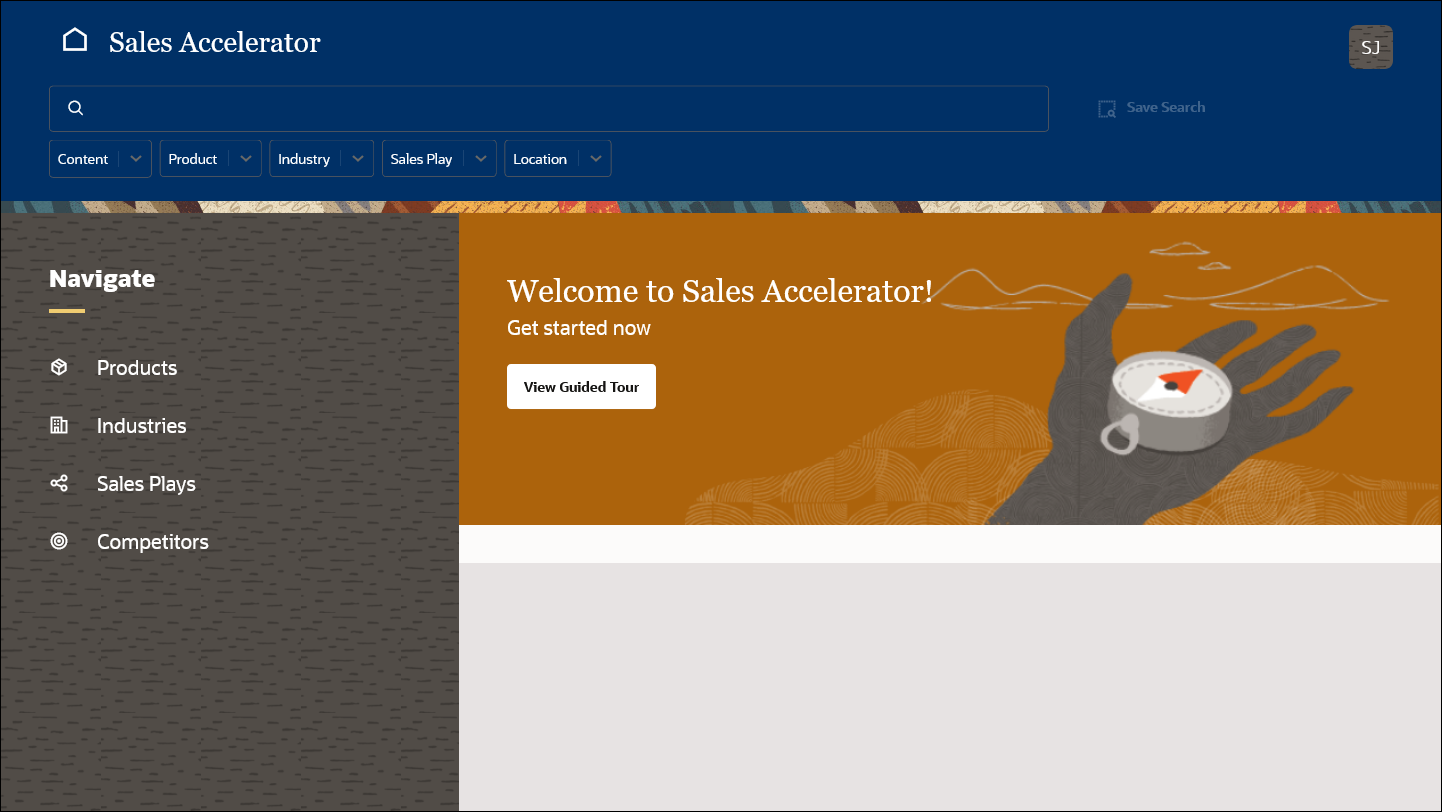
After publishing the new CSS file, you can go back to Sales Accelerator and refresh your page to see your changes.
It may take some time to see the changes as the system will typically keep everything in cache for 10-15 minutes. If you still don’t see the changes after a while, then try clearing your web browser cache and reloading the page.
Modify the Branding Logo or Text
In addition to styling, you can change the branding logo and/or text:
Log in to the Oracle Content Management web interface as an administrator, and open the Assets page.
Click Add, and then Add from this computer.
Select a logo image in PNG format and upload it to Oracle Content Management. Set the asset type to ‘SA-Logo’, and modify other attributes as needed. For example, you may want to set the asset’s visibility to public. Click Done when you’re done.
Make sure the PNG file has a transparent background.

After the logo image has been uploaded, you’ll see it listed on the Assets page.
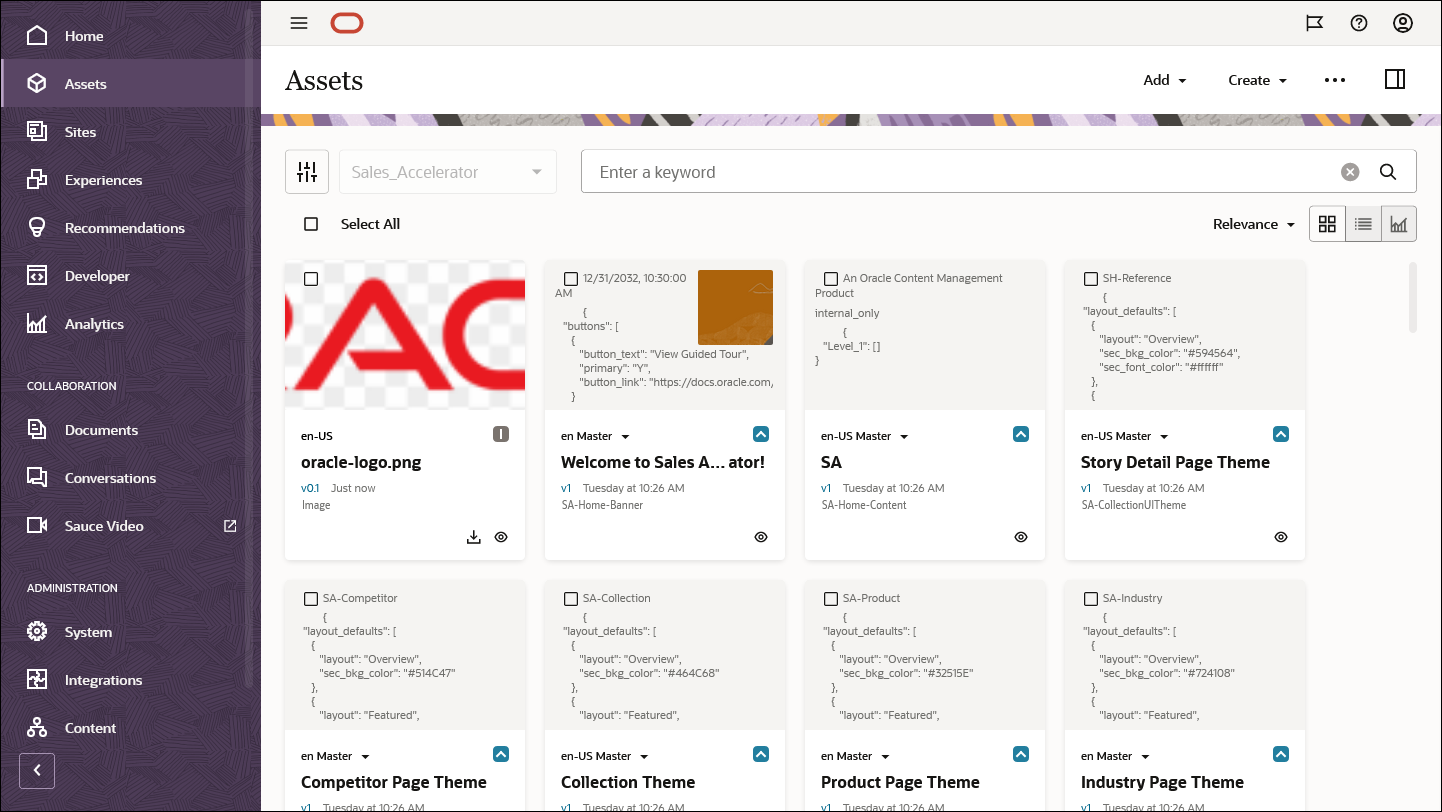
Select the logo asset and click Publish Now in the actions bar. (You may need to open the More menu to see this option.) On the Publish Assets page, select the Sales Accelerator publishing channel and click Publish. This makes the asset available through the REST API for Content Delivery.
Click on the image name in the assets list, toggle the sidebar, open the Properties panel, and then the API tab.
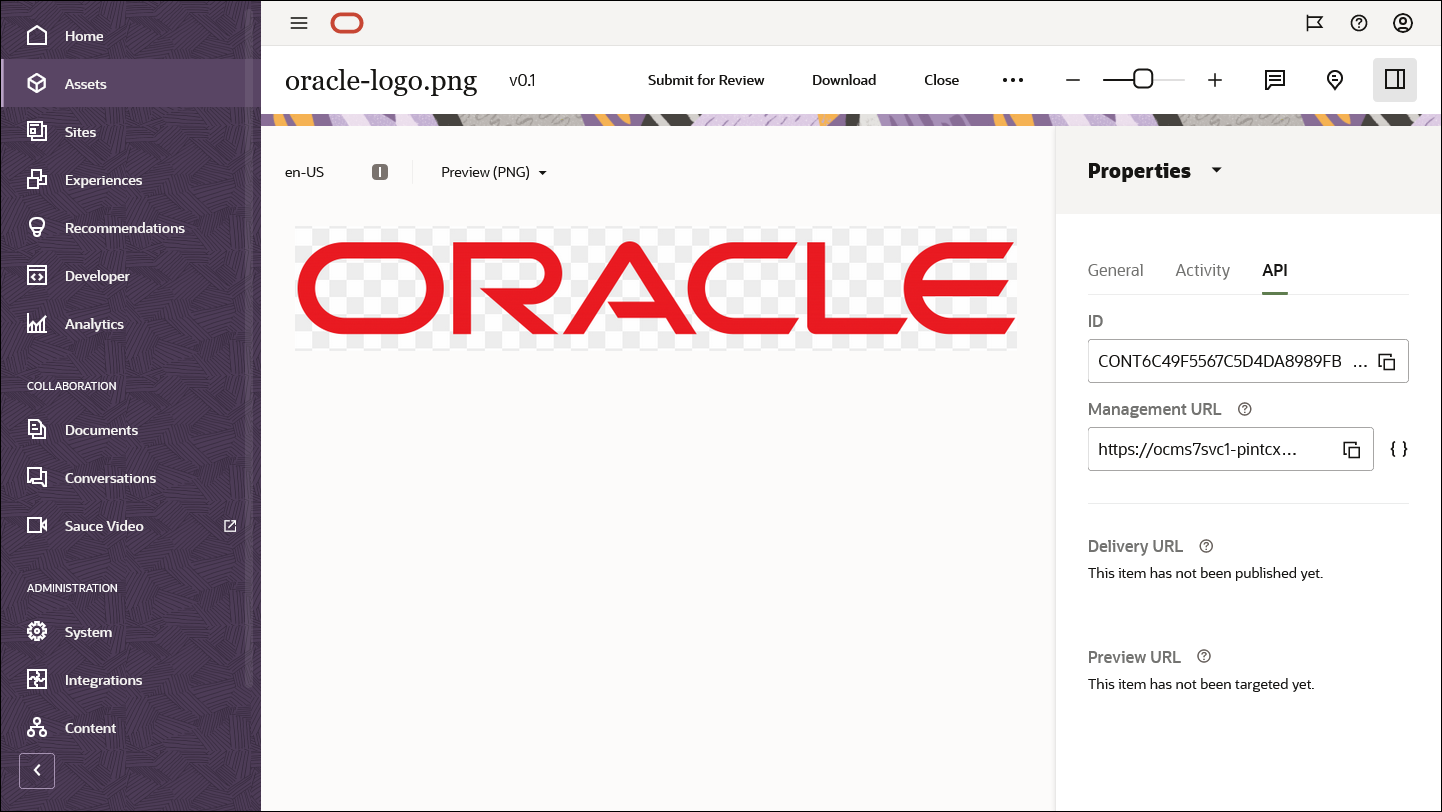
Copy the image ID and keep it somewhere, so you can update it in the Sales Accelerator administration interface.
Now log in to Sales Accelerator as a system administrator.
Open your user menu and choose Administration.
Click Application Configuration.
Search for ‘portal header text’, and click the edit icon (pencil) for the Portal Header Text item.

- In the Edit Category panel, go to the App Logo OCM Content ID field and paste the content ID of the logo you uploaded to Oracle Content Management earlier. Edit the SA Text field as needed.
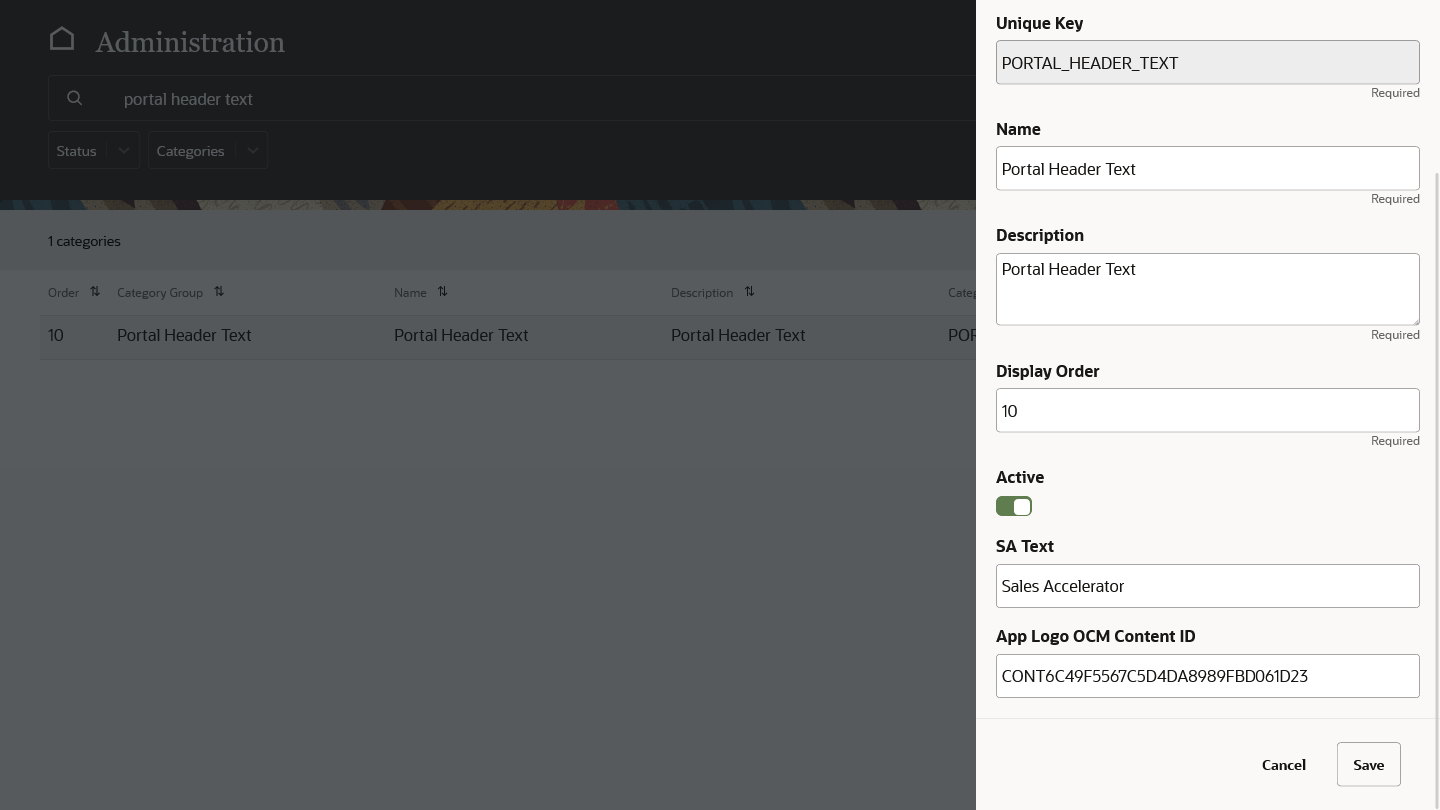
- Click Save when you’re done. You can now go back to your Sales Accelerator home page and see the changes.
It may take some time to see the changes as the system will typically keep everything in cache for 10-15 minutes. If you still don’t see the updated logo and/or text after a while, then try clearing your web browser cache and reloading the page.
Configure Custom Buttons
You can configure a custom button that’s displayed for each story type on the story details page:
Log in to Sales Accelerator as a system administrator.
Open your user menu and choose Administration.
Click Application Configuration.
Search for ‘SA Stories Types’, and click the edit icon (pencil) for an item.

Provide values for the custom button label, custom text (displayed below the button), link URL, and the parameter names. The values entered for Parameter Name 1 and Parameter Name 2 will be treated as URL query parameter names, and their values will be passed as shown in the example below.
Example:
Link = www.example.com
Parameter name 1 = storyId
Parameter name 2 = storyType
When you click the custom button, the URL is transformed towww.example.com?storyId=<current-story-id>&storyType=<current-story-type>. The value for parameter name 1 will always be considered the story ID, and parameter name 2 the story type.The custom button label, custom text, and link URL can’t be empty; otherwise, the button won’t appear in the user interface.
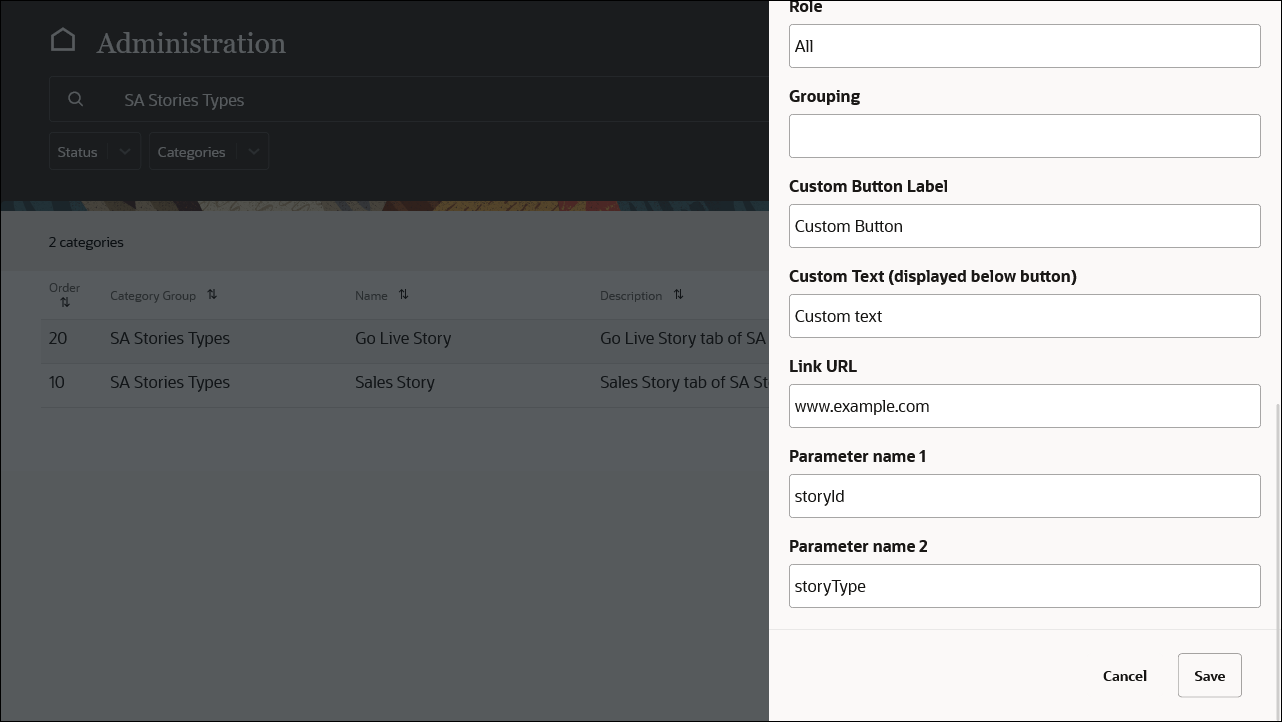
Click Save when you’re done.
The custom button will appear on the story details page:
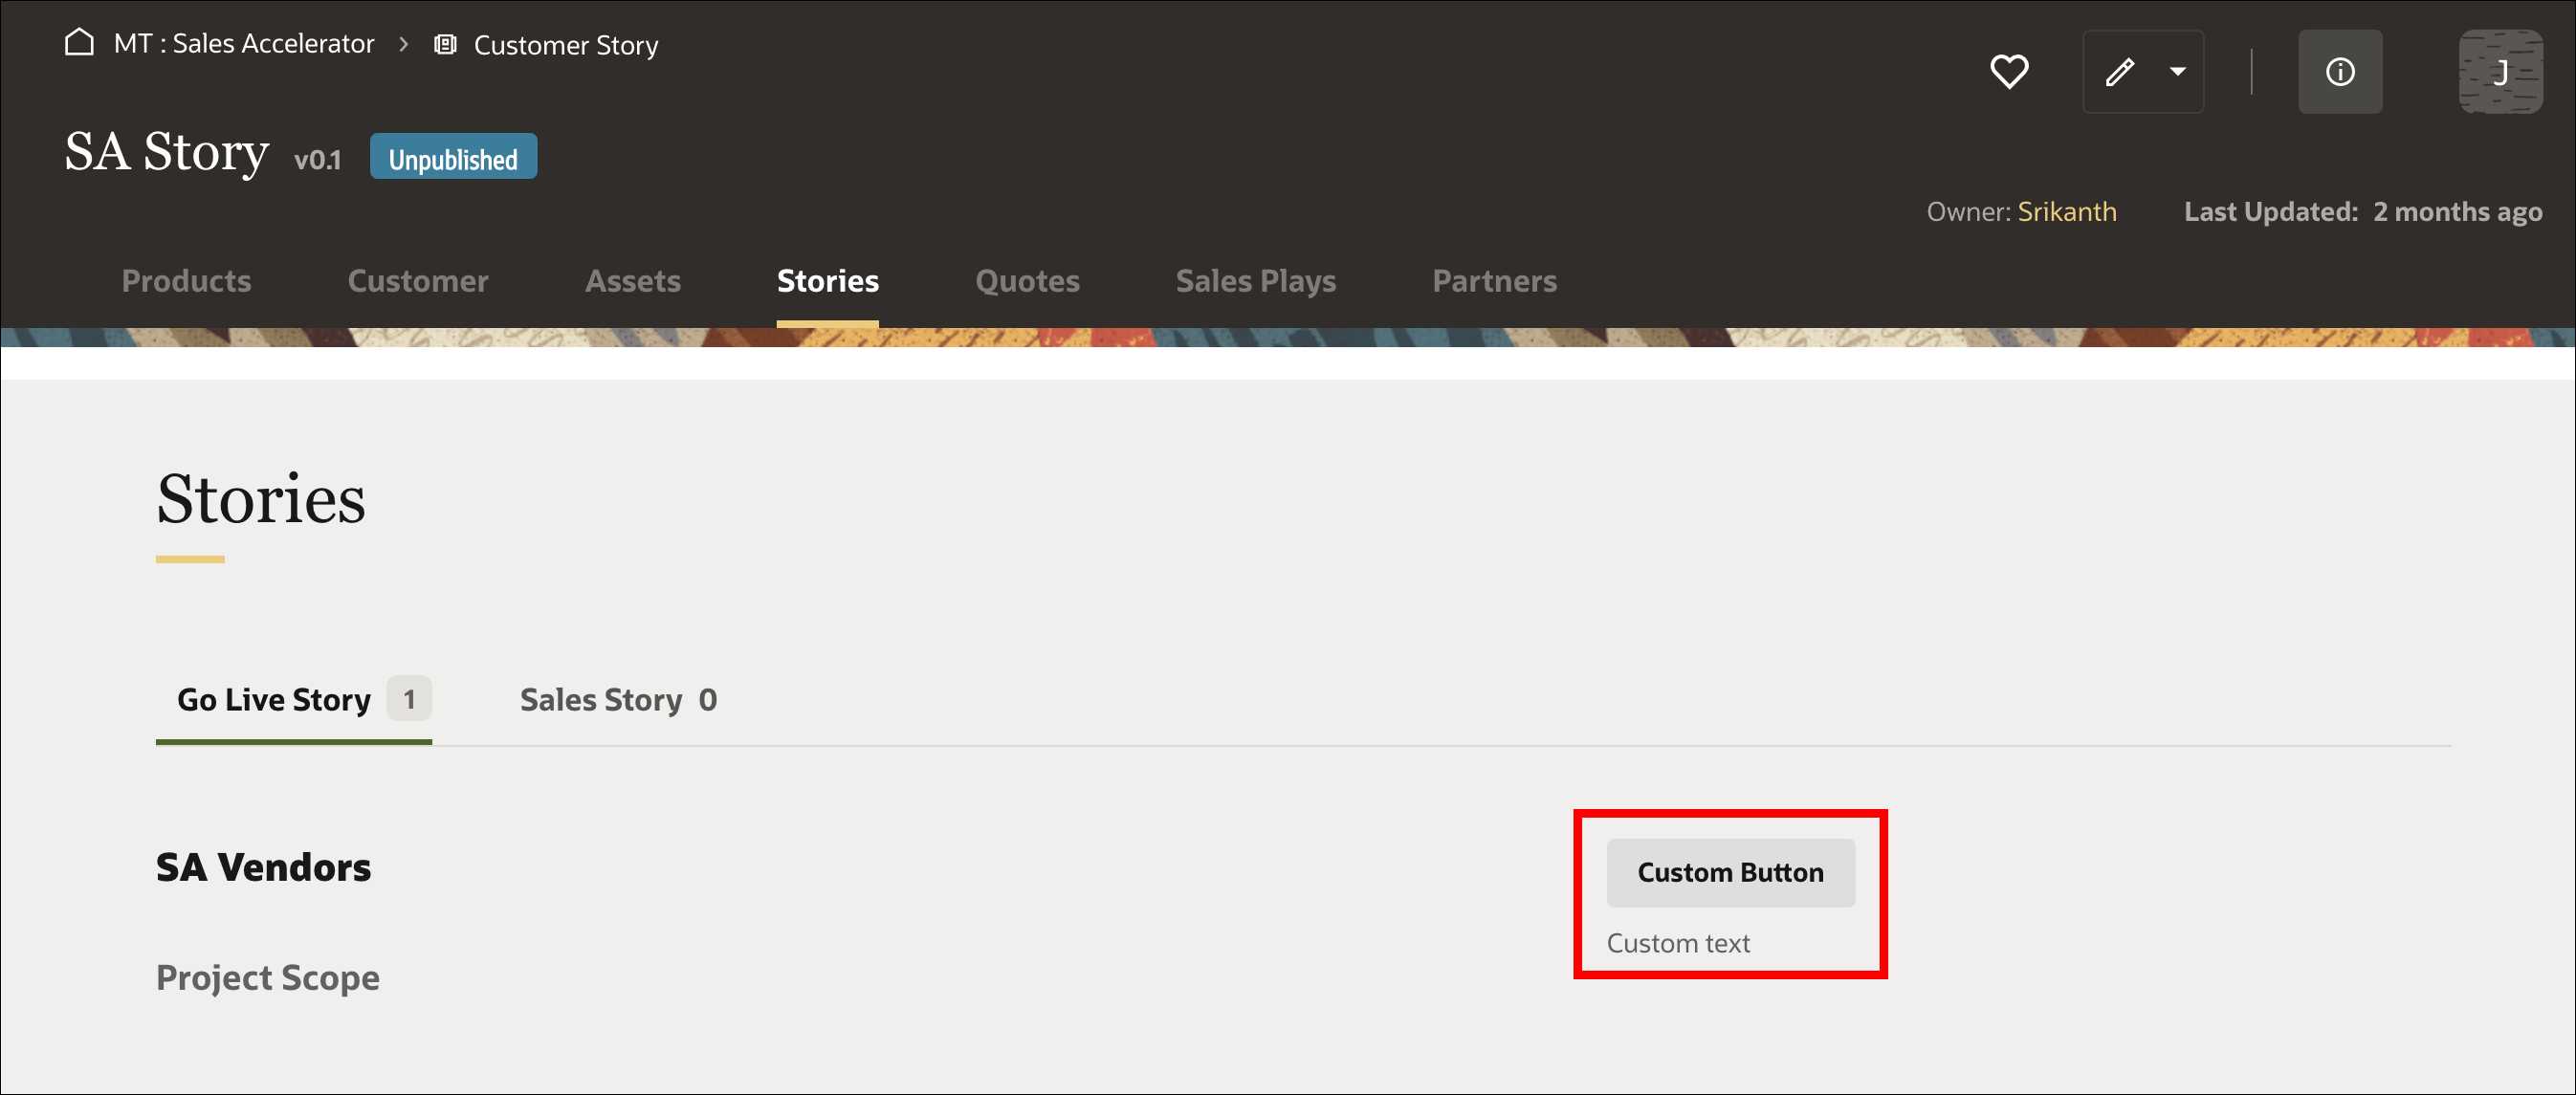
Embed Sales Accelerator Into Other Applications
Oracle Sales Accelerator can be embedded into other applications, which shows Sales Accelerator content within another application’s user interface.
There are two ways to embed Sales Accelerator into other applications:
- Using the Embed API (preferred method)
- Using URL parameters
The Embed API is the recommended way to embed Oracle Sales Accelerator into other applications. This API allows you to show the Sales Accelerator user interface within an iframe inside other applications. It allows users to make selections from search results and pass in the IDs for further processing.
The Embed API for Oracle Sales Accelerator is accessed through a simple JavaScript file, which can be obtained and referenced using an HTML <script> tag:
<script type="text/javascript" src="https://<server>/sa/sa-embed.js"></script>
This JavaScript API defines the OracleSAUI namespace, which provides access to the embeddable components.
As an alternative, you can also use URL parameters to embed Sales Accelerator, but that can only be used for consumption (read-only) purposes. It’s recommended that you use the Embed API wherever possible.
See Embed Oracle Sales Accelerator Into Other Applications for full details.
Set Up and Administer Oracle Sales Accelerator
F49626-07
July 2023
Copyright © 2021, 2023, Oracle and/or its affiliates.
Primary Author: Oracle Corporation