9 Use Lists of Values in an Excel Workbook
Oracle Visual Builder Add-in for Excel enables you to associate a list of values with a business object field, a custom action payload field, or a row finder variable.
A list of values is the set of valid values for a business object field and represents a relationship between the field in one business object and another referenced business object.
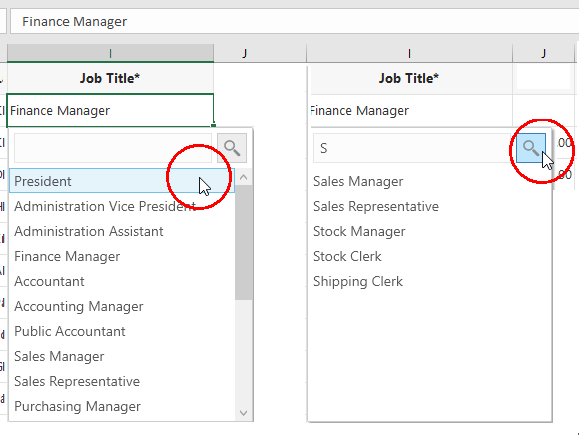
When a user selects a cell with a properly configured list of values, a search-and-select window shows a list of values for the user to choose from. Alternatively, the user can enter some text and click the Search icon to filter and show values based on the user input, for example, to show values that start with the user-specified text. See Configure Search for a List of Values.
This image illustrates both these scenarios. For the latter scenario, the user entered S in the search box to filter values from the list that begin with S (Sales Manager, Sales Representative, and so on). Users can also enter the full value in the search box, assuming it's a valid value such as Sales Manager.

Each item in the list of values has a display value (which appears in the Excel workbook) and an identity value that is retrieved and posted to the business object field. For example, an Employee business object's Job attribute might contain these display and identity values:
| Display value | Identity value |
|---|---|
| President | PRES |
| Finance Manager | FIN_MGR |
| Sales Manager | SAL_MGR |
On download, the identity values are replaced by the display values; On upload, the display values are replaced by the identity values.
Configure a List of Values for a Business Object Field
You can use the Business Object Field Editor to add or modify the list of values configuration for a field.
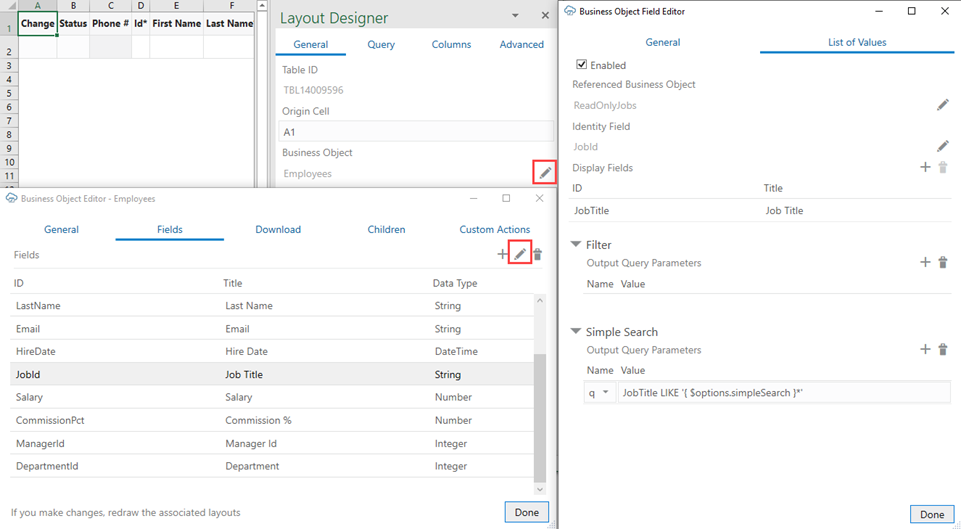
To access this editor, click the Edit icon next to the Business Object field in the Layout Designer. Once you open the Business Object Editor, click the Fields tab and select the business object's field. Then, click the Edit icon in the Business Object Editor to open the Business Object Field Editor, as shown in the following image where the Business Object Field Editor is open for the Employee business object’s Job Title field.
The List of Values tab in the Business Object Field Editor shows the following properties:
- Enabled: Select to enable list of value functionality for this field; deselect to disable
- Referenced Business Object: This business object provides the display values for the corresponding identity values
- Identity Field: The field in the referenced business object used to look up the display values for the identity values in the current field
- Display Fields: These fields come from the referenced business object and are shown instead of the identity values where this field is used in a layout
To configure a list of values for a business object field that does not have one yet:
- Select the Enabled check box on the List of Values page.
- Select the appropriate business object using the Edit icon next to the Referenced Business Object field.
Tip:
Pick a business object from the same catalog used to create the layout. If the catalog is missing the desired business object, you can add a new business object to an existing catalog (see Add a Business Object to an Existing Catalog).
If you want to reference a business object with a different base path, you can create or import a business object into the current catalog and then override the base path (see Override a Business Object's Base Path).
- Choose the appropriate identity field from the referenced business object.
- Choose the desired display field from the referenced business object.
You can choose multiple display fields for one list of values. In that case, values of all display fields are concatenated and the concatenated value will be shown in a single Excel cell.
- Configure Filter and Simple Search as desired (see subsequent sections for details).
- Click Done.
The add-in caches the data of list of values in the workbook. After you modify the configuration of any list of values, click Redraw Layout. Then, click Clear List of Values Cache from the Advanced menu in the Misc ribbon tab.
Note:
For a list of values with multiple display fields, if you enter a value directly in the cell that is not yet cached, the value will be considered invalid initially. Use the search-and-select window instead to select the value. The default search is specific to the first display field. You can modify the search expression from the List of Values page.Configure a List of Values for a Custom Action Field
Define a list of values for a custom action's payload field, just as you'd configure a list of values for a business object field.
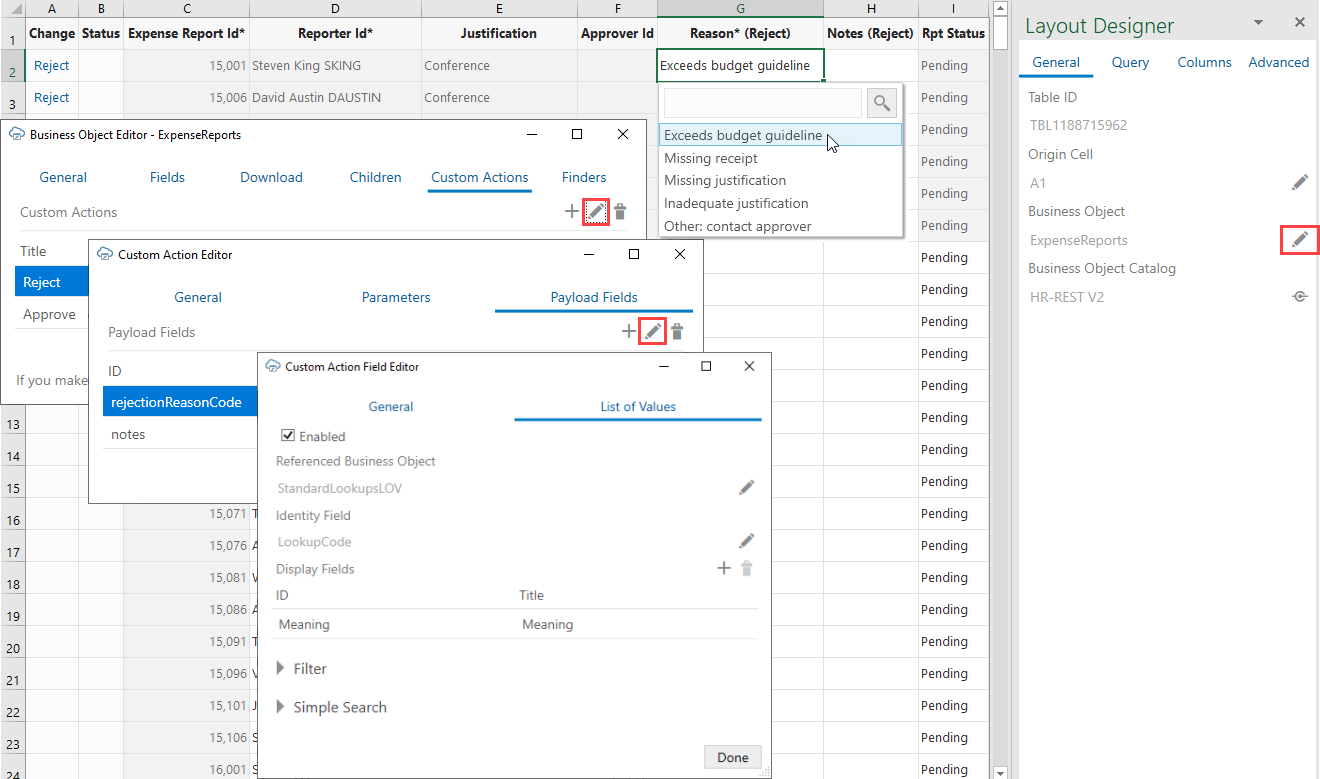
Use the Business Object Editor to access a business object's custom actions and associated payload fields. You can then edit a payload field to define a list of values:
Description of the illustration custom_action_lov.png
The List of Values tab shows the following properties:
- Enabled: Select to enable list of value functionality for this field; deselect to disable
- Referenced Business Object: This business object provides the display values for the corresponding identity values
- Identity Field: The field in the referenced business object used to look up the display values for the identity values in the current field
- Display Fields: These fields come from the referenced business object and are shown instead of the identity values where this field is used in a layout
To configure a list of values for a payload field that does not have one yet:
- Select the Enabled check box on the List of Values page.
- Select the appropriate business object using the Edit icon next to the Referenced Business Object field.
Tip:
Pick a business object from the same catalog used to create the layout. If the catalog is missing the desired business object, you can add a new business object to an existing catalog (see Add a Business Object to an Existing Catalog).
If you want to reference a business object with a different base path, you can create or import a business object into the current catalog and then override the base path (see Override a Business Object's Base Path).
- Choose the appropriate identity field from the referenced business object.
- Choose the desired display field from the referenced business object.
You can choose multiple display fields for one list of values. In that case, values of all display fields are concatenated and the concatenated value will be shown in a single Excel cell.
- Configure Filter and Simple Search as desired (see subsequent sections for details).
- Click Done.
Once you define a list of values, the choice list will appear wherever that payload field appears, as shown in the preceding image where the referenced business object's list of values appear for the Reason (Reject) column.
The add-in caches the data of list of values in the workbook. After you modify the configuration of any list of values, click Redraw Layout. Then, click Clear List of Values Cache from the Advanced menu in the Misc ribbon tab.
Note:
For a list of values with multiple display fields, if you enter a value directly in the cell that is not yet cached, the value will be considered invalid initially. Use the search-and-select window instead to select the value. The default search is specific to the first display field. You can modify the search expression from the List of Values page.Configure a List of Values for a Row Finder Variable
Define a list of values for a row finder variable, just as you'd configure a list of values for a business object field.
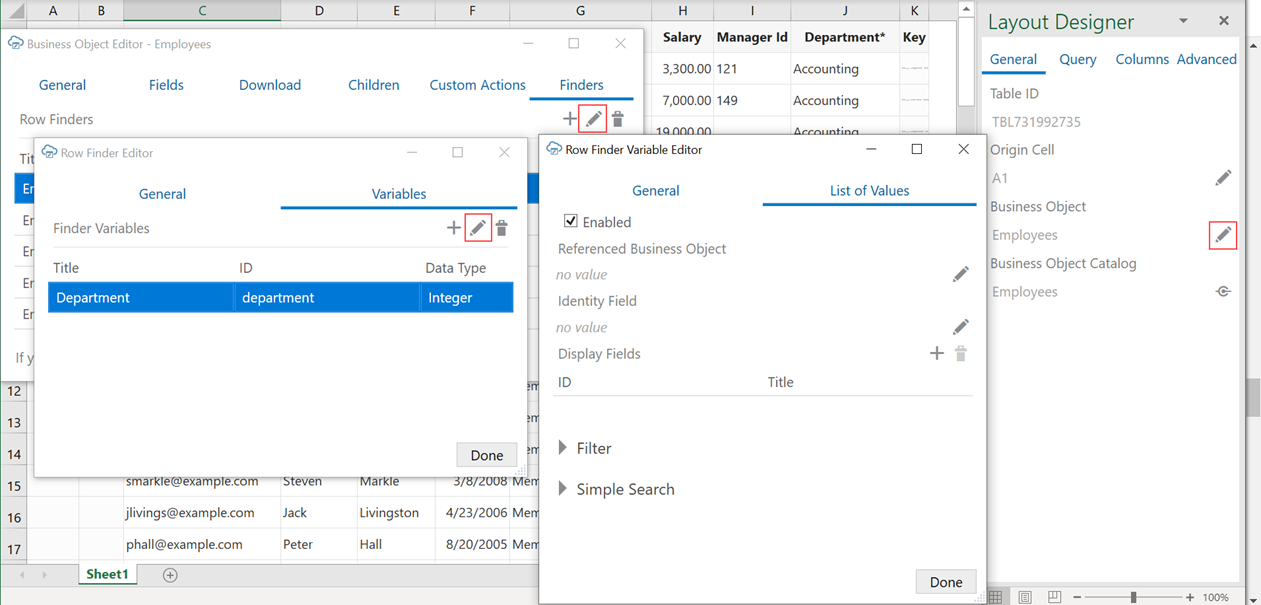
Use the Business Object Editor to access a business object's row finder variables. You can then edit a variable to define a list of values:
Description of the illustration row-finder-lov-editor.png
The List of Values tab shows the following properties:
- Enabled: Select to enable list of value functionality for this field; deselect to disable
- Referenced Business Object: This business object provides the display values for the corresponding identity values
- Identity Field: The field in the referenced business object used to look up the display values for the identity values in the current field
- Display Fields: These fields come from the referenced business object and are shown instead of the identity values where this field is used in a layout
To configure a list of values for a row finder variable that does not have one yet:
- Select the Enabled check box on the List of Values page.
- Select the appropriate business object using the Edit icon next to the Referenced Business Object field.
Tip:
Pick a business object from the same catalog used to create the layout. If the catalog is missing the desired business object, you can add a new business object to an existing catalog (see Add a Business Object to an Existing Catalog).
If you want to reference a business object with a different base path, you can create or import a business object into the current catalog and then override the base path (see Override a Business Object's Base Path).
- Choose the appropriate identity field from the referenced business object.
- Choose the desired display field from the referenced business object.
You can choose multiple display fields for one list of values. In that case, values of all display fields are concatenated and the concatenated value will be shown in a single Excel cell.
- Configure Filter and Simple Search as desired (see subsequent sections for details).
- Click Done.
Once you define a list of values, the choice list will appear wherever that row finder variable appears during download.
The add-in caches the data of list of values in the workbook. After you modify the configuration of any list of values, click Redraw Layout. Then, click Clear List of Values Cache from the Advanced menu in the Misc ribbon tab.
Note:
For a list of values with multiple display fields, if you enter a value directly in the cell that is not yet cached, the value will be considered invalid initially. Use the search-and-select window instead to select the value. The default search is specific to the first display field. You can modify the search expression from the List of Values page.Configure Filters for a List of Values
You can configure a filter for a list of values so that users see only certain values in the list when they select the field in a layout. You can define these filters using name-value query parameters.
The query parameter's value is a string that could include the expression { $options.fieldValues['FieldId'] }, where FieldId is the ID property of another field in the current business object. The add-in replaces this expression with the corresponding field value (specifically, the identity value) when sending the request for the referenced business object's list of values.
For example, when you work with a Table layout for departments and want users to see only the current department's employees, you can specify a configuration to filter the Employees list with a Row Finder based on the current row's DepartmentId, if the REST service supports finders.
Note:
The filter you define determines which items are fetched and displayed in the search-and-select window. This feature is different from the simple search query. When you configure a simple search for a list of values, the user can enter a search term in the search-and-select window and return values for the list that match the term. See Configure Search for a List of Values for more information on the simple search feature.- In the Business Object Field Editor's List of Values tab, click the Add Query Parameter icon in the Filter section.
- In the Name list, select finder as the query parameter.
- In the Value text box, enter an expression similar to:
EmpsByDeptIdFinder;DeptId={ $options.fieldValues['DepartmentId'] }
where EmpsByDeptIdFinder is the finder's name, DeptId is the finder's bind variable, and { $options.fieldValues['DepartmentId'] } is the expression for the current row's DepartmentId field value.
![This image shows the Filter section in the Business Object Field Editor's List of Values tab. The Name parameter is set to finder and the Value parameter is set to EmpsByDeptIdFinder;DeptId={ $options.fieldValues['DepartmentId'] }. This image shows the Filter section in the Business Object Field Editor's List of Values tab. The Name parameter is set to finder and the Value parameter is set to EmpsByDeptIdFinder;DeptId={ $options.fieldValues['DepartmentId'] }.](img/filter.png)
If the list of values' default order is unclear, you can add the orderBy parameter if the service supports it.
Configure Search for a List of Values
You can allow your users to enter a string to search for a value in a list of values by defining search parameters.
The query parameter value is a string expression that may include the expression { $options.simpleSearch }. The add-in replaces this expression with the input that the user enters in the search box within the search-and-search window. The add-in does not validate the values, so if the user enters invalid information, the add-in will make invalid requests that return errors.
Simple Search parameters are not applied when the add-in retrieves the initial set of values to show in the search-and-select window next to the cell in the worksheet. They are applied only when the user clicks the Search icon (after the initial set of values are already retrieved).
Note:
When both filter and simple search parameters are configured, the filter parameters are applied first and then the simple search parameters. The filter determines which items are fetched and displayed in the search-and-select window. Simple search only searches within the filtered list. If multiple values are specified for one parameter, the last value takes effect. See Configure Filters for a List of Values for more information on the filter feature.- In the Business Object Field Editor's List of Values tab, click the Add Query Parameter icon in the Simple Search section.
- Add values for the Name and Value properties based on what the service supports. Many REST services support a specific query parameter such as
qfor search, as in the following example:GET…/employees?q=LAST_NAME LIKE 'Jones*'Select the appropriate query parameter in the Name list; in our example, this is q. In the Value text box, provide a search expression that is appropriate for the service and include the { $options.simpleSearch } text placeholder where appropriate. In our example, the Value is:
LAST_NAME LIKE '{ $options.simpleSearch }*'

Now, if the user enters Jo in the search box and clicks the Search icon, the resulting request to the referenced business object will be:
GET.../employees?q=LAST_NAME LIKE 'Jo*'.
Note:
Consult the API documentation for your service to determine the appropriate search syntax to use in the Value column. For example, if you use an Oracle business object REST API service, consult Understanding Framework Support for Query Syntax in Accessing Business Objects Using REST APIs. Remember that the add-in uses REST framework version 6 when making requests to a business object REST API service.Configure a Cascading List of Values in a Layout
You can configure a cascading list of values if the REST service for your Excel workbook supports it.
In a cascading list of values, the value selected in one list determines the range of values that users can select from subsequent lists. For example, suppose a table displays columns with lists of values for Countries, States, and Cities. The value that a user chooses in the Countries list determines the values that appear in the list for States, and so on.
Here's how you use the Filter section in the Business Object Field Editor to configure a list of values for Countries, States, and Cities. To filter the list of values by the current country:![This image shows the Filter section in the Business Object Field Editor's List of Values tab. The Name parameter is set to finder and the Value parameter is set to ByCountryFinder;CurrentCountry={ $options.fieldValues['CountryId'] }. This image shows the Filter section in the Business Object Field Editor's List of Values tab. The Name parameter is set to finder and the Value parameter is set to ByCountryFinder;CurrentCountry={ $options.fieldValues['CountryId'] }.](img/bo_editor_stateid_lov.png)
To filter the list of values by Country and State:![This image shows the Filter section in the Business Object Field Editor's List of Values tab. The Name parameter is set to finder and the Value parameter is set to ByCountryAndStateFinder;CurrentCountry={ $options.fieldValues['CountryId'] },CurrenState={ $options.fieldValues['StateId'] }. This image shows the Filter section in the Business Object Field Editor's List of Values tab. The Name parameter is set to finder and the Value parameter is set to ByCountryAndStateFinder;CurrentCountry={ $options.fieldValues['CountryId'] },CurrenState={ $options.fieldValues['StateId'] }.](img/bo_editor_cityid_lov.png)
Table 8-1 Example Name-Value Parameters in Filter
| Field | Name | Value |
|---|---|---|
| StateId | finder | ByCountryFinder;CurrentCountry={ $options.fieldValues['CountryId'] } |
| CityId | finder | ByCountryAndStateFinder;CurrentCountry={ $options.fieldValues['CountryId'] },CurrenState={ $options.fieldValues['StateId'] } |
If the service has complete metatdata for a cascading list of values, the Filter section of the corresponding field's list of values is automatically configured.
If the service does not have complete metadata for a list of values but you know it supports search syntax that makes for a cascading list of values, you can use the Filter to manually configure a list of values. See Configure a List of Values for a Business Object Field.
Clear Cache for a List of Values
A list of values' choices are always cached in the workbook.
The cache contains up to 300 items, plus all used items. It is populated during the first download or the first time the search-and-select window is used. The search-and-select window shows the cached list of values, if available. An upload also uses cached data.
- Whenever you change any list of values configuration, and always when you publish the workbook
- When cached data is not what the user expects.
Notes and Limitations for List of Values
- For Oracle business object REST API services, "row context" list of values is not supported.
- Only one identity field is supported in a list of values.
- Display values support strings; identity values support integers or strings. Decimal numbers, dates, and date-time values are not supported.
- For any read-only field (column or form), the add-in still swaps identity values for display values. However, the search-and-select window does not appear when the cell is selected.
- Excel drop-down lists using data validation may not be compatible with the add-in.
