7 Troubleshoot Excel Workbooks
If you experience issues with Oracle Visual Builder Add-in for Excel, follow the steps here to identify and resolve issues. If you still can't resolve your issue, contact Oracle Support.
- Review the documentation to make sure the desired operation is supported.
- Download and run the Client Health Check Tool.
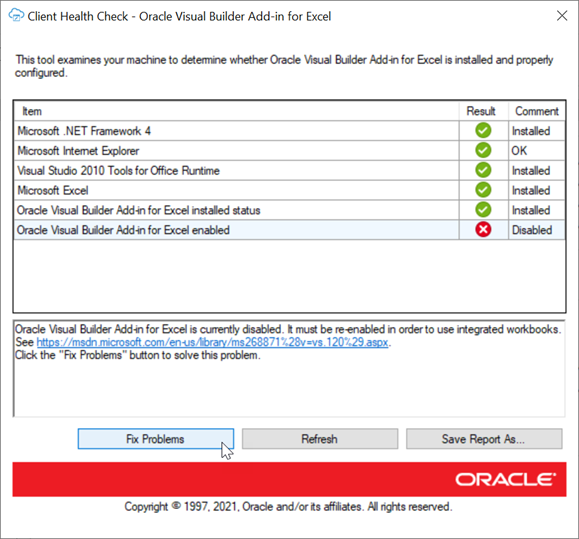
The Client Health Check tool scans your system to check that you have all necessary software such as Microsoft Excel and the add-in.
- Make sure you're on a supported platform.
- Upgrade to the latest version of the add-in.
- Apply available Microsoft updates.
- Close all workbooks, exit Excel, and try again with simple steps.
- Generate an add-in log for review. See Logging. If you contact Oracle Support, you may be asked to provide this log.
Note:
Log files may include personal information from the user's computer including, but not limited to, the computer's name and the end user's Windows profile name. Be sure to select the appropriate option when uploading files with personal information to a service request so that the file access can be restricted as needed.
Check Your Environment
Run the Client Health Check Tool to check if the desktop configuration and environment are suitable for Oracle Visual Builder Add-in for Excel and to resolve issues.
vbafe-health-check.exe) from the Oracle Downloads page.
Apply Microsoft Updates
When troubleshooting issues with Oracle Visual Builder Add-in for Excel, we recommend first applying all pending Windows, Office, and Internet Explorer updates before reproducing the issue. A Microsoft patch may resolve your problem.
Re-Enable Oracle Visual Builder Add-in for Excel
If your add-in becomes disabled and you are unable to use the client health check tool, you can re-enable Oracle Visual Builder Add-in for Excel through Microsoft Excel.
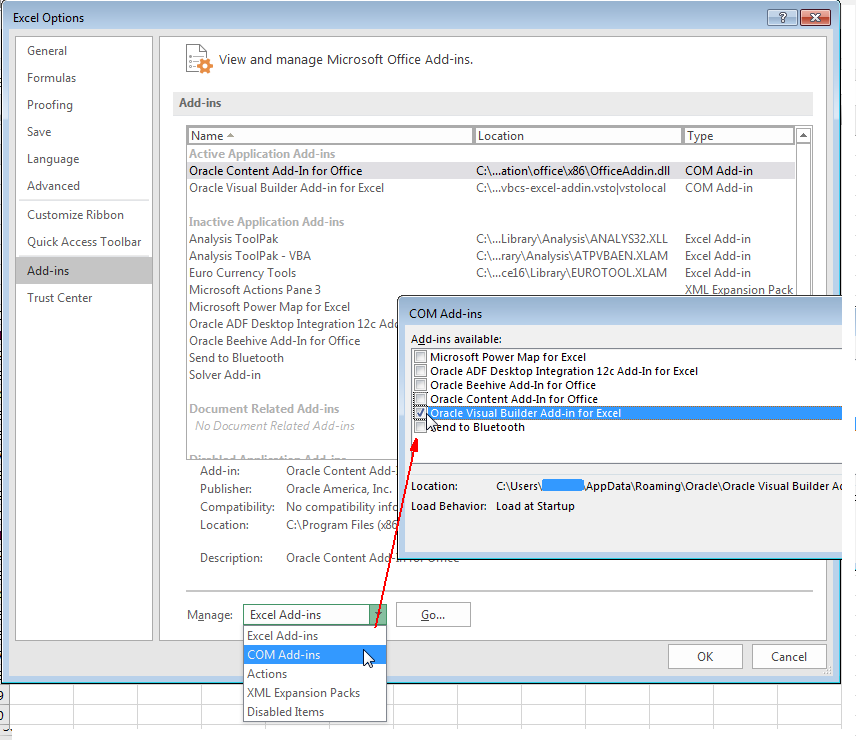
- In Excel, click File > Options > Add-Ins.
- Select COM Add-ins in the Manage drop-down list and click Go.
- Clear the Oracle Visual Builder Add-in for Excel check box and click OK.
- Restart Excel.
- Enable the add-in by repeating the steps and instead selecting the Oracle Visual Builder Add-in for Excel check box from the Add-ins available list in the COM Add-ins dialog.

Description of the illustration disableaddin.png
Logging
When reporting an issue about the add-in, generate a detailed log file that captures the steps that lead to the problem you want to report.
- In Excel, click the Oracle Visual Builder tab.
- Select Log Activity from the Advanced drop-down list to specify a directory location and file name for the log file. This starts the logging session.
- Repeat the steps that lead to the issue.
- Exit Excel completely to stop the logging session and before you access the log file.
Note:
The next time you run Excel logging will no longer be enabled.
The log file that you generate captures information about steps during an Excel session.
