6 Edit Service Descriptions and Business Objects
Oracle Visual Builder Add-in for Excel provides editors to modify a workbook's business object definitions.
Using the business object editors, you can change the URL of the host that provides access to the REST service your workbook uses.
Other examples of tasks that you can accomplish using these editors include:
- Edit field titles and tooltips
- Configure the list of values for a field
- Change when a field is editable
- Configure pagination
- Adjust the field data types (Advanced)
Note:
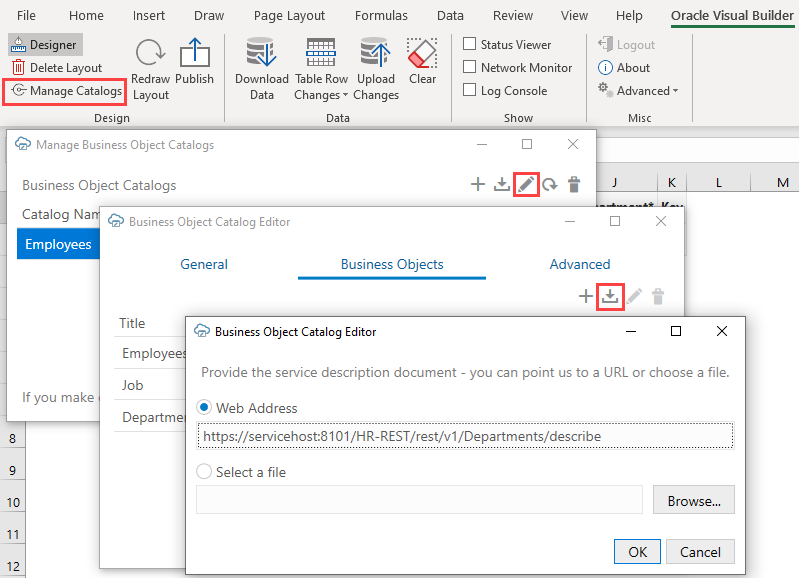
When you edit the details of business objects in your workbook, you're only telling the add-in how the service operates, you are not telling the service what it should do. Service behavior cannot be changed from the workbook. So any changes you make to the service description in the workbook must be compatible with the service.Click Manage Catalogs from the Oracle Visual Builder tab to view the Catalog editors progressively. That is, you first access the editor that lets you edit the catalog, then access subsequent editors for business objects and business object fields that the catalog supports. You can also open the business object and business object field editors from the Layout Designer. Both options (using Manage Catalogs and the Layout Designer) are shown here:
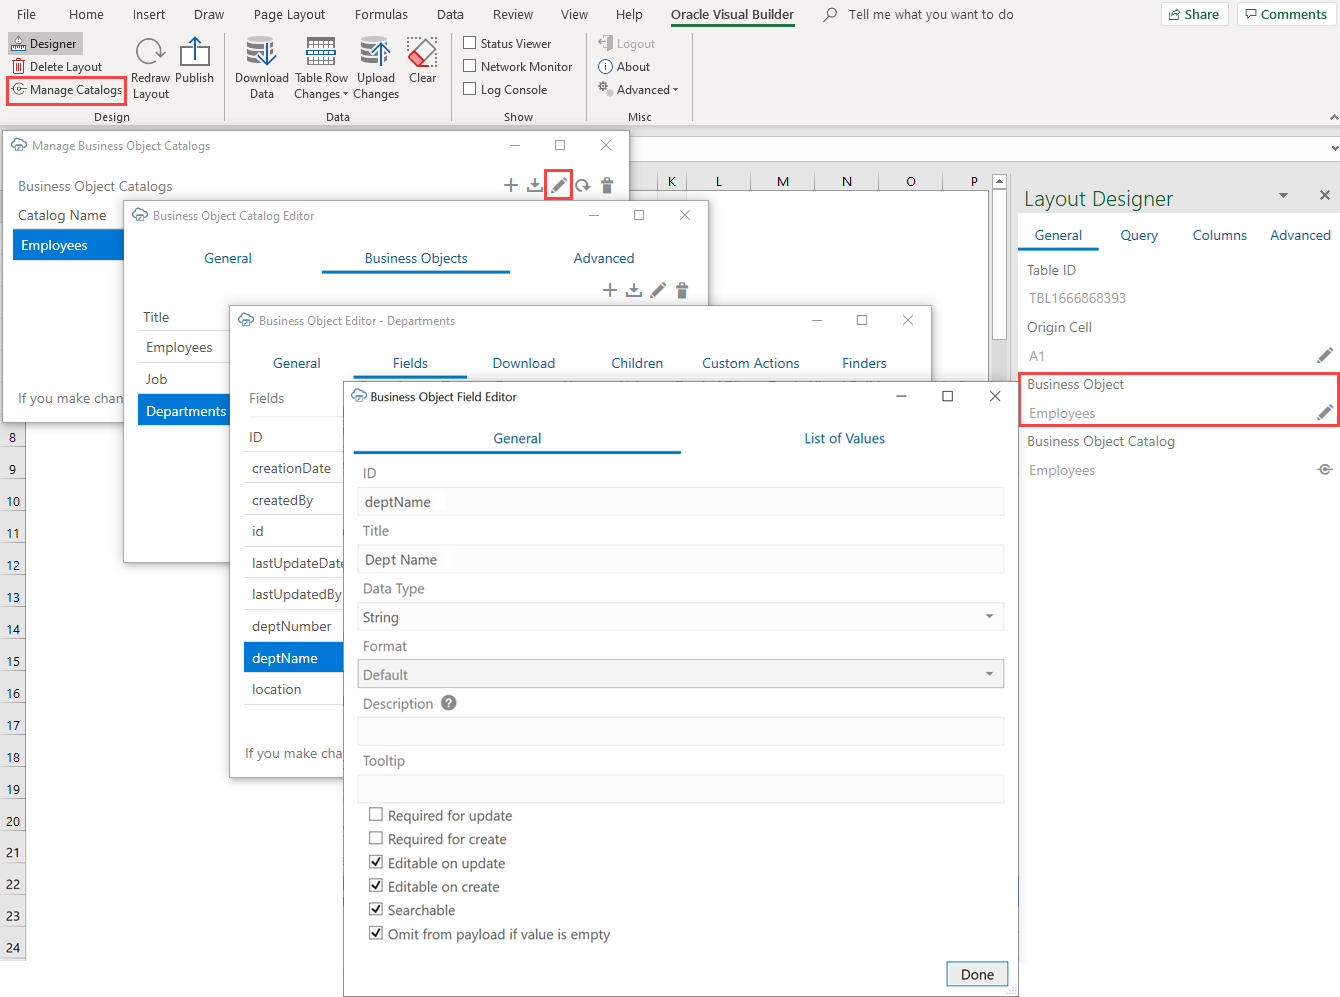
- To create a new catalog, particularly if the OpenAPI document has multiple business objects, use Manage Catalogs.
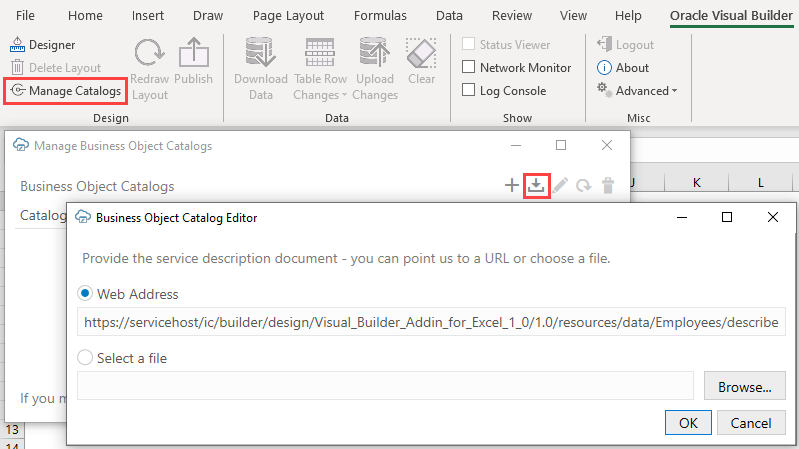
Description of the illustration excel-add-service.png - To add a business object to an existing catalog (with the understanding that the new business object will be located at the same host/base path as the other business objects in that catalog), use the Business Object Catalog editors (see Add a Business Object to an Existing Catalog). This option is particularly useful when configuring a list of values.
After you import a service description document into the Excel workbook, consider editing it in the Business Object Catalog Editor so that the catalog has a descriptive name. Very often, the title that the add-in displays for the catalog in the Excel workbook is the name of one of the business objects that the service exposes. For example, this image shows a catalog in which the default value for the Title property is Employees. This catalog exposes an Employees business object, so to avoid confusion, you can change the title that the catalog uses in the Excel workbook to something like Human Resources Services.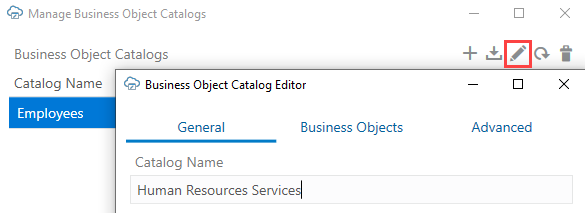
Description of the illustration excel-change-service-name.png
After making changes in the Business Object Catalog Editor, such as changing the service host or details of a business object, click Redraw Layout in the Oracle Visual Builder tab to see your changes reflected in the worksheet.
Note:
Certain OpenAPI document properties, such as Description, can contain formatting hints. The add-in displays the description text as is, with no interpretation of such hints.Create a Service Description in Oracle Visual Builder
If your target service does not provide an OpenAPI-compliant service description, you can create one in Visual Builder.
Add a Business Object to an Existing Catalog
If your catalog is missing a business object, you can add a new business object description to the catalog using the Business Object Catalog Editor:
- Click Manage Catalogs.
- In the Manage Business Object Catalogs window, select your existing catalog and click the Edit Business Object Catalog icon.
- In the Business Object Catalog Editor, click Business Objects, then click the Import a Business Object from a Service Description icon.
- Provide the URL or a file that contains the OpenAPI description of the new business object and click OK.
- Click Done first in the Business Object Catalog Editor, then in the Manage Business Object Catalogs window.
Override a Business Object's Base Path
You can configure a business object to use a specified base path. The Oracle Visual Builder Add-in for Excel then uses this base path when making REST requests for the business object.
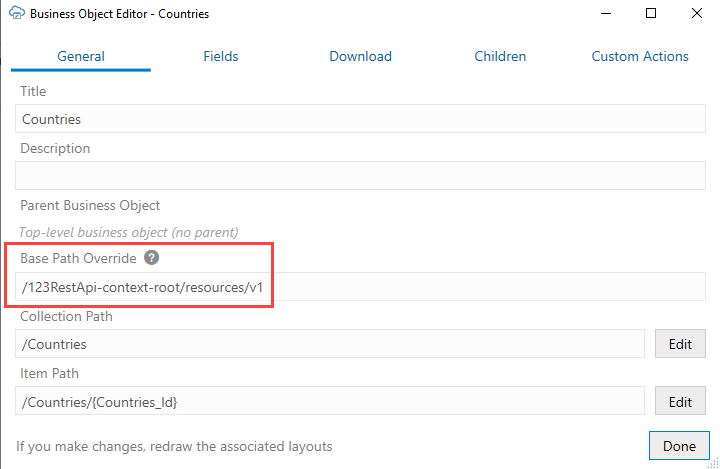
Typically, a Business Object Catalog holds business objects that share a base path (say, /abcRestApi-context-root/resources/v1). But if a business object needs to use a different base path (for example, your list of values come from /123RestApi-context-root/resources/v1), you can provide a new base path for the business object through the Business Object Editor.
To configure a business object to use a base path different from the one shared by business objects in the Catalog:
- Add a business object to your Business Object Catalog. See Add a Business Object to an Existing Catalog.
- Click the General tab in the Business Object Editor, enter the different base path in Base Path Override to override the base path used by all business objects in the Catalog, and click Done.
The add-in assumes that no extra authentication is required by business objects with a base path override.
You can now use the newly created business object as the Referenced Business Object for a list of values if required. See Configure a List of Values for a Business Object Field.
Configure Pagination for a Business Object
If the REST service supports pagination, you can download pages of rows.
Imagine you need to download 10,000 rows of data. Downloading one row at a time is too time-consuming, and attempting to download all 10,000 rows in one request might result in a timeout error. Instead, download one page at a time where the page contains, for example, 500 rows.
You can configure the pagination behavior using the Download tab in the Business Object Editor.
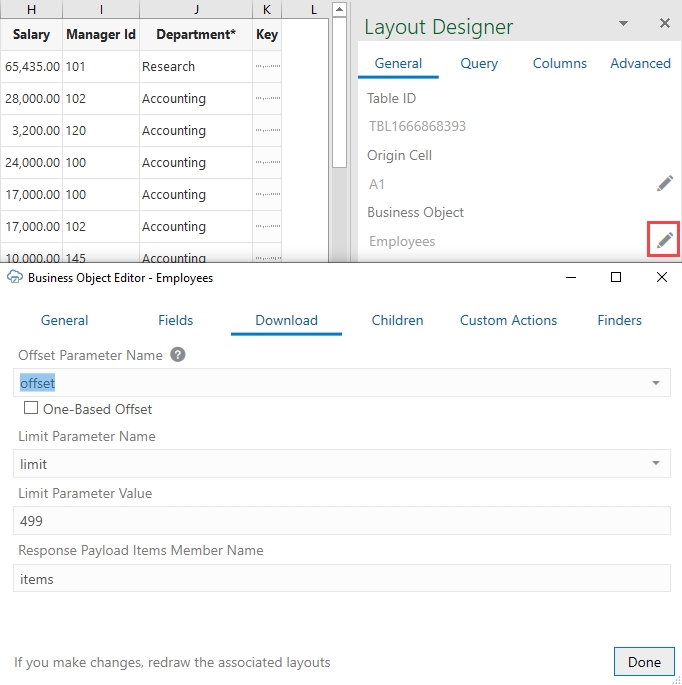
Description of the illustration vb-excel-download-prop.png
Configure the following as required:
- Offset Parameter Name: The name of the URL parameter that controls where to start the next page. When fetching the first page, the add-in uses a value of zero. When fetching the second page, the add-in uses a value of 499, assuming the limit value is 499.
- One-Based Offset: Controls whether the service starts counting from one. If this check box is cleared, the service assumes the service starts counting from zero.
- Limit Parameter Name: The name of the URL parameter that controls how many rows to fetch for each page.
- Limit Parameter Value: Controls the page size (number of rows that the add-in downloads).
For example, using the defaults for a Oracle business object REST API service, the add-in appends ?offset=0&limit=499 for the first download request.
For other service types, pagination may or may not be supported. If supported, the service may use parameter names like offset and limit or it may use other parameter names for the same purpose.
Consult the service API documentation to determine which parameters to use.
Configure Row Finders for a Business Object
Row finders are predefined filters available through Oracle business object REST API services that allow you to download a specific subset of records. If your resource developer has included row finders with the service, you can view and configure them through the Finders tab of the Business Object Editor.
For example, if your service includes a row finder that filters expense reports by "unapproved" status and assigned to the "current user", you can use the row finder to download only those expense reports that require your approval.
Row finders are defined through the service. You can't add or configure them through Oracle Visual Builder Add-in for Excel. However, you can configure how they appear in the add-in. For example, you can remove unneeded row finders so that they aren't available for use. You may also want to give row finders or row finder variables a more readable title.
Note:
Any changes you make must be compatible with the service. If your changes are incompatible, you will likely see errors during a download.- In the Excel ribbon, click Designer.
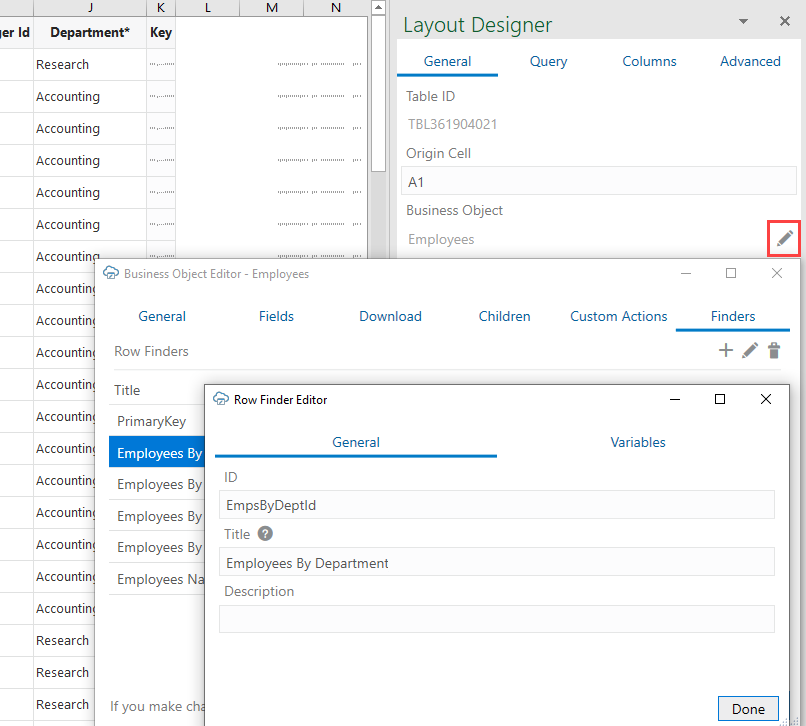
- In the Layout Designer, click the Edit icon next to the Business Object field.
- Click the Finders tab in the Business Object Editor to view a list of available row finders. Note that the Finders tab shows only for Oracle business object REST API services (not ORDS or other REST services).
- Remove row finders if required. You can also edit a row finder's details, like changing the title to be more readable:
When editing a row finder, take care to not change the row finder's ID.
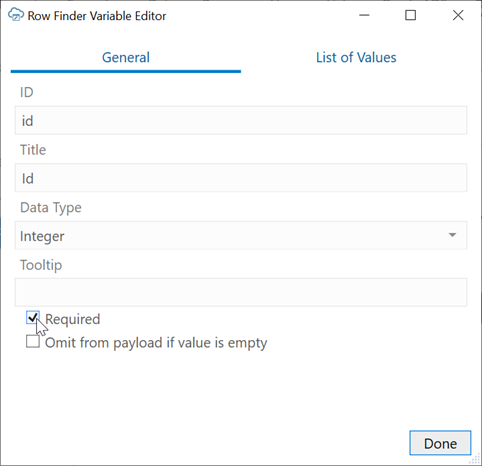
- If a row finder supports variables that act as arguments or parameters to the finder, click the Variables tab to update or delete variables. For example, you can change the row finder variable's title (but not the ID) or set the variable as required to force the user to provide a value at download time, as shown here:
- If required, configure a list of values for a row finder variable from the List of Values page in the Row Finder Variable Editor. See Configure a List of Values for a Row Finder Variable.
- Click Done until you return to the Layout Designer.
Once you are done making changes, the row finders become available to you as an option to limit downloaded data, as described in Use Row Finders to Limit Downloaded Data. For details on how your configuration takes effect, see Download Behavior in Layouts that Use Search and Row Finders.
Configure GZIP Compression for Request Payloads
For a POST, PUT, or PATCH request to the service that takes payloads, you can choose to compress the payload body using GZIP if the service accepts compressed request payloads.
When the Supports gzip compression for request payloads option is selected, the Content-Encoding: gzip header is added to the request. This option (found in the Business Object Catalog Editor's Advanced tab) is selected by default for Oracle business object REST API services.
Refresh a Business Object Catalog
A business object catalog is generated when a workbook is first configured to integrate with a service, based on the service description that you provide when creating a layout. If the service owner makes significant changes to the service description–especially its business object definition–after the workbook is integrated with the service, you can refresh the workbook's business object catalog to take advantage of the latest changes.
Refreshing a catalog is useful when changes to a service description are extensive–for example, when new fields, custom actions, row finders, or business objects are added to the service–and updating the business objects to incorporate these changes would take considerable time and effort. You can also refresh the catalog when an important property, such as a required value for a field, has a change that you'd like to readily use in your workbook.
Caution:
A refresh overwrites any changes that you've made locally to the business object catalog. If you've spent a lot of time customizing the business object (especially field titles), consider whether it's worth redoing those changes; it might be simpler to manually add that new field or custom action.Before refreshing a catalog, back up the workbook in case you want to revert your changes.
To refresh a business object catalog:
- Click Manage Catalogs in the Oracle Visual Builder tab.
- Select the catalog to refresh in the Manage Business Object Catalogs window.
- Click the Refresh Business Object Catalog icon (
 ).
). - Provide the URL or a file that contains the new service description.
- Click OK, then Yes when prompted to confirm the overwrite.
- Click OK, then Done.
- Refresh all layouts in the workbook before you proceed to other tasks.
If the new catalog has new business objects, those objects are added to the catalog. Existing business objects are refreshed with the corresponding ones in the new catalog. No business objects are removed.
For existing business objects, new fields, finders, custom actions, and so on are added and existing items are refreshed. No existing items are removed.
When an existing item is refreshed, the item's new properties replace the older properties. For example, a field's title, required, and editable properties are copied from the newer version to the older version, except when a new property is empty. If a field's newer version has a list of values configured, the newer list of values replaces the older list of values. If the newer version doesn't have a list of values, the previous list of values is left unchanged.
- In the Layout Designer, click Columns.
- Click Manage Columns (
 ) and select the new field. Click Done.
- Click Redraw Changes.
A refresh does not change any field formats, as those are always set manually.
Configure the REST-Framework-Version
You can change the value of the REST-Framework-Version request header, set to version 6 by default for Oracle business object REST API services. The REST framework version determines functionality for accessing business objects and is set to the default when a layout is first created in a workbook.
