8 Manage Language and Culture
You can change the display language for Oracle Visual Builder Add-in for Excel to any one of over 30 supported languages. If the workbook has been localized into your language, the add-in also displays your workbook's field titles and so on in the selected language.
If your workbook hasn't been localized, you may still be able to display field titles in your preferred language if the web application supports it. To do this, refresh the workbook's field titles using the add-in's Refresh Field Titles menu command. See Refresh All Field Titles.
Note:
When you open a workbook for the first time, you may be prompted to redraw it if it was last saved in another language. See Manage Data in Table Layouts.Change the Add-in's Language
By default, Oracle Visual Builder Add-in for Excel automatically detects the user's preferred language from Microsoft Excel and uses that language where possible. If desired, you can change the language that the Excel add-in uses.
To change the add-in language:
- In Excel, click the Oracle Visual Builder tab.
- Choose Select Language from the Advanced menu.
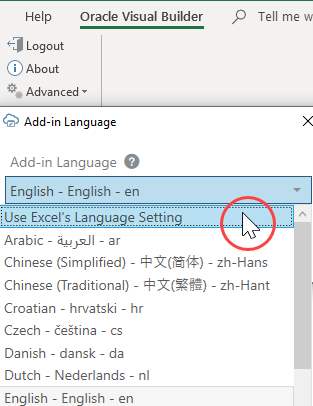
- From the Add-in Language list that appears, select the language you want to use. The list displays the languages that the add-in supports.
- Click OK.
- Clear the embedded browser cache. See Clear the Embedded Browser Cache.
- Restart Excel to make your changes take effect.
The add-in's user interface elements (Download Data and so on) now use the language you selected. If the workbook has been localized for the preferred language, the add-in uses that localization as well.
If the workbook is not localized but the web application provides localized text in your language, the add-in can retrieve localized text based on your language setting. Use the Refresh Field Titles command to update your workbook.
Note:
The service may or may not support localization in your language. Contact the workbook creator for details.If the preferred language uses a right-to-left writing system, the add-in's windows appear in right-to-left mode. The language that Excel uses remains unchanged, as does the format used for dates, times, and numbers. See Excel or Windows options to change Excel’s language and formats for dates, times, and numbers. See also Natural Language Support in Developing Integrated Spreadsheets Using Oracle Visual Builder Add-in for Excel.
The language that you choose for the add-in language is stored in a local file in the Windows user profile. You can select the Use Excel’s Language Setting option in the Add-in Language drop-down list to remove this setting for the current user.

Description of the illustration excel-choose-lang.png
When you open an integrated workbook for the first time, you may be prompted to redraw all layouts if the workbook was published in a different language. If you choose to redraw the workbook, any data and changes to the layouts are discarded. To keep these changes, skip the redraw. You can always manually redraw your workbook later using either the Clear Layout or Download Data icons from the Oracle Visual Builder tab.
Note:
Clearing all layouts when the language changes is recommended since some data, such as lists of values, may be language sensitive. Downloading in one language and uploading in a different language may not succeed.Refresh All Field Titles
In some cases, you might be able to refresh all field titles if, for example, you want to display field titles in another language.
Imagine you've received an invoices workbook with English as the current language, so all field titles are in English. Now, if you are a data entry user based in France who has Windows and Excel configured for French, you can reset the field titles to see field titles in French as well.
Before you begin, upload any pending changes to your workbook. If you don't, your pending changes will be discarded during the refresh.
To refresh the field titles in your workbook:
When the refresh is complete, the add-in displays the results of the refresh in the Status window.