Manage Fields in a Form or Table

When you create a layout, Oracle Visual Builder Add-in for Excel adds most but not all fields to your form or table. If desired, you can add or remove fields or change the order they appear in the layout.

Besides adding business object and custom payload fields to a layout, you can also add fields from a parent or higher business object to a layout in a set of dependent layouts. These fields are referred to as "ancestor" fields. For example, you might want to add an ancestor column to a layout to help your business users track which child items are associated with which higher-level items. See Add Ancestor Columns to Provide Additional Context.

If there are any descriptive flexfields (DFFs) available your layout, these are also included in the list of available fields. For more information about DFFs, see Add Descriptive Flexfields to a Layout.

This task shows you how to add, remove, and reorder columns in a Table layout but the steps are the same for form fields and table columns in a Form-over-Table layout.

To manage the columns in a Table layout:
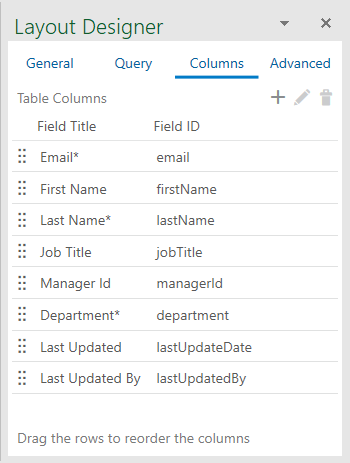
  1. Select the layout, then click Designer from the Oracle Visual Builder tab to open the Layout Designer.
  2. For a Table layout, click the Columns tab in the Layout Designer.
    For a Form-over-Table layout, click either the Form or Table tab.
    The tab displays the table columns in the order they appear in the layout.

  3. Perform one or more of these actions as required:
    • To change the order of the columns, drag a column to another location in the list.

      Tip:

      You can also right-click a column and select an action (Move Up, Move Down, and so on) from the popup menu.
    • To delete a column, select a column and then click the Delete icon (Delete icon).

      Tip:

      You can use the Shift and Ctrl keys to select multiple columns for deletion.
    • To edit the field, double-click the column in the list to open the Business Object Field Editor.
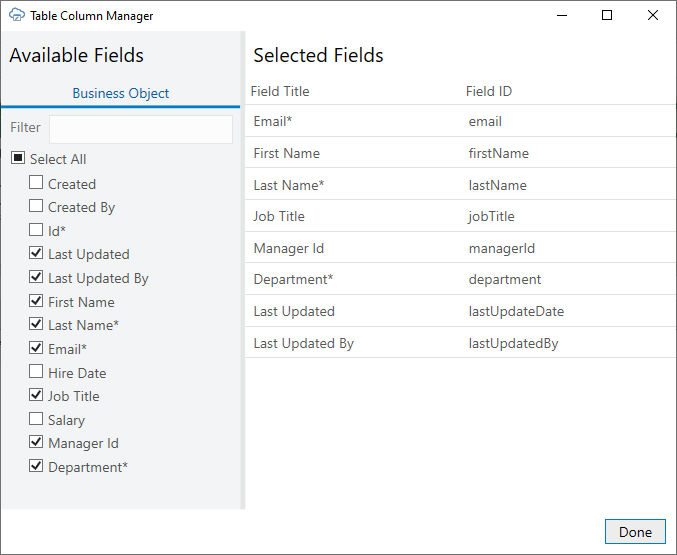
  4. If you want to add columns to your layout, click Manage Columns (Manage Columns) to open the Table Column Manager.
    Description of table_columns_manager.png follows
    Description of the illustration table_columns_manager.png

    If the business object supports custom actions or is a child object in a hierarchy of business objects, you'll see additional tabs (such as Custom Actions and Ancestors) in the Available Fields pane.


  5. Click the appropriate tab for the type of field you want to add from the Available Fields pane.

    Available ancestor columns are grouped by business object. So ancestor columns available for a grandchild layout are grouped by parent and child.

  6. In the Selected Fields pane, select the location where you want the columns to be added.
  7. Select the columns you want to add from the Available Fields pane.

    The columns are inserted before the selected field.

    In this example, you may want to add Hire Date and Salary to the table before Manager Id. To do this, select Manager Id in the Selected Fields pane, then select the Hire Date and Salary check boxes in the Available Fields pane.

    Note:

    If you are adding a column that is referenced by a list of values in another column, make sure the added column is positioned before the field with the list of values. See Configure a Filter with a Dynamic Parameter for more information.
  8. You can also perform one or more of these actions if required:
    • To add or remove all columns, select or deselect Select All.
    • To remove a column, deselect the column's check box.
    • To change the order in the layout, drag a column in the Selected Fields pane to another location in the list.

      Tip:

      You can also move a column by right-clicking it, then selecting an action (Move Up, Move Down, and so on) from the popup menu.
    • To edit the field, double-click the column in the Selected Fields pane to open the Business Object Field Editor.
  9. When you have made all your changes, click Done.