16 Publish an Integrated Excel Workbook
Once you complete configuring an Excel workbook, you can publish it for users who perform data entry. Publishing creates a copy of the workbook and prepares it for distribution; for example, it lets you hide the Design tools and turn on worksheet protection for each worksheet with a layout.
Alternately, you can use publish to create a clean, unlocked copy. See Publish an Unlocked Copy.
Publishing is optional. All data editing features of an integrated workbook are available in both published and unpublished copies of the workbook.
To publish an Excel workbook:
- Complete configuration of the workbook.
- Test the configuration thoroughly.
- Use Excel’s Inspect Workbook feature to review and remove personal information from the workbook.
Access the Inspect Workbook feature from Excel's File menu. When you use the Document Inspector to choose content to inspect and potentially remove, ensure that the Hidden Worksheets check box is not selected. You must not remove hidden worksheets from workbooks that you distribute because the add-in uses hidden worksheets to integrate the Excel workbook with the REST service.
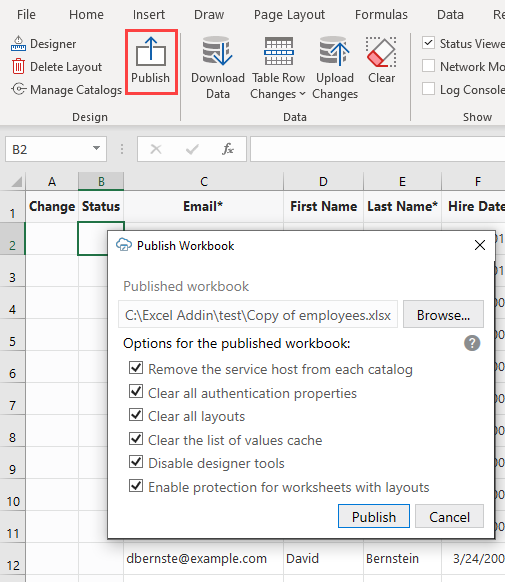
- In the Oracle Visual Builder tab, click Publish.
The Publish Workbook window opens. If the name of the original workbook ended with
-source(for example,employees-source.xlsx), the add-in will offer the same name without-source. - To change the published workbook's directory and file name, enter the desired name and location in the Publish Workbook window, or click Browse.
Make sure the published workbook doesn't use the same name as any open workbook (Excel won't let you use the same name for different workbooks, even if the file paths are different).
Note:
You cannot publish to a location that starts withhttpsuch as OneDrive. - In the Publish Workbook window, choose other options for your published workbook:
Check Box Use Remove the service host from each catalog This check box is selected by default. Leave it selected to ensure that users must enter the service host when they open the published workbook.
This option lets users connect to another service host to access the REST service.
Clear all authentication properties Select this check box to remove authentication configuration from the published copy of the workbook.
If you are distributing a sample workbook outside of your organization, you may want to select this option to avoid exposing potentially sensitive information. You should always choose this option if the workbook is posted in a public place.
However, if you are distributing a fully-configured workbook to business users inside your organization, you may want to deselect this option so that the target business users can log in using the properties you have chosen.
Clear all layouts Select this check box to clear data downloaded to each layout in the published workbook.
This option lets users download the latest data from the REST service in the published workbook.
Clear List of Values Cache Select this check box to clear the list of values cache in the published workbook.
This option is important if users might have different choices for a list of values in the published workbook.
Disable Designer tools Select this check box if you don't want users of the published workbook to modify its layout.
This option hides the design tools in the published workbook.
If the add-in was installed with the design tools already disabled, this option has no additional effect.
Note:
This check box is disabled if the workbook uses OAuth2 authentication and Clear all authentication properties is selected.Enable protection for worksheet with layouts Select this check box if you want to prevent users from modifying read-only fields and performing Excel actions in the published workbook.
This option enables Excel's worksheet protection for each worksheet with a layout.
- When you have adjusted the settings as required, click Publish.
You'll see a notification in the Status Viewer that the workbook has been published to the specified directory.
- Save the source version of the workbook, in case you need to make configuration changes post-publication.
Now that your workbook is published, you can distribute it to users for data entry.
