Use a Local Data Source for a List of Values

You can configure a list of values that uses a "local data source" for its values. A local data source is a set of name-value pairs stored in the integrated workbook.

These local data sources can be created by Oracle Visual Builder Add-in for Excel to store enums, if the service includes these. You can also create your own local data sources if required.

Create a Local Data Source for a List of Values

You can create a local data source that provides the values for the list of values (LOV). This data source stores these values in your integrated workbook as a set of name-value pairs.

Local data sources have a couple of key benefits. They convert field codes to user-friendly display values automatically to improve the user experience. They also provide the business user with a drop-down list that restricts the choices to a fixed set of appropriate values.

Let's consider an example. You may have a business object, Computer, with a Boolean field, personal, that captures whether the device is a business or personal one. In this case, the field expects only "True" and "False" values.

You may want to create an LOV on the personal field that displays "Yes" and "No" values in the list. To do this, create a new local data source in the catalog that includes these values, then configure an LOV for the personal field that uses this data source.

To create a local data source for a list of values:

  1. From the Oracle Visual Builder tab, click Manage Catalogs.
  2. In the Manage Business Object Catalogs window, select the catalog where you want to define the data source and click the Edit Business Object Catalog icon.
  3. From the Business Object Catalog Editor, click Local Data Sources.

    Note:

    You can also create a local data source from the Choose a Data Source window when you configure a list of values on a business object field. See Configure a List of Values with a Business Object.
  4. From the Local Data Sources tab, create a new data source:
    1. Click the Add icon (Add icon) to create a new data source.
    2. Select the new data source from the list, then click the Edit icon (Edit icon) to open the new data source in the Local Data Source Editor.
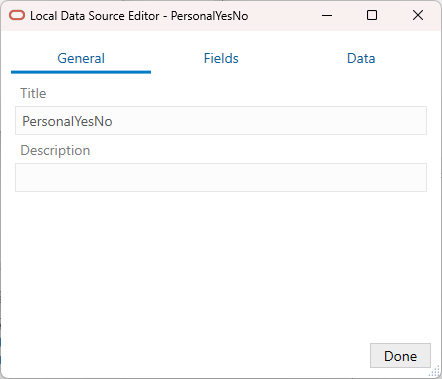
    3. From the General tab, enter a title and description for the data source.


      • Title: Identifies the local data source when creating a list of values. The title only appears in designer windows, such as the List of Values tab in the Business Object Field Editor.
      • Description: (Optional) Helps workbook developers understand the purpose and use of the data source. The description only appears in the designer.
  5. From the Fields tab, create fields for the data source.
    In this example, you will create two fields: one with a Boolean data type (flag) and the other with a string data type (display). flag is the key field ID in our example. display stores the values that appear in the list.

    Note:

    In some cases, you may want to show just the identity values ("True" and "False" instead of "Yes" and "No") to your business users. In this situation, create one field and use it later as both the identity field and display field in your LOV.
    1. Click the Add icon (Add icon).
    2. Select the new field from the list, then click the Edit icon (Edit icon) to open the field in the Local Data Source Field Editor.
    3. Provide details for the field, then click Done.


      In this example, type flag for the ID field and choose "Boolean" from the Data Type list.

      Also, provide a title and description for the field. These values help workbook developers identify the field when displayed in designer windows.

      Note:

      The ID, Title, and Data Type fields are required. The Description field is optional.
    4. Repeat these steps for the next field. In this example, create the display field for your data source, using "String" for the data type.
  6. When you've finished creating your fields, select the field that will be used to look up the display values from the Key Field ID list.

    This field provides a unique key for identifying the data in the local data source. This is the field you'll select when setting the identity field from the List of Values tab. In our example, the key field ID is the flag field.


    Note:

    When exporting strings for translation, rows are identified by their key field values. Key field values themselves are not translated.

    Make sure all the fields are configured properly before opening the Data tab, as described in the next step. If you make any changes in the Fields tab, any data entered in the Data tab is cleared.

  7. From the Data tab, add values to your data source for the newly-created fields.

    You can edit values directly in the data table and also add and delete rows using the appropriate icons. If you have a lot of data to input, you can also import values from a delimiter-separated values (DSV) file. See Import Data for a Local Data Source.

    The data table provides a single empty row for your first set of values. Click the row to add appropriate values. To add another row, select the last row and click the Add (Add icon) icon.


    In this example, the Flag (key ID) field has a Boolean data type and displays check boxes for the expected values. Select the check box for "True" and leave it unselected for "False".

    Then, enter the user-friendly value (for example, "Yes" for the selected check box) in the Display field, as shown in this image.

    To delete a row, select it and click the Delete (Delete icon) icon. To delete multiple rows, use the Shift and Ctrl keys, then press Delete.

  8. Click Done.

Now that you have created a local data source, you are ready to use it as the data source for an LOV. See Configure a List of Values with a Local Data Source.

Import Data for a Local Data Source

You can import values for a local data source using a comma-separated values (CSV) file. If your local data source includes many columns and rows, importing a CSV file lets you populate the values quickly and easily.

The add-in imports the configured field list without any validation such as data type matching. Make sure the fields are correctly configured before importing the file.

Supported delimiters include comma (,), semicolon (;), pipe (|), and tab.

Note:

Do not include column headers in your CSV file.

To import data from a CSV file:

  1. Create a local data source and provide a description and fields as described in steps 1 to 6 in Create a Local Data Source for a List of Values.
  2. From the Data tab, click the Import data to append (Import icon) icon to open the Import Data dialog.
  3. Navigate to the CSV file, select it, then click Open.
  4. When prompted, select the appropriate delimiter, then click OK.

    The add-in imports the data and appends it to the end of the data table.

    When complete, a popup appears providing a summary of the import action.

  5. Click OK to return to the Local Data Source Editor.
  6. Review the imported data in the editor and check for errors or empty values. Empty values may indicate a failure in the import process, in which case some of the values in your CSV file may be missing from the data table.

    Use the available tools to edit the data table:

    • Select a value in a row to edit it.
    • Click the Add a row icon to add a row.
    • Select a row and click the Delete icon to delete it.
    • To delete two or more rows, use the Shift and Ctrl keys to select multiple rows, then press Delete.

Configure a List of Values with a Local Data Source

Configure a list of values that references a local data source. Lists of values are supported for business object fields, custom action payload fields, and row finder variables.

Local data sources are listed along with business objects in the Choose a Data Source window when you configure your LOV.

Let's suppose you have a Computer layout in your workbook that shows details for every device on your network. This layout might include a Personal field that indicates whether the device is a business computer or an employee's personal computer. This field would need to be a Boolean field and expects only a "True" or "False" value.

In this scenario, you may choose to create a local data source that displays "Yes" and "No" in a list for the valid values "True" and "False". When a business user selects a cell from the Personal column, a popup window shows a list of values drawn from your local data source that allows the user to choose either "Yes" or "No" for this device.

You can configure a list of values to show more than one display field in the popup window. The add-in shows all the display fields, in separate columns, in the popup window but only those you configure are shown in the Excel cell. If you choose to show more than one field in the cell, the values are concatenated.

Note:

Lists of values based on local data sources do not support filters or search in the drop-down list.

To create a list of values with a local data source:

  1. From the Layout Designer, click the Edit (Edit icon) icon next to the Business Object field.
  2. From the Business Object Editor, click the Fields tab, then select the business object's field.
  3. Click the Edit (Edit icon) icon to open the Business Object Field Editor, then click the List of Values tab.
  4. Select the Enabled check box on the List of Values page.
  5. Click the Choose a data source (Find icon) icon next to the Data Source field, then pick an appropriate local data source from the Local Data Sources tab of the Choose a Data Source window.


    If there are no configured local data sources, you can create one using the Add a Local Data Source (Add a Local Data Source icon) icon. See Create a Local Data Source for a List of Values.

    Note:

    This data source provides the display values for the corresponding identity values.
  6. Click the Choose the ID value field (Find icon) icon next to the Identity Field field, then choose the appropriate identity field from the data source.

    Note:

    This is the field used to look up the display values for the identity values in the current field.
  7. Click the Add Field (Add Field icon) icon to open the Available Business Object Fields Editor, then choose the desired display field.

    These fields come from the data source and are shown instead of the identity values where this field is used in a layout.

    You can choose multiple display fields for one list of values. Repeat this step to add additional display values.

  8. For each display field, select either Picker and cell or Picker only from the Display Type list.

    If you configured only one display field, use Picker and cell to display the value in both the Excel cell and the popup window. For additional display fields, use Picker only if you don't want to display the value in the Excel cell.

    Note:

    When configuring the display values, make sure the information in the cell is unique and meaningful for your business users. Take for example a Contact field in your layout. To ensure your business users have enough information to determine the right contact for a purchase order, you may want to include the contact name, company, and email as display fields in the Excel cell. In this case, ensure that the display type for these display fields are set to Picker and cell.
  9. Click Done.

During runtime, the business user sees the user-friendly values from the display field of the data source in the LOV, as shown here:


The choice list will appear wherever that business object or payload field appears. For the row finder variable, the choice list will appear wherever that row finder variable appears during download.

The add-in caches the data of list of values in the workbook. After you modify the configuration of any list of values, click Clear List of Values Cache from the Advanced menu.