Create and Configure Deployment Build Jobs and Pipelines
To deploy extensions to other Oracle Cloud Applications instances, you can use the Manage Extension Lifecycle page. If you’d rather use a CI/CD pipeline for deployment, you’ll need to set up or create a packaging job, one or more deploy jobs, and a pipeline. Specifically:
- A packaging job packages the extension and creates a build artifact. Instead of creating new packaging jobs, you can use the
extensionName-Package job that was created with the project. (If you created this project manually, the package job is called Application-Extension-Package.) This job packages the extension and creates a build artifact from the same branch your team members used to deploy to the primary Oracle Cloud Applications Development instance. Remember, this packaging job is configured to trigger a build on every SCM commit. - Create one deploy job for each Oracle Cloud Applications instance you plan to deploy to. You’ll also need a user’s credentials who can deploy to each Oracle Cloud Applications instance. To create the job, see Create a Deployment Build Job.
- After you’ve created deployment jobs, create pipelines to run the package job and deployment jobs in sequence. You can create either of these pipelines:
-
A pipeline to deploy the extension to the primary and other Oracle Cloud Applications instances. Instead of creating a new pipeline, configure the existing
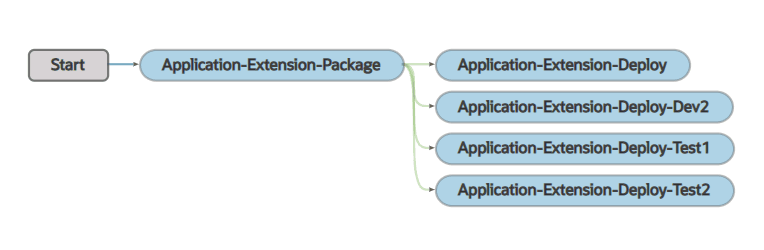
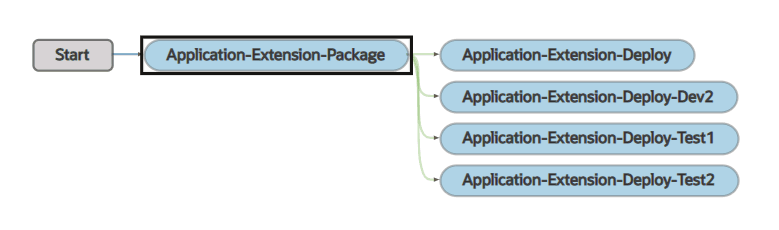
extensionName-Package and Deploy pipeline to deploy to other instances as well. (If you created this project manually, this pipeline’s name is Application-Extension Package and Deploy.) See Configure the Default Pipeline to Deploy to Other Oracle Cloud Applications Instances. Remember, the default pipeline runs automatically when a code change is pushed to themainbranch. After you’ve configured the pipeline, it deploys the extension to all development and test instances on every SCM commit to themainbranch.After creating this pipeline, you’ll have one pipeline in your project that deploys to all DEV and TEST instances. Here’s an example of what this pipeline could look like:
-
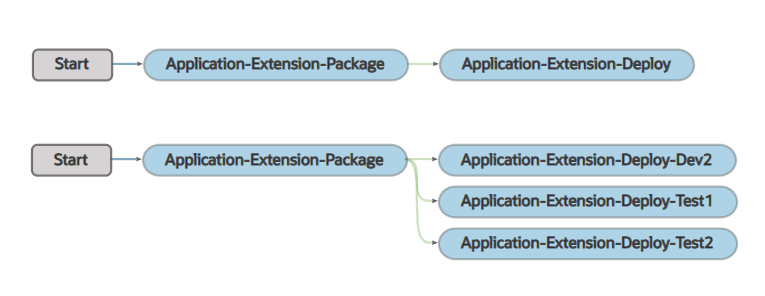
A pipeline to deploy the extension to other DEV and TEST Oracle Cloud Applications instances manually. See Create and Configure a Pipeline to Deploy to Other Oracle Cloud Applications Instances. Create this pipeline if you don’t want to deploy the extension to other instances on every SCM commit, but only after your team members have validated the extension on the primary development instance. After creating this pipeline, you’ll have two pipelines in the project:
- Your primary pipeline, which deploys to the primary development instance, and
- This pipeline, which deploys to other DEV and TEST instances.
Here’s an example of what these pipelines could look like:
-
Create a Deployment Build Job
The deployment job deploys the extension’s artifact that was generated in the default packaging job to the Oracle Cloud Application’s instance. Before you create the job, make sure you have credentials that VB Studio can use to access the instance.
- In the left navigator, click Builds
 .
. - In the Jobs tab, click + Create Job.
- In the New Job dialog box, in Name, enter a unique name.
- In Description, enter the job’s description.
- Select the Copy From Existing check box.
- From the Copy From drop-down list, select the deployment job that you’d like to copy.
- In Template, make sure that the System Default OL7 for Visual Builder template is selected.
- Click Create.
- From the Job Configuration page, click the Steps tab. The Application Extension Deployment section is displayed.
- In Target Instance, select the environment with the target Oracle Cloud Applications instance.
-
In the Authorization section, specify the authorization type to run this build step. With Use OAuth selected by default, you’ll see the
Authorization is requiredmessage, indicating that this build step needs a one-time authorization to handle OAuth requests to your environment’s Oracle Cloud Applications instance. Click Authorize and enter credentials to access your Oracle Cloud Applications instance; you can also run the job manually and enter the credentials when prompted. Either way, it is recommended that you authorize your OAuth connection during initial configuration. If you skip this step, you won’t be able to publish your changes from the Designer and will need to complete the required authorization before attempting to deploy changes. Once authorized, theAuthorization has been providedmessage shows.Note OAuth is the recommended authorization type. Use Basic authentication only if you run into issues with setting up an OAuth connection. To use Basic authentication, select Use Basic, then enter the credentials of a user who can access the Oracle Cloud Applications instance in Username and Password. These credentials must be those of a local user, not a federated identity, and must not require multi-factor authentication.
OAuth tokens (access and refresh) are cycled during regular use. A refresh token is used to obtain an access token whenever a user accesses the target instance. This refresh token is typically valid for seven days. (The token expiration time is set in the IDCS resource app and may be different based on your security requirements.) If the user authenticates with the target instance within the seven-day period, the active refresh token generates a new access token and a new refresh token. This cycle continues indefinitely as long as the refresh token stays valid. If the refresh token expires during extended periods of inactivity (say, when you’re away on vacation), click Renew Authorization (or run the job manually, so you’re prompted to authorize any expired OAuth tokens).
- The Build Artifact field should show the same artifact name that was used in the packaging build step. Confirm this value, especially if the packaging job used an artifact name other than the default,
extension.vx. - Click Save.
Configure the Default Pipeline to Deploy to Other Oracle Cloud Applications Instances
If you want to deploy to other DEV and TEST instances along with your primary Oracle Cloud Applications instance, you can configure the default pipeline to deploy to other instances as well.
- In the left navigator, click Builds .
- Click the Pipelines tab.
- In the
extensionName→ Package and Deploy pipeline row, click the Actions menu and select Configure Pipeline. (If you created the project manually, the pipeline name is Application Extension - Package and Deploy.) - Right-click the
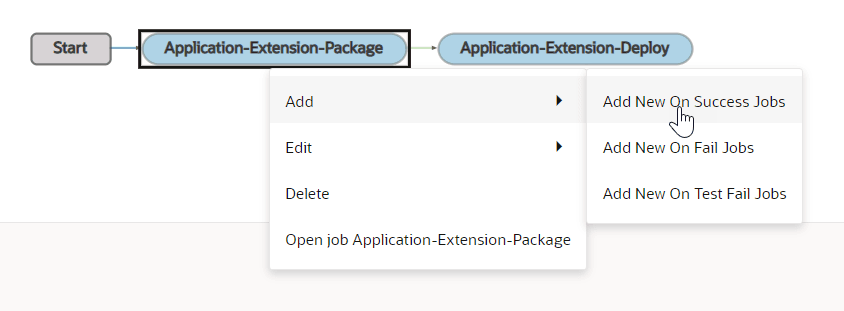
extensionName-Package job and select Add, then Add New On Success Jobs. Here’s an example:
- Click in the Select new on success job(s) field, select the jobs that you want to add from the list, and click Save.
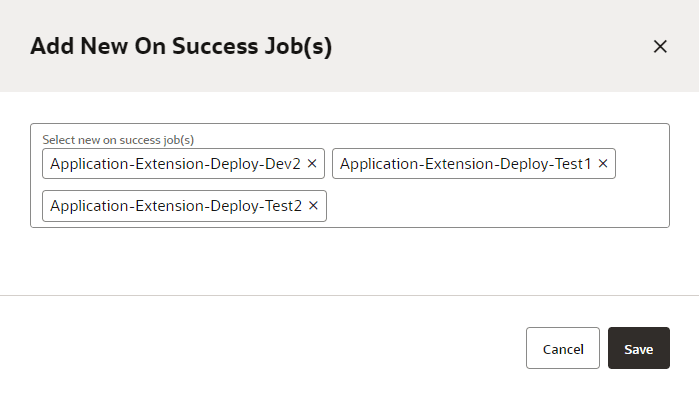 Here’s an example of the final diagram:
- Click Save.
Create and Configure a Pipeline to Deploy to Other Oracle Cloud Applications Instances
- In the left navigator, click Builds .
- Click the Pipelines tab.
- Click + Create Pipeline.
- In the Create Pipeline dialog box, in Name and Description, enter a unique name and description.
- Deselect the Auto start when pipeline jobs are built externally check box.
- Click Create.
- On the Pipeline Configuration page, right-click the Start node and select Add New Start jobs.
- Click in the Select new on success job(s) field, select
extensionName-Package, and click Save.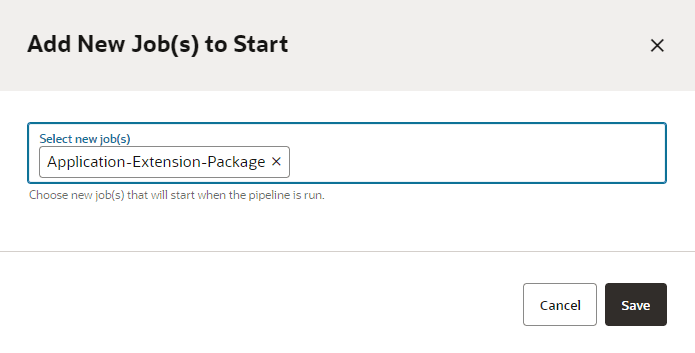
- Right-click the
extensionName-Package job and select Add, then Add New On Success Jobs. - Click in the Select new on success job(s) field, select the jobs that you want to add from the list, and click Save.
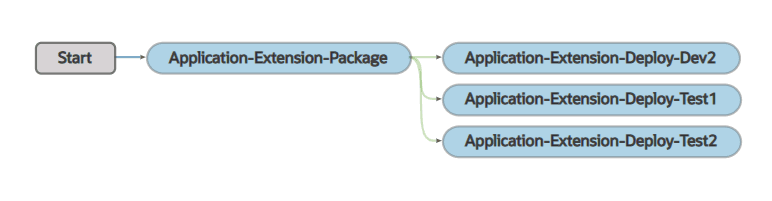
Here’s an example of a finished pipeline:
- Click Save.
Deploy Changes from a Different Branch
At some point, you’ll likely want to create a separate branch to host your new feature development work. You can package those changes from your new branch and deploy them to an Oracle Cloud Applications instance for testing.
To deploy to the Oracle Cloud Applications instance in the environment associated with your workspace, you can select the new branch when you publish your changes. Or, if your changes already exist in the new branch, you can use the Deploy option in the Designer. See Deploy Changes From the Remote Branch in Extending Oracle Cloud Applications with Visual Builder Studio.
To deploy to a different Oracle Cloud Applications instance, such as TEST or PROD, you’ll need to set up some build jobs and a CI/CD pipeline.
VB Studio can create the build jobs and pipeline for you, if you prefer. In the extension’s Settings editor, under Building and Publishing, select the new branch, and then create and enable a CI/CD pipeline for the branch. (If you’re deploying to a different instance that’s not the one associated with your workspace, you’ll need to change the target environment in the deployment job, after it’s created.) See Establish Extension-Level Settings in Extending Oracle Cloud Applications with Visual Builder Studio.
Create a Packaging Job for the New Branch
Create a packaging job following the same steps to create a production packaging build job, but when configuring the job, select the new branch instead of the default main branch:
- In the left navigator, click Builds .
- Create a job using the System Default OL7 for Visual Builder template.
- Click Configure .
- Click the Git tab.
- From the Add Git list, select Git.
- In Repository, select the Git repository. In Branch or Tag, select the new branch.
Finish configuring the packaging job as usual. See Create the Production Packaging Build Job.
Create a Deployment Job
Create a deployment job following the same steps to create a production deployment build job, but when configuring the job, select the packaging job that you just created.
Create and Configure a Pipeline for the New Branch
After you’ve created the packaging and deployment jobs for the new branch, create a pipeline to run the packaging job and deployment jobs in sequence. See Create and Configure a Pipeline to Deploy to Other Oracle Cloud Applications Instances.