Delete an Extension
Delete unnecessary extensions to restore your application to its original state and clean up your environment.
You have two options to delete an extension:
- The best practice is to use the Manage Lifecycle Extension page to delete an extension. When you delete an extension from this page, all versions of that extension are deleted.
- If you need to delete a specific extension version, you must configure a build job to delete it.
Delete an Extension Manually
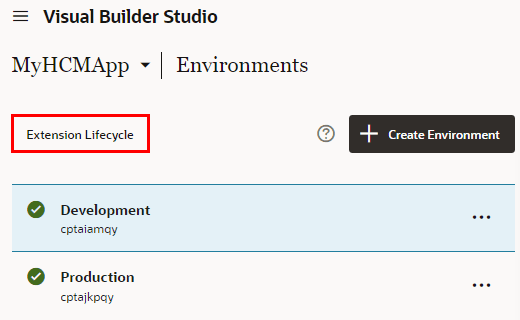
Use the Manage Extension Lifecycle page to delete extensions deployed from any project and to any Oracle Cloud Applications instance.
- Access the Manage Extension Lifecycle page:
- From the VB Studio left navigator, click Environments, then click Extension Lifecycle. You won’t see this option if you haven’t yet added an Oracle Cloud Applications instance to your environment.
Description of the illustration mel-ui-envts.png
- Or, from the menu in the Designer’s header, click Extension Lifecycle.
You should now see the Manage Extension Lifecycle page, which lists all the environments that are available.

Description of the illustration mel-ui-full-project1.png
You can work with an environment on this page as long as the authentication method for its Oracle Cloud Applications instance is OAuth. If there’s an environment listed whose authentication method isn’t OAuth, then you’ll first need to add a new environment with the same base URL, but using OAuth as the authentication method, before you can work with it. <div class="infoboxnote" markdown="1"> Note: If you see a Provide Credentials button next to an environment, you must first sign in before you can delete any extensions deployed to that instance. </div> Expand each environment to view a list of the extensions already deployed. Use the Show extensions for my project only checkbox to toggle between viewing extensions deployed from the current project only, or from all projects. Each entry includes the extension name plus additional details, such as extension version, deployment date, who deployed the extension, and project name.
- From the VB Studio left navigator, click Environments, then click Extension Lifecycle. You won’t see this option if you haven’t yet added an Oracle Cloud Applications instance to your environment.
-
To delete an extension from an Oracle Cloud Applications instance, find the extension that you want to delete and click
 .
.
All extension versions are deleted. If the extension was originally deployed via a CI/CD pipeline, the extension’s build jobs and their artifacts remain; this is helpful in case you ever need to redeploy an earlier extension version.Before deleting an extension from your PROD instance, delete the extension from the DEV instance (or TEST instance, if applicable) and make sure there aren’t any adverse effects.
Configure a Job to Delete an Extension
If you want to delete a specific extension version that’s deployed to an Oracle Cloud Applications instance, you must configure a build job and run it.
You can also use the Manage Extension Lifecycle page to delete extensions, but keep in mind that deleting an extension from that page deletes the entire extension.
Note that there can be only one active extension version at a time. The recommended best practice is to avoid deleting the active extension version because, if you delete it, the extension will become inactive as if it wasn’t installed at all. You can, however, delete inactive versions without impacting the currently active deployed extension.
Before you configure and run the job, delete the extension from the DEV instance (or TEST instance, if applicable) and make sure there aren’t any adverse effects. For example, let’s assume you have an attribute that’s hidden in both the extension’s business object and the user interface. After you delete the extension, the user interface shows the attribute that’s still hidden in the business object. This may cause an error.
To configure the job, make sure you have valid administrator credentials for the Oracle Cloud Applications instance where the extension is deployed.
- In the left navigator, click Builds
 .
. - In the Jobs tab, click + Create Job.
- In the New Job dialog box, in Name, enter a unique name.
- In Description, enter the job’s description.
- In Template, select System Default OL7 for Visual Builder.
- Click Create. The Job Configuration page opens.
- Click the Steps tab.
-
From Add Step, select Application Extension, and then select Delete. This image shows the Application Extension Delete build job page that’s partially filled in.
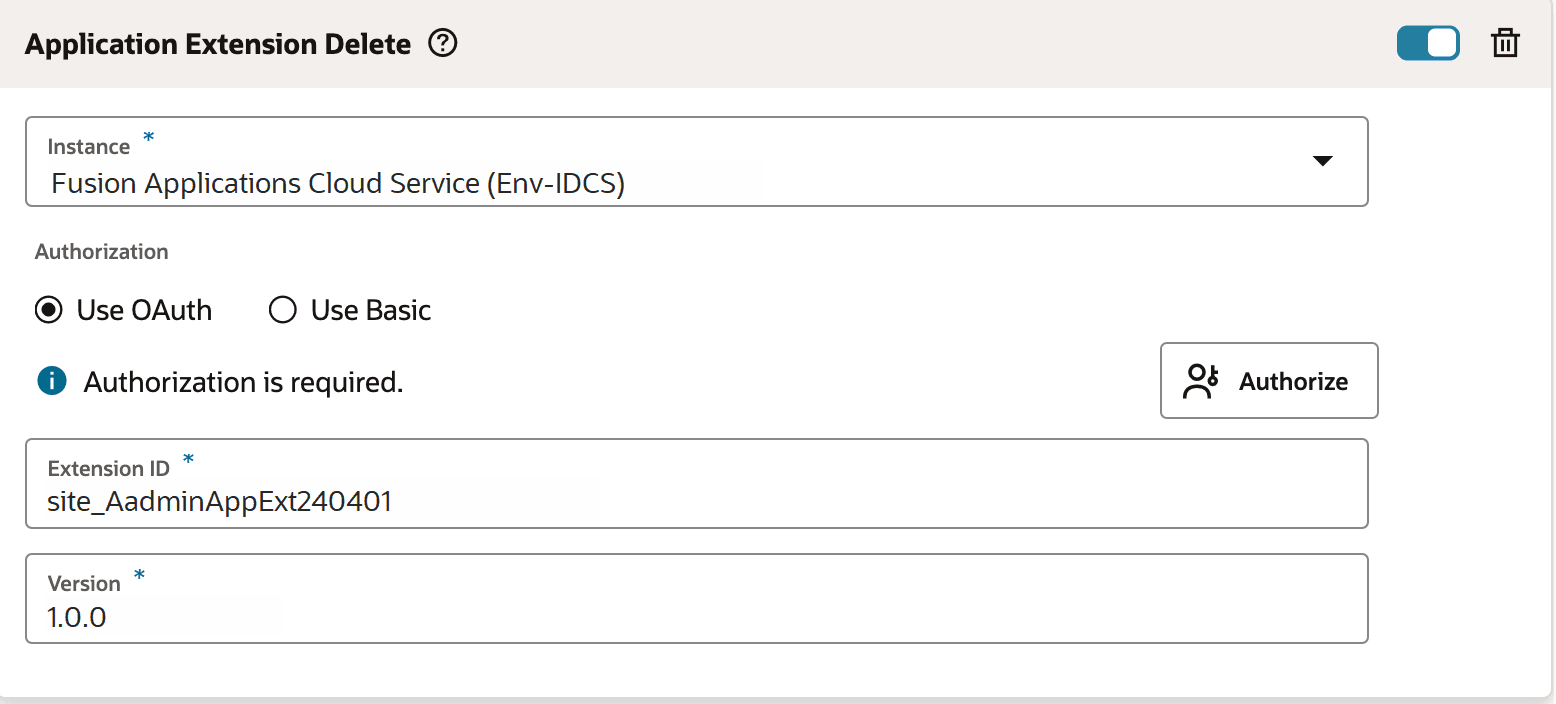
Description of the illustration app-ext-delete-build-step.png
- In Instance, select the Oracle Cloud Applications instance where the application is deployed.
-
In the Authorization section, specify the authorization type to run this build step. With Use OAuth selected by default, you’ll see the
Authorization is requiredmessage, indicating that this build step needs a one-time authorization to handle OAuth requests to your environment’s Oracle Cloud Applications instance. Click Authorize and enter credentials to access your Oracle Cloud Applications instance; you can also run the job manually and enter the credentials when prompted. Once authorized, theAuthorization has been providedmessage shows.OAuth is the recommended authorization type. Use Basic authentication only if you run into issues with setting up an OAuth connection. To use Basic authentication, select Use Basic, then in Username and Password, enter the credentials of a user who is not only an Oracle Cloud Applications user, but one who can access the Oracle Cloud Application’s instance and undeploy from it. These credentials must be those of a local user, not a federated identity, and must not require multi-factor authentication.
OAuth tokens (access and refresh) are cycled during regular use. A refresh token is used to obtain an access token whenever a user accesses the target instance. This refresh token is typically valid for seven days. (The token expiration time is set in the IDCS resource app and may be different based on your security requirements.) If the user authenticates with the target instance within the seven-day period, the active refresh token generates a new access token and a new refresh token. This cycle continues indefinitely as long as the refresh token stays valid. If the refresh token expires during extended periods of inactivity (say, when you’re away on vacation), click Renew Authorization (or run the job manually, so you’re prompted to authorize any expired OAuth tokens).
- In Extension ID and Version, enter the extension ID and version of the extension you want to delete.
You can find these items in the extension’s details on the Manage Extension Lifecycle page.
-
In the left navigator, click Environments, then click Extension Lifecycle.
-
Find the extension you want to delete, and select
 to obtain the extension ID and version.
-
- Click Save.
- To run a build, click Build Now.