Test Action Chains
You can use the Tests editor–located on the Action Chain editor's Tests tab–to implement a test-driven development approach to designing, creating, and maintaining your action chains, or to implement your own methodology. Using the Tests editor, you can easily define test cases for an action chain and run them at any time, to ensure that code changes haven’t broken any functionality.
The Tests editor removes the need to manually code a test for each code path by:
- Displaying the action chain's input parameters, context variables, and constants, so you can easily enter their values for testing.
- Displaying the actions that need their results provided (mocked) for the code path being tested.
- Suggesting expectations for the test, based on the provided values.
When testing action chains, the first thing you should do is figure out all of the possible code paths, since each one is a scenario that needs to be tested to achieve full test coverage. More complex code paths, however, might have more than one scenario that should be tested.
After identifying the code paths, create at least one test for each, depending on how many scenarios there are for a path. For each test, you need to:
- Provide any initial values, such as initial values for variables and
input parameters, that are needed to execute the code in the code path being tested.
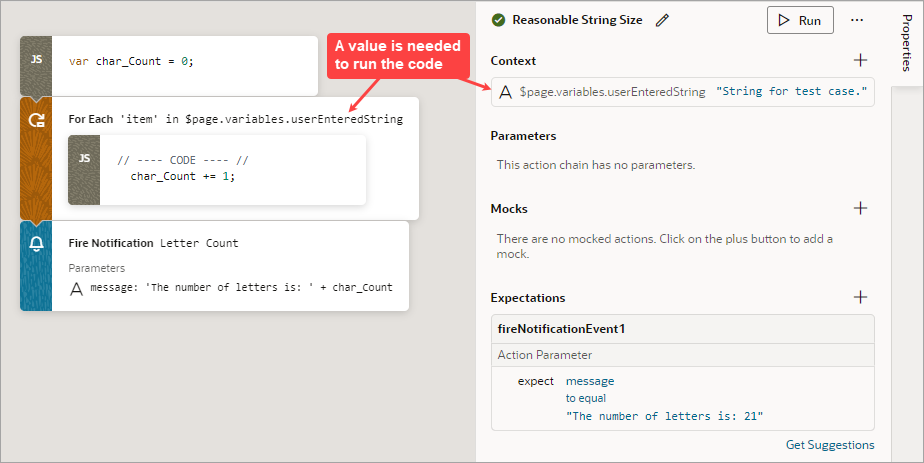
For instance, the code in the following image needs the value of the
$page.variables.userEnteredStringvariable to execute. The variable is used to count the number of characters that a user entered into an Input Text component that's bound to the variable. Since the variable's value is needed to run the code, you need to provide a value for it that is appropriate for the test case. - For
actions that can't automatically return a value during testing (such as a Call REST
action), provide the action's return value as a mock.
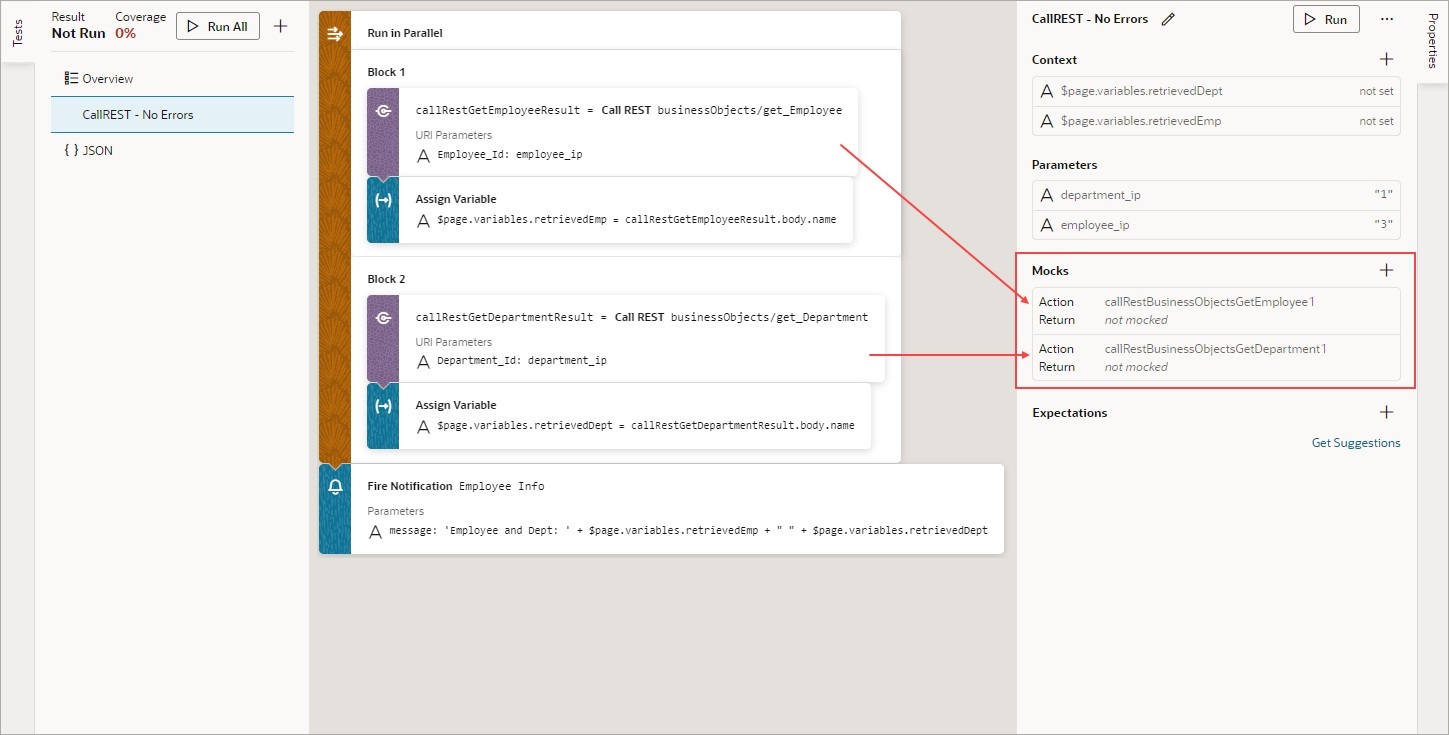
You'll see the Mocks section only when you have to provide the action's return value.
For example, in this Action Chain test, a Call REST action needs to get a movie using a parameter called
movieId:
Description of the illustration test_action_chain_rest_api_automatic.png - After values are provided for the test case, either by you (for actions
that can't automatically return a value) or the system (for actions that do
automatically return a value), VB Studio automatically generates expectations.
Select the expected results, such as a variable's final value, to test against.
For example, after you provide the initial values and mocks for a test, if VB Studio detects that a variable's final value will be 5, this expectation will be suggested to you. You can then add the expectation to the test, to test against. For the test to pass, all expectations have to be met.
The goal is to fully test your action chain by testing each of its code paths. If your tests cover the expected results for each code path, the value for Coverage will be 100%.
In the example below, three tests have been created for the three code paths that need to be covered to achieve full test coverage: Addition Test, Invalid Operator Test, and the Subtraction Test. Therefore, the value for Coverage is 100%, as you can see in the upper left corner of the editor.
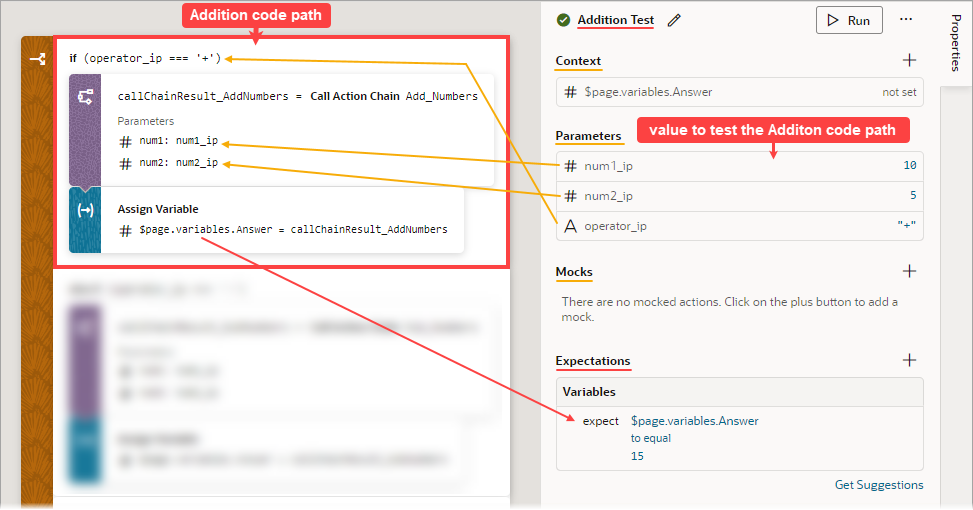
For the Addition Test, which tests the if operator_ip ===
'+' code block, you can see the three input parameter values in the
Parameters section of the Properties pane. The expected
results are in the Expectations section. 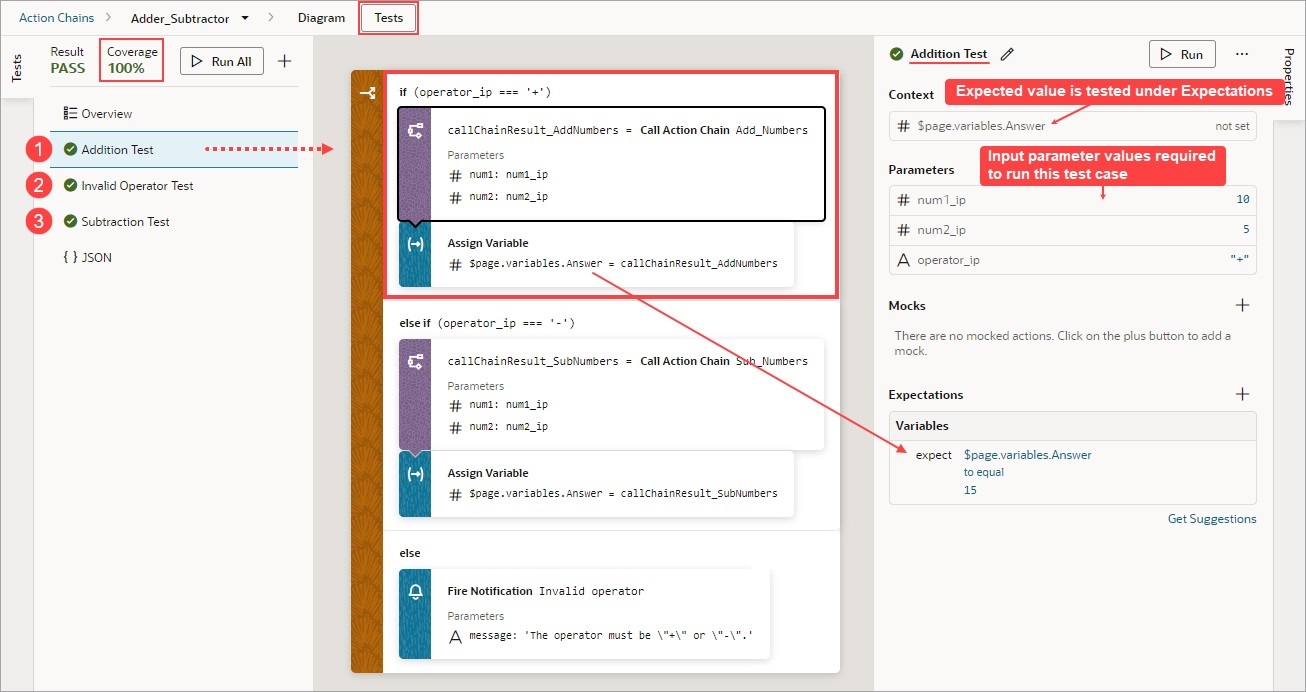
Description of the illustration jsac-testing-action-chain-example.jpg
The source code for all of your tests is stored in a separate JSON file, actionchainname-tests.json, for easier maintenance. To view this file's contents, click JSON in the left pane. You can also find this file under the artifact's chains folder in the Navigator's Source View tab.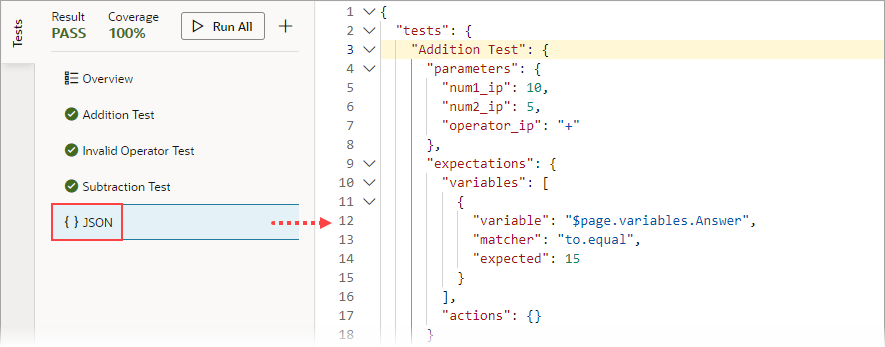
Description of the illustration jsac-tests-json.png
Create a Test for a Test Case
The first time you access the Tests editor, click the + Test button to create a test for a particular test case. The test name defaults to Test 1; enter a more descriptive name for the test case, if you want.
To create a test for a test case:
- In the Context section, provide the initial values for any context variables and constants that are used in the code path that is being tested. For instance, if a variable is used in the code path for a calculation, you'll need to provide a value for the variable that appropriately tests the code path.
Note:
If a variable or a constant's value is set by the code being tested and not required to execute the code, you don't provide an initial value for it. The expected value for the variable or constant will be suggested to you as an expectation. For instance, in the example that follows, the value for the variable$page.variables.Answerin set by the Assign Variable action. Since the value is set by code, the expected value for the variable is suggested to you in the Expectations section, as an expectation. - In the Parameters section, provide the values for any input parameters that are used in the code path. In this example, values have been entered for the three input parameters that are used in the addition code path:
- In the Mocks section, provide the results for any listed actions, ensuring that the
values are appropriate for the test case.
These actions always require mocked results:
- Call Component
- Call REST
- Call Variable
- Get Location
- Scan Barcode
To provide a mock for these actions (except for Call REST), click the action in the Mocks section. In the resulting window, provide a value that is appropriate for the test case.
For the Call REST action, all you need to do is provide the required parameters. VB Studio will make a REST request to get data and automatically populate the mock with the response. After you click Accept, VB Studio generates expectations based on this mock.

Description of the illustration test_action_chain_rest_api_mock.png
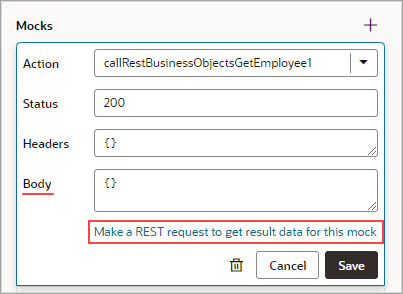
If you don’t want to use the automatically generated mocks, you can always manually make a REST call and add mocks. Just click anywhere in the Mocks section, then click Make a REST request to get result data for this mock.
You'll be taken to the Endpoint tab for the Call REST action. Here, you can modify the request to get and copy the response required to mock the action’s result:
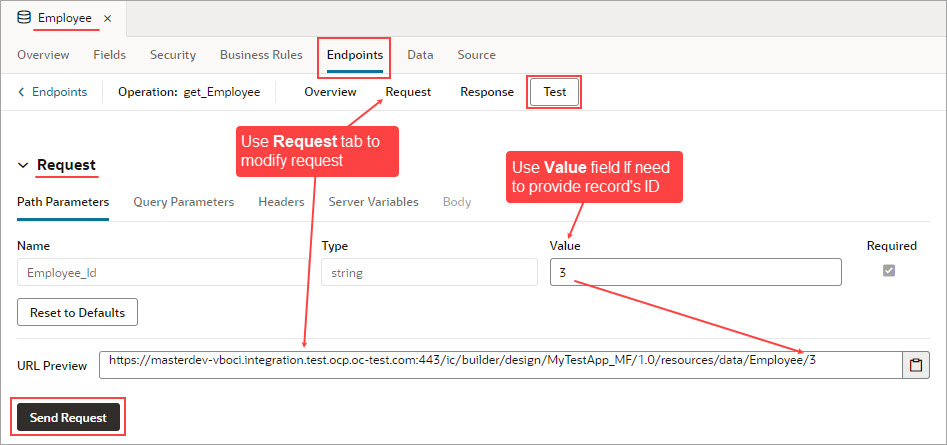
Description of the illustration jsac-get-call-rest-return-example.jpgShown here are the copied responses from the Call REST action requests, provided as mocks:
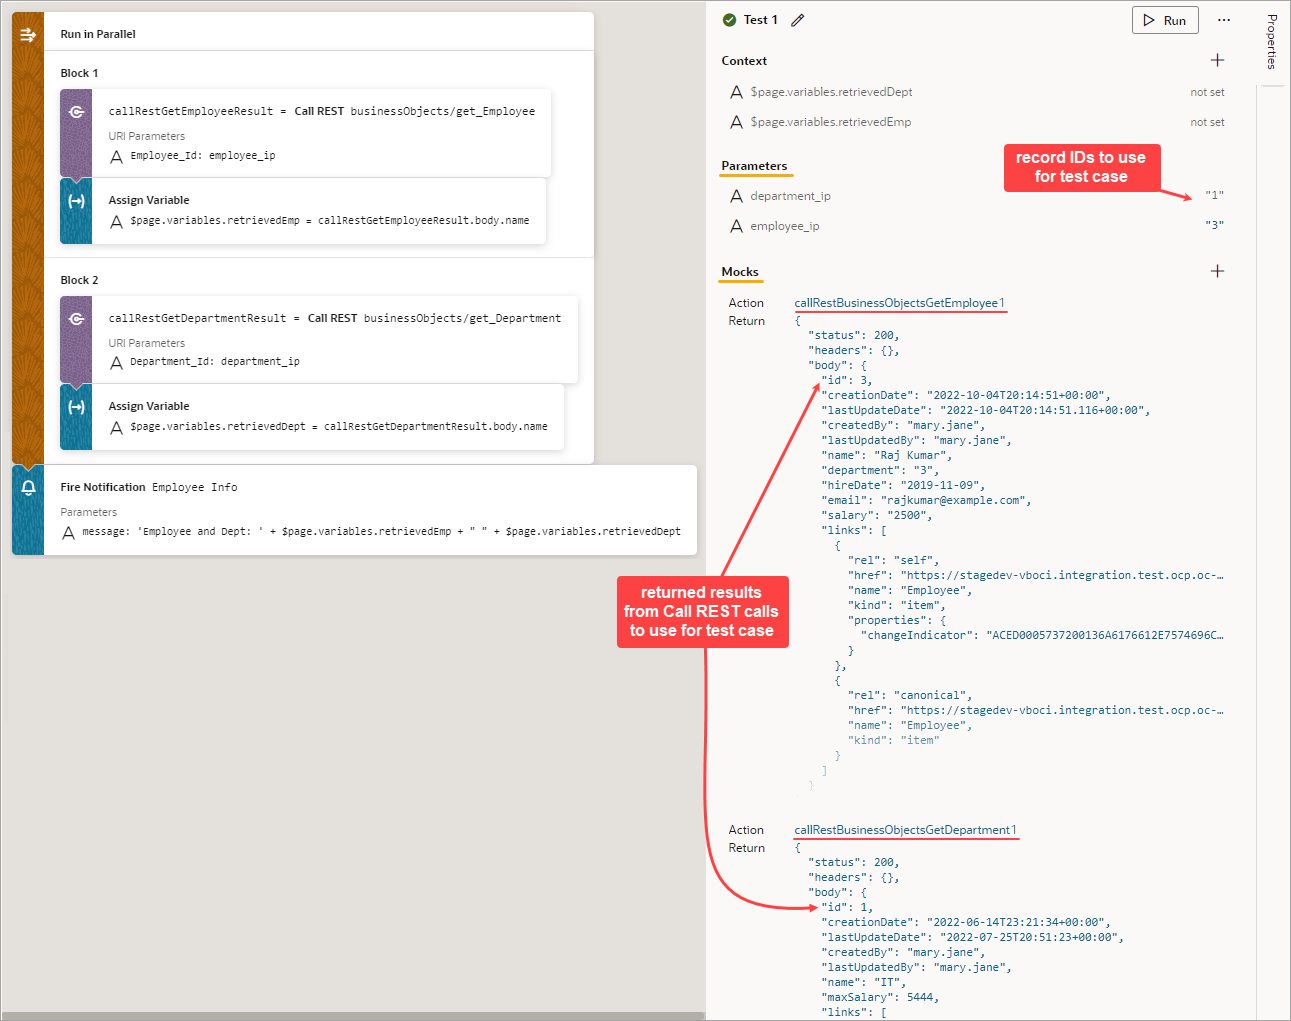
Description of the illustration jsac-example-call-rest-results.pngTo add a mocked result for an action that isn’t shown in the Mocks section, click the Add icon (+) for the Mocks section. Select the action from the Action drop-down list, then provide the value for the test case in the Return field.
- Now that you've provided the values for the test case, you can get suggested expectations based on those values by clicking the Get Suggestions button in the Expectations section.
Shown here are the suggested expectations that are based on the values entered for the Addition Test. In the Expectations section, use the Add All or Add links to add the applicable expectations. To refresh the expectations list, click Refresh:
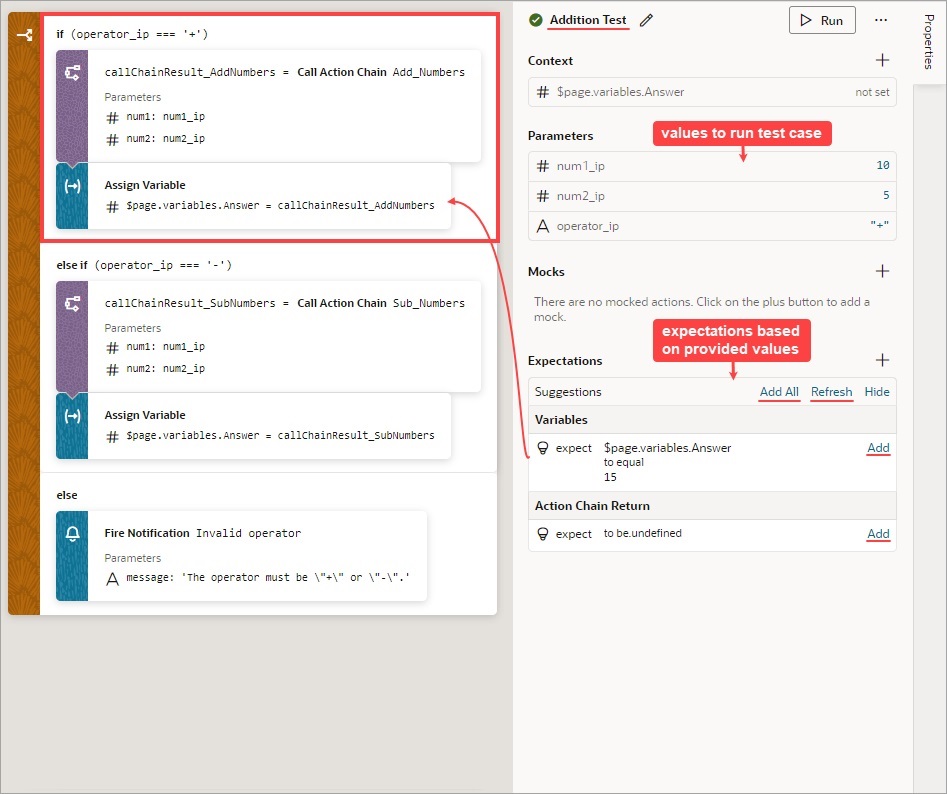
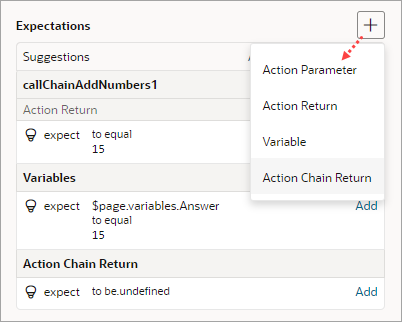
Description of the illustration jsac-expectations-based-values.jpgTo add your own expectation, click the Add icon (+) for the Expectations section. Select whether you’d like to create an expectation for an action’s parameter, an action’s return value, a context variable, or the action chain’s return value:
Description of the illustration jsac-expectations-box.pngMake the appropriate selections for the expectation and provide the expected value, as shown in this example. Click OK:
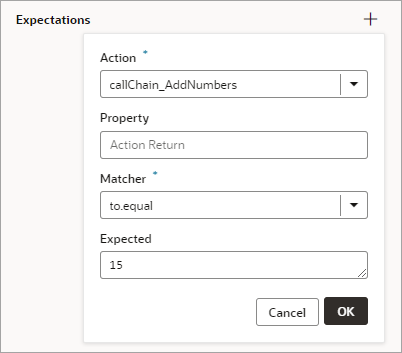
Description of the illustration jsac-expectations-box-example.png
Run the Tests
Once you've defined the tests, you can run them individually or all at once using the Run or Run All button.
After running the tests, a green icon beside a test indicates that its expectations were as expected and a red icon indicates an unexpected result. The reason for the failure is shown in the Expectations section.
If you incorrectly set an expected value and the detected expected value is correct, click the Accept as expected value link to change the expected value to the detected value: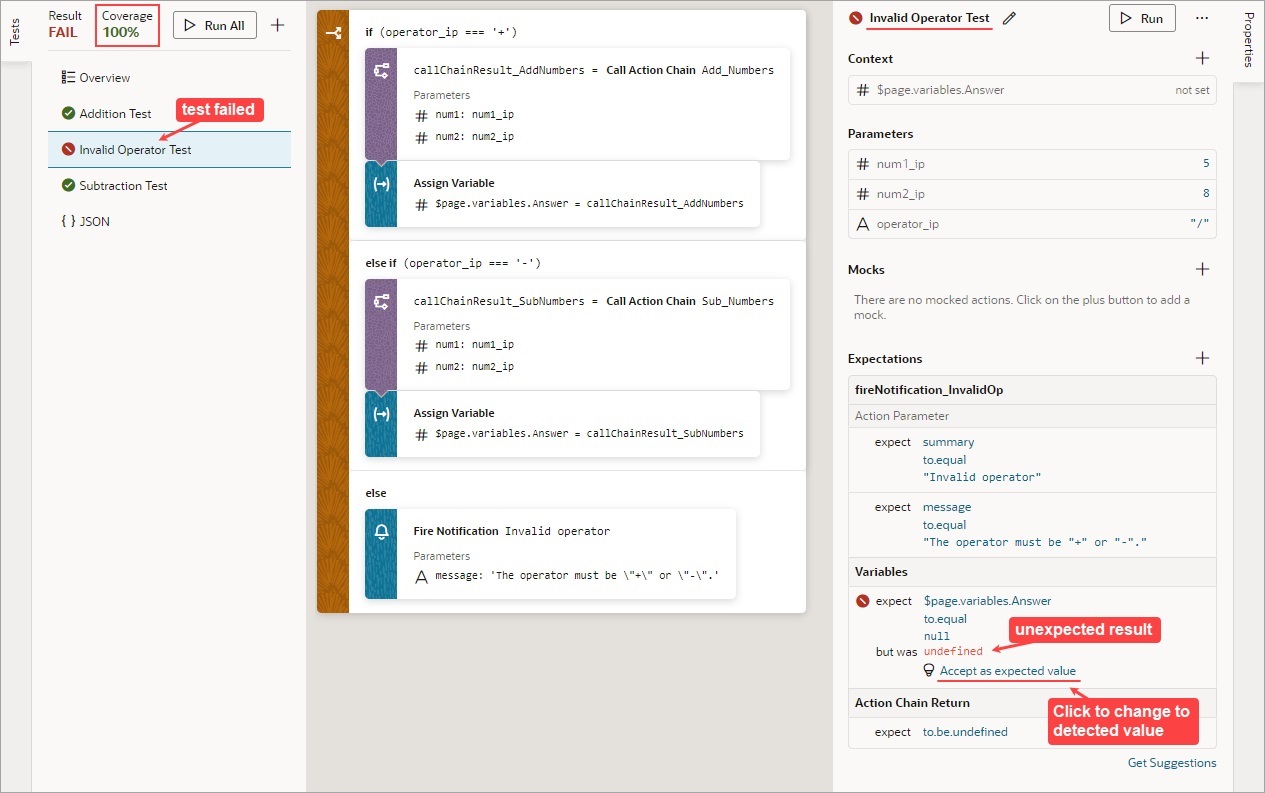
Description of the illustration jsac-test-failed.jpg
Use the Tests Footer in Your App UI
The Tests footer lets you simultaneously monitor multiple action chain tests that have been written for a App UI.
- At the top of the Test Results tab, you'll find the number of tests that have passed, failed, and are yet to be run in your App UI. Failed test for each App UI, flow, and page are shown below. For each failed test, click the link to access the editor, where you can identify and resolve any code-breaking issues.
While you can run all tests in your App UI using the Run All button, it's not required. Whenever you make changes to an action chain, the corresponding tests automatically run after ten seconds if you haven't yet run them.
- The Coverage tab provides an overview of how thoroughly the tests have covered the action chain code paths. At the top, it displays the average coverage of all tests, along with the number of failed and not-run tests. Below, the average coverage for each App UI, flow, and page is shown, along with a summary of coverage, failed tests, and not-run tests for each of their action chains.
Note:
Starting in 25.01, test coverage calculations are more accurate than they’ve been in the past. Specifically, the Coverage field now shows the percentage of all action chains with tests that have passed successfully.
