Resolve Conflicts Using the Git Panel

Use the Git Panel to review and resolve conflicts that occur when your changes clash with those made by other project members.

Conflicts usually occur when you and your teammate change the same line in different ways, or if one of you deleted a file while the other modified it. In such cases, VB Studio cannot tell which version is correct—it's up to you or your teammate to make that decision and resolve the conflict.

Note:

To help minimize the number of conflicts, the best practice is to make sure your local branch and the remote branch are in sync and up-to-date. You do this by frequently pulling commits on the remote branch to your local branch and by pushing changes from your workspace to the remote branch.

You'll be informed of conflicts when you attempt to merge or pull commits into your workspace. For example, let's say you've changed lines 2 and 3 in readme.md and committed the changes to a local branch in your Git repo. Now if someone else modified the same lines in readme.md and committed the changes to a remote branch, you'll be warned of conflicts between the file's remote version and your local version when you do a pull request to refresh your workspace, as shown here:
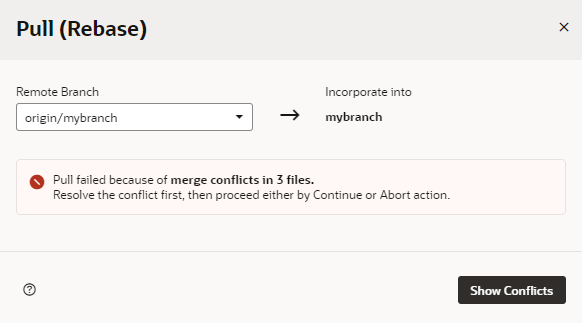
Description of showconflicts.png follows
Description of the illustration showconflicts.png

When this happens, here's what to do:

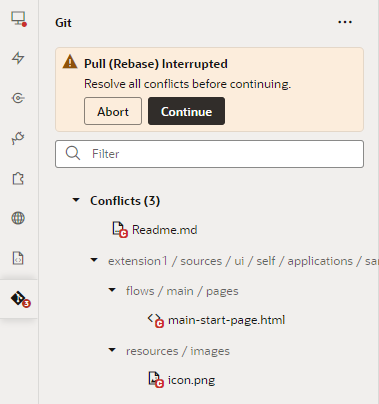
  1. Click Show Conflicts to open the Git Panel and view the files identified as containing conflicts:

    If you don't want to continue the operation, click Abort in the Git Panel to return your local repo to its previous state (the last commit made to the branch, known as HEAD)—but you won't be able to refresh your workspace until you abandon your local changes or resolve the conflicts.
  2. To resolve conflicts and continue your operation, right-click the file listed under Conflicts in the Git Panel and take action.

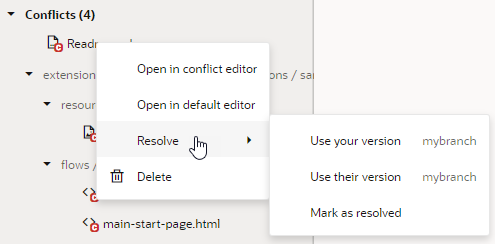
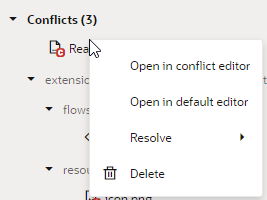
    The options that show depend on the type of conflict in the file. Here's an example of what you see when people make different changes to the same line of the same file (readme.md):
    Description of gitpanel-conflict-appui.png follows
    Description of the illustration gitpanel-conflict-appui.png

    Action Steps
    Open in conflict editor Select this option to open the file in the conflict editor; you can also just click the file to open it in the conflict editor. The conflict editor has controls to help you navigate between conflicts and provides options to resolve them. See Use the Conflict Editor to Resolve Conflicts.
    Open in default editor

    Select this option to open the file in the default editor, which are the designated artifact editors in VB Studio (for example, the Page Designer for an .HTML file or the JavaScript editor for a .JS file). This option is useful for non-text files (such as Excel worksheets and schema files) or other artifacts that aren't supported in the conflict editor. You can then open these files in the default editor and manually resolve the conflicts.

    Resolve Select this option to quickly resolve the file's conflicts, instead of going through each conflict in the conflict editor. This option is useful when the file has only a few conflicts that you can easily resolve by selecting either your version or the other version. See Use the Context Menu to Resolve Conflicts.

    Note:

    Resolve is not an option for non-text files. If you run into conflicts for binary files (say, an image file), you'll need to delete the file from the Git repo, then add it again after you've resolved all other conflicts and committed them to the remote repo.
    Delete Select this option to delete the file from the Git repo.

    It's also possible to review and resolve merge conflicts from VB Studio’s Git page. See Resolve a Merge Conflict.

  3. When you have many files with conflicts, you'll need to right-click each file in the Git Panel and take action.
  4. Once all the conflicts are resolved, click Continue in the Git Panel (or header menu) to continue your interrupted pull or merge operation.
  5. Remember to push your changes to the remote repo.

Use the Context Menu to Resolve Conflicts

When a file contains conflicts, you can use its context menu in the Git Panel to quickly resolve conflicts. You do this when the file has just a few simple conflicts that you can easily resolve by keeping your branch's changes or the other branch's changes.

Note:

If you want to keep changes from both branches (or a combination of them), or if the file has a large number of conflicts, it's better to open the file in the conflict editor and resolve each conflict separately.

The options available to you in the context menu depend on the type of conflict in the file. For example, what you see when a file is deleted in one branch and modified in another (as shown here on the right) is not the same as what you see for a file modified by different people on different branches (shown on the left):
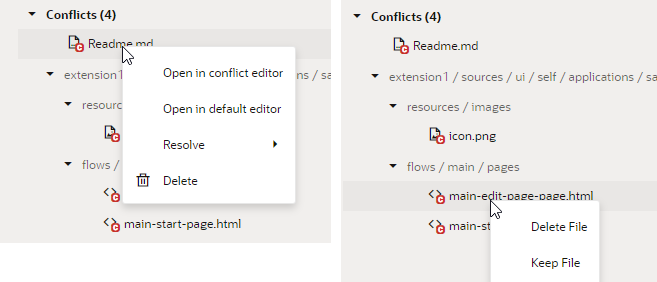
Description of conflict-types-appui.png follows
Description of the illustration conflict-types-appui.png

For demo purposes, we'll use the example of a file that's been modified by you and someone else.

  1. Right-click the file with conflicts in the Git Panel and select Resolve.

  2. Select the option you want to use:
    • Select Use your version to keep your changes in the local branch.
    • Select Use their version to keep changes in the remote branch.
    • Select Mark as resolved to mark the file as resolved by staging it in Git.

      Tip:

      When you select a file version (Use your version or Use your version), the file is automatically marked as resolved. Select Mark as resolved only if you manually made changes to a file either in the default editor or the conflict editor and did not mark the file as resolved (using Resolve and Close) in the editor.
Use the Conflict Editor to Resolve Conflicts

When you open a file with conflicts in the conflict editor, you can use the available controls to navigate between conflicts and resolve them.

  1. Right-click the file with conflicts in the Git Panel, then select Open in conflict editor. You can also double-click the file, especially if the type of conflict doesn't give the option to open the file in the conflict editor.

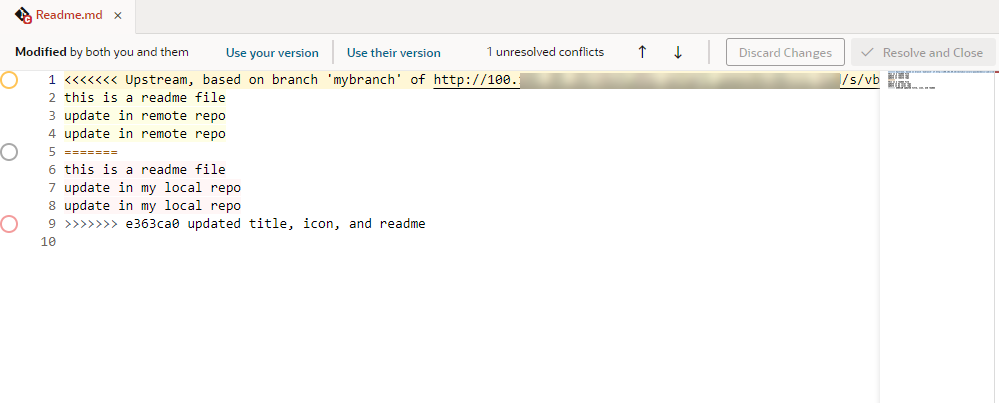
    When the file opens in the conflict editor, conflicts between your local version of the file and the remote version are highlighted. For example, here's an example readme.md file (with a single unresolved conflict) that was modified by you and someone else:Description of vbs-git-panel-code-conflict.png follows
    Description of the illustration vbs-git-panel-code-conflict.png

  2. Decide how you want to resolve the conflict. You can use the options in the toolbar or the markers that appear next to a conflict in the editor.

    The options available to you depend on the type of conflict you are resolving. For example, if you deleted a file in your local branch and someone modified the same file in the remote branch, you might see Delete File (Your Version) and Keep File (Their Version). (It's worthwhile to note that the content of deleted files shows in read-only mode and cannot be edited until the conflict is resolved. Note also that non-text file content won't show in the conflict editor.)

    For demo purposes, we'll use the example of a file that's been modified by you and someone else. Here are the options available to you for this use case:

    Action Step
    To keep changes in the remote branch
    • Select Use their version in the toolbar, or
    • Click Their Version conflict marker in the canvas and select Their Version.
    To keep your changes in the local branch
    • Select Use your version in the toolbar, or
    • Click Your Version conflict marker in the canvas and select Your Version.
    To keep changes from both branches Click Use Both Changes conflict marker in the canvas and select Use Both Changes.

    Note:

    You can also ignore these options and update the file as you would any text file, to keep the lines you want and delete the rest. You do this when you want to incorporate changes from both branches, for example, to keep some of your changes and some of theirs.

    The lines between <<<<<<< and >>>>>>> represent a conflicting change, with changes from each ref separated by =======. Remember to delete these markers as well as Git-related comments when resolving a conflict.

  3. If the file has more than one conflict, click Go to next conflict in the toolbar to go to the next conflict and take steps to resolve it.
  4. Optional: Click Discard Changes and confirm when prompted to revert all the updates you've made to resolve conflicts in the file.

    Once you discard your changes, resolve the conflicts again to proceed.

  5. When you see the No unresolved conflicts message in the toolbar, click Resolve and Close to mark the file as resolved.