Use the Page Designer

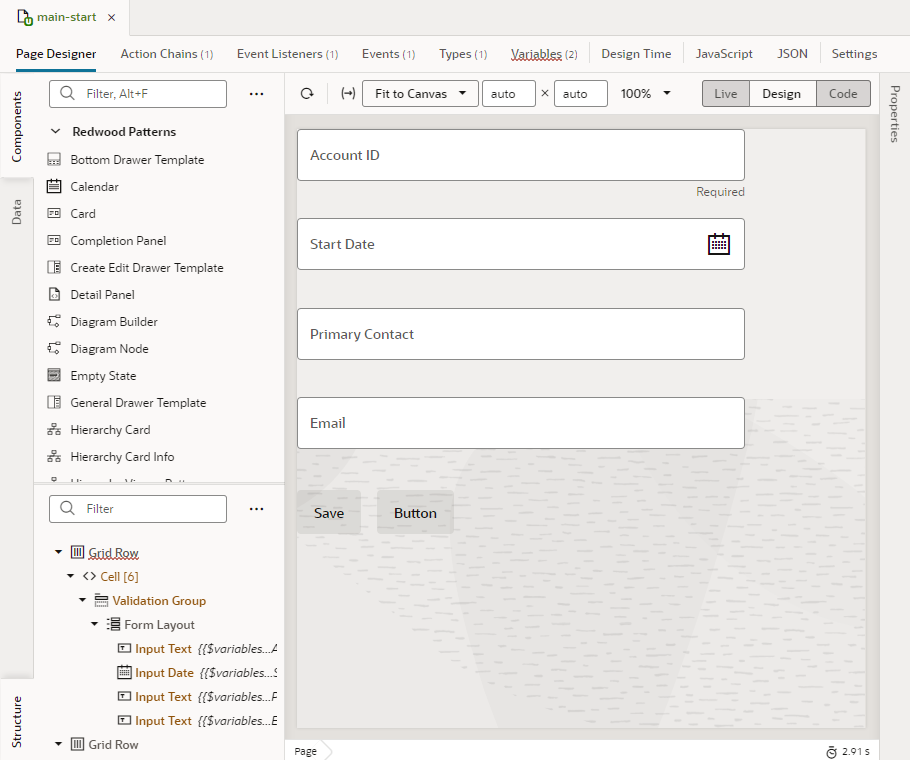
There are several editors available to you in the Designer—such as Actions, Event Listeners, and so on—but the one you'll likely use most frequently is the Page Designer. The Page Designer opens when you click a page or fragment in the Navigator's App UI pane:

Description of designercanvasandeditors.png follows
Description of the illustration designercanvasandeditors.png

Along the top of the Page Designer you can see a toolbar, which lets you configure the Page Designer itself:

Toolbar Item Description
Reload Page icon Reloads the page.
Page Input Parameters icon Opens a dialog box for entering input parameters for the page.
Device selector icon Opens a menu for selecting the screen size represented by the canvas. The default, Fit to Canvas , resizes the canvas to take up all the available space between the left and right panes. Use the Custom option to set the minimum and maximum values for viewport resolution, thus resizing the canvas to whatever size you want.
Show/hide bezel icon Shows or hides a mobile device's bezel (the border between a device's screen and its frame).
Zoom Canvas icon Opens a dialog box for changing the magnification of the canvas.
Live/Design/Code toggle icon Toggles between Live, Design, and Code modes.
  • Live mode: Displays the page as it will look and behave when it is published. Use Live mode to interact with the pages in your App UI to navigate to different pages, and to confirm that your application is behaving as you expect.
  • Design mode: The mode you use most frequently, to place and position components on the page.
  • Code mode: Use to edit the page's code. In Code mode, you can drag components from the Components palette and drop them directly into valid places in the code in the editor. When you use the Structure view to edit and reposition elements, the changes are automatically reflected in the code.

Tip:

Hold the Ctrl key (Cmd on Mac) to momentarily switch between Live and Design modes. Make sure the cursor is on the canvas, then hold the Ctrl key. For example, you can check the values in a drop-down menu by simply holding the Ctrl key and clicking the menu on the canvas.

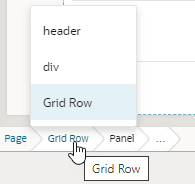
Example breadcrumbs path
At the bottom of the canvas (not in the toolbar), a breadcrumb path displays a hierarchical list of links to indicate its placement in the page's structure. Clicking a link in the breadcrumb path selects that component on the canvas and in Structure view and lets you view its details in the Properties pane. To hide the breadcrumbs (shown by default), select Hide Breadcrumbs in the right-click menu.

Loading Time icon

Displays time taken to render and display the page in the canvas. Clicking the icon will show a breakdown of how long different tasks (such as bootstrapping and loading a shell page) take in order to display the page, as shown in this example:
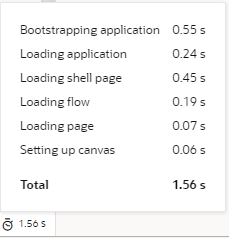
Breakdown of tasks taken to render a page

Rendering is done in runtime execution mode, with the Page Designer serving the resources needed to display the page. Because each resource is requested in a different phase of runtime initialization, the time between these resource requests is measured and summarized. This information can thus help you isolate runtime issues that may cause your app to load slowly. For example, if a page takes time because of long REST calls, you might decide to defer the calls or run them in parallel.

If the page contains runtime errors, an error message will show instead. Click the message to get details about the errors and resolve them for the page to render correctly.

The Page Designer offers several different ways for you to interact with your page. Specifically, you can:

  • Drag and drop components on to the page, then associate them with data, using the Components palette;
  • Work with page components from a hierarchical perspective, in Structure view;
  • Start with the data, then decide how to represent the data in the user interface, using the Data palette.
  • Work with the code directly, by clicking Code in the Page Designer toolbar.

Let's look at the first three modes in a bit more detail.

Hint: You can hide or show any of these panes by clicking the Components, Data, or Structure tab.

The Components Palette

The Components palette contains UI components and organizational elements that leverage the Oracle JavaScript Extension Toolkit (JET) to help you build pages. To add a component to a page, simply drag it from the palette onto the canvas.

Components by default show in list view and are organized by categories. You can scroll to locate a component, although it's simpler to use the Filter field. Hover your cursor over a component's Info icon to get hints about the component.
Description of page-designer-palette-appui.png follows
Description of the illustration page-designer-palette-appui.png

Note:

JET Core Pack components, written entirely using the VComponent API and the JET Virtual DOM architecture, are available for use in your extensions. See Work With JET Core Pack Components on how you can take advantage of them in your pages.

For ease of use, all JET components show in the Components palette, including those without design-time properties. These components show under the Advanced category and typically require you to manually code different aspects of their functionality. Use tooltips to access JET documentation on how to use these advanced components.

Click Components to show or hide the Components palette.

If you want to customize the palette's default settings, click Components Menu (Components menu):
  • To view components laid out as a grid, select Grid (default is List).
  • To always show components in every category, select Expand All; to hide them, select Collapse All (default is Expanded By Default).

    If you want to change the default view with components collapsed, deselect Expanded By Default. Changing this setting when working in a page editor won't change your current view, but it will take effect when you open a new editor. To change this setting in your current view, use Expand All and Collapse All.

  • To hide categories and view all components in a flat list, deselect Show Categories.

You can also:

  • Click Get Components to access your instance's Component Exchange, from which you can add JET web components to your page.
  • Click Show Deprecated to view components that have been deprecated (badged Deprecated badge for easier identification). Deprecated components are flagged in your App UI's audit and are retained only to allow existing App UIs to continue to run. It's recommended that you move away from these components as soon as possible. Use the component's tooltip to view details of the version it was deprecated in, as well as a suitable alternative.
  • Click Show Maintenance to view components in maintenance mode (badged Maintenance badge for easier identification). As with deprecated components, you should transition away from components in maintenance mode as they will eventually be deprecated. Use the component's tooltip to view a suitable alternative.

The Structure View

The Structure view provides a structural view of components on the canvas. You can use it to see the hierarchy of a page's components and to reposition components within the page's structure. You can also add components in the Structure view. Click Structure in the Page Designer to show or hide the Structure view.

Selecting a component in the Structure view also selects it on the canvas and displays its properties in the Properties pane. You can organize and reposition components on the page either by dragging them into position in the Structure view or by dragging them from the Structure view directly to the canvas. You can also select multiple components in the Structure view to simultaneously reposition them (for example, to move them into a new container).

It's also possible to add components to a page by dragging components from the Components palette or the canvas into the Structure view; you can also click Insert Component in the right-click menu. This option can help you position a component exactly where you want to add it, especially if you're working with complex layouts. When you select Insert Component on a selected component, you'll be able to add a component before, inside, or after the selected one. If the selected component has multiple slots, you will have the option to drop the component into a particular slot; if it's a single slot, the component is dropped directly into the slot.

Use the Page Structure Menu (Options menu in Structure view) to set your Structure view preferences.
Description of page-designer-structure.png follows
Description of the illustration page-designer-structure.png

You can choose to display a component's details, for example, its id, classes, or hints about its content (enabled by default). You can use Show Visible Components Only to view only the nodes of the components visible on the page. When combined with the default view that fades into the background components that are not currently displayed on the page, this option can trim background information and allow you to focus on parts of the page, a section at a time.

You can also enable Show Slots to display the location of empty as well as occupied slots. When slots are visible, you can easily locate the slot where you want to drop a component, as shown here:
Description of showslots.png follows
Description of the illustration showslots.png

Even if you don't enable the option to show slots, it's possible to locate available slots by pausing over a component node when dragging a component into Structure view. If the component node has slots, a pop-up menu that lists the available slots opens; you can then drop your component into the desired slot in the pop-up menu.
Description of page-designer-structure-slots.png follows
Description of the illustration page-designer-structure-slots.png

You can also right-click a slot and select Insert Component to drop a component directly into a slot. Doing this brings up the list of components, including a set of recommended ones. Recommended components show under a Preferred category and are based on the type of component that can be used in the slot. For example, components recommended for a button's startImage and endImage slots are icons and images:
Description of preferred-components.png follows
Description of the illustration preferred-components.png

The Data Palette

The Data palette provides a data-centric approach to page design. Instead of choosing UI components and binding each component to a data source, as you would when using the Components palette, this approach starts with your data source and lets you choose from UI options that optimally display the data.

Data is the basis of any application, and when working with pages in VB Studio your data sources are always based on REST. In particular, service connections link your App UI with external REST APIs to retrieve data, which you can then surface by choosing a component suggested by VB Studio.

In this example, the service connection site_mc_designer has been created for this extension, based on the crmRestApi in the Oracle Cloud Application catalog. Within that connection, the endpoints for the accounts REST API are displayed:

Description of datapaletteget.png follows
Description of the illustration datapaletteget.png

Suppose you want to show account data on a page. You would simply drag an endpoint from the Data palette and drop it on the canvas. (You can drop a data element on the page canvas, in the Structure view, or in Code view.) When the Render as pop-up appears, you can choose from the list of components that VB Studio suggests based on the REST endpoint you've chosen:

Description of datapaletterenderas.png follows
Description of the illustration datapaletterenderas.png

Notice that both dynamic and standard options are shown. Once you select an option, the corresponding quick start opens, to walk you through the required configuration tasks.

If a service contains multiple endpoints of the same type—for example, two Get Many endpoints—you'll be additionally prompted to select the correct endpoint:

Description of data-palette-select-endpoint.png follows
Description of the illustration data-palette-select-endpoint.png

Because endpoints enable CRUD operations, your component suggestions reflect endpoint functionality. For example, data from a Get Many endpoint lends itself to a table or list view. Similarly, a Create endpoint will render a form. Here's a summary of the components suggested (standard and dynamic) for a particular type of endpoint:

Endpoint Type Component
Get Many Table, Table Dynamic, List, List Dynamic
Create Create Form, Create Form Dynamic
Get One Detail Form, Detail Form Dynamic
Update Edit Form, Edit Form Dynamic

The Data palette is available to you when working with pages, fragments, and dynamic container templates.

When working with quick starts in the Data palette, keep in mind that both standard and dynamic component quick starts add a form or a table to the existing page and configure it. Normally, quick starts for standard components add pages to your App UI, and quick starts for dynamic components configure an existing form or table—for the Data palette, quick starts do both. Except for this key difference, the quick starts are similar to those used for standard and dynamic components.