Create a Rule For Tables
You use a collection rule when you want to hide or display columns in a dynamic table, assuming that certain conditions are met at runtime.
To create a collection rule:
- Open the page you want to configure, and then click Configure Fields and Regions in the Properties pane to open the business rules editor.
-
Click
 next to Collection Rules to open the Create Business Rule dialog box.
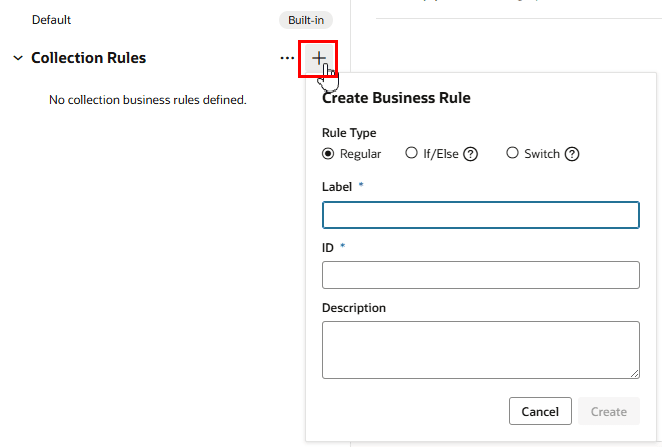
Description of the illustration metadata-ext-collectionrule-create.png
- In the Create Business Rule dialog box, do one of the following.
-
Select the Rule Type in the dialog box.
Select Regular to create a standard business rule. The other rule types (If/else and Switch) are special types of nested rules. For more about these nested rules, see Add an If/Else Rule and Add a Switch Rule.
-
Select a rule template.
If there are any business rule templates defined in the app, you can select one using the Template dropdown list in the Create Business Rule dialog box:
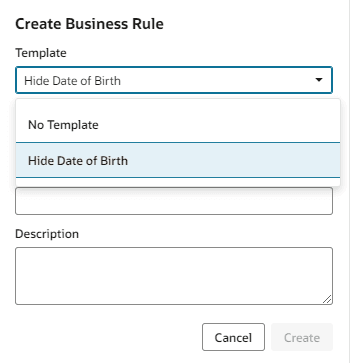
Description of the illustration metadata-visapp-brtemplate.png
A template can provide examples of how to configure business or validation rules, for example, how to specify rule conditions, how to write advanced expressions, or examples of how to override properties.
When you create a rule from a template, the new rule contains all the examples in the template. You can edit the examples in the new rule as needed.
-
-
Enter a label, id, and description for the rule.
The id is generated automatically based on the label you enter, but you can modify the id if you wish. The description field is not required, but it can be helpful when you later try to understand what a rule is doing, especially when there are many rules.
-
Click Create
Your new rule is added to the top of the list of extension rules under Collection Rules.
- Click Edit, and then create a condition for the rule. See Set Conditions for a Rule.
-
In the Fields area, locate the field corresponding to the column you want to configure.
In a table, each field corresponds to a table column. This means that if a dynamic table is configured to display four fields, the table will have four columns.
Note: If you have trouble locating the field you want to modify, confirm that there were no errors loading services in the editor. The editor only lists fields from services that have loaded successfully. You’ll see "Loading Completed with Errors" in the editor’s status bar if any errors occurred when loading the editor.
If you see the error message in the status bar, contact your project administrator about resolving the error. -
Click the dash—or an existing value—for the field’s Hidden property, and select a new value for the property in the dropdown list.
In a collection rule, the only property you can override is the Hidden property:
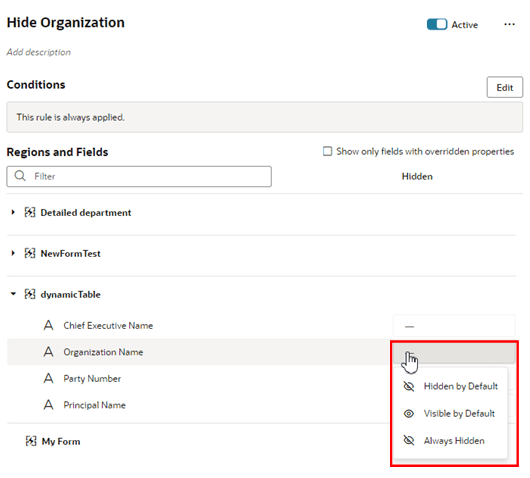
Description of the illustration metadata-collectionrule-property.png
The Hidden property has three options:
- Hidden by Default hides the table column when the page is rendered. A user can still use the table’s popup menu to hide and show the column.
- Visible by Default displays the table column when the page is rendered. A user can still use the table’s popup menu to hide and show the column.
- Always Hidden hides the table column. When this option is selected, a user cannot use the table’s popup menu to display the column.
In a collection rule, you can set the Hidden property for a field even if it’s not included in a table. The Hidden property in a collection rule is only applied to table columns. (The property does not affect fields in forms.)
Depending on how the app was configured, you might have options for filtering the list of fields displayed in the editor. The Show only fields used by layouts option filters out the fields not included in layouts. If you don’t select this, the list contains all the object’s fields. The Show only fields with overridden properties option limits the list of fields to those that have been modified by a rule.
Rather than creating a rule from scratch or from a business rule template, you can duplicate an existing rule and use it as the basis for a new rule. To duplicate a rule, right-click the rule in the list, and then click Duplicate.
Note When duplicating rules defined in extension dependencies (the rules labeled “Built-in”):
- You cannot duplicate a rule if it uses advanced expressions, for example, in the rule’s condition or to override a field’s value.
- You cannot duplicate a rule if it uses any global functions that cannot be referenced in the extension. If the global functions are referenceable, when the rule is duplicated they are automatically imported, and the references to the function are updated in the rule.
- When duplicating nested rules, you can only duplicate the top-level rule. When you duplicate the rule, the child rules are also duplicated.
To delete a rule, right-click the rule in the list to open the popup menu, and then click Delete.
Rules are evaluated in order, from bottom to top, so all extension rules are evaluated after the built-in rules. As you create more rules, make sure you position each one in the order you want them evaluated. To change a rule’s position, right-click the rule and use the Move up and Move down items in the popup menu. To find out more about how rules are evaluated in Understand What Will Be Shown at Runtime.
If you decide you don’t want to include a rule in the evaluation order, select the rule, then use the Active toggle switch in the upper right corner to deactivate it. (You can also right-click a rule and deactivate and activate it in the popup menu.) This enables you to still keep the rule so you can re-activate it later. You can tell at a glance if a rule is inactive because “(Inactive)” is appended to the name, like this:

Description of the illustration inactiverule.png
Inactive rules are not included in the rule evaluation process.
Note: You can deactivate all the extension rules at once by clicking the three dots next to the Form Rules and Collection Rules headings, then clicking Deactivate All. This can be useful when debugging a page, allowing you to see the page with only the built-in rules applied. Use Activate All to reinstate all the rules at once, or use the Active toggle to selectively activate them as you work through your debugging process.