Build Maven Applications
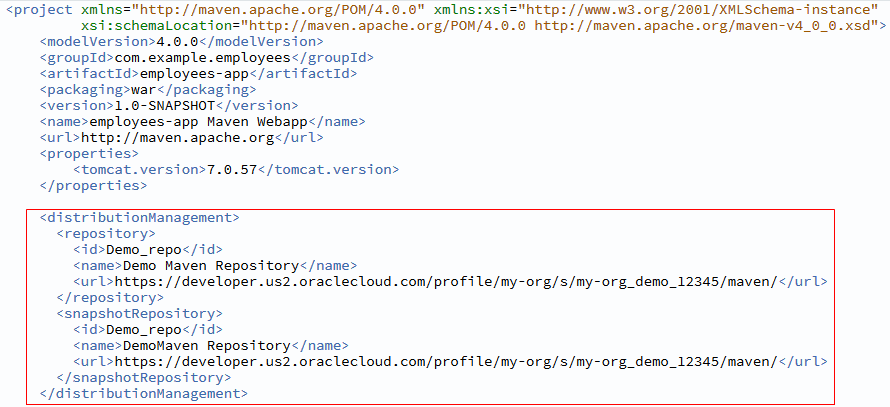
Using Apache Maven, you can automate your build process and download dependencies, as defined in the POM file:
- Upload the Maven POM files to the project Git repository.
- Open the job’s configuration page.
- In the Git tab, add the Git repository where you uploaded the build files.
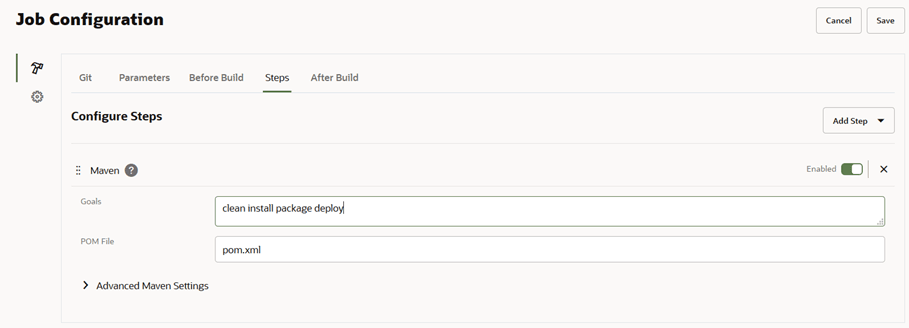
- Click the Steps tab.
- From Add Step, select Maven.
- In Goals, enter Maven goals, or phases, along with their options. By default,
cleanandinstallgoals are added.For more information about Maven goals, see the Maven Lifecycle Reference documentation at
http://maven.apache.org. - In POM file, enter the Maven POM file name and path, relative to the workspace root. The default value is pom.xml at the Git repository root.
- If necessary, specify the Advanced Maven Settings:
Action How To Use a private repository for builds Select the Use Private Repository check box. You may want to use it to make sure that other Maven build artifacts don’t interfere with the artifacts of this job’s builds. When a build runs, it creates a Maven repository
.maven/repodirectory in the build executor workspace. Remember selecting this option consumes more storage space of the workspace.Use a private temporary directory for builds. Select the Use Private Temp Directory check box. You may want to use it to create a temporary directory for artifacts or temporary files. When a build runs, it creates a
.maven/tmpdirectory in the workspace. The temporary files may consume large amount of storage, so, remember to clean up the directory regularly.Work offline and don’t access remote Maven repositories Select the Offline check box. Activate Maven profiles In Profiles, enter a list of profiles, separated by commas. For more information about Maven profiles, see the Maven documentation at
http://maven.apache.org.Set custom properties In Properties, enter custom system properties in the key=valueformat. Specify each property on its own line.Tip:
Don't surround properties that have multi-word values, like
key2=say
                                                  hello
, with single or double quotes. Multi-word property assignments will be automatically wrapped with double quotes.Also, notice that arguments, which are generated for the
mvncommand, have an extra space in them between "-D" and the argument, like this:mvn ... -D key1=value1 -D "key2=say hello" ...When a build runs, the properties are passed to the build executor in the standard way (for example,
-Dkey1=value1
                                                -Dkey2=value2
) without the extra spaces.Include build parameters in the Properties list Leave checked (default setting) to include all build parameters in the Properties list. Deselect to stop automatically adding the parameters to the list.
Set the Maven verbosity level From Verbosity, select the level. You may want to use it to set the verbosity of the Maven log output to the build log.
Set the checksum mode From Checksum, select the mode. You may want to use it to set the check-sum validation strictness when the build downloads artifacts from the remote Maven repositories.
Set handling of the SNAPSHOT artifacts From Snapshot, select the mode. Include other Maven projects to the reactor In Projects, enter the comma or space separated list of Maven project jobs to include in the reactor. The reactor is a mechanism in Maven that handles multi-module projects. A project job can be specified by [groupId]:artifactIdor by its relative path.Resume a Maven project from the reactor In Resume From, enter the Maven job project name from where you would like to resume the reactor. The Maven job project can be specified by [groupId]:artifactIdor by its relative path.Set the failure handling mode From Fail Mode, select the mode. You may want to use it to set how the Maven build proceeds in case of a failure.
Set the Make-like reactor mode From Make Mode, select the mode. You may want to use it enable Make-like build behavior. Configure the reactor threading model In Threading, enter the value for experimental support for parallel builds. For example, a value of 3 indicates three threads for the build. Pass parameters to Java VM In JVM Options, enter the parameters. The build passes the parameters as MAVEN_OPTS. - Click Save.
Use the WebLogic Maven Plugin
The WebLogic server includes a Maven plugin that you can use to perform various deployment operations against the server, such as deploy, redeploy, and update. The plugin is available in the VB Studio build executor. For more information about how to use the WebLogic Maven plugin, see Fusion Middleware Deploying Applications to Oracle WebLogic Server in Oracle Fusion Middleware Online Documentation Library.
Note:
Make sure that your build VM template includes the WebLogic Server (WLS) software bundle. For example, the Oracle JDeveloper Studio 12 software bundle includes the JDeveloper Studio 12.2.1.3 (or 12.2.1.4) software.-
Open the job’s configuration page.
-
Click the Steps tab.
-
From Add Step, select Unix Shell.
-
In Script, enter this command:
# Use sync to install deps mvn install:install-file \ -DpomFile=`find $MIDDLEWARE_HOME -name "oracle-maven-sync*.pom"` \ -Dfile=`find $MIDDLEWARE_HOME -name "oracle-maven-sync*.jar"` mvn com.oracle.maven:oracle-maven-sync:push \ -DoracleHome=${MIDDLEWARE_HOME} # Add additional arguments for deployment mvn com.oracle.weblogic:weblogic-maven-plugin:deploy -
Click Save.


