Importing and Exporting Teams and Members
Administrators and Power Users can perform a bulk update of teams and members, rather than having to update teams and members individually. When the teams.csv file is exported, it provides a report of the teams and the members for each team.
You can also create new teams by editing the teams.csv file. When editing the teams.csv file, you must use the format as shown in "Required File Format".
You need to perform the following steps:
- Generate the export .csv file. See the format in "Required File Format" below.
- Import the information back to the application.
In Account Reconciliation, the following roles are selectable
- User
- Viewer
Exporting Teams and Members
To perform a bulk export of Teams and Members:
- On the Home page, click Tools, and then click Access Control.
- Click the Manage Teams tab.
- Select a team.
- Click the Export File icon
 . The teams listed on the Manage Teams page are exported to a teams.csv file, by default
- Click Save to save the teams.csv file. The file provides a listing of all teams and the members for each team.
Required File Format
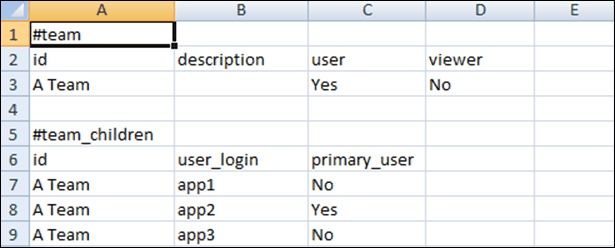
When you create a .csv file to import or export teams, it must use the following format:
| CSV Element | Required | Description |
|---|---|---|
|
#team |
Yes |
List of teams with team description and roles |
|
#team_children |
No |
List of team members |
|
Roles |
No |
If team has specific roles, allowed values are Yes and No. Default value is No. Allowed roles are Administrator, Power User, User and Viewer. |
|
id |
Yes |
Uniquely identifies a team or team name |
|
Primary_user |
No |
Allowed values are Yes and No. Default value is No if either the column or value is not specified. |
A sample CSV file is shown below.
Importing Teams and Members
When you import teams, the system merges the Team list. For example, if the application has Team 1, Team 2, and Team 3 defined, and the CSV file has Team 2 and Team 4 defined, after the import process, Team 2 will be updated and Team 4 will be added.
Team membership will be replaced by the contents of the CSV file. For example, if the application has Team 1 with membership of UserA, UserB, and UserC, and the CSV file has a membership of UserB and UserD, after the import process, Team 1 membership will include UserB and UserD.
To perform a bulk import of Teams and Members:
- On the Home page, click Tools, and then click Access Control.
- Click the Manage Teams tab.
- Select a Team.
- Click the Import File icon
 , and complete the following information:
- Under File, browse to the exported .csv file.
- Under Import Type, select one of the following options:
- Click Replace to replace the rows that are in the teams.csv file. This is the default option.
- Click Replace All to perform the import as follows:
- If the team exists in both the UI and the .csv file, the import will overwrite to update the team in the UI.
- If additional teams exist in the UI but not in the .csv file, those teams will be deleted.
- If additional teams exist in the .csv file but not in the UI, those teams will be imported.
Caution:
Any entries that are not included in the import file will be deleted.
- Under File Delimiter, select Comma or Tab or choose Other to specify any single character as the file delimiter.
- Click Import.
The import runs, providing statistics on the progress of the import.
- When the import is complete, verify the results in the Import Teams message box and then click OK.