Importing Pre-mapped Transactions for Reconciliation Compliance
You can import transactions into a reconciliation from a flat file.
For example, you could export 10 invoices for Prepaid Expenses for July 2016 to a flat file from your source system. You import the transactions into the reconciliation for Prepaid expenses for July 2016 in Reconciliation Compliance.
Note:
The import file can contain a maximum of 500000 rows.- Transaction import files are comma-separated value (.csv) files.
- You may import up to one million transactions.
- Separate rows are used to define each transaction. The first row contains the column headings that identify the data in the columns, for example, Transaction Date. Required columns are Short Description and, if loading transactions across multiple reconciliations, you must also have Reconciliation Account ID. It is highly recommended to have a Transaction Date so that Aging can be calculated.
- You must also specify the amount and currency for any enabled currency buckets
that are not subject to currency translation. The fields must be labeled Amount
and Amount Currency, with a number to indicate the currency bucket. For example,
Amount1 and Amount Currency1 specify the amount and currency for the first
currency bucket.
Note:
You do not need to include amount or currency for translated buckets.
- If there are additional buckets configured for this reconciliation, and you do not import values for the additional buckets, the amounts are calculated using the selected exchange rate to the default currency code selected on the profile.
-
If you specify a currency but not an amount, the amount is calculated using the currency code provided.
-
If you specify an amount and a currency code, the amount is compared to the calculated translated amount, and if it differs, the amount is marked as overridden.
- The backslash "\" is a special character in file imports. The system reads the next character after a backslash "as is". In order for data containing a backslash to load properly from the .csv file, you must use a double backslash \\.
-
Column headers are always specified in their original English names. Translated names and names changed by the Service Administrator will not be accepted.
The best way to get the correct column names is to export a sample transaction and use the file to fill in the import transactions.
- Attribute names and other metadata appearing in the rows of the import file need to be translated into the locale of the user importing the file.
- When the Transaction Date is blank, the period's end date is set as the Transaction Date.
To import transactions from a file:
-
From Home , select Reconciliations, and then select a reconciliation with the status Open with Preparer for which you are the preparer. The Reconciliation actions dialog is available to Administrators, Power Users, and Users.
Note:
You may also access the option to Import Pre-Mapped Data from the Worklist or the Actions menu in Periods (for Service Administrators and Power Users). You can access this option while working within a single reconciliation. - Select Actions, and then Import Pre-mapped
Data, and then Import Pre-mapped
Transactions.

Note:
Administrators can import transactions for all reconciliations, Power Users can import for reconciliations included within their security profile and Users can import for reconciliations where the user is assigned the Preparer function. Note that if you import transactions that were previously imported, the transactions will be replaced by the new import but limited to the scope based on your user security profile.
To import transactions into multiple reconciliations at the same time, Power Users must have a security profile that encompasses all the reconciliations into which the transactions are being imported. This applies when importing transactions using Account Reconciliation and Smart View.
Note:
When using the Replace All option during an import of transactions, existing pre-mapped transactions are not deleted. A column indicates how the transaction was created.
-
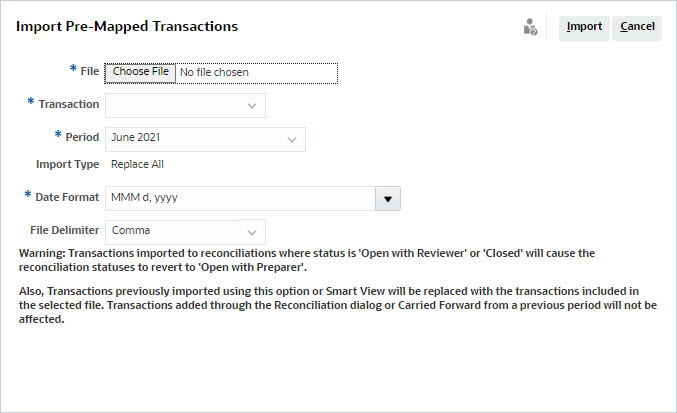
Browse to the flat file of transactions you want to add. This is an example of a transactions flat file.
Note:
If you import transactions to a single reconciliation, the Reconciliation Account ID field is not needed in the flat file.
Note:
If you have a URL attachment, you must add the following columns to your flat file with # representing a number:- Attachment Name#
- Attachment Type#
- Attachment URL#
- Attachment Doc ID#
-
Select the type of transaction: Balance Explanations, Adjustment to Source System, Adjustment to Subsystem, or Variance Explanations.
-
Select a Date Format from the drop down list of allowed date formats. Date formats are not translated. By default, the date format is set to the locale date format of the exported file location.
For example:
-
MM/dd/yyyy
-
dd/MM/yyyy
-
dd-MMM-yy
-
MMM d, yyyy
-
- Select a file delimiter for the import file (for example, comma or tab). Or, choose Other to specify any single character as the delimiter.
- Click Import.
Pre-mapped transaction imports are processed immediately, and the user is unable to leave the page until the import has completed. Results of the import are presented on the same page.
Note:
No post-processing actions are performed after pre-mapped transactions are loaded for Reconciliation Compliance.