Exporting Profiles
Exporting Profiles to a File
To export profiles:
-
From Home, click Applications, and then Profiles.
- OnProfiles, select Actions, and then Export.
Optional: Filter the Profile List to include only the profiles that you want to export.
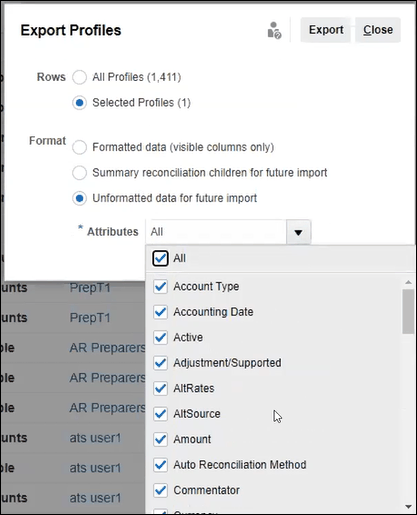
- In Export Profiles, select:
-
Rows
Select one:
-
All profiles to export all profiles that meet the current filter criteria
-
Selected profiles to export the selected profiles
Note:
You can adjust the maximum number of rows to display by using the Maximum Number of Items displayed in a List setting. See Setting Governor Limits in Account Reconciliation for detailed instructions.
-
-
Format
Select one:
-
Formatted data (visible columns only) to export to an Excel-compatible format
-
Summary reconciliation children for future import to export summary information for future import
-
Unformatted data for future import to export to CSV format for future import.
Note than an Administrator or Power User is able to select the attributes you want to include in the file or leave the default of All.

-
-
- Click Export.
- Click Open or Save to save the file to your hard drive.
- In Export Profiles, click Close.
Using Export Profiles for Future Import of Revised Profile Attributes
Note that the Export Profiles dialog can be used to export profile attributes in order to make changes within the exported file and then re-import the revised profiles into Account Reconciliation. The process is:
- Export the profile attributes using Export on the Profiles dialog. See Exporting Profiles
- Make your changes in the downloaded csv file.
- Import the revised profiles using Import on the Profiles dialog. See Importing Profiles