Manage Data Access through Security Assignments

As a security administrator, you need to map data security assignments to users to enable data level access.

Use the Security Assignments tab on the Security page to search for the currently set up data security assignments. You may either search for all records or narrow your search to a specific security context, security value, or user. You can remove a security assignment that you had set up or add new security assignments to a user.

Create a Security Assignment

Use these instructions to create a security assignment in a specific security context.

Security contexts are categories that contain values that you can secure a user for. For example, you can define which users have access to which "ledgers" or "departments". In this example, "ledgers" and "departments" are security contexts. Within "ledgers", you can have "ledger A", ledger B", or "ledger C" as values. You first select "ledger", then select a value such as "ledger A", and then select the users to secure for "ledger A". The selected users can access "ledger A".
  1. Sign in to your service.
  2. In Oracle Fusion Data Intelligence Console, click Security under Service Administration.
    You see the Security page.
  3. On the Security page, click the Security Assignments tab.
    You see all users who have been granted the security assignments in a specific security context.
  4. Click New Assignment.
  5. In New Security Assignment, under Select Security Assignments, select a security context, and then search for a security value or select from the displayed list.Move the selected security assignments to the column on the right.
  6. Under Select Users, search for a user and select the user and move the user to the column on the right.
    Users are filtered based on the role associated with that context.
  7. Click Add to Cart and then click View Cart.
  8. In Security Assignments, click Apply Assignments.
    You can grant this security assignment to other users as required. Bulk assignments may take some time to process. See the Security Activity tab for details.

Delete a Security Assignment

Use these instructions to delete a security assignment. When you delete a security assignment, Oracle Fusion Data Intelligence removes all users associated with the security assignment.

  1. Sign in to your service.
  2. In Oracle Fusion Data Intelligence Console, click Security under Service Administration.
    You see the Security page.
  3. On the Security page, click the Security Assignments tab.
  4. Select a security assignment from the displayed list of assignments or search for a security assignment and select it.
  5. Click Delete Assignment.

Remove Users from a Security Assignment

You can revoke the security assignment granted to one or more users.

  1. Sign in to your service.
  2. In Oracle Fusion Data Intelligence Console, click Security under Service Administration.
    You see the Security page.
  3. On the Security page, click the Security Assignments tab.
  4. Select a security assignment from the displayed list of assignments or search for a security assignment and select it.
  5. In the security assignment details region, select the users from the displayed list of users or search for and select the users.
  6. Click Remove User.
  7. In Revoke User Assignment, click Revoke Assignment.

Manage Users for a Security Assignment

As a security administrator, you can manage users for existing data security assignments. In the Manage Users dialog, you can revoke users for an existing assignment or add new users for that assignment.

  1. Sign in to your service.
  2. In Oracle Fusion Data Intelligence Console, click Security under Service Administration.
    You see the Security page.
  3. On the Security page, click the Security Assignments tab.
  4. Select a security assignment from the displayed list of assignments or search for a security assignment and select it.
  5. In the security assignment details region, click Manage Users.
  6. In Manage Users:
    1. Under Add User, search for a user and select the user.
    2. Under User, click the Delete icon to revoke the user from the assignment.
  7. Click Save.

Set Exclusion Rules for Security Assignments

You can set up data security to exclude access for specific users within a security context for specific security assignments.

For example, you can grant access to all security assignments but the business unit ABC. This enables you to have a single rule for a single user within a security context. You can also remove the indirectly derived security assignments of the specific user. Ensure that the users for whom you want to exclude assignments are members of a group related to the security context. You can automate the application of the security exclusion rules by downloading the DataSecurityExclusionAssignments_csv.zip, making changes, and then uploading it; see Download and Upload Data Security Exclusion Rules.

  1. Sign in to your service.
  2. In Oracle Fusion Data Intelligence Console, click Security under Service Administration.
  3. On the Security page, click Security Assignments, and then click Exclusion Rules.
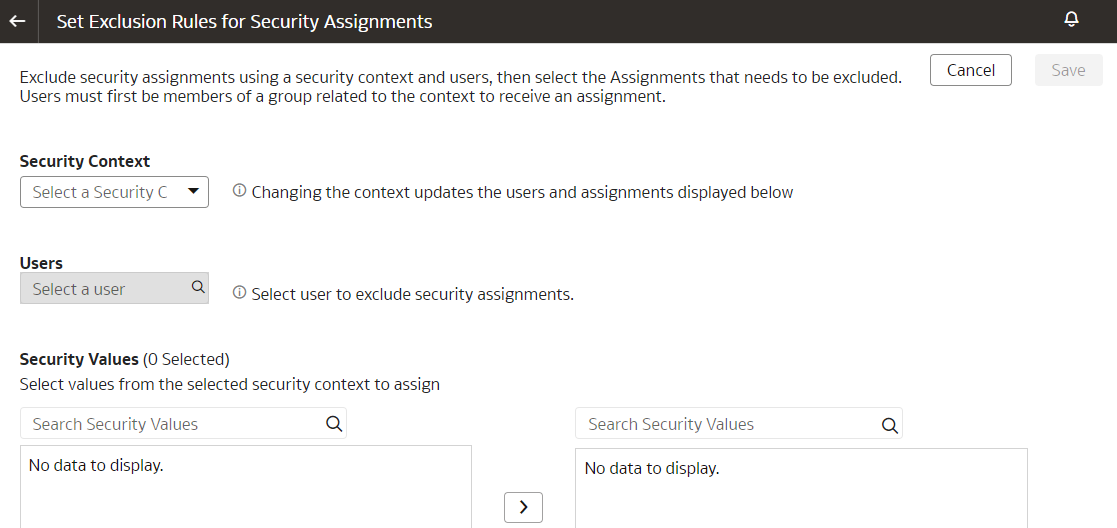
  4. On the Set Exclusion Rules for Security Assignments page, select the security context such as Ledgers in Security Context, select a user to exclude security assignments in Users, and then in Security Values, select the assignments that you want to exclude from the selected user within the selected security context.

    Set Exclusion Rules for Security Assignments page

  5. Click Save.

Update Security Assignments Automatically

As a security administrator, automate the updating of security assignments to effectively manage the regular security assignment changes in your organization.

If you want to automate the insertion and deletion of data in the format of USERNAME, SEC_OBJ_CODE, SEC_OBJ_MEMBER_VAL, Operation (to add or to remove the mapping), then configure the changes in the security assignments to be updated automatically and regularly.

To ensure that the changes in security assignment are updated automatically, you must create a table for the OAX_USER schema in Oracle Autonomous Data Warehouse associated with your Oracle Fusion Data Intelligence instance. Ensure that you name the table "CUSTOMER_FAW_CONTENT_AUTOSYNC_ASSIGNMENT". You must seed data into this table regularly with the timestamp in universal time (UTC) format in the "CREATION_DATE" column of the table. The CREATION_DATE column ensures that the same records aren't processed repeatedly and no record is missed. Oracle Fusion Data Intelligence periodically scans the synonym (2 hours once), pick up the values, and based on the "CREATION_DATE" criteria, populates the FAW_CONTENT_AUTOSYNC_ASSIGNMENT table in the OAX$INFRA schema in Oracle Autonomous Data Warehouse. Later, Oracle Fusion Data Intelligence processes the data and uploads the security assignments as per the FAW_CONTENT_AUTOSYNC_ASSIGNMENT table.
  1. In Oracle Autonomous Data Warehouse associated with your Oracle Fusion Data Intelligence instance, create the CUSTOMER_FAW_CONTENT_AUTOSYNC_ASSIGNMENT table in OAX_USER schema using the following script:
    CREATE TABLE CUSTOMER_FAW_CONTENT_AUTOSYNC_ASSIGNMENT (
        "USERNAME"           VARCHAR2(256 CHAR),
        "SEC_OBJ_CODE"       VARCHAR2(256 CHAR),
        "SEC_OBJ_MEMBER_VAL" VARCHAR2(4000 CHAR),
        "OPERATION_TYPE"     VARCHAR2(65 CHAR),
        "CREATION_DATE"      TIMESTAMP(6)
    );
    
    -- Grant access from the schema OAX_USER
    
    GRANT SELECT ON CUSTOMER_FAW_CONTENT_AUTOSYNC_ASSIGNMENT TO OAX$INFRA;
    COMMIT;
  2. In the CUSTOMER_FAW_CONTENT_AUTOSYNC_ASSIGNMENT table, specify the actual values for "USERNAME", "SEC_OBJ_CODE", "SEC_OBJ_MEMBER_VAL", "OPERATION_TYPE", and "CREATION_DATE". For "OPERATION_TYPE", enter "ADD" and enter the timestamp in "CREATION_DATE" in "2024-02-21 12:34:56.789" format.