Enable Security on a Chart of Accounts
This example demonstrates how to use the Security Console and the Manage Value Sets, Manage Chart of Accounts Structures, and Publish Account Hierarchy pages to enable security on a chart of accounts to control access to specific segment values.
The following table summarizes the key decisions for this scenario.
|
Decisions to Consider |
In This Example |
|---|---|
|
Which segment in the chart of accounts must be restricted? |
Cost center |
|
Which cost center values have to be granted to different users? |
|
|
What's the name of the value set for the segment with the Cost Center label? |
Cost Center Main |
|
What's the name of the user who can access cost centers 110 to 120? |
Casey Brown |
|
What's the name of the tree for the accounting flexfield? |
All Corporate Cost Centers |
|
What version of the tree hierarchy does the condition apply to? |
V5 |
Summary of the Tasks and Prerequisites
This example includes details of the following tasks you perform when defining and implementing segment value security.
-
Define roles for segment value security rules.
-
Enable segment value security for the value set.
-
Define the conditions.
-
Define the policies.
-
Deploy the accounting flexfield.
-
Publish the account hierarchies.
-
Assign segment value security roles to users.
Perform the following prerequisites before enabling security on a chart of accounts:
-
To work with the Security Console, you need the IT Security Manager role assigned to your user setup.
-
To work with value sets and profile options, you need the Financial Application Administrator role.
-
Set the Enable Data Security Policies and User Membership Edit profile to Yes.
Defining Roles for Segment Value Security Rules
To create a complete data security policy, create the roles first so that they're available for assignment to the segment value security rules.-
In the Tools work area, open the Security Console.
-
Perform the following steps four times to create four roles.
-
Click Create Role.
-
On the Create Role page, complete the fields as shown in this table, and then click Next, Next, Next, Next, Next, Save and Close.
-
Click OK and complete the fields, as shown in this table.
Field
Role 1
Role 2
Role 3
Role 4
Role Name
Cost Center 110-120 SVS Role
Cost Center 310 SVS Role
Cost Center 400 SVS Role
Cost Center All SVS Role
Role Code
CC_110_120_SVS_ROLE
CC_310_SVS_ROLE
CC_400_SVS_ROLE
CC_ALL_SVS_ROLE
Role Category
Default
Default
Default
Default
Description
Access to cost centers 110 to 120.
Access to cost center 310.
Access to parent cost center 400 and all its children.
Access to all cost centers.
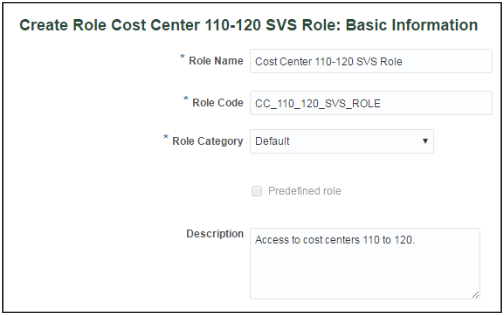
The following figure shows the Create Role page for the first role, which is Cost Center 110-120 SVS Role. The role code, role category, and description fields are complete.
Enabling Segment Value Security for the Value Set
-
In the Setup and Maintenance work area, go to the following:
-
Offering: Financials
-
Functional Area: Financial Reporting Structures
-
Task: Manage Segment Value Security Rules
-
-
In the Value Set Code field, enter Cost Center Main and click Search.
-
In the Search Results section, click Edit to open the Edit Value Set page.
-
Select the Security enabled option.
-
In the Data Security Resource Name field, enter Secure_Main_Cost_Center_Values.
-
Click Save.
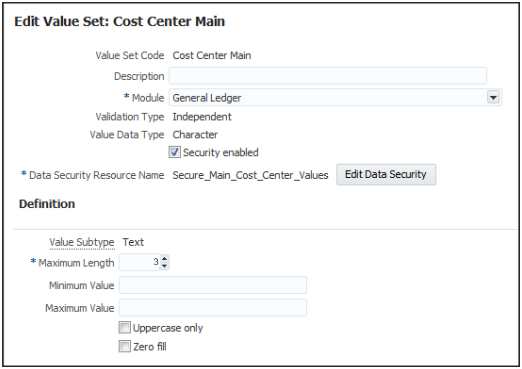
The following figure shows the Edit Value Set page for the Cost Center Main value set. Security is enabled and a data security resource name has been entered.
Defining the Conditions
Use conditions to specify the segment values that require security.Segment value security rules that provide access to all segment values, and segment value security rules that provide access to single nonparent segment values, don't need a condition. Instead, you can define the policy to cover all values, and you can define a policy to cover a single nonparent segment value provided that you know the internal ID for that segment value. If you don't know the internal ID, you can create a condition for that single segment value.
In this scenario, the internal ID for segment value 310 isn't known, so the following steps create all of the conditions, except for the access to all cost centers, which the policy definition can cover.
-
Click Edit Data Security to open the Edit Data Security page.
-
On the Condition tab, click Create to open the Create Database Resource Condition window.
-
Enter CC 110 - 120 in the Name field.
-
Enter Cost Centers 110 to 120 in the Display Name field.
- Accept the default condition type of Filter.Note: SQL predicate isn’t a supported condition type.
-
Accept the default value of All for the Match field.
Matching to All means that all of the condition rows apply simultaneously and all of them must be met in identifying the values.
Matching to Any means that any of the condition rows could apply. For example, if you create multiple condition rows, each of which on its own is an alternative scenario for identifying the values that apply, you would select Match to Any.
Because this example only has one condition row, the Match selection doesn't matter. If however, you define multiple condition rows for segment value security, you would have to select Match to Any, because a single account value can't satisfy multiple account value-based conditions.
-
Click Add in the Conditions section.
-
Select VALUE for the Column Name field.
-
Select Between for the Operator field.
Note: You can select one of the following operators: Between, Contains, Ends with, Equal to, Is descendant of, Is last descendant of, Not equal to, Starts with. -
Enter 110 in the first Value field and 120 in the second Value field.
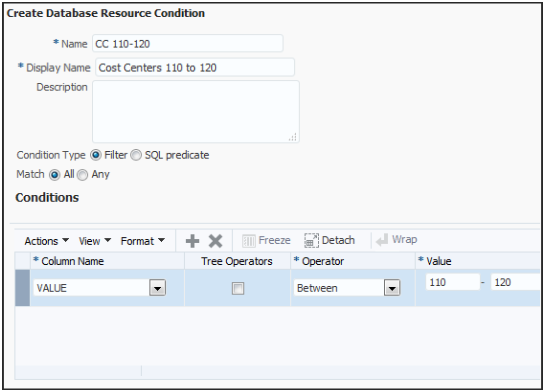
The following figure shows the Create Database Resource Condition page for the condition named CC 110 - 120. The display name is Cost Centers 110 to 120, and one condition is defined. The condition has a column name of VALUE, an operator of Between, and the specified values are 110 and 120.
-
Click Save.
-
To create the next database resource condition for segment value 310, click Create on the Condition tab.
-
Enter CC 310 in the Name field.
-
Enter Cost Center 310 in the Display Name field.
-
Click Add in the Conditions section.
-
Select VALUE for the Column Name field.
-
Select Equal to for the Operator field.
-
In the Value field, enter 310.
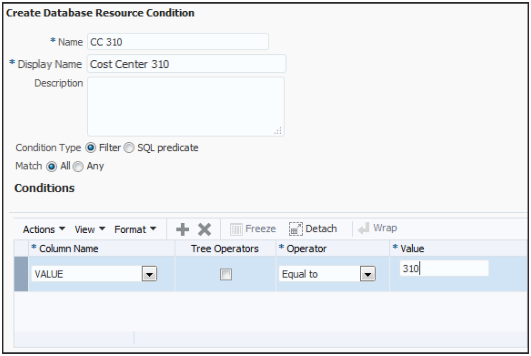
The following figure shows the Create Database Resource Condition page for the second condition named CC 310. The display name is Cost Center 310, and one condition is defined. The condition has a column name of VALUE, an operator of Equal to, and the specified value is 310.
-
Click Save.
-
To create the next database resource condition for parent value 400, click Create on the Condition tab.
-
Enter CC 400 in the Name field.
-
Enter Parent Cost Center 400 in the Display Name field.
-
In the Condition section, click Add.
-
Select VALUE for the Column Name field.
-
Select the Tree Operators option.
-
For the Operator field, select Is a last descendant of, which restricts access to the parent cost center 400 and all of its children, including intermediary parents.
Note: For the Tree Operators field, you can only select Is a last descendant of or Is a descendant of. -
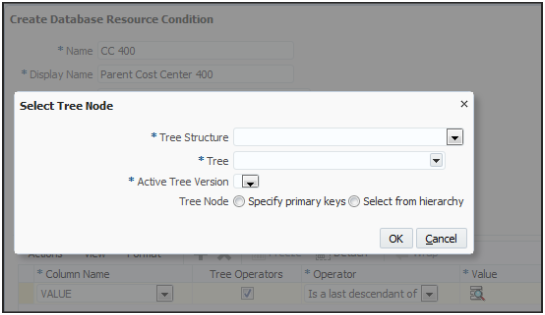
In the Value column, click the Select Tree Node icon to open the Select Tree Node window.
The following figure shows the Select Tree Node window. Values are required for the Tree Structure, Tree, and Active Tree Version fields. The window also includes these Tree Node options: Specify primary keys, Select from hierarchy.
-
In the Tree Structure field, select Accounting Flexfield Hierarchy. This signifies that you are choosing among trees that are used as accounting flexfield, or charts of accounts, hierarchies.
-
In the Tree field, select All Corporate Cost Centers.
-
In the Active Tree Version field, select V5.
-
In the Tree Node field, select the Select from hierarchy button. The Tree Node section opens.
-
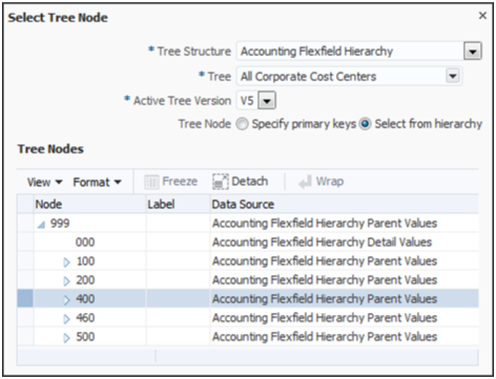
In the Tree Node section, expand the nodes and select 400.
The following figure shows the Select Tree Node window after completing the fields in steps 27 through 31.
-
Click OK.
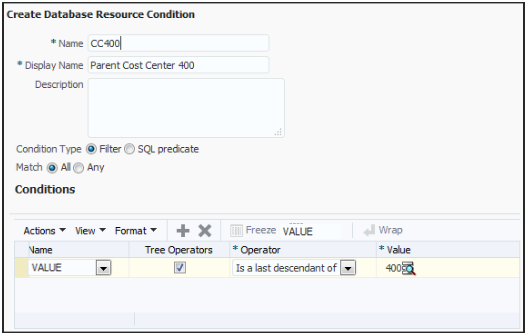
The following figure shows the resulting Create Database Resource Condition page for the condition named CC 400. The display name is Parent Cost Center 400 and one condition is defined. The condition has a column name of VALUE, an enabled Tree Operators option, an operator called Is a last descendant of, and a value of 400.
-
Click Save.
Defining the Policies
Create policies to assign conditions to segment value security roles.-
On the Edit Data Security page, click the Policy tab.
-
Click Create to open the Create Policy window.
-
On the General Information tab, enter Policy for 110-120 in the Name field.
-
Accept the default value of General Ledger in the Module field.
-
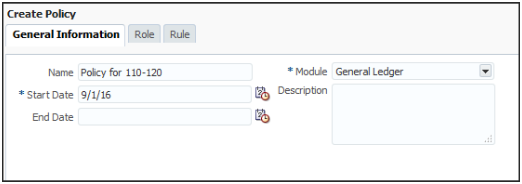
Enter 9/1/16 in the Start Date field.
The following figure shows the General Information tab on the Create Policy page for the policy named Policy for 110-120. The start date for the policy is 9/1/16.
-
Select the Role tab and click Add to open the Select and Add window.
-
Enter 110 in the Role Name field.
-
Select hcm in the Application field.
Roles with the Default category are created in the hcm application. -
Click Search.
The following figure shows the Select and Add Roles window with the search results. The role retrieved by the search results is named Cost Center 110-120 SVS Role.
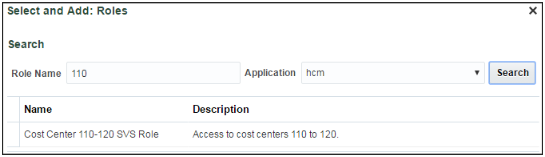
-
Select Cost Center 110-120 SVS Role and click OK.
The following figure shows the Role tab on the Create Policy page with the role that was populated by the search results.

-
Select the Rule tab.
-
Accept the default setting of Multiple Values in the Row Set field.
Note: The Row Set field determines the range of value set values affected by the policy.-
If Multiple Values is selected, a condition must be specified.
-
If All Values is selected, then the policy grants access to all values in the value set and no condition is needed.
-
If Single Value is selected, then the internal Value ID for the segment value must be specified and no condition is needed.
-
-
Click Search on the Condition field.
-
Select Cost Centers 110 to 120 for the Condition field and click OK.
The following figure shows the Rule tab on the Create Policy page. The selected row set is Multiple Values and the condition is Cost Centers 110 to 120.
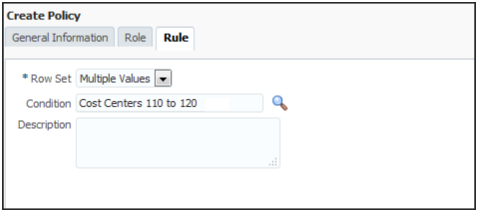
-
Click Save and Close.
-
Click OK to confirm.
-
Repeat steps 2 through 13 to create the rest of the policies, using the values in the following table.
Field
Policy 2
Policy 3
Policy 4
General Information tab, Name
Policy for 310
Policy for 400
Policy for all cost centers
General Information tab, Start Date
9/1/16
9/1/16
9/1/16
Role tab, Role Name
Cost Center 310 SVS Role
Cost Center 400 SVS Role
Cost Center All SVS Role
Rule tab, Row Set
Multiple Values
Multiple Values
All Values
Rule tab, Condition
Cost Center 310
Parent Cost Center 400
Not Applicable
-
Click Done.
Deploying the Accounting Flexfield
You must deploy the accounting flexfield for the segment value security changes to take effect.-
In the Setup and Maintenance work area, go to the following:
-
Offering: Financials
-
Functional Area: Financial Reporting Structures
-
Task: Manage Chart of Accounts Structures
-
-
In the Module field, select General Ledger and click Search.
-
Select the row for the Accounting Flexfield and click Deploy Flexfield.
The following figure shows the Manage Chart of Accounts Structure page after searching for General Ledger modules. The search results display a row with a key flexfield named Accounting Flexfield.
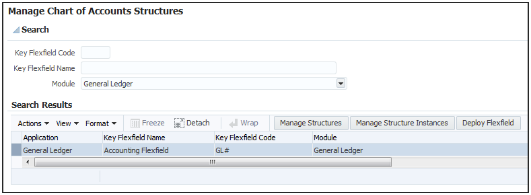
-
Click OK.
Publishing the Account Hierarchies
-
In the Setup and Maintenance work area, go to the following:
-
Offering: Financials
-
Functional Area: Financial Reporting Structures
-
Task: Publish Account Hierarchies
-
-
In the Hierarchy field, select All Corporate Cost Centers.
-
In the Hierarchy Version field, select V5.
-
Click Search.
-
In the Search Results section, expand the hierarchy row.
-
Select the row for the hierarchy version V5.
-
Click Publish.
-
Click OK.
Assigning Segment Value Security Roles to Users
-
In the Tools work area, open the Security Console.
-
Enter Cost Center 110-120 SVS Role in the Search field and click Search.
-
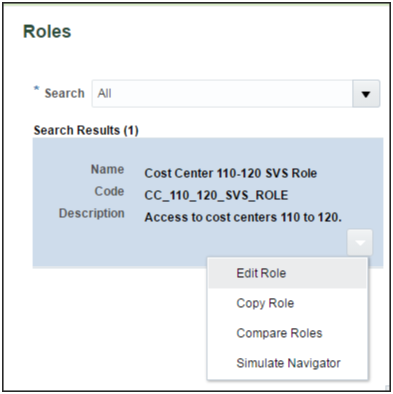
In the Search Results section, select the down arrow icon and select Edit Role.
The following figure shows the Roles page and the available menu options, including Edit Role, for the role named Cost Center 110-120 SVS Role.
-
Click Next four times to navigate to the Edit Role: Users page.
-
Click Add User.
-
Enter Casey in the Search field and click Search.
-
Click Add User to Role to add Casey Brown to the role.
-
Click OK to confirm.
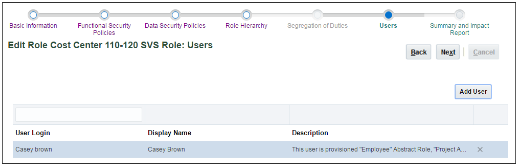
The following figure shows the Edit Role page for the Cost Center 110-120 SVS Role with the user Casey Brown selected.
-
Repeat steps 2 through 8 to add the other roles to different users as needed.