Create Custom Subject Areas
Creating a subject area is simple. In Application Composer, just follow the train steps.
Creating a Custom Subject Area
To create a custom subject area, you can't be in a sandbox.
-
Navigate to Application Composer.
-
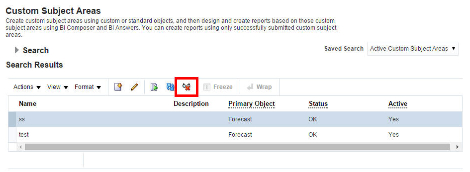
Click Custom Subject Areas on the Overview page of Application Composer.
-
Select Create from the Actions menu.
Here are the steps in the train stops that you can use for configuring your custom subject area:
-
Define Custom Subject Area
In this step, you provide the name for your subject area and select the primary object that is the basis for the reports you create later using the custom subject area. Subject areas usually have names or labels that correspond to the type of information they contain, such as service requests and orders. Display labels have the Custom: prefix added automatically.
-
Select Child Objects
In this step, you select the child objects whose data you want to use in your reports. You can add child objects only if the primary object has child objects. Otherwise, the add icon is disabled. You can only add one child object per level. The parent-child-grandchild-grand grandchild hierarchy supports adding up to three levels of child objects with one child object at each level, for example, parent-child1-child1.1-child1.1.1.
-
Configure Fields
In this step, you select the fields that you want to display on your reports. You typically add at least one field from each of the objects that you have selected for your custom subject area.
Select the desired measures to generate for number, date, or currency fields from all the available objects so that the subject area includes only those measures that you want to analyze. Also, define at least one measure.
In the Measure Aggregations column, select an option from the list of predefined formulas that you can apply to the Measure field. When you select the formula, the application applies the selected formulas to the selected field as measures.
Note: You can choose measures only for the lowest child. For example, if only a primary object exists with no children, you can select measures for the primary object. Otherwise, if any child objects exist, you can select measures only at the lowest child object level, not for the parent object.In the Canonical Date Candidate column, notice which standard object date fields are already defined as canonical dates. Canonical dates are already defined for some standard objects that support the Time dimension in standard subject areas, and display with a read-only check mark. Optionally add this field from the lowest object in your custom subject area. This means that you can later join your custom subject area to a standard subject area in BI Composer, and create analytics that can drill up and down the date hierarchy.
You can change the display labels of the fields that you select in this step. Additionally, you can use the Select Fields dialog to remove fields that belong to the primary object, or add fields from the related objects. The Select Fields dialog appears when you click Select Fields when configuring fields for your custom subject area.
After you publish your custom subject area, the fields you have selected for your subject area are automatically added to their owning object's folder. If you have also defined measures, those fields are automatically added to the Facts folder. If you didn't define a measure, then one is automatically created for the custom subject area.
-
Configure Dates
If required, select one or more Date columns for date leveling. Date leveling lets you add calendar attributes to your analytics, which provide better context to your transaction data.
You can also optionally select one date field to be the canonical date for the custom subject area. Do this if you want to create analytics that can drill up and down the date hierarchy.
For more information on configuring date fields in a custom subject area, see Custom Subject Area Dates.
-
Configure Security
Select the required security level for the Everyone Role Name, which is added by default, or add additional Role Names by clicking in the + icon and define the security level for each one of them.
The security definition here only controls who can access the custom subject area definition to create reports. It doesn't control data visibility which is automatically controlled based on the user running the reports.
For more information on securing custom subject areas, see Secure Custom Subject Areas.
-
Review and Submit
Review the custom subject area configuration for all added objects, attributes, and measures, and if satisfied, click Submit. If changes are required click Back to navigate back to the required screen.
This figure shows the custom subject area configuration. 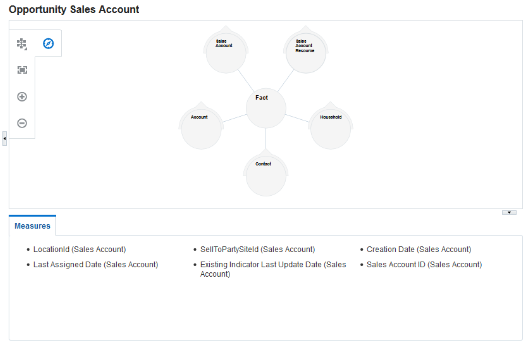
After you submit, the custom subject area configuration is prepared for publishing. You can create and submit a custom subject area either immediately or save and close the custom subject area at any point and submit it later. You must first submit a custom subject area for publishing before you can select it from within Oracle BI Composer. After you save or submit a custom subject area, you can't modify its primary object.
To access the published custom subject area in BI:
-
From the Navigator menu, select .
-
In the Contents pane, click Create.
-
Select the published custom subject area and start creating your report.
-
Editing Custom Subject Areas
You can edit a published or saved custom subject area and then republish it when your changes are done. Modifying a custom subject area doesn't affect the reports that you had created using that custom subject area before making the changes. You can use the modified custom subject area if you need to enhance existing reports.
To edit a custom subject area:
-
On the Overview page of the Application Composer, click Custom Subject Areas.
-
Locate the custom subject area that you want to edit, and click the Edit icon.
You can filter out inactive custom subject areas in Application Composer by viewing custom subject areas in Active status. This is safer than deleting them, because the inactive subject areas are still available and can be found by searching.
-
Make the desired changes and then click Submit to republish the custom subject area.
While you can edit a custom subject area in any status, there are considerations on what you can or can't do when editing. When editing a published custom subject area, it's not possible to:
-
Change the primary object.
-
Add or remove child objects.
-
Remove related objects.
-
Remove fields.
-
Remove previously added measures, date levels, and canonical dates.
-
Add more aggregation types for measures that are already published.
Activating or Inactivating Custom Subject Areas
When editing custom subject areas, you can activate or inactivate custom subject areas when your reporting or business requirements change. This step enables you to control what information is displayed on the reports that use the information from custom subject areas.
You can inactivate only those custom subject areas that are published and have a status of OK, and can activate only previously inactivated custom subject areas.
To inactivate a custom subject area, select it in the list and then click the Inactivate button. To activate an inactive custom subject area, select it and click Activate. Note that if no custom subject area is selected in the list, the button doesn't appear.
When searching for custom subject areas, you can filter out inactive custom subject areas in Application Composer by viewing only those in Active status. Inactivating a custom subject area is safer than deleting it, because the inactive subject areas are still available and can be found by searching.