Transfer a Chat to Another Agent
When necessary, you can transfer a chat to another agent during a chat session. This feature is helpful when another agent has more experience with a specific topic than you do.
- When you see the agent you want to transfer the chat to,
select the agent’s name and click Request.
The agent receives a toast notification to accept, view, or decline the transfer request.
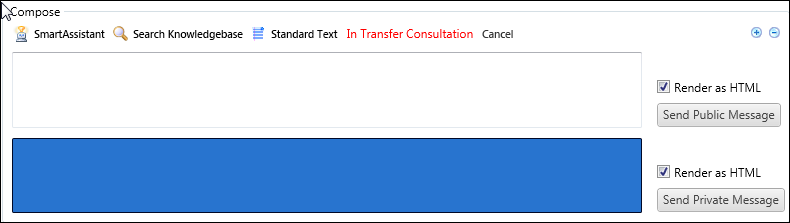
- If the agent clicks View, the toast invitation closes, the chat transcript appears on both of
your workspaces, the Compose section indicates In Transfer Consultation, and a message area
is highlighted in blue for private messaging. You and the agent can chat before the other
agent accepts or declines the transfer request. The customer cannot view messages sent in the
private message area.
- If the agent clicks Accept, the associated contact and incident are automatically saved, and the chat is transferred to the agent. After the transfer is made, the customer is notified that you left the chat and the new agent’s name appears in the chat transcript instead of your name.
- If the agent declines the conference, the chat stays with you.
- If the agent clicks View, the toast invitation closes, the chat transcript appears on both of
your workspaces, the Compose section indicates In Transfer Consultation, and a message area
is highlighted in blue for private messaging. You and the agent can chat before the other
agent accepts or declines the transfer request. The customer cannot view messages sent in the
private message area.