Creating data science models
A data science model helps solve specific business use cases using machine learning algorithms. The model involves choosing the right algorithm required to solve the business problem and the query that brings the right data to the model.
Creating a data science model
To create a data science model,
-
Click the Oracle icon
 in the bottom-right corner to open the navigation menu.
 -
Select Intelligence workbench.
-
Click the Models tab.
-
Click Create model.

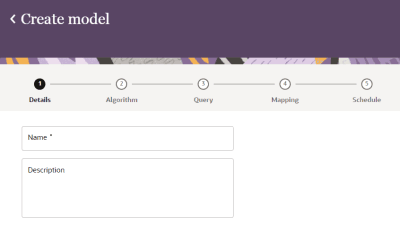
Step 1: Defining the model details
Details section helps define the specifics of the model. This will also define how the model will display in Oracle Unity.
-
Enter the details for the model.
-
Name: Enter the model name.
-
Description: Optionally, enter a description for the model.
-
-
Confirm the model details and click Algorithm to go to the next section.

Step 2: Choosing the right algorithm
Select an algorithm appropriate for your use case. Ensure you read the algorithm documentation thoroughly to make sure you are choosing the right algorithm for your use case.
-
Click the required algorithm name to select it. For example, Recency, Frequency and Monetary model
-
Confirm the selected algorithm and click Query to go to the next section.

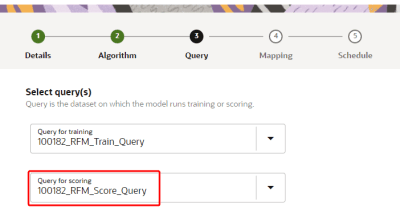
Step 3: Choosing the right data query
Select the right data query that suits your use case. Ensure the following before committing a query to a model.
-
Ensure the query retrieves all necessary attributes required for the model
-
Apply appropriate data filters and aggregations aligned with the specific business use case
-
Verify that both training and scoring queries use accurate and relevant filters to support robust model development for the business use case
Use the SQL Query Builder in Intelligence Workbench to create data queries for your use case. Refer to the documentation.
Below are the steps to choose the right queries
-
In the Query for training field, use the drop-down list to select the query you want to use for model training.

-
In the Query for scoring field, use the drop-down list to select the query you want to use for model scoring.
-
Confirm the selected queries and click Mapping to go to the next section.

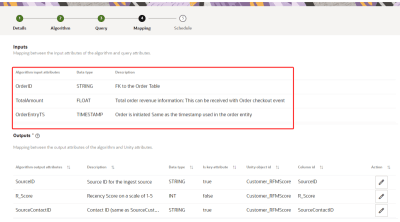
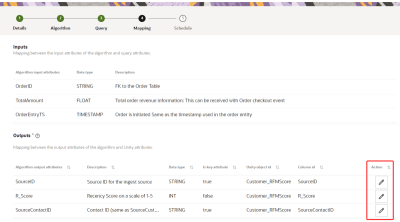
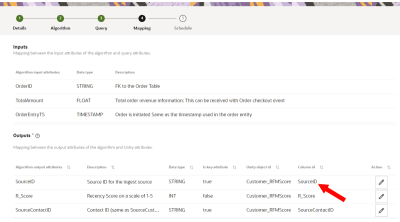
Step 4: Mapping the right inputs and outputs
Based on the selected algorithm, review the mapping for model inputs and outputs to the Unity data model. Make any necessary updates to the default mapping of model outputs.
-
Review the Inputs section and the mapping of Algorithm input attributes.
-
Review and make the necessary updates to the Outputs section. To make an update, edit the entries using the edit icon in the Action column. When done updating an item, click the checkmark.
-
In the Unity object id column, confirm the default object ID or click the field and enter the exact name of the data object you want to use as an output.

-
In the Column id column, confirm the default Unity attribute or click the field and enter the exact name of the attribute you want to use as an output.
-
Review the input and output mapping and click Schedule to go to the next section.


Step 5: Choosing the right model schedule
You will need to configure the schedule and notification settings for the model.

-
Configure the schedule for the model:
-
Click Recurring to automatically run the model on a regular schedule. If a job for the model is still running while the next one is scheduled to run, the next scheduled run will not start until the current one completes. Two scheduled instances of the same job can't run simultaneously.
-
Click On demand to run the model as needed.
-
-
If the job is recurring, select the Frequency, Start time, and Days it will run.
-
In the field for Notify, enter the email addresses of people to be notified when the job runs. Separate multiple emails with a comma.
-
If you only want a notification if the job fails, click the checkbox for Only notify on failure.
-
When done creating the model, click Save.
Publishing a data science model
After saving the model, click Publish from the Intelligence workbench page.

After publishing the changes, Oracle Unity will do the following:
-
Create the required data objects and attributes that will store output values from the model.
-
Create the training and scoring jobs that will need to run to generate output values.
To generate output values, you will need to Run the training and scoring jobs.
Running training and scoring jobs
Complete the following steps to run the training and scoring jobs for data science models.
Training jobs
You can do the following to run the training job.
-
Click the Oracle icon
in the bottom-right corner to open the navigation menu.
-
Select Intelligence workbench.
-
Click the Action menu (
 ) for the data science model you want to analyze and select Start Training. Monitor the status of the job from the Jobs dashboard.
When the job completes, Oracle Unity will automatically run the Scoring job. If needed, you can manually run the scoring job.
Scoring jobs
You can do the following to run the scoring job.
To run the scoring job:
-
Click the Oracle icon
in the bottom-right corner to open the navigation menu. -
Select Intelligence workbench.
-
Click the Action menu (
) for the Scoring job you want to run and select Start Scoring. The job runs in three stages and takes about an hour to complete. -
Monitor the status of the job from the Jobs dashboard. When the job successfully completes, move on to the next step.
-
Click the Oracle icon
in the bottom-right corner to open the navigation menu. -
Select Data feeds.
-
Click the Action menu (
) for the System - Data warehouse job and select Start. -
Click the Action menu (
) for the System - Identity resolution pipeline job and select Start.
When all the jobs complete, you can start using and accessing the output data.
Accessing model output data
After running the training and scoring jobs that calculate values for output attributes, you can do one of the following to access the data.
-
Create an export job and select the model output data object to export. You can then review the values in the output attributes.
-
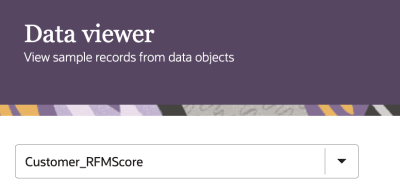
Sample data for the model outputs can be viewed using the Data viewer page. You can view a maximum of 200 records from a data object.
To verify and review with an export job:
-
Follow the steps for Creating export jobs.
-
When you get to Step 2: Data payload, for Payload type, select Data object.
-
In the field for Data object, select the object corresponding to the model output.
When the data object is exported, review the model output attributes.
To verify and review using the Data viewer page:
-
Click the Oracle icon
in the bottom-right corner to open the navigation menu. -
Select Data viewer.
-
Use the drop-down menu for Select or search and select the data object.
-
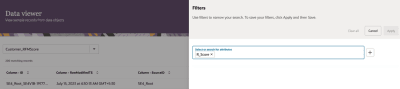
Click Filters
 . The Filters dialog displays.
 -
Use the drop-down menu to select or search for the following attributes.
-
Click Add
 .
.
-
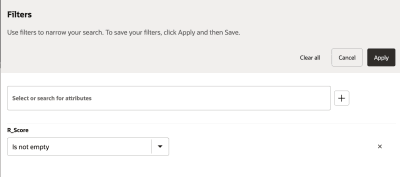
Use the drop-down menu for the output attributes and select the Is not empty operator.
-
Click Apply.
-
Click Column settings
 .
. -
Click the checkbox for the output attributes to display them.
-
Click Apply.


You can review values for up to 200 records.