Adobe Ad Cloud
You can create audiences containing first- and third-party data linked to Oracle Data Cloud cookies and mobile advertising IDs (MAIDs) and then create campaigns to send your audiences to the Adobe Ad Cloud. AfterAdobe Ad Cloud maps your audiences in your advertiser account, your Oracle Data Cloud platform data flows into your audiences. You can then use Adobe Ad Cloud's converged TV and video advertising platform to optimize the performance of your video and display advertising campaigns.
If you need advice or recommendations about creating audience, contact My Oracle Support.
Note: The Adobe Ad Cloud app deprecates the TubeMogul cookie and MAID apps. Delete the old TubeMogul apps from your app catalog to ensure you are using the current features for this integration. Deleting the apps does not affect any of your existing TubeMogul data campaigns.
Important! A new version of the Adobe Ad Cloud app was introduced in July, 2018. If you installed the old app, you must delete it before installing the new one.
To send your audiences to the Adobe Ad Cloud:
- Delete previous Adobe Ad Cloud apps.
- Install the Adobe Ad Cloud app.
- Create an audience.
- Create a campaign.
Deleting previous Adobe Ad Cloud app installations
If you have an existing Adobe Ad Cloud installation, you must delete it and replace it with the new version.
To delete a previous Adobe Ad Cloud app:
- Log on to partner.bluekai.com and select Apps > Install Apps.
- Select Adobe Ad Cloud Custom App.

- Click Delete.
- Click Yes in the confirmation dialog that appears.

Installing the Adobe Ad Cloud Custom Audience app
Use the install an app workflow to configure the Adobe Ad Cloud app
To install the Adobe Ad Cloud app:
- Log on to partner.bluekai.com and select Apps > Install Apps.
- Click App Catalog.
- Select the Media Targeting campaign solution type or filter by "Adobe Ad Cloud."

- Select the Adobe Ad Cloud Custom Audience App - NEW entry.
- In the App Name box, enter a name that identifies the app (for example, Adobe Ad Cloud).

- In the Notification Email box, enter the email addresses of anyone who should be notified about app activity.
- Leave the Increase Data Delivery Overlap check box selected to enable ID swaps to match unique user IDs between Oracle Data Cloud and Adobe Ad Cloud. This enables ID swaps to be executed automatically on your site once every seven days via the platform's tag management system.

- Click Save.


The selected Adobe Ad Cloud app is enabled in your partner seat and you can create data campaigns to deliver your audiences to the Adobe Ad Cloud.
Learn more: Installing an app
Creating an audience
Select the users you want to deliver to Adobe Ad Cloud using the audience builder.
To create an audience:
- In the Oracle Data Cloud platform, click New Audience. The audience builder is displayed.

- In the Name box, enter a name that makes it easy to identify your audience. The audience name should only contain alphanumeric characters, spaces, and underscores.
- Define your target audience by selecting first- and third-party categories from the taxonomy tree.
-
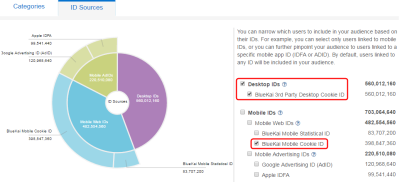
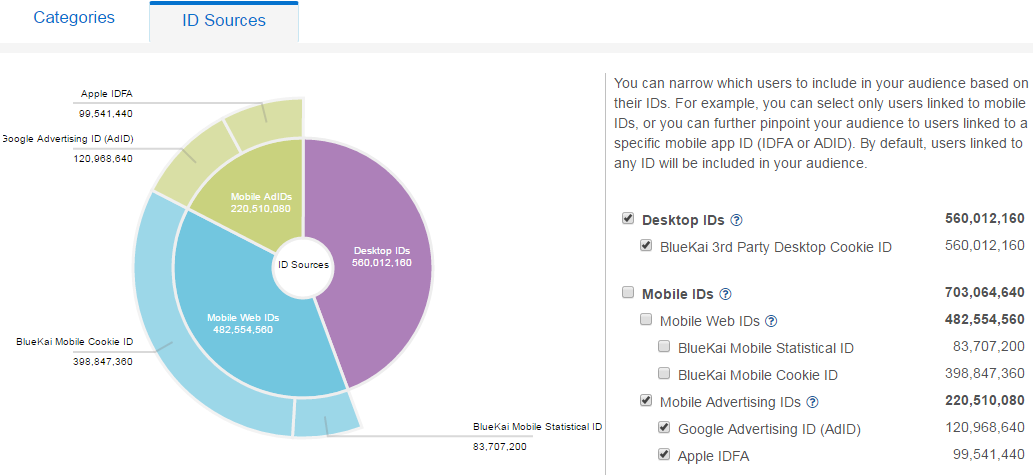
Click the ID Sources tab.

- If you want to target both cookies and MAIDs, you do not need to make any changes; otherwise, clear the check boxes for any ID sources you do not want to target.
- Click the button to the right of Save, and the click Save and Create Campaign. Alternatively, you can click Save to create the data campaign later.


Learn more: Creating an audience
Creating a campaign
When you create a campaign that uses the Adobe Ad Cloud app for delivery, you must enter an Adobe email address to map your audience to the Adobe Ad Cloud. There is a separate email addresses for each Advertiser seat. These addresses are used a logins for Adobe Ad Cloud. For example, the email might be agency@tubemogul.com.
If you do not know the appropriate Advertiser email address, please contact Adobe DMP Support at the following address.
TubeMogul-dmp_segment_import@adobe.com
To create a campaign:
-
If you did not save your audience with the Save and Create Campaign option, you can create a campaign from the Manage > Audiences page by clicking Create, and then clicking Create Campaign. From the Manage > Campaigns page, click Create.
The audience is associated with the campaign and the Create Campaign window is displayed.
- In the Campaign Name box, enter a name that makes your campaign easy to identify and includes the ID sources.
- In the Basic Information section:
- Set the start and end dates. By default , the campaign ends one year after the start date.
- From the Status list, select the Active status.
-
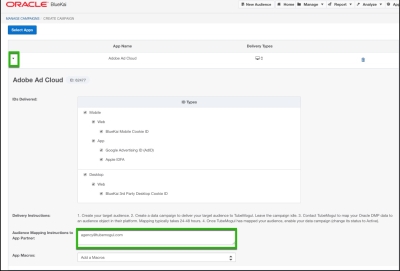
Click Select Apps, select the Adobe Ad Cloud app, and then click Add Apps.

-
Expand the Adobe Ad Cloud app, and then enter your Adobe Ad Cloud email address in the Audience Mapping Instructions to Partner field.
The email address is required to add your users to your Adobe Ad Cloud custom audiences. The campaign will fail without a valid email address.
-
Click Save.
Adobe Ad Cloud receives a real-time email notification with your name, campaign ID, and the category IDs being delivered by your data campaign. Within 48 hours, Adobe Ad Cloud uses this information to map your Oracle Data Cloud platform data at the campaign level in their platform.
After Adobe Ad Cloud marks your audience as mapped, data delivery into your Adobe Ad Cloud segment object begins immediately. Your segment object is ramped within 24 hours. (It therefore takes approximately a total of 72 hours between the time you save your data campaign until it is fully populated and ready for use in your media campaigns.)
You can verify that delivery has begin by checking the campaign status in the Campaigns page.


Learn more: Creating a campaign


