Audience Discovery Report
The Audience Discovery report helps you identify buyable categories that are highly-correlated to a one or more audiences you specify. You can use this report to discover new audiences, extend your target audience during campaign planning, improve your campaign performance, and ultimately increase the return on your advertising dollars. The report shows how an audience correlates to the data categories in the taxonomy and leverages the entire Oracle Data Cloud universe, including exclusive inventory of millions of in-market shoppers and keyword searchers.
In this topic
Understanding the report content
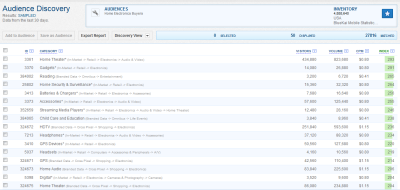
The Audience Discovery report is displayed in a table format that lists categories. By default, the categories are ranked by an index the represents the likelihood of an audience member being included.
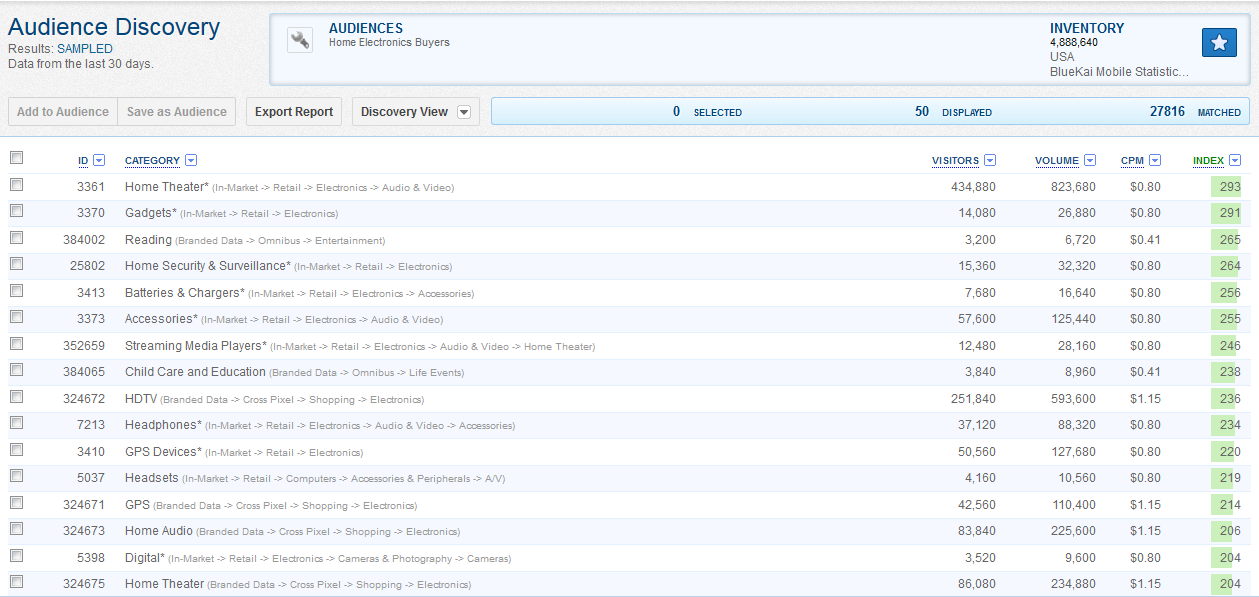
The following table describes the information included in the report.
| Property | Description |
|---|---|
| Inventory | The number of unique users the Oracle Data Cloud platform has seen in the queried audience over the last 30 days. |
| ID | The unique ID assigned to the category. |
| Category | The name (and taxonomy path) of the category. |
| Visitors | An integer that represents the overlap between the specified audience this category over the last 30 days. This value indicates how many users in this category you're already targeting. |
| Volume | An integer that represents the number of unique users the Oracle Data Cloud platform has seen in this category over the last 30 days. This value forecasts how many users are potentially available to target. The difference between Volume and Visitors indicates you how many new users you can reach with this category. |
| Index | A calculated value that indicates how many more times more likely a member of the specified audience is to be in the category than another user. The higher the index, the more alike the category is to your query. |
How the Audience Discovery report ranks audiences
The Audience Discovery report ranks categories based on a calculated index. The index value is an integer that represents how many times more likely an audience is to be in the category than an average user in a universe you select. The universe can be the entire population in the Oracle Data Cloud universe, a set of one or more audiences, or a set of one or more containers.
The index is calculated by using the following formula:
# of users from query X in the category (Visitors) / # of users in query X (Inventory)
-------------------------------------------------------------------------------------------------------------------------
# of BK users in the category (Volume) / # of total users in the selected universe (Universe)
The result of the calculation is rounded to the nearest integer. For example, if the calculated value is 3.1415, the index is 3. If the calculated value is 3.83, the index is 4.
If the result of the calculation is a negative number, the index is set to 0 because there is no chance of a match. If the calculated value is between 0 and 1, the index is set to a negative number. For example, if the calculation returns 0.5, the index is set to -2 to indicate that the user is twice as likely not to match as to match.
Example:
Suppose you generate an Audience Discovery report based on these values:
- You select an audience of users in the Site Converters category. This sets the Inventory value in the formula to 1 million.
- You set the scope of audience query to include all of your site visitors. This sets the Universe value to 5 million.
If the total number of users in that category (Volume) is 60,000 and the overlap between the queried audience and a sample category (Visitors) is 50,000, the calculation looks like this:
50,000/1,000,000 0.05
------------------------ = ------- = 4.167
60,000/5,000,000 0.012
After round, the index is 4. This index means that a site converter is about 4 times more likely to be in the sample category than a site visitor.
Creating an Audience Discovery report
To create an Audience Discovery report:
-
Select Analyze > Audience Discovery.
The Audience Discovery page is displayed:
If you have not yet created any audiences, a message indicates that you must create audiences in the Oracle Data Cloud platform.
-
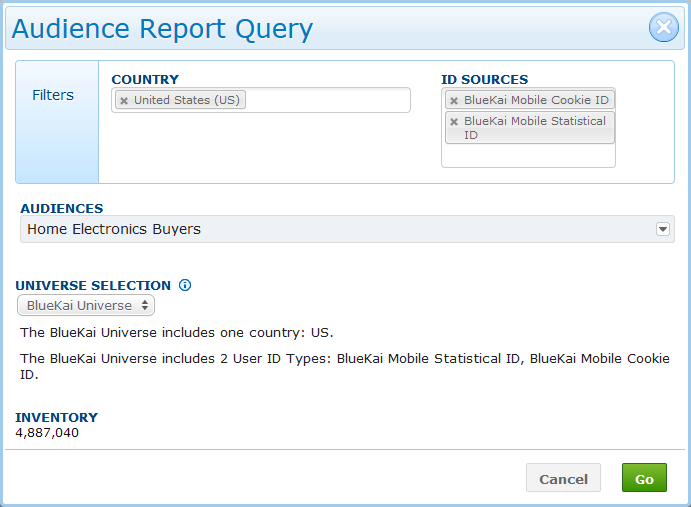
Click the Selector icon or double-click anywhere in the Audiences query bar.
The Audience Report Query dialog opens.
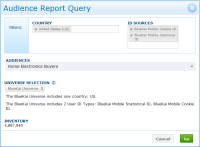
- In the Country box, select the countries of your saved audiences to be included in the report.
- From the ID Sources list, select which saved audiences to include in the report based on the target ID sources specified in the audiences. You can only select those ID sources that have been targeted in your audiences; the other types are unavailable.
-
Under Audiences, click Choose Audiences.
The Audiences area expands to include selection fields. By default, all active audiences in your seat are displayed but none are selected.
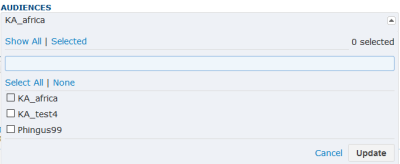
- Select audiences for the report:.
- Click the check boxes for audiences you want to include in the report. Click Select All to include all of the available audiences.
- To search for a specific audience, click Selected and then enter the name of an audience in the text box. Matching audiences appear as you type.
-
Click Update.
The Audiences area collapses back to its original size The Inventory value is displayed with an estimate of the number of unique users seen in the queried audiences over the last 30 days.
- Under Universe Selection, select the scope of your audience query. By default, your query considers the entire population of Oracle Data Cloud platform users; however, you can focus your query on the users in one or more of your audiences or containers (sites). Select one of the following options:
- BlueKai Universe: Your audience query considers all Oracle Data Cloud platform users.
- Audience: Your audience query considers one or more specified audiences. Select the check boxes for the audiences to be included in the query scope, and then click Update. Click Select All to include all of your available audiences in the scope. Click None to remove all of the selected audiences from the scope. To search for a specific audience, enter the name of the audience in the text box. The audiences are filtered as you type. To clear the filter, click Show All or delete the entered text. Click Show All to display all the available audiences. Click Show Selected to display only the audiences you have selected.
- Container: Your query considers one or more specified sites based on a relative risk calculation: Select the check boxes for the sites to be included in the query scope, and then click Update. Click Select All to include all of your available sites in the query scope. Click None to remove all of the selected sites from the scope. To search for a specific site, enter the name of the site in the text box. The sites are filtered as you type. To clear the filter, click Show All or delete the entered text.
-
Click Go.
The Audience Discovery Report is generated.
 >
>


Working with Audience Discovery Reports
After you create an Audience Discovery Report, you can filter and update its content in various ways:
- You can sort and filter the contents of the report.
- You can include or exclude specific categories from audiences in the report.
- You can save the report as a favorite. so you can run it again quickly. When you save a report as a filter, your sorting and filtering options are preserved.
- You can export the report.
- Click the filter icon in any column header and select a sort option.
-
Click the filter icon in the Visitors, Volume, or Index column header.
A dialog appears, including a slider for adjusting the value.
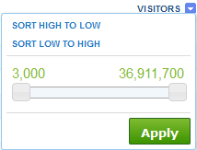
- Use the slider to enter upper and lower limits. Alternatively, enter at either end of the slider.
-
Click Apply to filter the data.

To include or exclude categories from the report:
-
Click the green filter icon to the right of the Category column.
A dialog including a hierarchical list of categories appears.
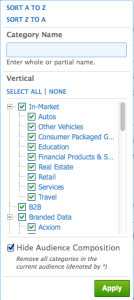
- Select the verticals you want to include in the report. You can expand the list to show sub-categories. Categories to which the audience belongs are marked with asterisks. Categories that have no overlap with the selected audience are listed, but are unavailable (grayed-out).
- Select the Hide Audience Composition check box to hide the categories to which the audience already belongs.
- To filter by category name, enter text in the Category Name search box. When you apply the filter, the report will display only categories whose names include the text.
- Click Apply to update the report based on the selected filters.

To export an Audience Discovery report:
- Click Export Report to export the Audience Discovery report to a CSV file.


