Creating Containers
Oracle Data Cloud platform containers help you to do the following:
- Generate a unique site ID that represents your desktop and mobile websites, mobile apps, ad server log, or offline file where the user's data was collected and associates it with your Oracle Data Cloud platform partner seat.
- Generate HTML and JavaScript tag code that transfers explicitly-defined data from your sites to partners by scheduling tags and pixels on desktop and mobile web pages.
- Manage the firing of tags on your websites.
- Collect user data that is pushed to your DMP.
The site ID enables the platform to recognize incoming data as yours and the data extracted from your site to be mapped to the appropriate categories in your taxonomy via classification rules.
Important: Use a separate site ID for each of your desktop sites, mobile sites, and mobile apps. If you are collecting data from all three, you will need at least two containers: one for your desktop and mobile site, and another for your mobile app. Each mobile app should have its own container.
In this topic
Creating a container
You can create a container and generate tag code using the container creation tool. The tool includes different tag types that control how the container is fired and how it collects and transfers user data.
To create a container:
- Select Manage > Containers. The Containers page lists all the containers you have created.
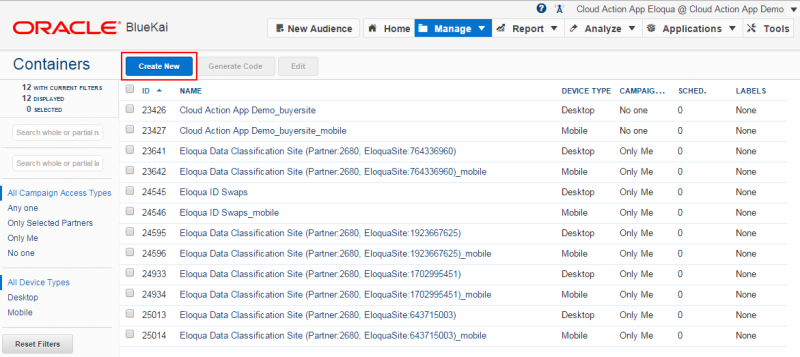
You can open a container to view its client-side tag code for use in to your website. - Click Create New. The Create New Container dialog is displayed.

-
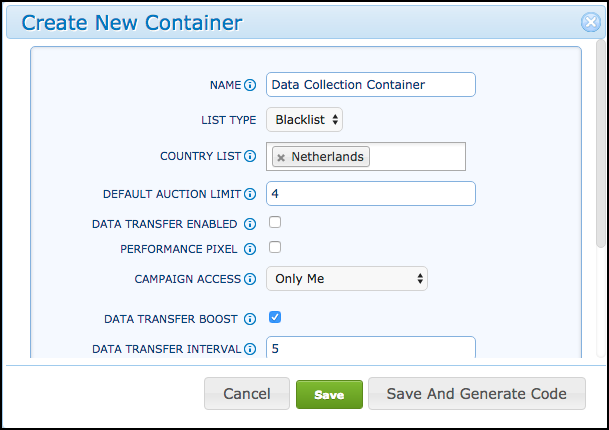
In the Create New Container dialog, enter the following properties:
Property Description Name Enter a unique, descriptive name for the container that makes it easy to identify. For example, you can enter the name of your web site. List Type Whitelist (enable) or blacklist (disable) data collection for users with IP addresses mapped to the countries selected in the Country List.
You can use whitelisting to enable data collection/delivery for a small set of countries (all unselected countries are disabled). You can use blacklisting to disable a small set of countries. Netherlands is blacklisted by default.
Data Providers Onboarding EU Data. To ingest data for user profiles located in the European Union (EU), you must have signed Oracle's General Data Protection Regulation (GDPR) Consent agreement. If you have not signed the agreement, you can only create containers that are configured for non-EU countries.
This means that a blacklist must include the EU region or countries and a whitelist may not; otherwise, the Containers dialog will display an error. By default, new containers will blacklist the EU.
Contact your Oracle Account Representative to obtain and sign the agreement. After the agreement has been processed, you can edit your existing containers or create new ones for onboarding EU data.
IP Address - Country Mapping: Oracle uses third parties to map IP addresses to countries and is not responsible for the accuracy of those mappings. Customer is responsible for obtaining the consents from and providing the notices to all users whose data is collected through the services.
Country List Select one or more countries or regions to be whitelisted or blacklisted based on the selected List Type. You can select all the countries in the EU by selecting the EU region.
Default auction limit Enter the maximum number of slots available in the container for firing image tags. For DMP clients, this is the number of slots available for transferring first-party data to app partners. For data providers, this is the number of slots available for selling data or executing ID swaps. The default auction limit is 4. You can overwrite this default auction limit in your client-side container tag code. To do this, enter the overriding limit in the Pixel Limit per pageview property within the container tag code generator. The lowest value entered between the Create New Container dialog and the code generator will be the auction limit that is used.Data transfer enabled Enables the user data collected from this container to be sold to any partner in the Oracle Data Marketplace. This check box is cleared by default, which means that the data is private and cannot be sold to any partner that has not been whitelisted. You can classify your private data into public categories (for example, Geographic > Self Declared), and only you will get the data delivery or see the inventory. Performance pixel Makes this container a performance pixel, which is used only for analytics. This check box is cleared by default. Campaign access Specify which of your whitelisted partners can fire image pixels in the container's exchange <div> tag and win on this site: - Anyone: All of your whitelisted partners can win on this site. This is the recommended setting for data providers who sell data in the Oracle Data Marketplace.
- Only Selected Partners: Only specified whitelisted partners can win on this site. To enable a whitelisted partner to win on your site, click anywhere in the box below and then select the partner. This is the recommended setting for DMP clients who work with a trading desk and need to give them access to their container.
- Only Me: Only you can win on this site. This is the default.
- No One: No one can win on this site. This includes your own partner seat. This setting is useful for onboarding offline data or other scenarios where the site needs to be used exclusively for a specific purpose.
For more details on whitelisting partners, contact My Oracle Support (MOS).Data transfer boost Select this check box to re-fire the container tag every n seconds after the initial page load while the user is still on the page. This enables you to increase the number of third-party pixels that can be fired from the container, while exceeding the auction slot limit, but without affecting the performance of your page. The container tag can be re-fired a maximum of 15 times. If you cannot insert an <iframe> tag on the web page or if a deployment is implemented using JavaScript. It also can be used to track events that are executed after the web page has initially loaded. The frequency in which the container tag is re-fired depends on the data transfer interval. For example, if you set the default auction limit to
10, enable data transfer boost, set the data transfer interval to7seconds, and you add 30 third-party pixels to the container, the following will occur:- When the page is initially loaded, the first 10 third-party pixels are fired.
- After the Oracle Data Cloud platform receives a DomReady event indicating that the page has completed loading, a 7-second countdown begins.
- If the user is still on the page after the countdown, the next 10 third-party pixels are fired. The next 7-second countdown begins.
- If the user is still on the page, the last 10 third-party pixels are fired.
Note: Data transfer boost is enabled by default for new containers.
Data transfer interval If you enabled data transfer boost, specify how frequently (in seconds) the container tag is re-fired. Labels Enter unique, descriptive tags for your container and then press Enter or click the link for the label that appears after you enter the label name. Labels must be two characters or more. You can use labels to help classify your containers in the Containers page. Notes Enter a summary or any other relevant information for your container. - Do one of the following to save the container:
- Click Save to save the container and return to the Containers page. To generate the container tag code later on, do one of the following:
- Select the check box for the container and then click Generate Code.
- Select the check box for the container, click Edit to optionally modify the container's settings in the Edit Container dialog, and then click Generate Code.
- Click Save and Generate Code to save the container and immediately open the Generate Code dialog, where you can create the tag code to be included in the container.
- Click Save to save the container and return to the Containers page. To generate the container tag code later on, do one of the following:
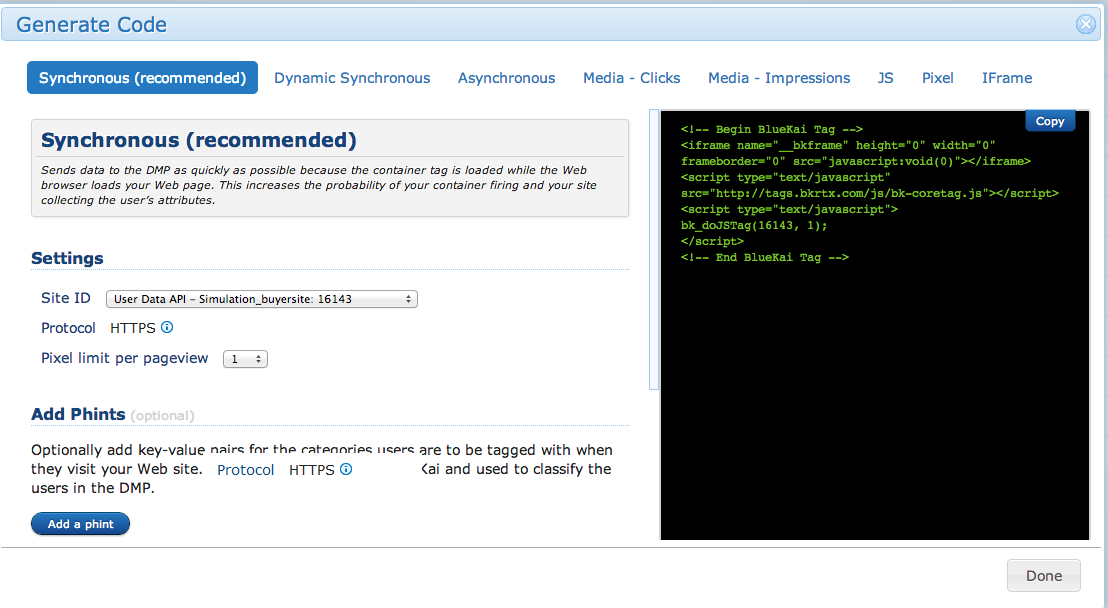
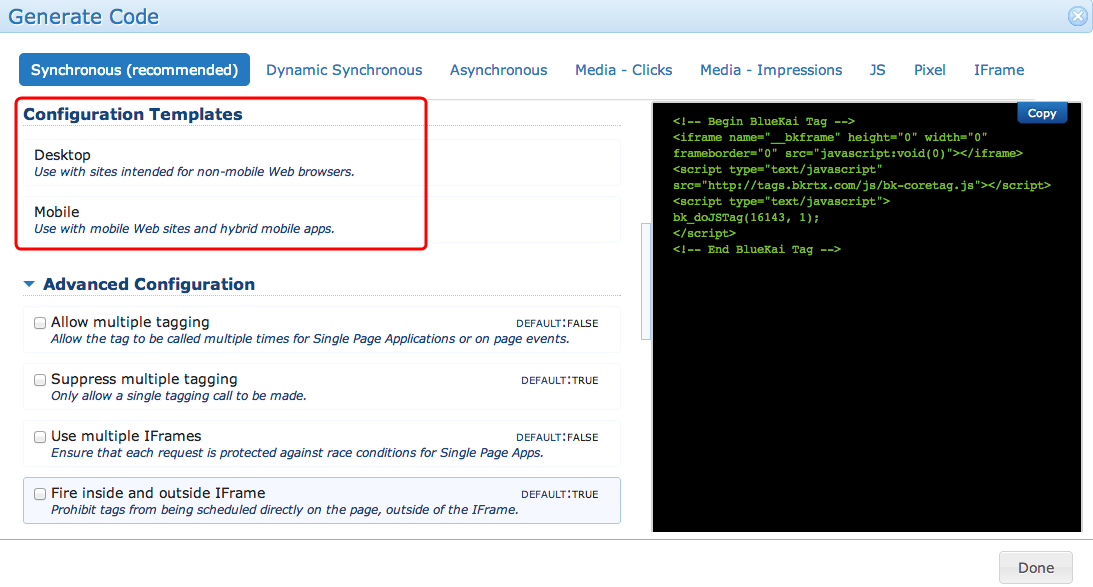
- At the top of the Generate Code dialog, click one of the tag types, which control how the container is fired. The code corresponding to the selected tag type is displayed in the read-only code box to the right. The tag types support a number of deployments, such as synchronous for quickly sending user data to the platform or dynamic synchronous for deploying the container inside another tag manager. You can also add phints (key-value pairs) to the container for tagging users with categories and sending the user data to the platform. The Create New Container tool displays the updates to your container tag code as you modify its settings and add phints. It includes a standard configuration template for deploying your containers on mobile websites and hybrid mobile apps.

- Under Settings, set the following options for the container. The code box to the right is updated as you configure these options:
Option Description Site ID Select the unique site identifier to be used in your tag code. This value overwrites the default auction limit set in the lowest value between the Create New Container dialog and the code generator is the auction limit that is used. The lowest value between the Create New Container dialog and the code generator is the auction limit that is used. Protocol Oracle Data Cloud does not support the creation of non-secure tags. Only HTTPS is available. Pixel limit per pageview You can enter a lower value for this setting to override the Default auction limit value in the Create New Container dialog. The lower of the two values is used. Ad server If you are configuring a Media - Impressions or Media - Clicks tag type, select the ad server to be used, such as DFP. Creative click thru URL If you are configuring a Media - Impressions or Media - Clicks tag type, enter the click-thru URL and then click anywhere outside the box or press TAB. The click-thru URL is encoded and added to the tag code. - (Optional) Under Add Phints, add key-value pairs for the categories user are to be tagged with when they visit your website. The phints are passed to the platform and used to classify the user in the DMP. If you are not using a Synchronous, Dynamic Synchronous, or Asynchronous container, which contain the standard Oracle Data Cloud core tag, you must input the phints directly in your URL. To add a phint to the tag code:
- Click Add a phint.
- In the Key and Value boxes, enter the unique identifier for the data item and the value of the data item, respectively.
Important! If you add the
redirordoneparameters as phints to a Media - Impressions or Media - Clicks tag type, the parameters must be placed at the end of the URL. Although the user interface allows you to place them elsewhere, they must be at the end to be evaluated correctly. Useredirwith ID swap tags anddonewith other tags. - If you are configuring a Synchronous, Dynamic Synchronous, or Asynchronous tag type, you can click one of the following server standard templates under Configuration Templatesto automatically configure the tag code with the recommended advanced options:

- (Optional) Configure the tag code by setting advanced options.
- In the code box to the right, click Copy to copy the container tag to the clipboard so you can directly paste it into your web pages or save them in a text file. The status of the box changes to Copied to Clipboard.
Note: The code is not saved in the Generate Code dialog when you click Done. This dialog is only serves as a tag code generator.
- Click Done.

Tag types
The Create New Container tool can generate eight different tag types that control how the container is fired and how it collects and transfers user data. All of the following example container tags indicate that the site ID is 15415:
- Synchronous (recommended): Sends data to the Oracle Data Cloud platform as quickly as possible because the container tag is loaded while the web browser loads your web page. This increases the probability of your container firing and your site collecting the user's attributes.
<!-- Begin BlueKai Tag --> < iframe name = "__bkframe" height = "0" width = "0" frameborder = "0" style = "display:none;position:absolute;clip:rect(0px 0px 0px 0px)" src = "about:blank" > < /iframe> < script type = "text/javascript" src = "https://tags.bkrtx.com/js/bk-coretag.js" > < /script> < script type = "text/javascript" > bk_addPageCtx('Key', 'Value'); bk_doJSTag(15415, 1); < /script> <!-- End BlueKai Tag --> - Dynamic Synchronous: Enables the container to be deployed inside another container tag. When the container tag code is executed, it dynamically creates an iframe. This tag type is useful when your web page calls the Oracle Data Cloud core tag, the site ID enables the platform to recognize the incoming data as yours, identifies the type of user (desktop or mobile), and the data extracted from your web page to be mapped to the appropriate categories in your taxonomy.
<!-- Begin BlueKai Tag in body--> < script type = "text/javascript" src = "https://tags.bkrtx.com/js/bk-coretag.js" > < /script> < script type = "text/javascript" > bk_addPageCtx('Key', 'Value'); BKTAG .doTag({ site_id: 15415, pixel_limit: 1 }, function() {}); < /script> <!-- End BlueKai Tag --> - Asynchronous: Enables your site to control when the container tag is fired by calling the
window.bk_async = function()of the container tag code.<!-- Begin BlueKai Tag --> < script type = "text/javascript" > window.bk_async = function() { bk_addPageCtx('Key', 'Value'); BKTAG.doTag(15415, 1); }; (function() { var scripts = document.getElementsByTagName('script')[0]; var s = document.createElement('script'); s.async = true; s.src = "https://tags.bkrtx.com/js/bk-coretag.js"; scripts.parentNode.insertBefore(s, scripts); }()); < /script> <!-- End BlueKai Tag --> - Media Clicks: Supports audience analytics for users who click on your ads. Generate this tag and add it to the front of your click-through URLs within your selected ad server. This tag does not support the advanced configuration options.
https://analytics.bluekai.com/site/15415?phint=event%3Dclick&phint=aid%3D%eadv!&phint=pid%3D%epid!&phint=cid%3D%ebuy!&phint=crid%3D%ecid!&phint=Key%3DValue - Media Impressions: Supports media ingest for audience analytics users who view your impressions. Embed this tag on media creatives within your selected ad server. This tag does not support the advanced configuration options.
https://analytics.bluekai.com/site/15415?phint=event%3Dimp&phint=aid%3D%eadv!&phint=pid%3D%epid!&phint=cid%3D%ebuy!&phint=crid%3D%ecid!&phint=Key%3DValue&done=INCLUDE_URLENCODED_URL - JS (JavaScript): Returns data in JSON format. This tag type is primarily used for data transfer (data is not sent to the DMP). This tag does not support data collection or the advanced configuration options.
<script type="text/javascript" src="https://stags.bluekai.com/site/15415?ret=js&limit=1&phint=Key%3DValue">
</script> - Pixel: Returns a single image pixel. This tag type is primarily used for data collection, with minimal data transfer support (because it can only redirect to another pixel). This tag does not support the advanced configuration options.
<img height="1" width="1" src="https://stags.bluekai.com/site/15415?limit=1&phint=Key%3DValue">
</img>Note: You can use the pixel and JS tag types to capture mouse click events on desktop and mobile web pages (for example, clicks on Add To Cart, Play Video, or other buttons). For details, see using pixel and JS tags to capture mouse click events.
-
IFrame: Enables you to do both data collection and return multiple pixels for sending data to multiple partners. This is a legacy tag type. This tag does not support the advanced configuration options.
<iframe name="__bkframe" height="0" width="0" frameborder="0" title="" src="https://stags.bluekai.com/site/15415?ret=html&limit=1&phint=Key%3DValue">
</iframe>
Important: All URIs are assumed to be percent-encoded on the client side.
Advanced configuration options
For synchronous, dynamic synchronous, and asynchronous tags, you can manually configure the tag code by setting the following advanced configuration options in the Generate Code dialog:
| Option | Description | Default |
|---|---|---|
| Allow multiple tagging | bk_allow_multiple_calls=true
The container tag can be called multiple times for single page applications or page events when this option is selected. |
FALSE: The container tag can only be called once. |
| Suppress multiple tagging | Allows only a single tagging call to be made per page. If you select this check box, multiple calls are not suppressed: bk_suppress_multiple_calls=false |
TRUE: The container tag can only make a single call. |
| Use multiple iframes | bk_use_multiple_iframes=true
Ensures that each request is protected against race conditions for single page apps. |
FALSE: The container tag can only use a single IFrame. |
| Fire inside and outside iframe | bk_ignore_outside_iframe=false
Prevents tags from being scheduled directly on the page, outside the iframe that is populated within the container. |
TRUE: Tags may only be scheduled inside the iframe. |
| Disable metadata | bk_ignore_meta=true
Prevents your site from passing the title, referrer, and URL to the container. |
FALSE: Metadata, including page title, page referrer, and page URL is passed to the platform by default without setting these as explicit phints. |
| Extract named meta elements | bk_meta_vars=[]
Configure this parameter to allow your site to send meta data stored in the HEAD element of a web page (for example, segment, web_section_id, page_content, and so on). |
N/A |
| Extract named global variables | bk_js_list=['navigator.appName']
Configure this parameter to allow your site to send page variables. |
N/A |
| Use first-party cookies | bk_use_first_party=true
Sets a cookie (bkrid) in the domain of the page that the container tag is hosted on (first-party cookie). The container will read this cookie value as a stable identifier on the user. |
FALSE: First-party cookies are not used. |
| Suppress first-party cookies | The default setting prevents the platform from ever setting a cookie (bkrid) in the domain of the page that the container tag is hosted on. If you select this check box, first-party cookies are not suppressed:bk_suppress_first_party=false |
TRUE: First-party cookies may not be set. |
| Enable debugging | bk_is_debug=true
Enables your site to pass additional debugging information to the platform. |
FALSE. Debugging information is not sent to the platform. |
| Allow unlimited GET request length | bk_limit_get_length=false
The platform supports unlimited GET requests without truncating the URL. If your site has a significant number of IE6 users, normalize the URL at less than 2000 characters. |
TRUE: The length of the GET request is not restricted. |
| Suppress event scheduling | Disables all postMessage support. This will prohibit you from being able to support client-side event handling such as firing tags on onClick events. If you select this check box, event scheduling is not suppressed: bk_suppress_event_scheduling=false |
TRUE: Events cannot be scheduled. |
| Suppress cache busting | bk_suppress_cache_busting=true
Prevents the forcing of the cache to be broken if the same parameters are sent. |
FALSE. Sending the same parameters breaks the cache |
Container report