Adding a Custom View to the Drill Through Landing Page
When drilling through to data on the landing page in the Oracle Fusion Cloud Enterprise Performance Management, you can create and select a custom view of columns. This feature enables you to customize the display of the landing page. You can customize the list of the source columns, and order the columns and column titles. The custom view definition can be saved. For subsequent drills, the system uses the last used custom view. If no custom view, the system uses the Source (All) as the default view.
Note:
When drilling into Oracle Smart View for Office, Data Integration uses the last used view on the Drill landing page. If no last used view is found, Data Integration uses the default view selection in this setting
To define a custom view for a drill:
-
From the Home page, click Navigator, and then under Tasks and Reporting, select Data (
 ).
).
-
Open a form containing loaded source data.
The icon
 in the right top corner of a cell indicates that it has drill-through
data.
-
From a cell that contains drill-down data, right click the cell, and then select Drill Through to source.
-
Select the default view from which to build your custom view definition.
-
Click
 .
.
-
From the Edit View Definition page, click
 .
.
-
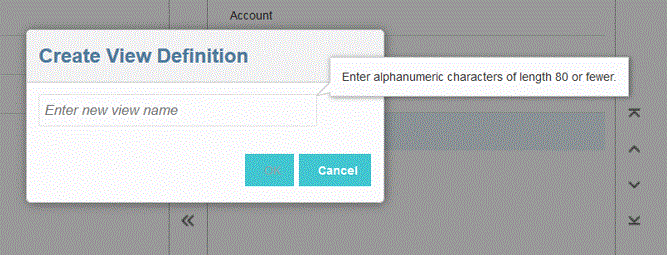
In the Create View Definition windows, enter the name of the custom view definition and click OK.
The view definition name can contain alphanumeric characters. The view definition name can have up to eighty characters or less.

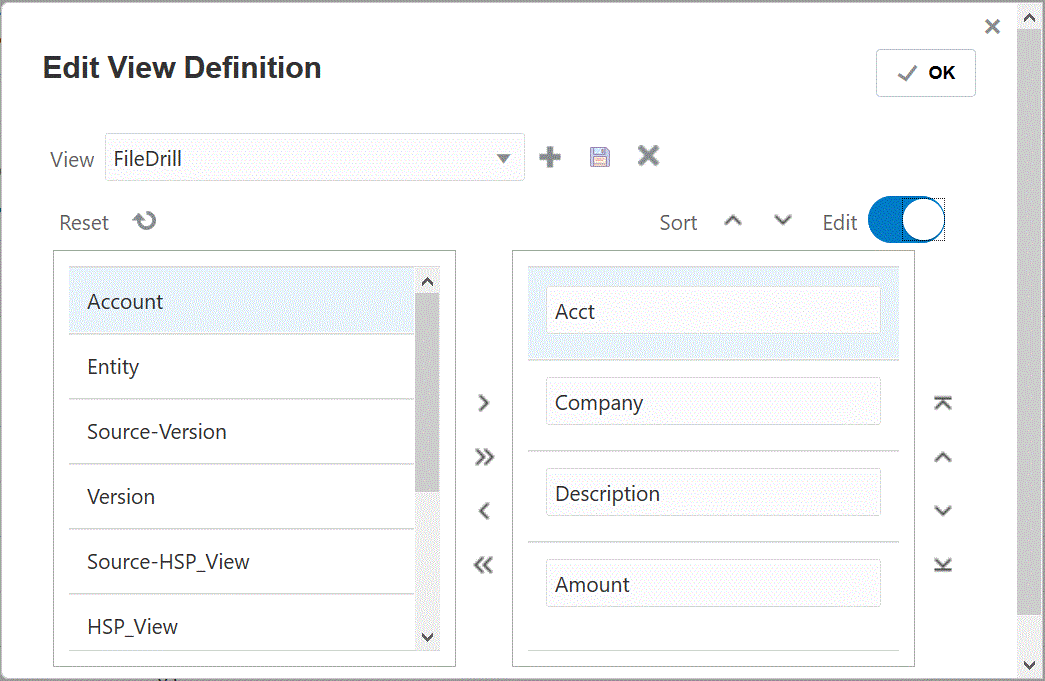
When the Edit View Definition page is first displayed for the new view, all columns are shown in the (Show Columns) right pane. Move all columns that you do not want to include in the custom view to the (Available Columns) left pane.

-
To include a column in a custom view, select the column from the (Available Columns) left page and then click
 to move it to the (Show Column) right pane.
To clear the populated values in the view, click Reset.
-
To exclude a column in a custom view, select the column from the (Show Columns) right pane and then click
 to move it to the (Available Column) left pane.
Additional move options include:
-
To move all columns from the (Available Columns) left pane to the (Show Columns) right pane, click
 .
.
- To move all columns from the (Show Columns) right page to the (Available
Columns) left page, click
 .
.
-
-
Optional: To rename a column in the (Show Columns) right pane, select the column, then tap the Edit slider on, and then type the new column name.
-
Optional: To rearrange a column in the (Show Columns) right pane, select the column and then select one of the following:
 —Move column to the top of the display.
 —Move column up one position of the display.
 —Move column down one position of the display.
 —Move column down to the bottom the display.
-
Optional: Click Sort to sort columns in the Shown Columns pane in ascending or descending order.
-
Click OK or
 to save and update the view definition.
-
Optional: To delete a view, click
 .
.