Introduction
This tutorial describes the layers of security in Cloud EPM business processes and shows you how to manage security using Access Control and access permissions. The sections build on each other and should be completed sequentially.
Background
Oracle Cloud Enterprise Performance Management (EPM) implements security in several layers. Infrastructure security components, which are implemented and managed by Oracle, create highly secure Cloud EPM environments. Cloud EPM ensures security using the following mechanisms that permit only authorized users to access the service:
- Single Sign-On (SSO)
- Role-based access to environments, including predefined Cloud EPM roles and application-level roles
- Access Control
- Additional security layers such as access permissions
SSO and role-based security are controlled by Oracle Identity Management, which defines a security domain for each environment. After a successful sign in, access to the service is determined by the role assigned to the user.
Here are a few key terms and concepts in this tutorial:
New Oracle Cloud Enterprise Performance Management (EPM) subscriptions are supported on Oracle Cloud Infrastructure, which uses Oracle Identity Cloud Services as its default identity store.
Oracle Cloud Infrastructure: Cloud EPM is a component of Oracle Cloud.
The newest version of Oracle Cloud is known as Oracle Cloud Infrastructure (OCI). OCI delivers highly available computing power and infrastructure to Cloud EPM. New Cloud EPM subscriptions purchased by first-time customers are supported on OCI. OCI may also be referred to as Oracle Cloud Gen 2 or OCI (Gen 2).
Oracle Cloud Classic: Oracle Cloud Classic is the predecessor to OCI. Many Cloud EPM customers are supported on Oracle Cloud Classic.
Note:
Oracle Cloud Enterprise Performance Management business processes function the same irrespective of the Oracle Fusion Cloud Enterprise Performance Management infrastructure in use. However, there are some differences between EPM Cloud operations in Classic and OCI environments. Review Differences Between Classic and OCI Environments in the Getting Started with Oracle EPM Cloud and EDM Cloud for Administrators documentation.Cloud Portal: The website from where you set up and configure Cloud EPM users and security. OCI and Oracle Cloud Classic maintain separate Cloud Portals. This document refers to Oracle Cloud Classic portal as My Services (Classic) and OCI portal as My Services (OCI).
Identity Domain: A slice of the shared identity management infrastructure where Identity Domain Administrators create and manage Cloud EPM users and security in Oracle Cloud Classic using My Services (Classic). Equivalent to Cloud Account Name in OCI.
An Identity Domain Administrator creates and manages user accounts within an identity domain. The Account Administrator, grants the Identity Domain Administrator role to one or more users to delegate the process of setting up security.
By default, each customer is allocated two environments (test and production environments) of a service. The Identity Domain Administrator uses the My Services application (OCI and Classic) or the Oracle Cloud Identity Console (OCI only) to manage the users who need access to these environments. Many EPM Cloud services may be activated under one Customer Account or identity domain.
Cloud Account Name: The name of the account that manages your EPM Cloud subscription. In OCI (Gen 2), the Cloud Account Name is used as the name of the identity domain that secures your EPM Cloud environments. Identity Domain Administrators use My Services, Oracle Cloud Identity Console, and Oracle Cloud Console (IAM) to set up and manage EPM Cloud users and security. By default, each customer is allocated two environments (test and production environments) of a service.
The Account Administrator grants the Identity Domain Administrator role to one or more users to delegate the process of setting up security. Many EPM Cloud services may be activated under cloud account name.
Oracle Cloud Identity Console: Another console that Identity Domain Administrators use to set up and manage security in Identity Cloud Services (IDCS) in OCI. This console is accessed from My Services (OCI).
This tutorial shows you an overview of each security layer, and shows you how you can manage security using Access Control and Access Permissions.
Prerequisites
Cloud EPM Hands-on Tutorials may require you to import a snapshot into your Cloud EPM Enterprise Service instance. Before you can import a tutorial snapshot, you must request another Cloud EPM Enterprise Service instance or remove your current application and business process. The tutorial snapshot will not import over your existing application or business process, nor will it automatically replace or restore the application or business process you are currently working with.
Before starting this tutorial, you must:
- Service Administrator access to a Cloud EPM Enterprise Service instance.
- An application loaded for any of the Cloud EPM business processes. If available, you can use the prebuilt sample applications delivered with the business process.
- A few users created and provisioned in your identity domain.
Note:
If you run into migration errors importing the snapshot, re-run the migration excluding the HSS-Shared Services component, as well as the Security and User Preferences artifacts in the Core component. For more information on uploading and importing snapshots, refer to the Administering Migration for Oracle Enterprise Performance Management Cloud documentation.About Cloud EPM Security
About Single Sign-On
An Oracle Cloud service account is a unique customer account that can have multiple cloud services of different service types. Every Oracle Cloud service belongs to an identity domain. An identity domain is a construct for managing users and roles, integration standards, external identities, secure application integration through Oracle Single Sign-On (SSO) configuration and OAuth administration. Multiple services can be associated with a single identity domain to share user definitions and authentication. Users in an identity domain can be granted different levels of access to each service associated with the domain to ensure a segregation of duties.
You can use the default Oracle Cloud EPM Single Sign-On (classic) or use a Security Assertion Markup Language (SAML) 2.0 compliant identity provider to authenticate users to multiple Cloud EPM services.
Note:
Cloud EPM supports only Service Provider (SP) initiated SSO.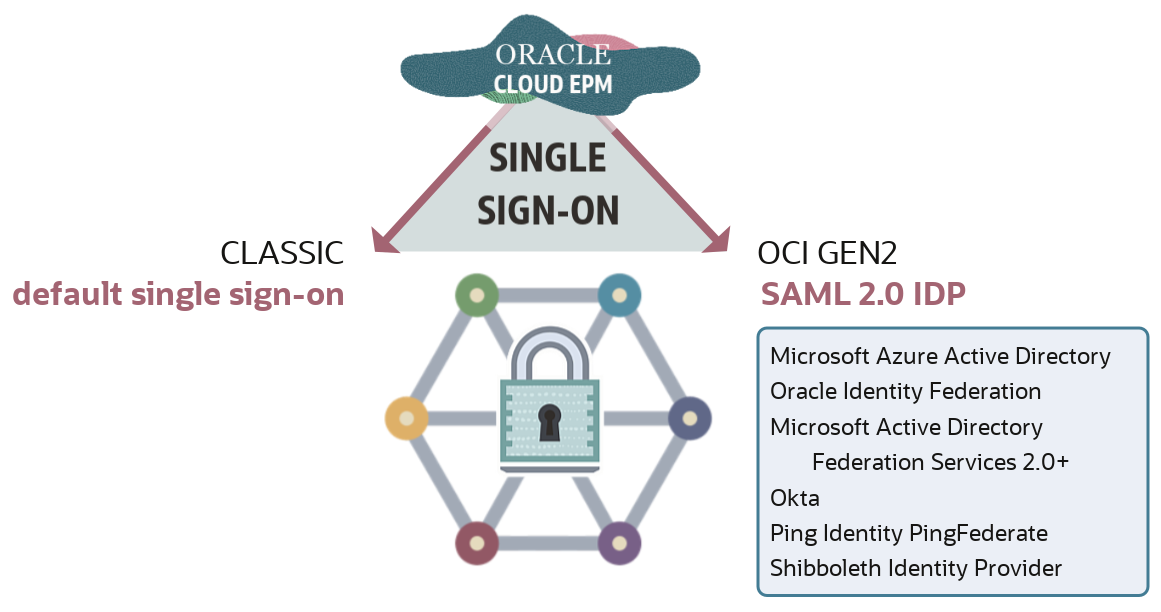
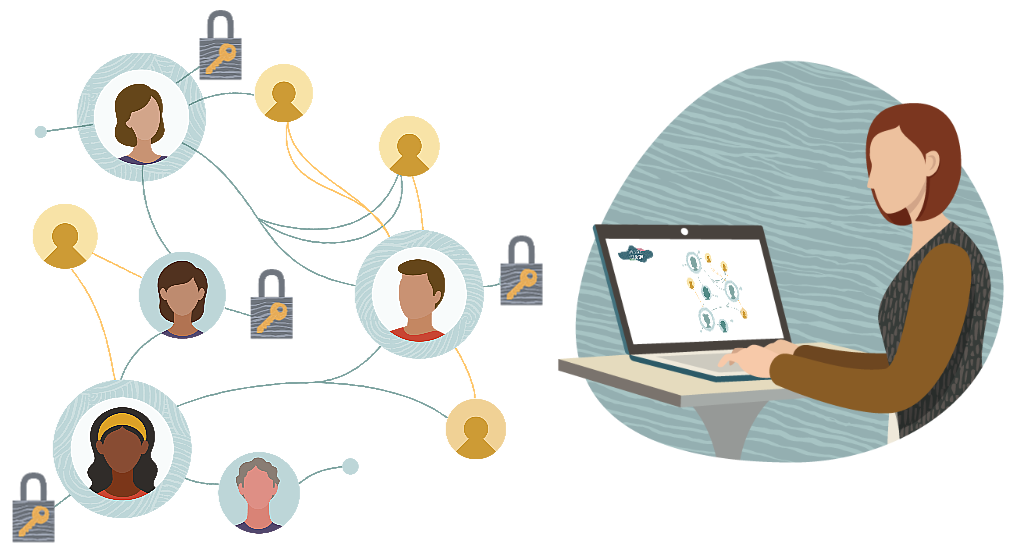
With SSO, Cloud EPM users can authenticate using the same credentials they use to access network resources within their organization when they connect to a Cloud EPM environment.
In Identity Cloud Service, for OCI GEN2, you can simplify role assignment by assigning multiple Cloud EPM users to groups. Then, assign predefined roles to these groups. Since IDCS groups can be synced with Identity Provider groups (such as MSAD groups), you can add individual users to Identity Provider groups and assign the predefined roles to these groups in Oracle Cloud Identity Console.
Identity Domain Administrators can create users individually or use an upload file containing user data to create many users at once. Identity Domain Administrators must be proficient in security concepts, including the predefined Oracle Cloud Enterprise Performance Management roles that allow users to gain access to an environment, and know how to use My Services (Classic) or My Services (OCI) and Oracle Cloud Identity Console (OCI only) to complete tasks.
About Predefined Cloud EPM Roles
Access to Cloud EPM service environments is determined by predefined functional roles assigned to a user or group. Predefined functional roles link users and groups to the business activities they are permitted to perform within an environment and the data that they can access. Users and groups must be assigned to predefined roles that grant them access to business functions and associated data.
The following Oracle Cloud EPM services use a common set of four predefined functional roles to control access to environments:
- Planning
- FreeForm
- Financial Consolidation and Close
- Tax Reporting
- Profitability and Cost Management
- Enterprise Profitability and Cost Management
- Account Reconciliation
- Strategic Workforce Planning
- Narrative Reporting
- Sales Planning
Oracle Enterprise Data Management Cloud (EDMC) uses only the Service Administrator and User predefined roles. Power User and Viewer are displayed in My Services. Do not assign users to these roles. They are not applicable to EDMC.
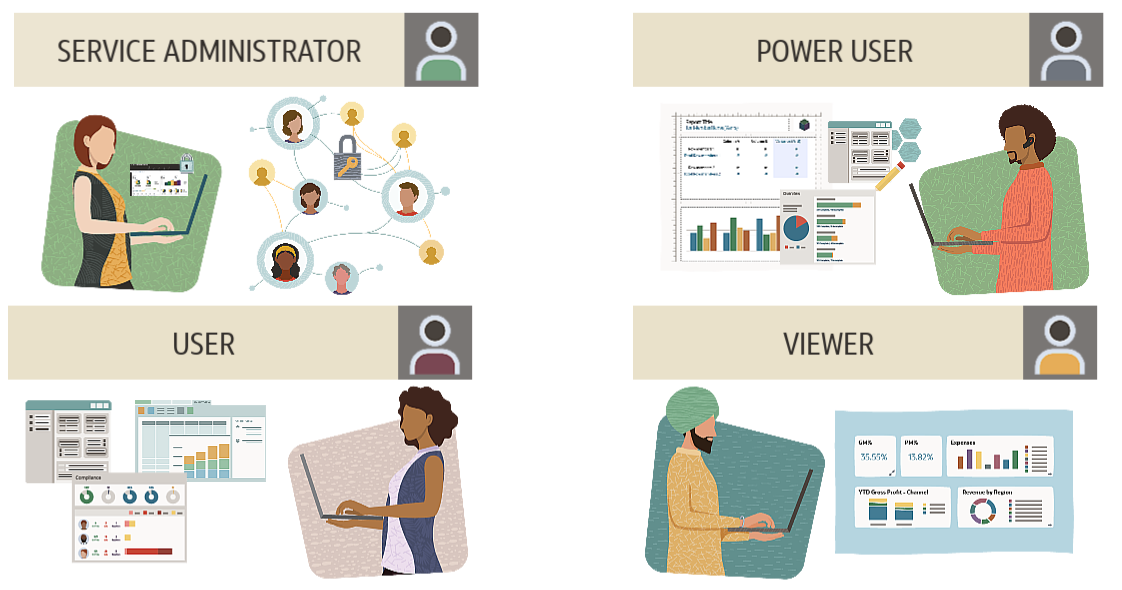
The access that a predefined role grants within an environment depends on the service type. For example, the Power User role in Planning enables you to manage business rule security and control the approval process while the same role in Tax Reporting enables you to run tax automation and import data.
Service Administrators perform administrative and functional activities such as managing users and their roles, configuring single sign-on, and setting up network restricted access. Service Administrators are responsible for configuring application-level security.
If the service is configured for SSO, Oracle Cloud EPM user names and passwords, and password policies, are managed by the directory server of your organization.
Power Users can view and interact with data, as well as create and maintain forms, ad hoc grids, and reports.
Users can enter and submit data for approval, analyze forms using ad hoc features, and drill through to the source system. Users can view reporting content for which they have access.
The Viewer views and analyzes data through forms and ad hoc grids. A viewer can’t enter data in the system.
Roles are hierarchical. Access granted through lower-level roles is inherited by higher-level roles.
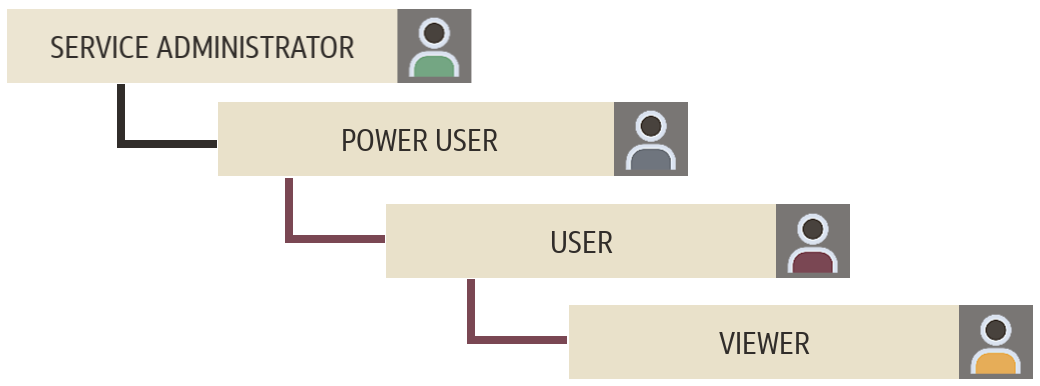
For example, Users assigned as Service Administrators also inherit the privileges of Power User, User, and Viewer. Power Users inherit the privileges of User and Viewer, and Users inherit the privileges of Viewer.
Note:
The Understanding Predefined Roles topic of the Getting Started with Oracle Enterprise Performance Management Cloud for Administrators documentation includes predefined role details for each applicable Cloud EPM business process. The Assigning Roles to Users topic covers the tasks you need to complete when assigning roles using My Services (Classic) and Identity Cloud Service.About Application-Level Roles
Application roles enhance the access rights of users beyond the predefined roles assigned to them.
While the overall access rights are controlled by the predefined roles, Service Administrators or users assigned with the Access Control Manager application role can grant application-specific roles and data grants to users and to groups created and managed in Access Control. For example, a User, by default, does not have the right to design the approvals process, which is granted only to Power Users and Service Administrators. From Access Control, Service Administrators can assign the Approvals Administrator role to enable the user to perform approvals-related activities.
Cloud EPM business processes that support application role assignment are:
- Planning
- FreeForm
- Financial Consolidation and Close
- Tax Reporting
- Narrative Reporting
- Enterprise Profitability and Cost Management
- Oracle Enterprise Data Management Cloud
- Account Reconciliation
Note:
For a complete list of application roles available in each Cloud EPM business process, refer to the business process subtopics of the Managing Role Assignments at the Application Level section of the Administering Access Control for Oracle Enterprise Performance Management Cloud documentation.You manage application role assignments in Access Control. Service Administrators can grant application-specific roles and data grants to users and to groups created and managed in Access Control.
About Access Control
Access Control is a Cloud EPM component available in the following business processes:
- Planning
- FreeForm
- Financial Consolidation and Close
- Tax Reporting
- Profitability and Cost Management
- Enterprise Profitability and Cost Management
- Account Reconciliation
- Oracle Enterprise Data Management Cloud
- Narrative Reporting
- Oracle Strategic Workforce Planning Cloud
- Oracle Sales Planning Cloud
With Access Control, you can perform the following tasks:
- Create groups and add EPM Cloud users or other groups as members
- Add or delete group members
- Assign application roles to groups or to users including yourself
- View a list of users who are members of a group
Additional Security Layers
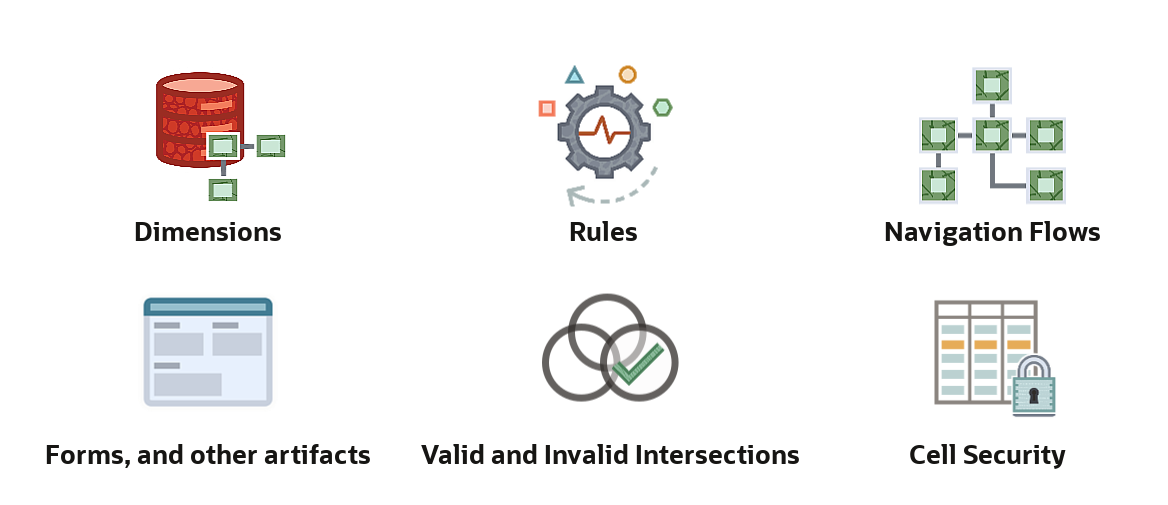
Additional security functionality may be available within each Cloud EPM business process. These work in conjunction with Access Control to provide access permissions. You can define access permissions to dimensions, rules, navigation flows, forms, and other artifacts, as well as set valid and invalid intersections, and cell-level security.
Managing Security in Access Control
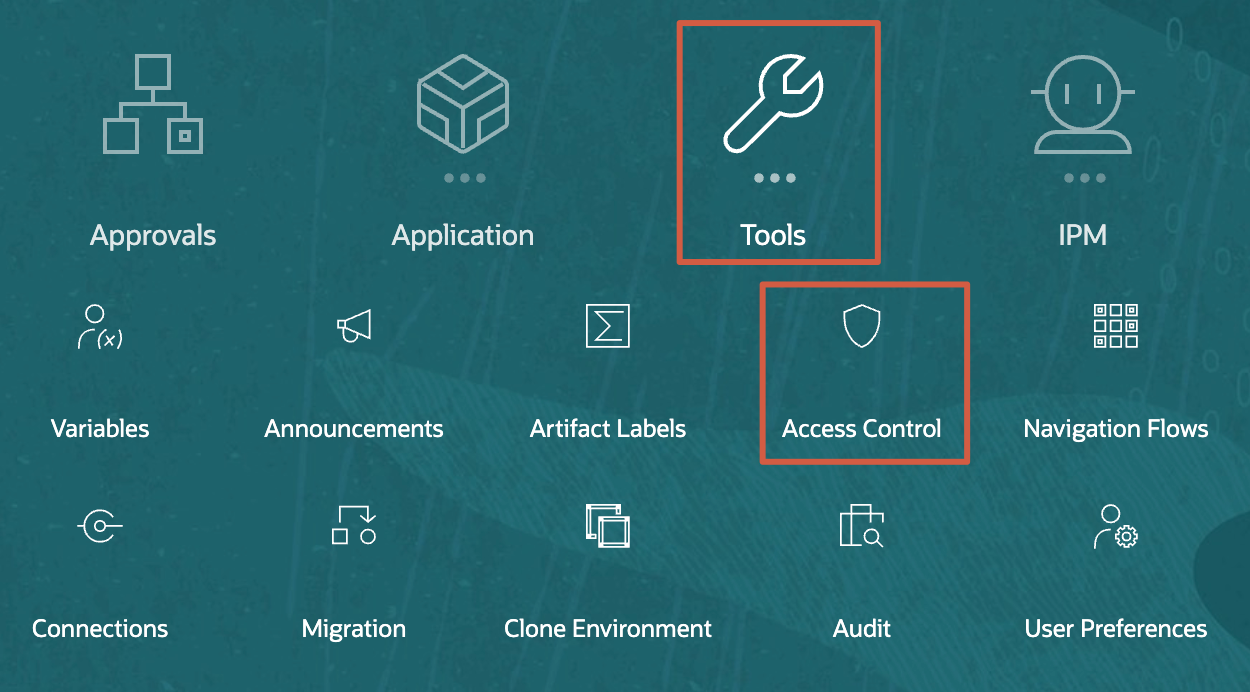
To open Access Control, from the home page of your Cloud EPM business process, click Tools, then Access Control.
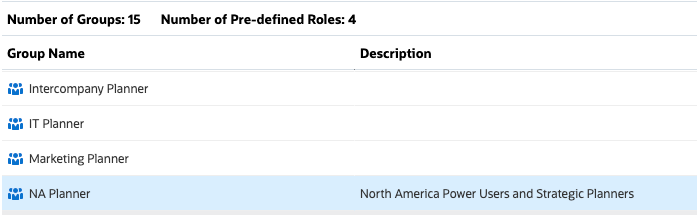
Access Control opens with Manage Groups displayed. This example displays predefined roles and groups created in the Planning Sample Vision application.
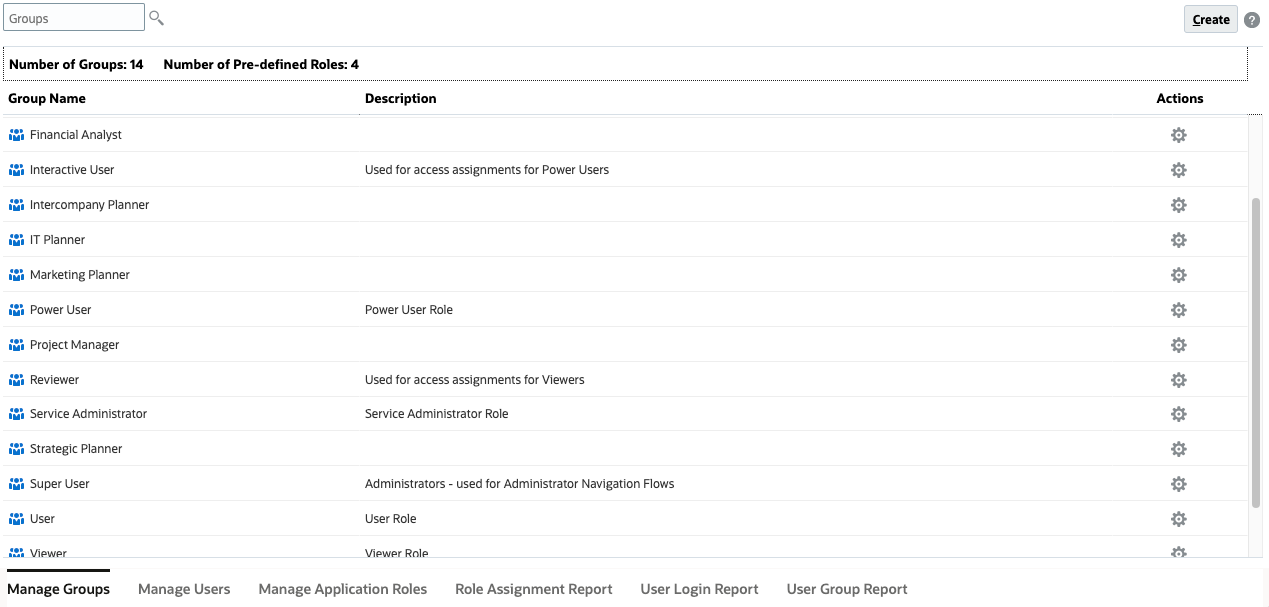
Manage access control in the following tabbed pages, located at the bottom of the page:
- Manage Groups
- Manage Users
- Manage Application Roles
- Role Assignment Report
- User Login Report
- User Group Report
Managing Groups
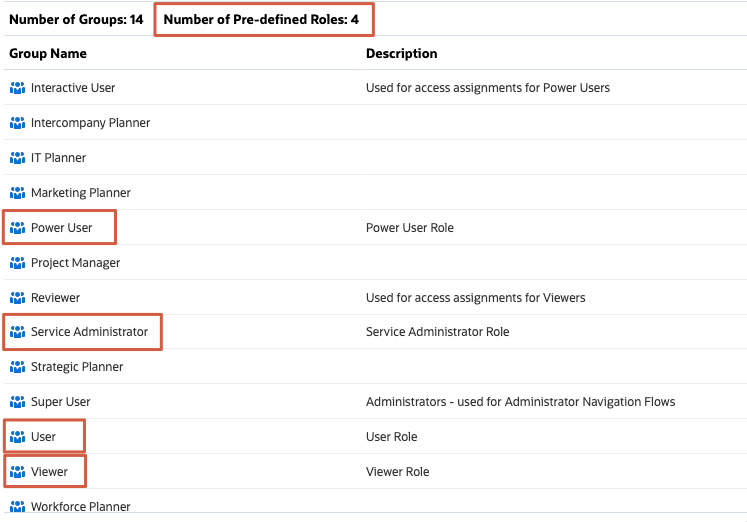
In Manage Groups of Access Control, predefined roles are listed as groups.
Note:
You cannot delete, modify, or assign application-level roles to predefined roles from Access Control. Additionally, Cloud EPM users, who are assigned to predefined roles, are listed in Access Control so that they can be added as group members.
Cloud EPM business processes use an internal repository to support application-level role assignments.
Cloud EPM users and other groups can be members of groups maintained in Access Control. Users can be granted application roles by assigning a role to the group.
Tip:
Import or export groups using migration or EPM Automate commands.Creating Groups
- In Manage Groups, on the top-right, click Create.
- Enter the following information:
- Name: Enter a unique group name (maximum 256 characters).
Note:
Group names are not case-sensitive. Cloud EPM does not allow you to create groups with names identical to predefined role names (Service Administrator, Power User, User or Planner, and Viewer). - Description: (Optional) Enter a description for the group.
- Name: Enter a unique group name (maximum 256 characters).
- (Optional) In Groups, add groups to create a nested group.
- Click
 (Search) to display a list of available groups or filter the list by entering a search string, and then clicking (Search).
 - From Available Groups, select the member groups to add to the new group.
- Click > (Move).
The selected groups are listed under Assigned Groups.
Note:
Clicking > (Move), >> (Move All), < (Remove), << (Remove All) allows you to add or remove assignments.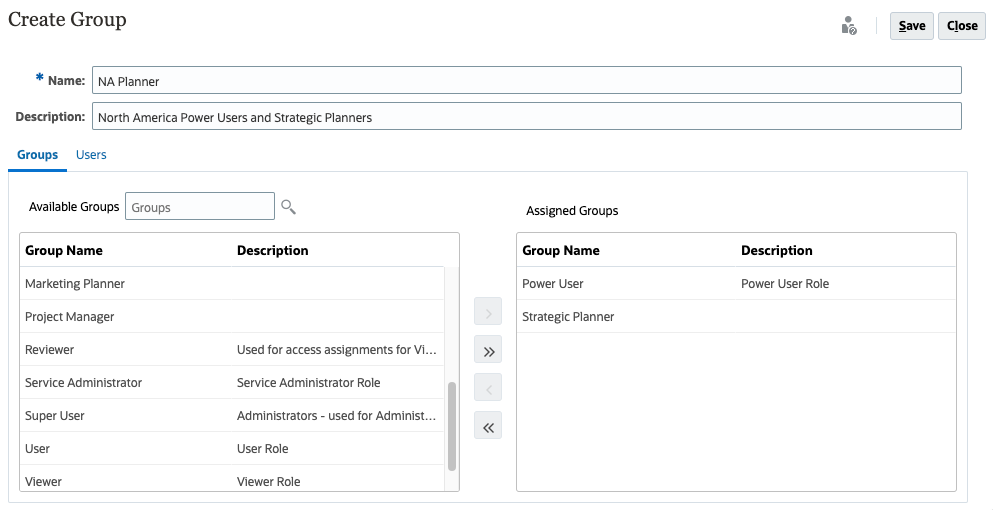
- Click
- (Optional): Click Users to add service users as members of the group.
- Click (Search) to display a list of available users or filter the list by entering a search string, and then clicking (Search).
- From Available Users, select users to add to the new group.
- Click > (Move).
The selected users are listed under Assigned Users.
Note:
Clicking > (Move), >> (Move All), < (Remove), << (Remove All) allows you to add or remove assignments.
- Click
- Click Save.
- At the information message, click OK.
The newly added group is listed on the page.
Modifying Groups
- In Manage Groups, locate the group you want to modify, click
 (Actions), and select Edit.
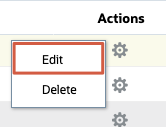
- In Edit Group, modify the name, description, group and user selection.
Tip:
See steps 3 and 4 in the Creating Groups section of this tutorial for steps in adding and removing assignments. - Click Save.
- At the information message, click OK.
Deleting Groups
- In Manage Groups, locate the group you want to delete, click (Actions), and select Delete.
- In the Delete Group information prompt, click Yes.
- In the next information message, click OK.
Managing User Group Assignments
- From the horizontal tabs, click Manage Users.

- Locate the user you want to assign roles, click (Actions), and select Edit.
- In Member Of - Available Groups, add groups to create a nested group.
- Click (Search) to display a list of available groups or filter the list by entering a search string, and then clicking (Search).
- From Available Groups, select the member groups you want to assign.
- Click > (Move).
The selected groups are listed under Assigned Groups.
Note:
Clicking > (Move), >> (Move All), < (Remove), << (Remove All) allows you to add or remove assignments.
- Click
- Click Save.
- At the information message, click OK.
Assigning and Unassigning Cloud EPM Application Roles
Service Administrators can grant application-specific roles and data grants to users and groups created and managed in Access Control.
The recommended best practice is to assign the lowest level role that fits additional privileges where necessary.
Assigning Application Roles to Users
- From the horizontal tabs, go to Manage Application Roles.

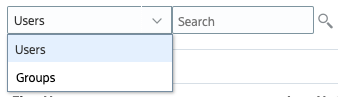
- From the dropdown list, verify that Users is selected.
Tip:
You can filter the list by entering a search string, and then clicking (Search). - Locate the user you want to assign roles, click (Actions), and select Manage Roles.
- To assign an application role:
- In Available Application Roles, select an application role.
Tip:
The following standard browser techniques for selecting multiple items from a list are supported:- Shift + click: Selects two or more consecutive items. To select consecutive items, select the first item, then press Shift and click the last item to select both items and all items in between.
- Control + click: Selects two or more non-consecutive items. To select multiple non-consecutive items, press the Control key as you click each item.
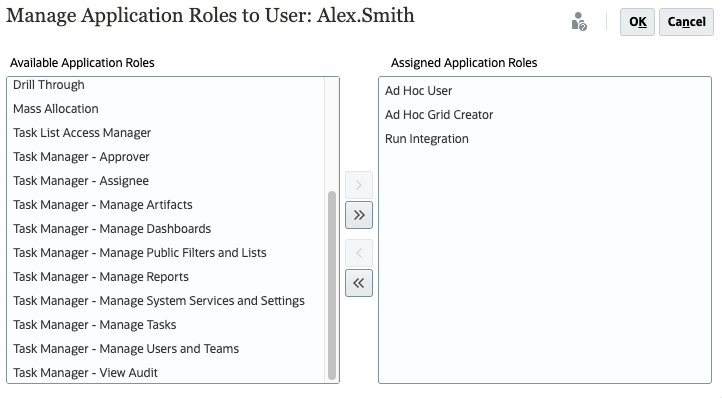
- Click > (Move).
The selected roles are listed under Assigned Application Roles.
Note:
Clicking > (Move), >> (Move All), < (Remove), << (Remove All) allows you to add or remove assignments.
In this example, Planning application roles are assigned to a user.
- In Available Application Roles, select an application role.
- To remove an application role:
- In Assigned Application Roles, select an assigned role.
Tip:
The following standard browser techniques for selecting multiple items from a list are supported:- Shift + click: Selects two or more consecutive items. To select consecutive items, select the first item, then press Shift and click the last item to select both items and all items in between.
- Control + click: Selects two or more non-consecutive items. To select multiple non-consecutive items, press the Control key as you click each item.
- Click < (Remove).
Note:
Clicking > (Move), >> (Move All), < (Remove), << (Remove All) allows you to add or remove assignments.
- In Assigned Application Roles, select an assigned role.
- Click OK.
- At the information message, click OK.
Assigning Application Roles to Groups
- In Manage Application Roles, from the dropdown list, select Groups and click (Search).
Tip:
You can filter the list by entering a search string, and then clicking (Search). - Locate the group you want to assign roles, click (Actions), and select Manage Roles.
- To assign an application role:
- In Available Application Roles, select an application role.
Tip:
The following standard browser techniques for selecting multiple items from a list are supported:- Shift + click: Selects two or more consecutive items. To select consecutive items, select the first item, then press Shift and click the last item to select both items and all items in between.
- Control + click: Selects two or more non-consecutive items. To select multiple non-consecutive items, press the Control key as you click each item.
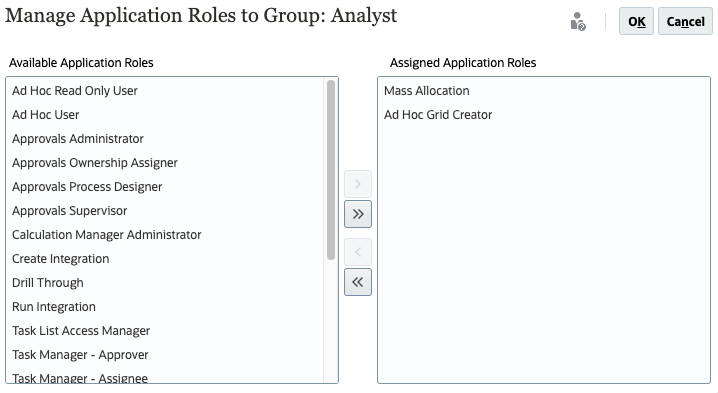
- Click > (Move).
The selected roles are listed under Assigned Application Roles.
Note:
Clicking > (Move), >> (Move All), < (Remove), << (Remove All) allows you to add or remove assignments.
In this example, Planning application roles are assigned to a group.
- In Available Application Roles, select an application role.
- To remove an application role:
- In Assigned Application Roles, select an assigned role.
Tip:
The following standard browser techniques for selecting multiple items from a list are supported:- Shift + click: Selects two or more consecutive items. To select consecutive items, select the first item, then press Shift and click the last item to select both items and all items in between.
- Control + click: Selects two or more non-consecutive items. To select multiple non-consecutive items, press the Control key as you click each item.
- Click < (Remove).
Note:
Clicking > (Move), >> (Move All), < (Remove), << (Remove All) allows you to add or remove assignments.
- In Assigned Application Roles, select an assigned role.
- Click OK.
- At the information message, click OK.
Generating Reports
Service Administrators or users assigned with the Access Control Manager application role can generate reports to analyze and manage role assignments. You can export a report to create a Comma Separated Value (CSV) version of the report.
Viewing a Group's Role Assignment Report
You can review assigned predefined roles and application roles of a user or group. Groups to which a user belong are not listed if the groups are not used to assign application roles to the user. This report enables you to track user access for compliance reporting.
- In Manage Application Roles, from the dropdown list, verify that Groups is selected.
Tip:
You can view role assignment roles for users or groups. To switch to users, from the dropdown list, select Users and click (Search). - Locate the group you want to report on, click (Actions), and select Role Assignment Report.
- Review the Role Assignment Report for the selected group.
In this example, the Role Assignment Report for the Analyst group is displayed.

- (Optional) Click Export to CSV, then save the file to a local folder.
- Click Close.
Viewing the Role Assignment Report
You can review the access, assigned through predefined roles and application-level roles, of all users. The report lists the predefined roles (in bold), and the application roles (not in bold) assigned to the user.
- From the horizontal tabs, click Role Assignment Report.
- From the dropdown list, verify that Users is selected.
Tip:
You can filter the list by entering a search string, and then clicking (Search). - Review user details, including the roles assigned to each user.
Note:
Depending on your application setup, the users may be different than shown here.Inherited roles, as well as information on inheritance, are displayed in one row for each user.
In this example, Predefined and Application roles for each user are displayed.

- (Optional) Click Export to CSV, then save the file to a local folder.
Viewing the User Login Report
The User Login Report, by default, contains information on the users who signed into the environment over the last 24 hours. It lists the IP address of the computer from which the user logged in and the date and time (UTC) at which the user accessed the environment.
Service Administrators or users assigned with Access Control Manager role can regenerate this report for a custom date range or for the last 1 day, last 30 days, last 90 days, and last 120 days. They can also filter the report to view only the information of specific users by using a partial string of the users' first name, last name or user id as the search string.
- From the horizontal tabs, click User Login Report.
- From the dropdown list, select a date range.
Tip:
You can filter the list by entering a search string, and then clicking (Search). - Review login details.

- (Optional) Click Export to CSV, then save the file to a local folder.
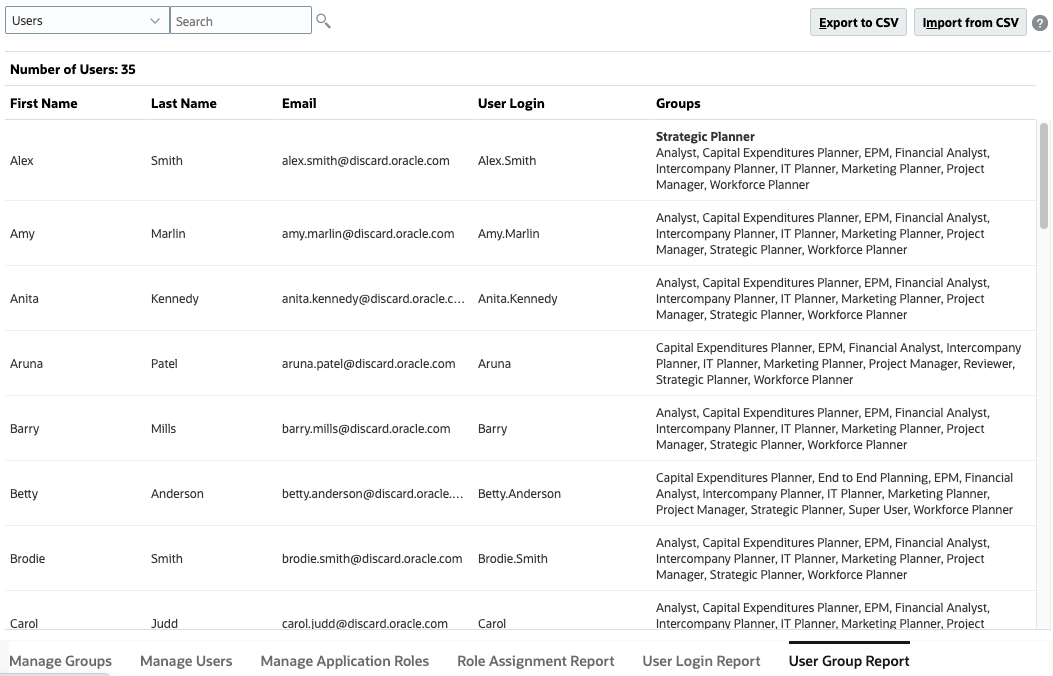
Viewing the User Group Report
The User Group Report lists the direct or indirect membership of users assigned to groups in Access Control. Service Administrators or users assigned with Access Control Manager role can generate this report.
Users are deemed to be direct members of a group if they are assigned to the group. Users are considered indirect members if they are assigned to a group which is a child of another group. For each user assigned to a group, the report lists information such as the login ID, first and last name, email ID, and a list of comma separated groups to which the user is directly or indirectly assigned. The direct groups are displayed in bold font, while the indirect groups are in non-bold font. The CSV version of the report indicates whether the user is directly or indirectly assigned to a group by using Yes or No.
- From the horizontal tabs, click User Group Report.
- From the dropdown list, verify that Users is selected.
Tip:
You can view role assignment roles for users or groups. To switch to groups, from the dropdown list, select Groups and click (Search). - Review user provisioning information, including assigned groups and application roles.
- (Optional) Click Export to CSV, then save the file to a local folder.
Importing User Group Assignments (Optional)
Service Administrators or users assigned with the Access Control Manager application role can import group assignments of users from a Comma Separated Value (CSV) file to create new assignments in an existing Access Control group. Cloud EPM enforces application-level and artifact-level security assignments based on the new group assignments.
Note:
All User Logins identified in the import file must exist in the identity domain; all group names included in the file must exist in Access Control. You cannot create a group using this import process. You can only create new group assignments; you cannot remove users' current group assignments.Here are a few examples of a CSV file used to import group assignments:
User Login,Group
jdoe,Grp1
jane.doe@example.com,Grp2
User Login,First Name,Last Name,Email,DirectGroup
jdoe,John,Doe,jdoe@example.com,Yes,Grp1
jane.doe@example.com,Jane,Doe,jane.doe@example.com,No,Grp2Tip:
Export the User Group report and use it as a template.Note:
You will need an import file containing group assignments to complete the tasks in this section.- In User Group Report, click Import from CSV.
- In Import User Group Assignment CSV, click Choose File or Browse.
Note:
Depending on your browser, the button label may display Choose File or Browse. - Select your import file.
- In Import User Group Assignment CSV, click Import.
- At the prompt, click Yes.
- At the next prompt, click OK.
Viewing Access Control System Reports
You can create a report that lists current access permissions for users and groups in the application.
- On the top left, click
 (Navigator).
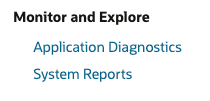
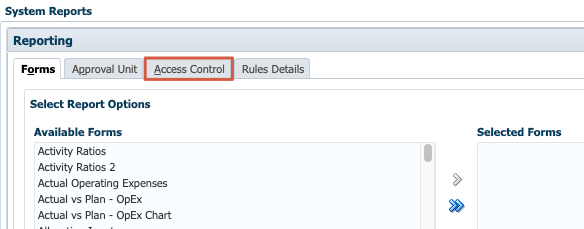
 - Then, under Monitor and Explore, click System Reports.
- From the tabs, click Access Control.
- In Select User a Group, select an option:
- Available Users
- Available Groups
- Available Users and Groups
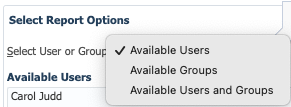
The Available panel updates depending on the option you selected.
- From the left Available panel, select users and/or groups, then move users and/or groups on which to report to the Selected panel.
In this example, groups were selected.
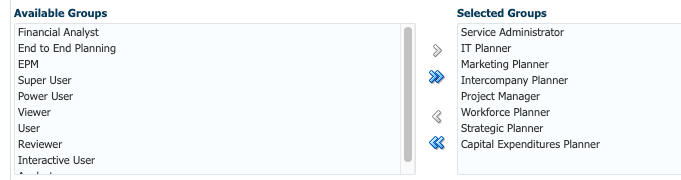
Tip:
Use the Move and Remove icons to move selections between panels. - From the left Available Objects panel, select and move objects on which to report to the Selected Objects panel.
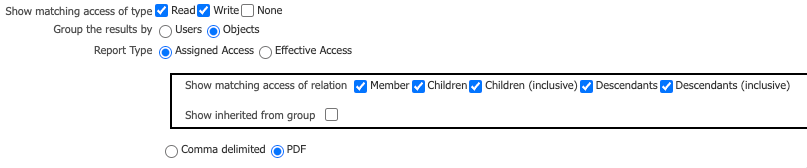
- Select reporting options:
- For Show Matching Access of Type, select the access to view: Read, Write, or None.
- For Group the Results By, select how to view the report: Users or Objects.
- From the Report Type sections, select Assigned Access or Effective
Access:
- If you selected Assigned Access, specify whether access permissions are assigned by member selection relation or group membership:
- From Show matching access of relation, select: Member, Children, Children (inclusive), Descendants, or Descendants (inclusive).
- Select Show Inherited From Group to show access permissions inherited by users in a group.
- If you selected Effective Access, select Show effective access origin to include a description of the origin of the effective access permissions in the report.
- If you selected Assigned Access, specify whether access permissions are assigned by member selection relation or group membership:
- Select whether you want to create a report in Comma delimited or PDF format.
- Verify your selections.
Here is an example of report option selections:
- Click Create Report, then save the report to a local folder.
Managing Access Permissions
Assigning Dimension and Member Security
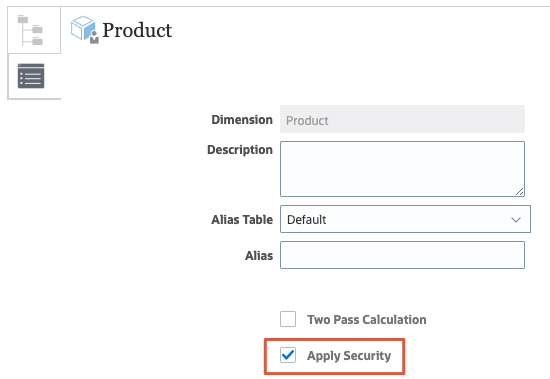
You can assign permissions to members by selecting the dimension property Apply Security. See the Managing Dimensions in Cloud EPM Business Processes tutorial for steps in Editing Dimension Properties.
The behavior of all predefined roles other than Service Administrator is affected by the Apply Security option defined at the dimension level in the business process. Disabling the Apply Security option leaves dimensions unsecured allowing all users assigned to predefined roles to access and write data to dimension members. Oracle recommends that you select the Apply Security option at the dimension level to enforce security.
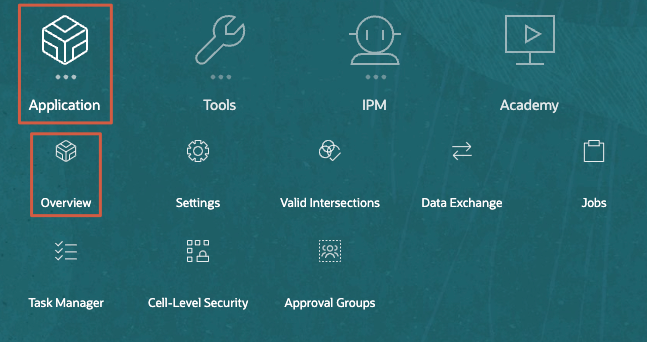
- Return to the home page. On the upper right, click
 (Home).
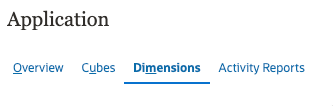
 - Click Application, and then Overview.
- Click Dimensions.
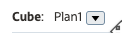
- Filter the dimension view by selecting a cube from the Cube dropdown list.
In this example, the Plan1 cube is selected.
- After selecting a cube, click the name of a dimension you want to apply security.
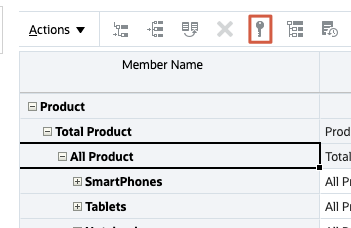
In this example, the Product dimension in the Plan1 cube is opened in Edit Member Properties. You can expand the member hierarchy by clicking
 (Zoom All Members).
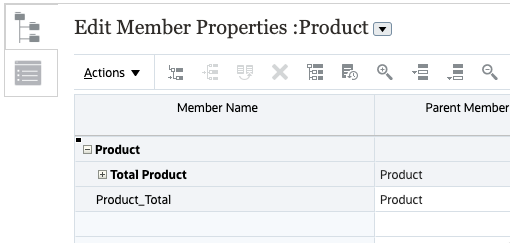
Note:
Before you can assign access permissions, Apply Security must be enabled for the dimension you are working with. - On the left, click
 (Edit Dimension Properties).
 - Select Apply Security.
- Click Done.
- Click the name of the dimension to edit it.
- In the grid of Edit Member Properties, select a member then click
 (Assign Permission).
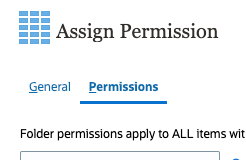
- In Assign Permission, click Permissions.
- Perform a task:
- To add permissions, click Add User/Group, then click Users or Groups, and select from the list of available users and groups.
- Click OK, then click Close.
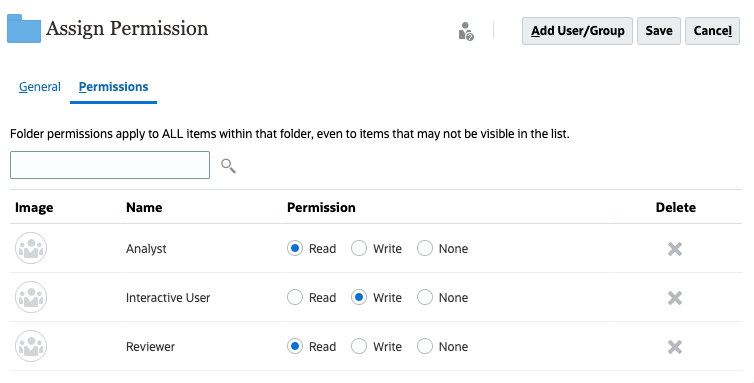
- To edit the type of permissions, select an option for the user or group you added:
- Click Read to allow the selected users and groups to view the artifact or folder in the listing, but not allow them to create, edit, or delete the artifact or folder information.
- Click Write to allow the selected users and groups to view the artifact or folder in the listing, and to create, edit, or delete the artifact or folder information.
- Click None if you don't want the selected users or groups to view the artifact or folder in the listing.
- Optional: Select a relationship.
For example, select Children to assign access to children of the selected member.
- To remove permissions, for the selected user or group, click X (Delete).
- When finished adding permissions to users and groups, click Save.
- If prompted with an information message, click OK.
- Click Cancel to close Assign Permissions.
- In Edit Member Properties, click Save.
- Click Cancel to close Edit Member Properties.
- Return to the home page. On the upper right, click (Home).
Assigning Permissions to Navigation Flows
Navigation flows enable administrators to control how roles or groups interact with the business process. The business process comes with one predefined navigation flow, called Default.
Navigation flows are categorized as follows for customization:
- Global: Navigation flows are seen by all users.
- Role: Navigation flows are seen only by users in a specific role; for example, User or Power User.
- Group: Navigation flows are seen only by users belonging to a specific group.
Navigation flows can be defined at any of these levels. In cases where navigation flows exist at multiple levels, updates are applied in the order of highest (global) to lowest (groups).
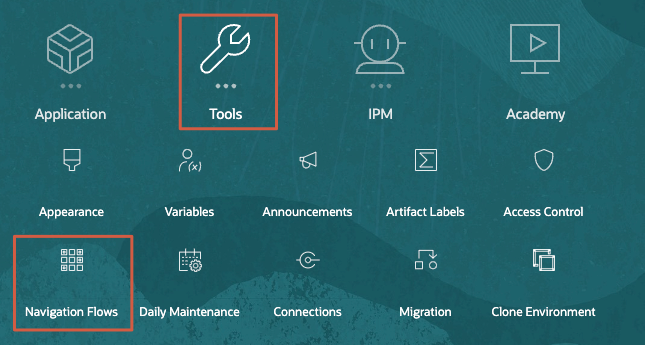
- On the home page, click Tools, then Navigation Flows.
If you have navigation flows created in your business process, they will be listed on the page. Here is a list navigation flows available in the Planning Sample Vision application.
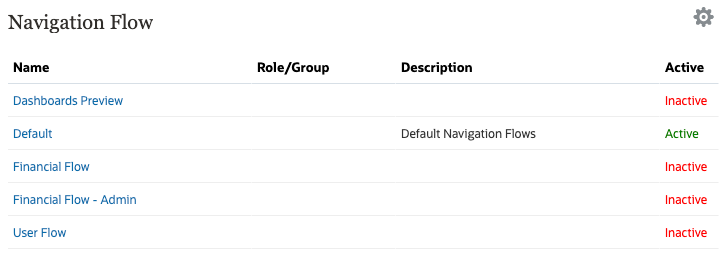
- Select an inactive navigation flow to assign permissions to. Click its name to modify it.
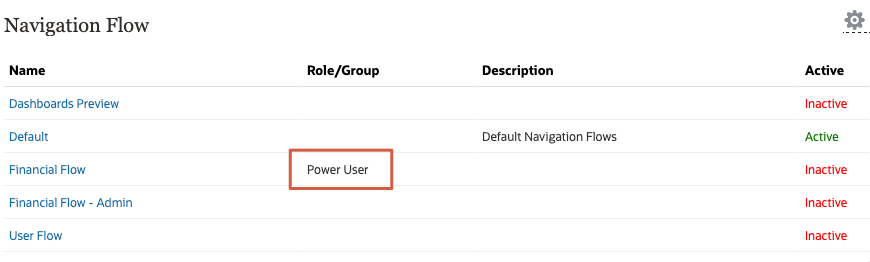
- In Assign To, perform one of the following:
- Enter a predefined role or group.
- Click (Search), then in the Assign Navigation Flow dialog, select a group or role and click OK.
- Click Save and Close.
The role or group assigned to the navigation flow is displayed. In this example, the Power User role was assigned to the Financials navigation flow.
The business process offers three levels of permissions for navigation flows:
- Role-based: Permissions are granted to users or groups assigned to a specific role; for example, a User will see different cards displayed on the Home page than a Service Administrator
- Artifact-based: Permissions are granted to users or groups who can see certain artifacts; for example, a User will see only the forms to which they have been assigned permission
- Global: Permissions are granted to all users
- Return to the home page. On the upper right, click (Home).
Assigning Permissions to Dashboards, Infolets, Forms, and Rules
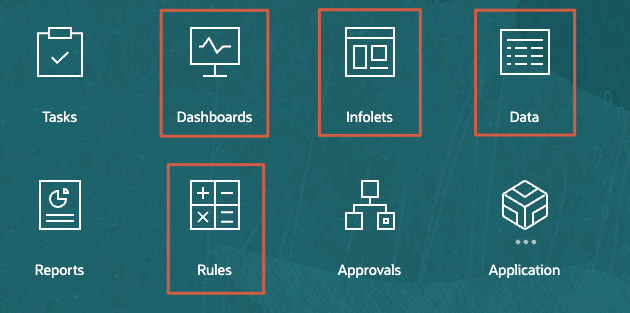
- On the home page, click one of the following: Dashboards, Infolets, Data, or Rules.
For Dashboards, Infolets, Forms (Data) and Rules the listed folders and artifacts each have an Actions menu.
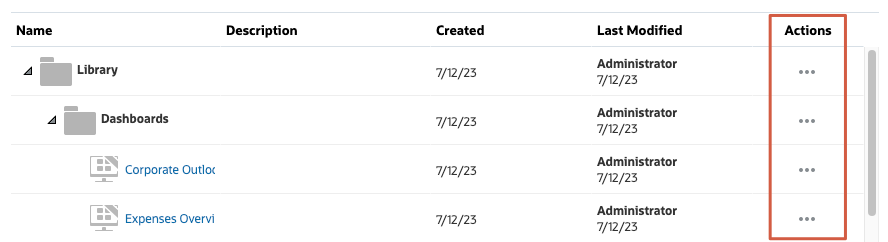
- For the artifact you want to apply permissions to, click
 (Actions) then select Assign Permission.
 - In Assign Permission, click +(Add User/Group).
- In Add User/Group, click Users or Groups.
- Select from the list of available users and groups then click >.
- To edit the type of permissions, select user or group then select an option:
- Dashboards, Infolets, Forms:
- Click Read to allow the selected users and groups to view the artifact or folder in the listing, but not allow them to create, edit, or delete the artifact or folder information.
- Click Write to allow the selected users and groups to view the artifact or folder in the listing, and to create, edit, or delete the artifact or folder information.
- Click None if you don't want the selected users or groups to view the artifact or folder in the listing.
- To remove permissions, for the selected user or group, click
 (Delete).
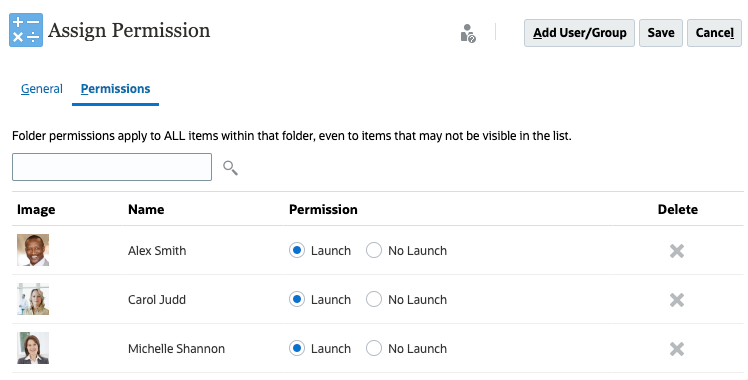
- Rules:
- Click Launch to allow the selected users and groups to launch the selected rules.
- Click No Launch to prevent the selected users and groups from launching the selected rules.
- To remove permissions, for the selected user or group, click (Delete).
- Dashboards, Infolets, Forms:
- Click Add.
- Click Save.
Related Links
- Oracle EPM Tutorials YouTube Channel
- Documentation: Getting Started with Oracle Enterprise Performance Management Cloud for Administrators, Managing EPM Cloud Users and Roles
- Documentation: Administering Access Control for Oracle Enterprise Performance Management Cloud
- Documentation: Administering Planning
More Learning Resources
Explore other labs on docs.oracle.com/learn or access more free learning content on the Oracle Learning YouTube channel. Additionally, visit Oracle University to view training resources available.
For product documentation, visit Oracle Help Center.
Setting Up Security in Cloud EPM
F83533-03
September 2025