Uploading and Working with Page Attributes and Slide Masters
Note:
When connected to an Oracle Fusion Cloud Enterprise Performance Management OCI (Gen 2) environment where virus scanning is enabled, if a virus is detected in a doclet of any type that you are attempting to upload, then the doclet is not uploaded.Doclets in Word-based Report Packages
This topic applies to Word doclets in a Word-based report package.
For Microsoft Word-based report packages, you are asked to specify style sample attributes to override during the doclet upload process.
When a Word-based report package is created in Narrative Reporting, a style sample document is uploaded. It contains the page attributes that the report package owner wants in the final report. These attributes include the page header and footer, orientation and size, margins, numbering, and alignment.
When you upload a doclet, the system checks the doclet against the style sample document to compare the attributes. An alert is displayed next to the attributes that differ from the style sample.
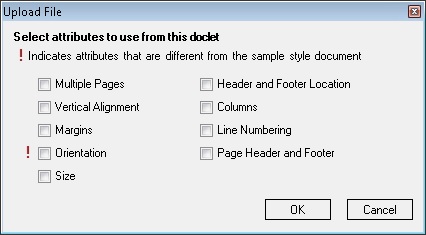
Figure 24-16 Upload File Dialog Box

By default, the system overrides the doclet attributes with the style sample attributes when the doclet is uploaded. For example, if the style sample orientation is portrait mode and the doclet is in landscape mode, then the doclet’s orientation will be changed to portrait mode to match the style sample.
Figure 24-16 shows the Upload File dialog box with an alert next to the Orientation attribute. To keep the doclet in landscape mode, overriding the style sample, you would select the Orientation check box. When you select an attribute, the system uses the attribute from the doclet rather than the attribute from the style sample.
To upload a Word doclet, and review and select style attributes to override:
-
If the doclet is not already open, in the Smart View Panel, navigate to the doclet and double-click the doclet name.
To upload changes, you must have the doclet checked out.
-
In the Narrative Reporting ribbon, click Upload.

The Upload File dialog is displayed (see Figure 24-16).
Style attributes in the doclet that differ from the style sample for the report package are noted with an exclamation point.
Note:
To view the Upload File dialog, where you can review any style sample attribute alerts and choose attributes to override, you must click the Upload button. Do not select the Upload and Check In action on the Check In button. -
In the Upload File dialog box (see Figure 24-16), select the check box next to the style attributes that you want to override, and then click OK.
Style attributes in the doclet that differ from the style sample for the report package are noted with an exclamation point.
You can select only those attributes noted with an exclamation point.
-
Proceed to Checking In Doclets.
Alternatively, you can continue working on the checked-out doclet and repeat the upload procedure in this topic as many times as you require, and then proceed to Checking In Doclets.
Doclets in PowerPoint-based Report Packages
This topic applies to PowerPoint doclets in a PowerPoint-based a report package.
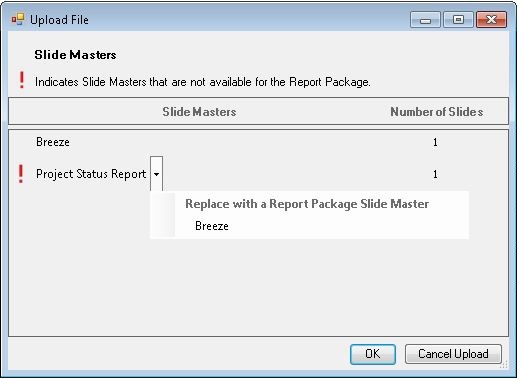
For Microsoft PowerPoint-based report packages, when a report package is created, a style sample is uploaded that contains the slide masters and slide layouts that the report package owner wants in the final report. These slide masters determine the overall look and format of the presentation. When you upload a doclet, the system scans the doclet and highlights the slide masters in use. An alert icon indicates slide masters that are not in the style sample document.
Note:
The doclet slides must be sized the same as the report package style sample slides in order to upload the doclet. For example, if your doclet slides are sized for On-Screen Show (4:3) and the report package style sample slides are sized for On-Screen Show (16:9), you must resize your doclet slides before you can upload the doclet.To upload a PowerPoint doclet and select a slide master:
-
If the doclet is not already open and checked out, in the Smart View Panel, navigate to the doclet, double-click the doclet name to open it.
To upload changes, you must have the doclet checked out.
-
In the Narrative Reporting ribbon, click Upload.

The Upload File dialog is displayed.
Note:
To view the Upload File dialog, where you can review any style sample slide master alerts and choose attributes to override, you must click the Upload button. Do not select the Upload and Check In action on the Check In button. -
If the doclet uses the same slide master as the style sample document, click OK in the Upload File dialog box, then proceed to step 5; otherwise, proceed to step 4.
-
If the doclet contains a slide master that is not in the style sample document, perform one of the following actions:
-
To replace the doclet slide master with the report package slide master, click the name of the doclet slide master, and then select the report package slide master to replace it with.

The system maps the doclet slide layouts to the report package slide master to maintain a uniform look for the presentation.
-
To preserve the doclet slide master, click OK to upload the doclet.
If you preserve the doclet slide master, the system adds it to the merged presentation to ensure that the slides will render correctly. However, that slide master is available for use by the current doclet only. The doclet slide master is not available to other doclets. If you want the doclet slide master to be used by other doclets, the report package owner must add it to the report package style sample document.
-
-
Proceed to Checking In Doclets.
Alternatively, you can continue working on the checked-out doclet and repeat the upload procedure in this topic as many times as you require, and then proceed to Checking In Doclets.
Note:
When you upload a doclet to the report package, the system resets all slides to their default layouts. If you have modified any slides from the default slide master layout, those modifications are reset back to the default. For example, if you have changed the size of a text box on a slide to make room for an image, the text box is reset to its original size when you upload the doclet. However, you can add additional layouts to the doclet slide master, and those new layouts are persisted within the doclet. Therefore, if you want to preserve the modified text box size, you must add that layout to the doclet slide master.
As an example, you are working with a doclet with a slide layout called Title and Content that contains a text box that spans the entire slide. You want to resize the text box to cover half of the slide so that you can add an accompanying image. If you were to resize the text box, add the image, and upload the doclet, the system would reset the slide back to the Title and Content default layout, and the text would overlap the image. Instead, add a new slide layout (called, for example, Title, Text, and Image) with the resized text box. When you upload the doclet, the new slide master is copied over and persisted for that doclet.
Office-based Supplemental Doclets in Report Packages
This topic applies to Office-based supplemental doclets.
You upload Office-based supplemental doclets for checking in. However, in the upload process, you do not have to overwrite styles or slide masters. You simply upload.
Other supplemental doclet file types, such as ZIPs or PDFs, are not checked out in Oracle Smart View for Office; they are only opened or downloaded. Therefore, they do not need to be uploaded.
To upload an Office-based supplemental doclets:
-
If the doclet is not already open, in the Smart View Panel, navigate to the doclet and double-click the doclet name.
To upload changes, you must have the doclet checked out.
-
In the Narrative Reporting ribbon, click Upload.

Alternatively, to upload and check in the doclet, in the Narrative Reporting ribbon, select Check In, and then Upload and Check In.
Whether you select the Upload command or the Upload and Check In command, the Upload File dialog is displayed.
-
Proceed to Checking In Doclets.
Alternatively, you can continue working on the checked-out supplemental doclet, repeat the upload procedure in this topic as many times as you require, and then proceed to Checking In Doclets.