Specifying Ancestor Position in Ad Hoc Grids
Use the Ancestor Position option to specify the ancestor position for hierarchies as Top or Bottom. The Ancestor Position option is located in the Member Options tab of the Options dialog.
Data source types: Oracle Essbase, Planning Ad Hoc, Planning Modules Ad Hoc, Enterprise Profitability and Cost Management, Financial Consolidation and Close Ad Hoc, FreeForm, Tax Reporting Ad Hoc
Note:
Essbase only: The ancestor position is set in the application by your Essbase administrator. By default, the ancestor position is set to Bottom. To set the ancestor position to Top, an administrator must set the application config setting, SSANCESTORONTOP, to True.
-
Users: See the example grids in Example 8-3 and Example 8-4.
-
Administrators: To set this option, see SSANCESTORONTOP.
Note:
-
Changing the Ancestor Position setting has no effect on the dimension and member layout in an existing grid. You will only see the change when you perform a zoom-in operation.
-
In an existing grid, or in the middle of a series of ad hoc analysis operations, changing Ancestor Position option (from Bottom to Top or from Top to Bottom) can result in non-uniform hierarchy display in the grid.
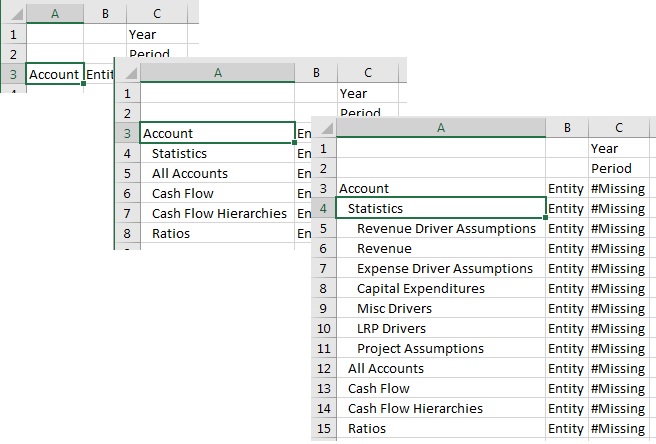
Example 8-3 Zoom in Results Selecting Ancestor Position - Top
In this example, we zoom in on the Account dimension. After zooming in, the Account ancestor is shown at the top of its children members. Next, we zoom in on Statistics. After zooming in, the Statistics ancestor is shown at the top of its children members.
Figure 8-8 Zooming In with Ancestor Position Set to Top

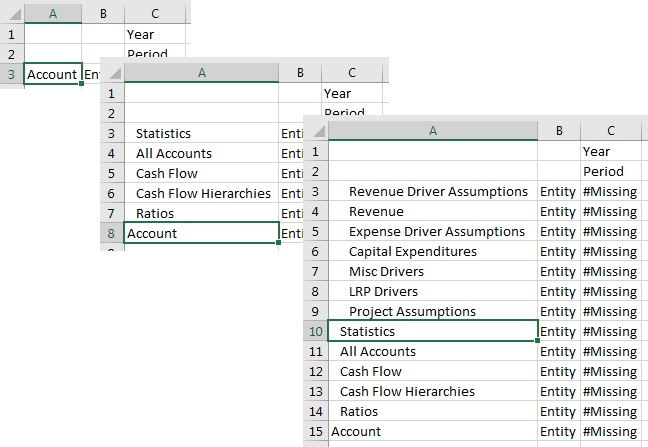
Example 8-4 Zoom in Results Selecting Ancestor Position - Bottom
In this example, we zoom in on the Account dimension. After zooming in, the Account ancestor is shown at the bottom of its children members. Next, we zoom in on Statistics. After zooming in, the Statistics ancestor is shown at the bottom of its children members.
Figure 8-9 Zooming In with Ancestor Position Set to Bottom
