Creating the Report Package Structure
Before you begin creating a report package, considering the design of your report can be helpful:
-
What do you want the report to look like?
-
How does your report break down into doclets?
-
Which development phases does your report package require?
For help with these questions, see Report Package Design Considerations.
You create the report package structure by entering basic details about the report package, such
as the name and description, defining the development phases for the report package,
and assigning user responsibilities. A design wizard guides you through this
process. See also this video![]() Creating the Report Package Structure and Working with PDF-Based Report
Packages.
Creating the Report Package Structure and Working with PDF-Based Report
Packages.
To create the report package structure:
- Choose a method to launch the wizard:
-
From the Welcome Panel on the Home page, click
 , and then select Report Package.
-
From the Library environment, click
 , and then select Report Package.
Note:
You cannot create a report package from the Recent folder in the library.
-
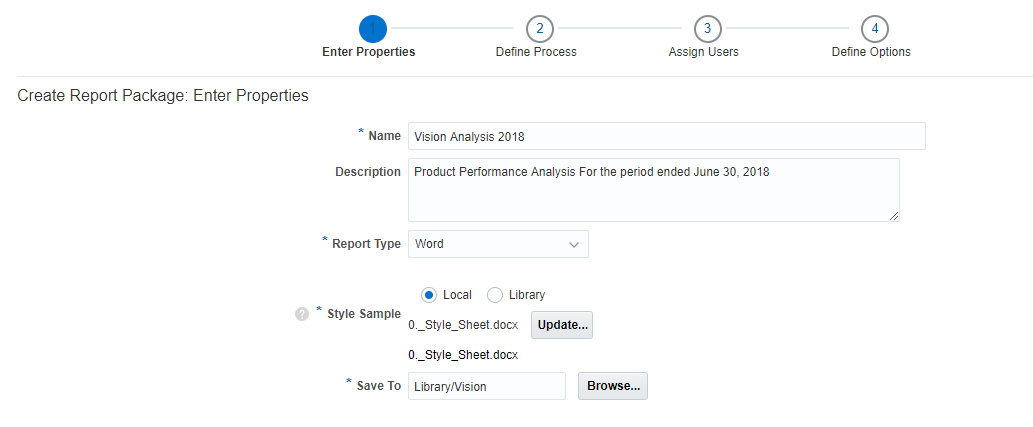
- In Enter Properties, enter a name and description for the report package.
Note:
The name and description cannot contain the following characters: / \ [ ] : ; | ^ ' < > = + & *. The name field cannot exceed 80 characters, and the description cannot exceed 260 characters.
- In Report Type, select Word, PowerPoint, or PDF.
Note:
If you select PDF, the Style Sample field is replaced with a Headers and Footers link.
- Perform an action:.
-
For Word and PowerPoint-based report packages, in the Style Sample field, select a Microsoft Word DOCX file (for Word-based report packages) or a Microsoft PowerPoint PPTX file (for PowerPoint-based report packages) to upload from your local drive that contains the style settings or slide layouts for your report package. See Understand Style Samples.
-
Optional: For PDF-based report packages, click Headers and Footers to set the header and footer information and margin sizes. See Specifying the Header, Footer, and Margins for PDF-based Report Packages.
-
- Select a library location in which to save the report package, and then click Next.
Note:
You must select an existing public folder in the library. You cannot save the report package to a personal folder. To create a folder, in Select Library Folder, click
 , and then Folder.

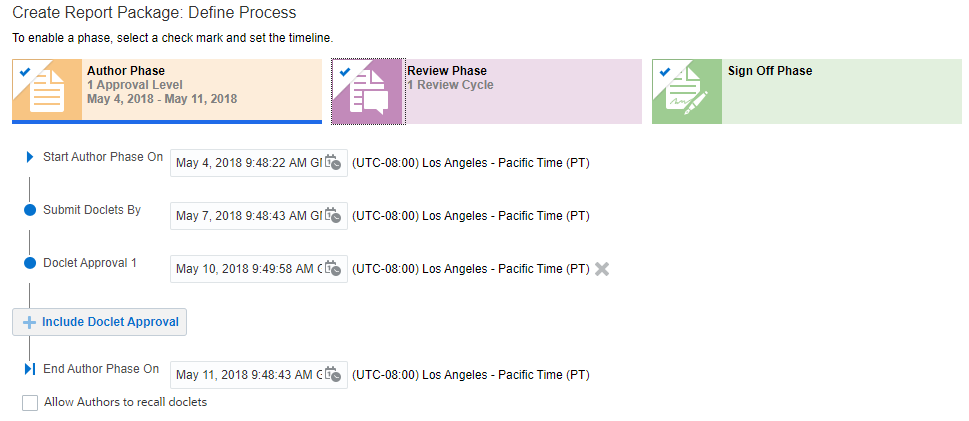
- In Define Process, click the check mark in the corner of each phase that you want to enable:
 , set the timelines for the phases by entering the dates for the phase milestones, such as the start and end dates, and then click Next. You can enter the dates manually, or use the date selector to pick the date from a calendar. None of the phases is mandatory.
You can enable these phases:
-
Author phase— Assign doclets to doclet authors for content development. If your report package requires doclet approval, click
 to add an approval level and set the due date for it. You can add multiple approval levels on this screen, which defines the maximum number of approval levels that a doclet in the report package can have. You can vary the number of approval levels per doclet from zero up to the maximum. That is, if you set three doclet approval levels on this screen, each doclet that you add can have up to three levels of approval enabled.
Allow Authors to recall doclets – If enabled, this option allows authors and approvers to restart the Doclet workflow. By default, Allow Authors to recall doclets option is disabled. See Recall Doclets in Authoring and Approving Doclets for Narrative Reporting.
-
Review phase— The report package is reviewed by a reviewer or group. Reviewers comment on selected report content and participate in threaded discussions about possible modifications to that content. To add additional review cycles, click
 .
.
-
Sign Off phase— The report package is signed off on, typically by a corporate-level executive, before publication. After the report package enters the sign off phase, no additional modifications can be made.

-
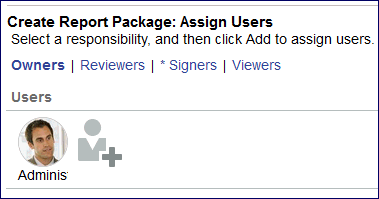
- In Assign Users, assign the following responsibilities to report package users:
-
Owners can modify the report package structure and properties, execute the phase processes, and assign users.
-
Reviewers can review the report package and provide feedback on the content.
-
Signers provide the final sign off for the report package so that it can be published.
Note:
The report package allows a maximum of 50 users to be assigned a Signers within the sign off phase. If the signers user assignment exceeds the limit, the report package cannot be saved. -
Viewers can view the report package but cannot make modifications.
- Select the tab for Owners, Reviewers, Signers, or Viewers, and then click
 to launch the user selector and assign users to that responsibility. As the report package creator, you are automatically assigned the Owner responsibility. If you defined a Sign Off phase on the previous screen, you must assign at least one user to the Signers responsibility. An asterisk indicates the required responsibility.
- From the user selector, select a user or group, and then click OK. You can also search for users or groups.
- To remove a user, select the user portrait, and then click
 .
.
-
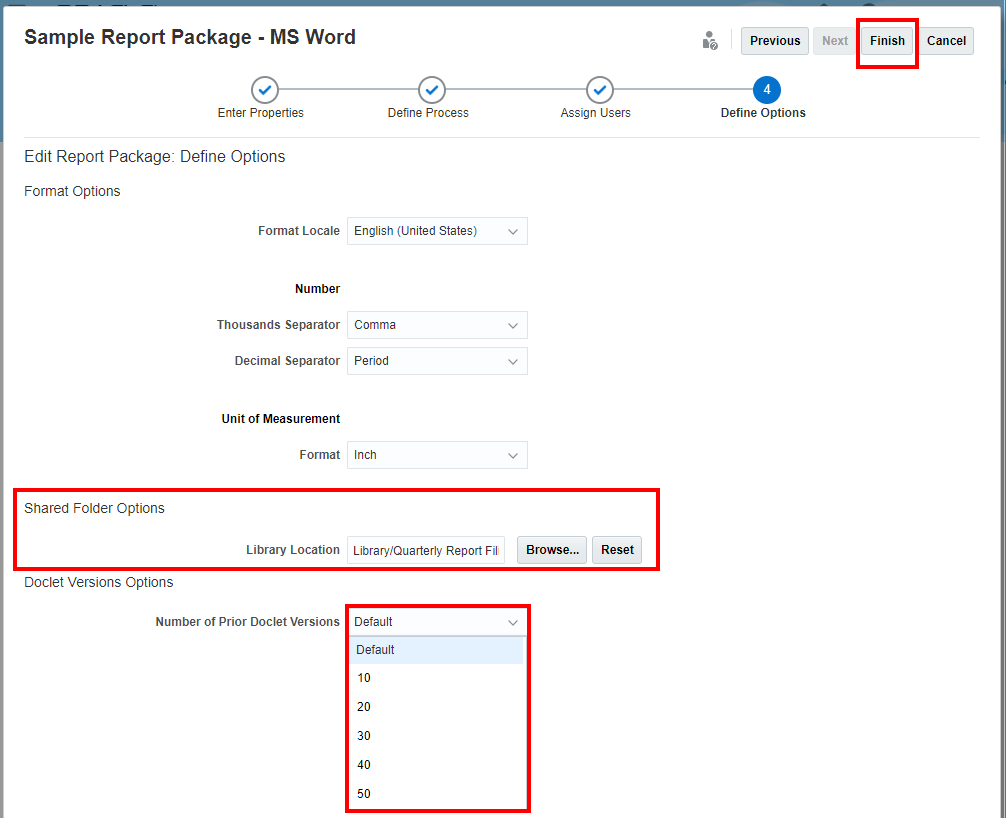
- In Define Options, select the report package settings for the format locale, thousands and decimals separators, the unit of measurement, set the shared folder link, and then select the doclet versions.

The following considerations apply to these settings:
-
These settings apply to the entire report package. They are not set at the doclet level.
-
The system applies these settings to all outputs of the report package and its doclets, including:
-
Preview (both report package and doclet)
-
Review and Sign Off instances
-
Downloading or opening individual doclets
-
Downloading of the report package
-
All publication outputs of the report package
-
-
These settings are applied to all embedded content from both Excel-based and Reports reference doclets, as well as reference variables that are sourced from Excel. However, they do not apply to any manually-entered content or static variables. For example, if you manually enter a number in a doclet with a period as the thousands separator and the report package has a comma as the thousands separator, the system will not convert the separator to a comma when the doclet is merged into the report package.
-
These settings override any other number formatting settings, including the user preference settings in either Narrative Reporting or Microsoft Excel.
For example, if you set the decimal separator to a period on this screen, and then you add a Microsoft Excel reference doclet with a comma as the decimal separator, the resulting decimal separator format for the entire report package (including the reference doclet) is a period.
-
In the Shared Folder Options setting, you can simply change the folder location, rather than manually updating the links in the Doclets to the relevant Reports.
-
In the Doclet Versions Options setting, you can set the number of prior doclet versions. The number of prior doclet version limit determines the maximum number of doclet versions maintained within the service. The System creates a new doclet version whenever the doclet is checked in. When the service reaches the prior versions limit, any additional check-ins of the doclet will continue to create a new version, but the oldest version will automatically be deleted.
-
- Click
 to close the wizard and display the report package in the Report Center. To launch the wizard again, select
  , and then Edit Report Package Properties.
From the Report Center, you can view the report package status, add and organize content by adding doclets and sections, and manage the report package phases. See Manage Report Packages.