Introduction
This 60-minute hands-on tutorial shows you how to use the PCM Agent to request assistance with workflow tasks by executing confirmed modeling commands in Enterprise Profitability and Cost Management (EPCM).
Background
PCM Agent uses a guided natural language tool that uses Generative AI (GenAI) to assist with workflow tasks by executing confirmed modeling commands.
Note:
Objectives
By the end of this tutorial, you should be able to:
- Enable PCM Agent
- Write commands in natural processing language
- Review, refine and run commands
- Create models, rules and rulesets
- Calculate models
- Run trace diagrams
Prerequisites
- Have access to Enterprise Profitability and Cost Management for EPM Enterprise Cloud Service. Some tasks in this tutorial are subject to your user access level.
- Have the sample application installed.
Note:
The examples shown in this tutorial use the Enterprise Profitability and Cost Management sample application, BksML50. Install the sample application in your Enterprise Profitability and Cost Management instance if you want to follow along with the examples, or substitute information from your own application to try generating commands using your own data.Overview of PCM Agent
Enabling Profitability and Cost Management (PCM) Agent
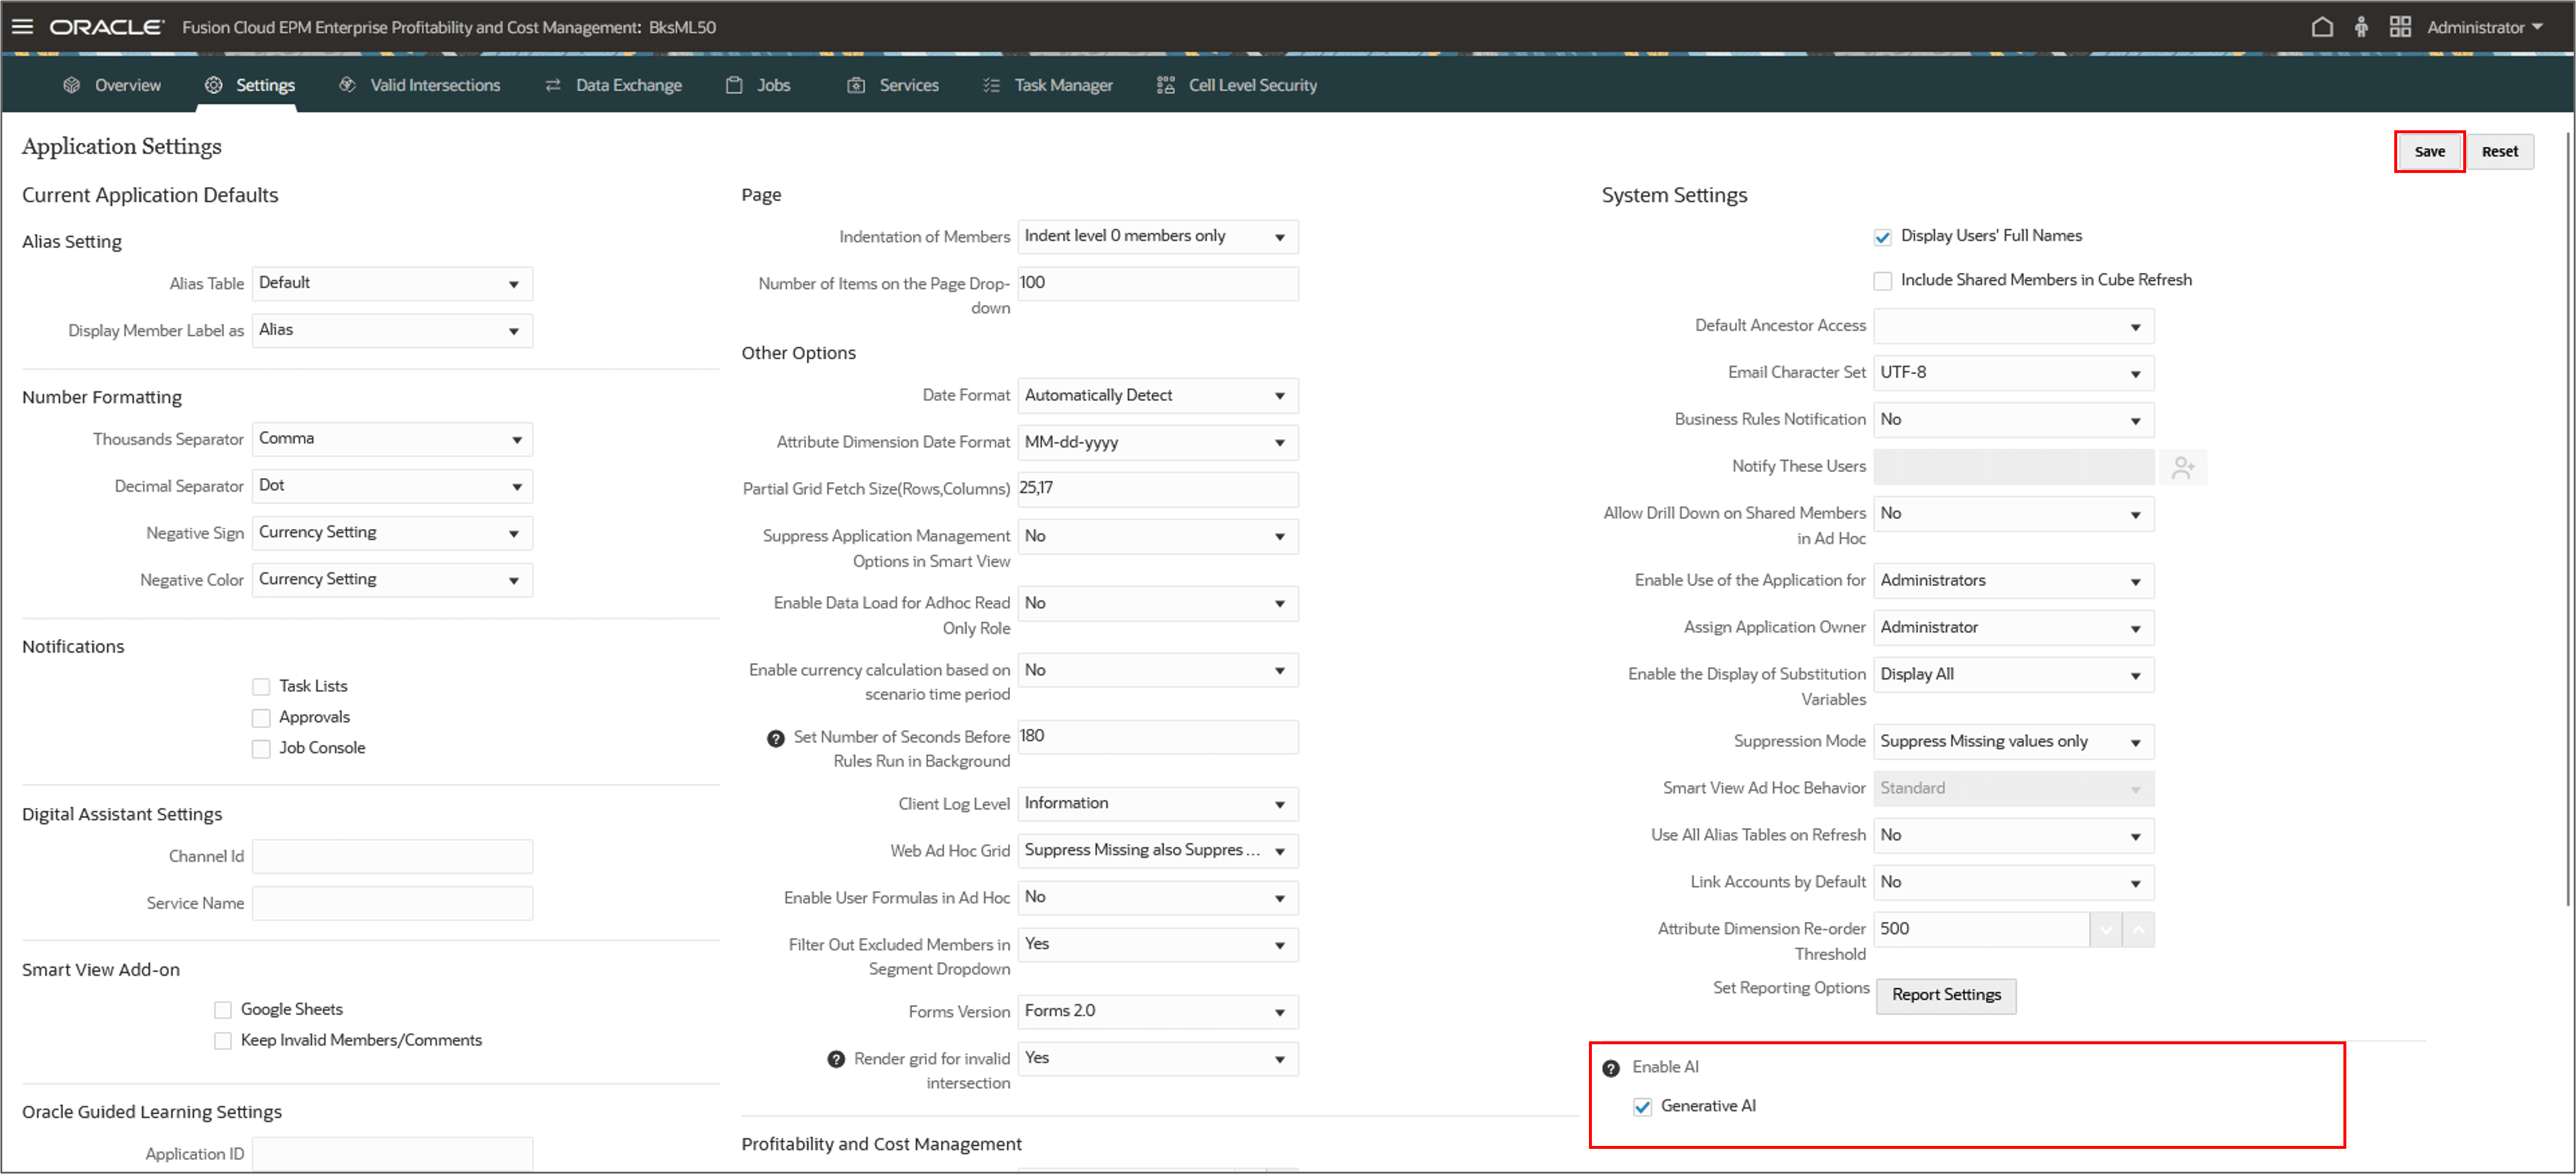
- From the Home page, click Application and then click Settings.
- Under Enable AI, select Generative AI, and click Save.
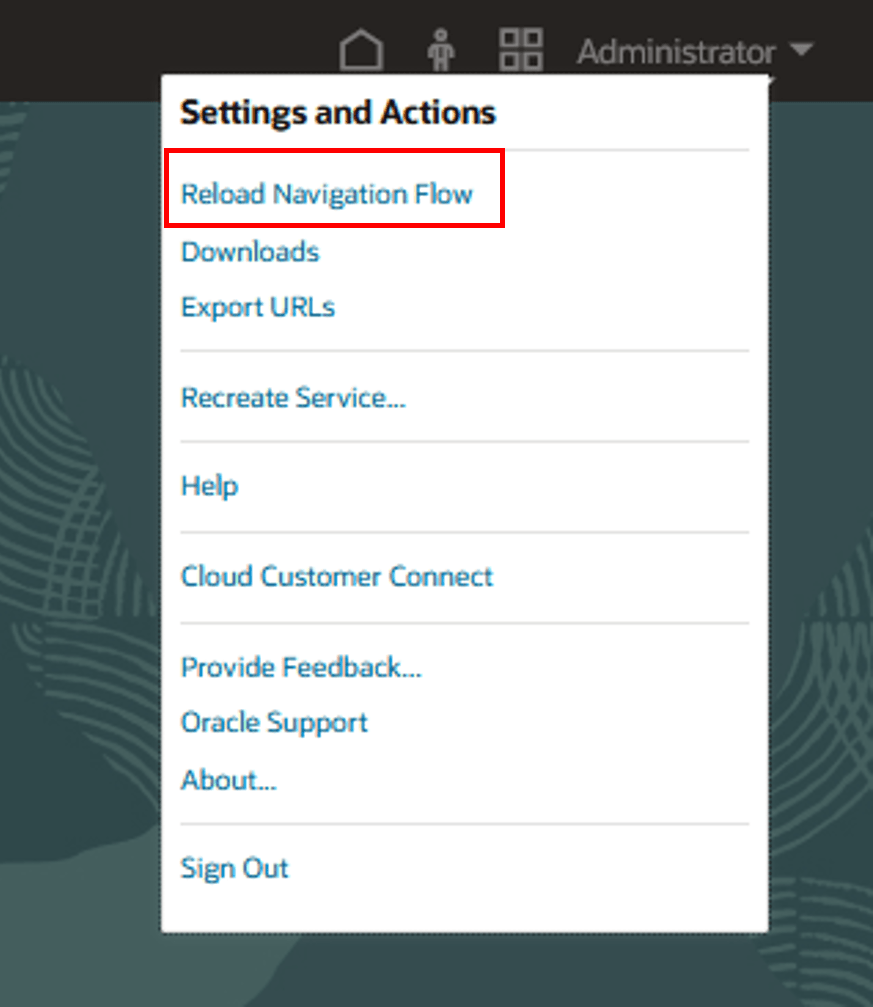
- Click the down arrow next to the user name on the top right. On the Settings and Actions menu, click Reload Navigation Flow.
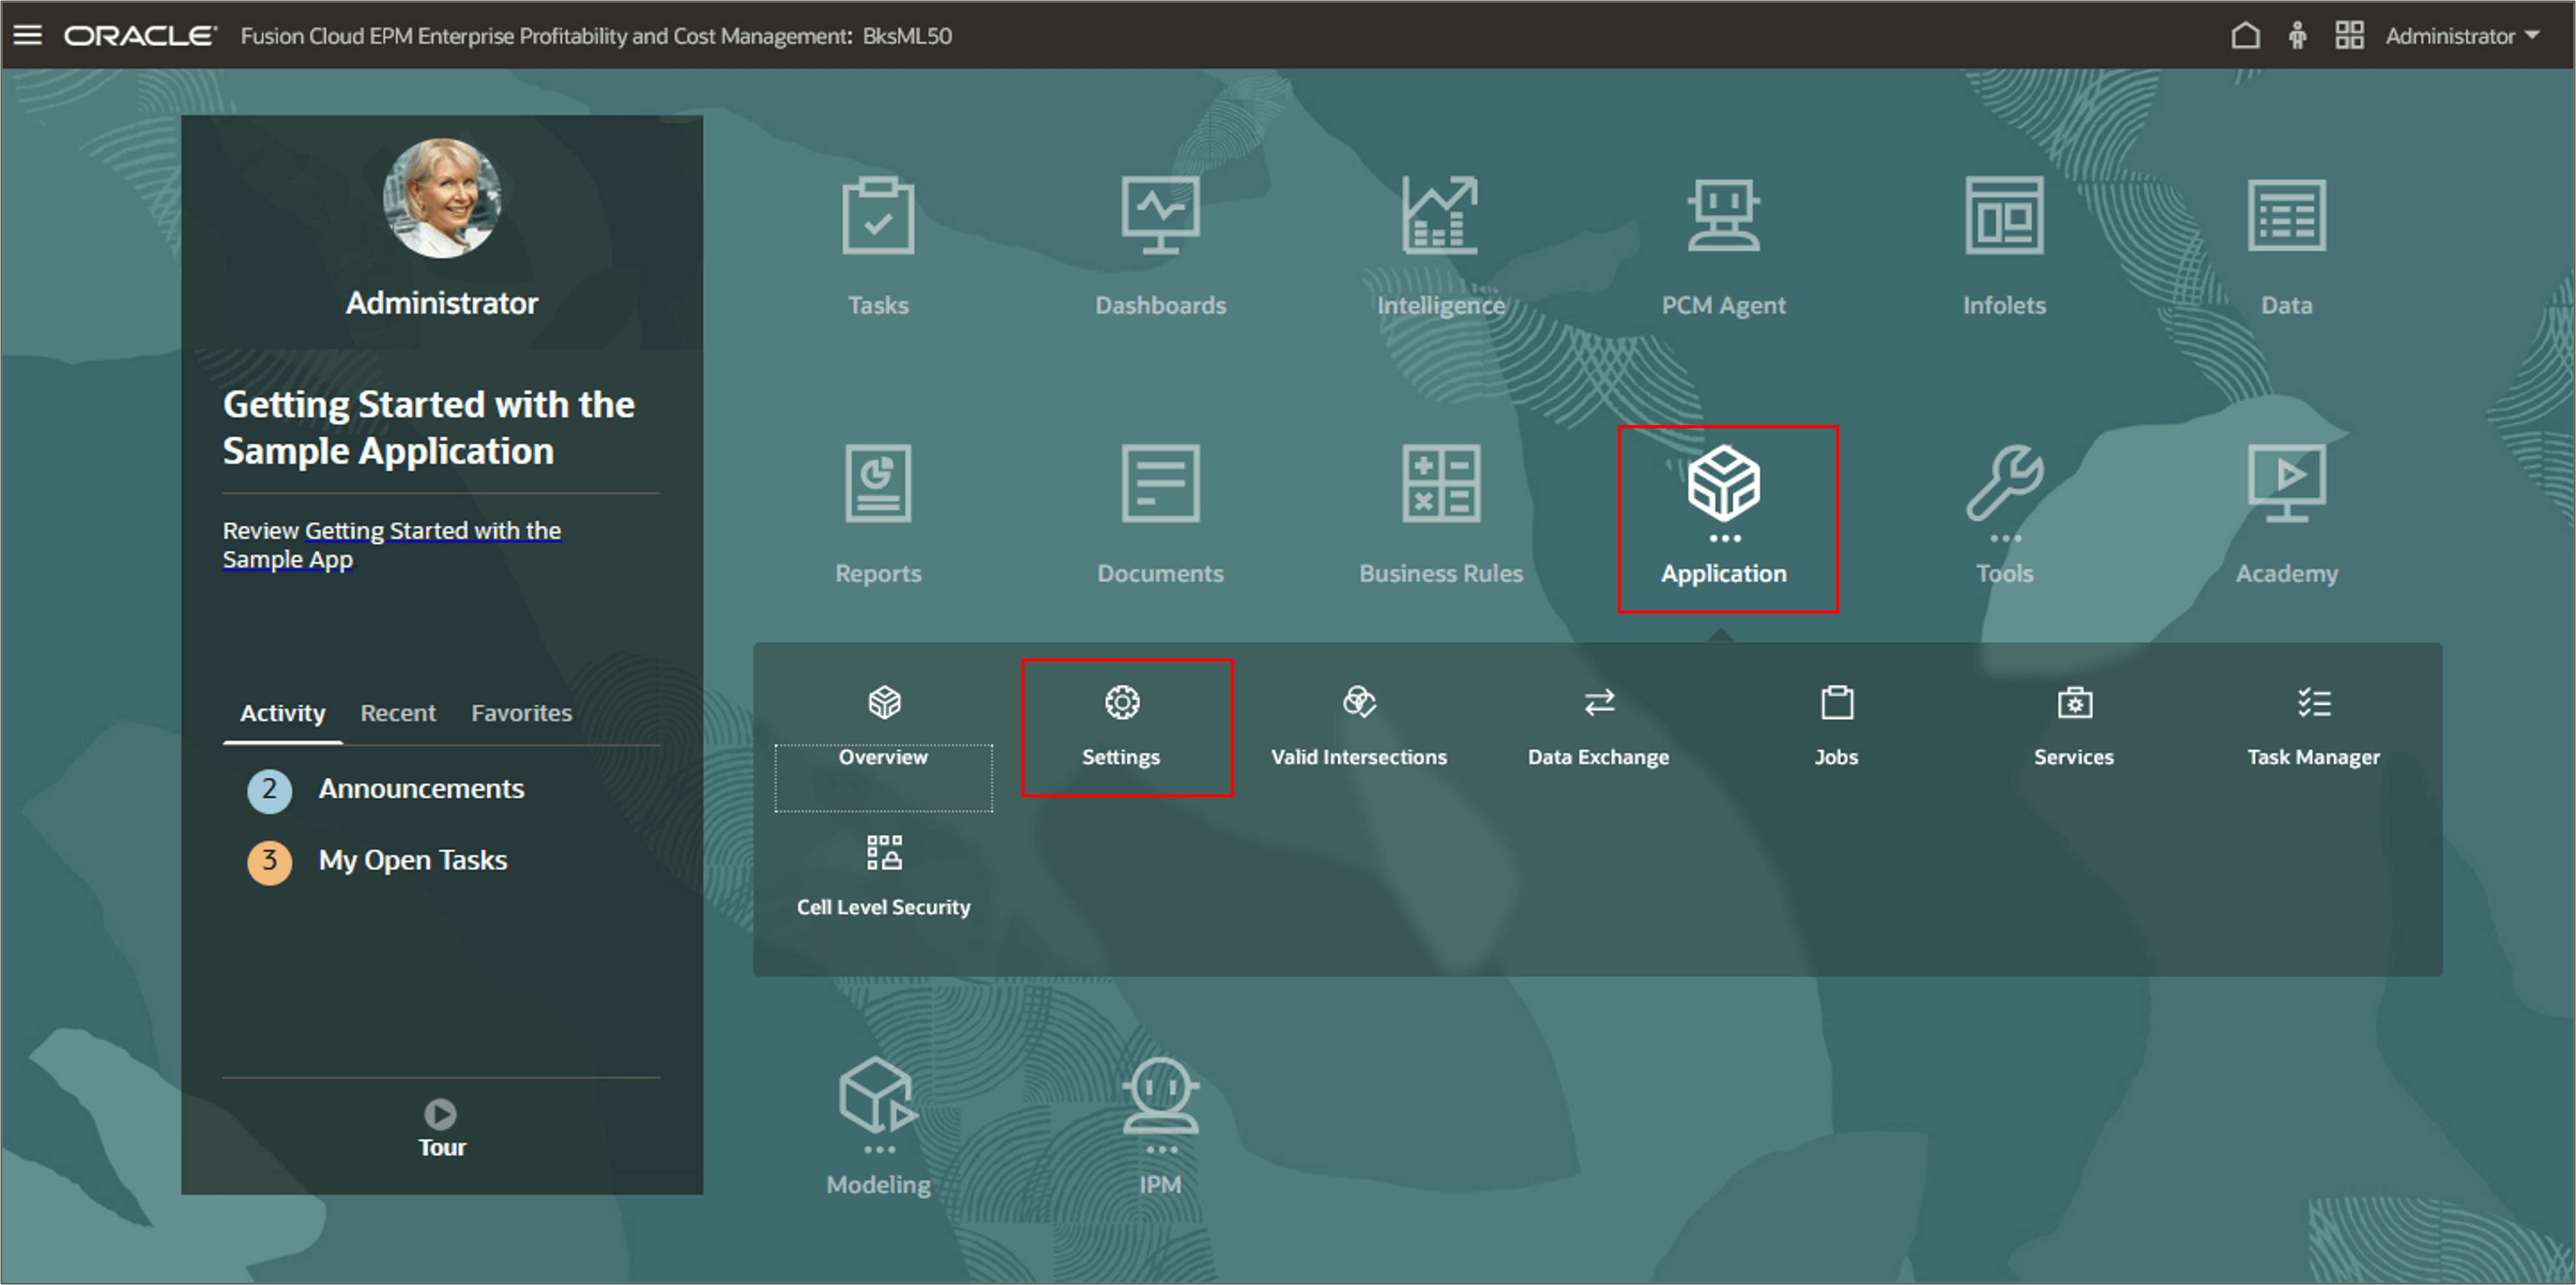
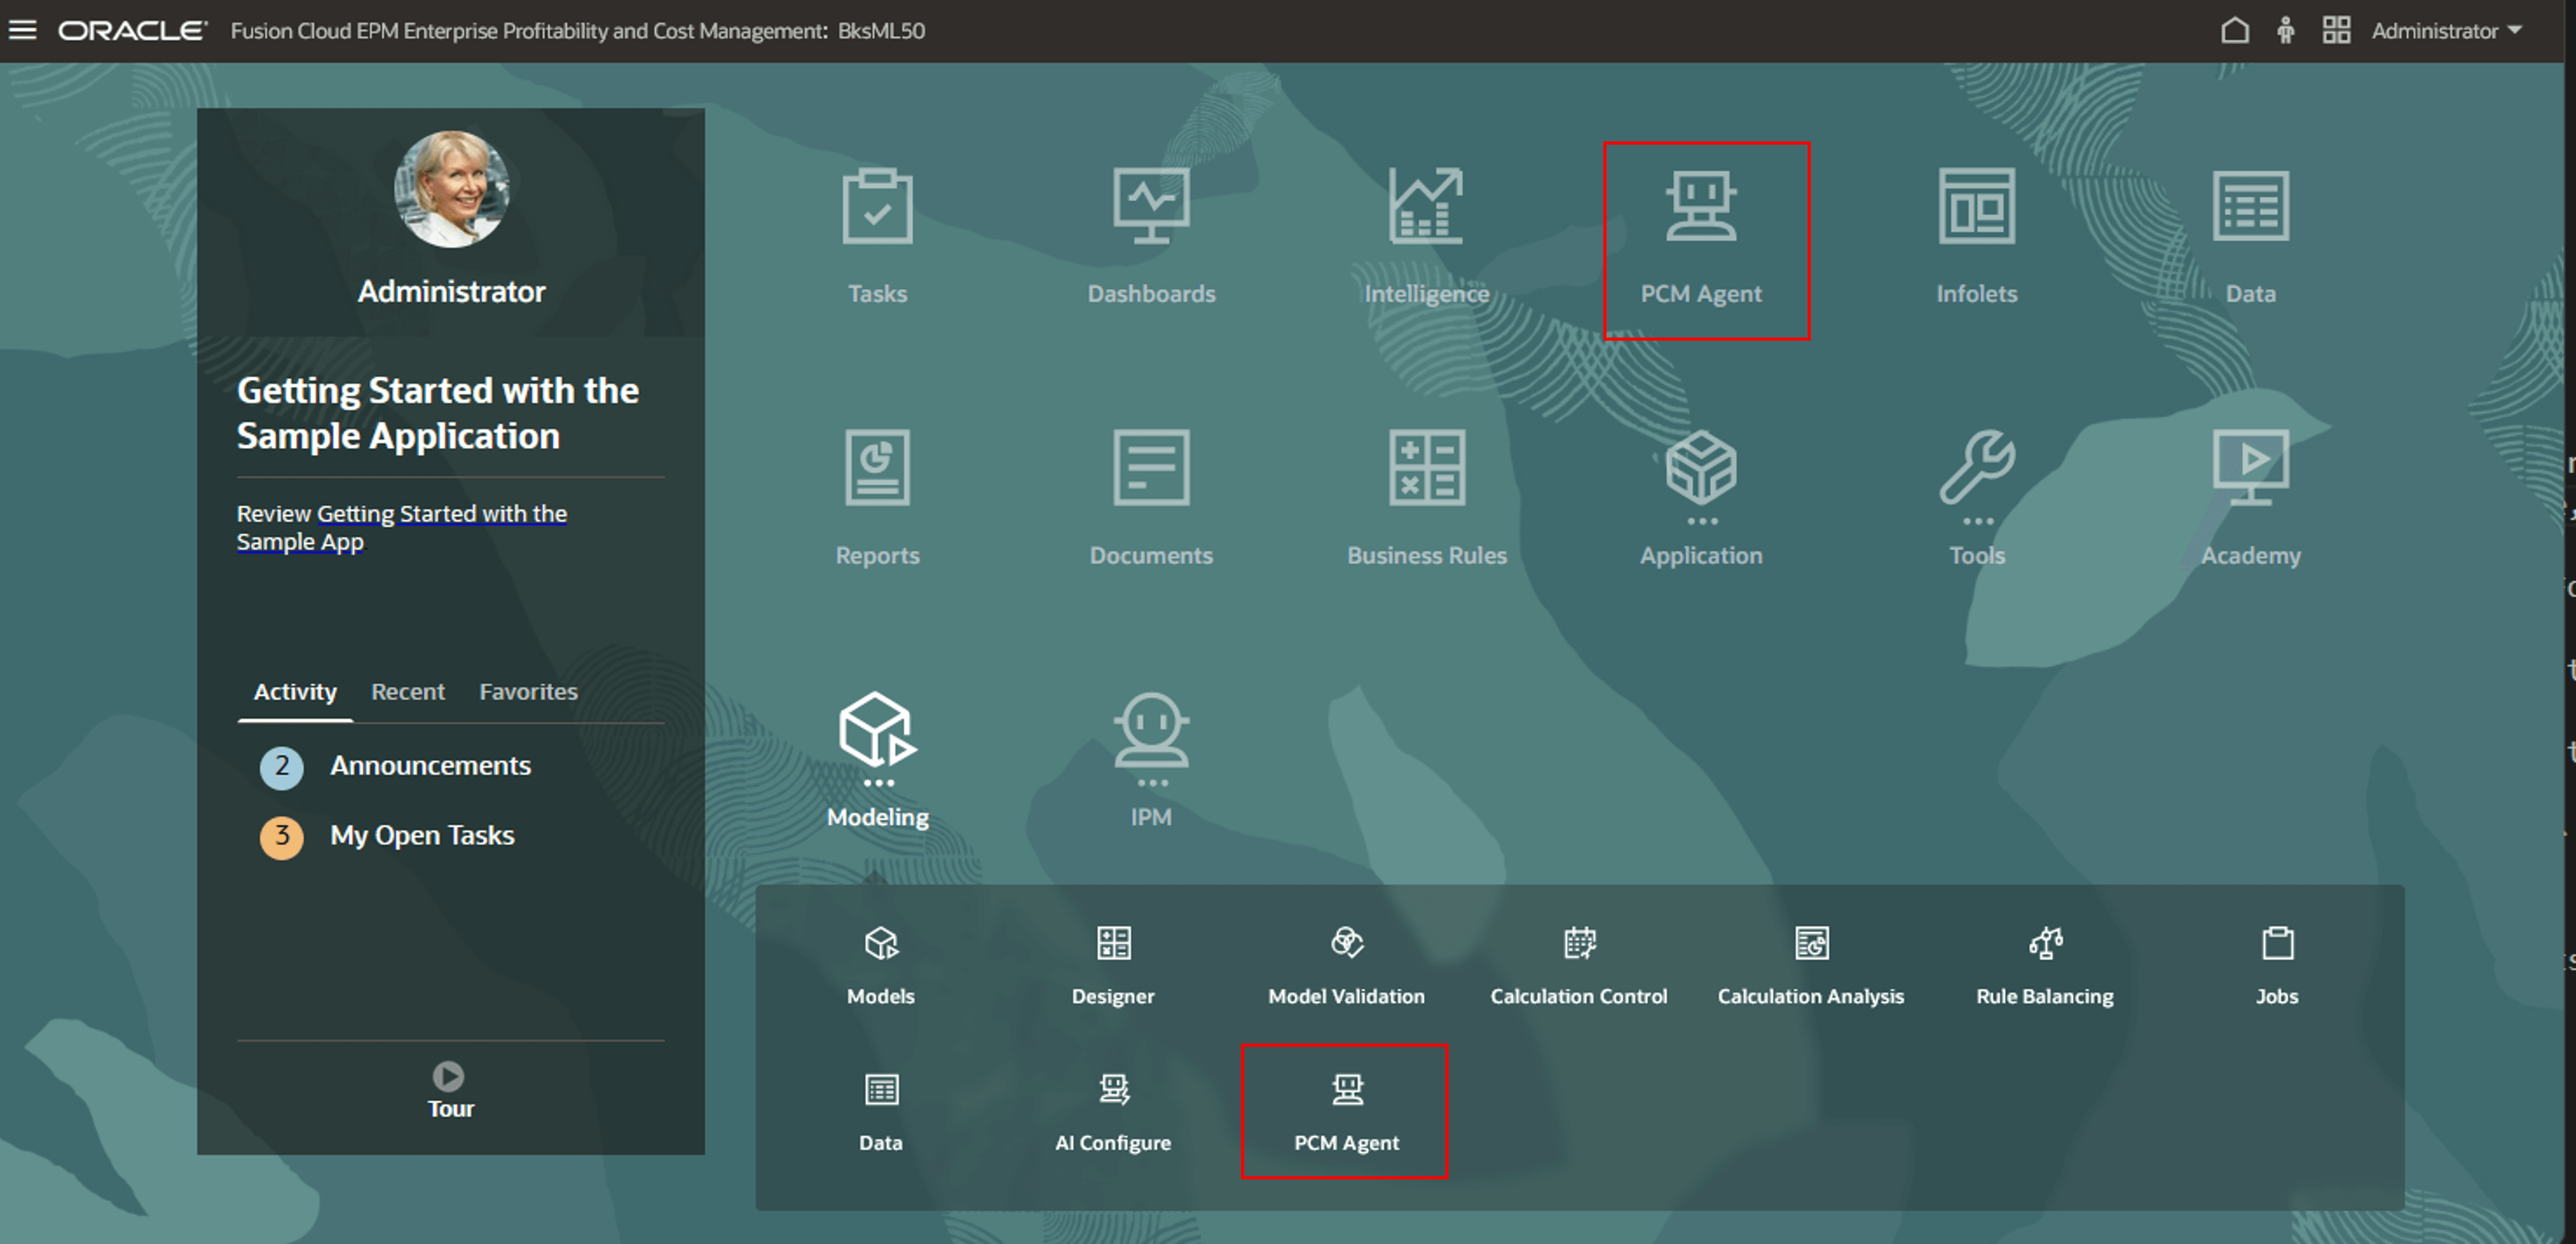
This enables the PCM Agent card on Home page and also in the Modeling cluster on Home page.
Accessing PCM Agent
- From the Home page, click the PCM Agent card, or click Modeling to open the Modeling cluster, and then click the PCM Agent card.
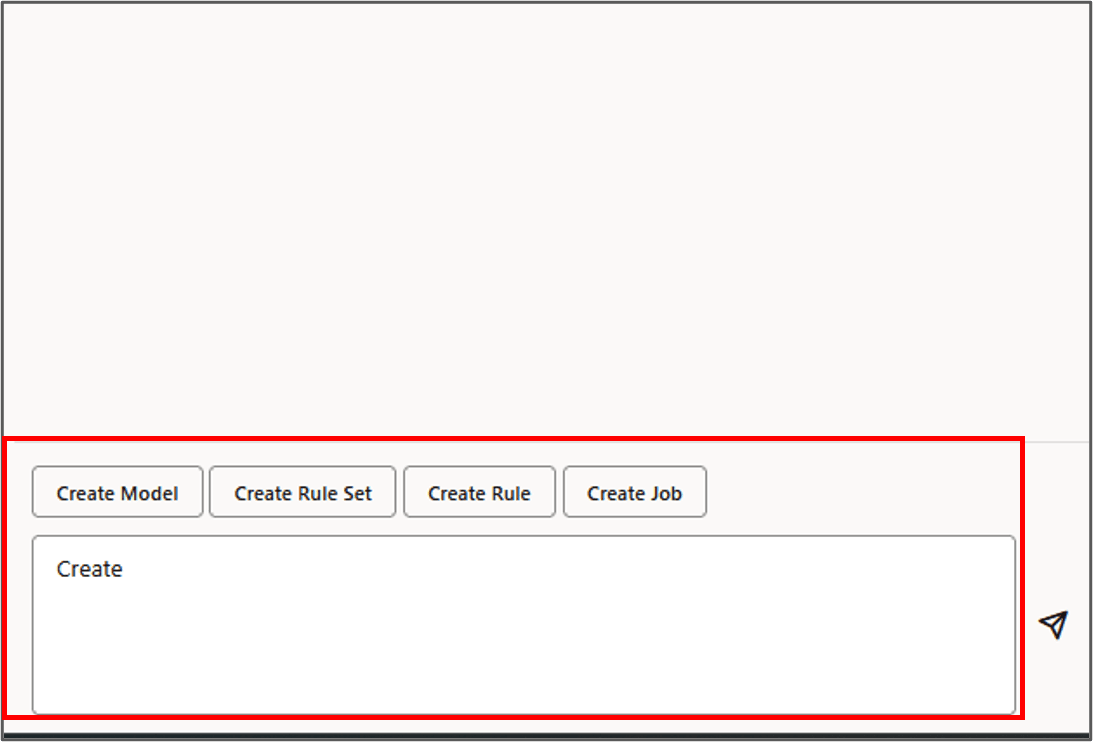
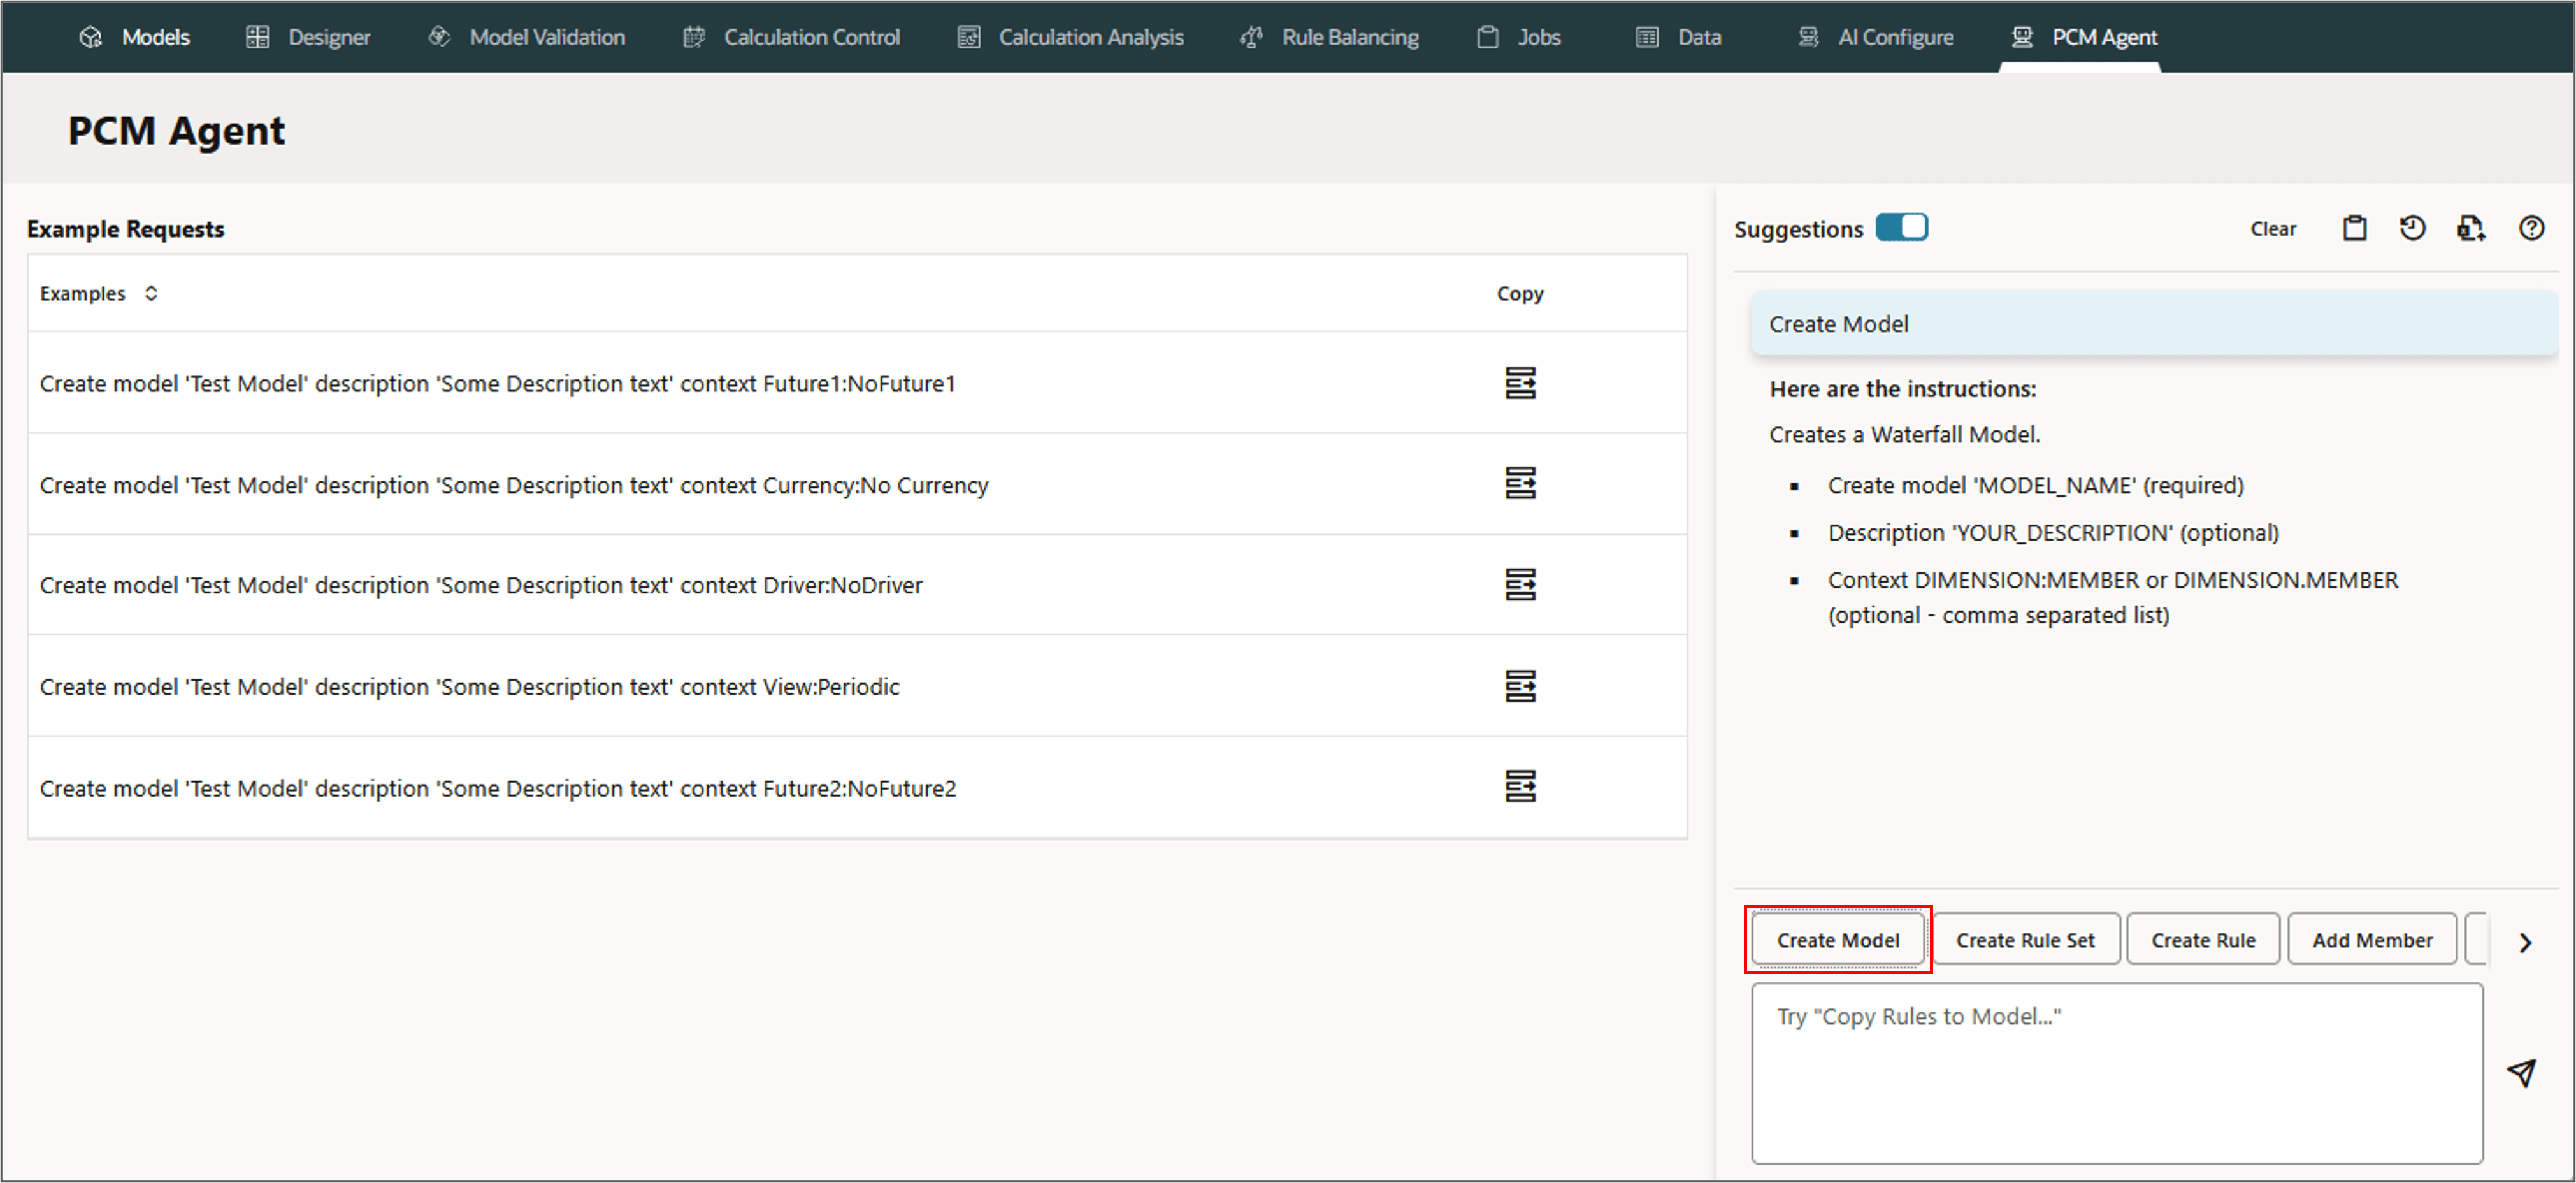
- On the PCM Agent tab, select a supported action from the buttons at the bottom right of the page, or enter your request into the text box.
- Create Model
- Create Rule Set
- Create Rule
- Add Member
- Replace Member
- List Rules, Run Trace
- Calculate Model
- Copy Rules
- Select an action by clicking the button corresponding to the action, or by typing text that describes the action.
- Narrow down the available actions by typing in the first word of the action. For example, if you enter create, only the buttons with Create in the action are displayed:
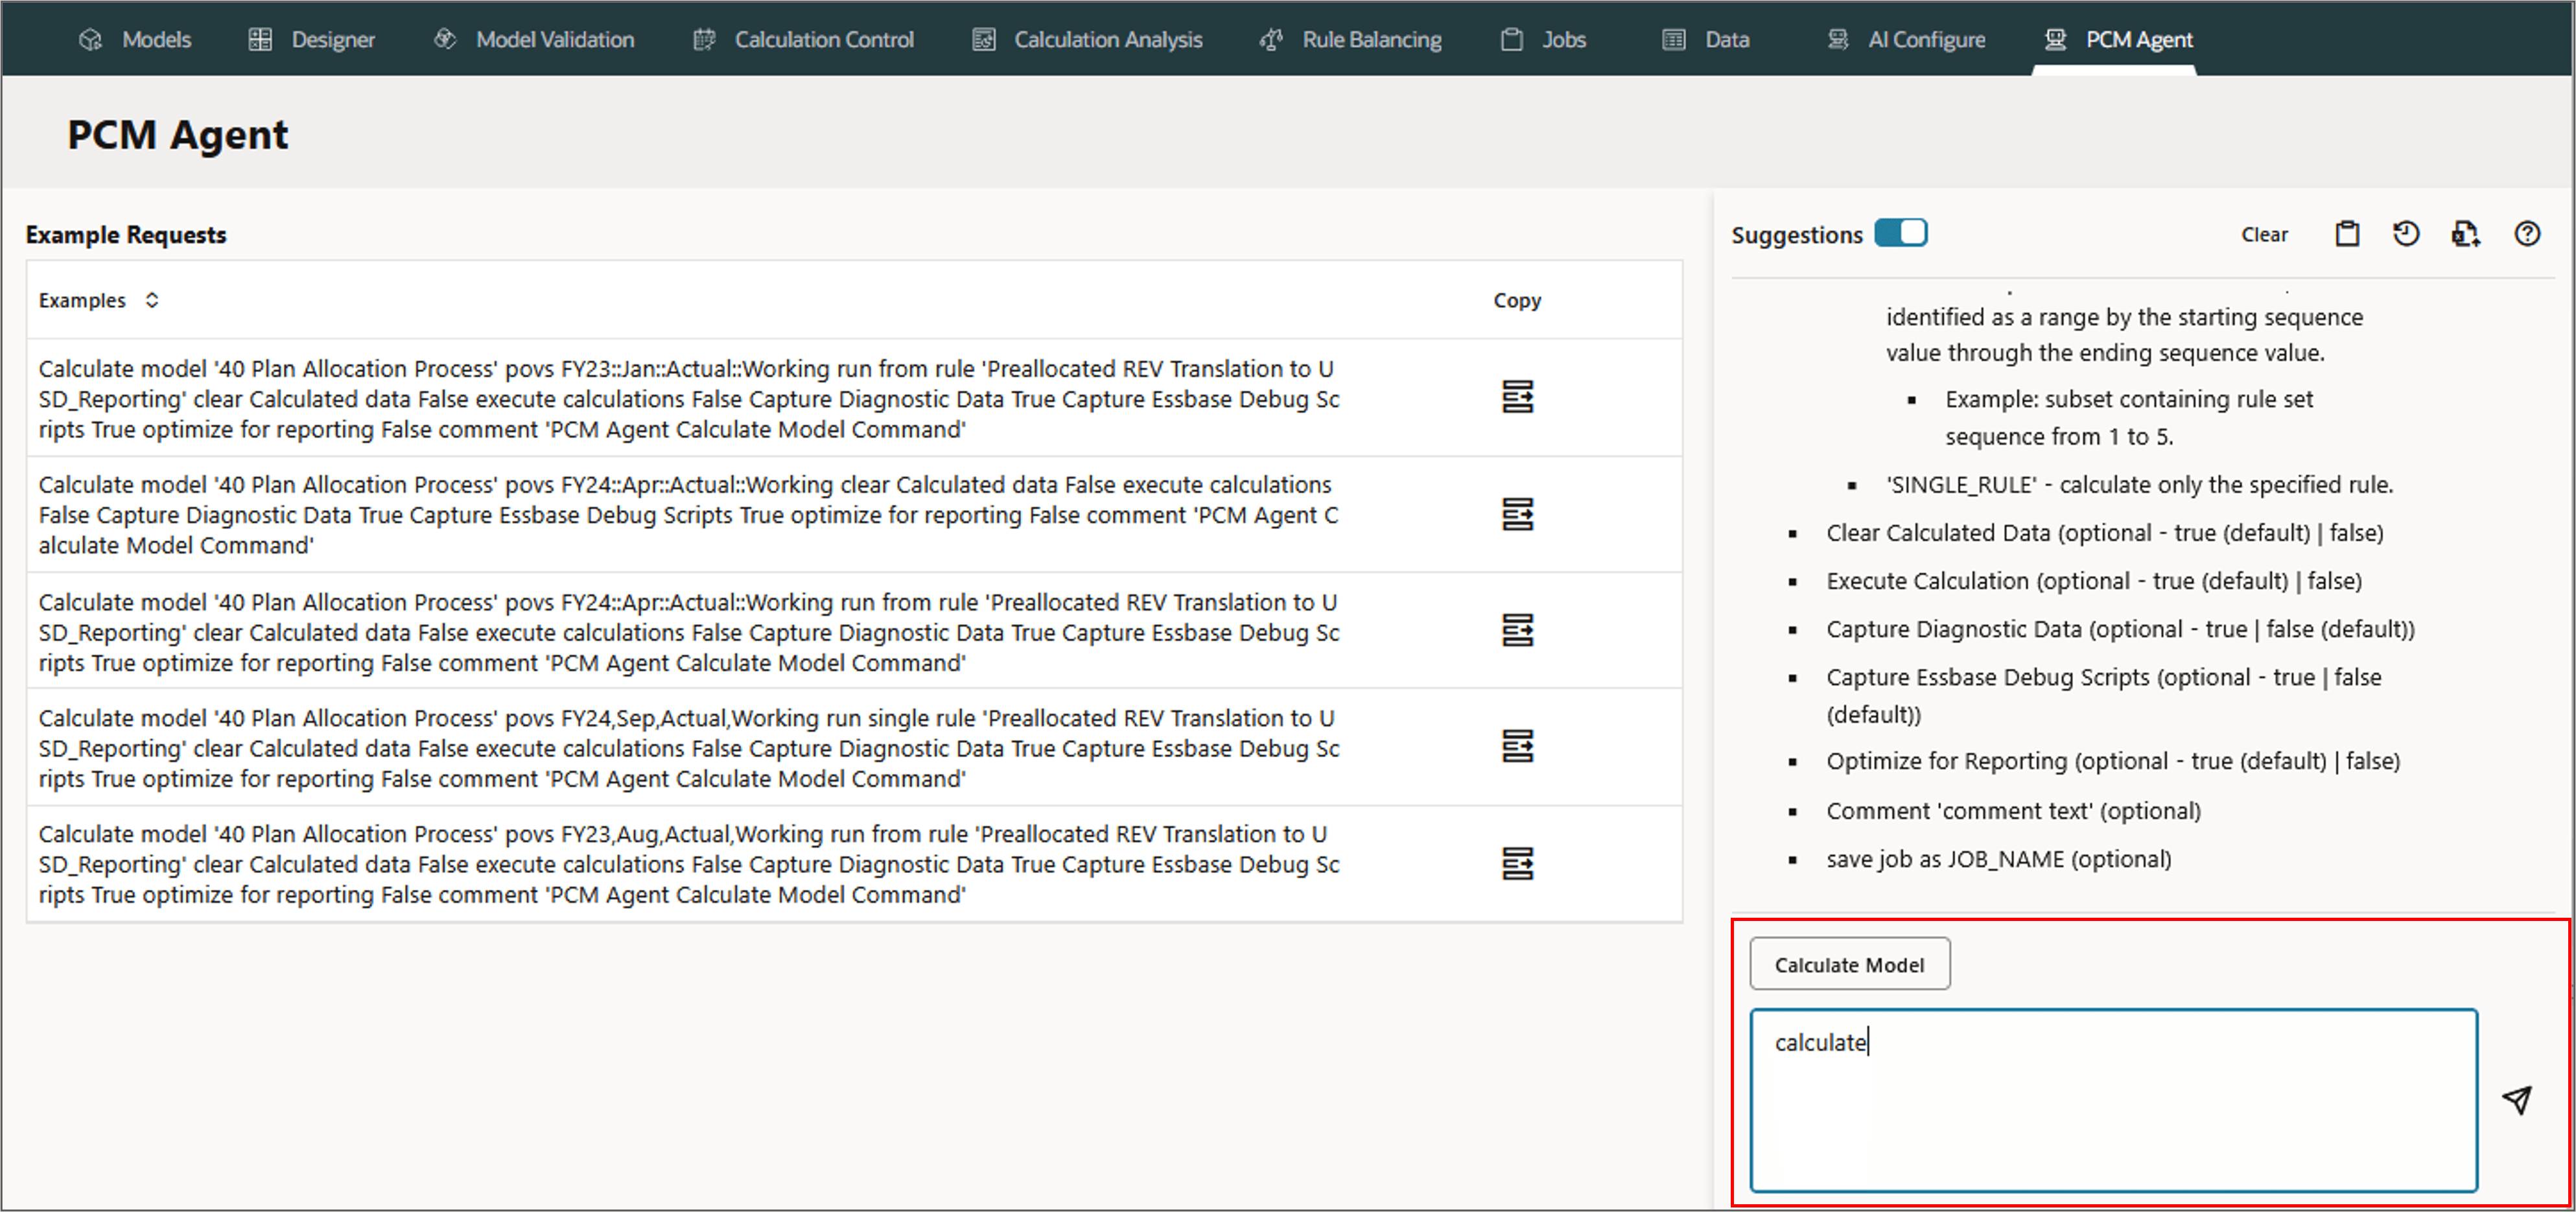
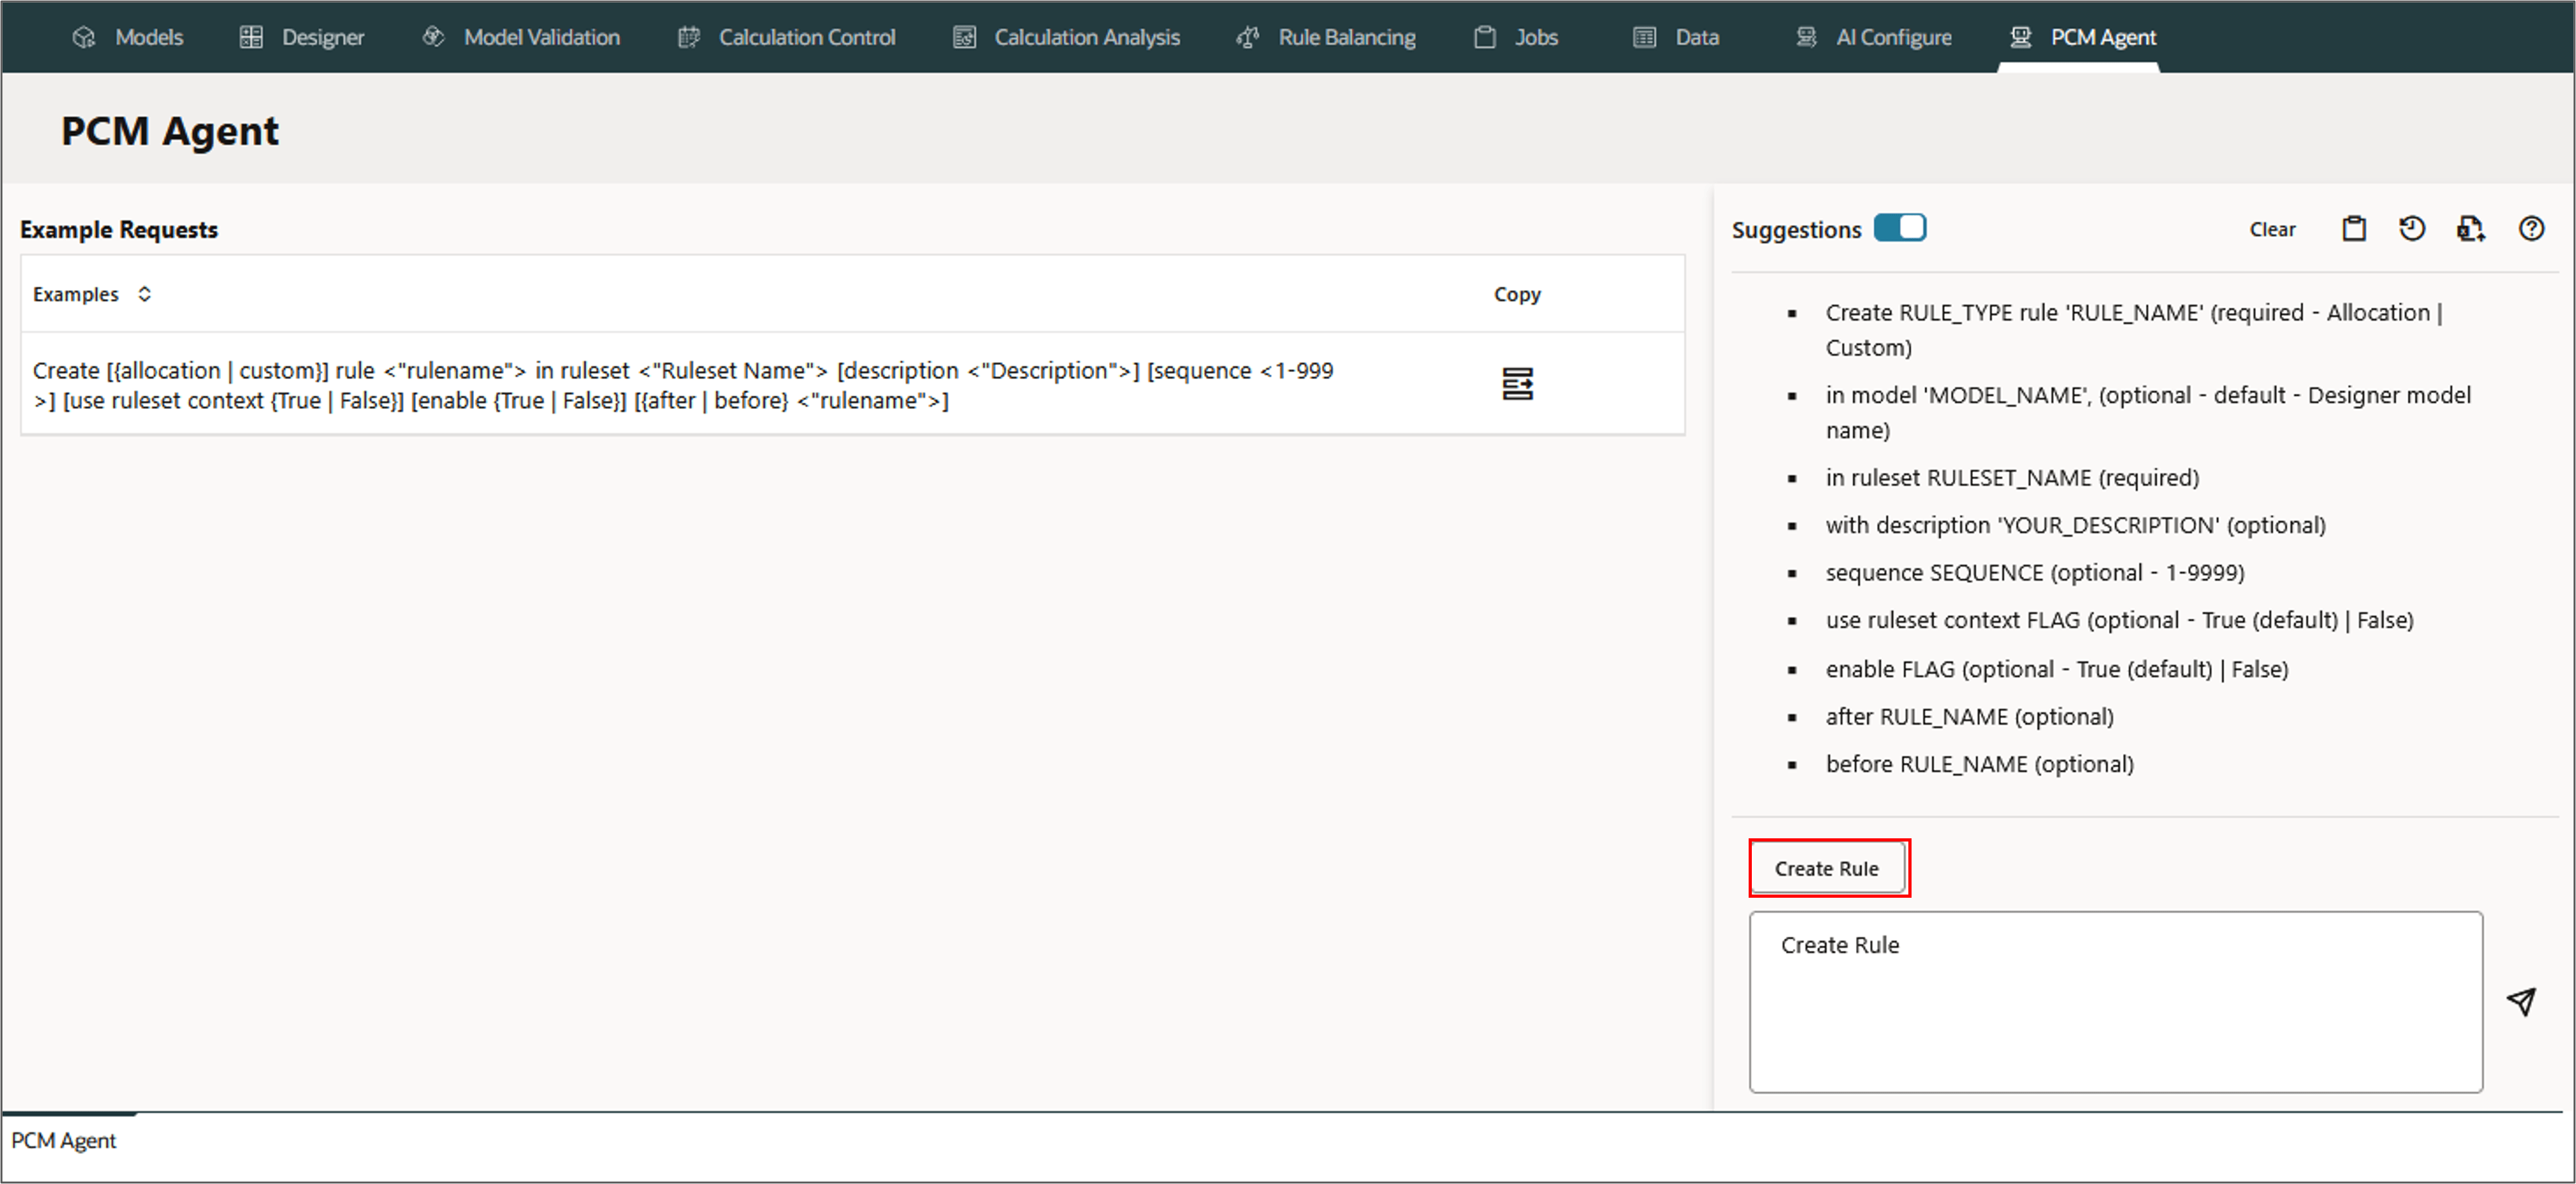
Supported Actions include:
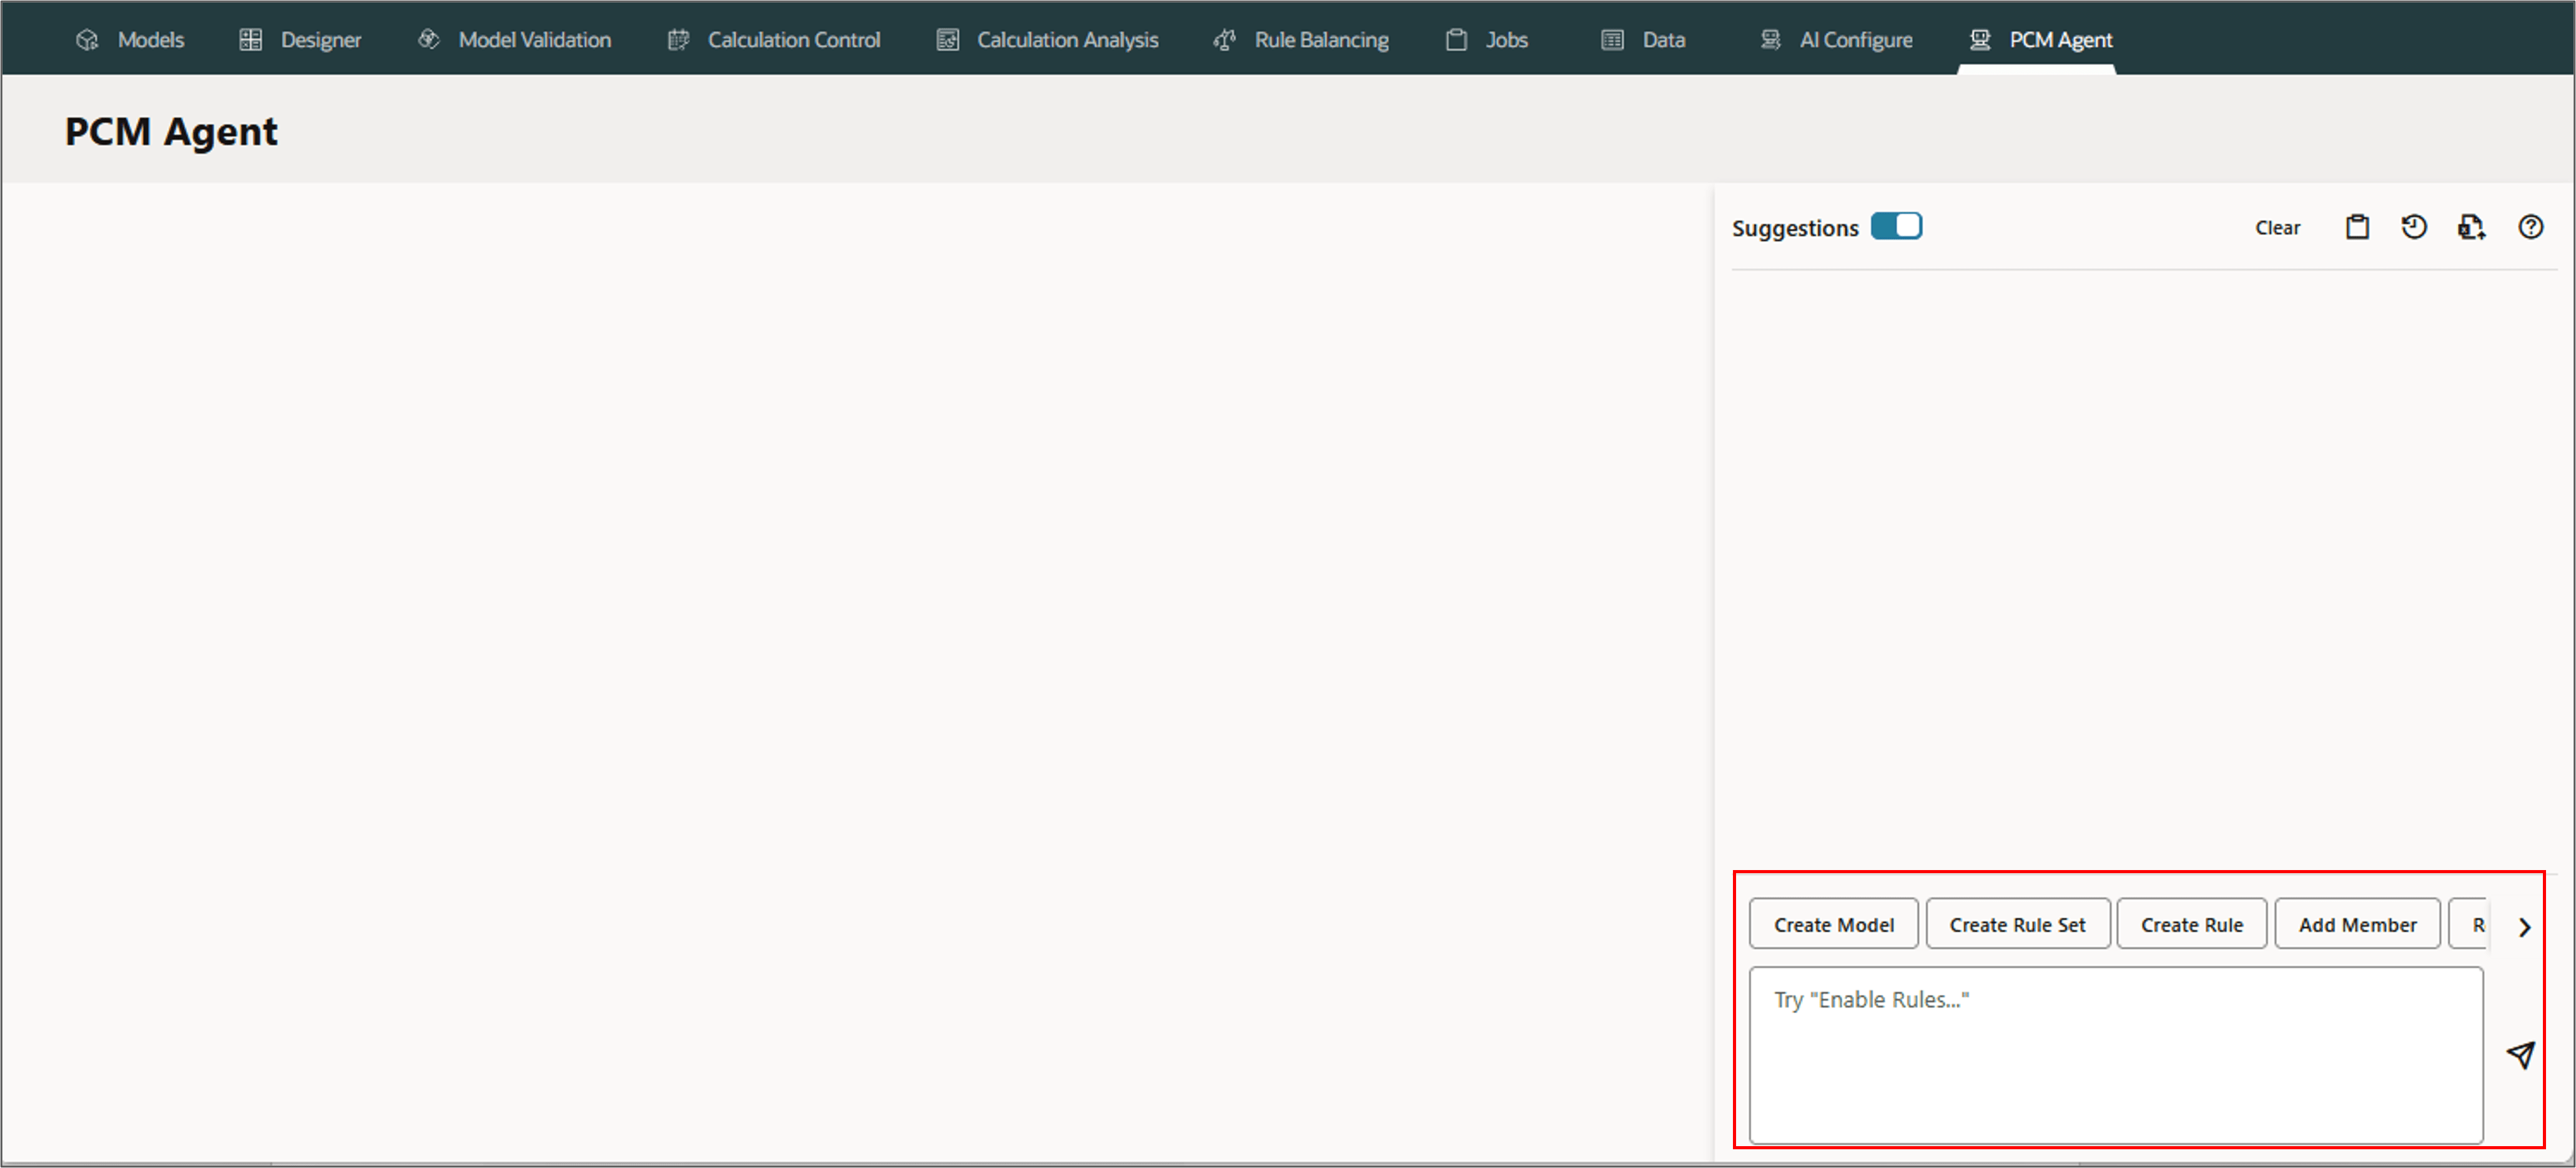
For example, to create a model, click Create Model, or enter Create Model in the text box.
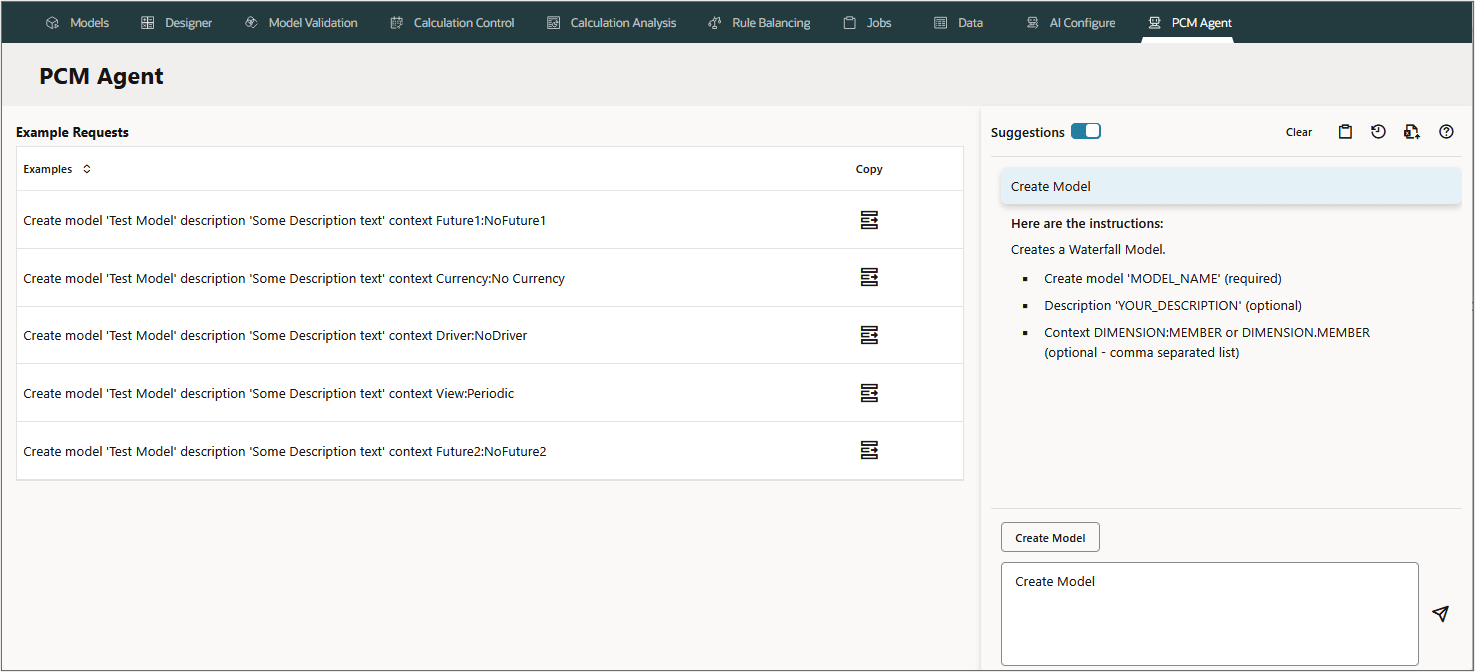
When you enter text or click a button to select an action, the PCM Agent tab displays the following information related to the action:
Example Requests and Suggestions
- Suggestions: By default, the Suggestions function is enabled. This lists the required and optional parameters. Move the slider next to Suggestions to enable or disable the display.
- Example Requests: Examples can be copied into the prompt area using the copy button. Prior requests can be copied into the prompt area so they can be edited and resubmitted.
For example, When performing an action, either enter the request or click ![]() (Copy to Request) next to one of the example requests on the left side of the preview pane to copy the request into the PCM agent.
(Copy to Request) next to one of the example requests on the left side of the preview pane to copy the request into the PCM agent.
Other Supporting actions
- Click Clear to clear the request information under Suggestions.
- Click
 (View Jobs) to display the jobs created for the request.
 - Click
 (Examples) to display additional example requests.
 - Click
 (Export to Excel) to export a prompt history CSV file to Excel, to review all the requests you have created.
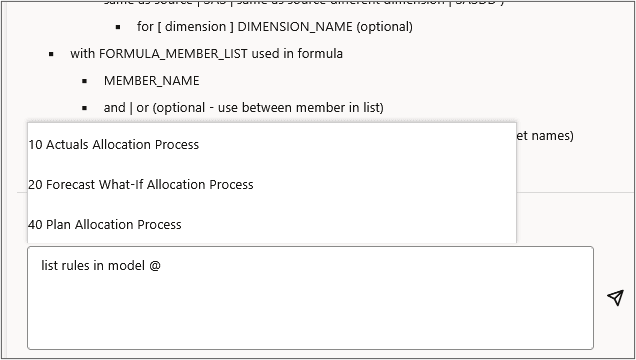
Using Smart Lookup
Using Smart Lookup when creating user requests improves productivity by removing the need to navigate to other screens to identify the names of artifacts to include within the request.
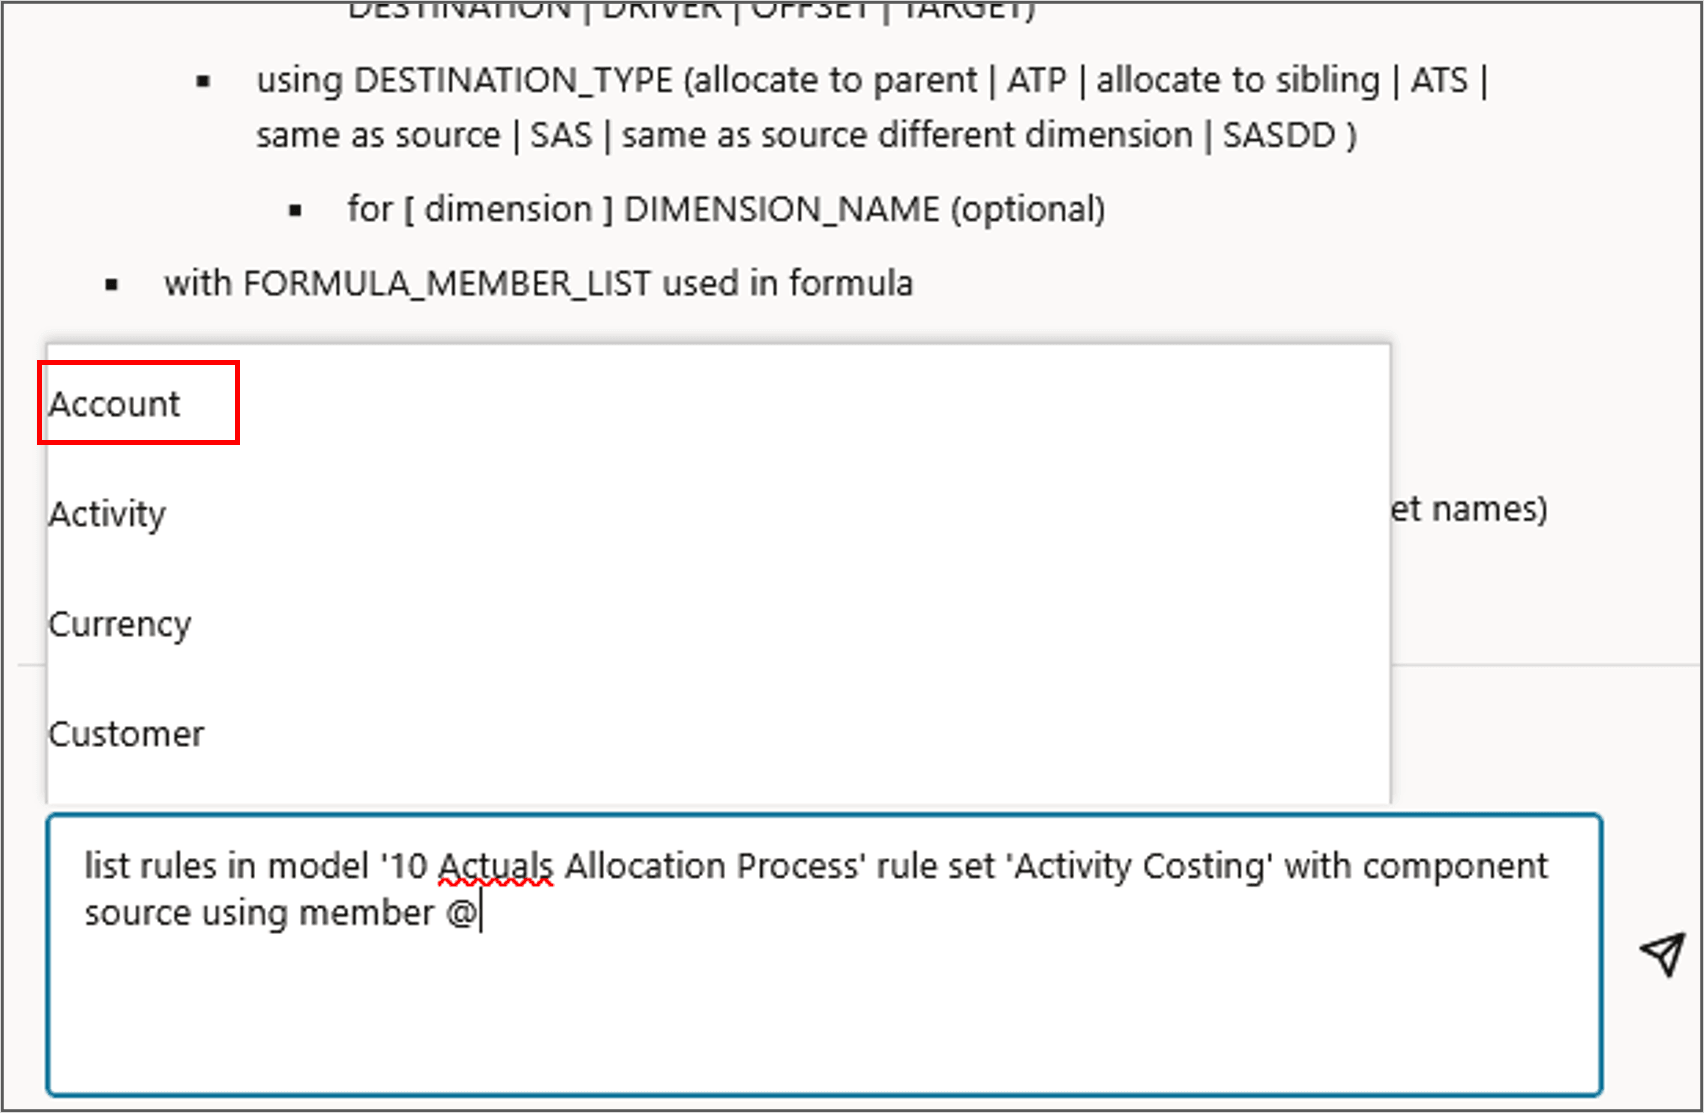
To use Smart Lookup, type in an artifact name followed by space, and then type in the @ symbol, optionally followed by one or more characters contained in the value you are looking for. This triggers a list of values for the artifact. For example, enter List rules in model @ in the PCM agent, and smart lookup provides a list of models in your application to select.
Results are returned with search criteria containing "Starts With" followed by "Contains". For example, assuming the following members for a "Product" dimension within a manufacturing client where the search is "all", the members would be returned as follows:
"All Packaging Products"
"All Products"
"All Tool Products"
"Ball-pen Hammer"
"Halligan Bar"
"Metallized Pouches"
"Pallet Wrap"
"Wallboard Saw"
When you select a value, it is placed at the location of the cursor surrounded by quotes.
Smart Lookup Example
- Begin by typing list rules in model @, and then select the 10 Actuals Allocation Process model from the pop-up list of available models.
- With the cursor at the end of the request, enter a space, type rule set @, and then select Activity Costing from the pop-up list of available rule sets
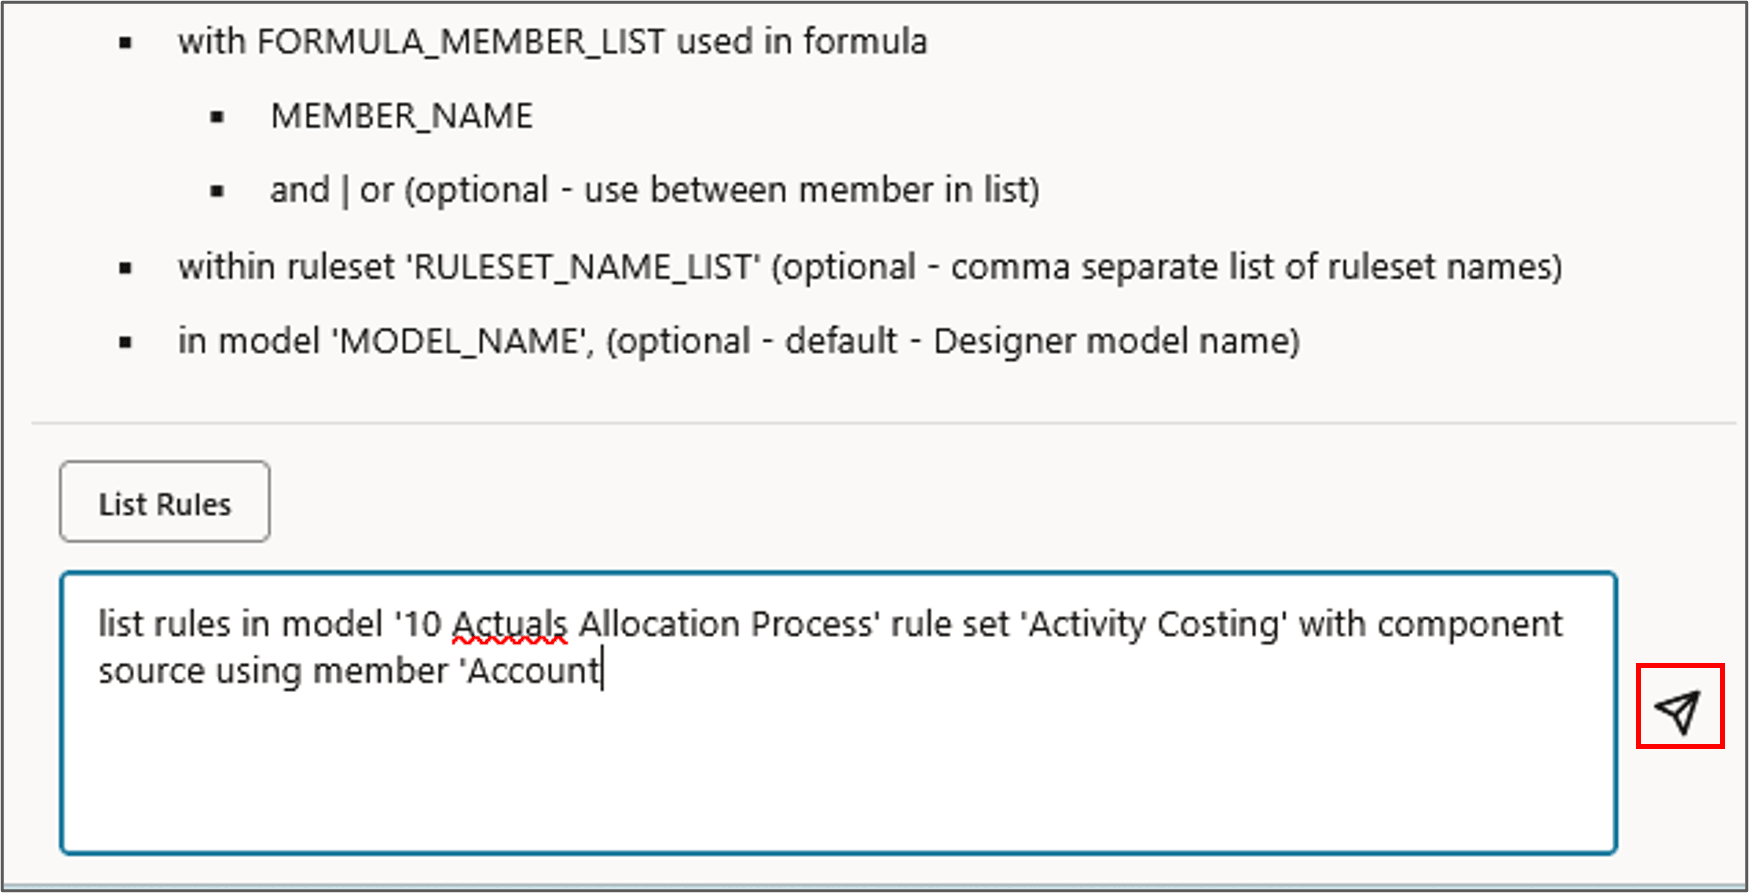
- With the cursor at the end of the request, enter a space, type with component source using member @, and select Account.
- click
 (Send) to submit the request.
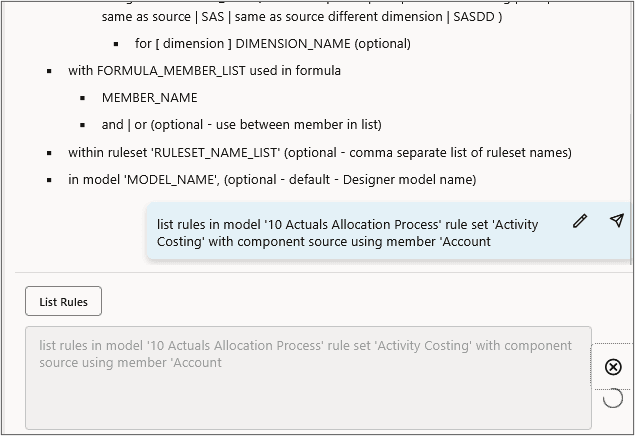
 - The request displayed in the PCM Agent page as follows:
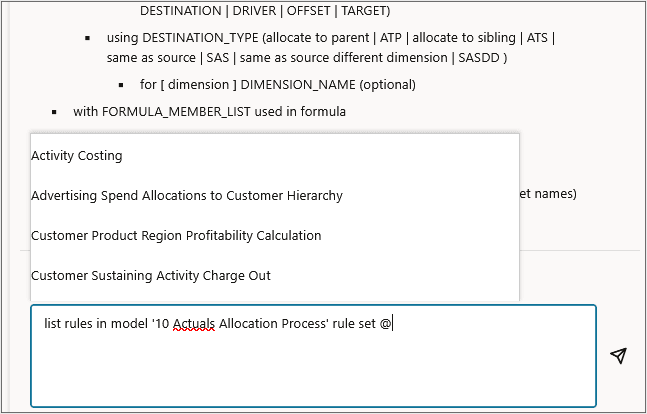
list rules in model '10 Actuals Allocation Process'
	rule set 'Activity Costing' with component source
	 using member 'Account'
Calculating Models
PCM Agent enables you calculate models for one or more points of view.
Parameters for Calculating Models
- Calculate model using job JOB_NAME (required) OR Calculate Model 'MODEL_NAME' (required - defaults to Designer model name)
- POV_DEF (required - pov FY24:Jan:Actual:Working | pov 'current pov' | reference pov FY24:Feb:Actual:Working povs 'Jan' through 'May')
- Choose one of the supported rule processing ranges. (optional - Defaults to ALL_RULES)
- 'ALL_RULES' - calculate all the rules within the specified model.
- 'RUN_FROM_RULE' - calculate rules from the specified rule to the last rule within the model.
- 'STOP_AFTER_RULE' - calculate rules from 1st rule within model until the specified rule completes.
- 'RULESET_SUBSET' - calculates rules contained within the specified subset of rule sets, which is identified as a range by the starting sequence value through the ending sequence value. Example: subset containing rule set sequence from 1 to 5.
- 'SINGLE_RULE' - calculate only the specified rule.
- Clear Calculated Data (optional - true (default) | false)
- Execute Calculation (optional - true (default) | false)
- Capture Diagnostic Data (optional - true | false (default))
- Capture Essbase Debug Scripts (optional - true | false (default))
- Optimize for Reporting (optional - true (default) | false)
- Comment 'comment text' (optional)
- save job as JOB_NAME (optional)
Note:
You can use substitution variables for the year and period dimensions in the POV definitions.Example: Calculating a Model
Let's calculate a model with the following options:
- POV of FY23:January:Actual:Working.
- Processing options unchecked for: Clear Calculated Data, Execute Calculation, and Optimized for Reporting.
- Processing options checked for: Capture Diagnostics Data and Capture Essbase Debug Scripts.
- On the PCM Agent tab, select Calculate Model from the list of buttons, or simply enter Calculate to refine the buttons.
- Type the below request in the command section, and click (Send).
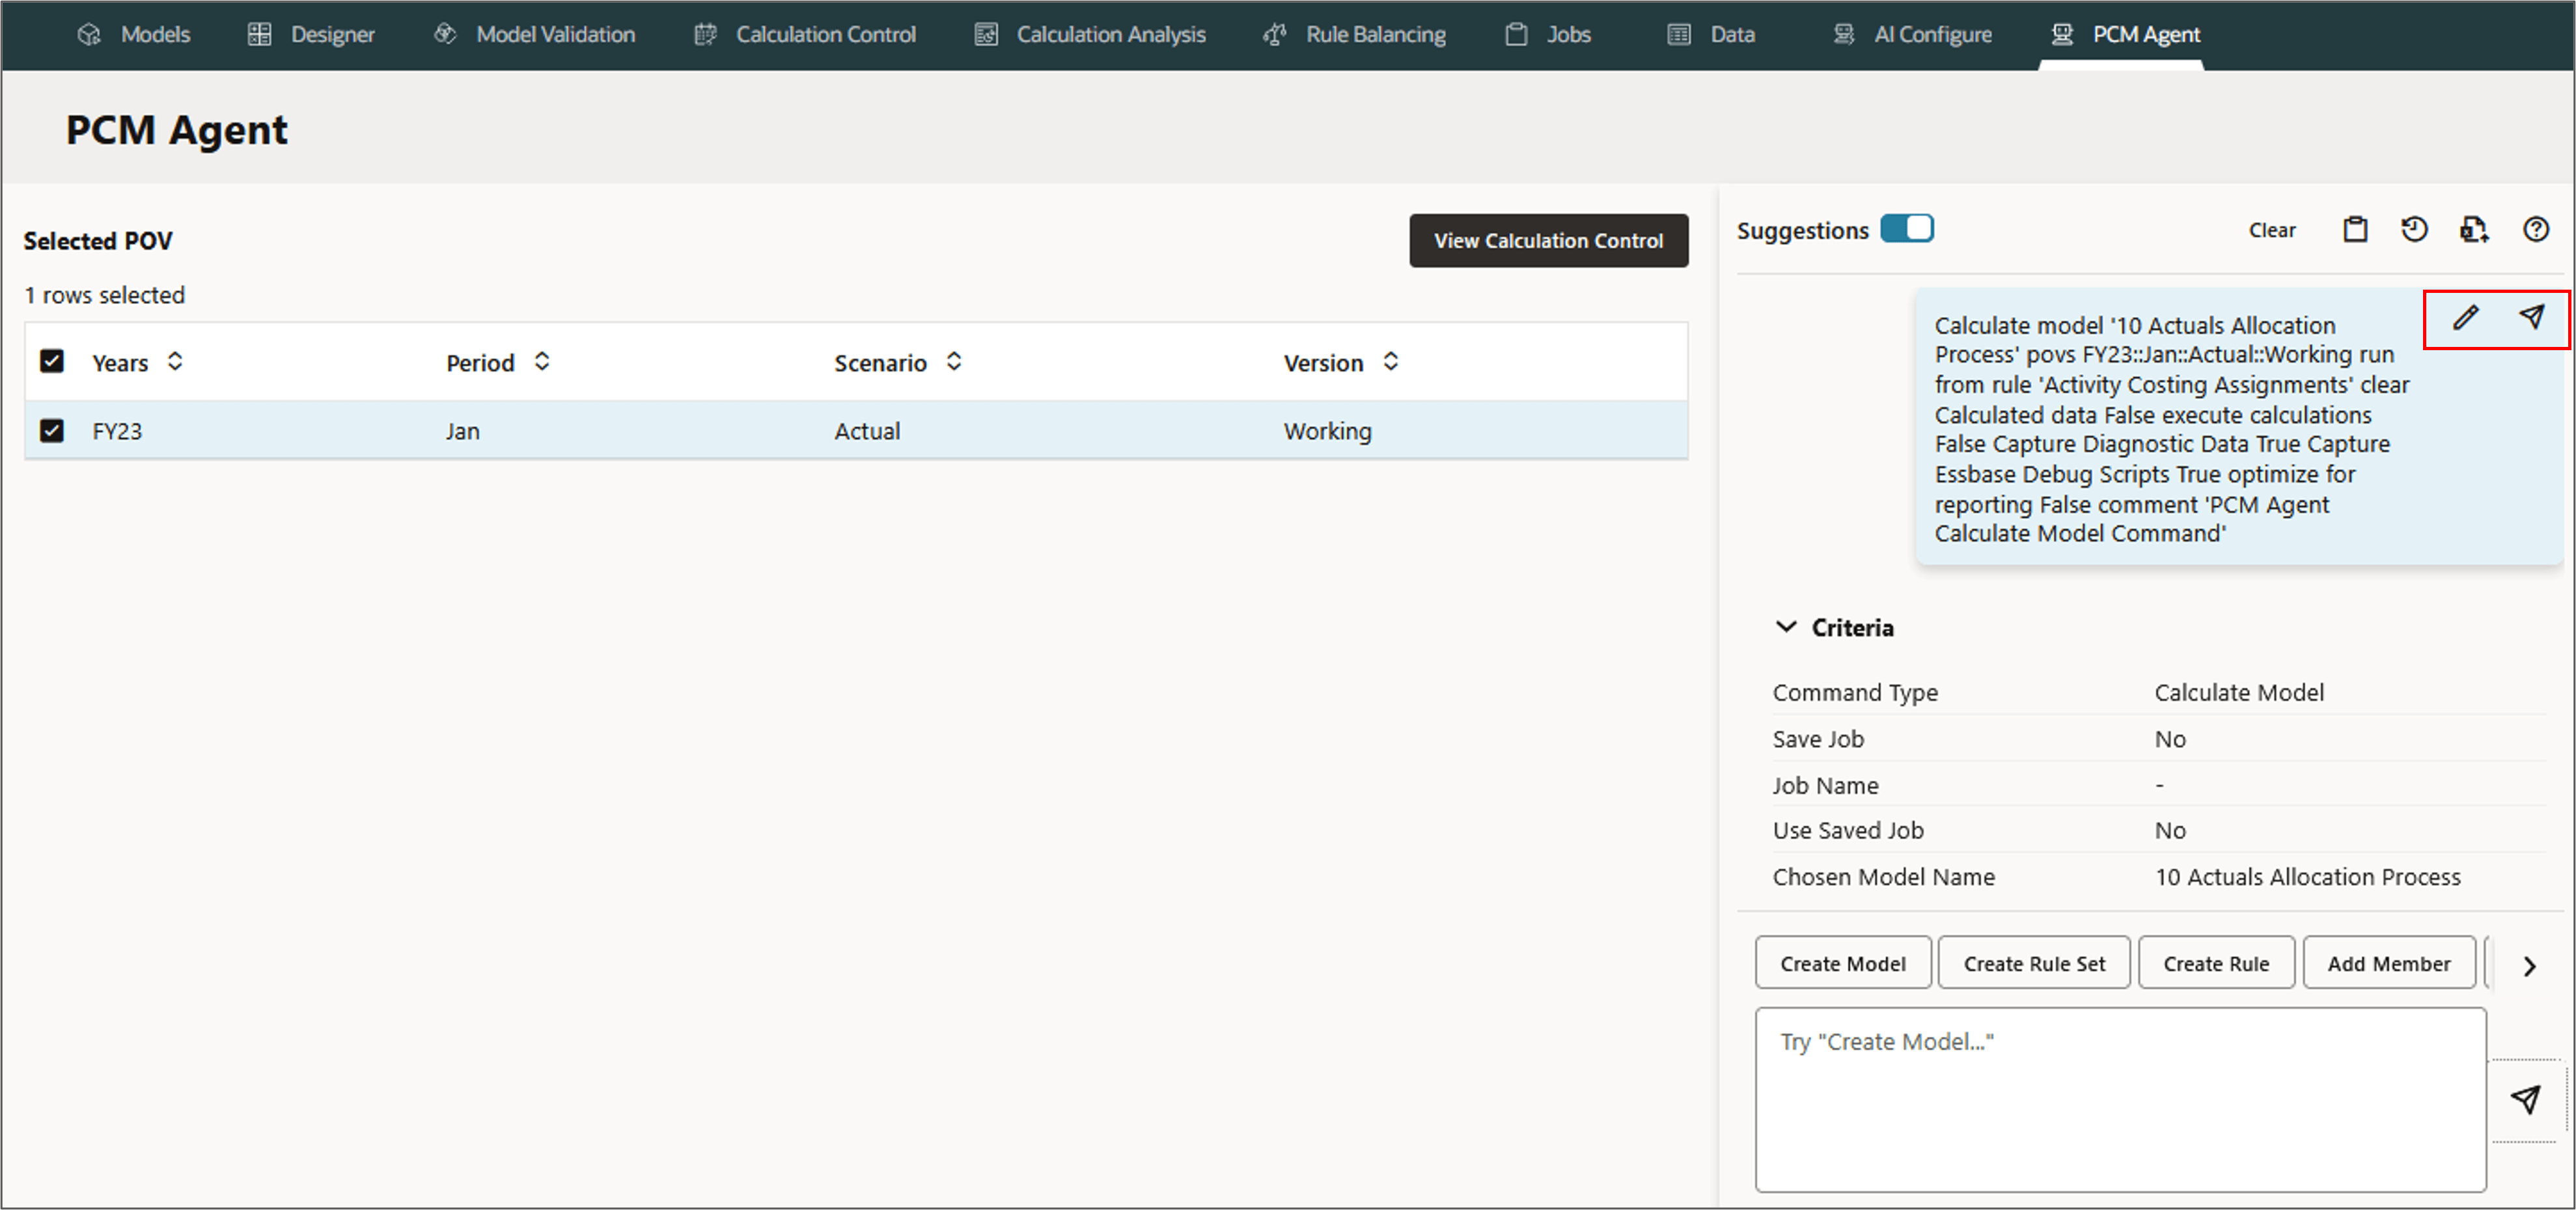
- Review and refine the prompt if needed. To make any changes, click
 (Refine), and then click
  (Resend).
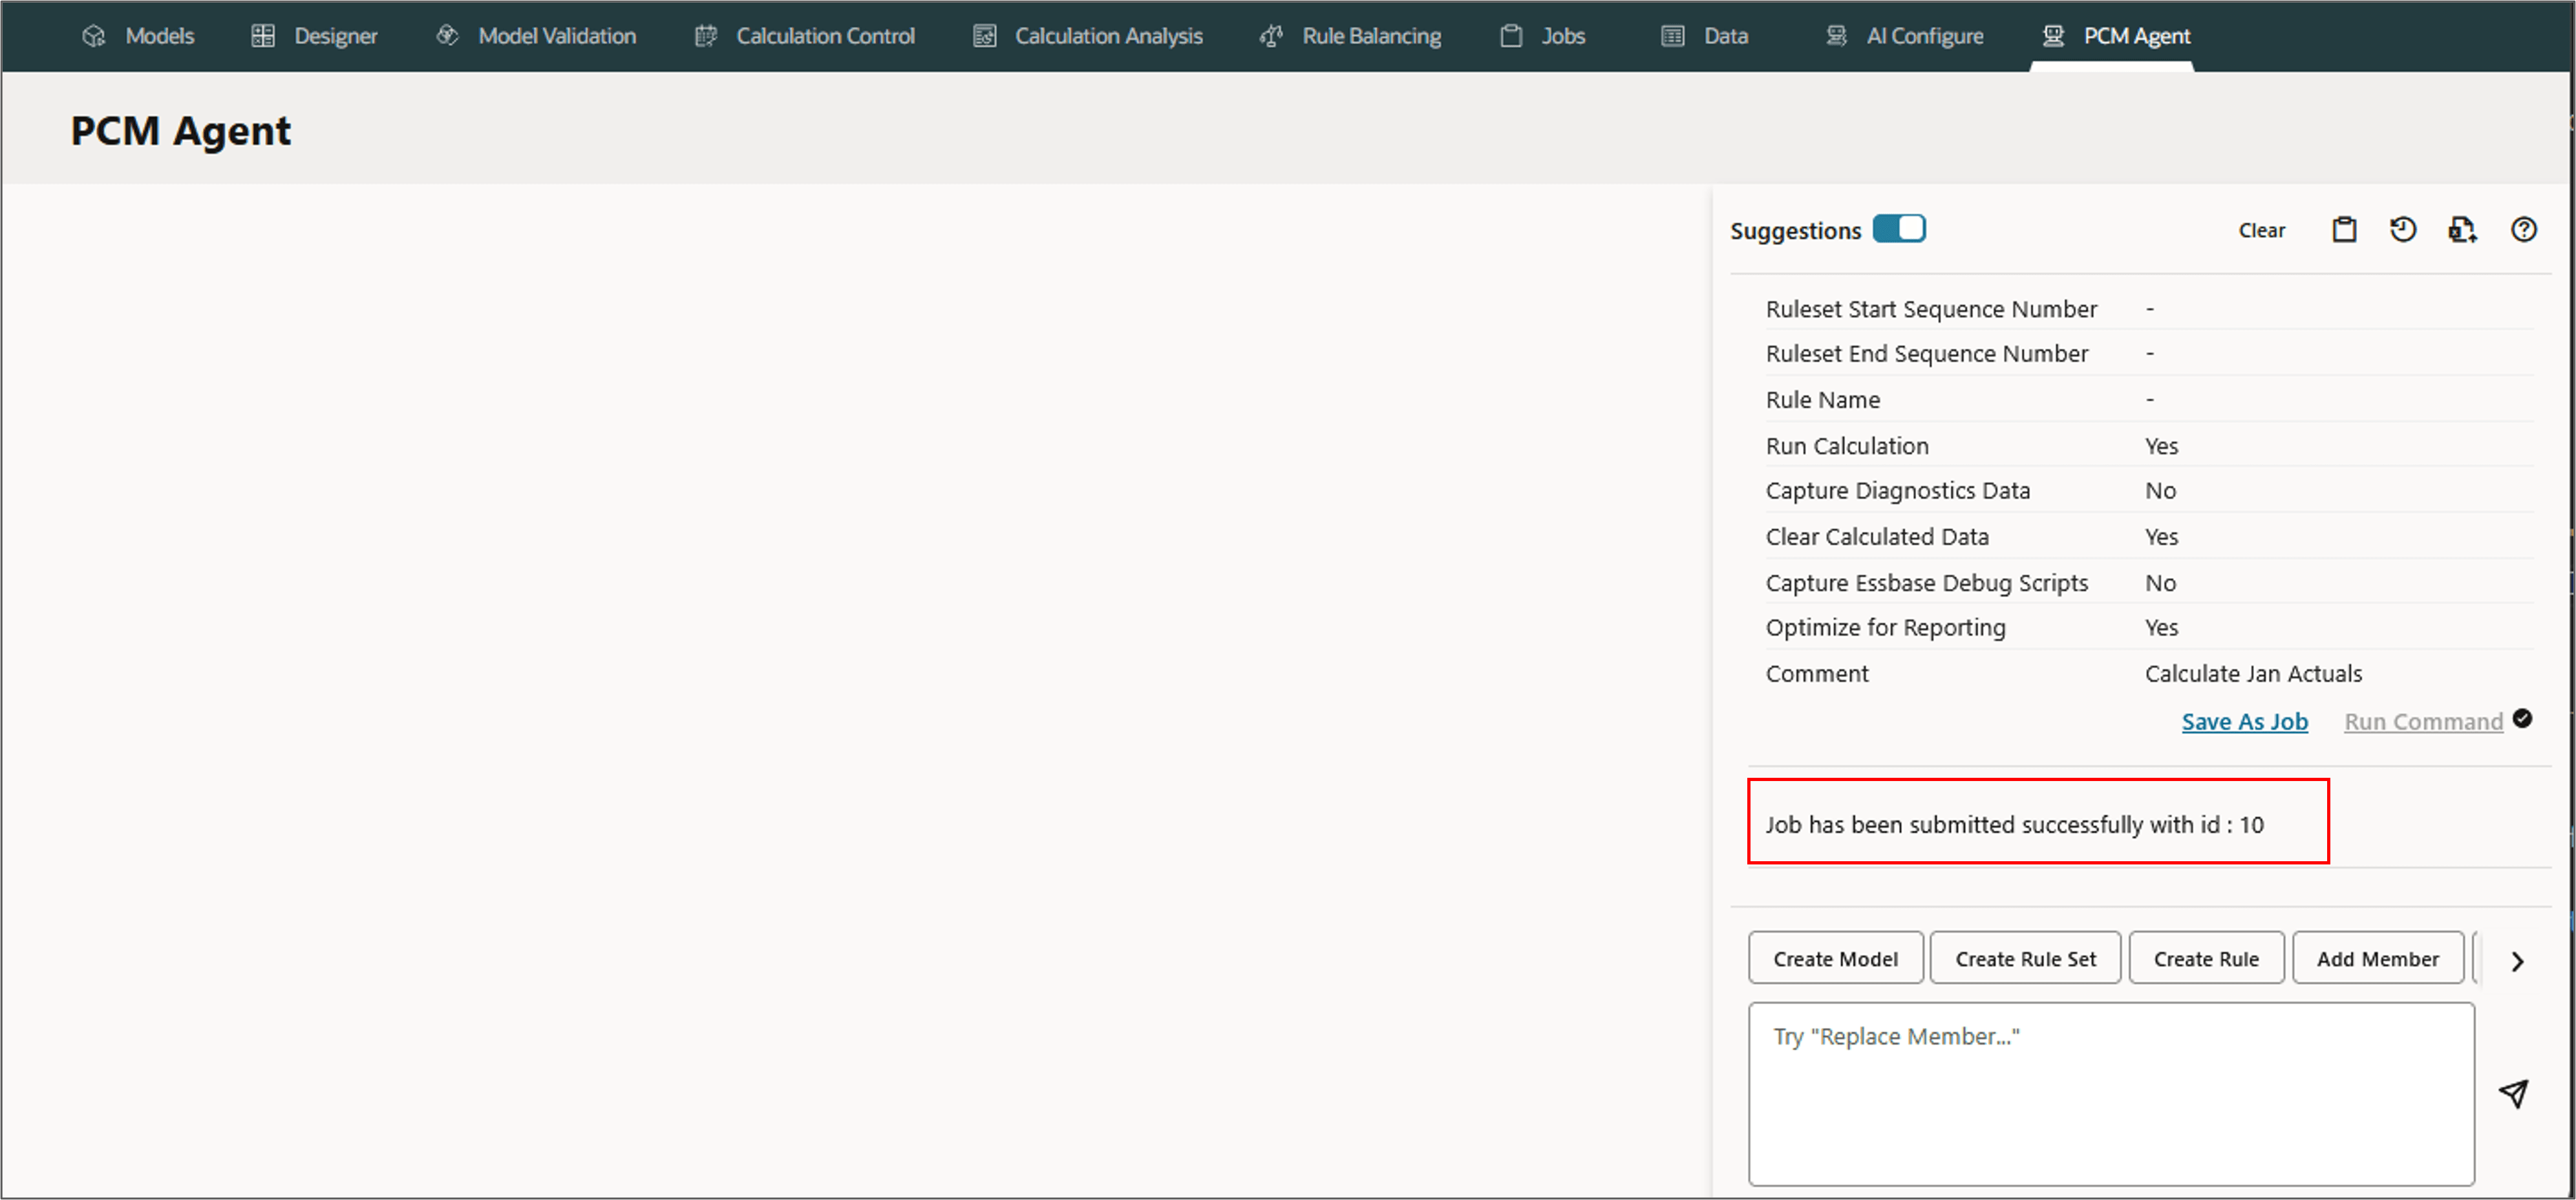
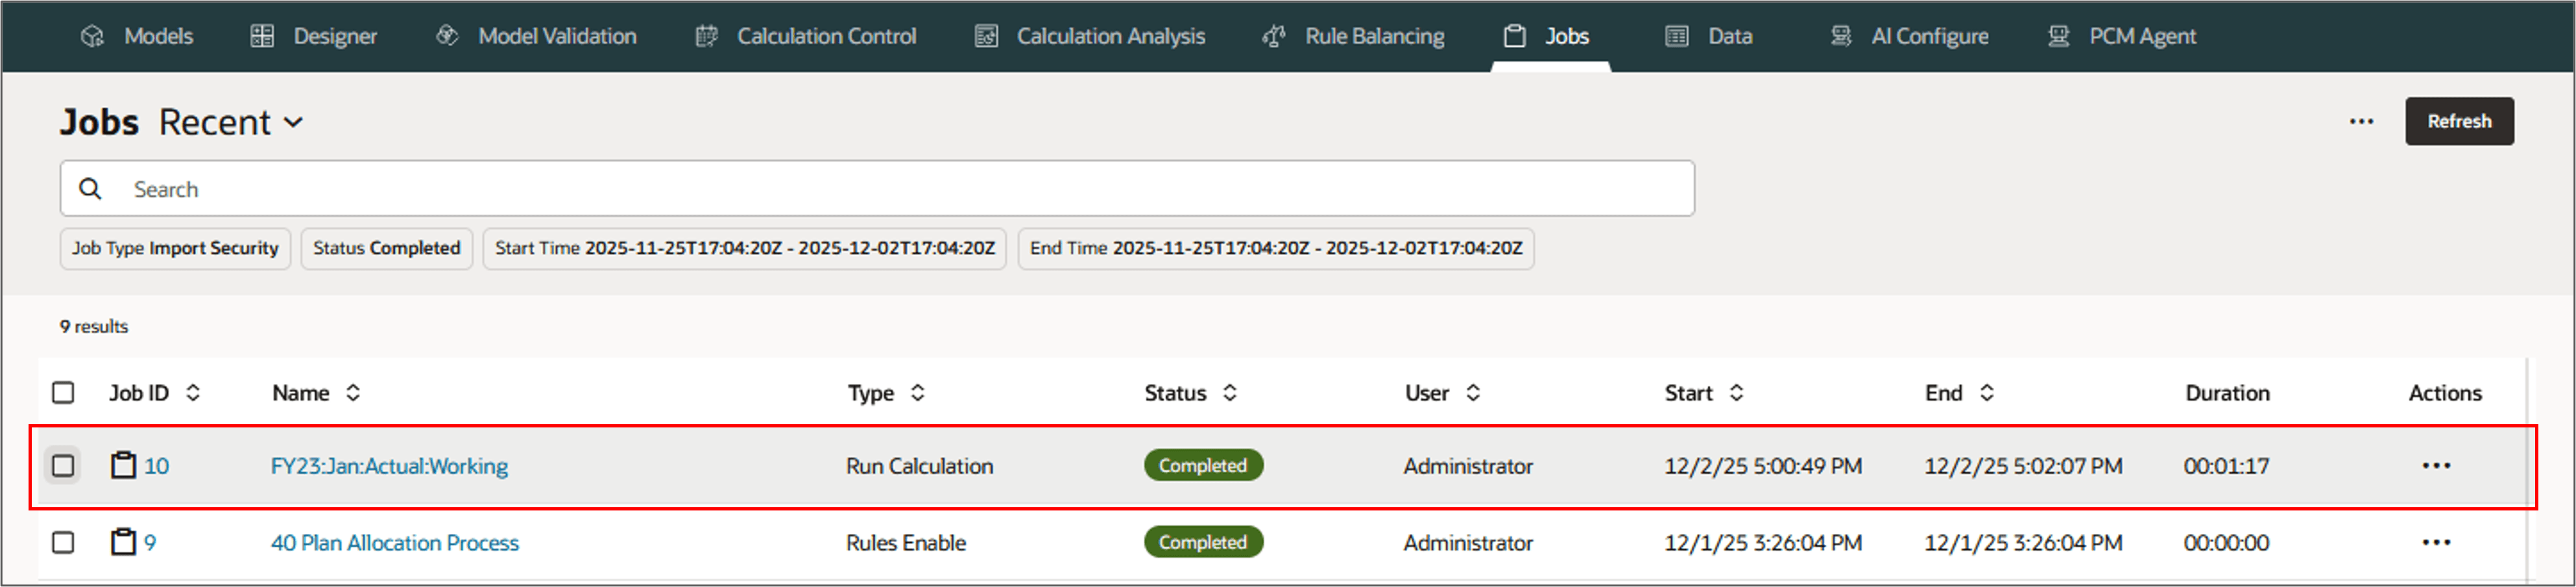
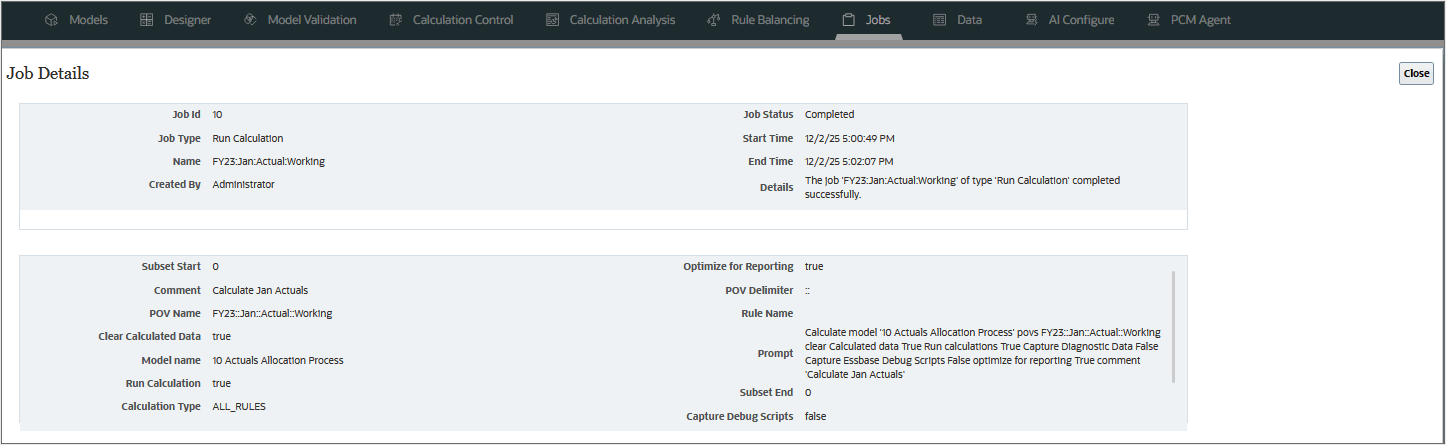
 - A job is displayed with the options to save the job and schedule it for later, or run it immediately. Click Run Command to run the job.
 Calculate model '10 Actuals Allocation Process'
		povs FY23::Jan::Actual::Working
		run from rule 'Activity Costing Assignments'
		clear Calculated data False
		execute calculations False
		Capture Diagnostic Data True
	 Capture Essbase Debug Scripts True
	 optimize for reporting False
	 comment 'PCM Agent Calculate Model Command'
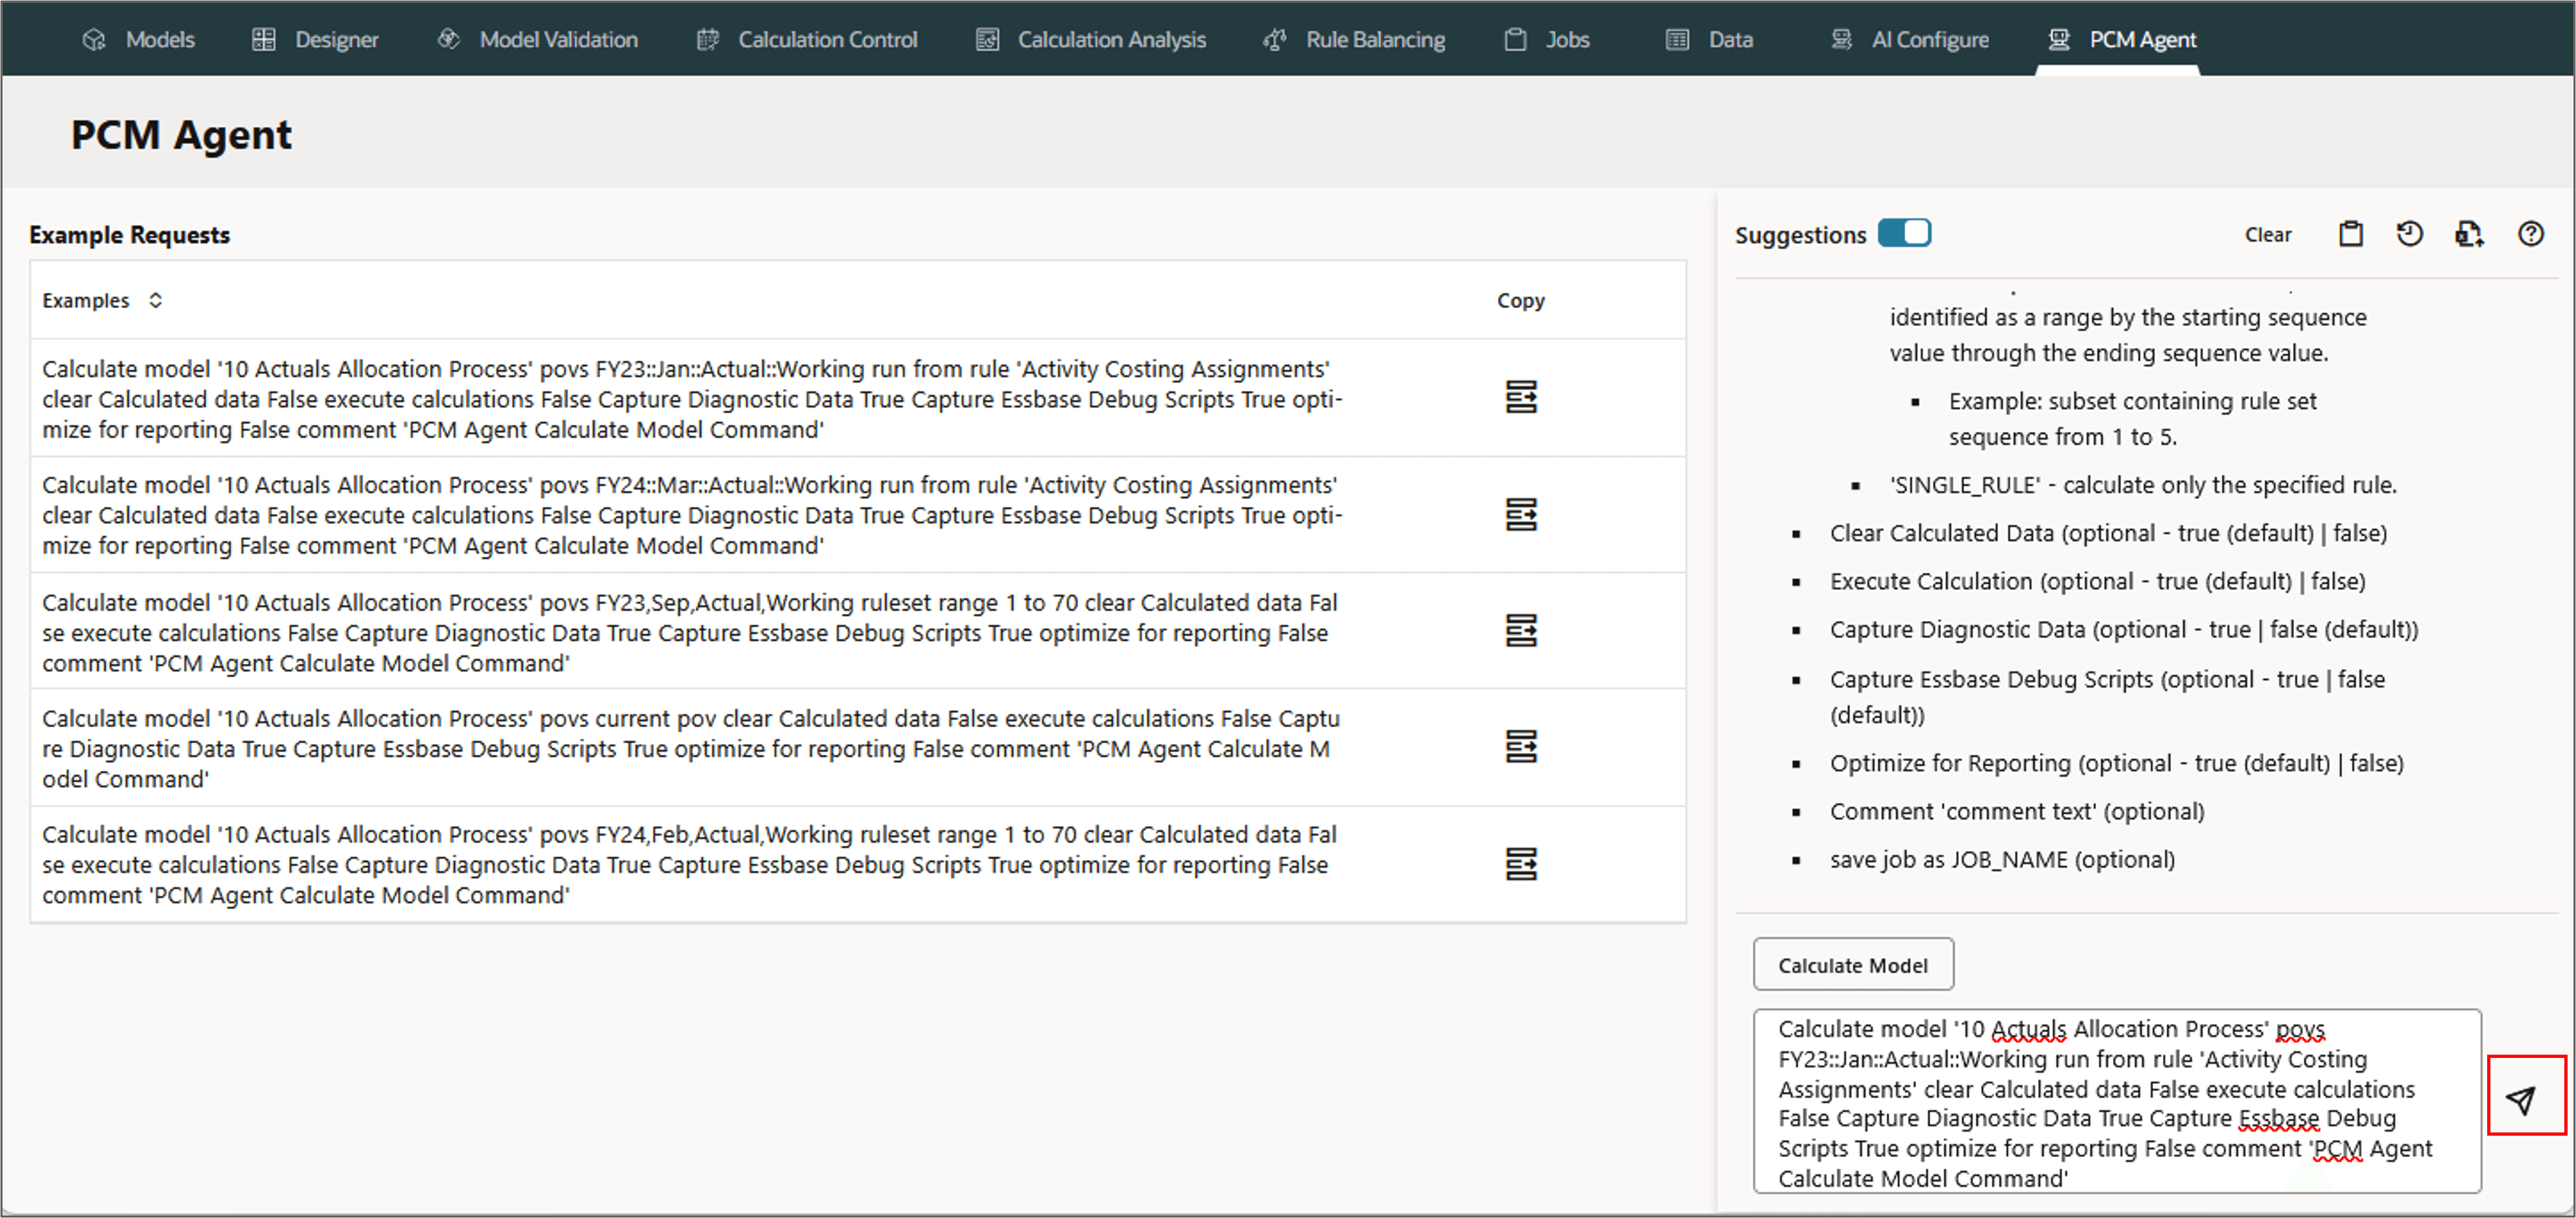
The PCM Agent page is updated with the request information.
Tip:
Use the Save as Job option to create reusable calculation jobs that can be run using substitution variables.Note:
Click View Calculate Control on the top to view the Calculation Control page.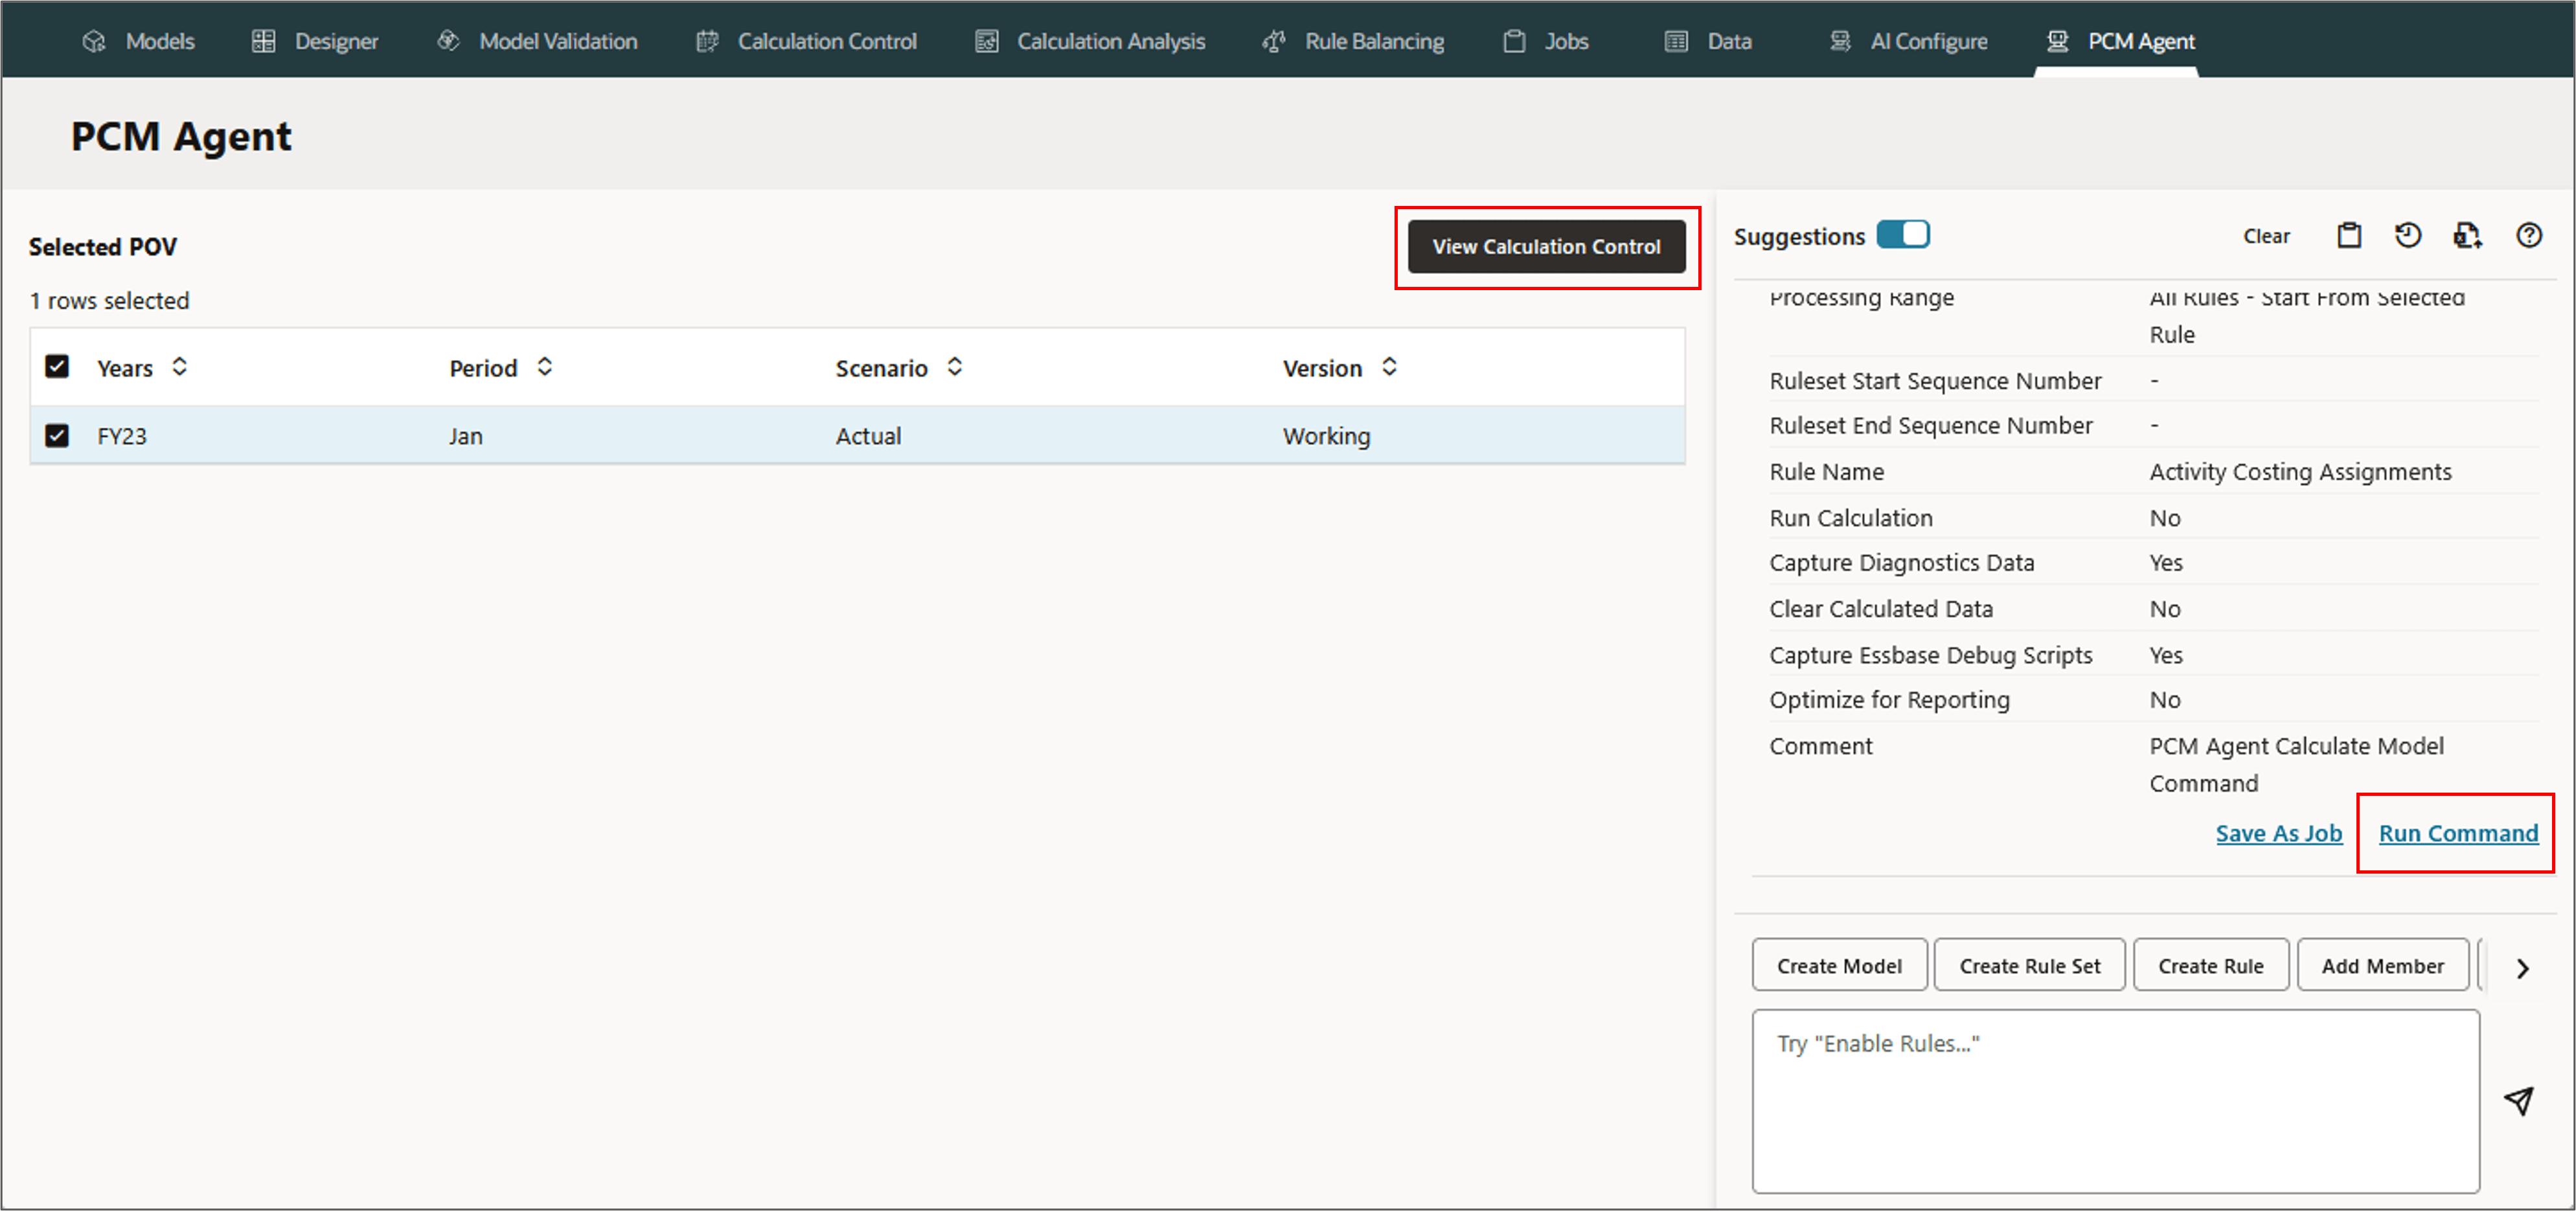
A job with an ID is displayed.
Creating Models, Rule Sets, and Rules
Creating a Model
Models are containers for allocation and custom calculation rules. Create multiple models if you have different sets of rules that you want to apply to your data. PCM agent uses natural language prompts in the interface to create one or more models with ease.
Parameters for Creating a Model
- Create model 'MODEL_NAME' (required)
- Description 'YOUR_DESCRIPTION' (optional)
- Context DIMENSION:MEMBER or DIMENSION.MEMBER (optional - comma separated list)
Example: Creating a Model
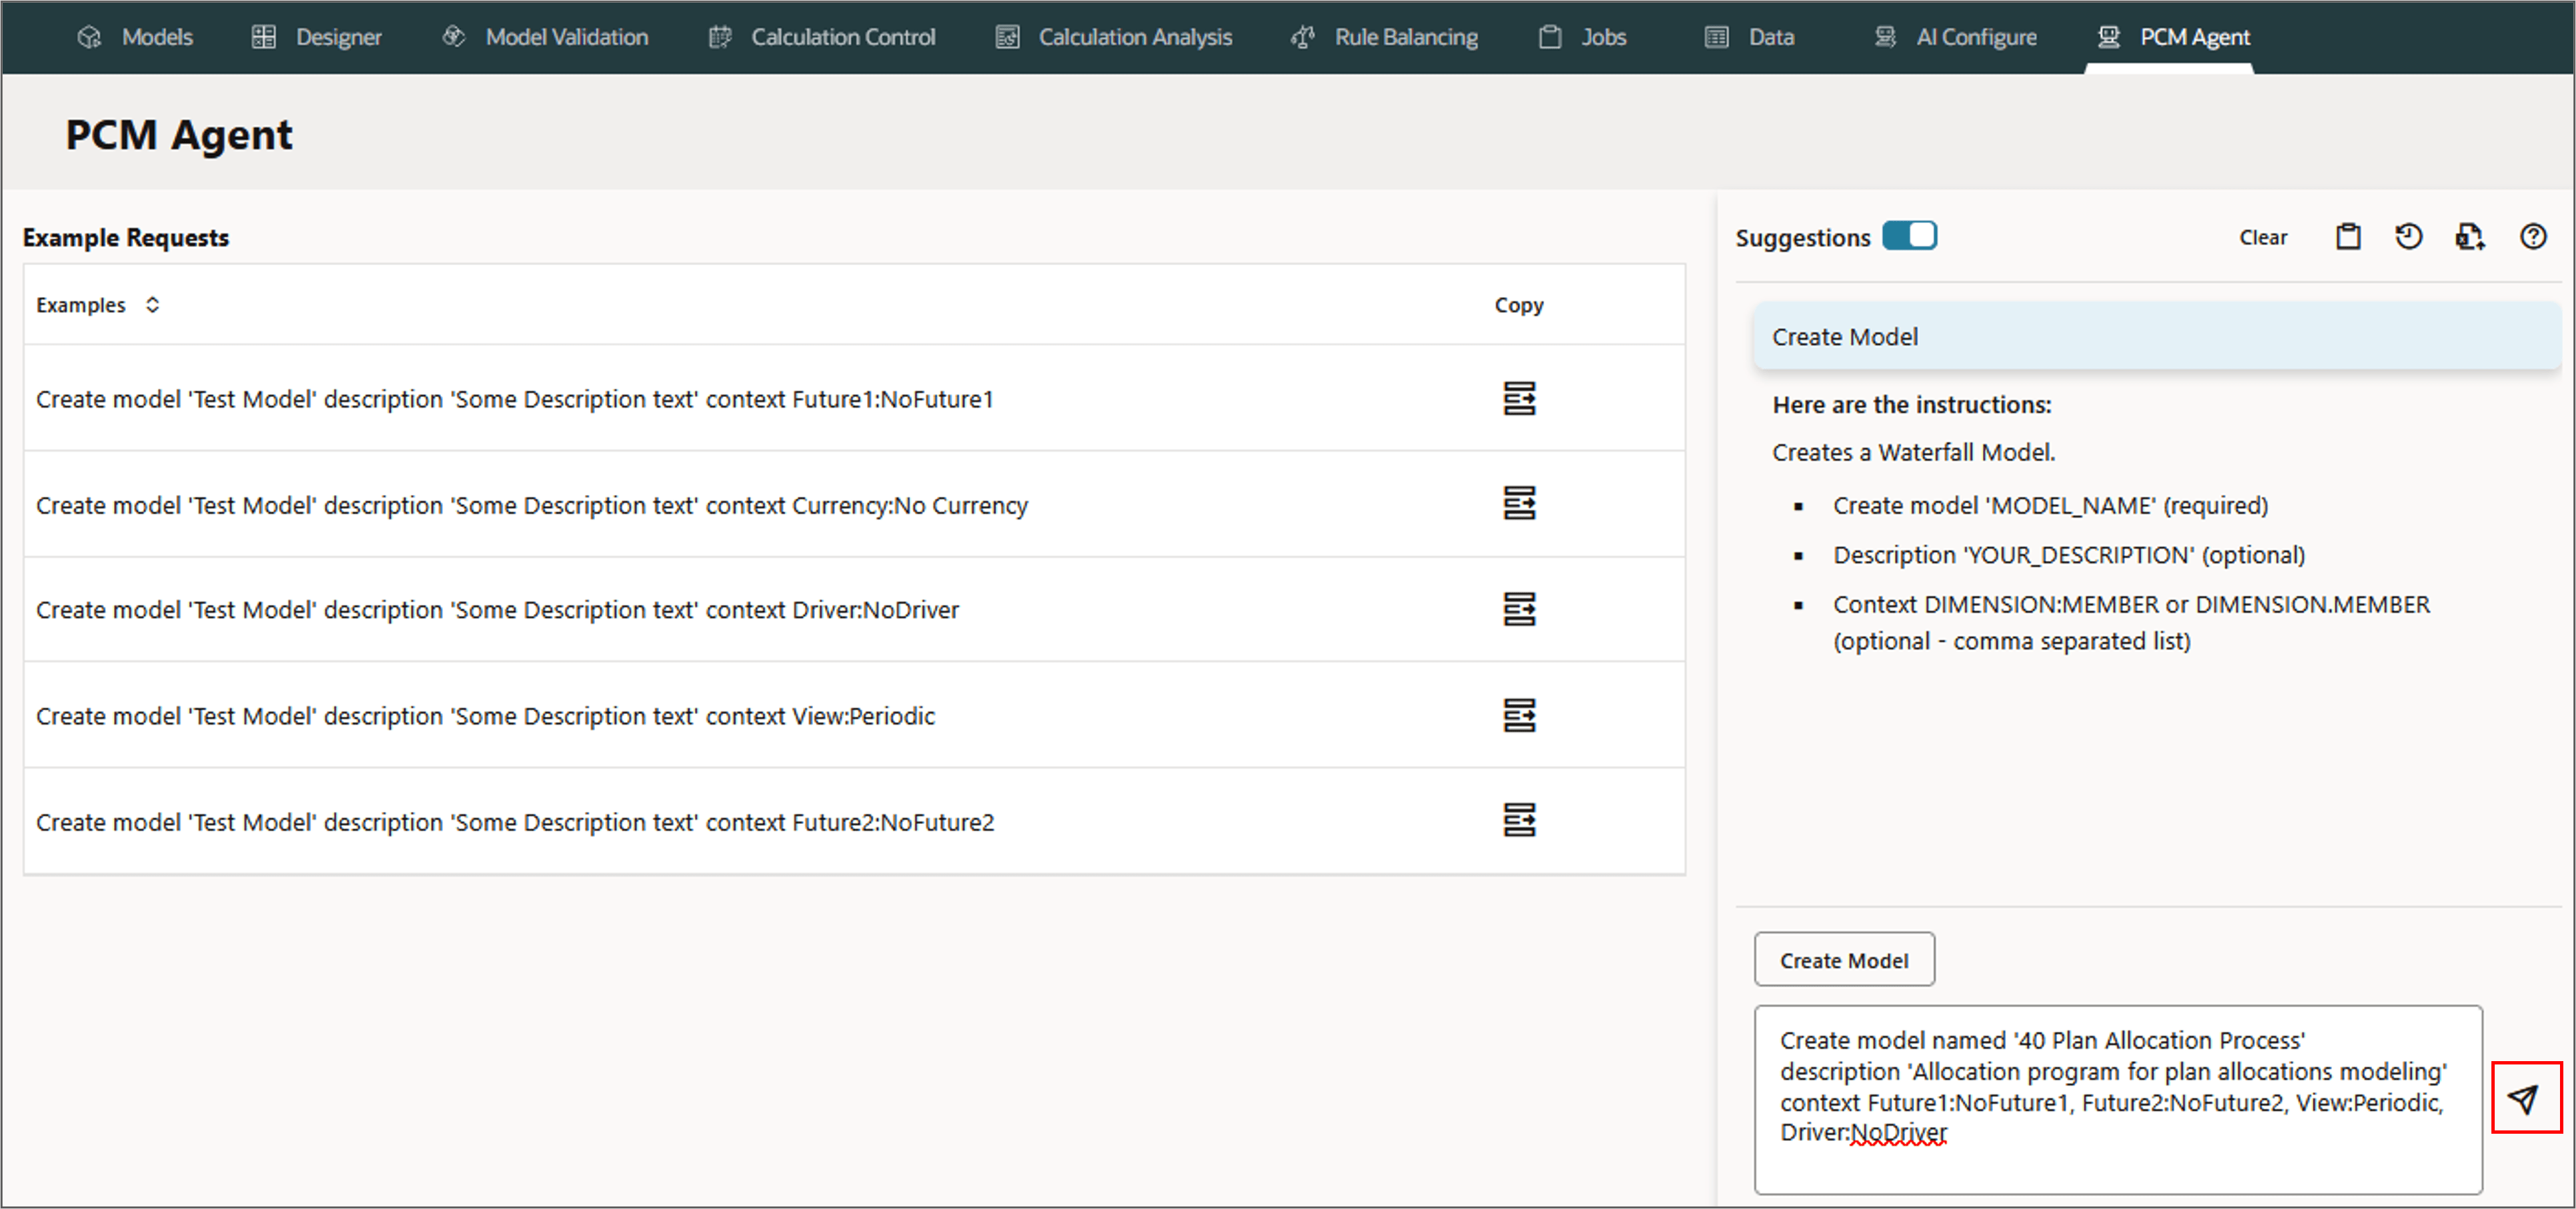
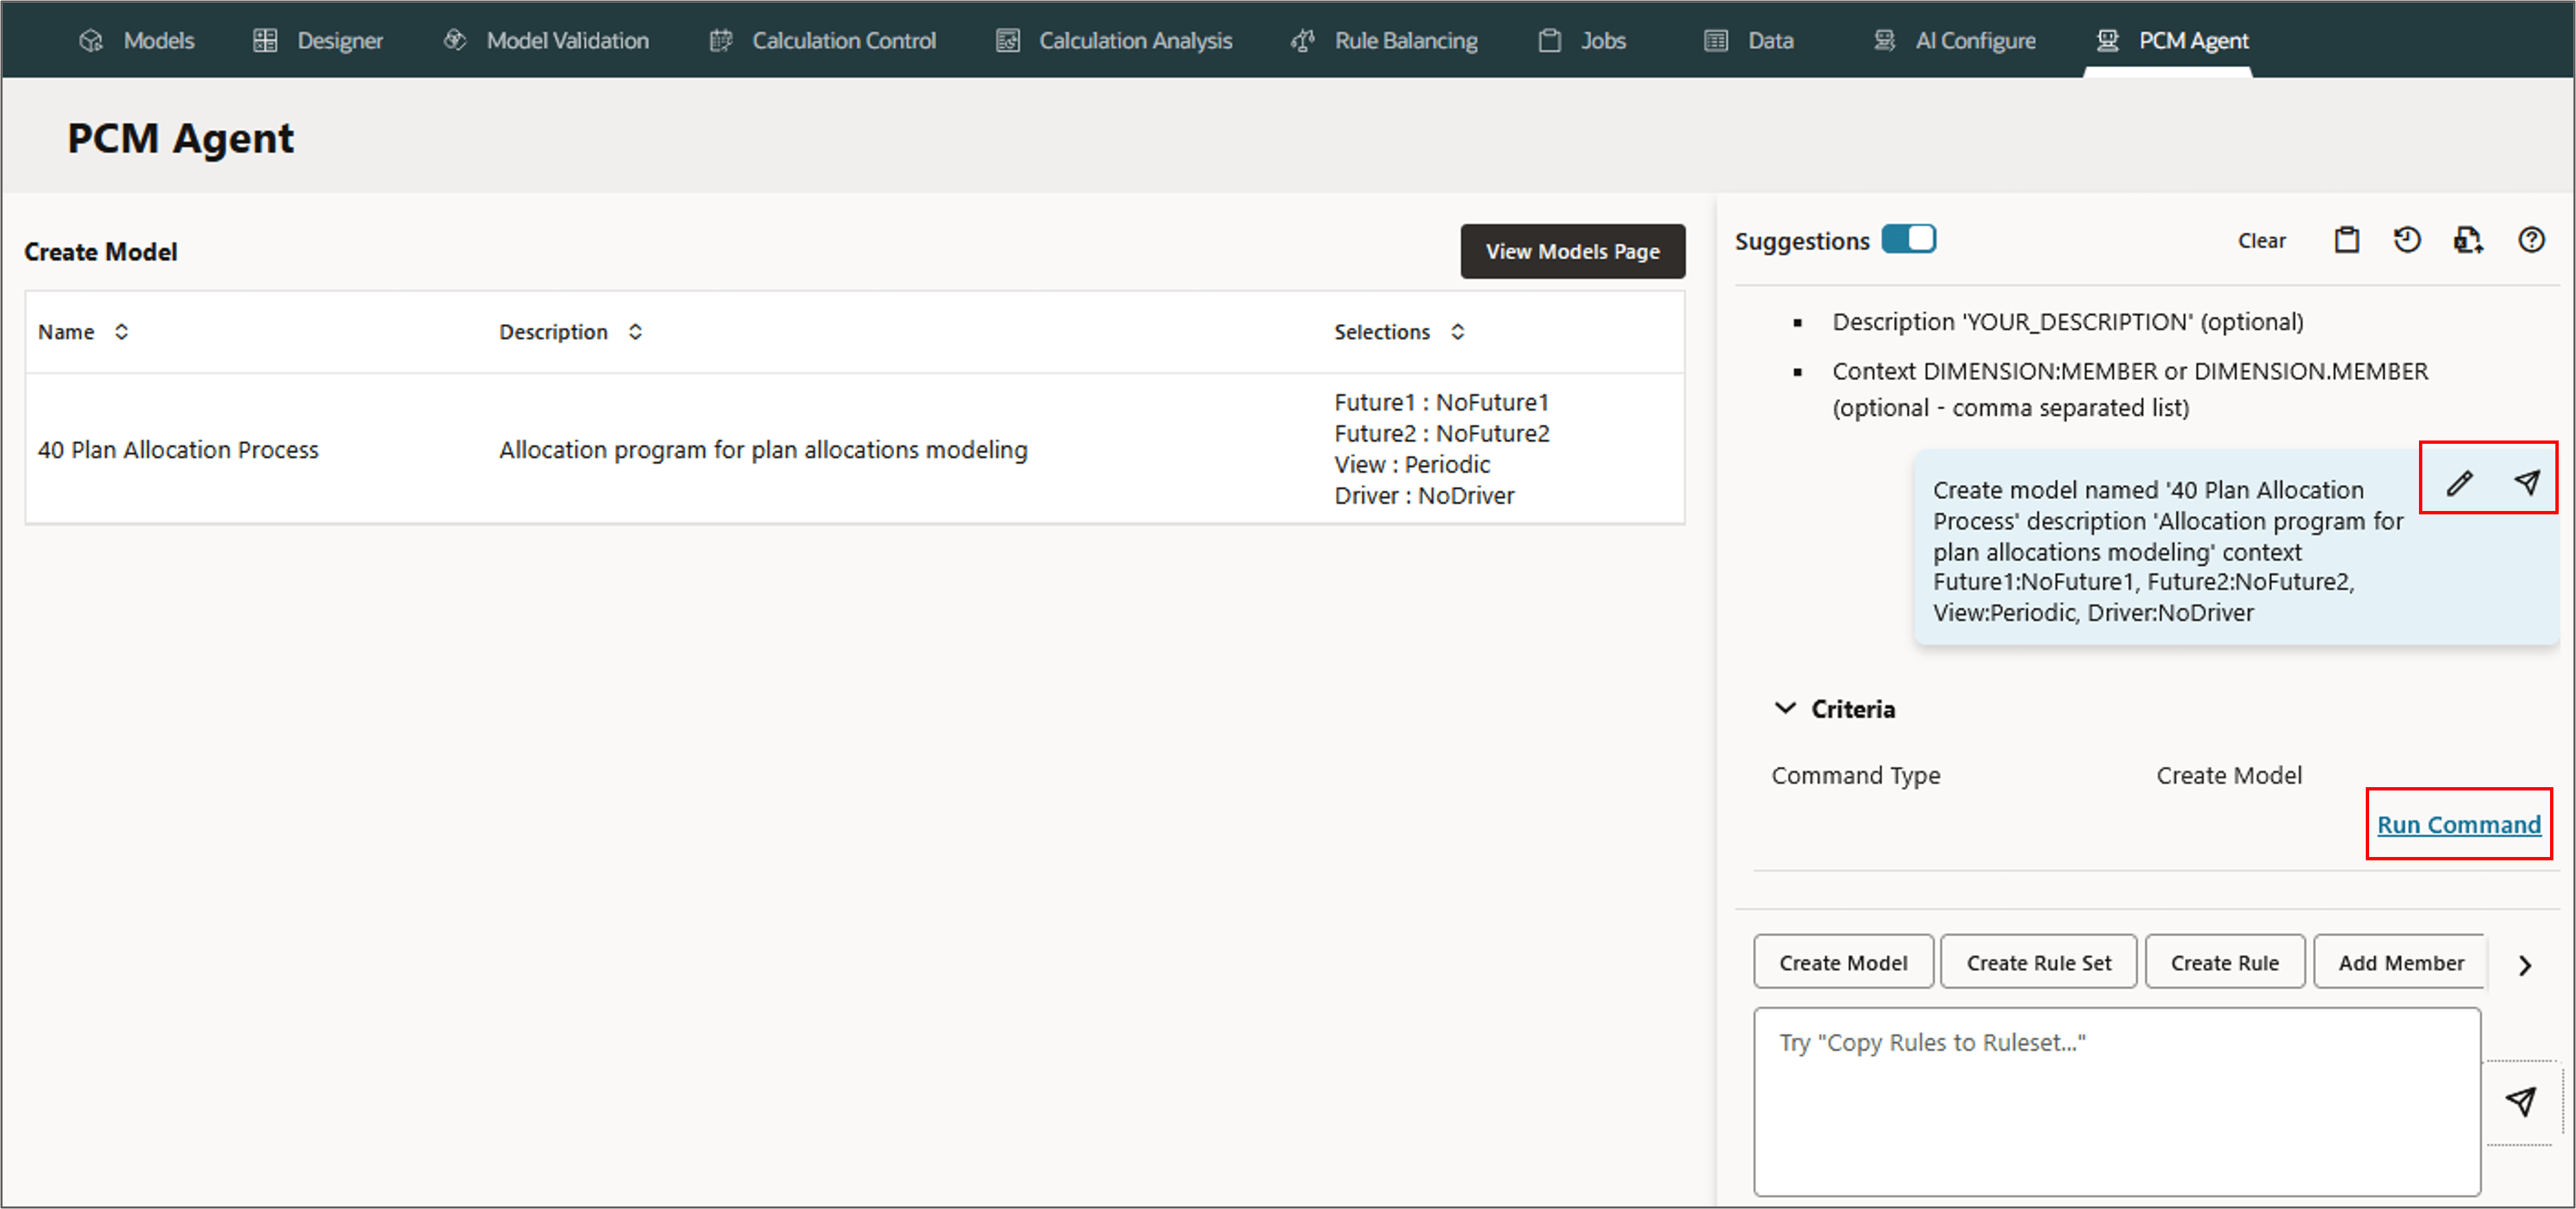
In this section, you create a model with the following details:
- Name: 40 Plan Allocation Process
- Description: Allocation program for plan allocations modeling
- Context: Future1:NoFuture1, Future2:NoFuture2, View:Periodic, Driver:NoDriver'
- In the command section of the PCM Agent, click Create Model or enter Create Model.
- Type the below request in PCM agent and click (Send).
- Review or refine the prompt if needed. To make changes, click
 (Refine), and then click (Resend).
 - When you are satisfied with the request, click Run Command.
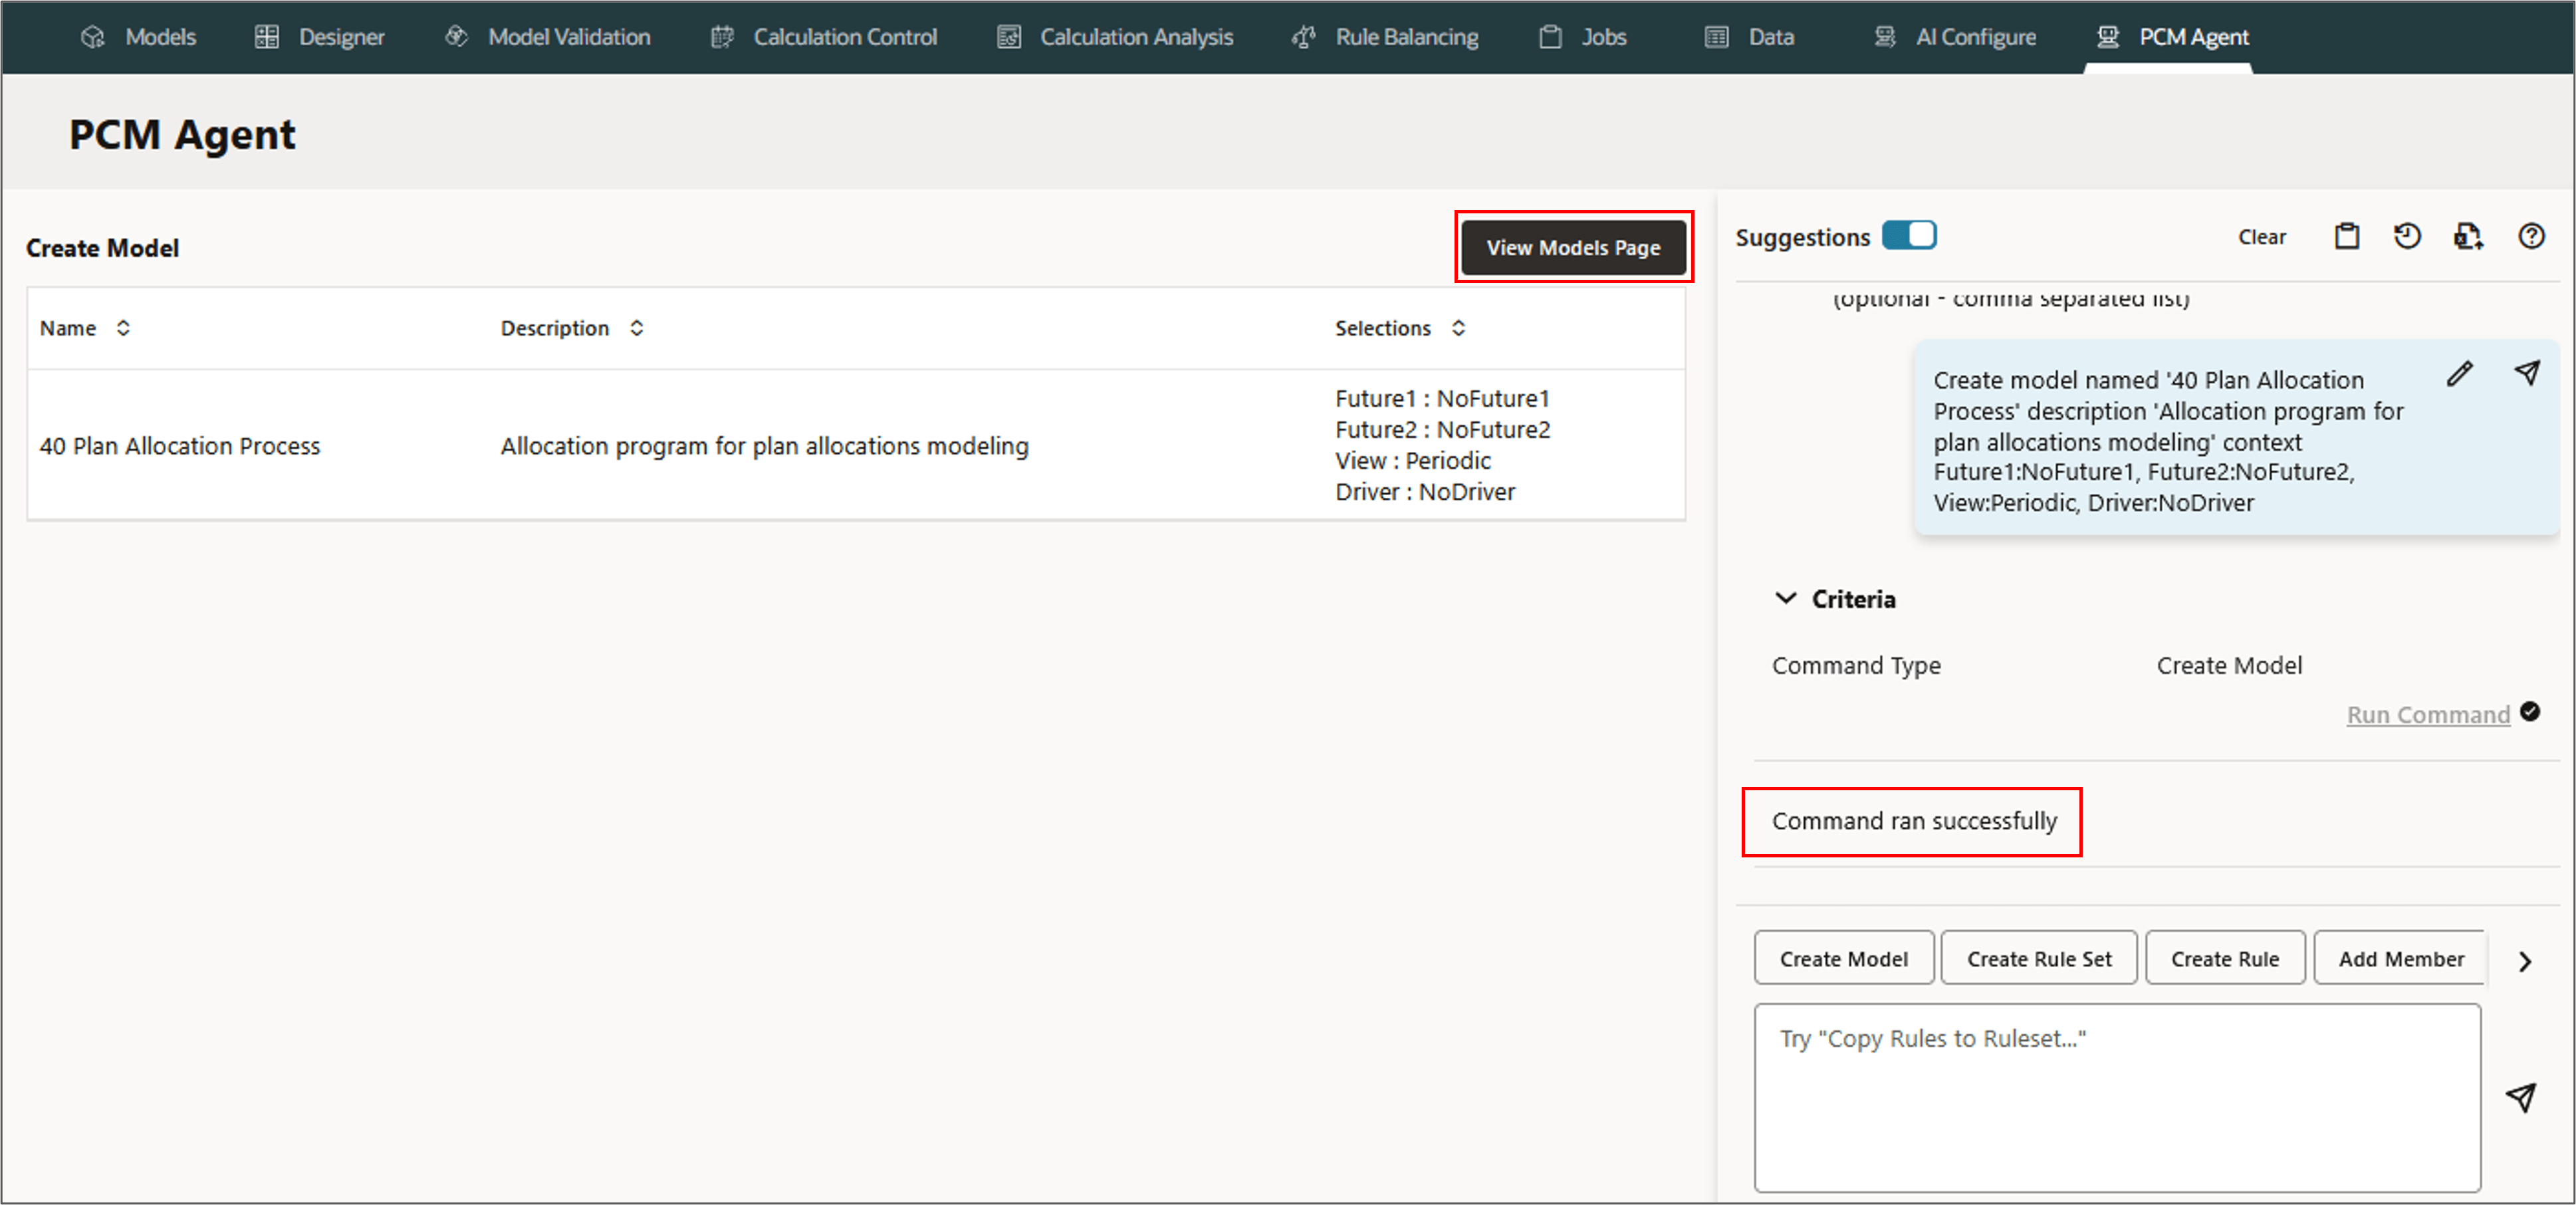
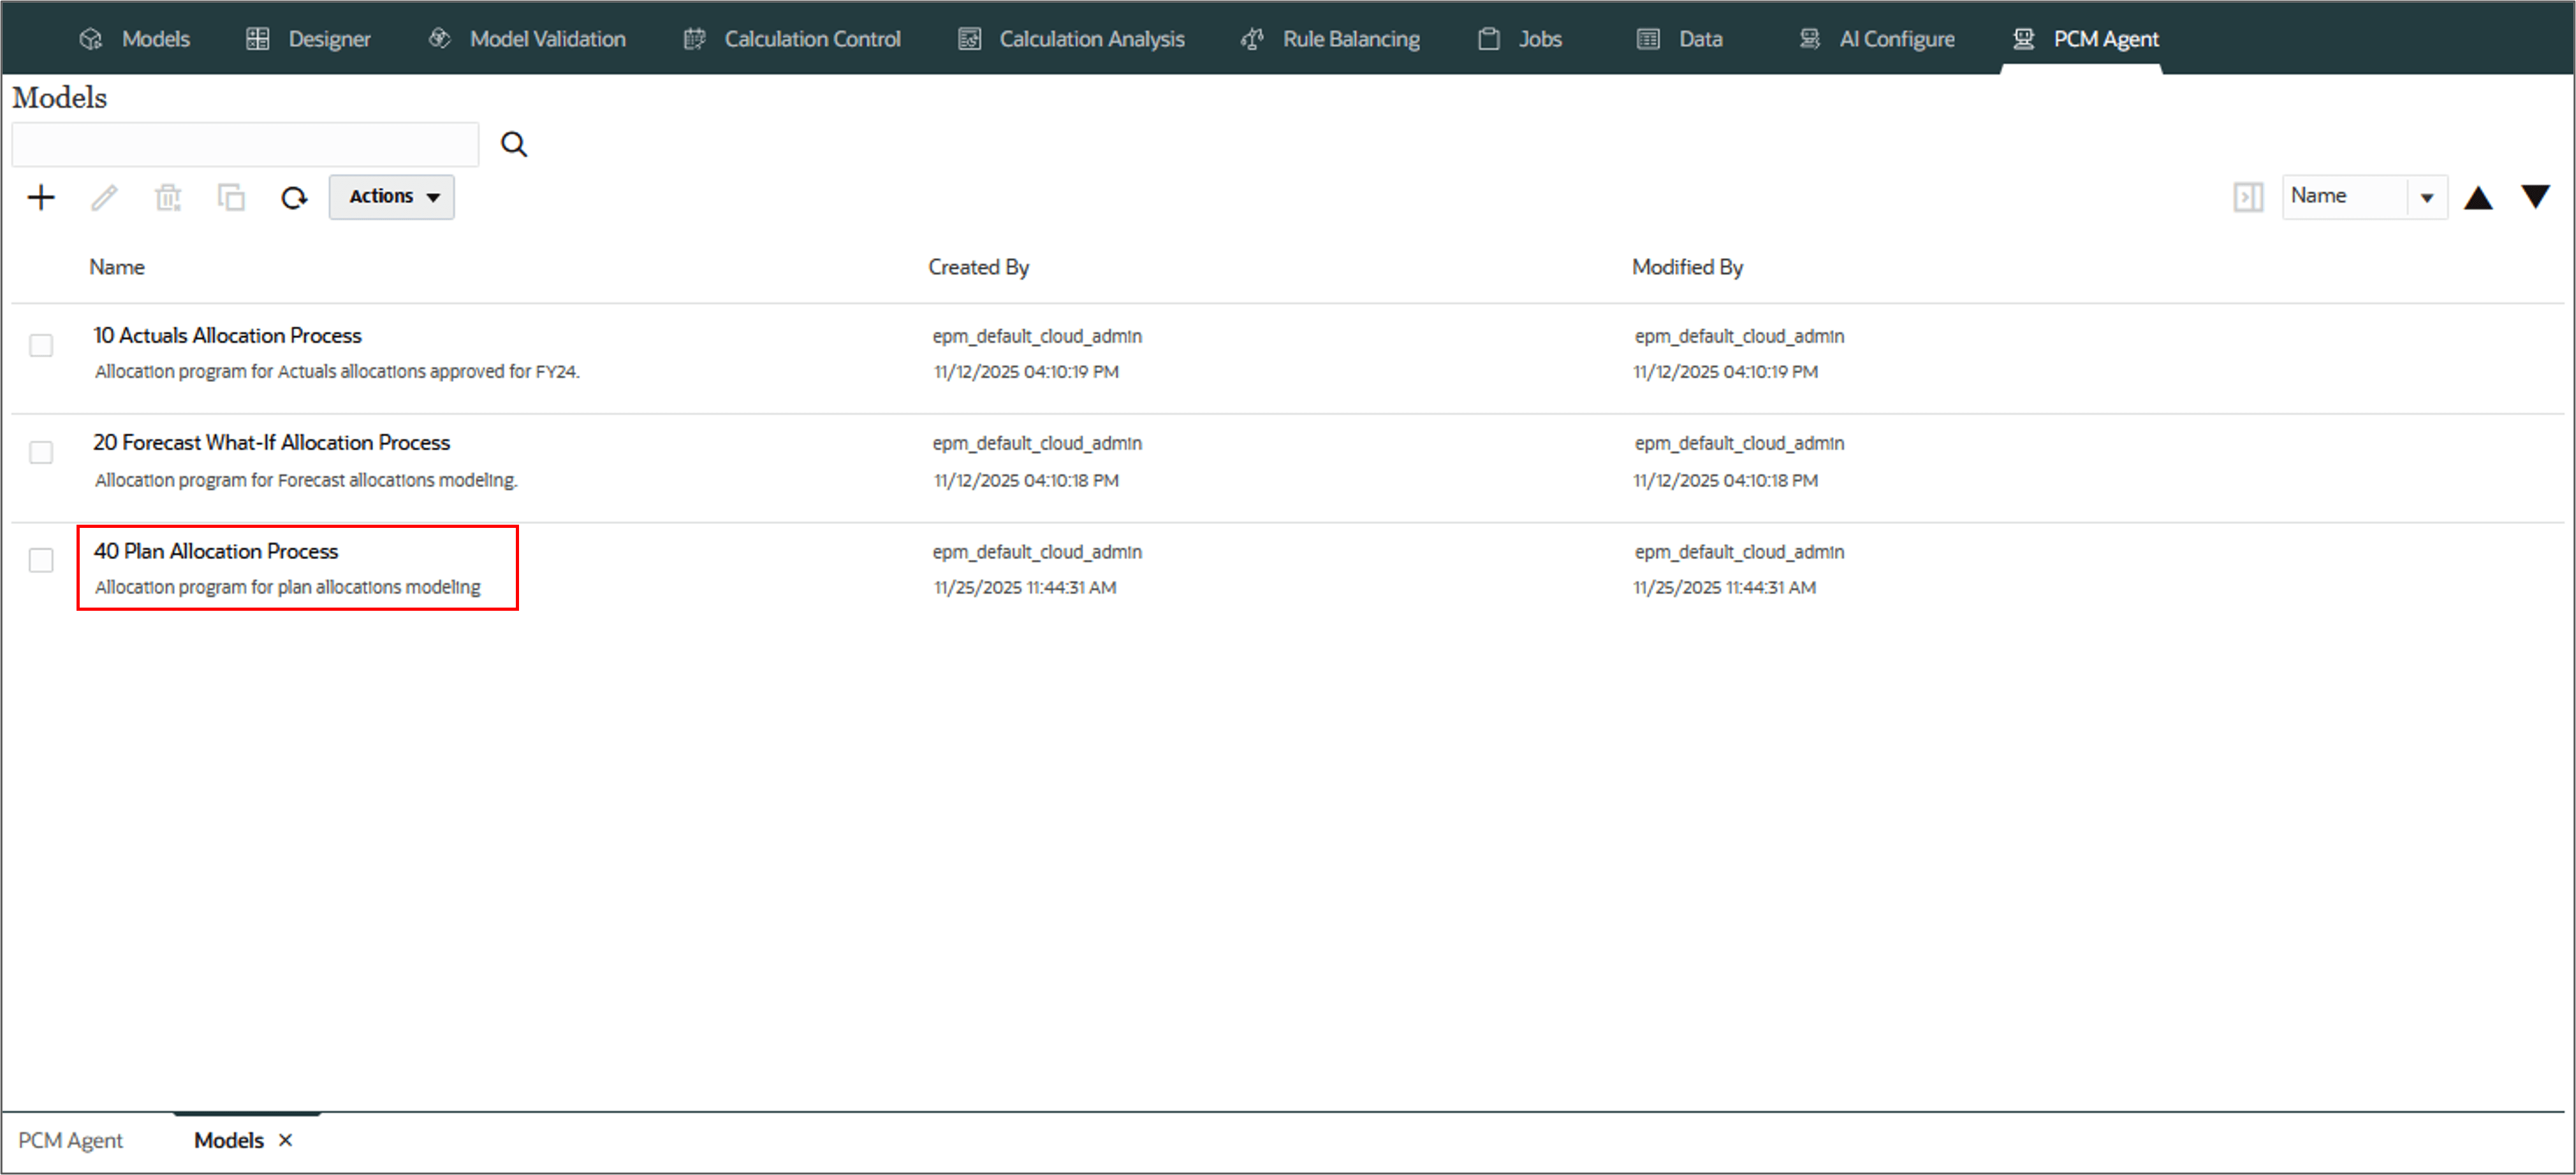
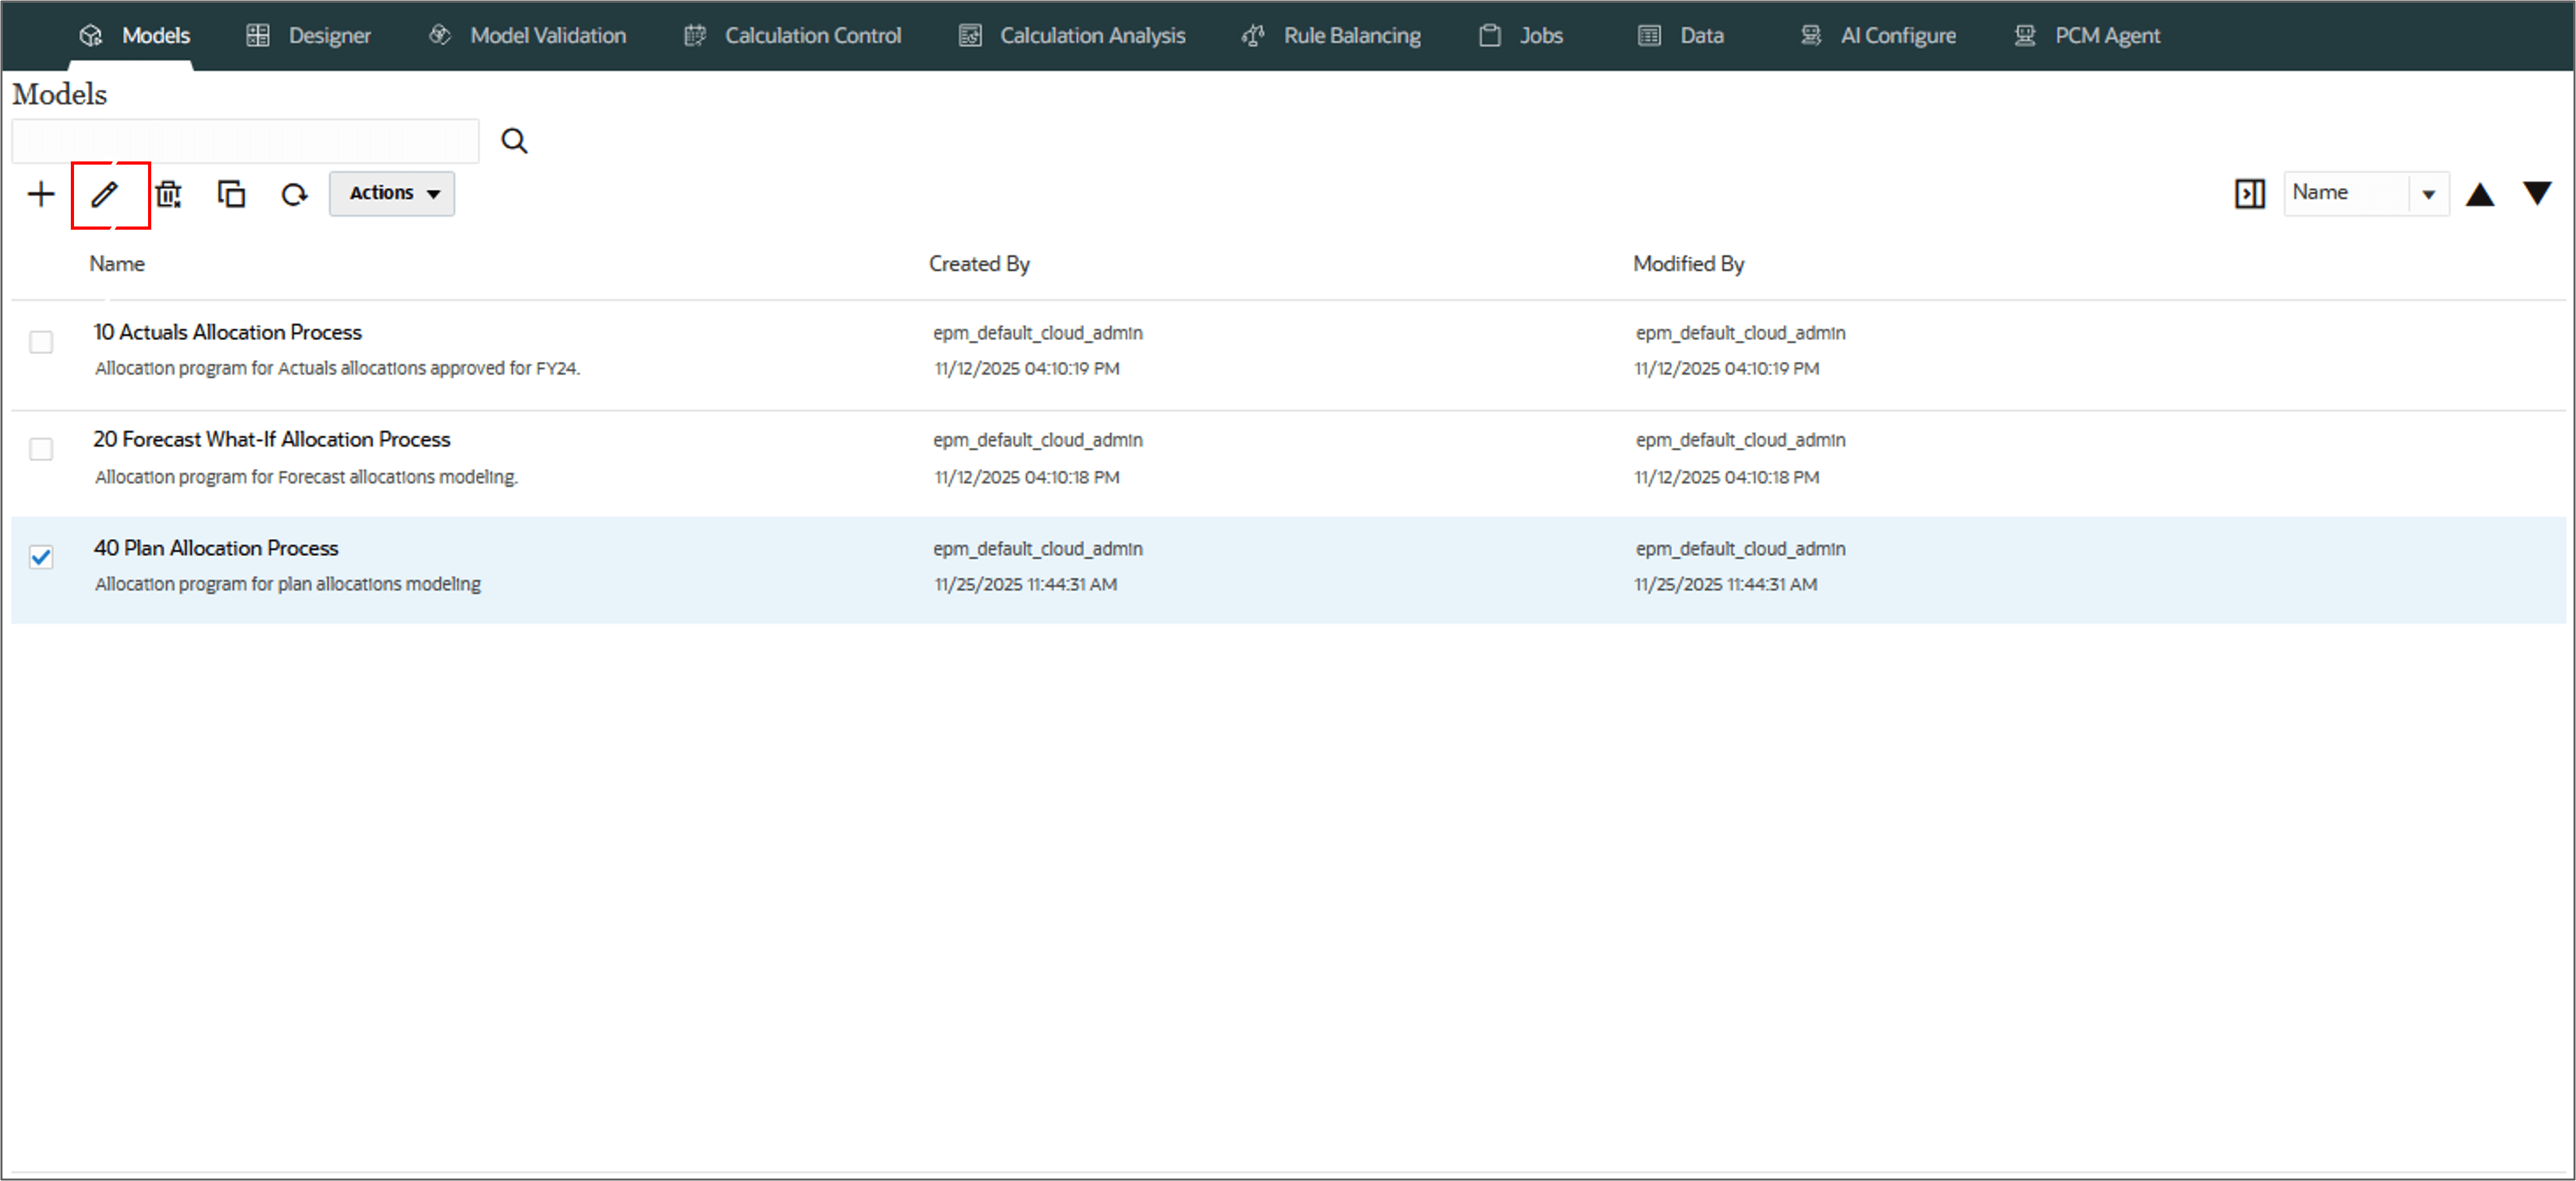
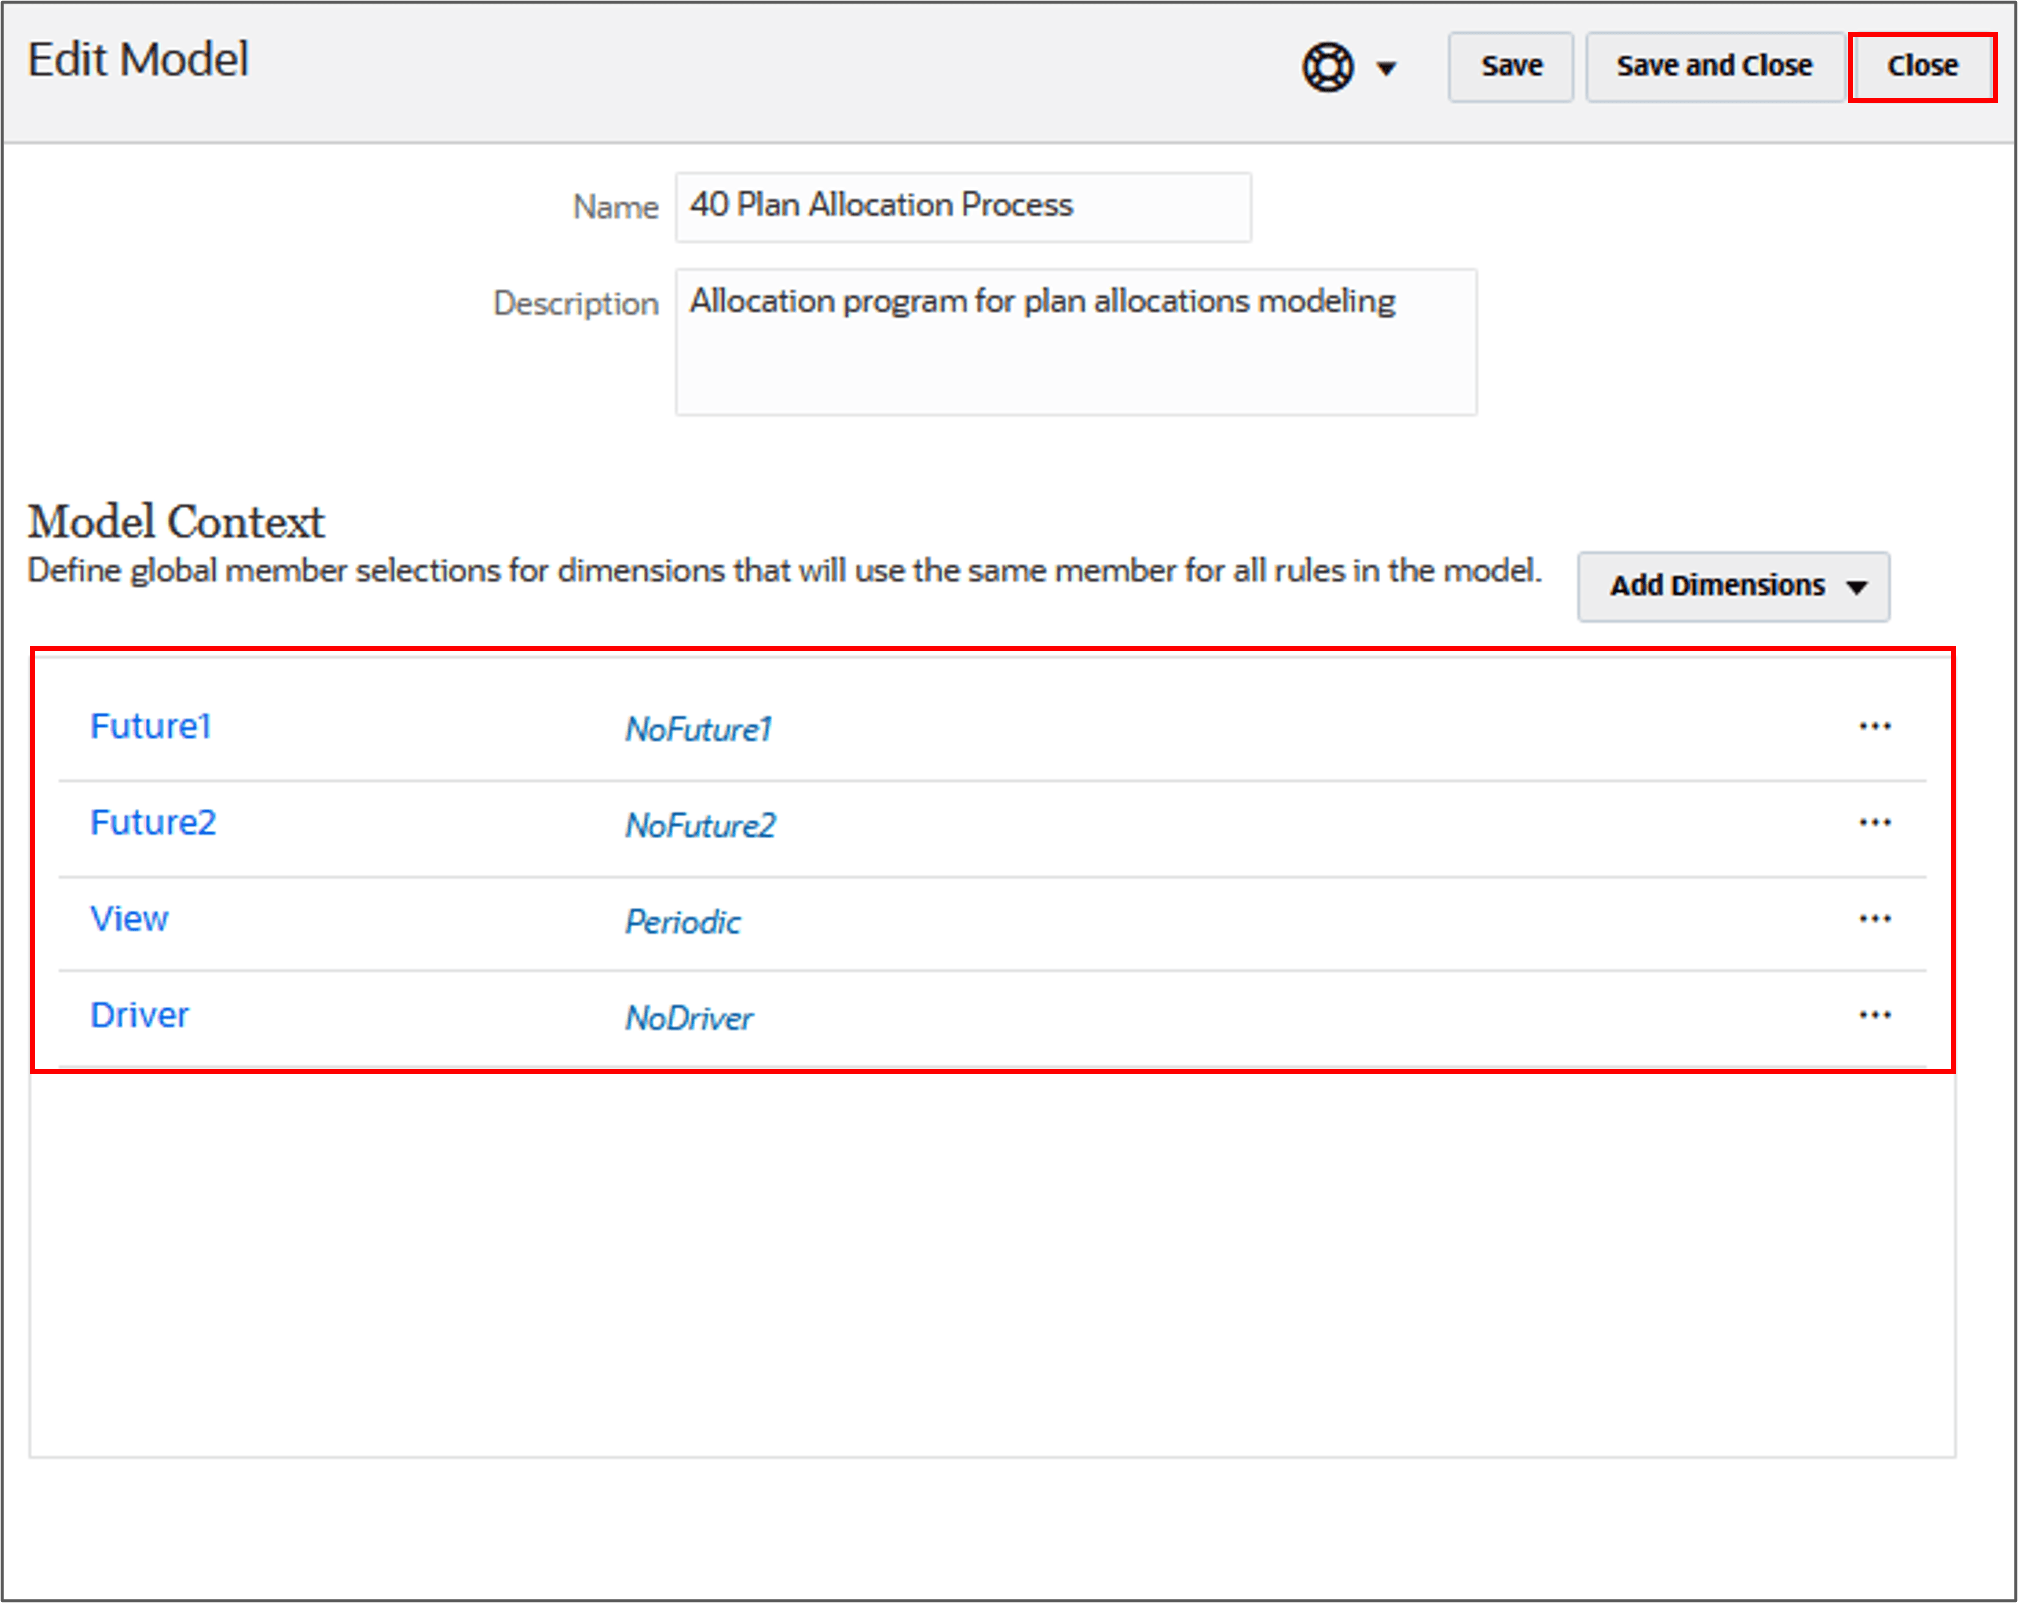
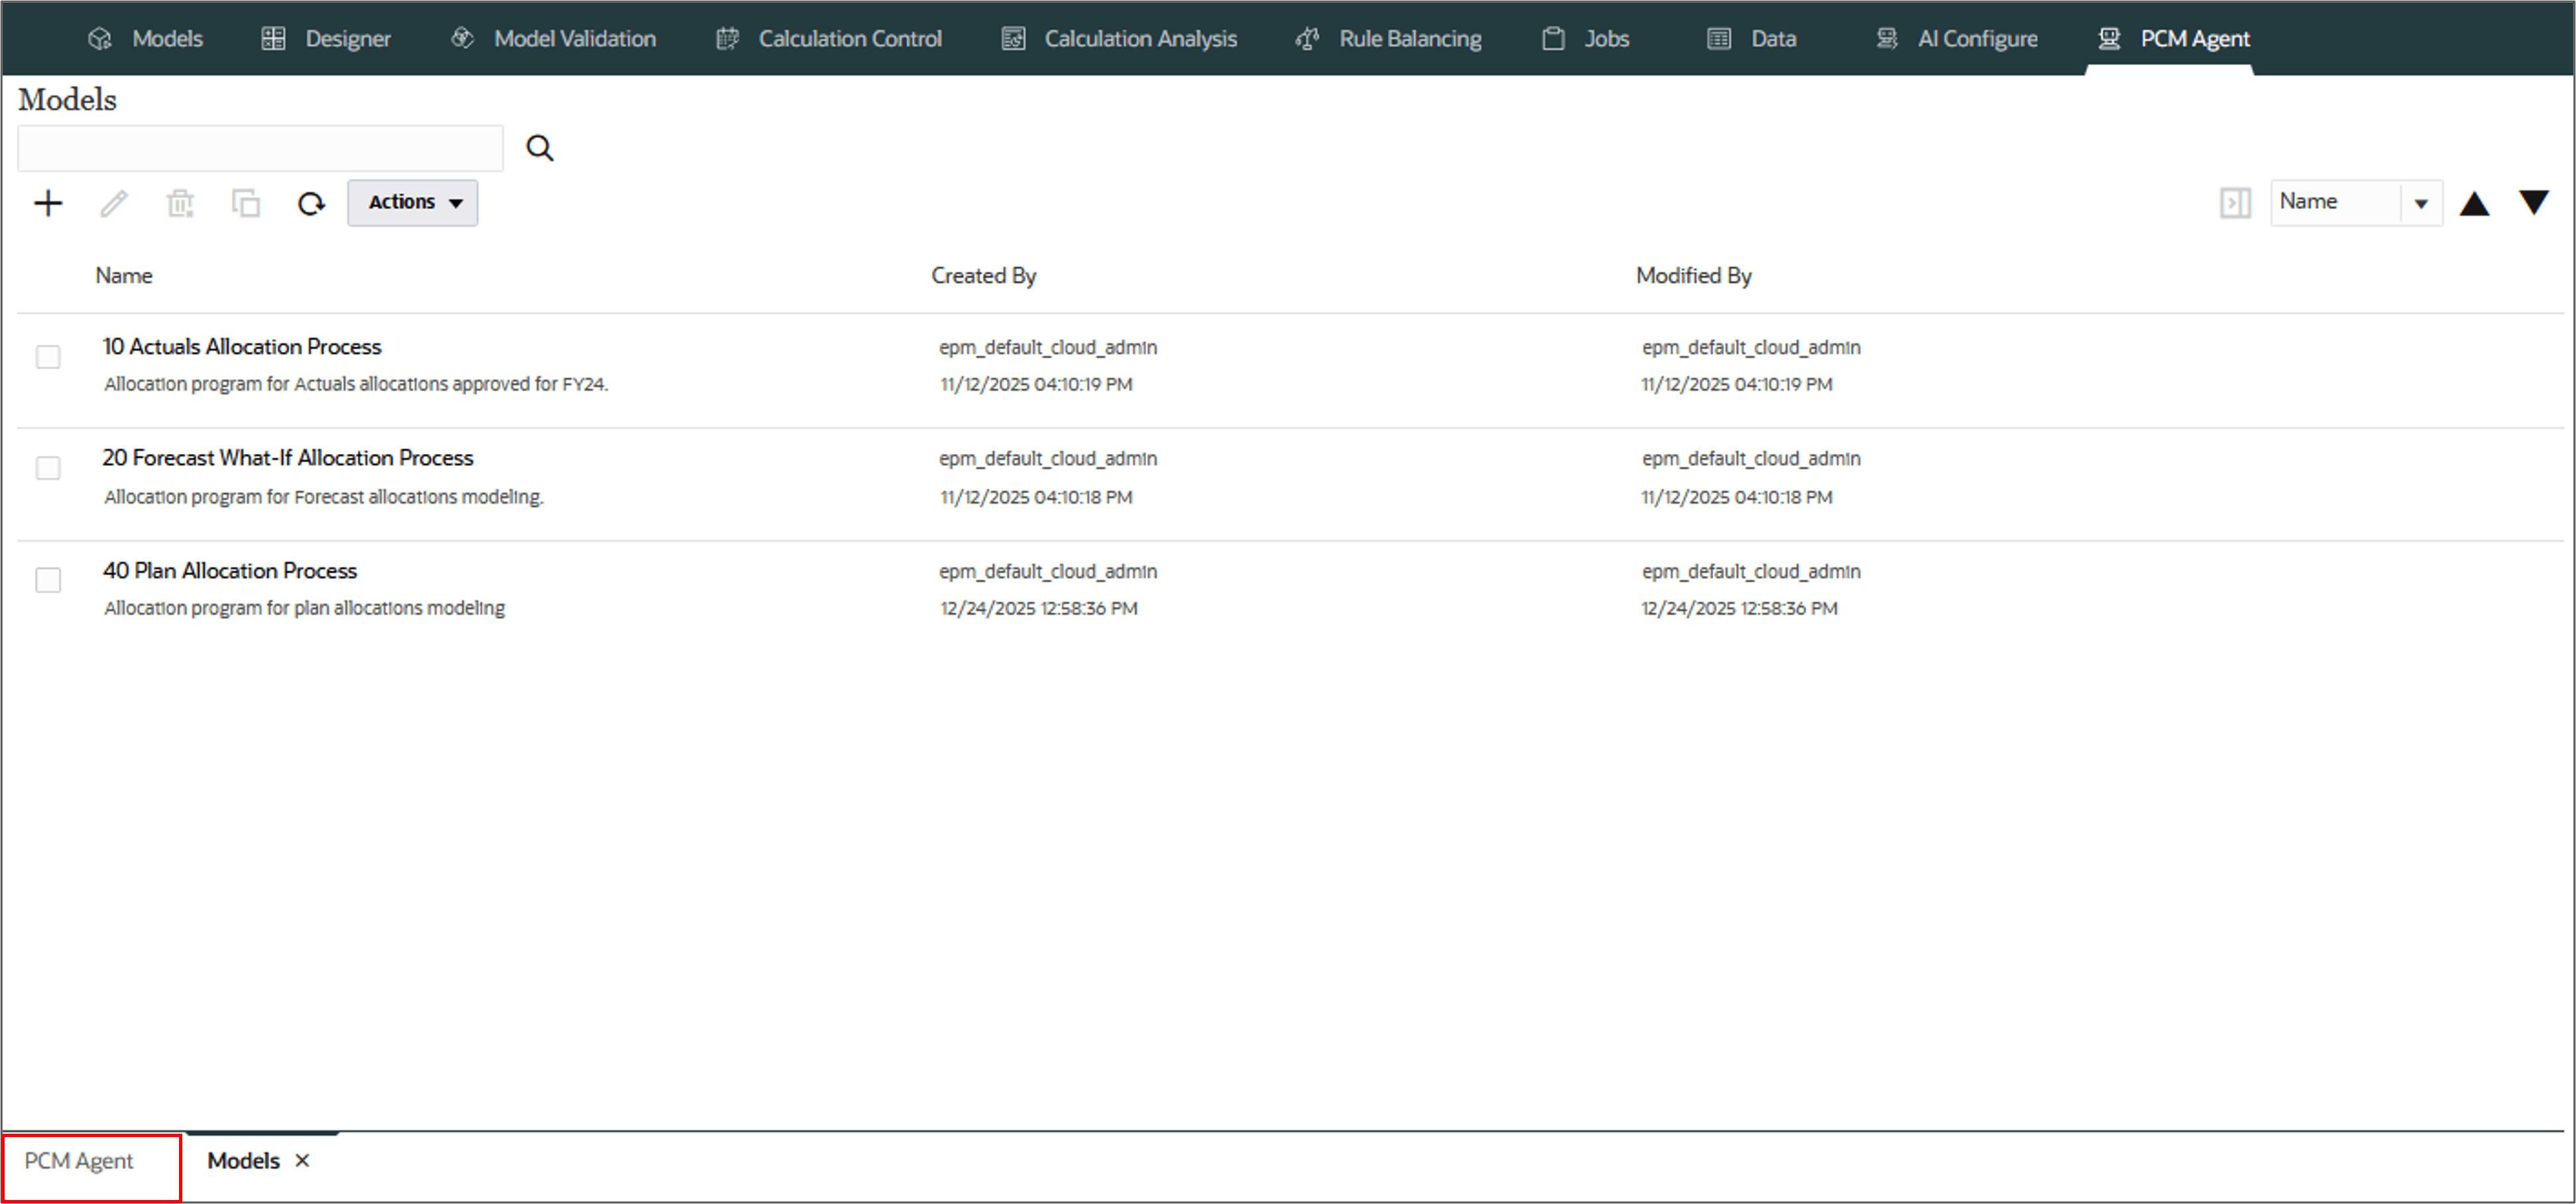
- Click View Models Page to view the model on the Models page.
- The model '40 Plan Allocation Process' is displayed in the list.
- Select and click
 (Edit) to view and verify the model context.
 - Verify if the model context is defined correctly. Click Close.
- Click PCM Agent tab at the bottom of the page to go back to the PCM Agent.
Create model named '40 Plan Allocation Process'
description 'Allocation program for plan allocations modeling'
context Future1:NoFuture1, Future2:NoFuture2, View:Periodic, Driver:NoDriver
The PCM Agent processes the request and displays a message indicating successful execution of the command. If the execution failed, the agent displays error messages.
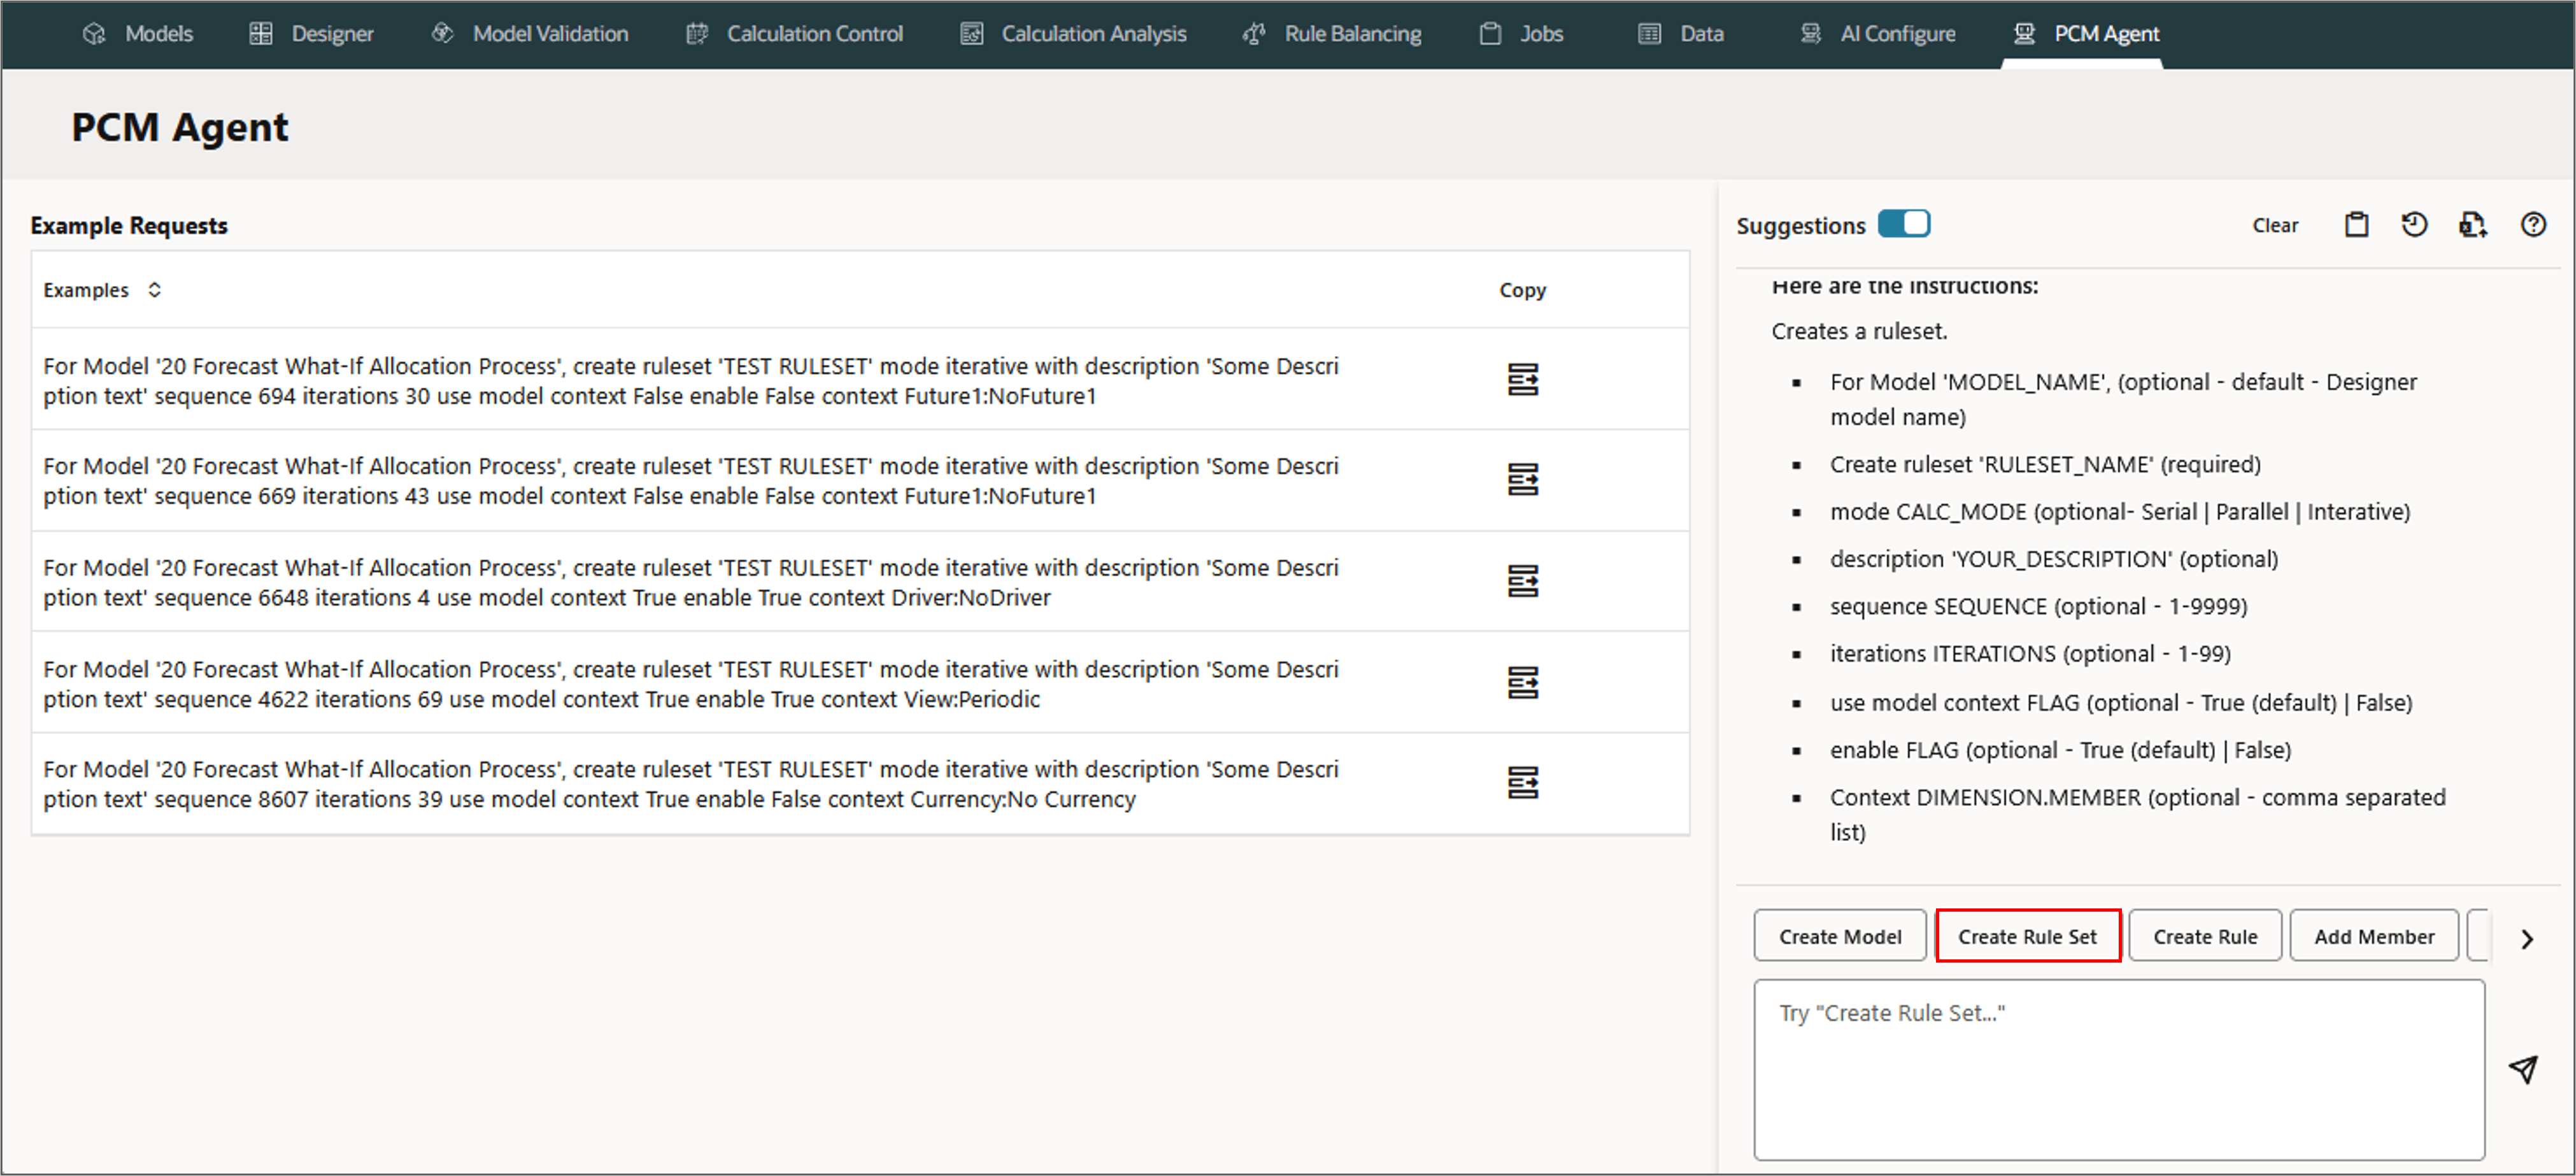
Creating a Ruleset
In this section, you create a rule set using PCM agent. Rule sets enable users to group related rules together to better organize the definition of calculation logic, to execute similar rules together, and to simplify the definition of rules that share common dimension members.
Parameters for Creating a Ruleset
- For Model 'MODEL_NAME', (optional - default - Designer model name)
- Create ruleset 'RULESET_NAME' (required)
- mode CALC_MODE (optional- Serial | Parallel | Interative)
- description 'YOUR_DESCRIPTION' (optional)
- sequence SEQUENCE (optional - 1-9999)
- iterations ITERATIONS (optional - 1-99)
- use model context FLAG (optional - True (default) | False)
- enable FLAG (optional - True (default) | False)
- Context DIMENSION.MEMBER (optional - comma separated list)
Example: Creating a Ruleset
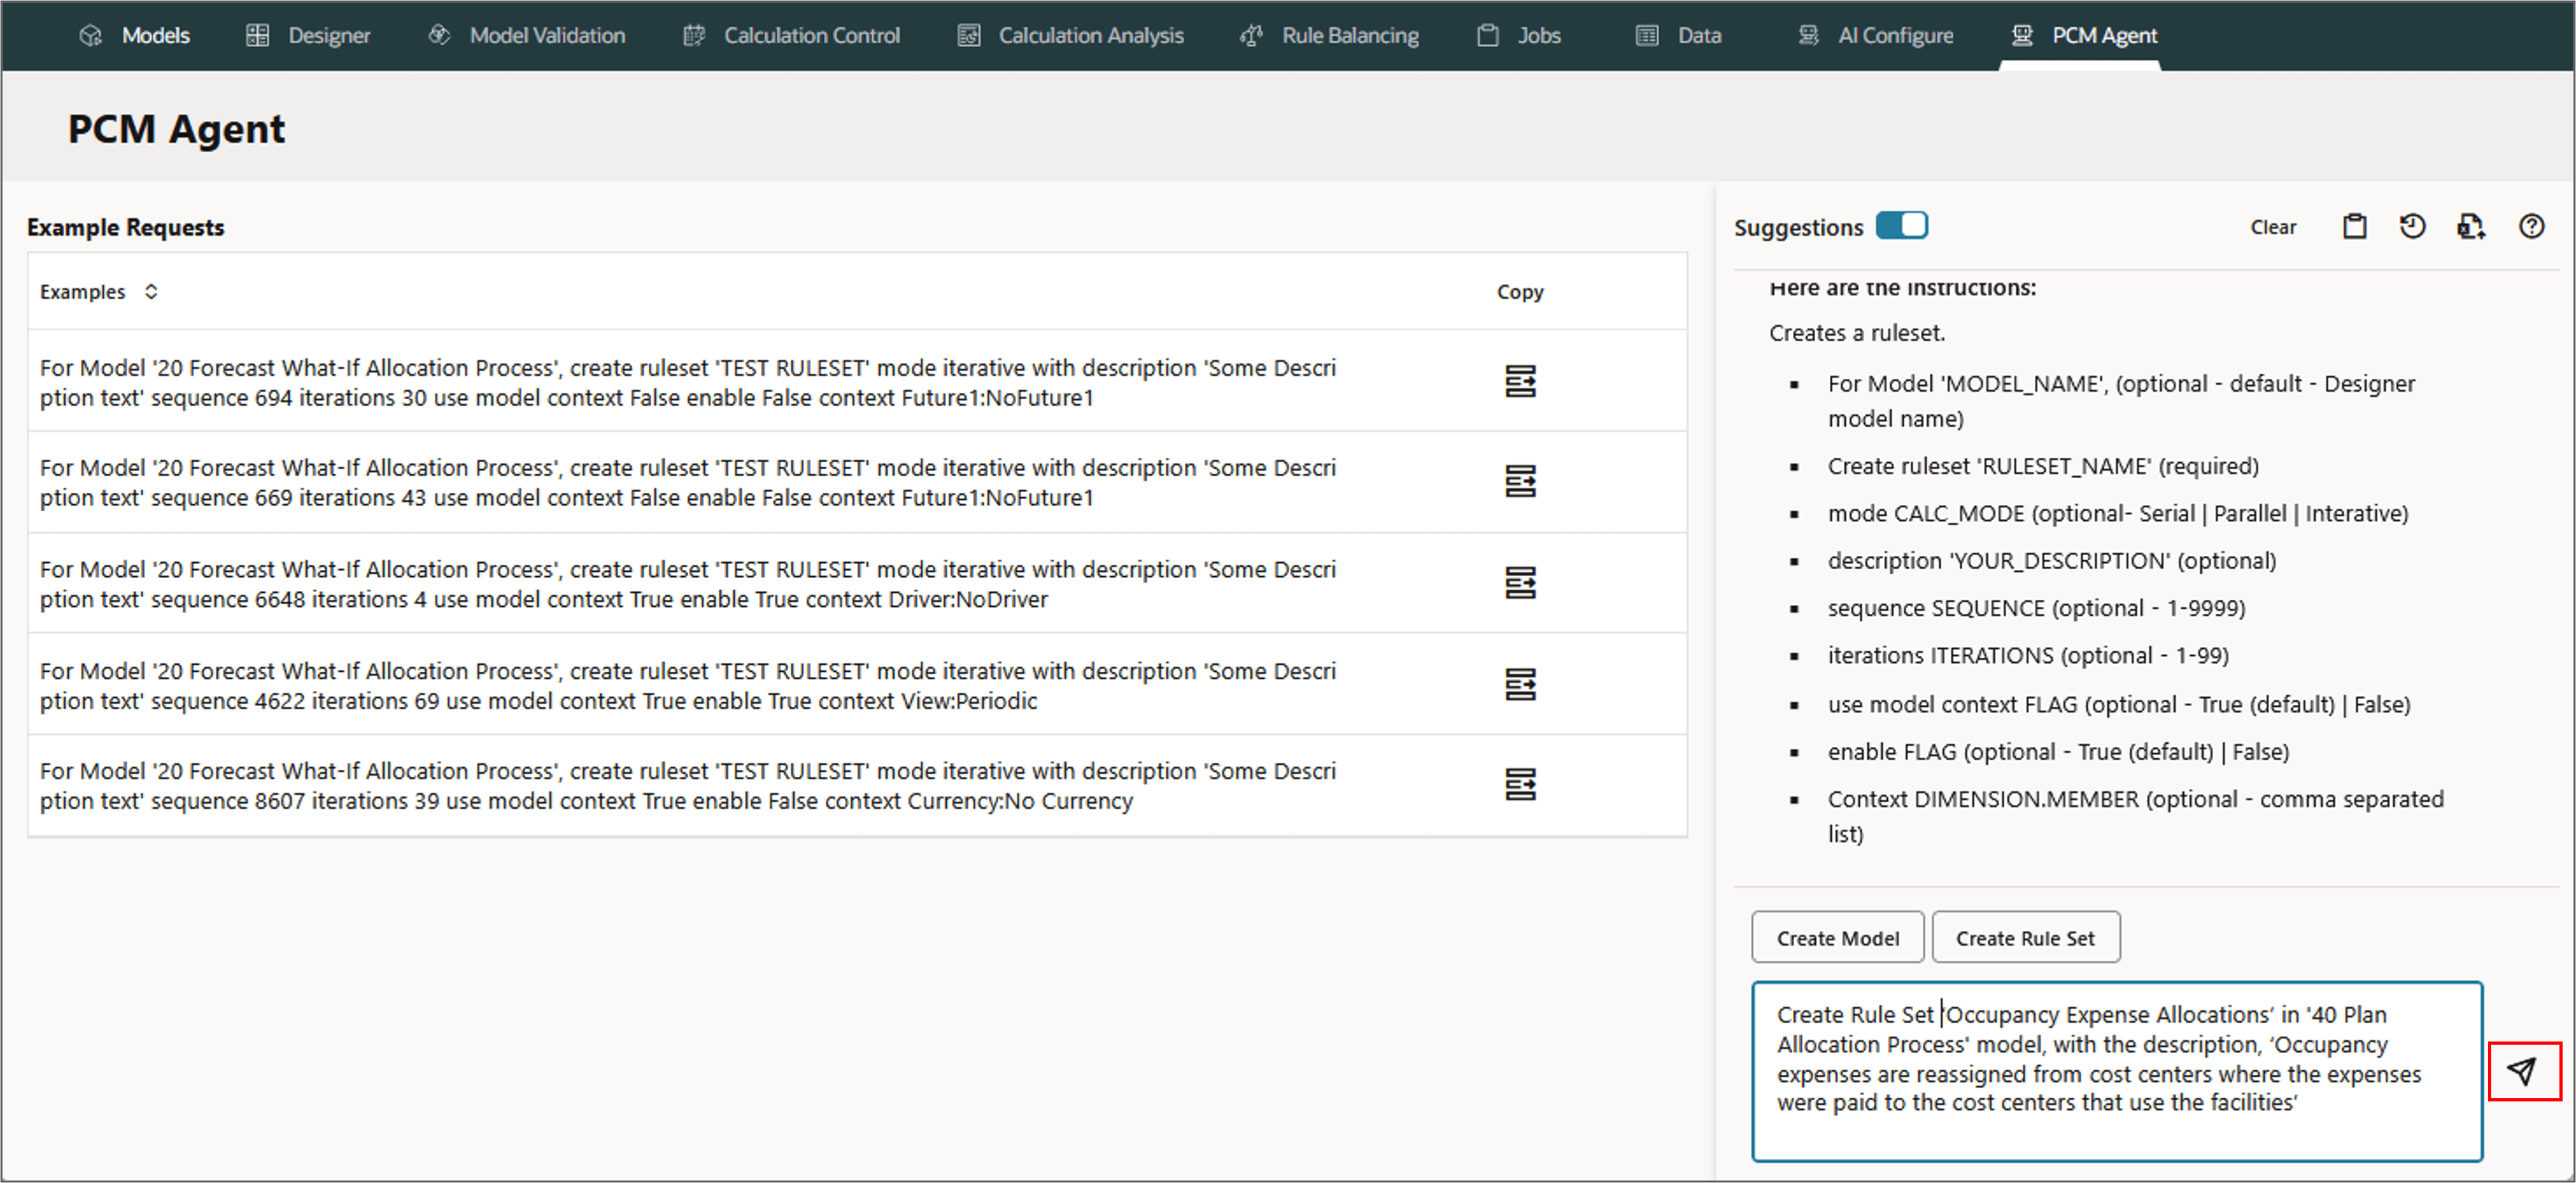
Let's create a rule set Occupancy Expense Allocations in 40 Plan Allocation Process model, with the description, Occupancy expenses are reassigned from cost centers where the expenses were paid to the cost centers that use the facilities.
Note:
Use the SmartLookup feature to help typing the commands accurately. Type a command word followed by the @ symbol to bring up a list of available artifacts (models, rulesets, dimensions, etc.) to select from. Start typing model @ and a list of existing models are displayed .- On the PCM Agent tab, select or enter Create Ruleset.
- Type the following in the PCM agent and click (Send). The PCM Agent processes the request and converts it into a structured command.
- Review or refine the request if needed.
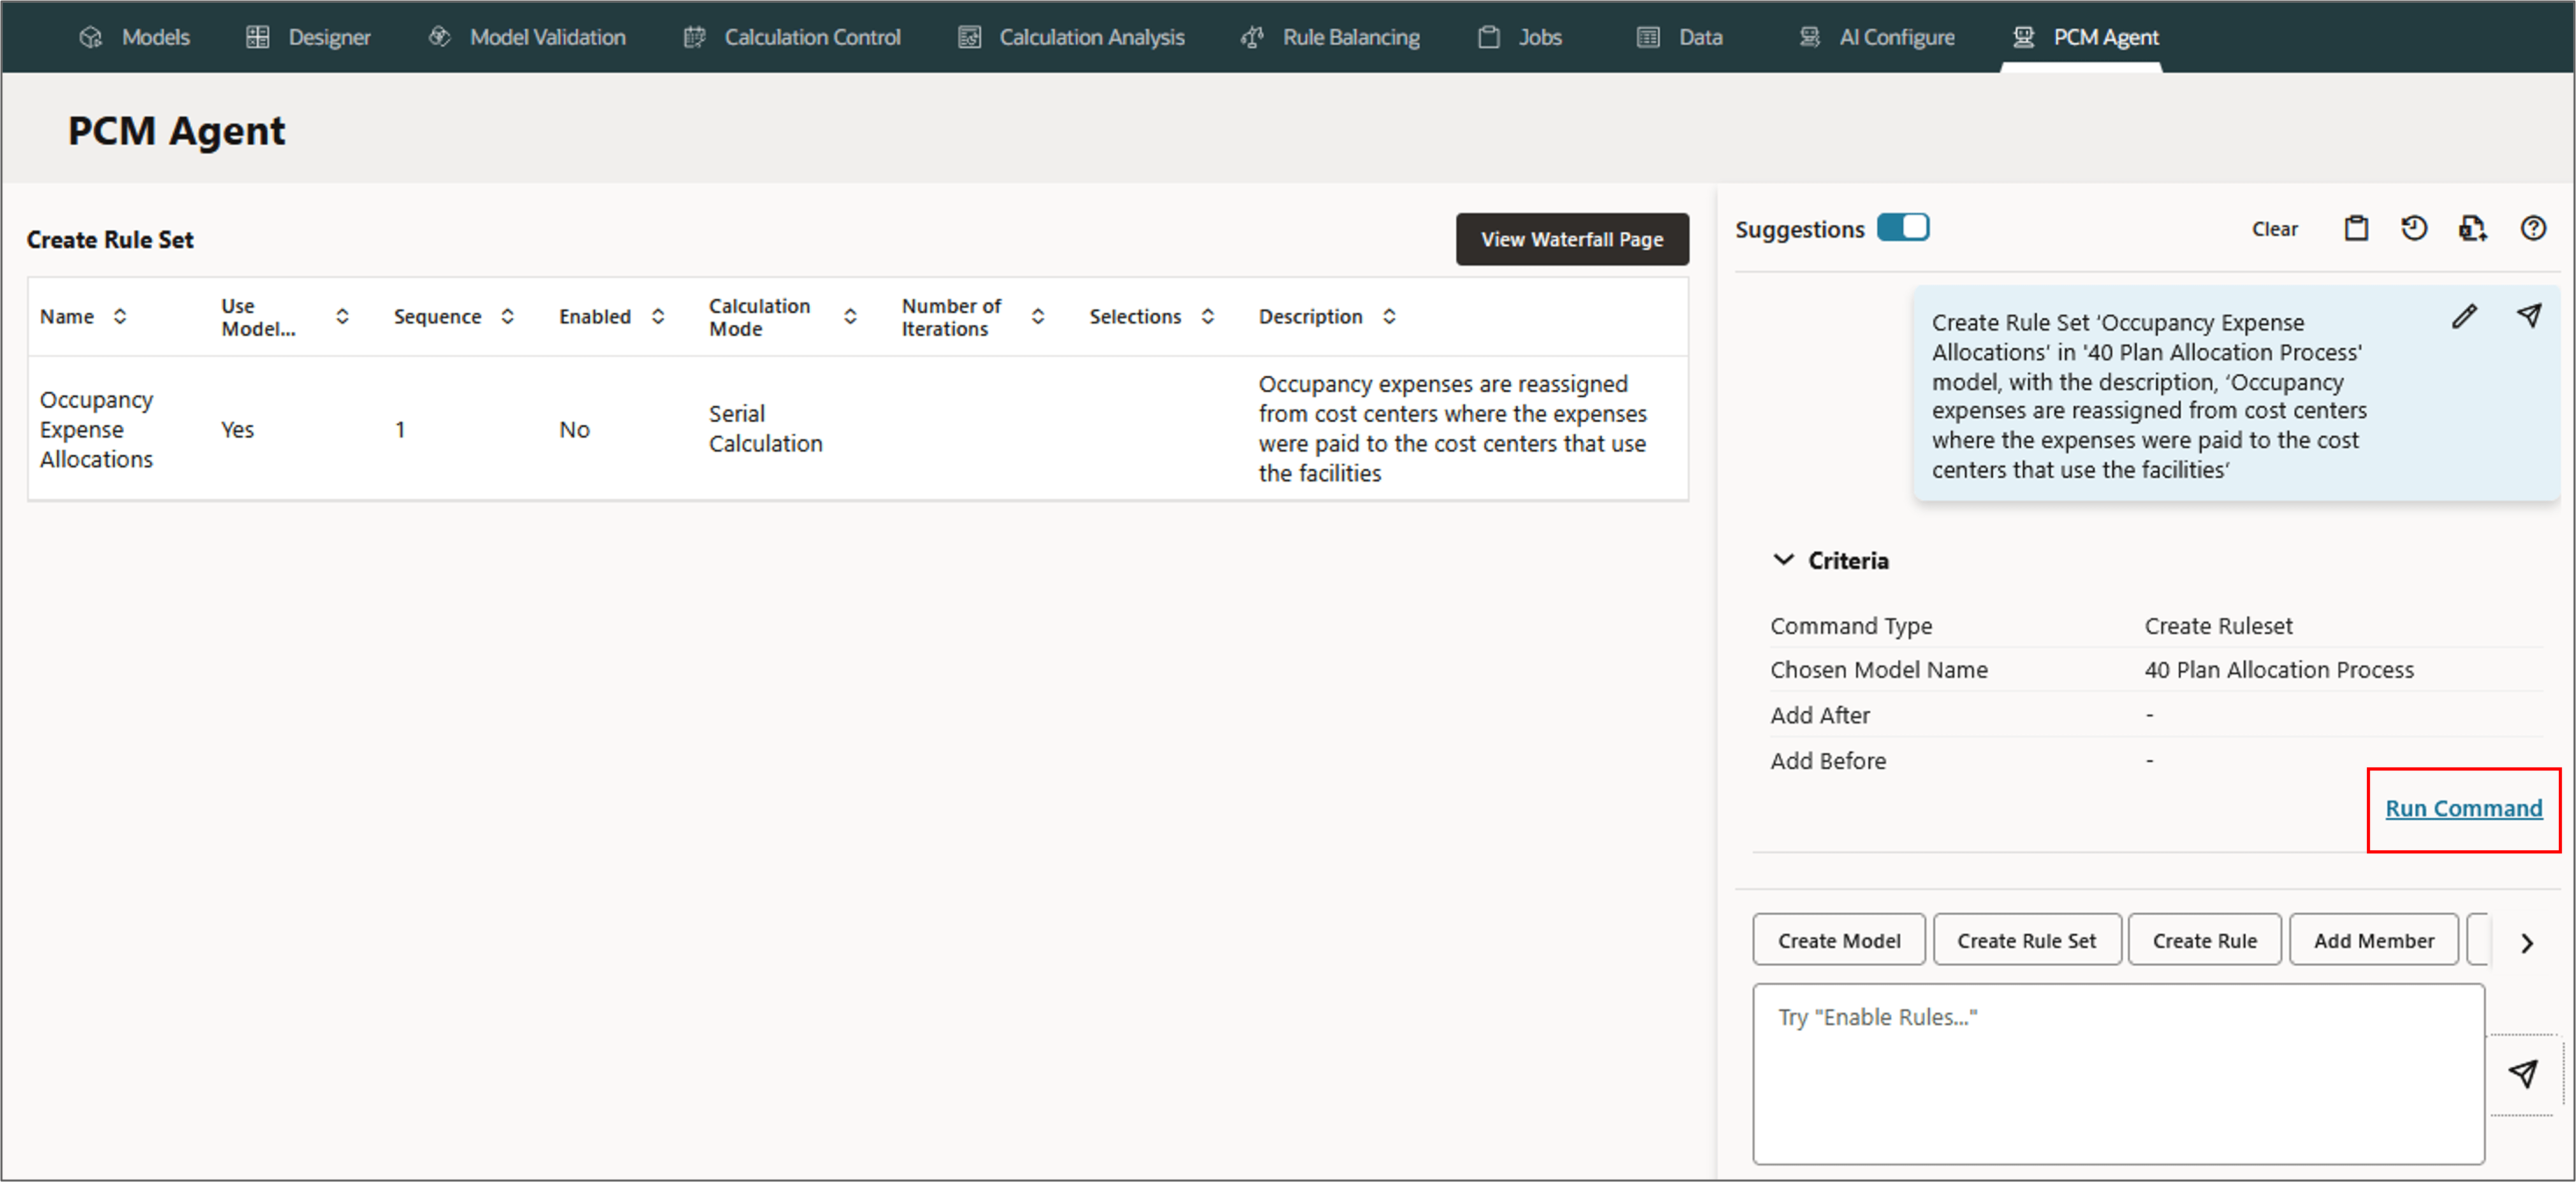
- Run the command.
- Verify the results by clicking View Waterfall Page on the top to view the newly created rule set.
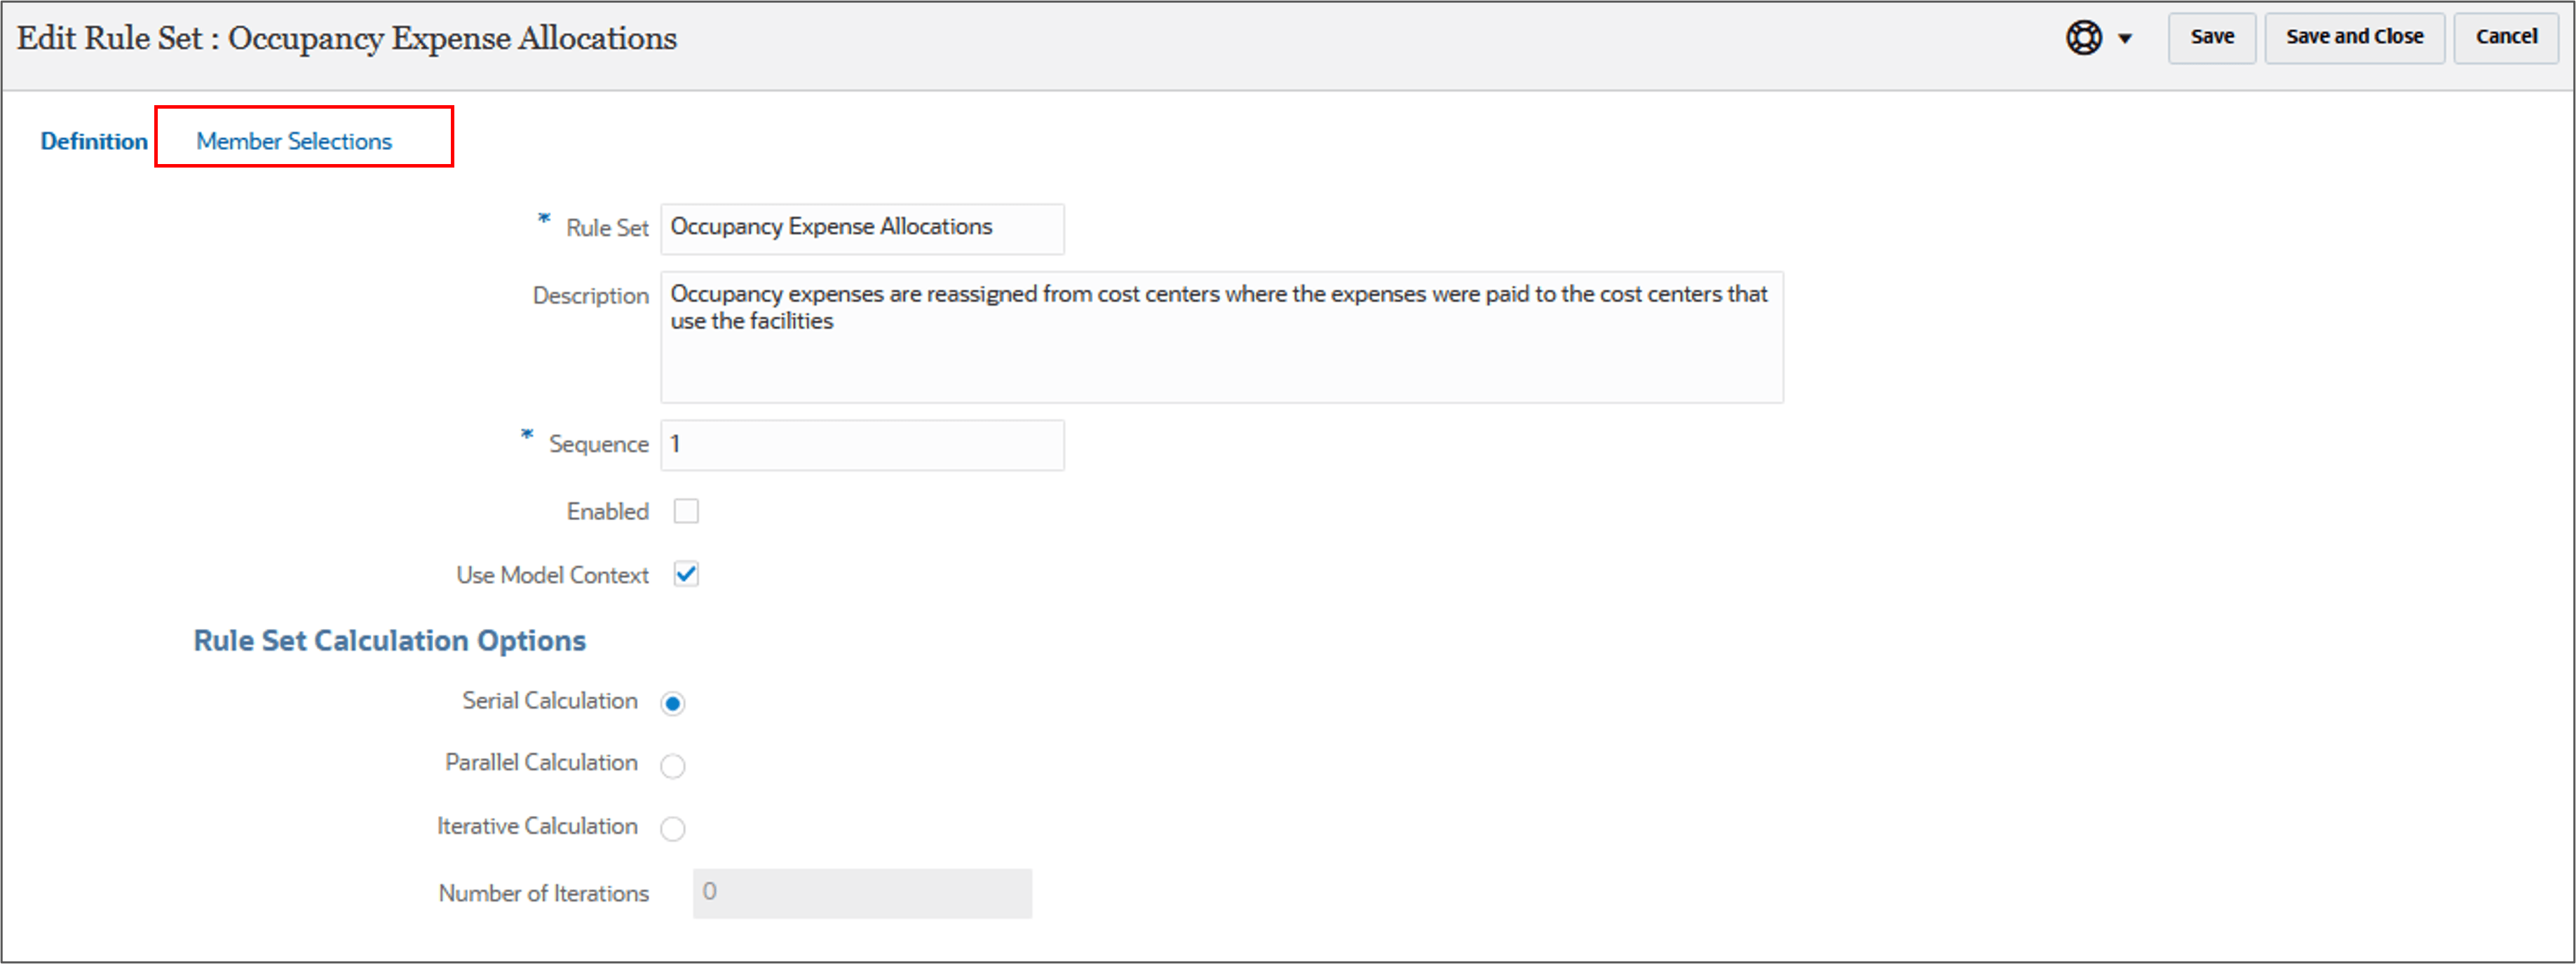
- Click
 (Edit) to edit the Definition and add the Member Selections.
 - Click Member Selections to add the required dimensions.
Create Rule Set 'Occupancy Expense Allocations'
in '40 Plan Allocation Process' model, with the description,
'Occupancy expenses are reassigned from cost centers where the expenses were
paid to the cost centers that use the facilities'
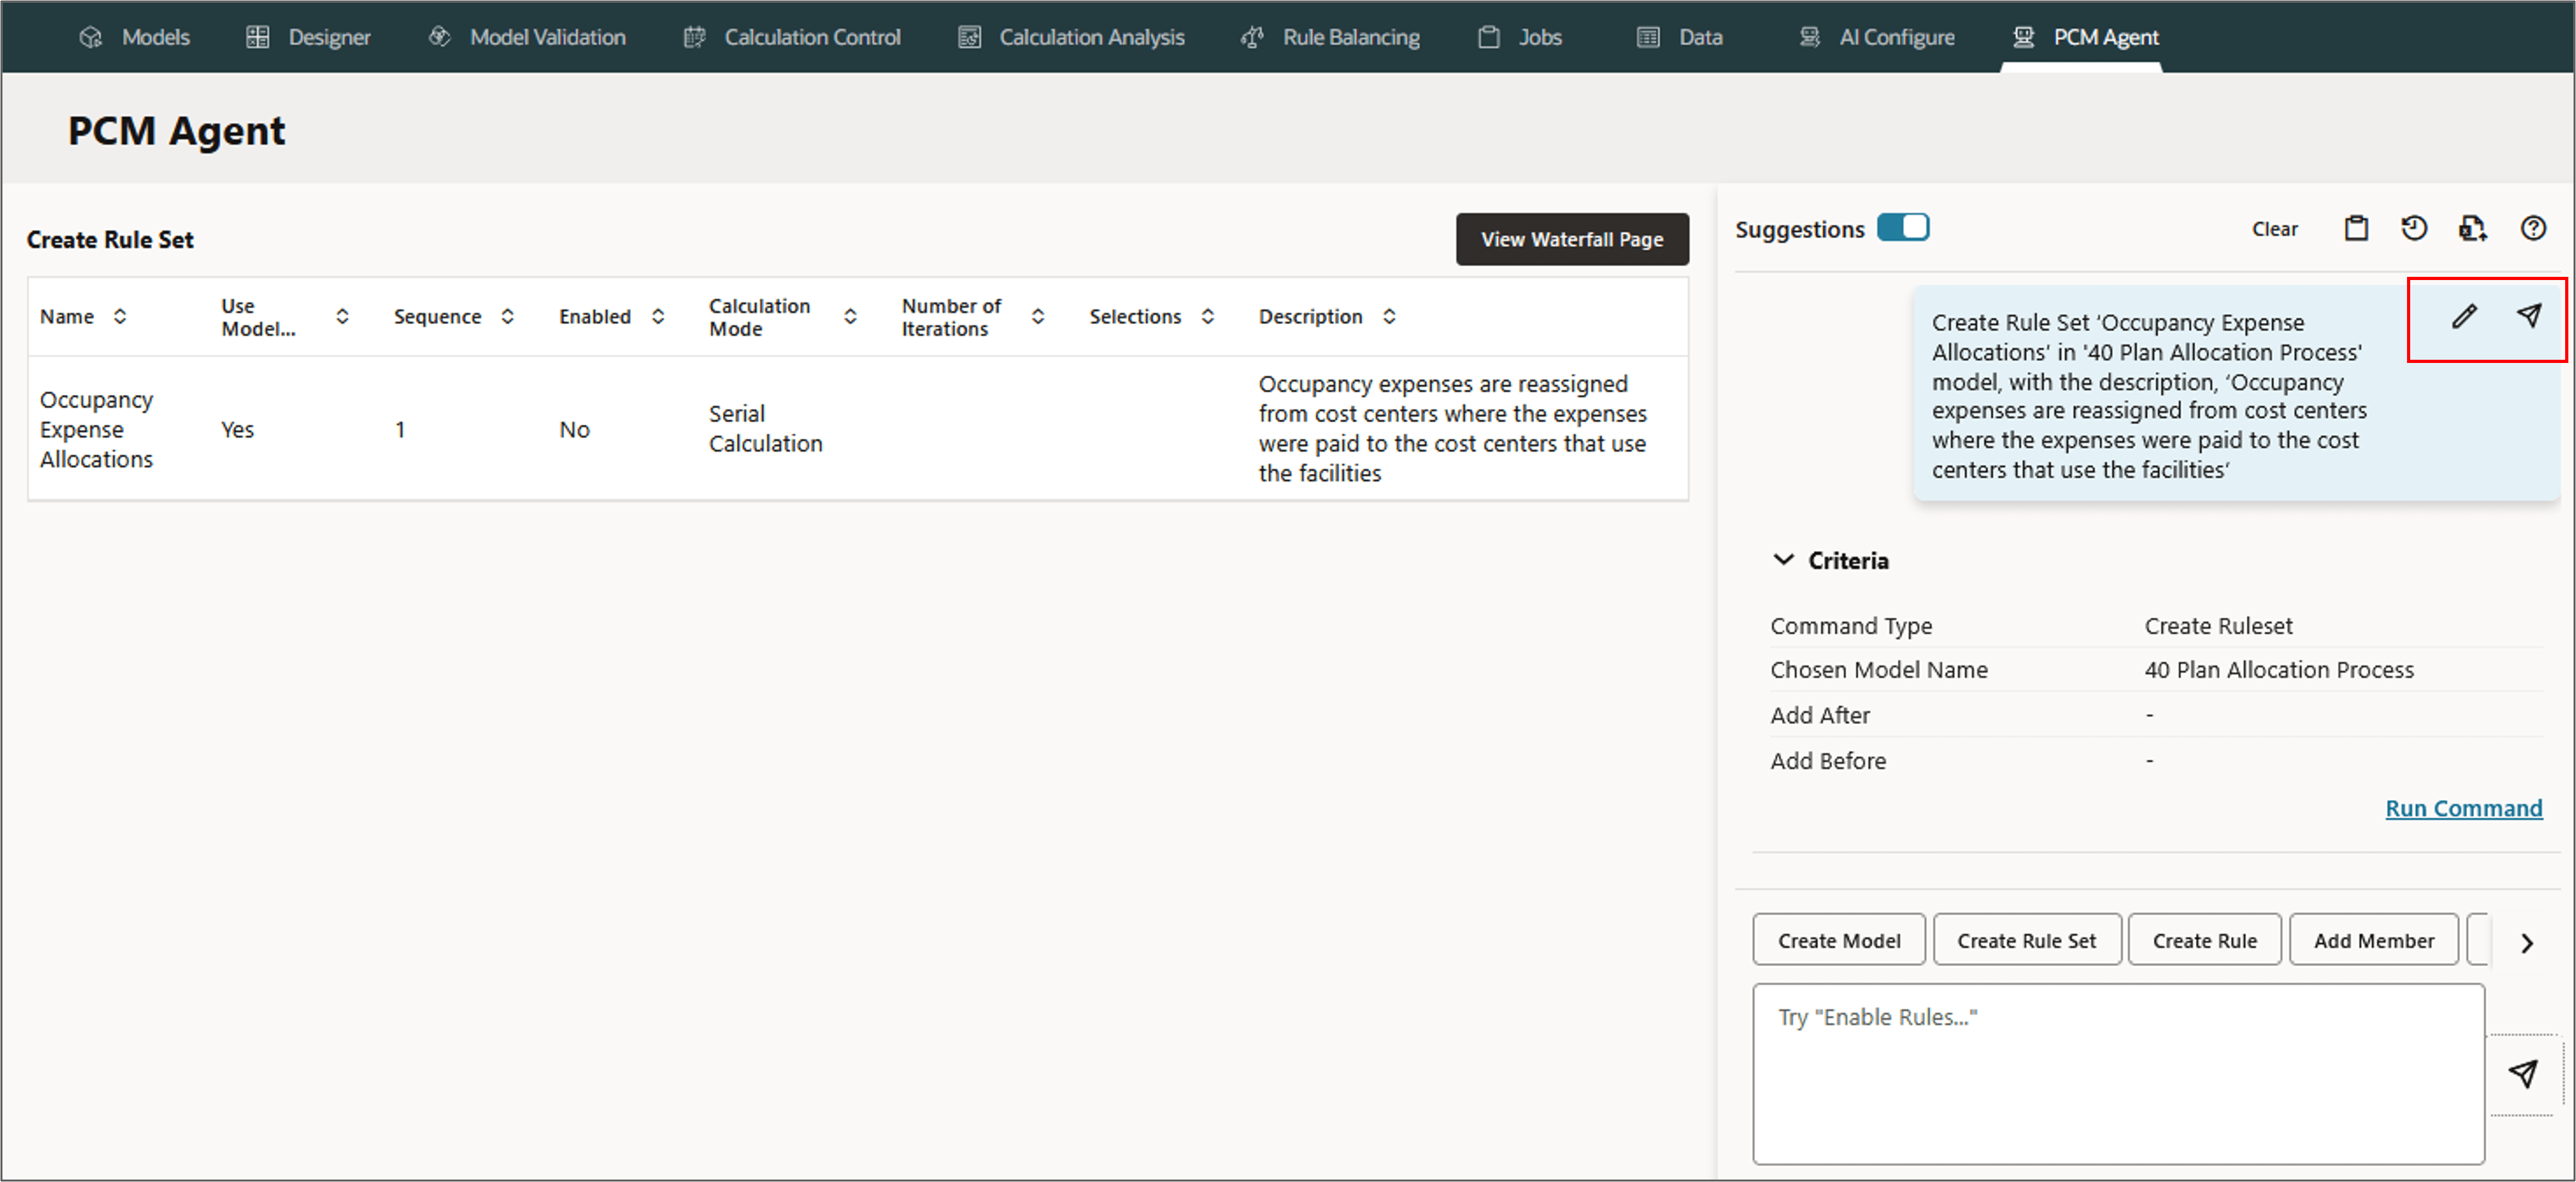
The PCM Agent processes the request and displays a message indicating successful execution of the command. If the execution failed, the agent displays error messages.

The new ruleset is displayed in the model, 40 Plan Allocation Process.
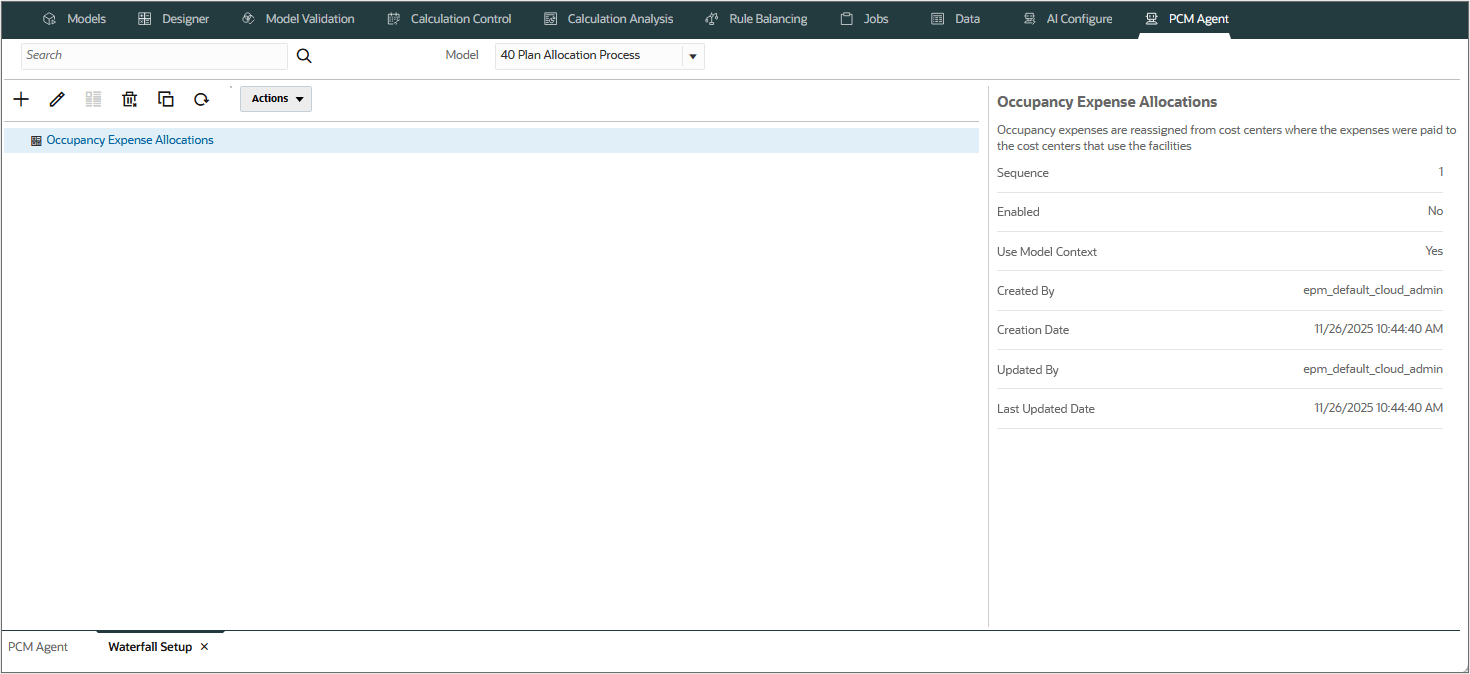
Note:
Rule set created this way has an initial outline and default to serial calculation. It does not have any rule set context members defined. If you need to change the calculation option or add rule set context members, you can edit the rule set after it has been added to your model.
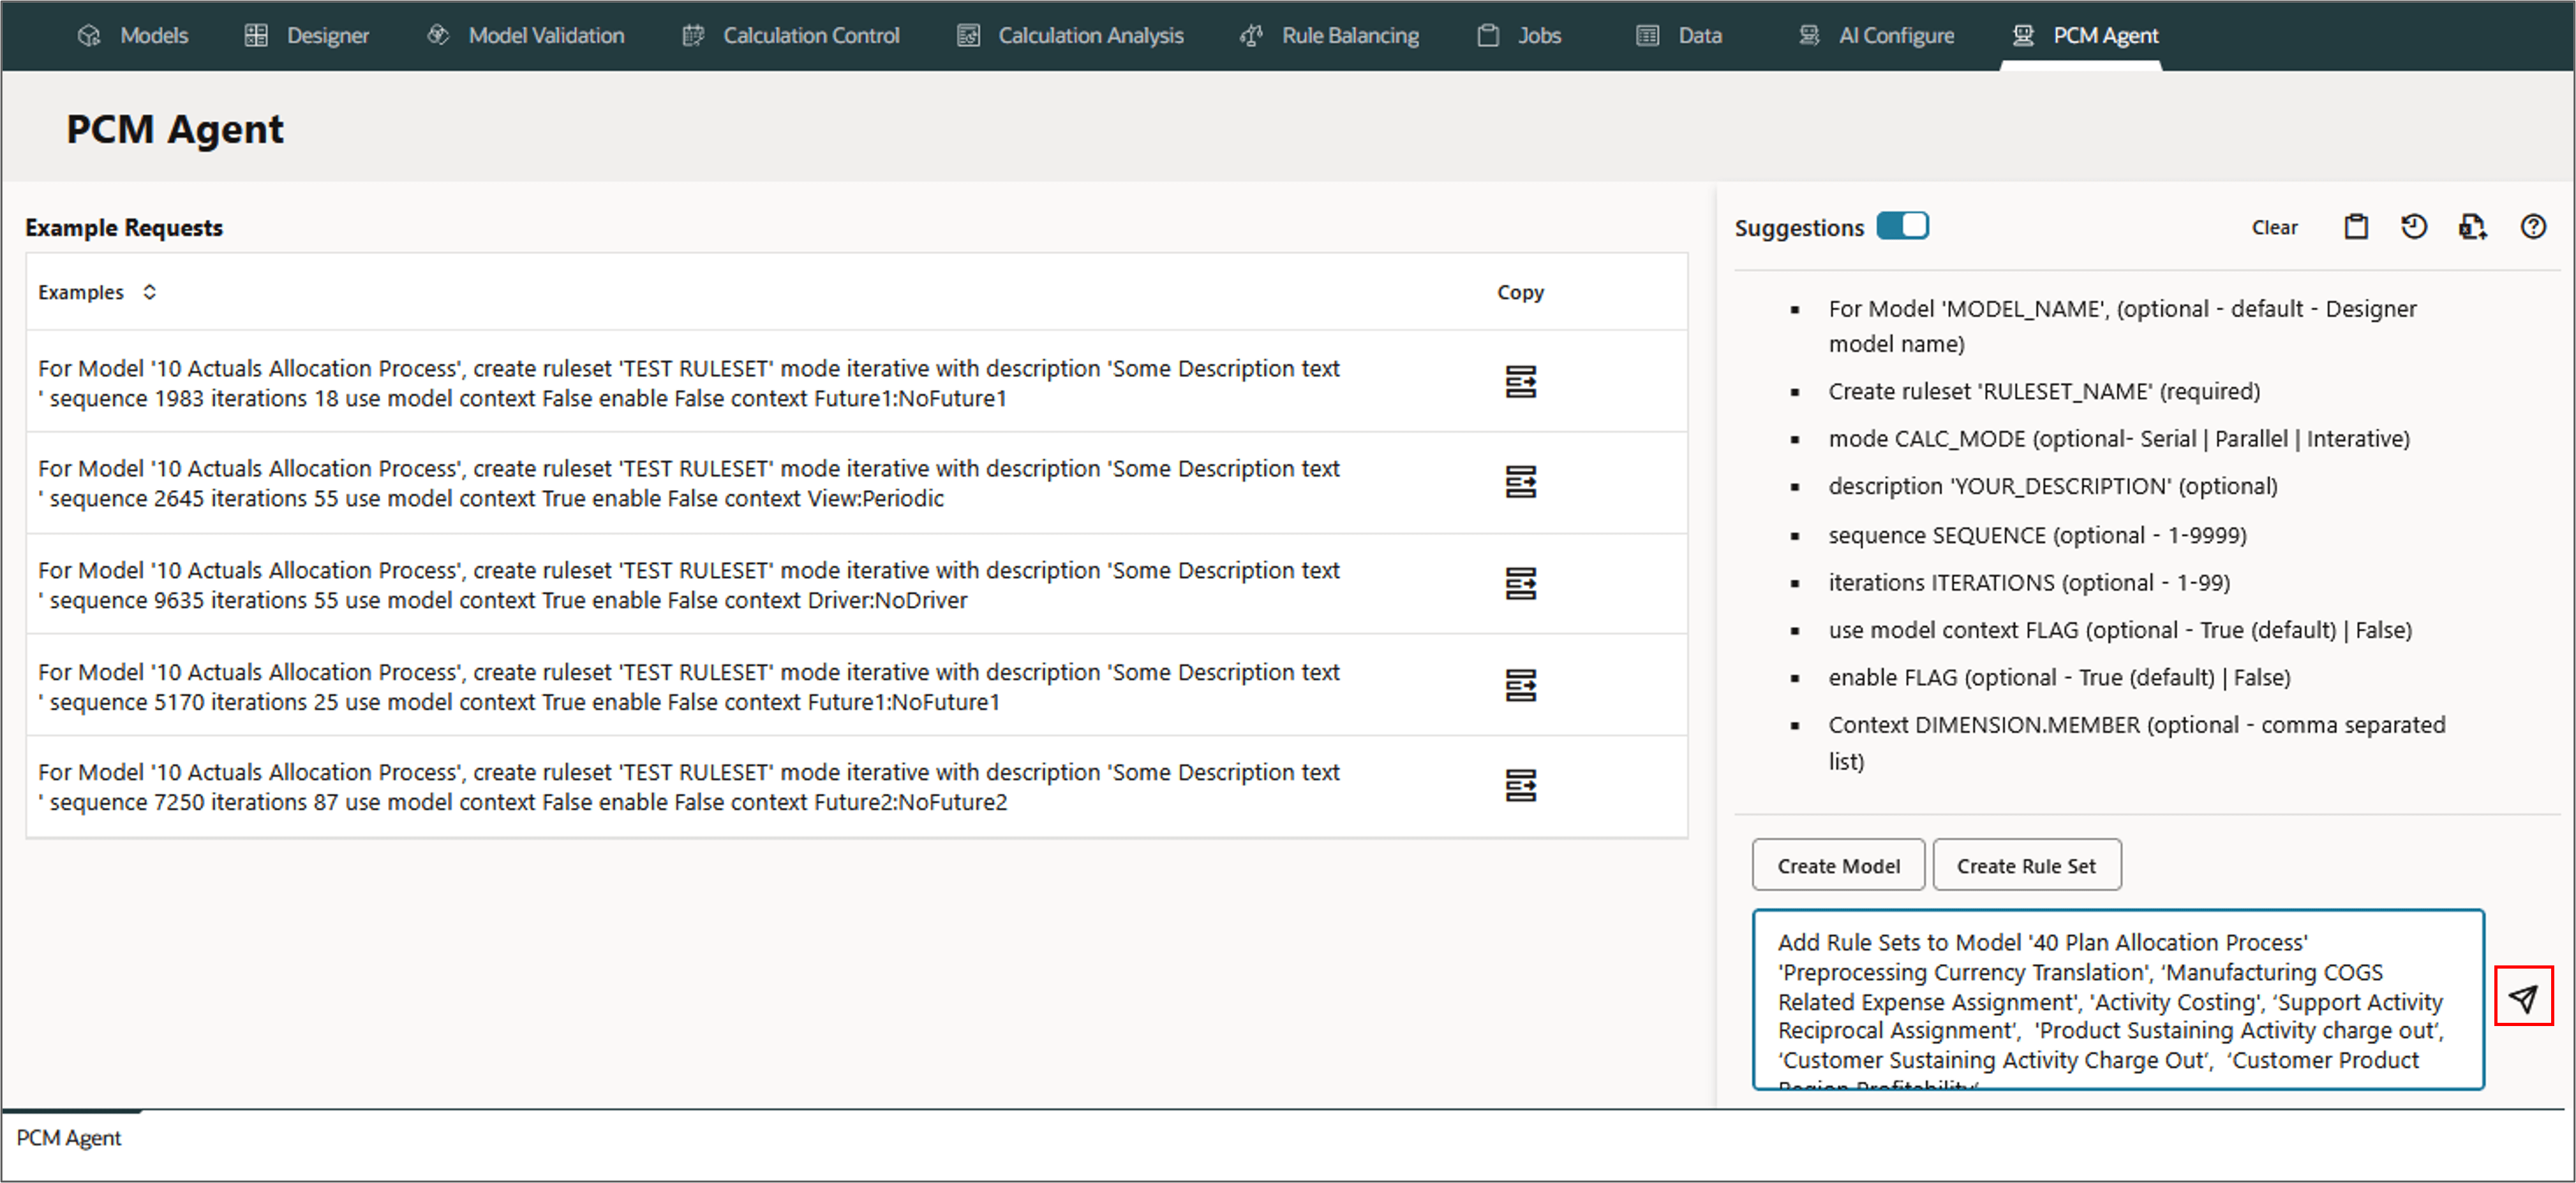
Creating Multiple Rule Sets
PCM agent enables creating multiple rulesets seamlessly using natural processing language with a single command. This can be a big time saver when you are defining a model with a large number of rule sets.
- To create multiple rule sets in a model, go to PCM Agent and select Create Rule Set.
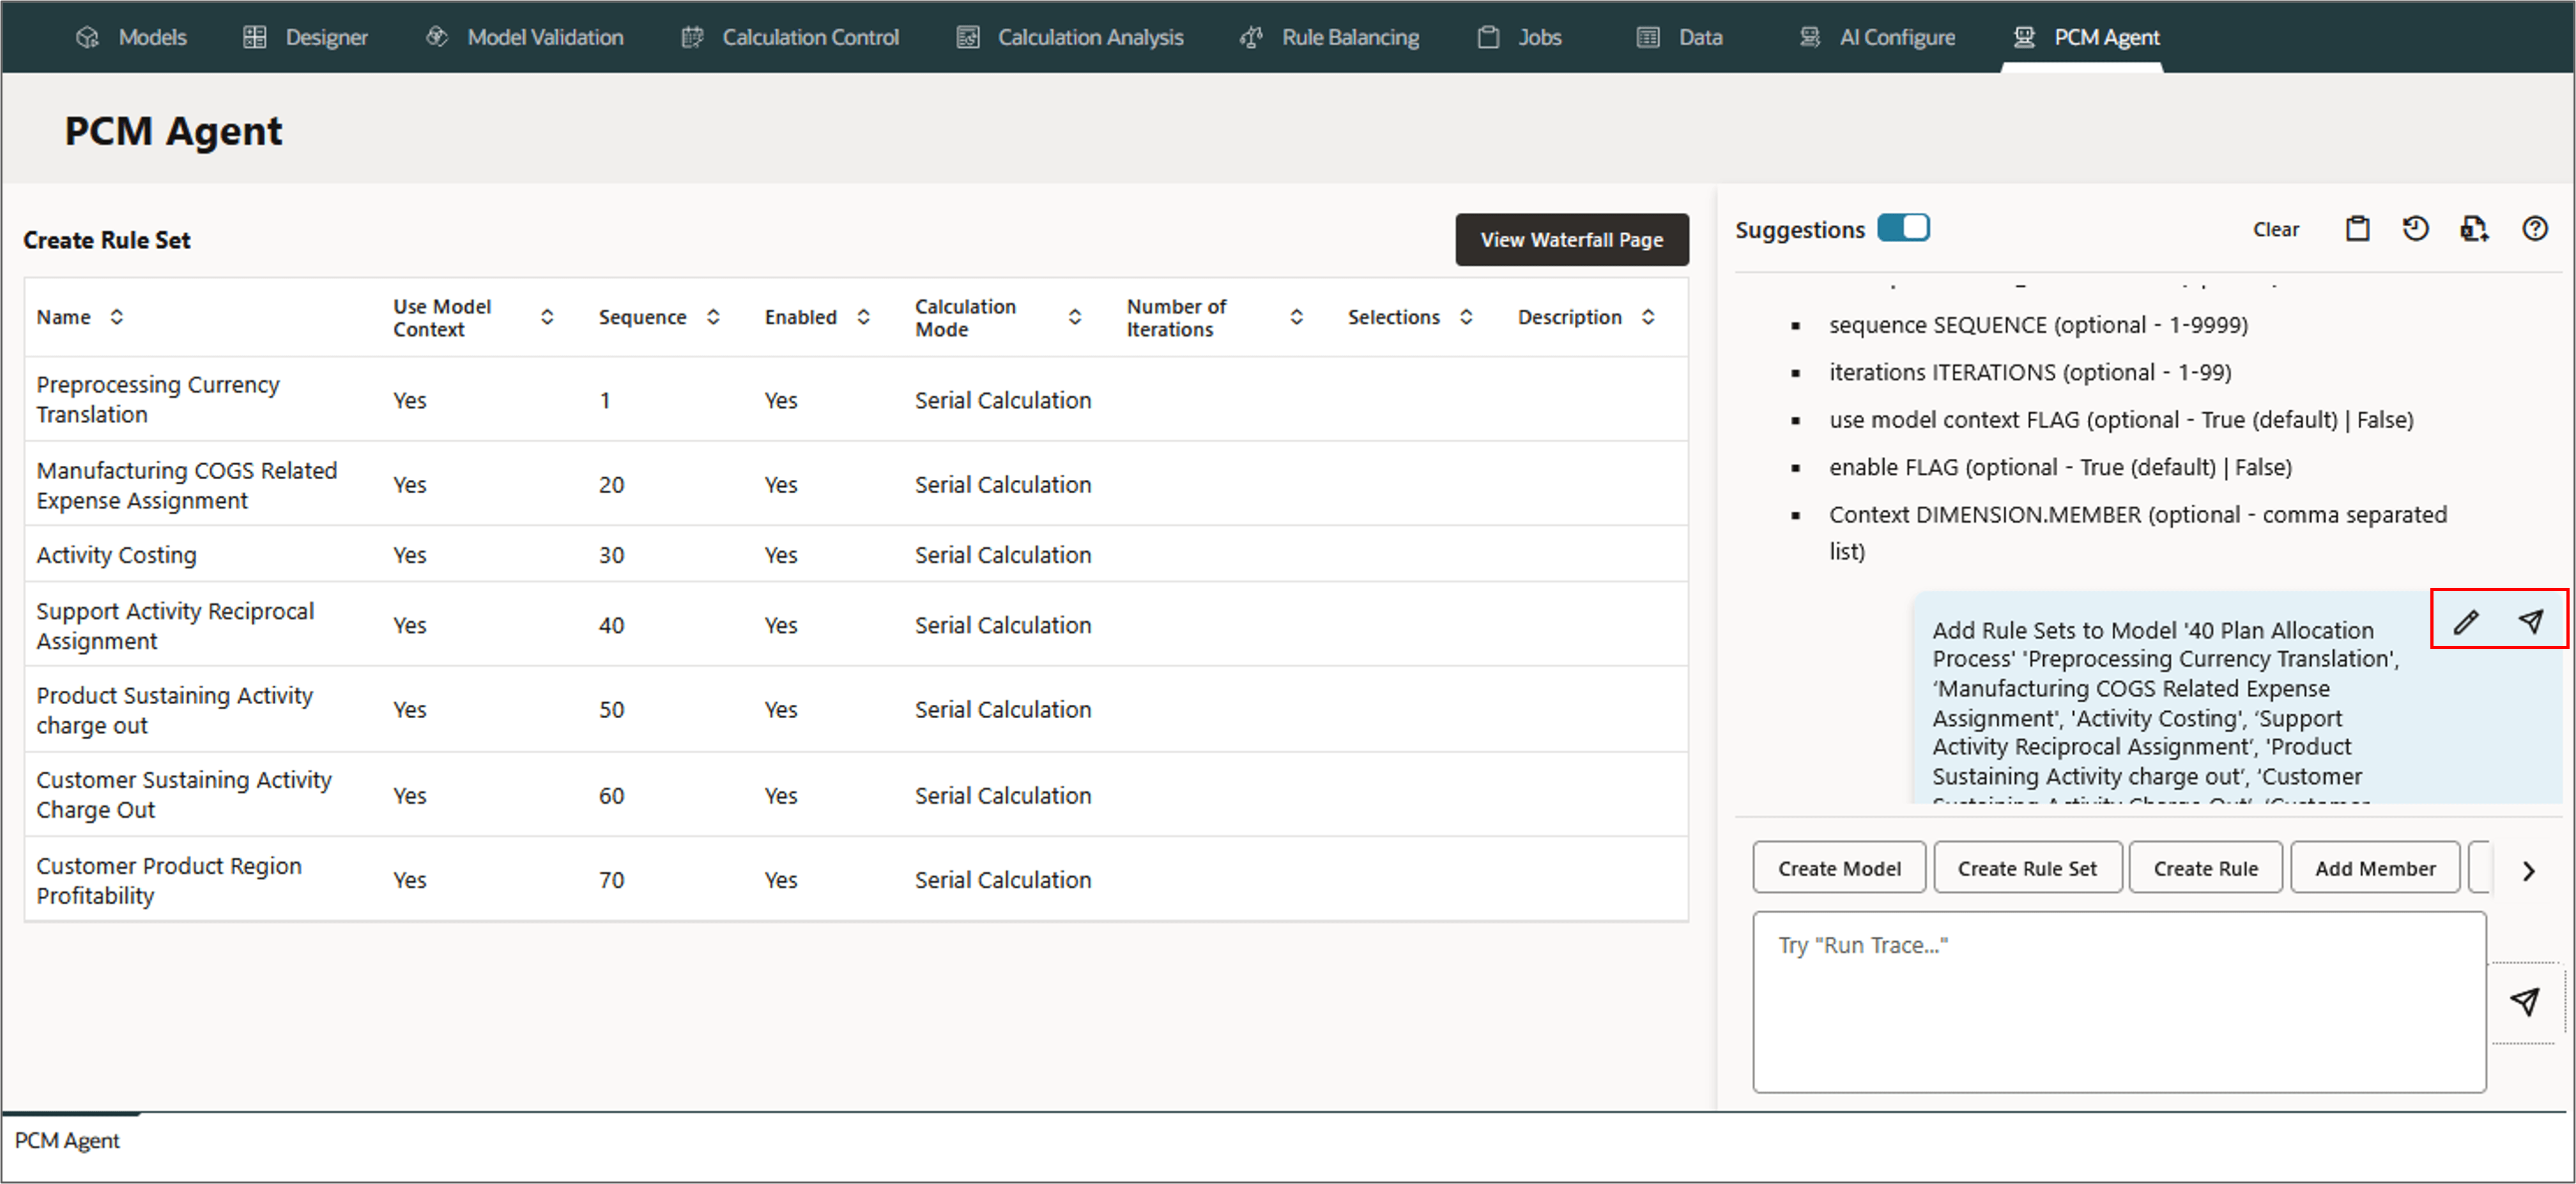
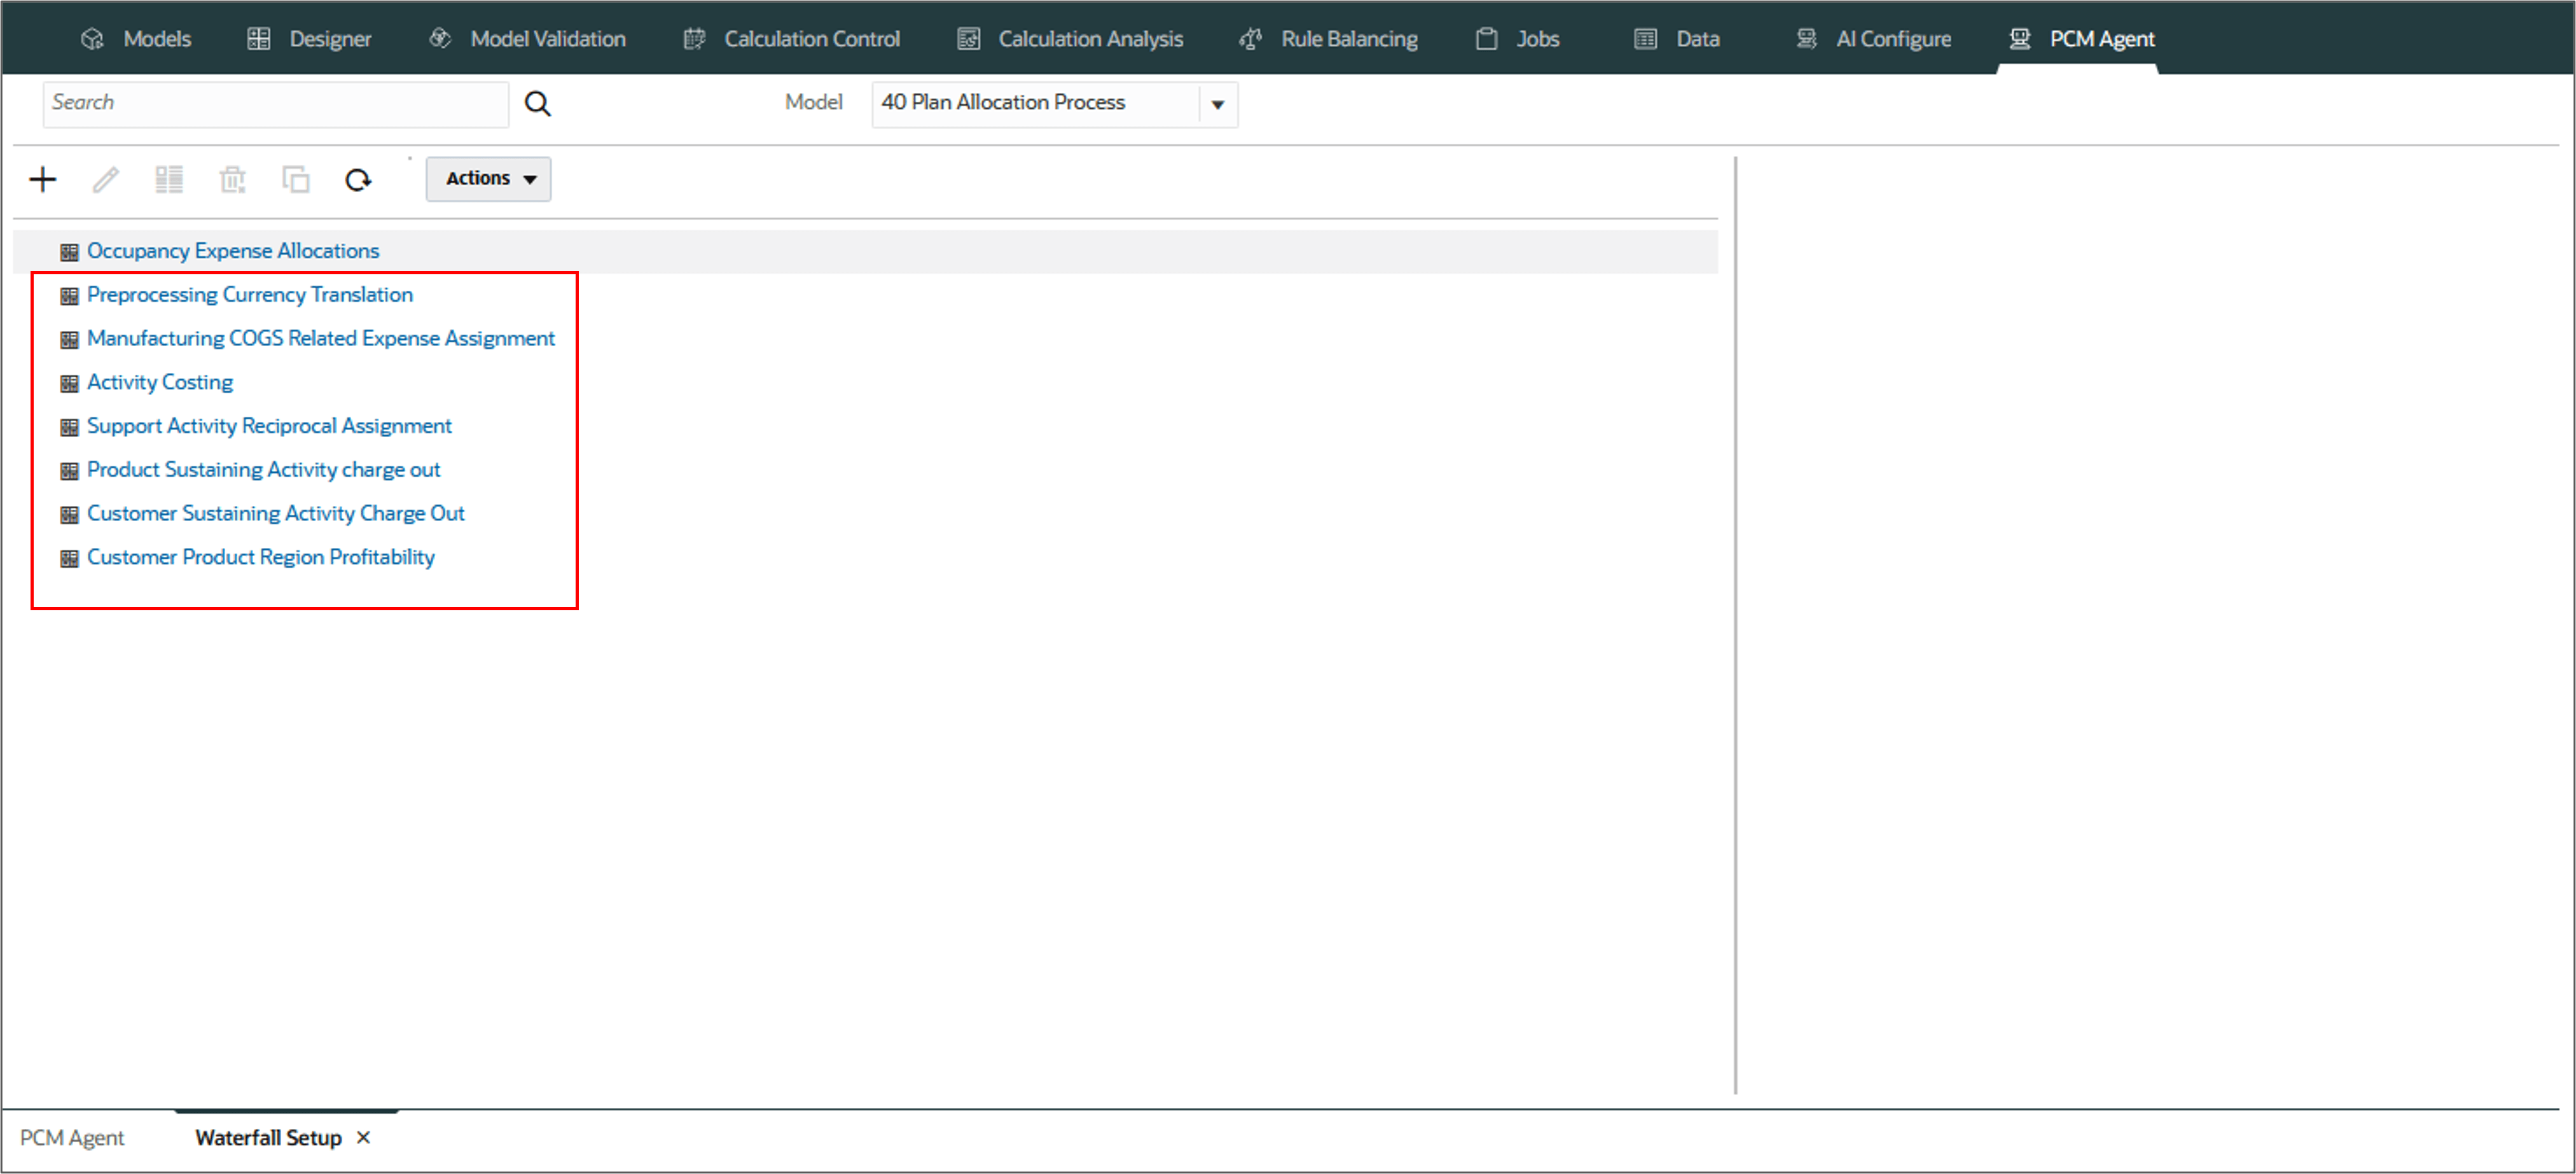
- The following is an example of a user request to create seven rule sets, and add them to the model, 40 Plan Allocation Process. The request includes a comma-separated list of the rule sets to create.
Type the following request in the PCM agent, and click (Send).
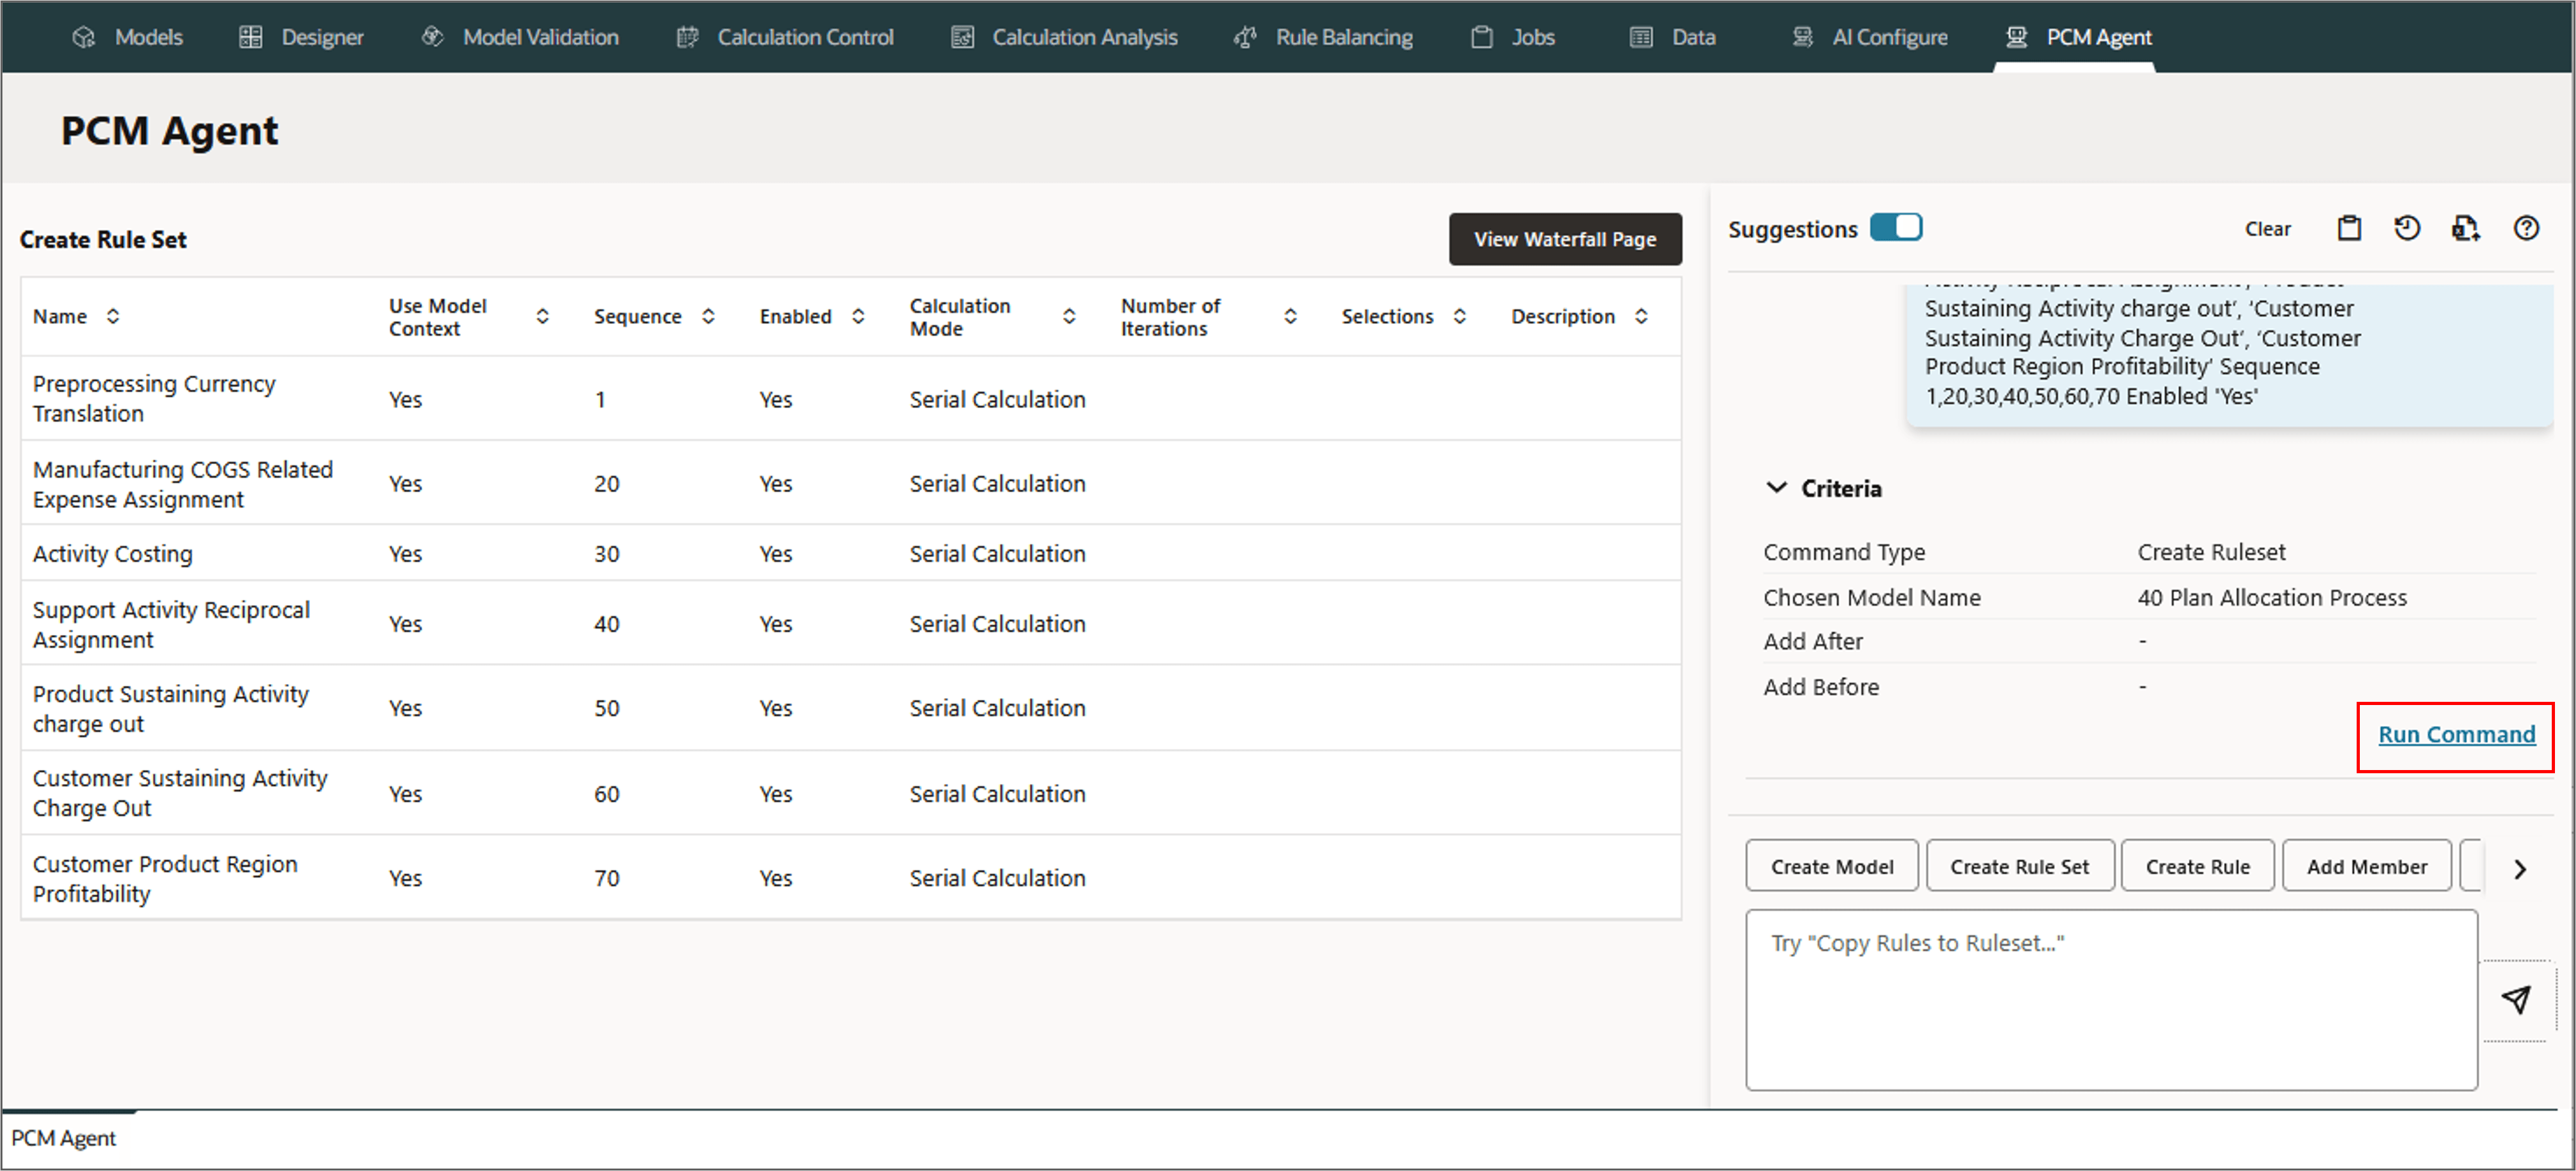
- Review and refine the request if needed.
- Run the command.
- Verify the results by clicking View Waterfall Page on the top to view the newly created rule sets.
- The list of newly created rule sets in the model, 40 Plan Allocation Process is displayed.
- Click (Edit) to edit the Definition and add the Member Selections.
- Click Member Selections to add the required dimensions.

Add Rule Sets to Model '40 Plan Allocation Process'
'Preprocessing Currency Translation',
'Manufacturing COGS Related Expense Assignment',
'Activity Costing',
'Support Activity Reciprocal Assignment',
'Product Sustaining Activity charge out',
'Customer Sustaining Activity Charge Out',
'Customer Product Region Profitability'
Sequence 1,20,30,40,50,60,70
Enabled 'Yes'
The PCM Agent processes the request and displays a message indicating successful execution of the command. If the execution failed, the agent displays error messages.
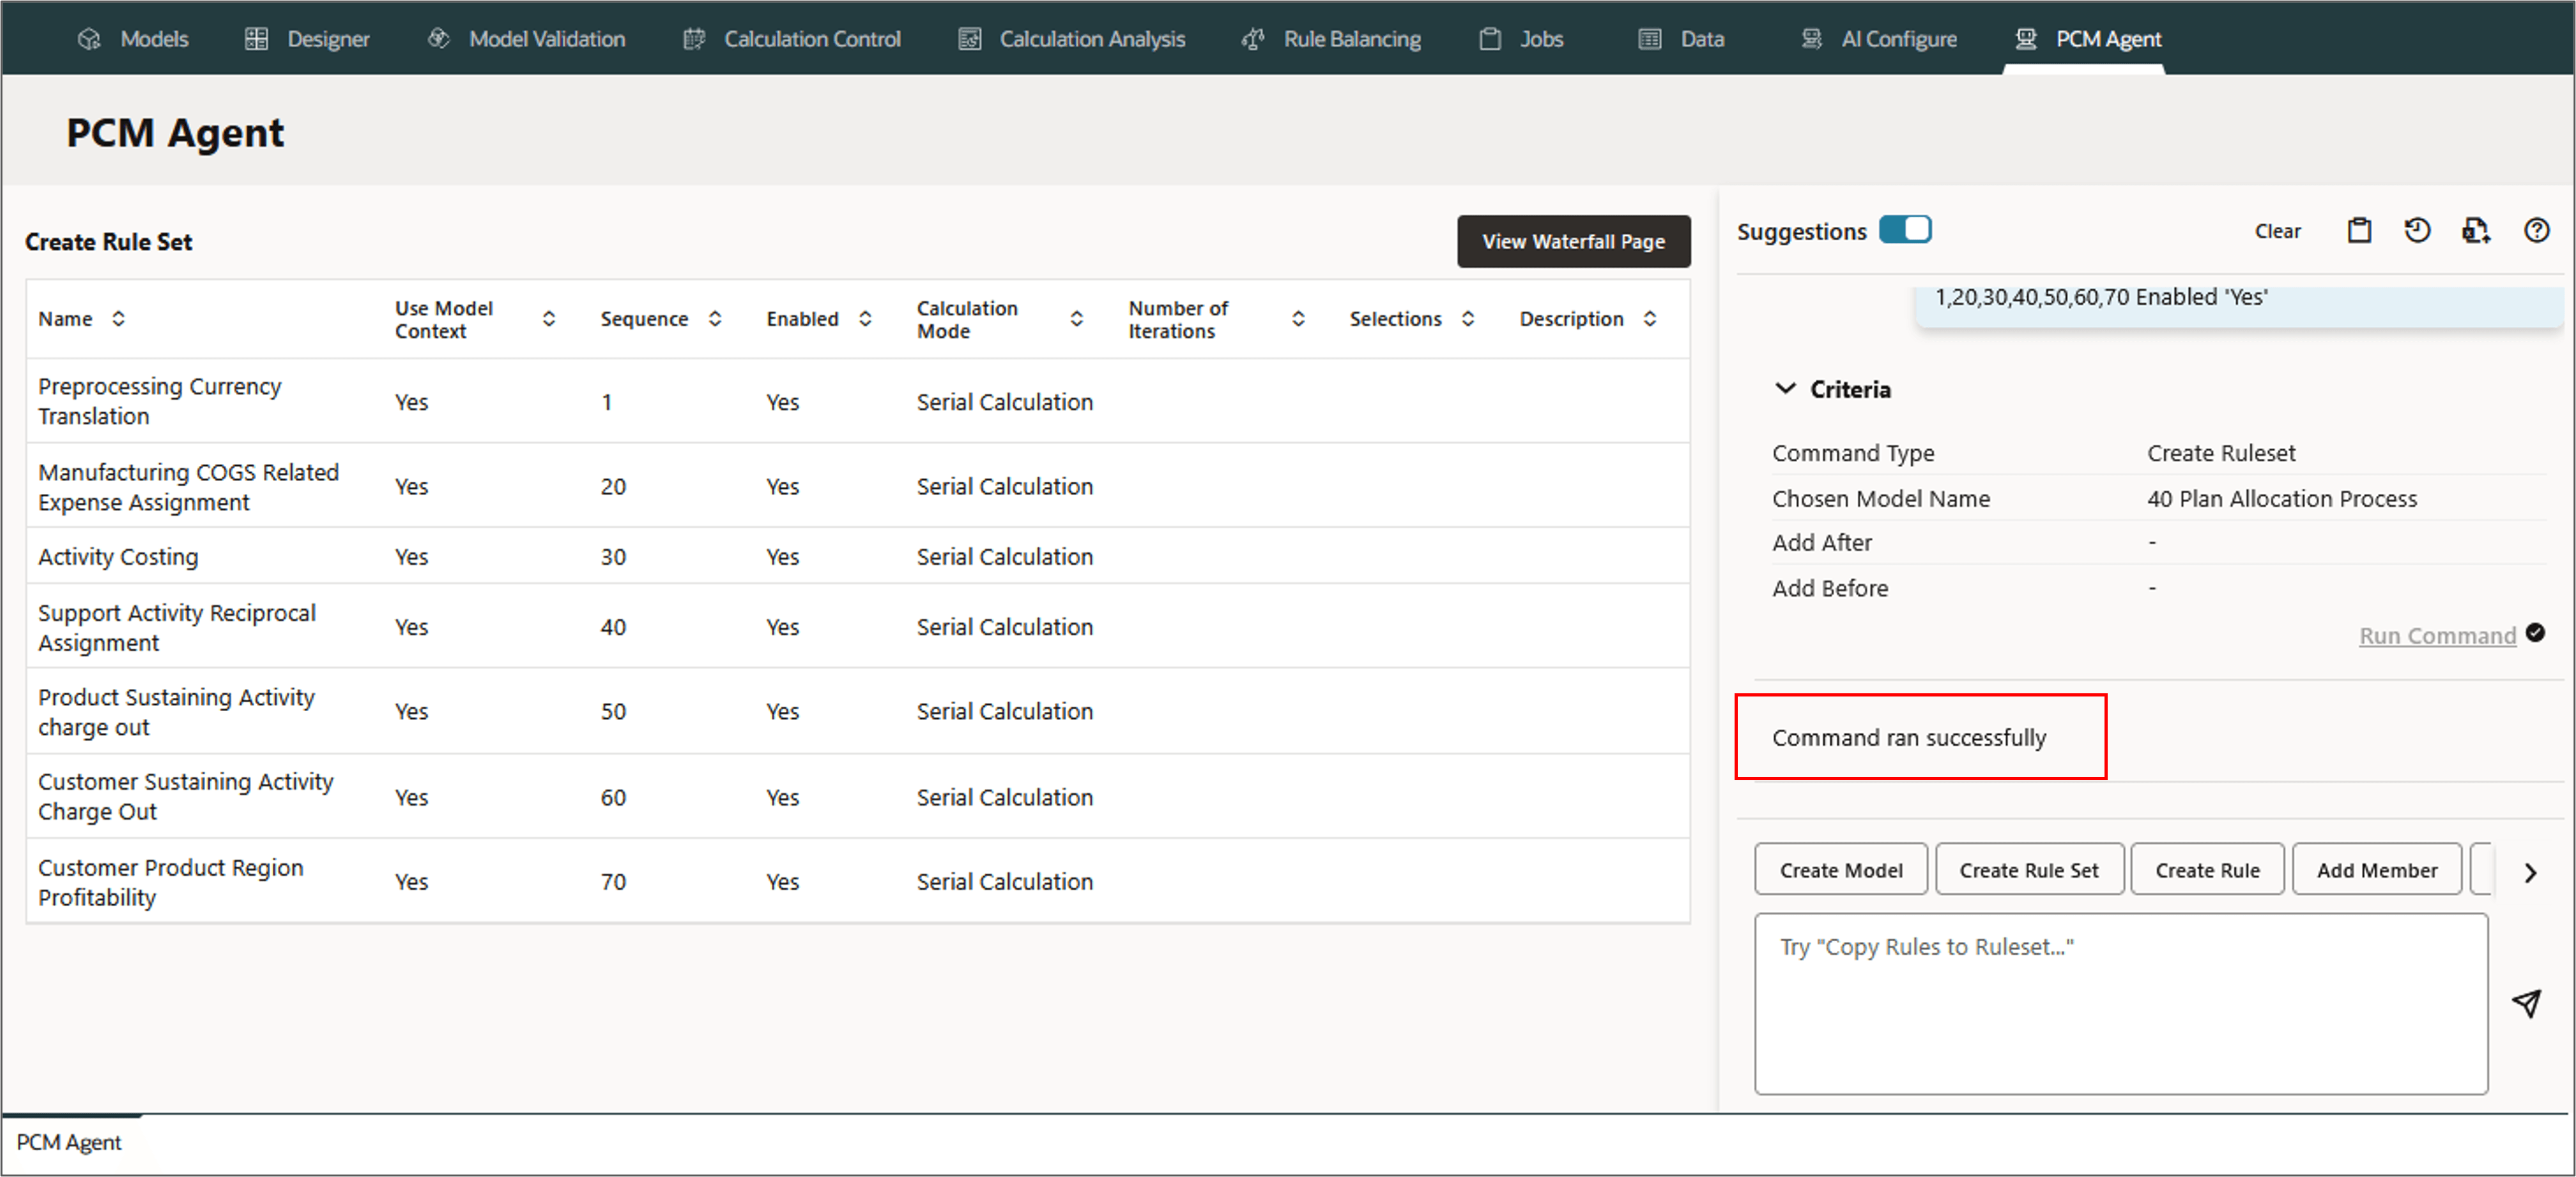
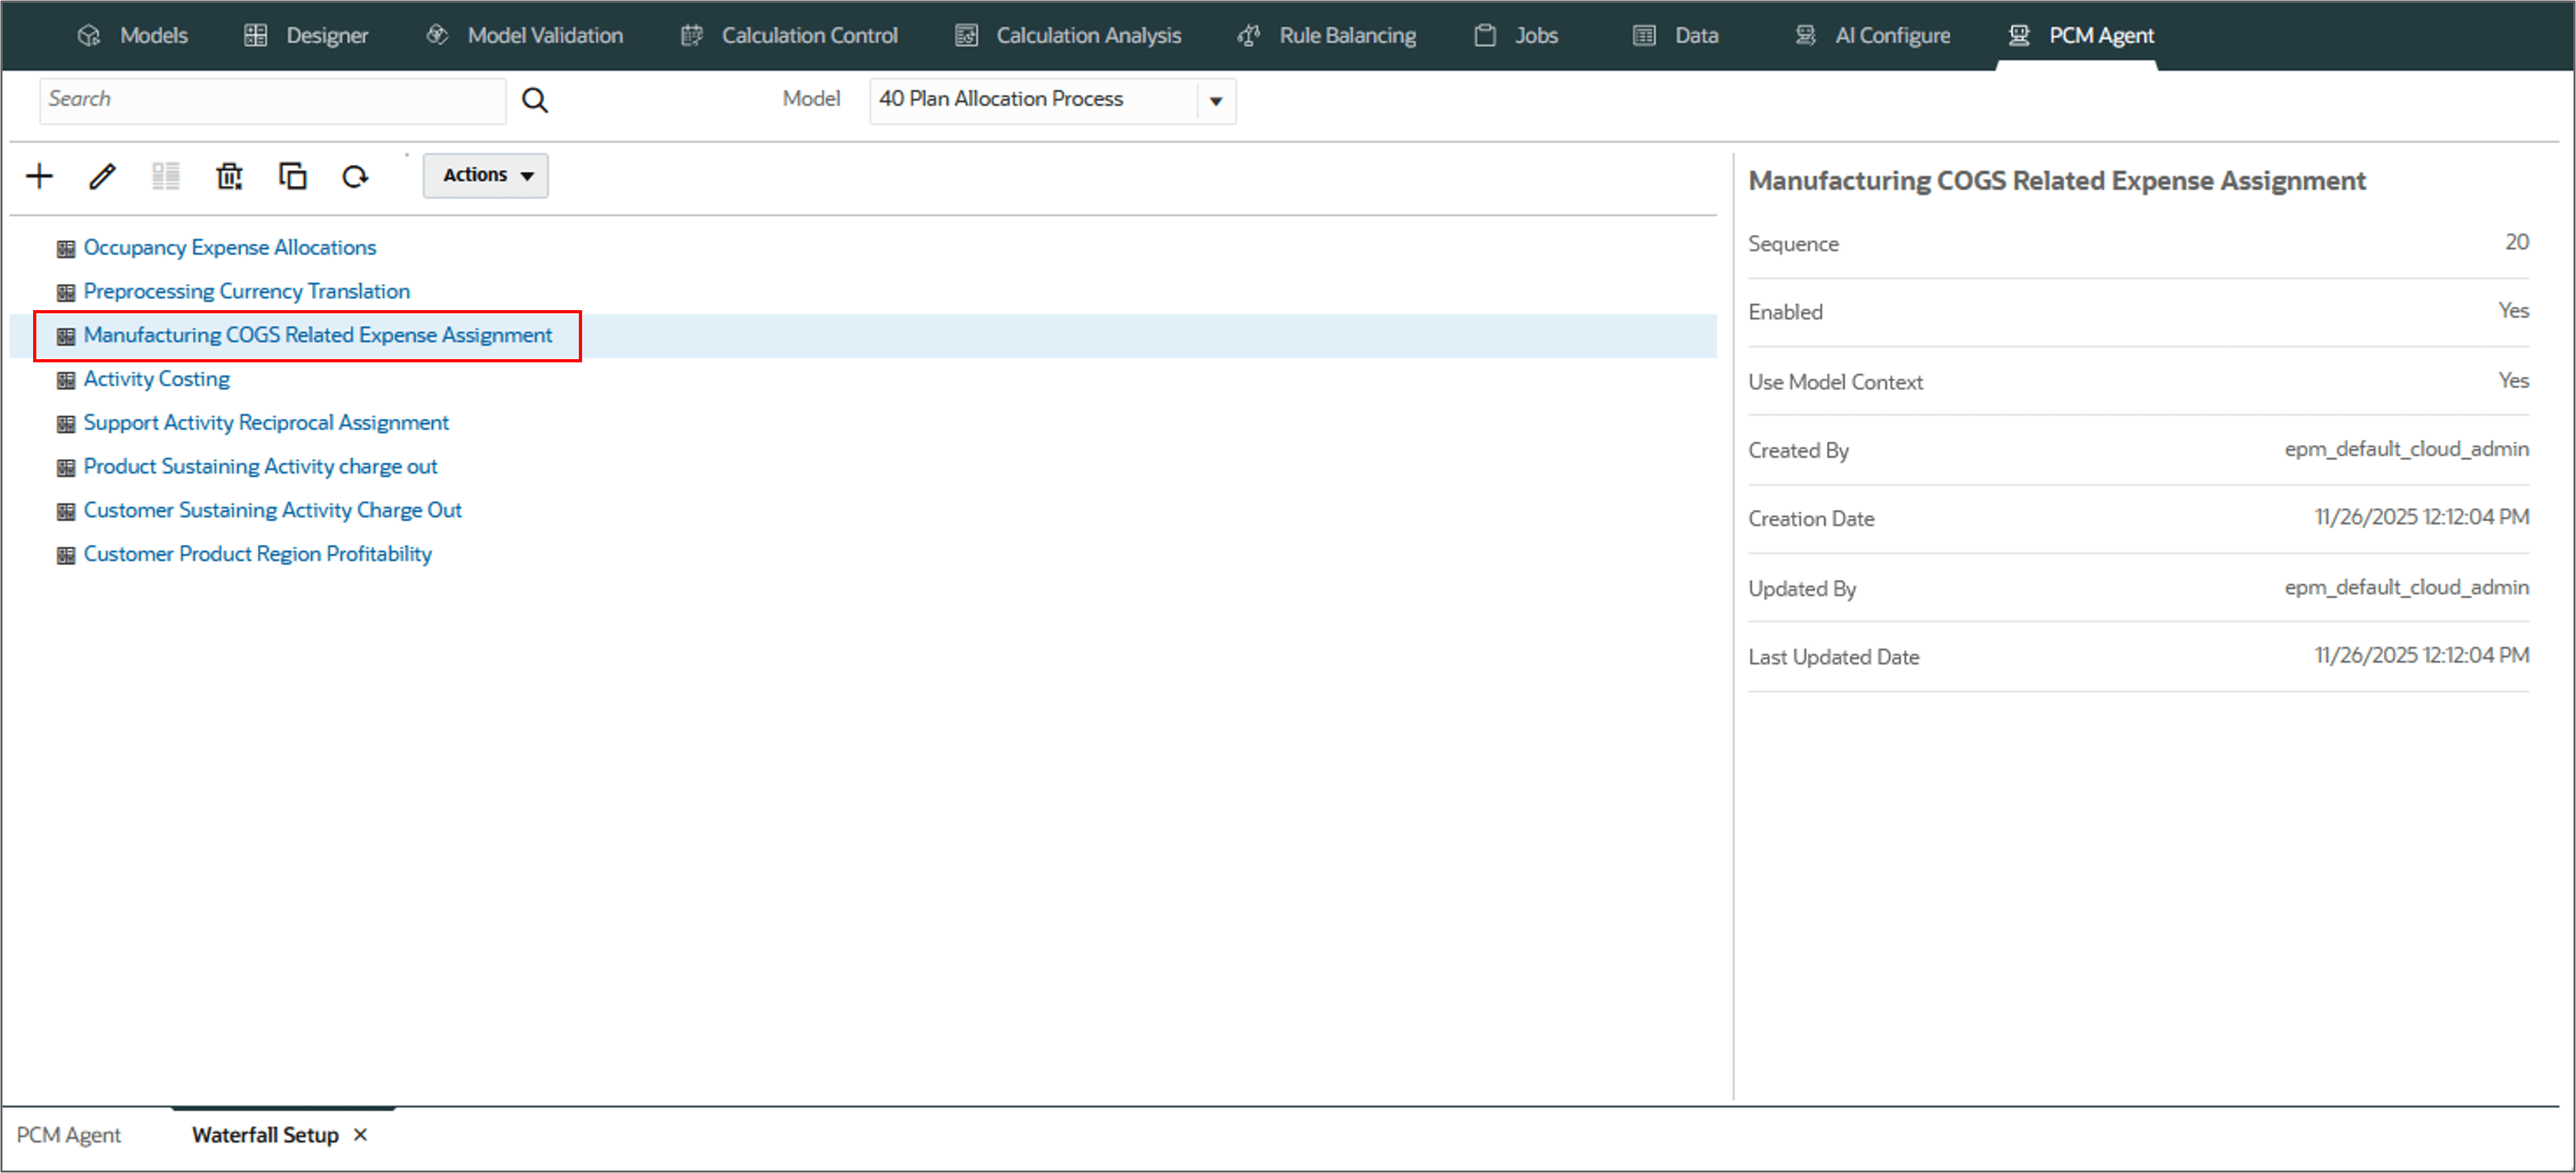
Click any of the rule sets to verify the rule set properties.
Note:
Rule sets created this way have initial outline and default to serial calculation. They do not have any rule set context members defined. If you need to change the calculation option or add rule set context members, you can edit the rule set after it has been added to your model.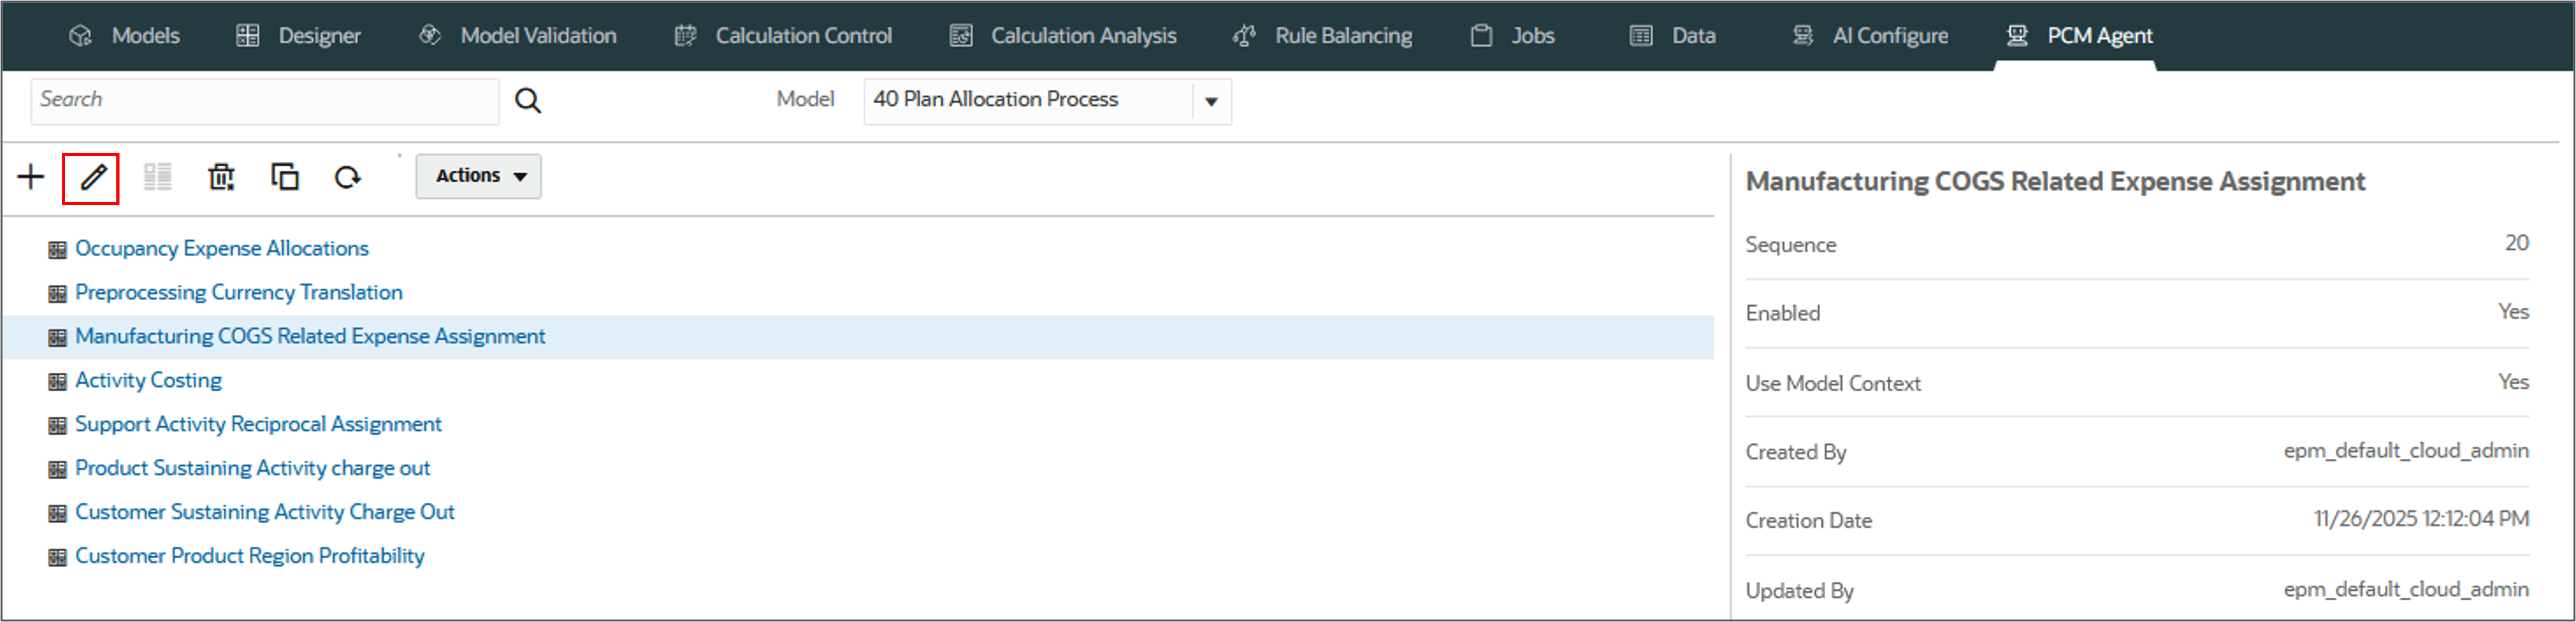

Creating a Rule
In this section, you create a rule using a natural language command in the PCM agent interface. Creating rules involve defining allocations or custom calculation rules by defining context and specifying dimensions, drivers, and calculation logic.
Parameters for Creating a Rule
- Create RULE_TYPE rule 'RULE_NAME' (required - Allocation | Custom)
- in model 'MODEL_NAME', (optional - default - Designer model name)
- in ruleset RULESET_NAME (required)
- with description 'YOUR_DESCRIPTION' (optional)
- sequence SEQUENCE (optional - 1-9999)
- use ruleset context FLAG (optional - True (default) | False)
- enable FLAG (optional - True (default) | False)
- after RULE_NAME (optional)
- before RULE_NAME (optional)
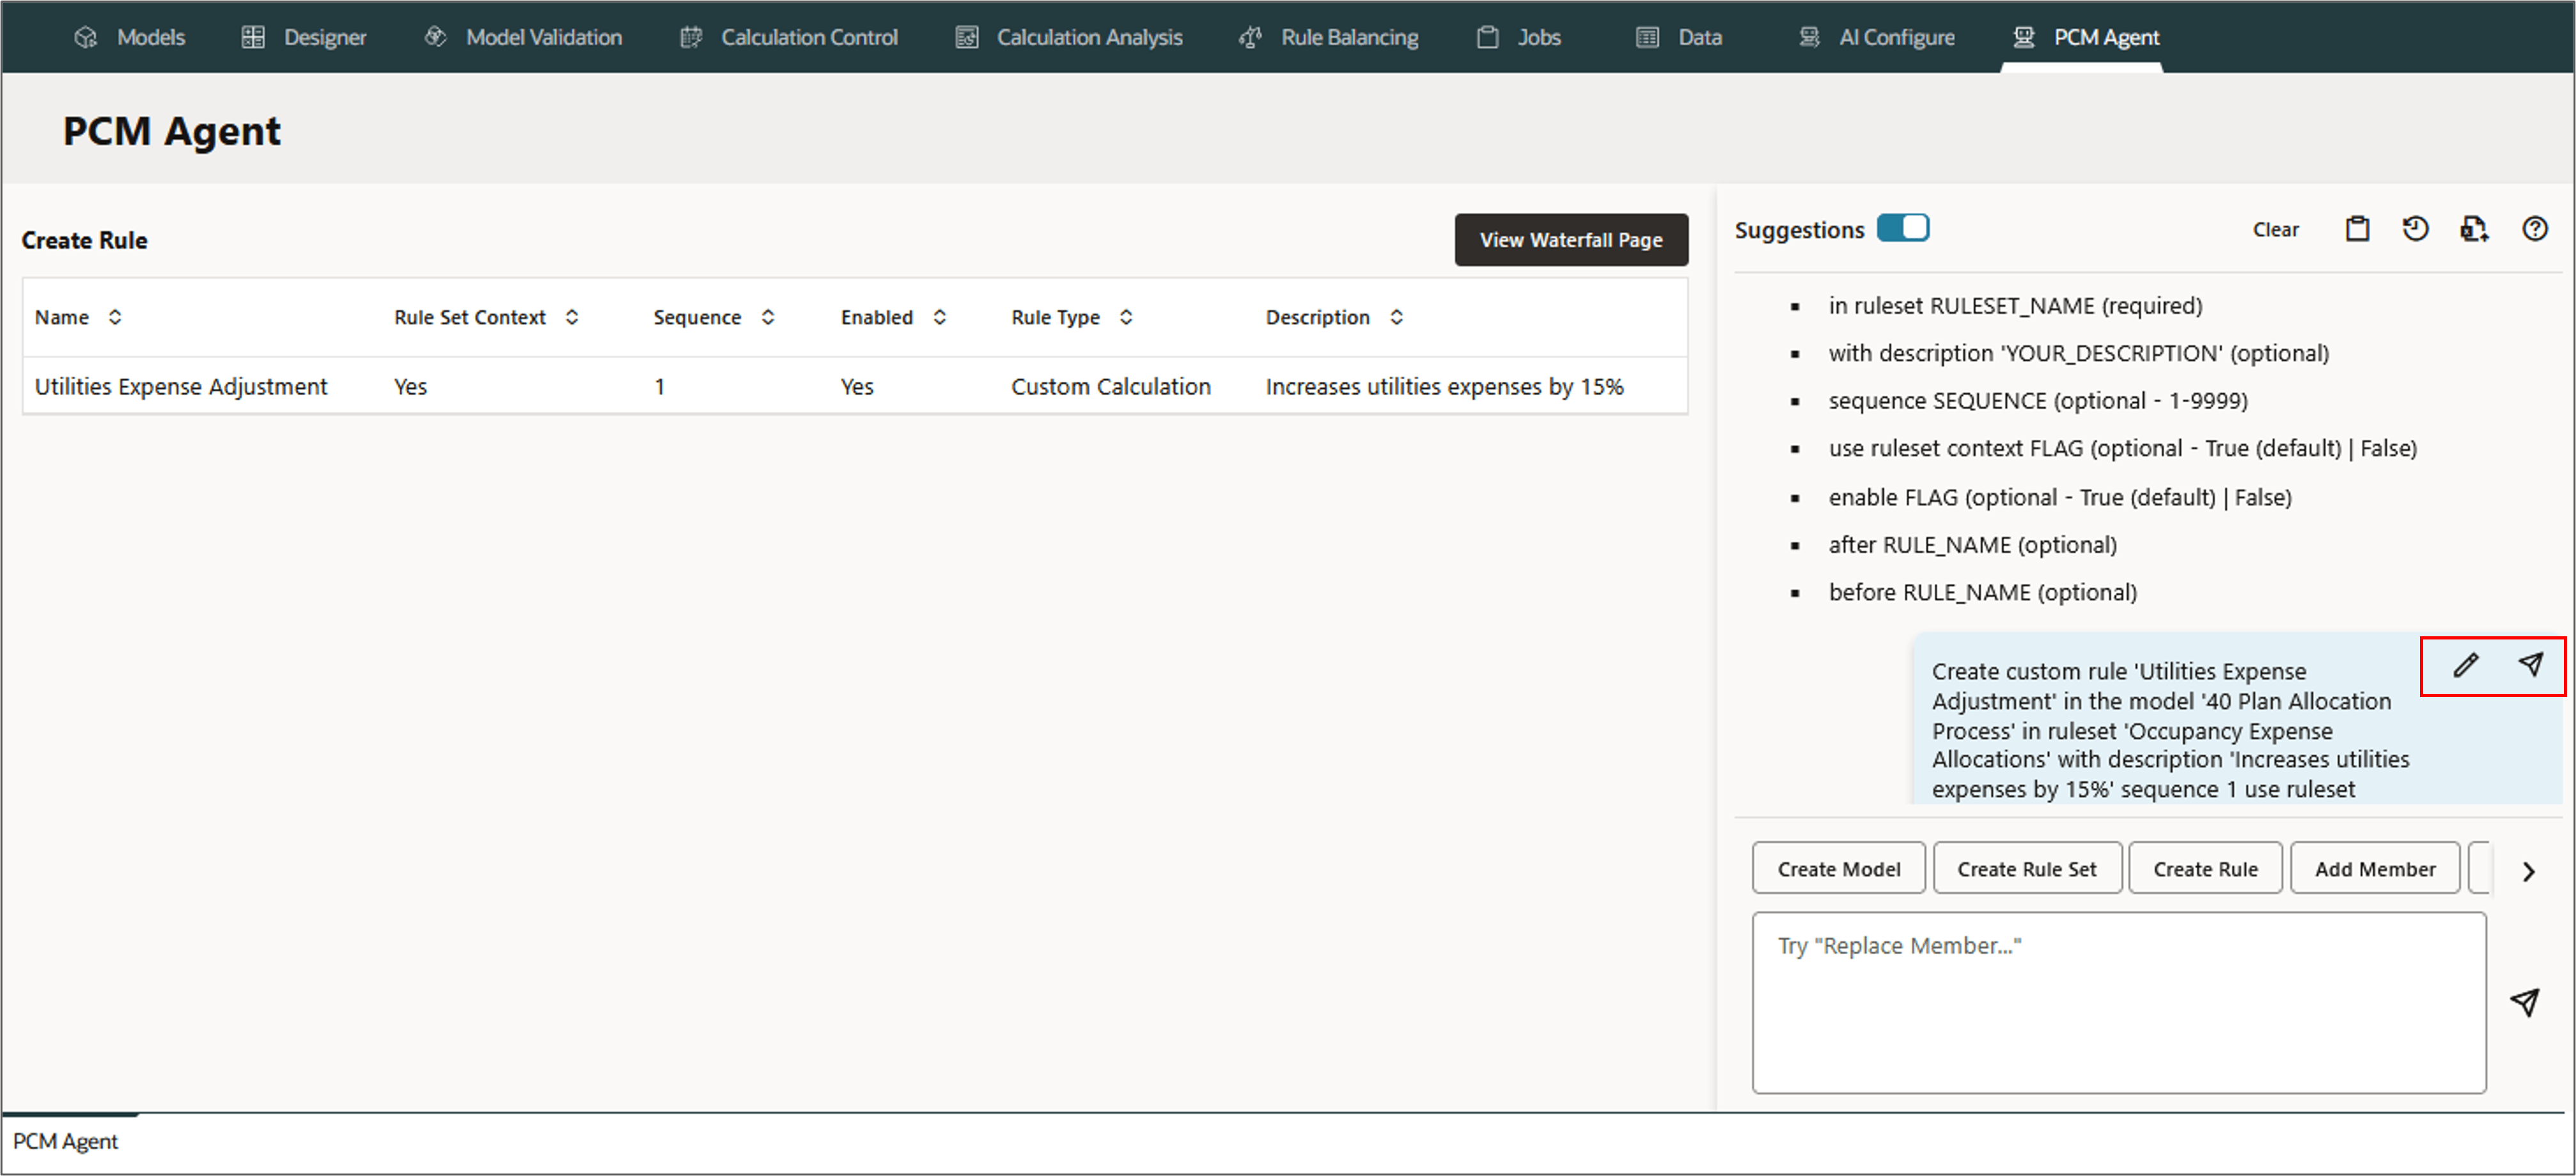
Example: Creating a Rule
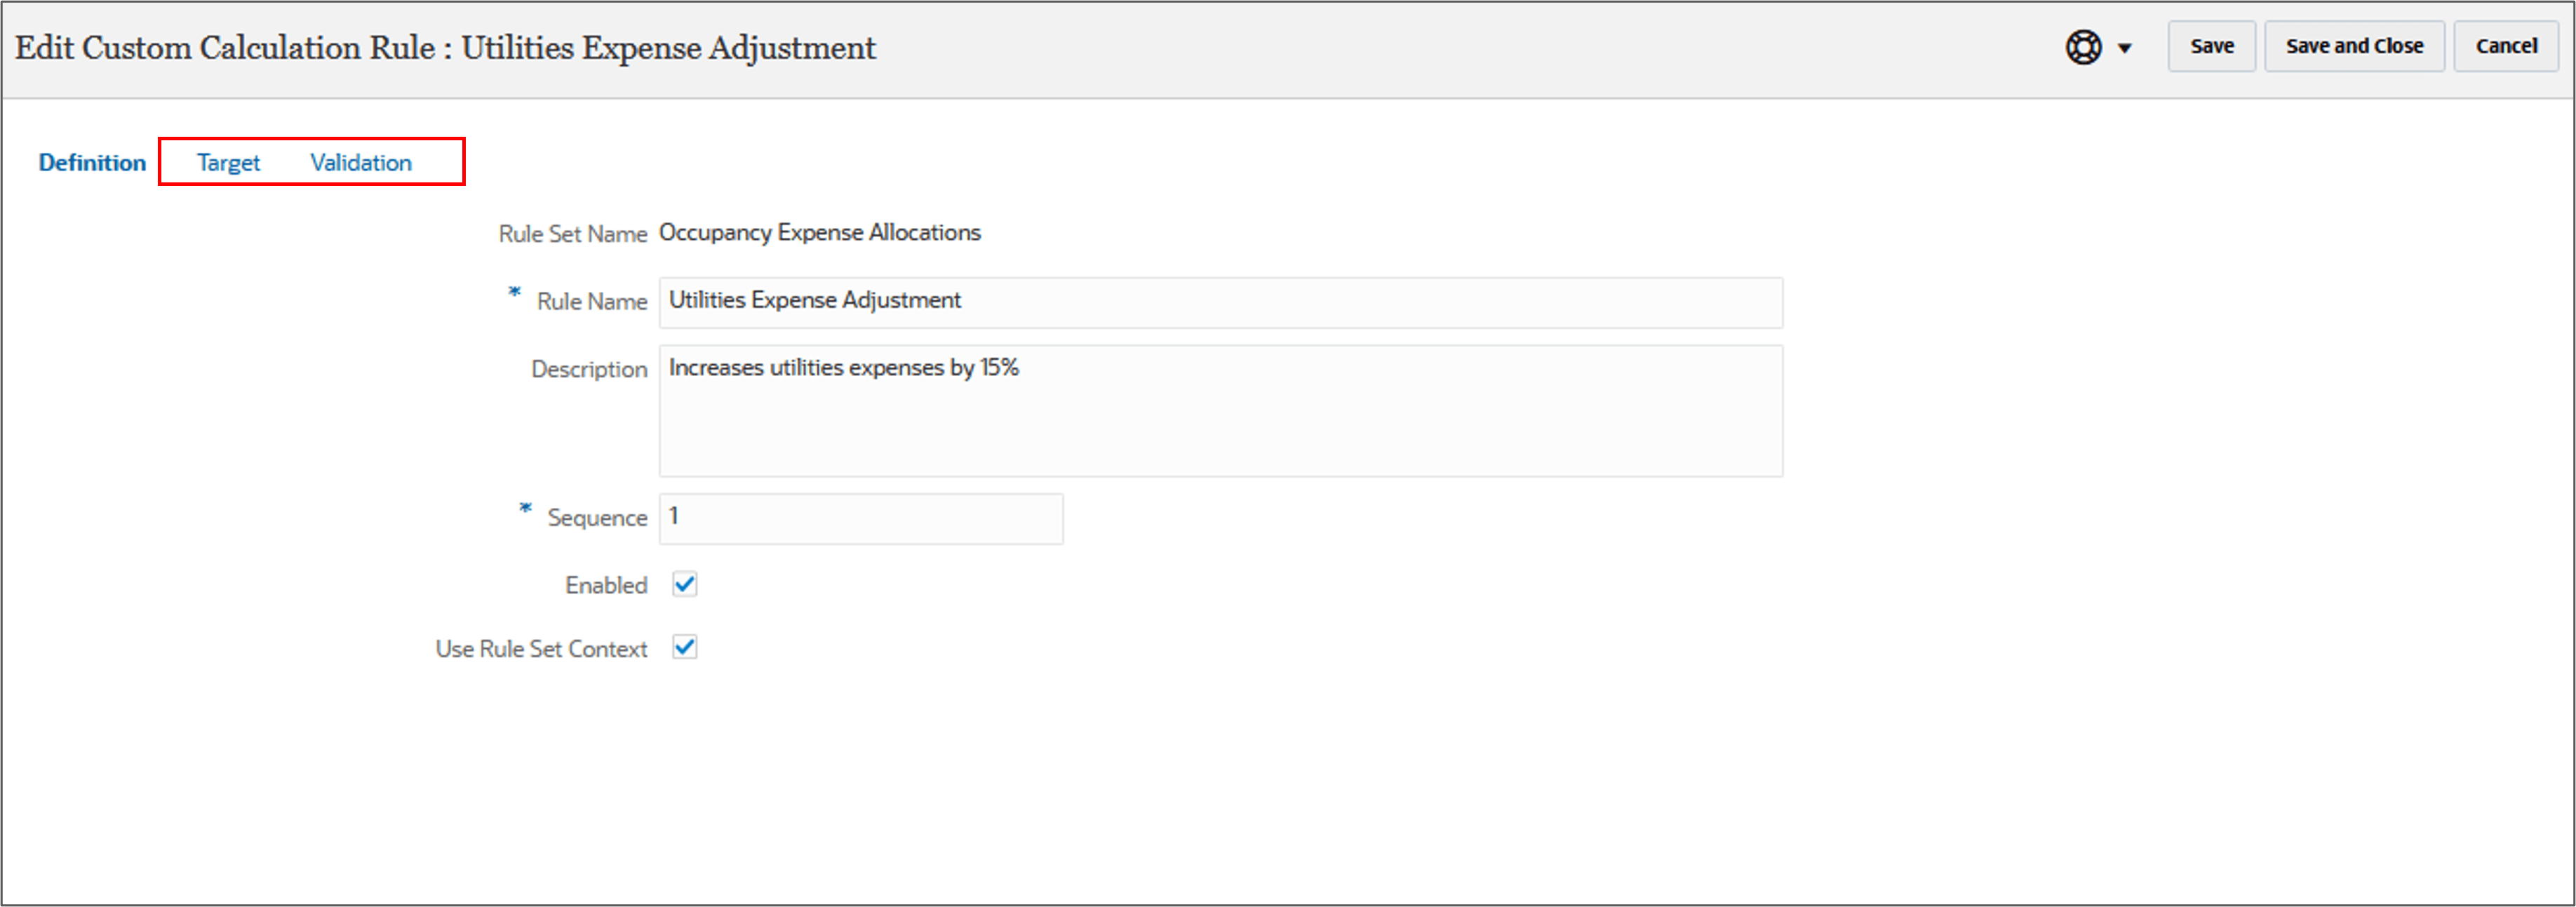
Let's create a Custom Calculation rule Utilities Expense Adjustment in the rule set Occupancy Expense Allocation for the 40 Plan Allocation Process. The description would be Increases utilities expenses by 15%'. The Sequence is 1, select Enabled, and use rule set context.
Note:
The Custom Calculations rule performs complex logic and transformations on data. They define calculations to be performed in a certain region of the database with results posted to a specific member.- Go to PCM Agent and select Create Rule.
- Type the following in the PCM agent and click (Send).
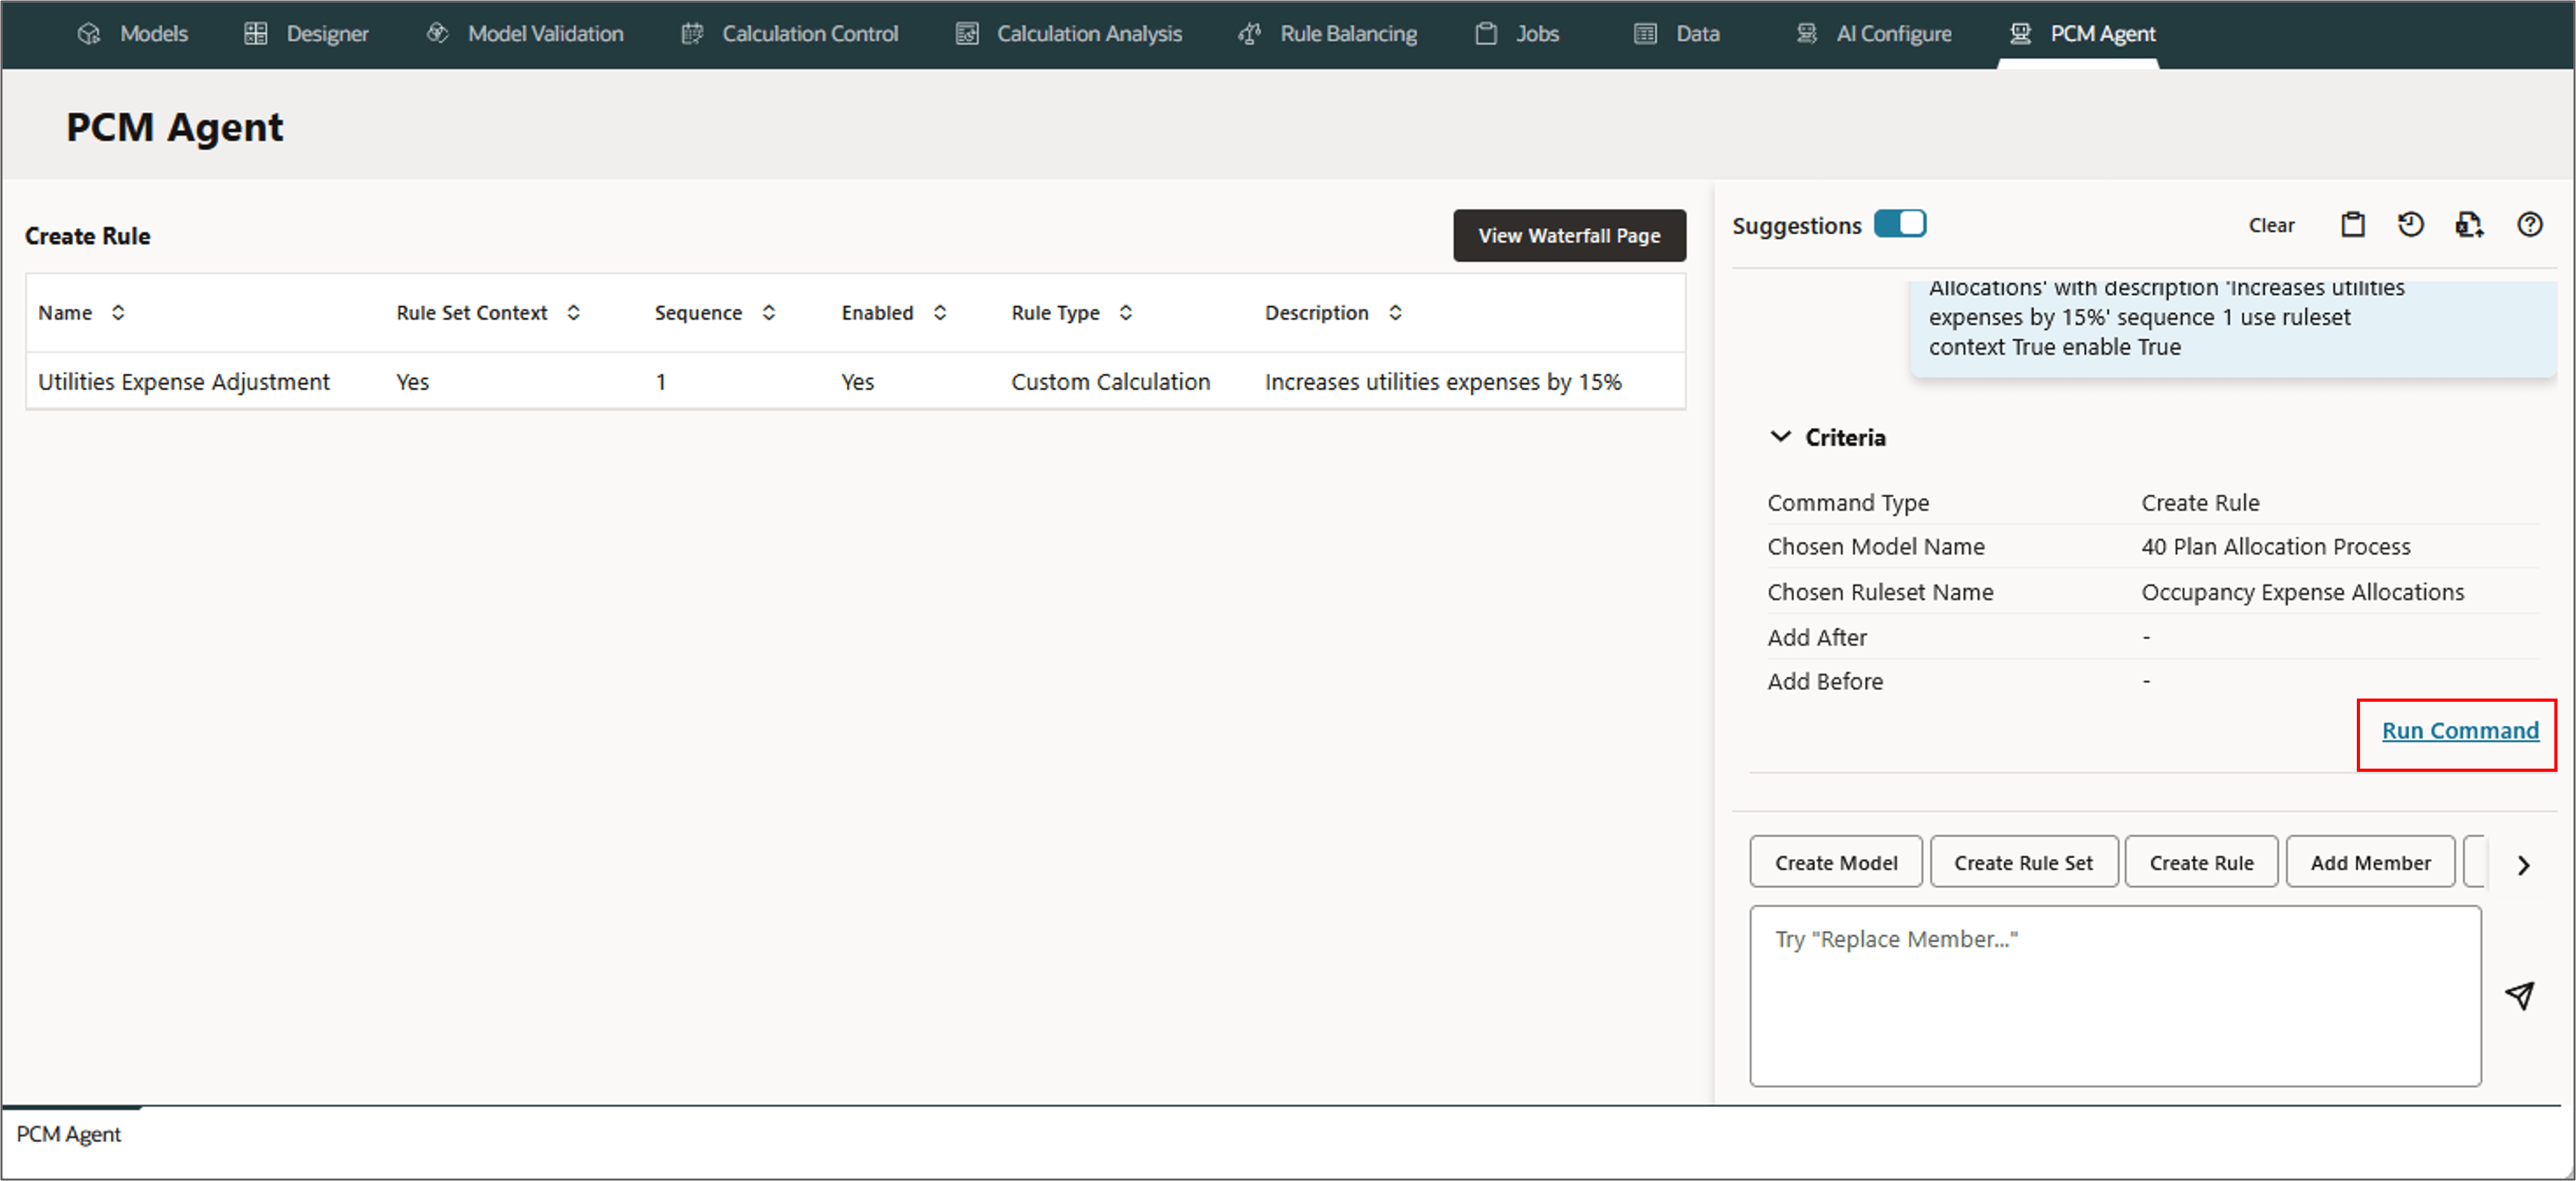
- Review and refine the request if needed.
- Run the command.
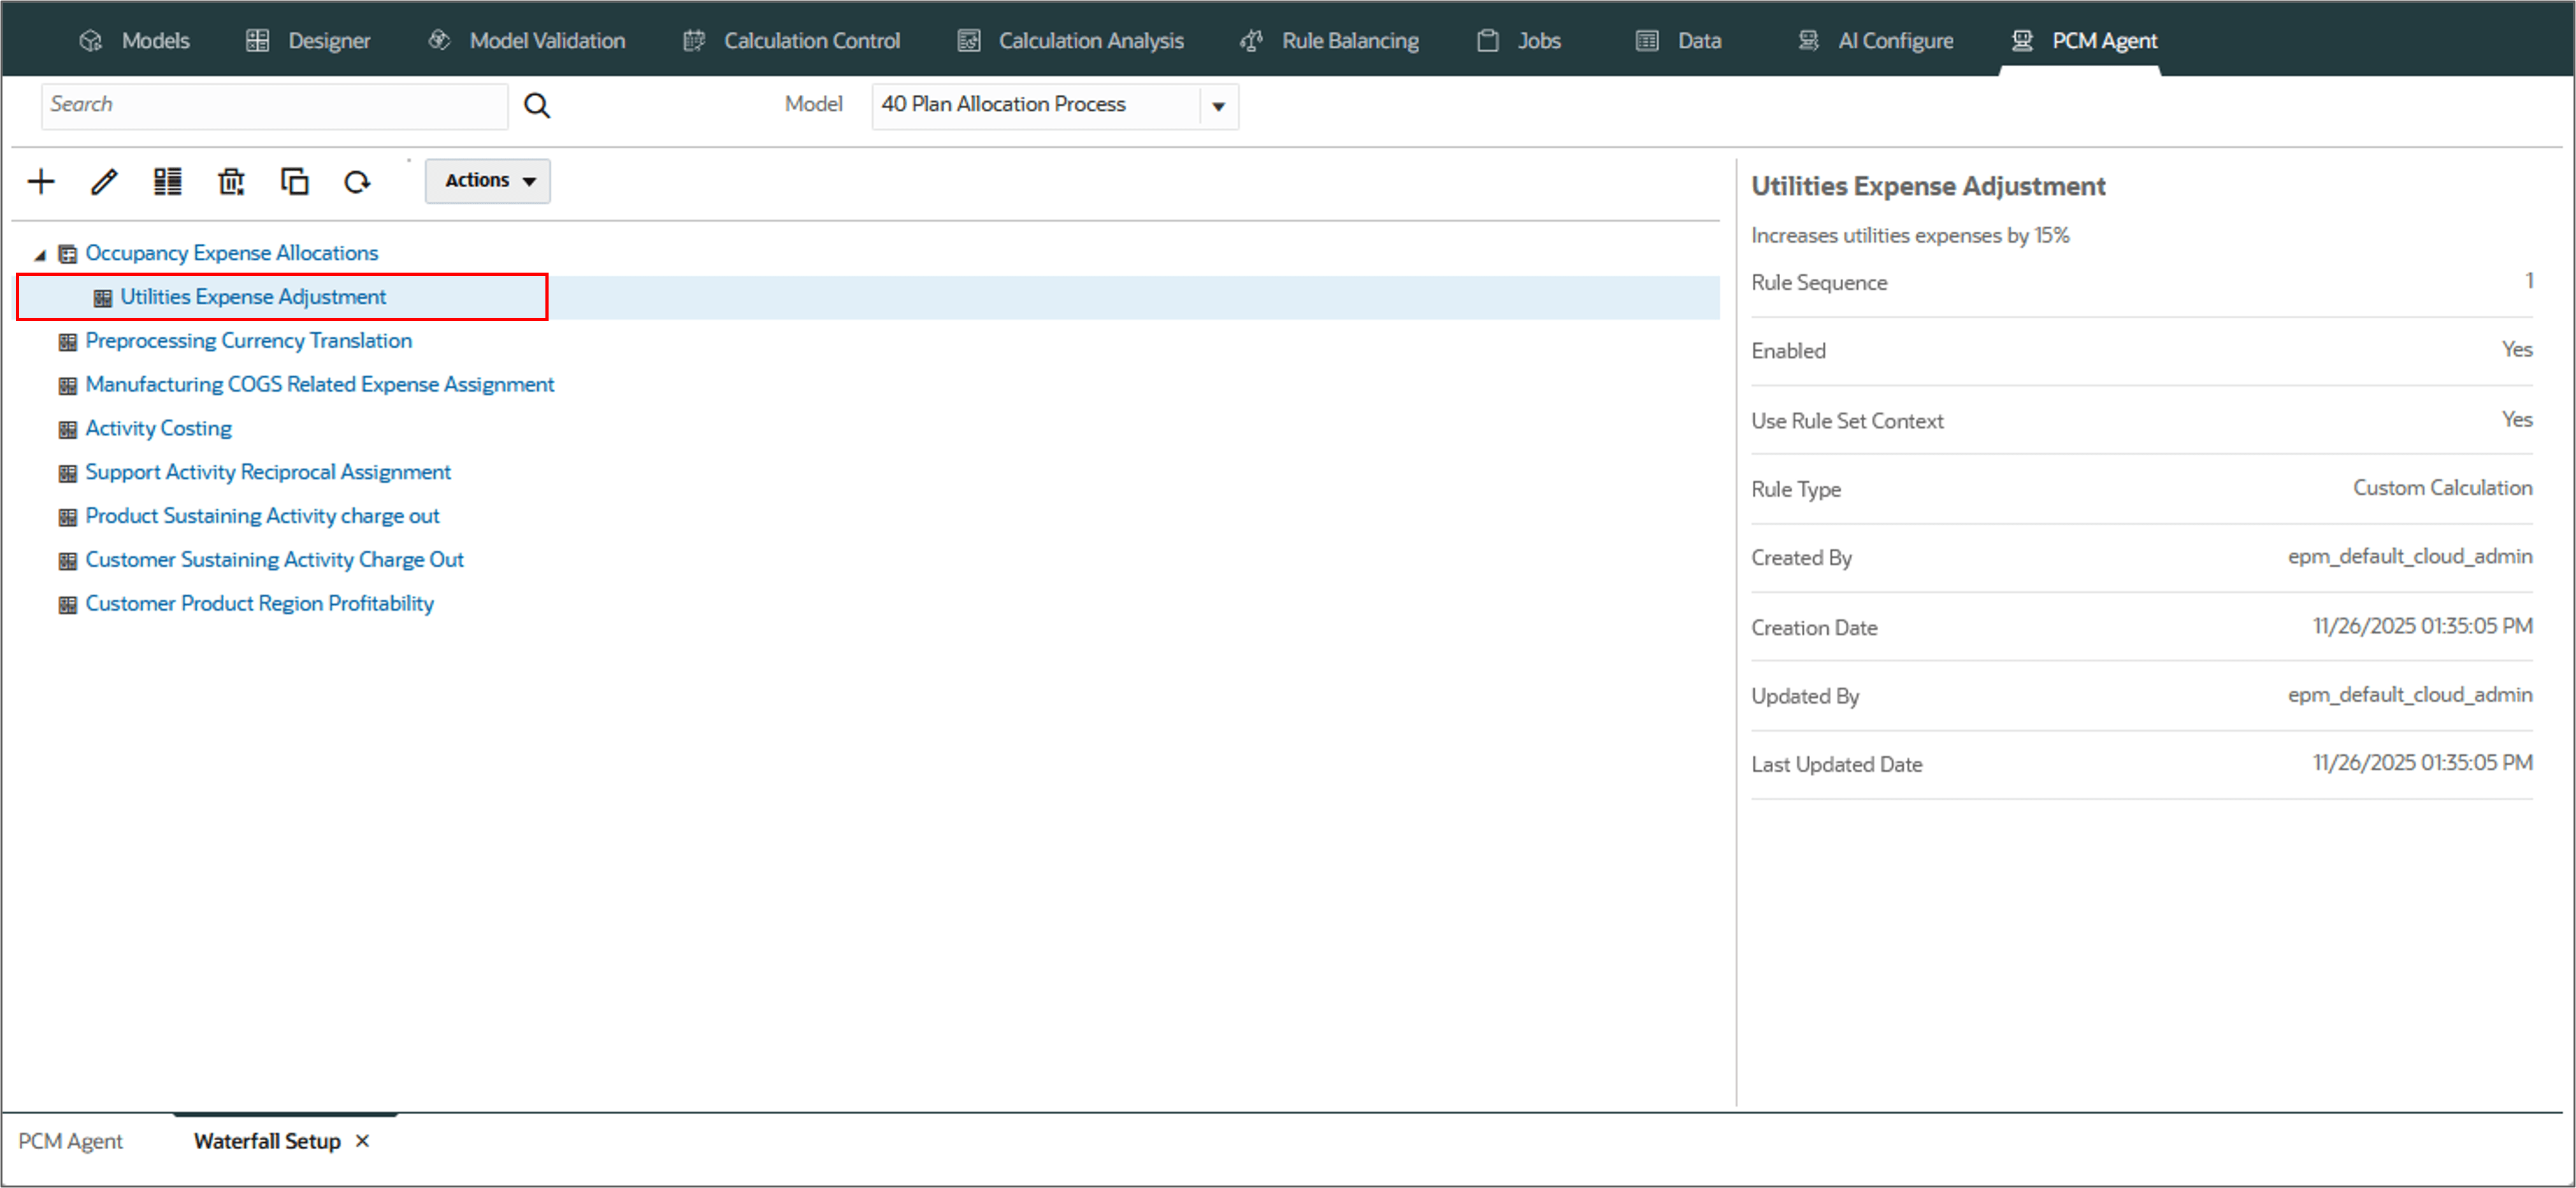
- Verify the results by clicking View Waterfall Page on the top to view the newly created rule.
- Click the rule to verify the rule properties.
- Click (Edit) to edit the Definition, add the Target dimensions and to validate the rule definition.
- Click each tab to add the result and target dimensions, define and validate the formula, and then validate the rule definition.
Create custom rule 'Utilities Expense Adjustment'
in the model '40 Plan Allocation Process'
in ruleset 'Occupancy Expense Allocations'
with description 'Increases utilities expenses by 15%'
sequence 1
use ruleset context True enable True

The PCM Agent processes the request and displays a message indicating successful execution of the command. If the execution failed, the agent displays error messages.

Note:
Rule created this way has an initial outline and default to serial calculation. It does not have any rule set context members defined. Edit the rule manually to select the result and target dimensions. Define and validate the formula, and then validate the rule definition.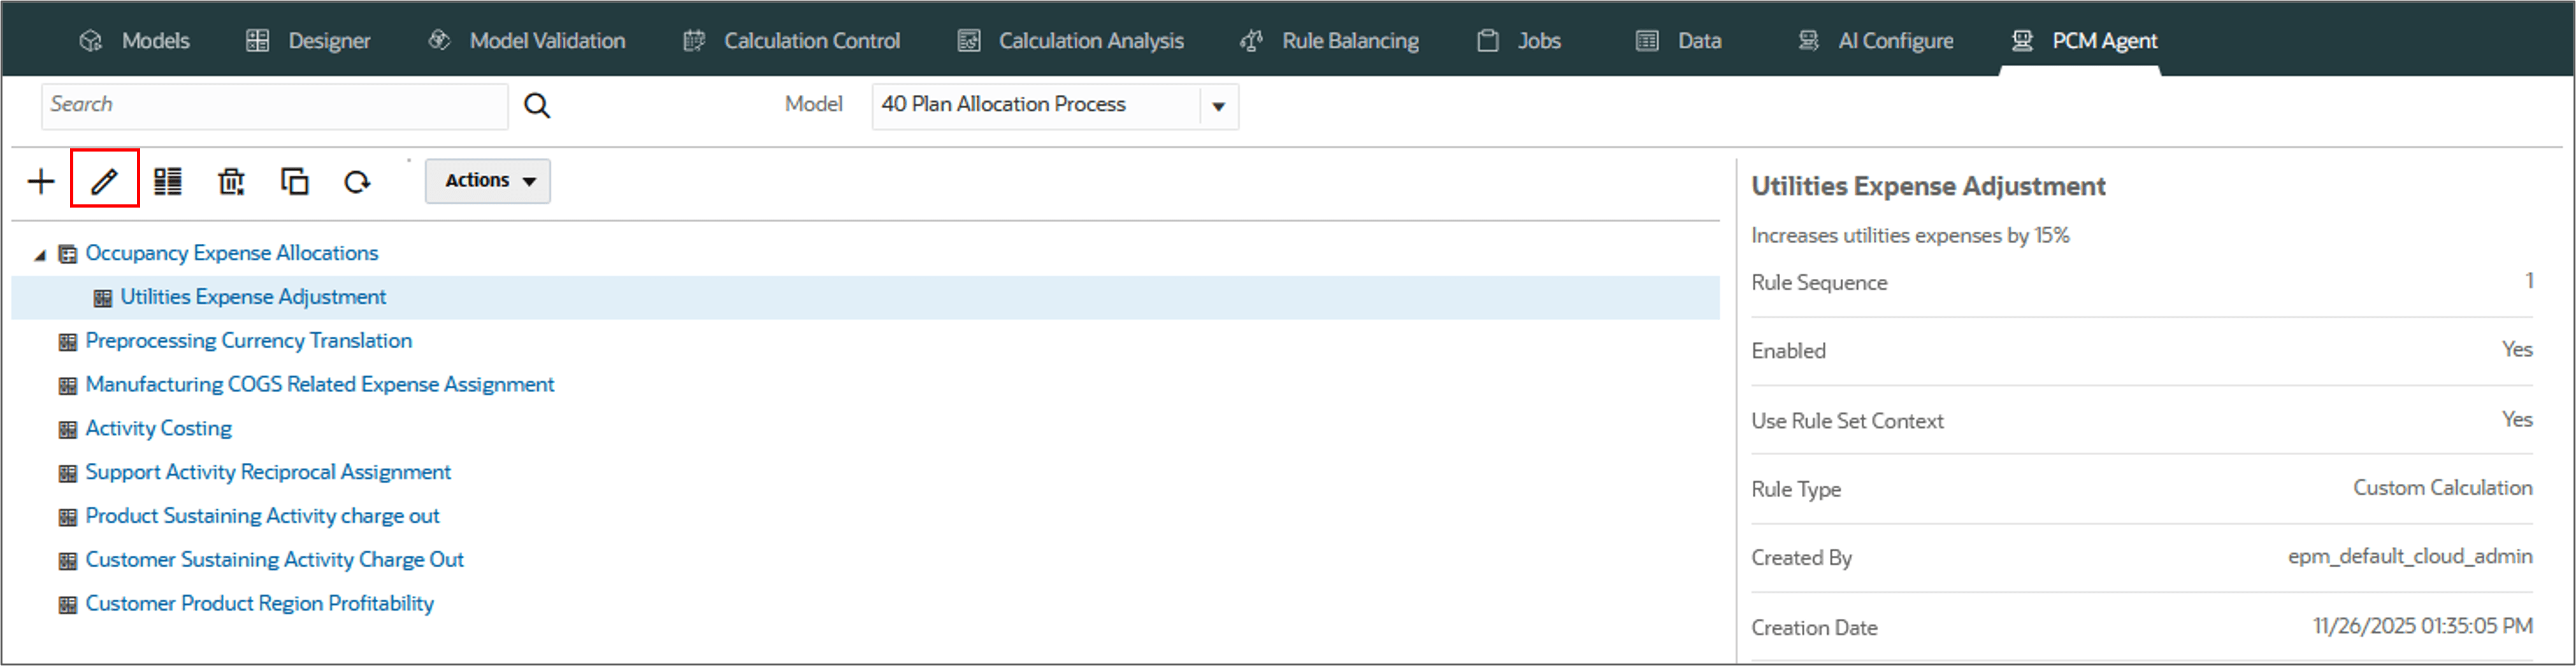
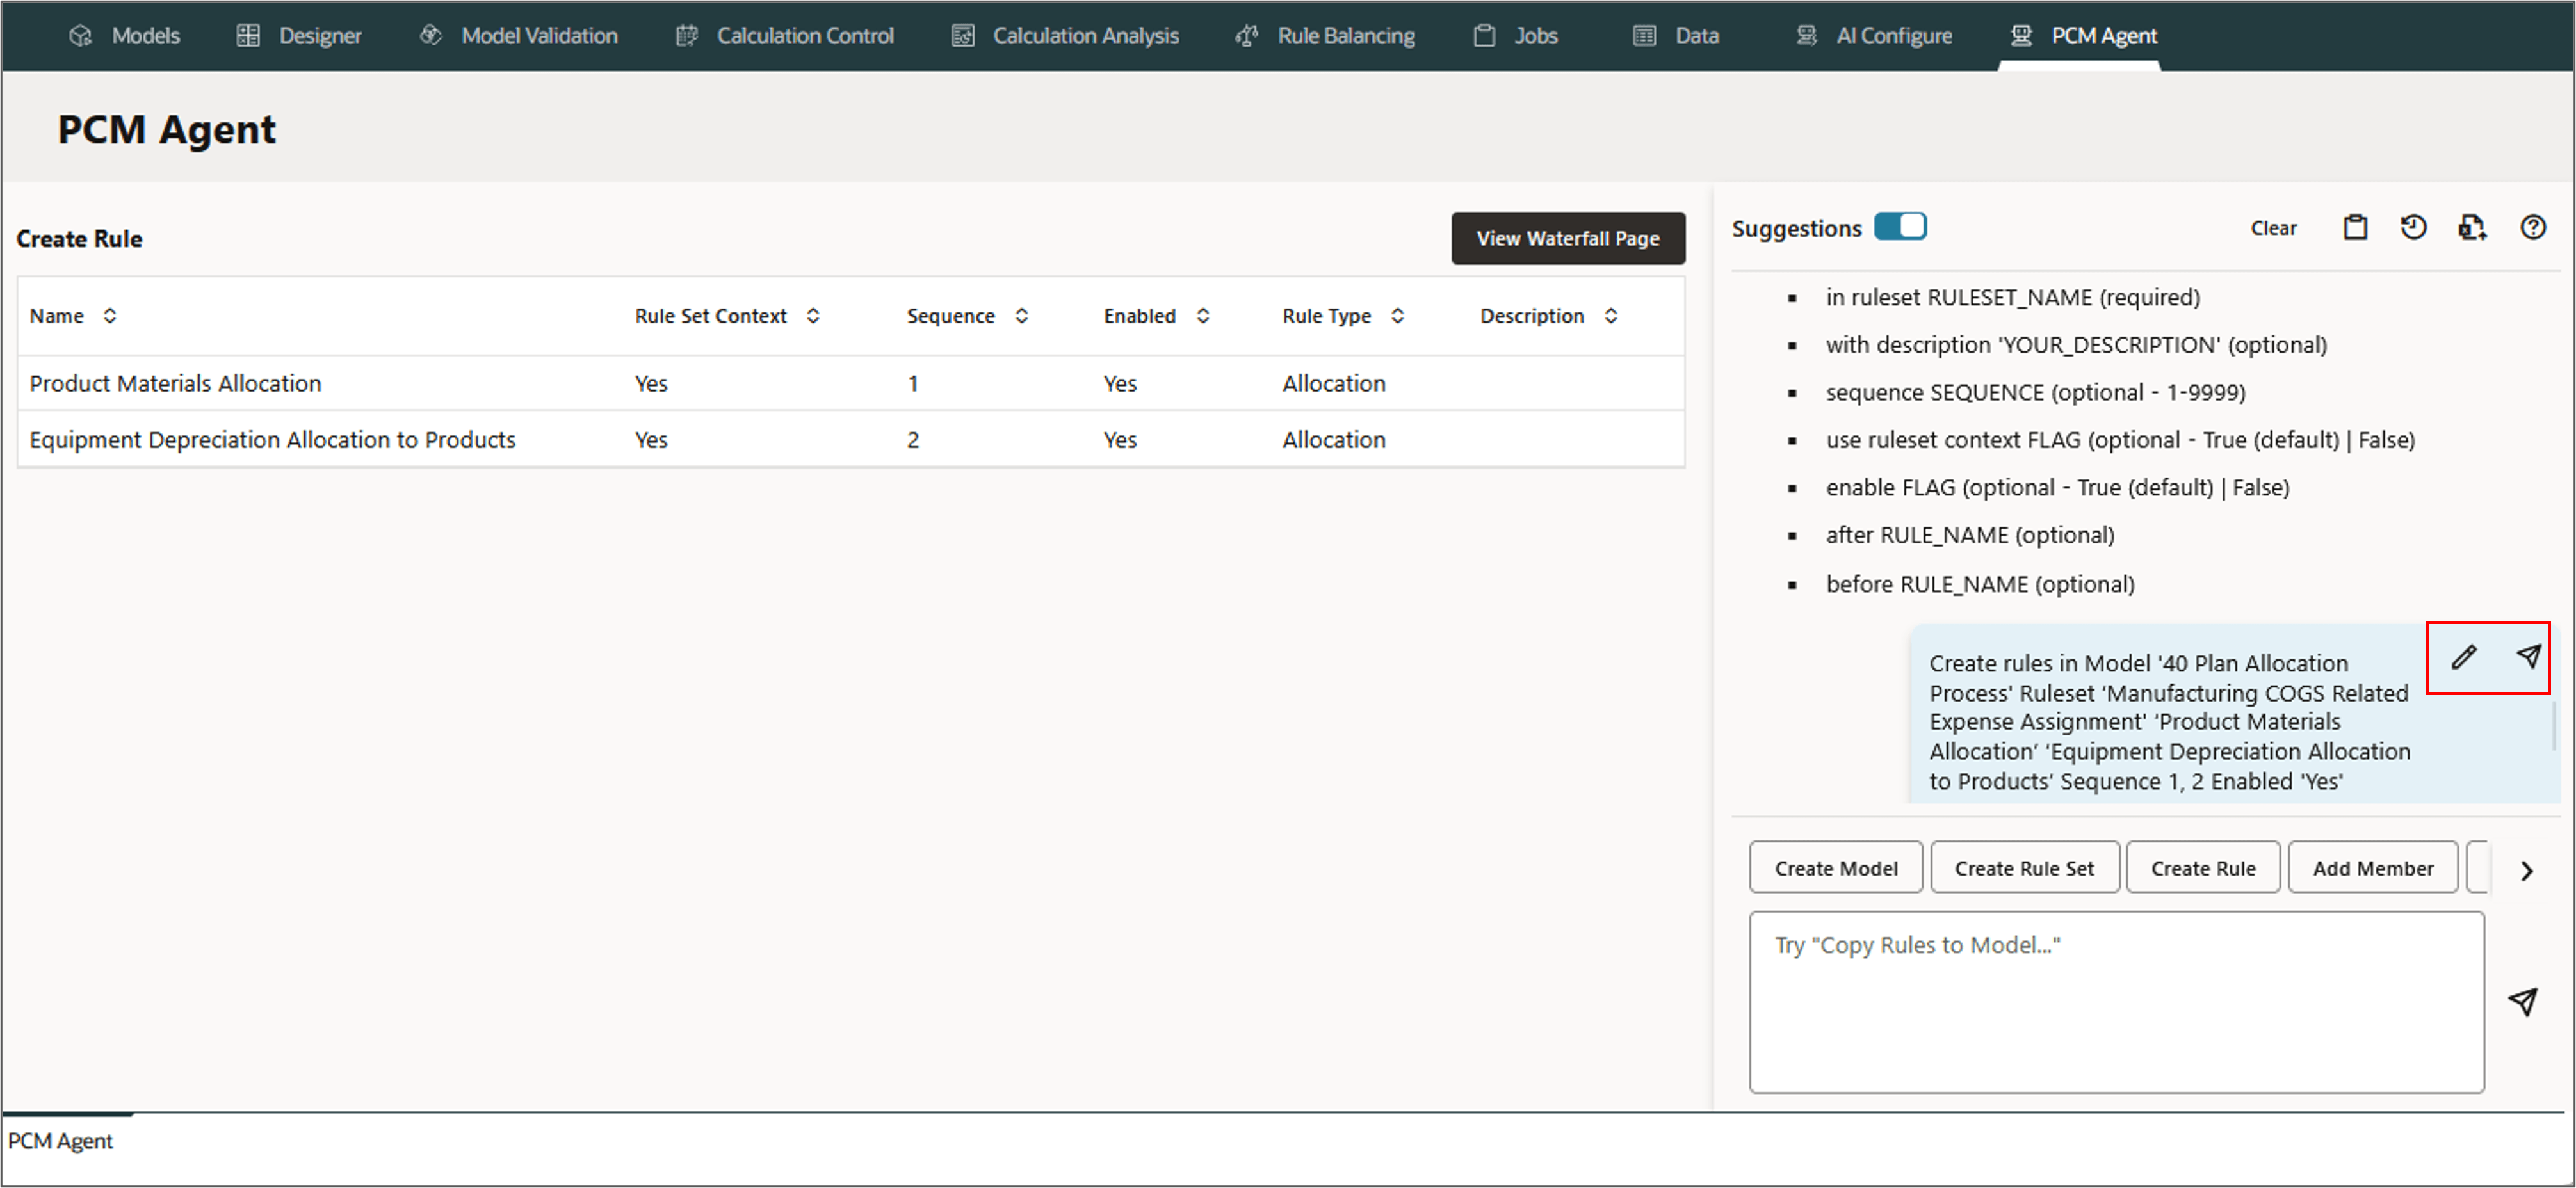
Creating Multiple Rules
Use PCM agent to create multiple rules at once. This is useful when you need to create a large number of rules in a rule set. You can create the initial outline of the rules, and then come back later and fill in the details for each rule. This can save you time and help you manage your models more efficiently.
In this section, you create two allocation rules and add them to the rule set called Manufacturing COGS Related Expense Assignment under the model 40 Plan Allocation Process. The Sequence for the rules is set to 1, 2 respectively, and Enabled is specified once.
Note:
Allocation rules determine how allocated data flows and how drivers determine allocation amounts.- Go to PCM Agent, and enter or select Create Rules in the command section.
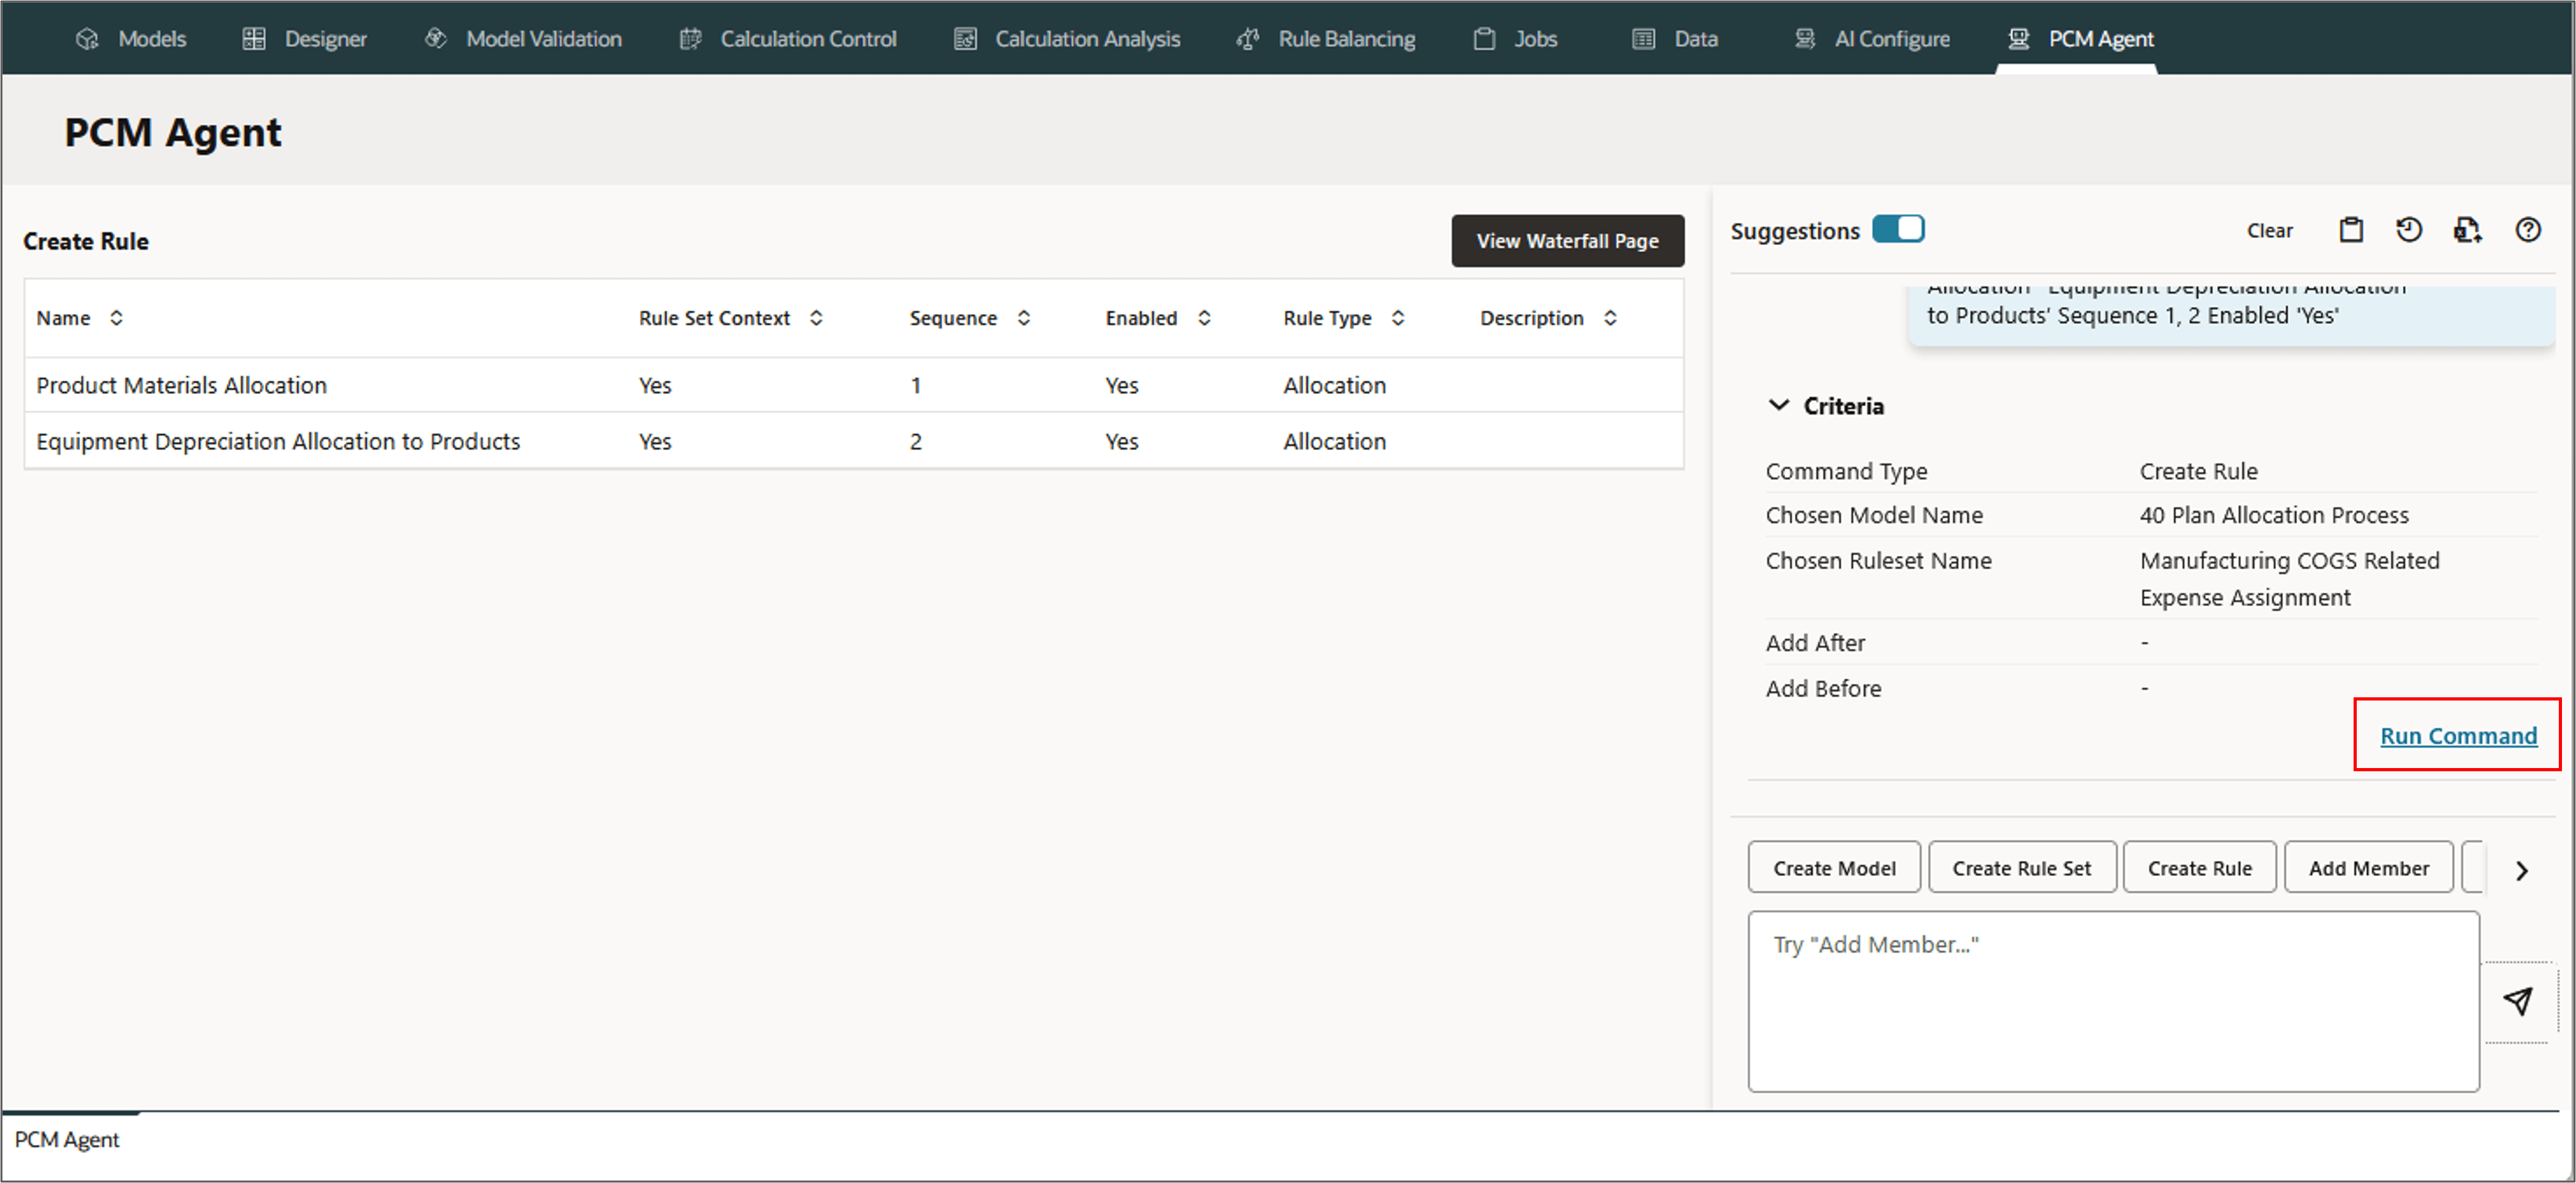
- Type the below request in the PCM agent and click (Send).
- Review and refine the request if needed.
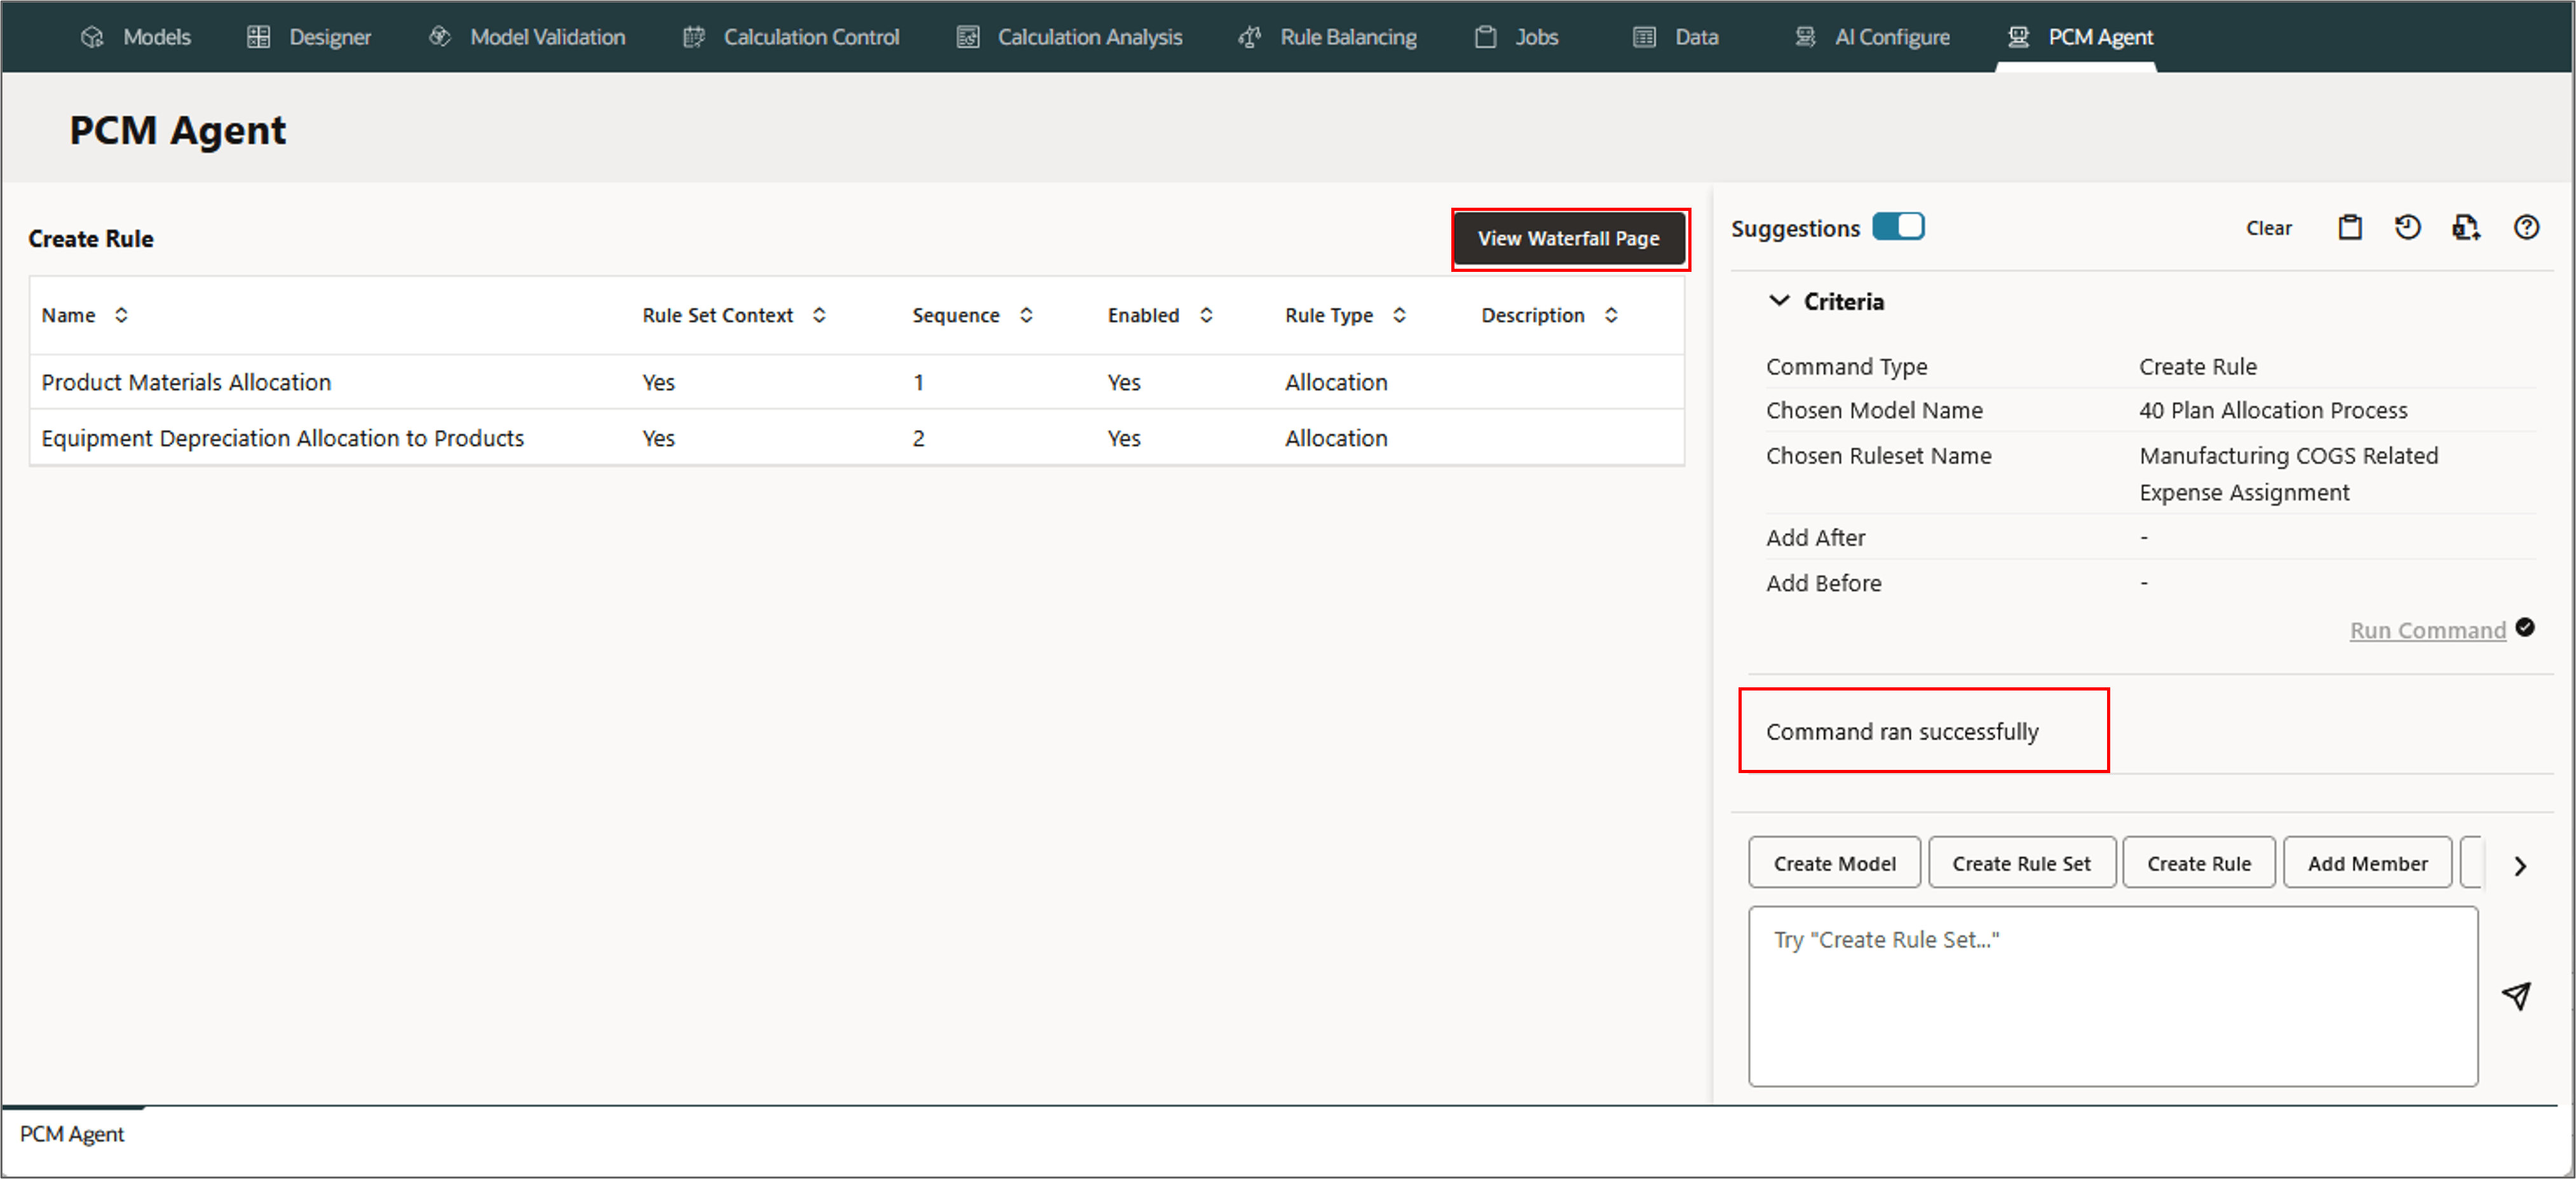
- Run the command.
- Verify the results by clicking View Waterfall Page on the top to view the newly created rules.
- Click any of the newly created rules to verify the rule properties.
- Click (Edit) to edit the Definition, add the Target dimensions and to validate the rule definition.
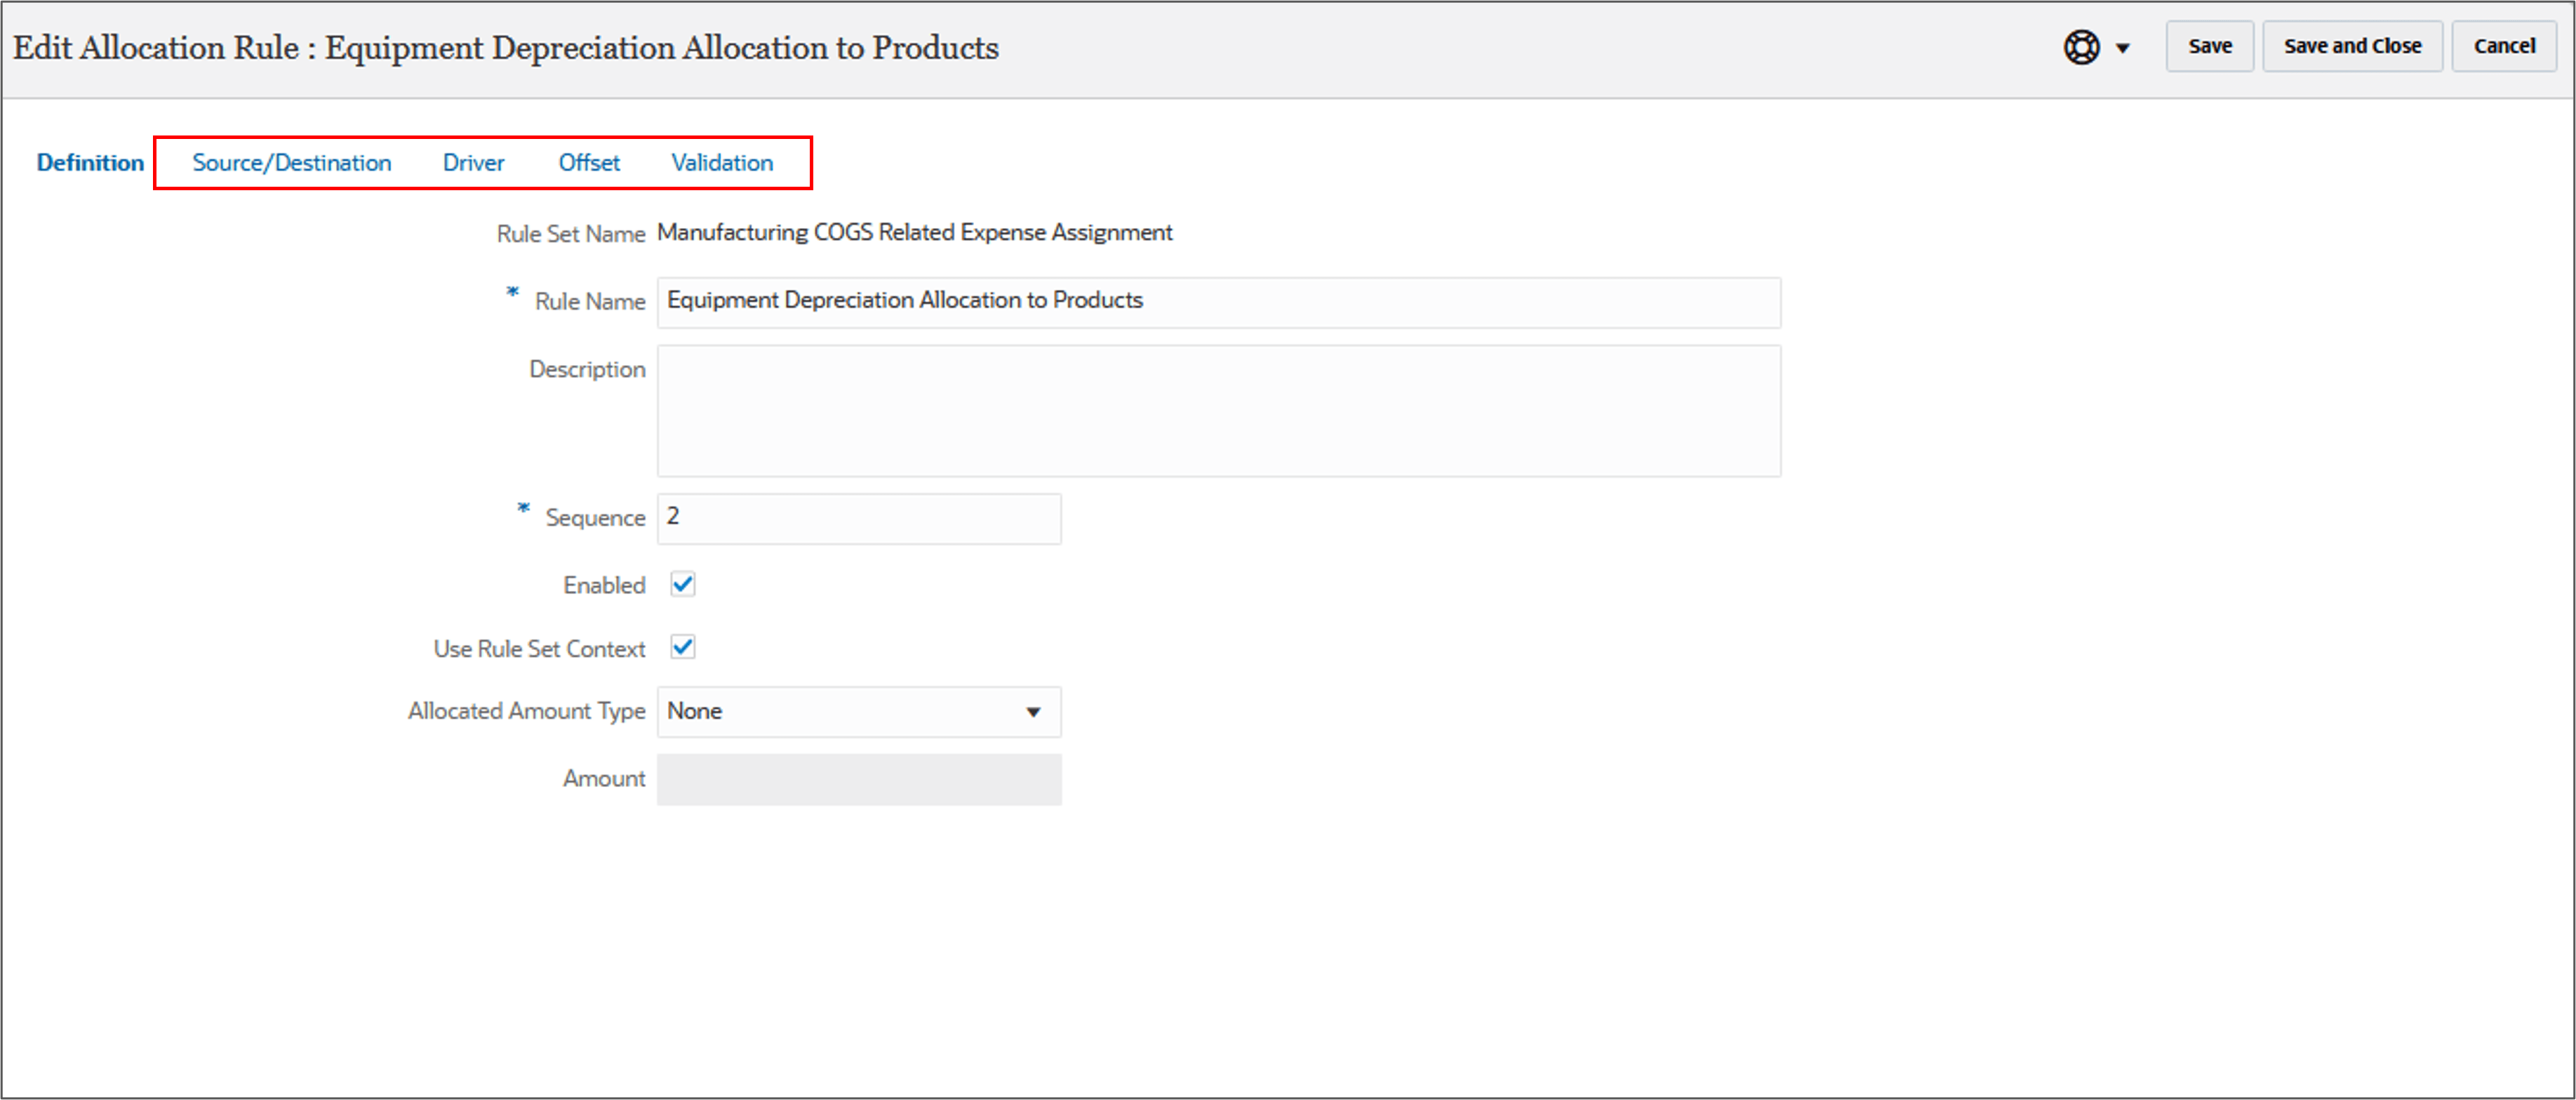
- Click each tab to add Source/Destination path, the Driver and Offset locations, and validate the rule definition
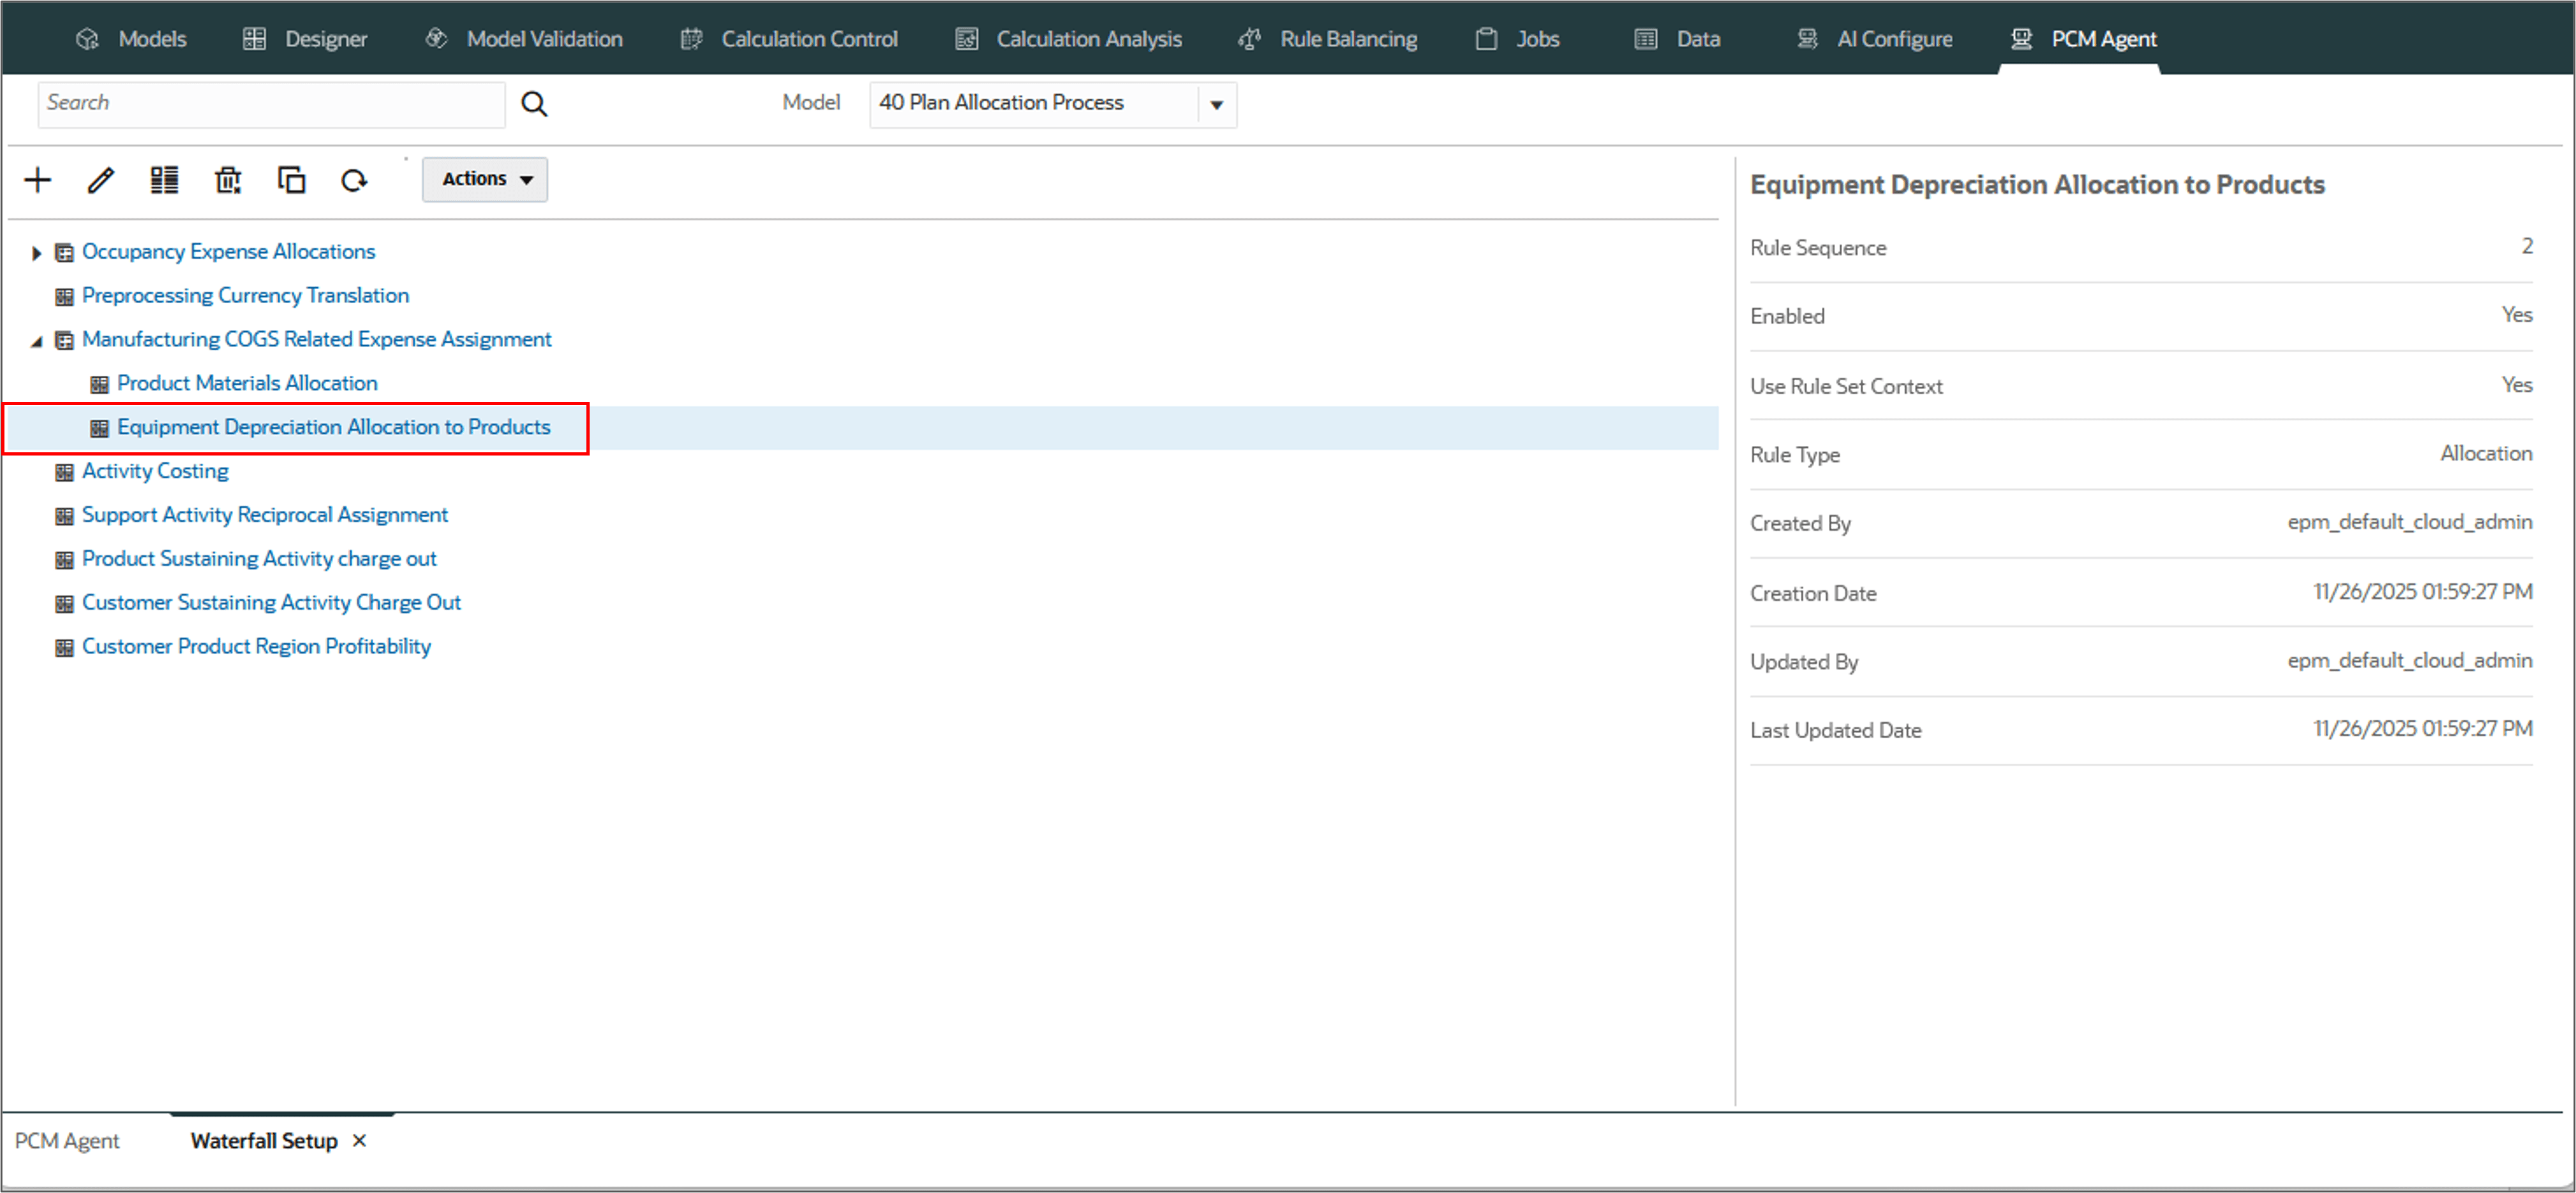
Create rules in Model '40 Plan Allocation Process'
Ruleset 'Manufacturing COGS Related Expense Assignment'
'Product Materials Allocation'
 'Equipment Depreciation Allocation to Products'
Sequence 1, 2
Enabled 'Yes'
The PCM Agent processes the request and displays a message indicating successful execution of the command. If the execution failed, the agent displays error messages.
Note:
Rules created this way have an initial outline and default to serial calculation. They do not have any rule set context members defined. Edit each rule manually to select Source/Destination path, the Driver and Offset locations, and validate the rule definition.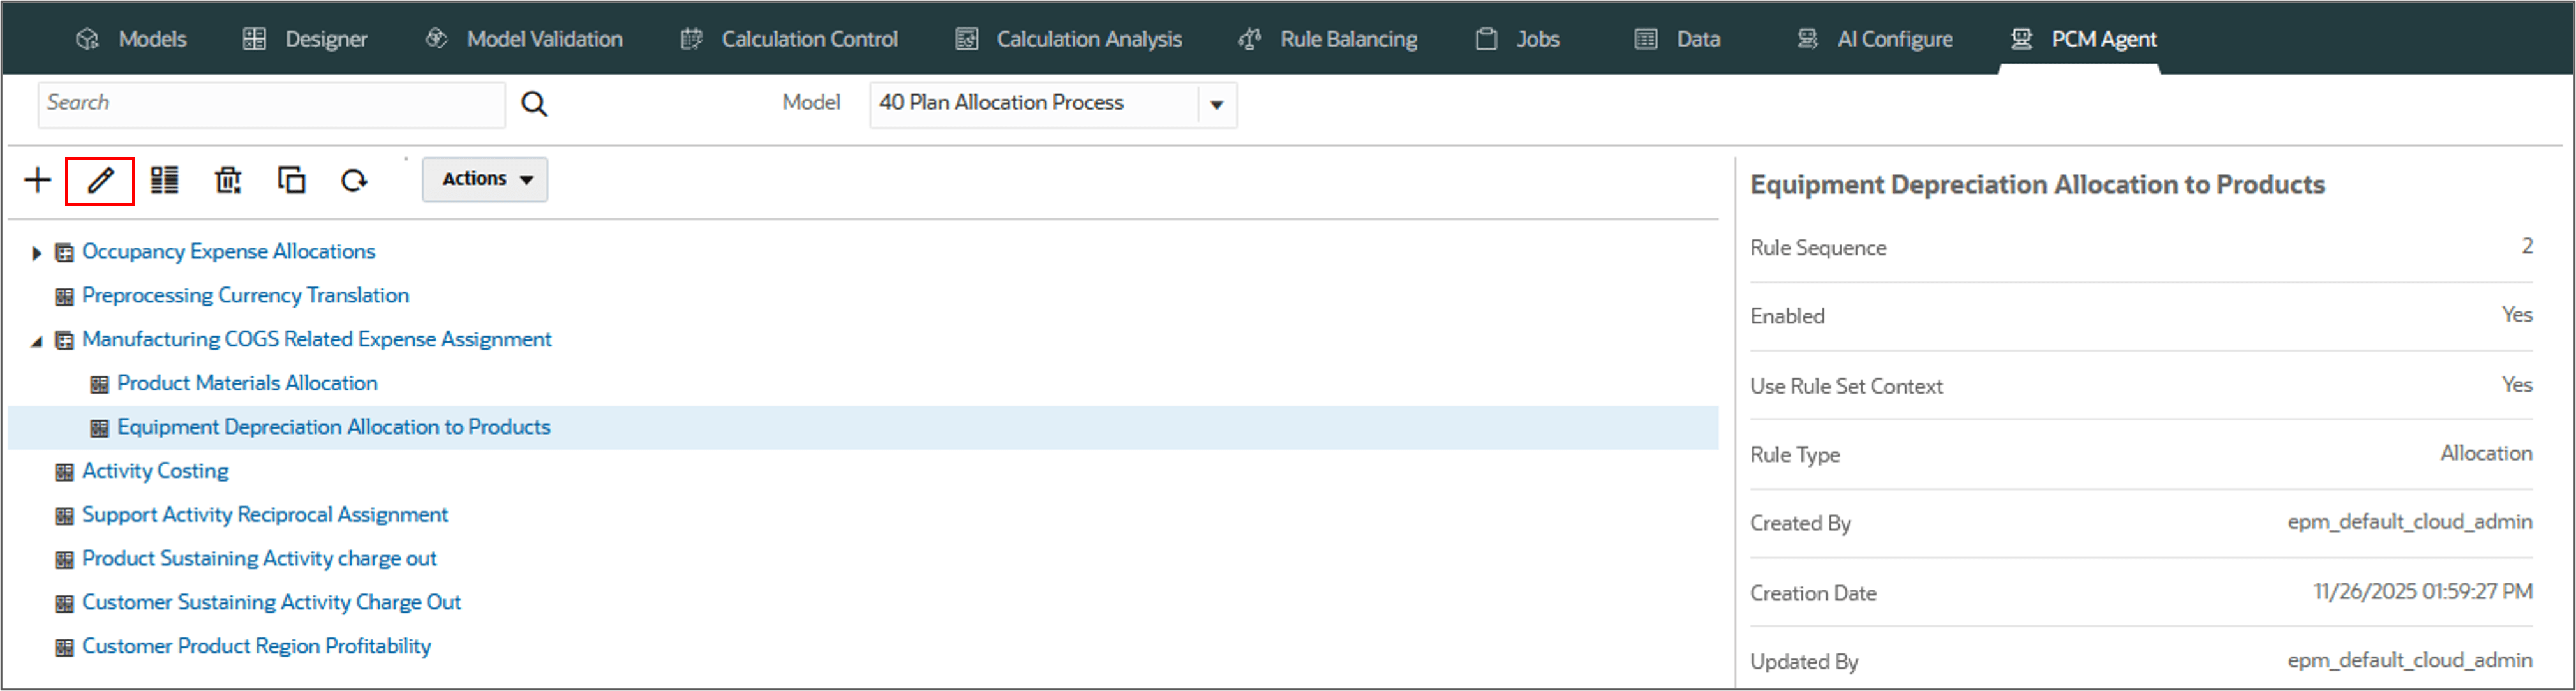
Working with Rules
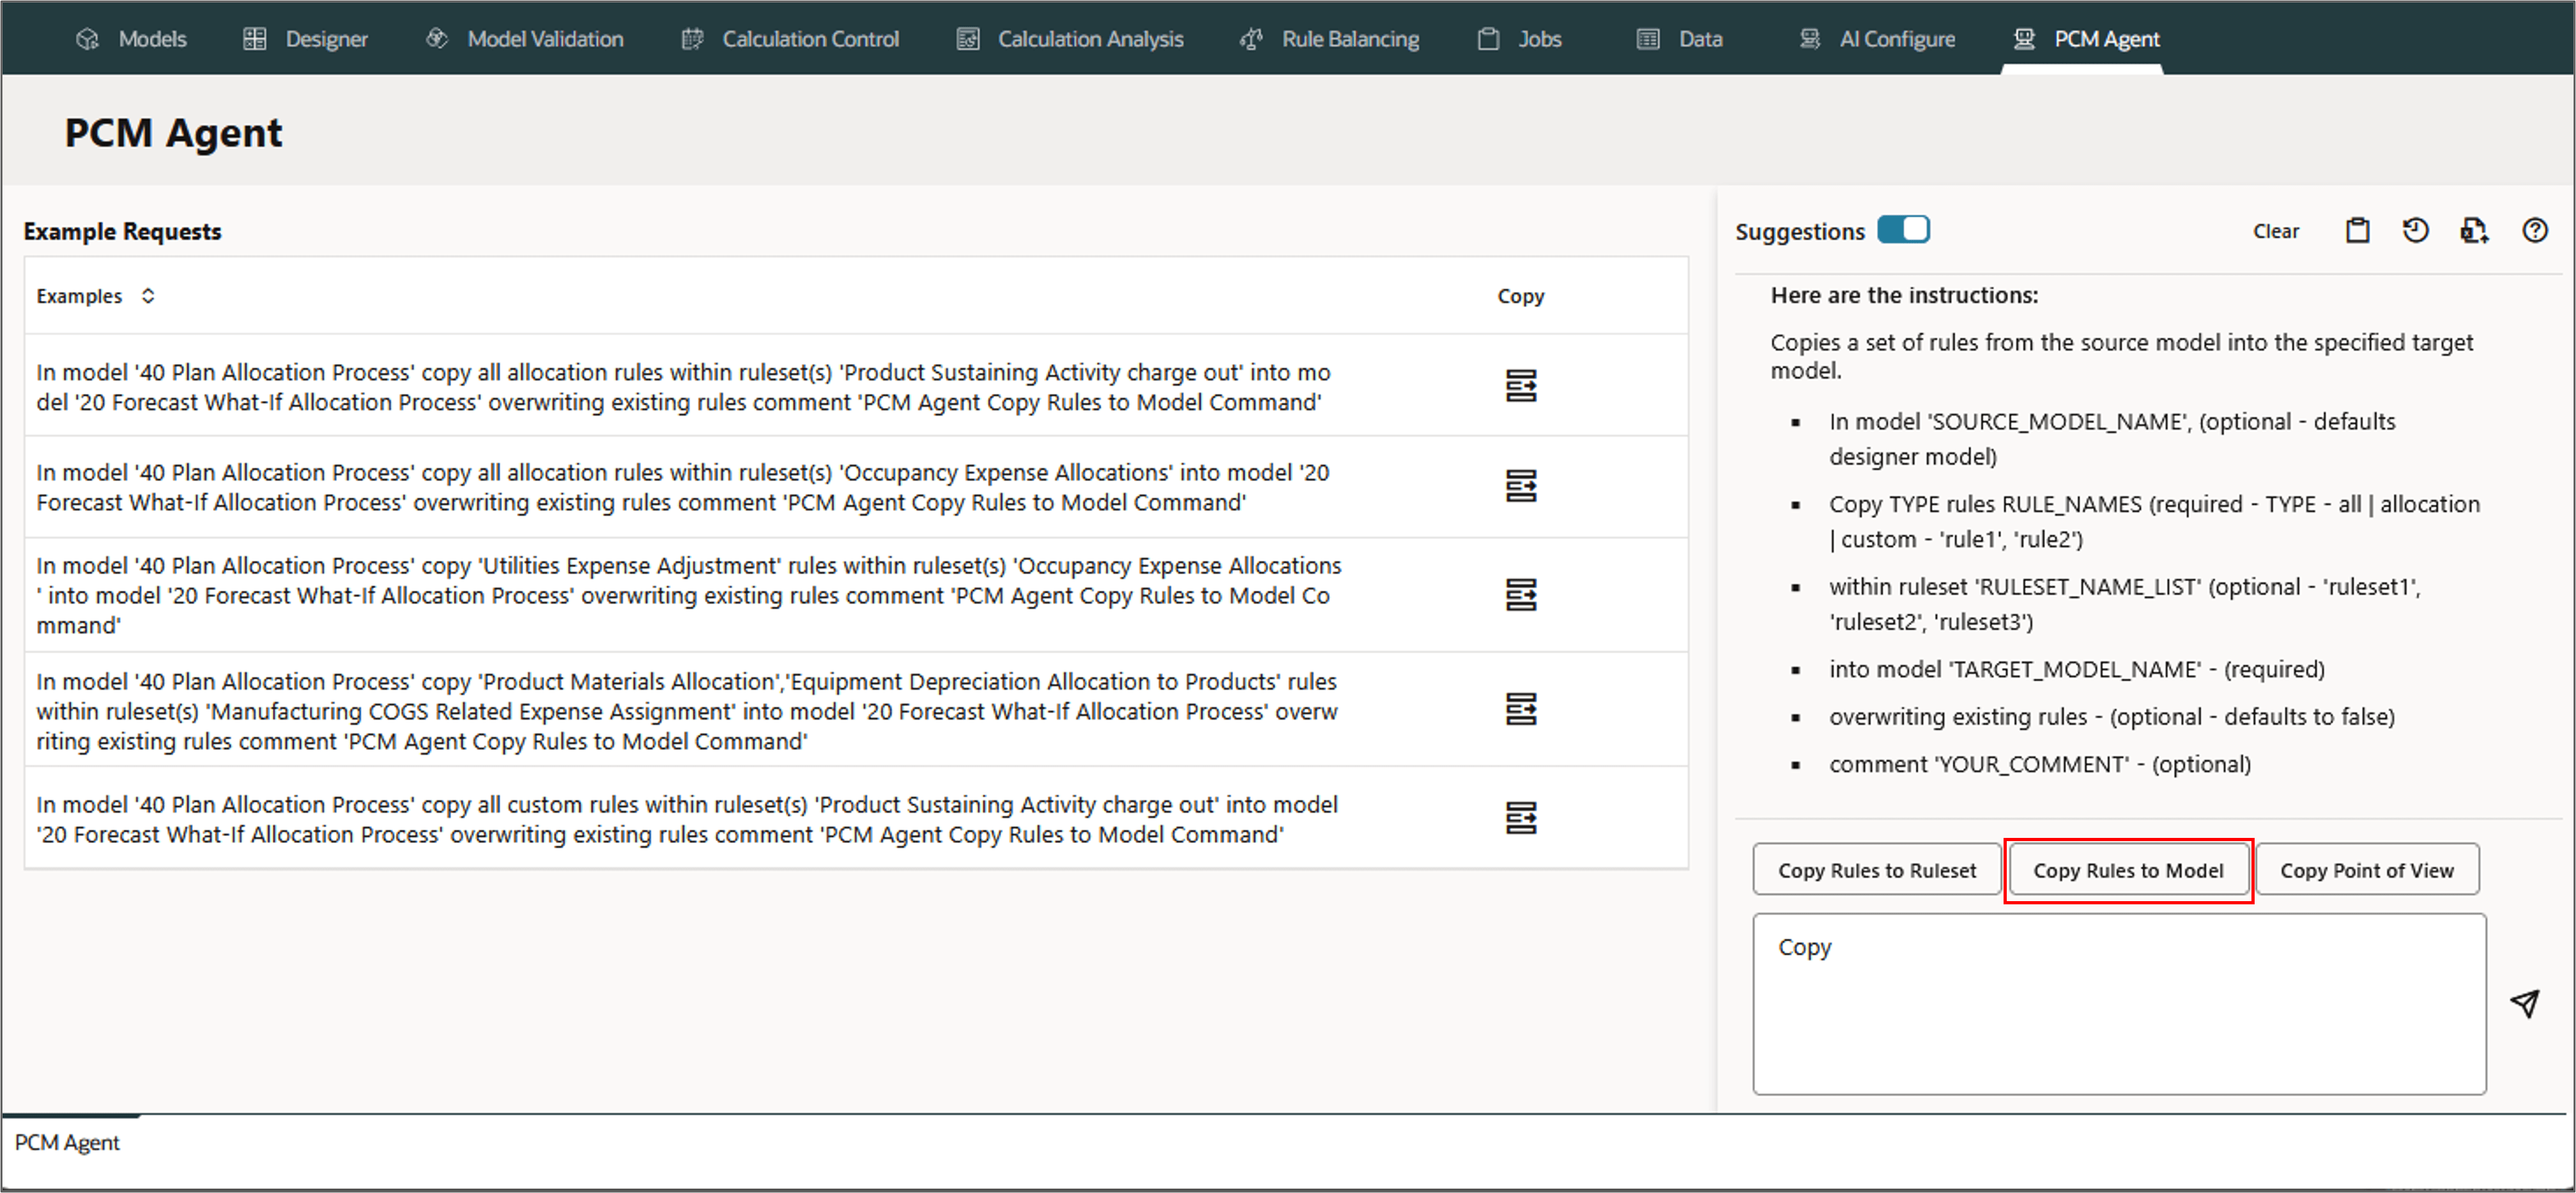
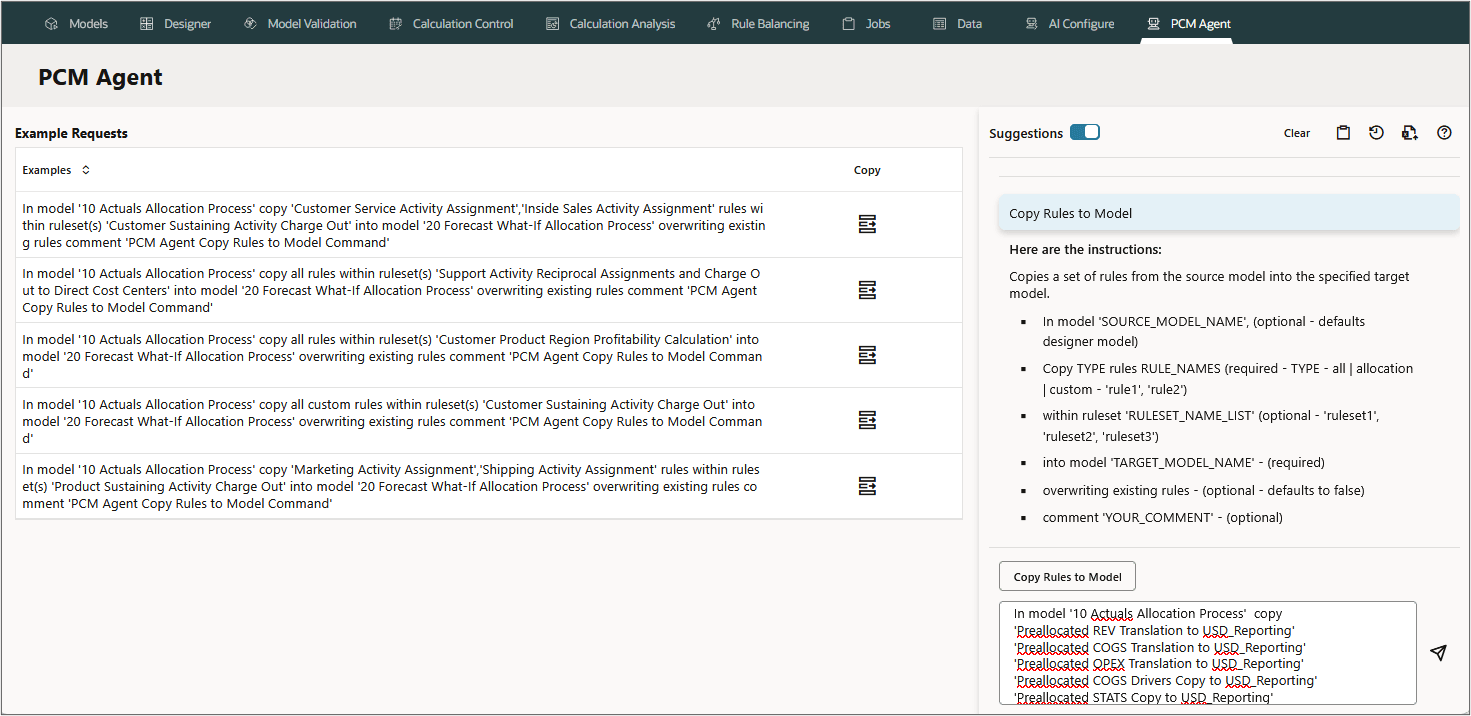
Copying Rules to Model
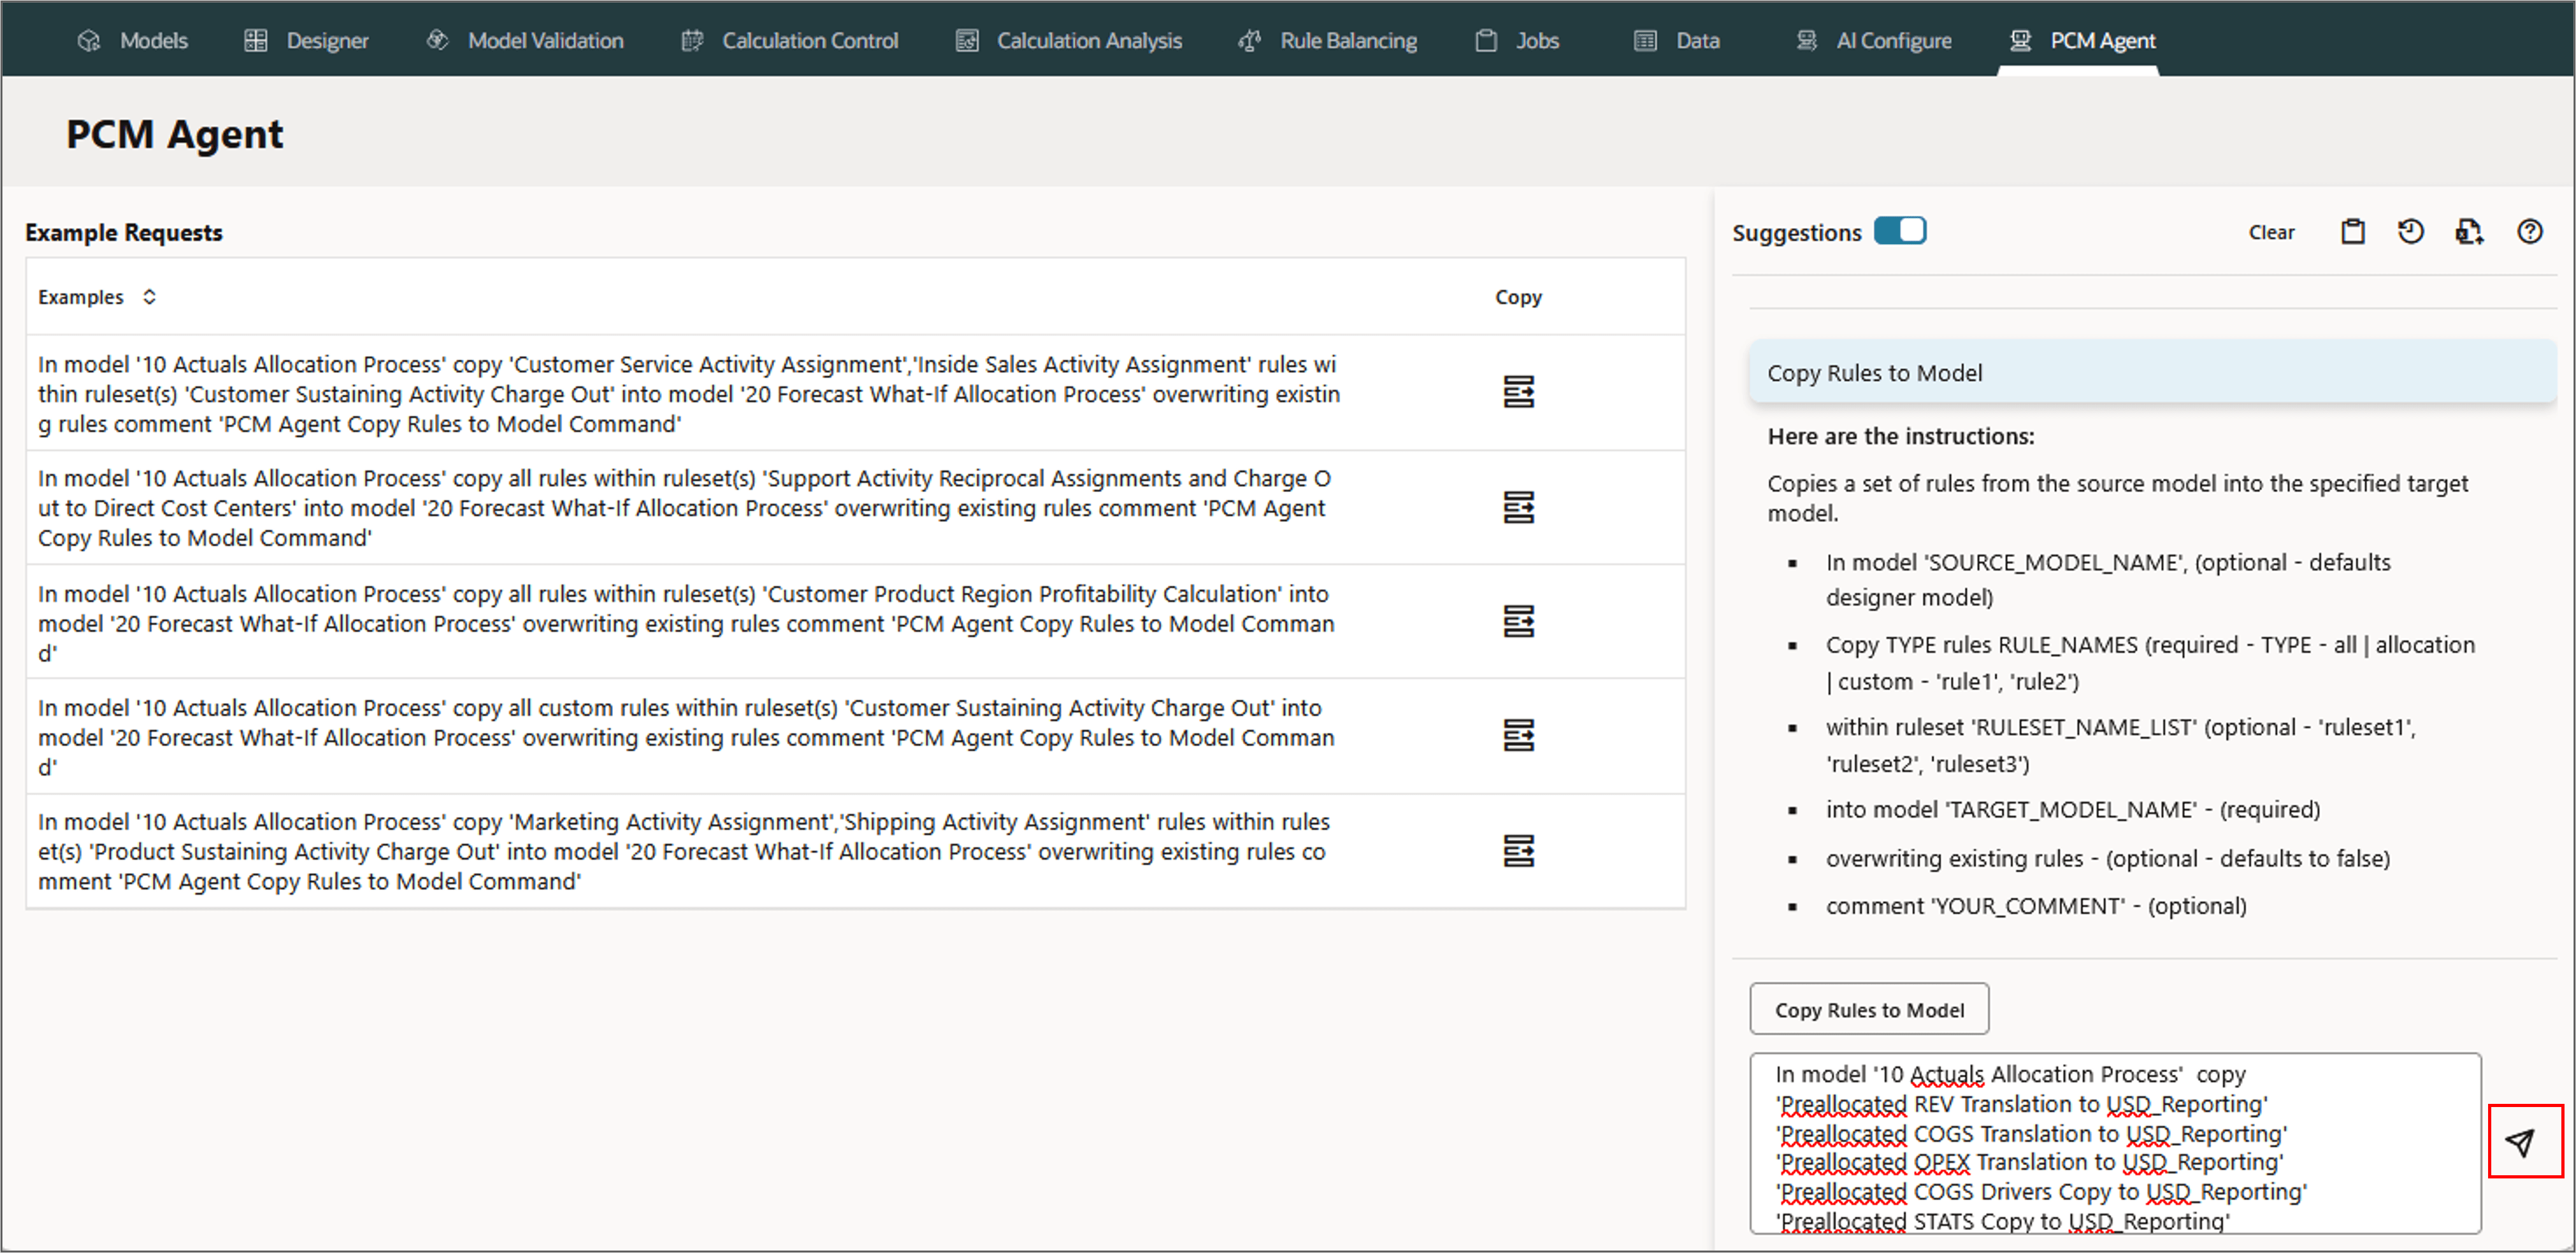
PCM agent enables copying rules to a specified target model using a command. This feature is useful if you are creating a new model and want to include identical or similar rules from an existing model in the new model. You can select multiple rules to copy to a model.
Parameters for Copying Rules to Model
- In model 'SOURCE_MODEL_NAME', (optional - defaults designer model)
- Copy TYPE rules RULE_NAMES (required - TYPE - all | allocation | custom - 'rule1', 'rule2')
- within ruleset 'RULESET_NAME_LIST' (optional - 'ruleset1', 'ruleset2', 'ruleset3')
- into model 'TARGET_MODEL_NAME' - (required)
- overwriting existing rules - (optional - defaults to false)
- comment 'YOUR_COMMENT' - (optional)
Example: Copying Rules to Model
In this section, you copy all the five rules within the ruleset Preprocessing Currency Translation from the model 10 Actuals Allocation Process into the 40 Plan Allocation Process model.
- On the PCM Agent Page, select Copy Rules to Model.
- Type the following request in the PCM agent and click (Send).
- Review and refine the request if needed.
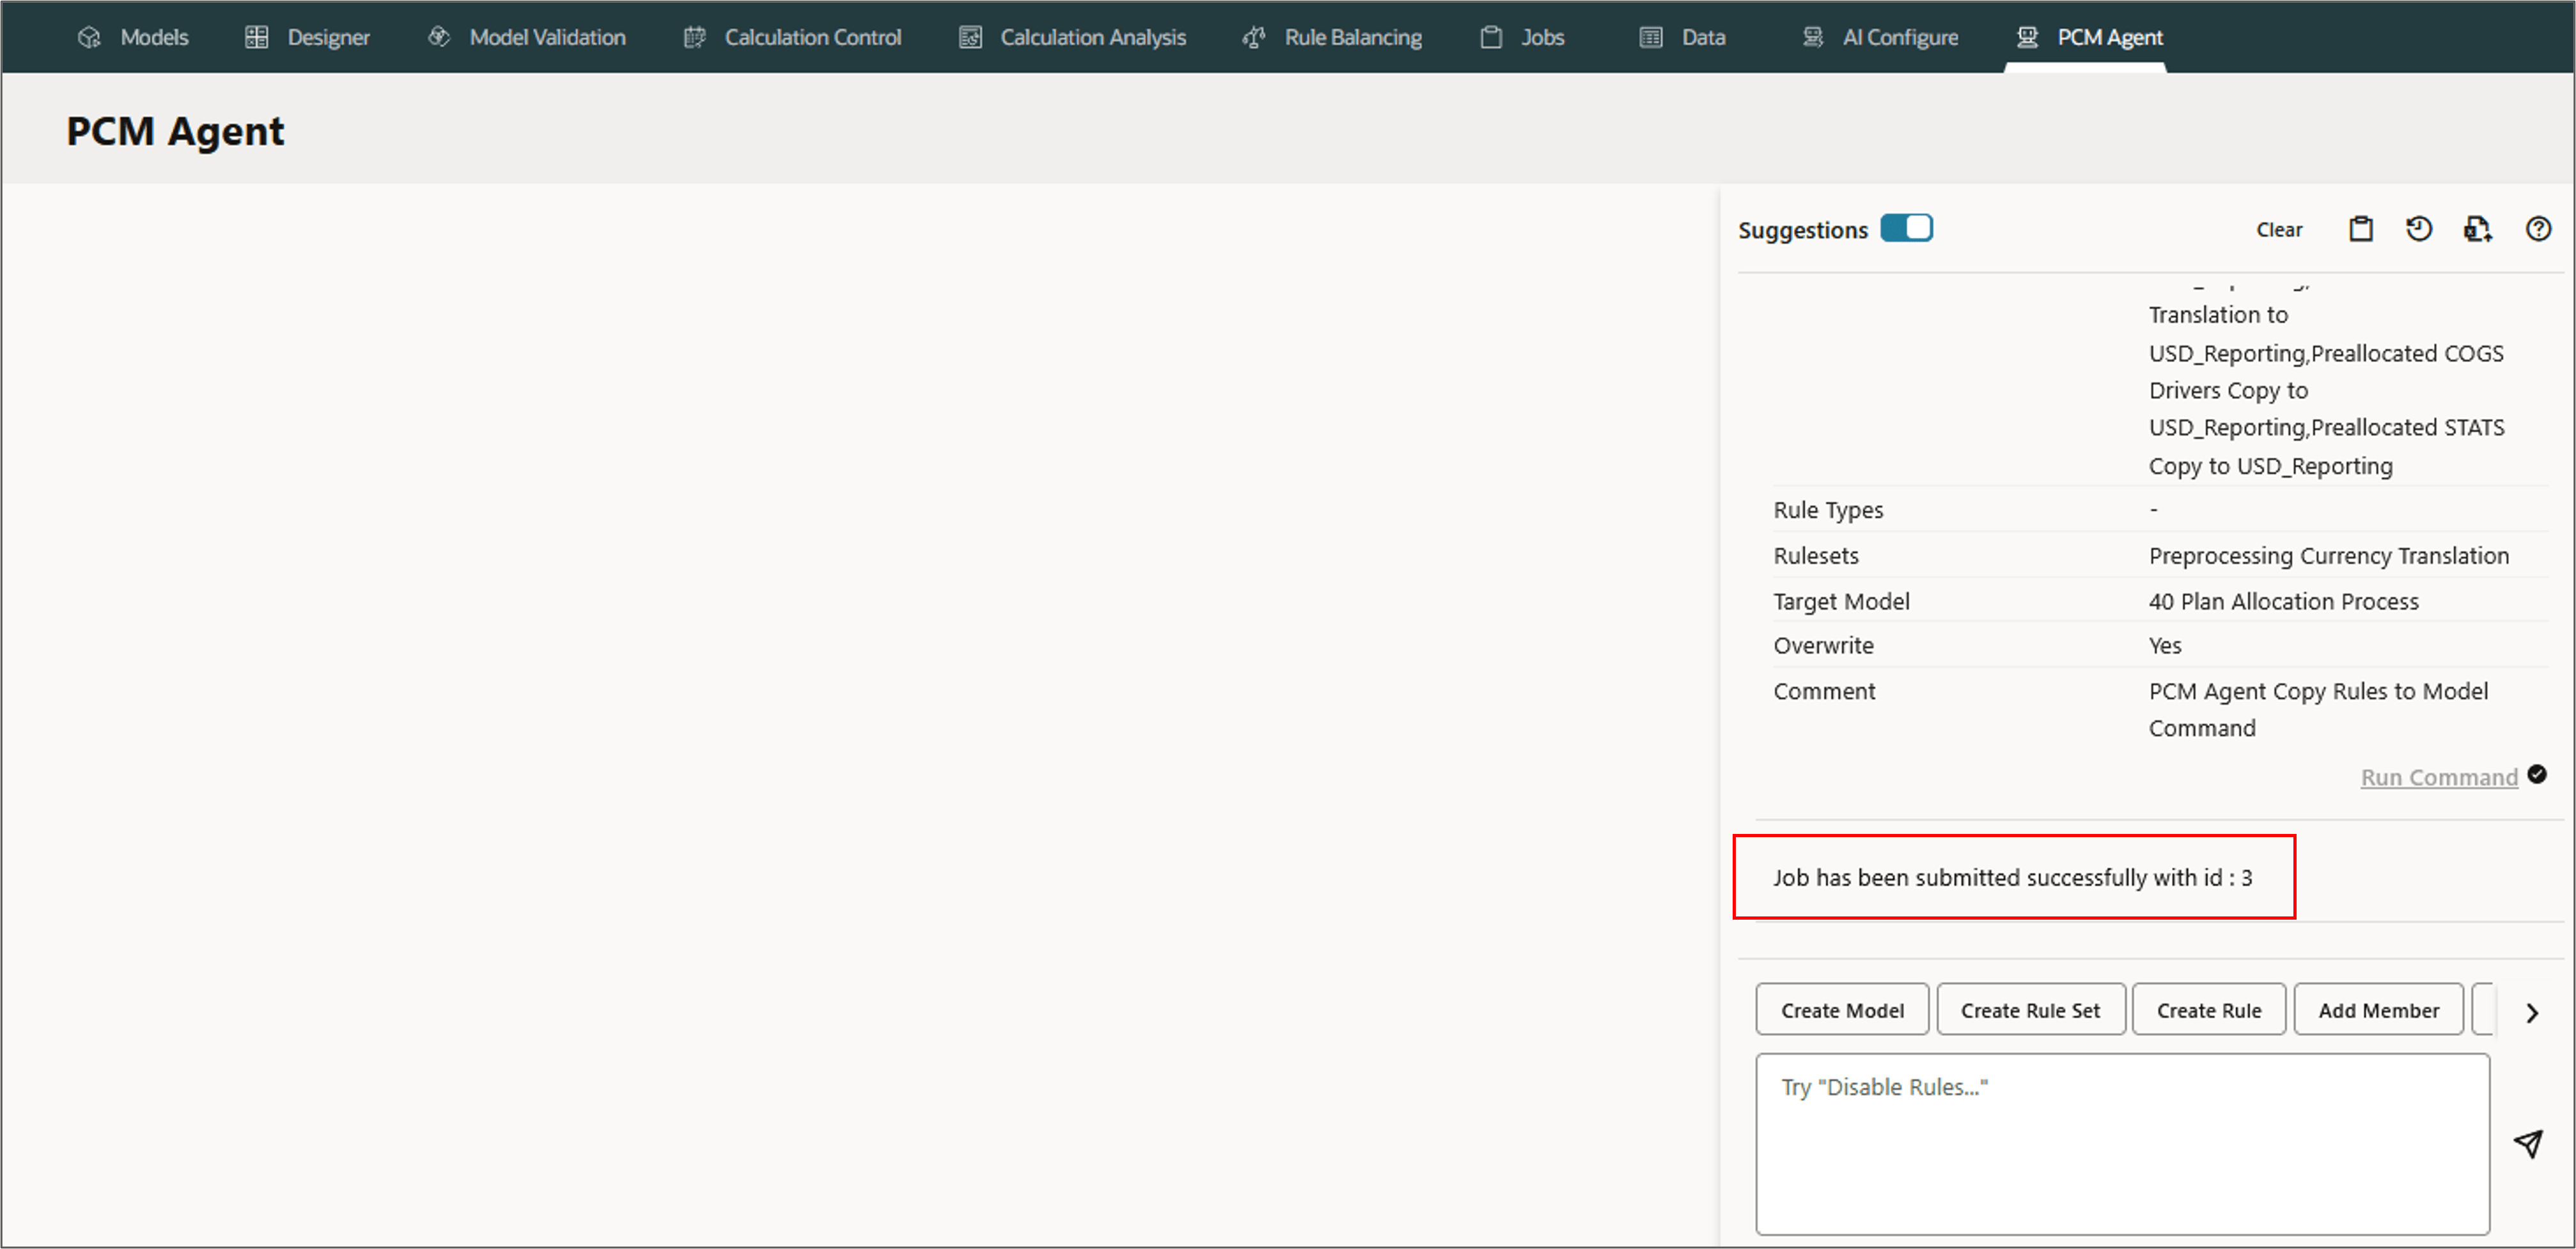
- Run the command.
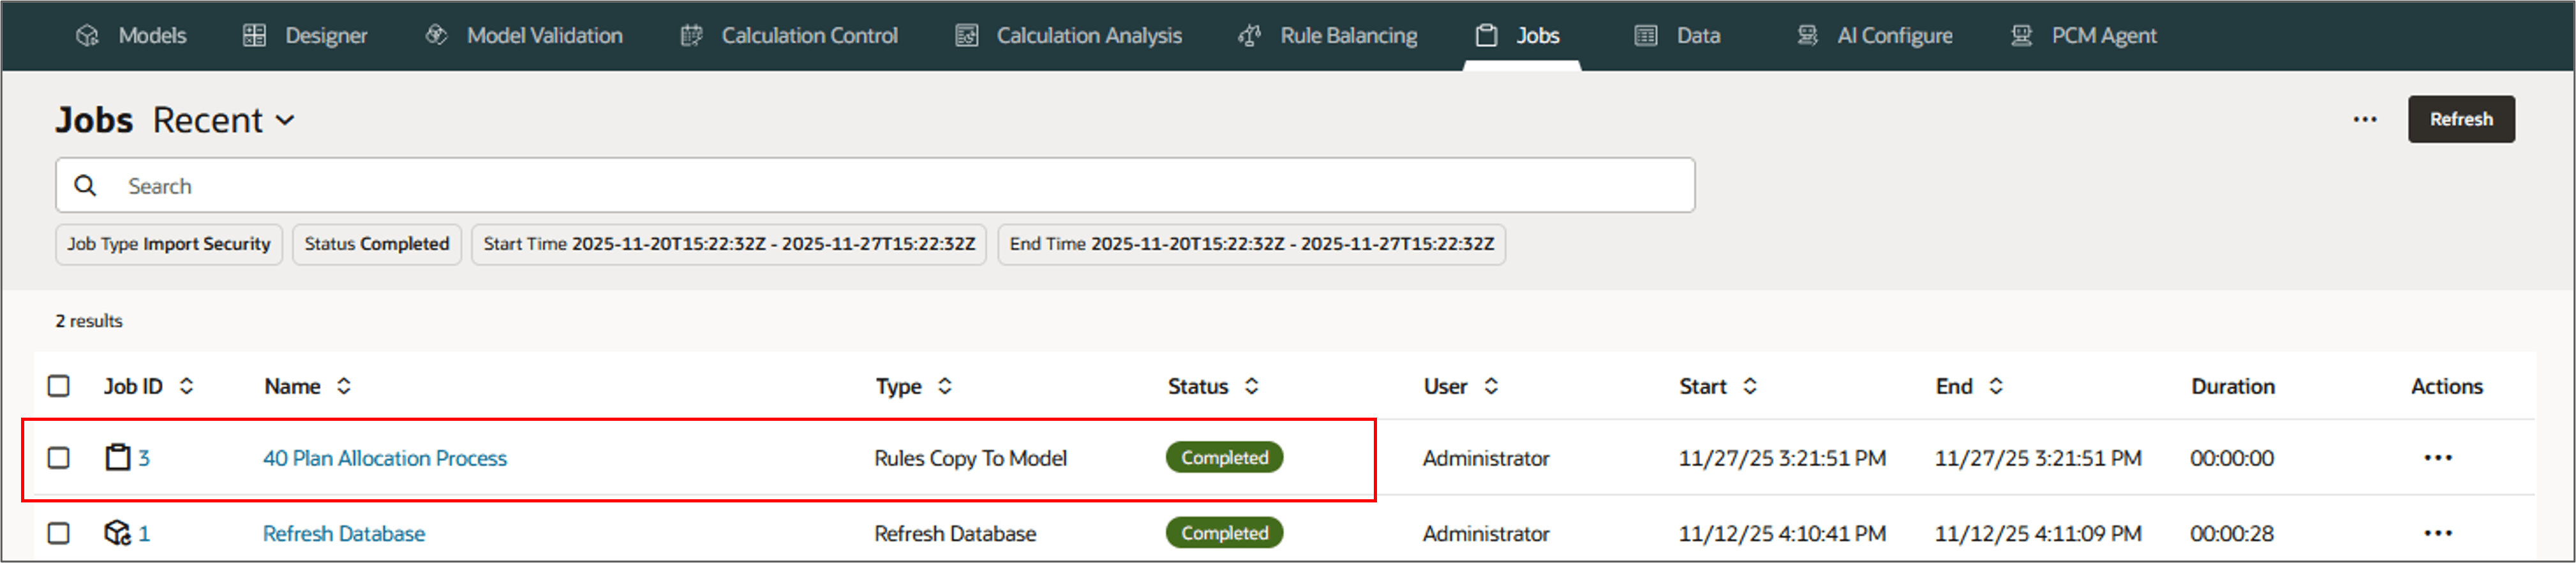
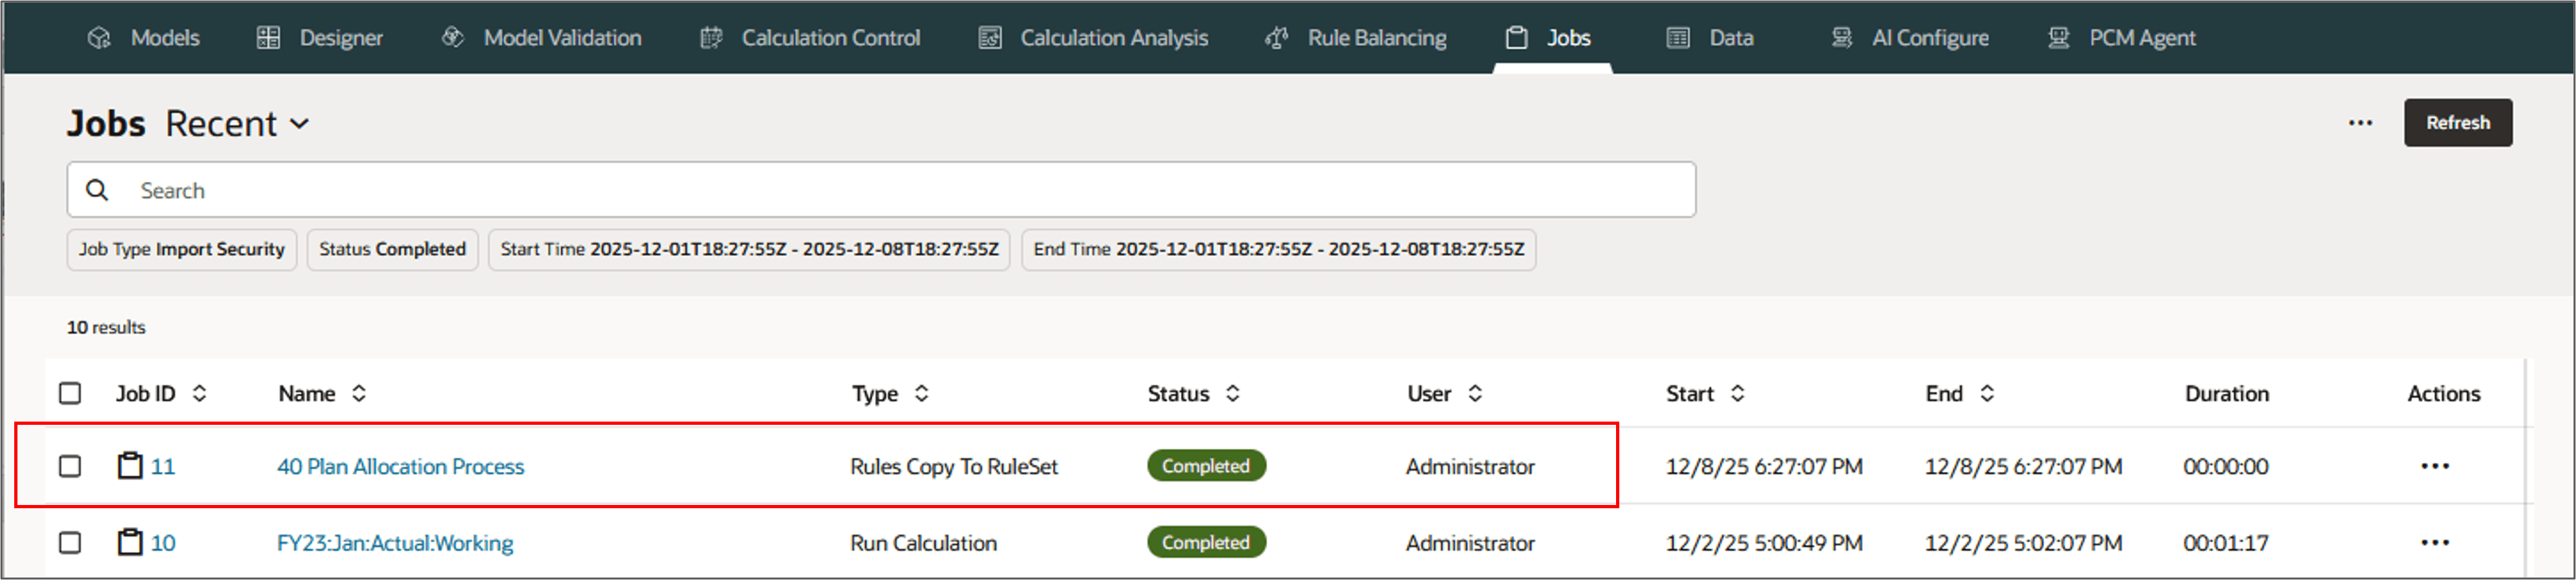
- Go to Jobs to view the job status.
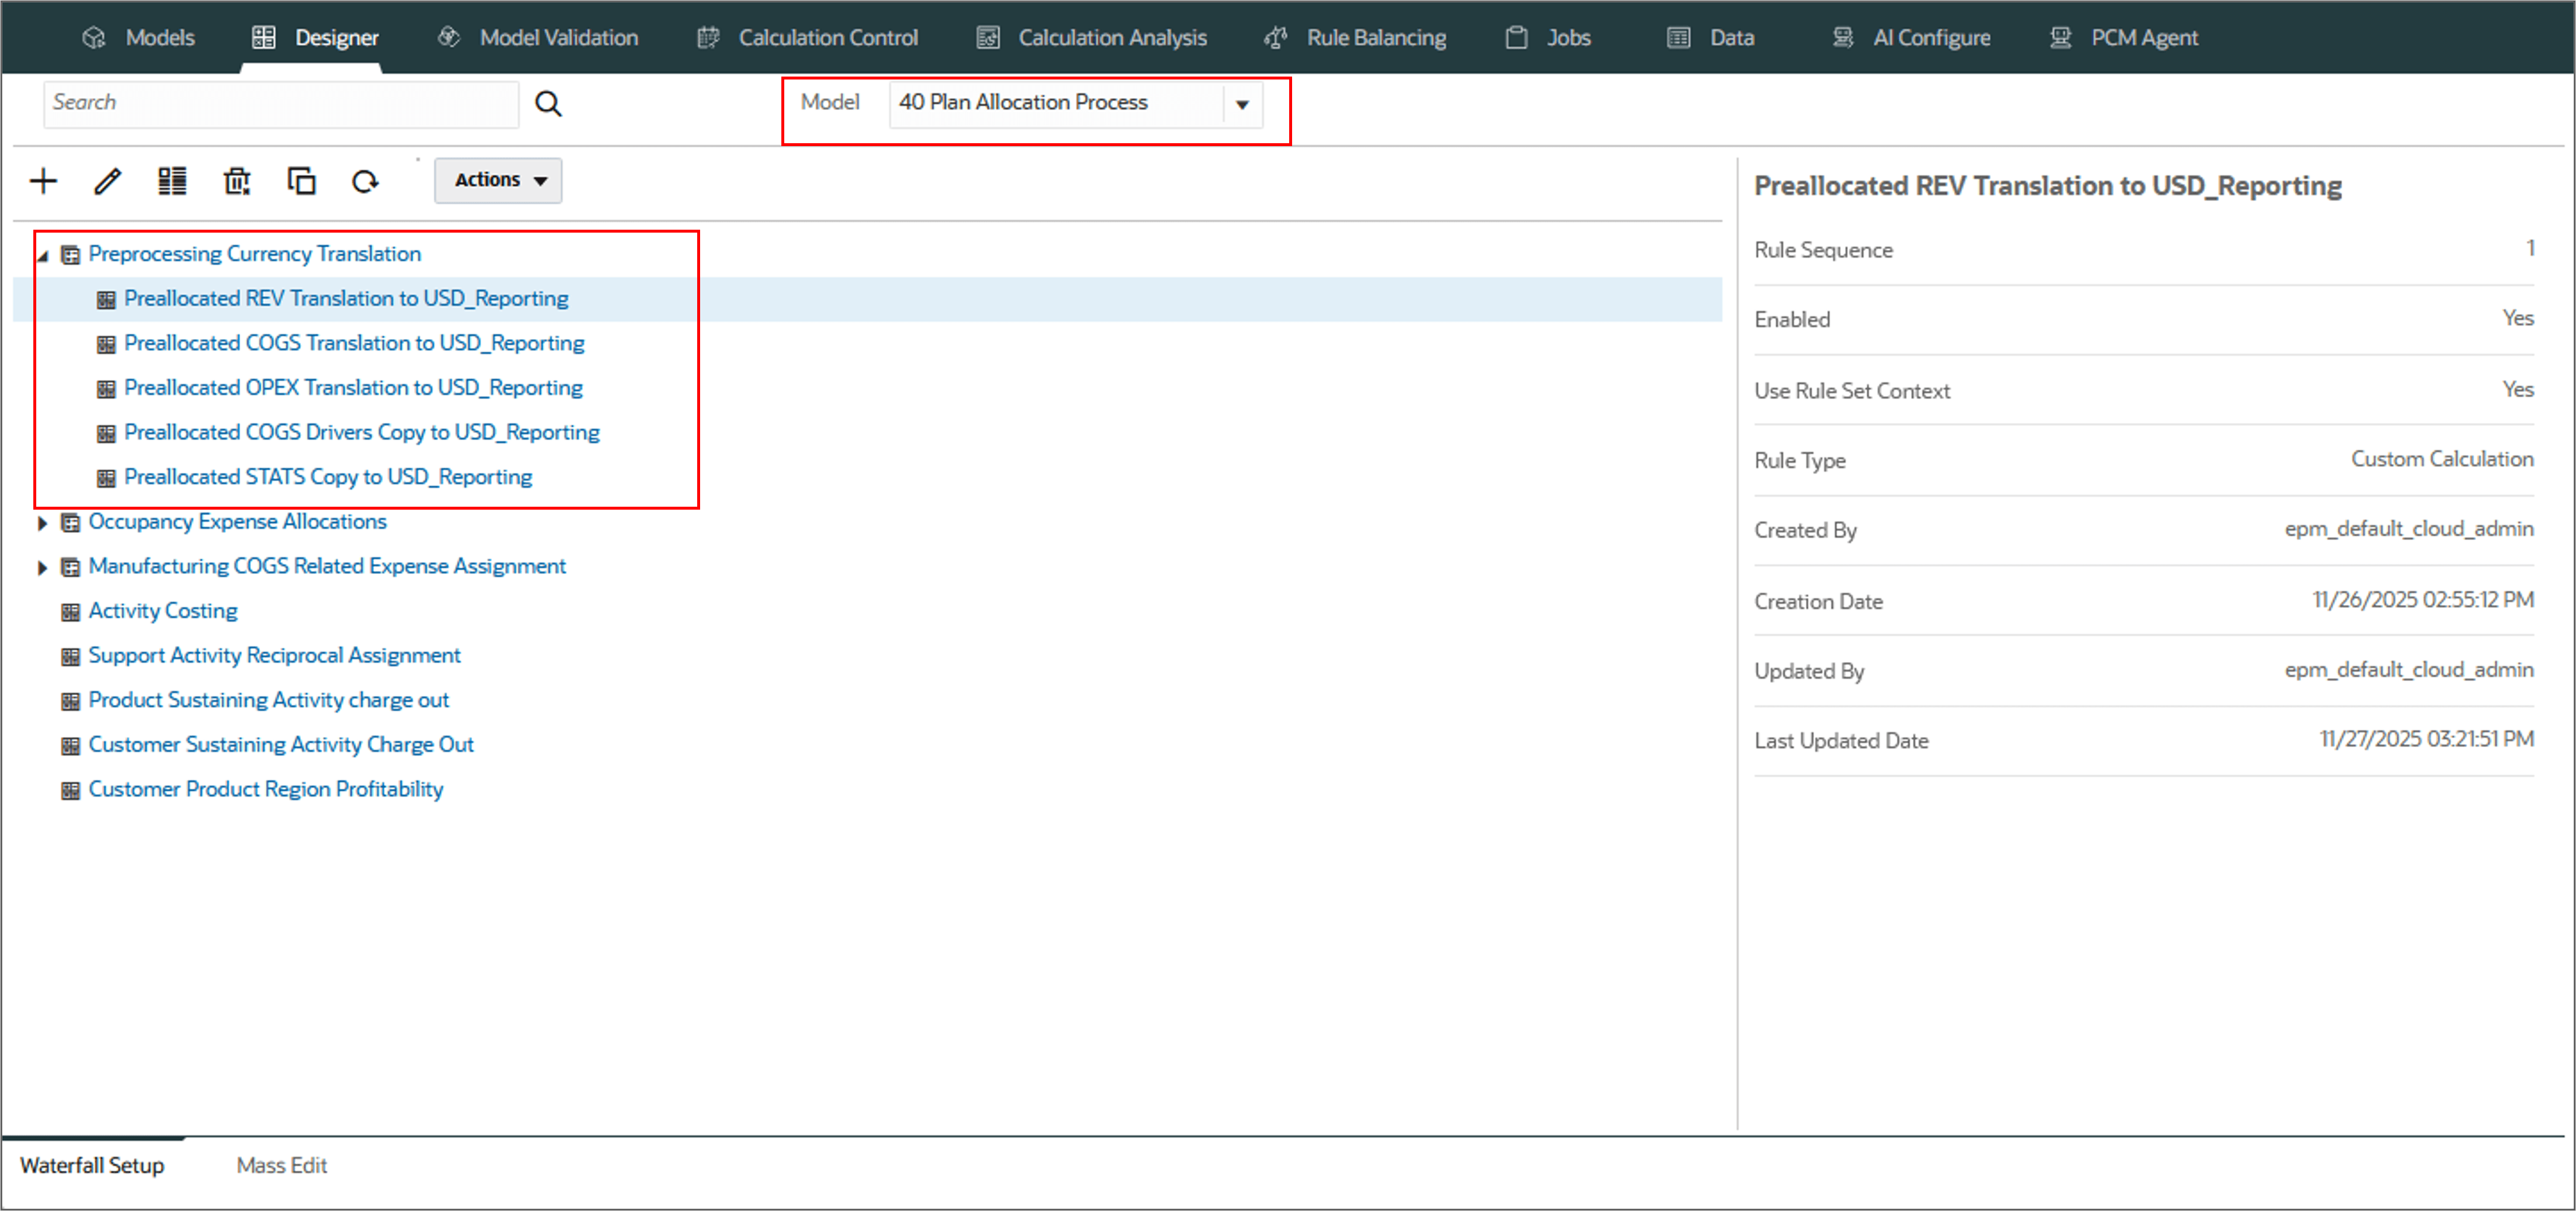
- Now, go to the Designer page and select the model 40 Plan Allocation Process to view the newly copied rules.
In model '10 Actuals Allocation Process' copy
'Preallocated REV Translation to USD_Reporting'
'Preallocated COGS Translation to USD_Reporting'
'Preallocated OPEX Translation to USD_Reporting'
'Preallocated COGS Drivers Copy to USD_Reporting'
'Preallocated STATS Copy to USD_Reporting'
rules within ruleset(s) 'Preprocessing Currency Translation',
 into model '40 Plan Allocation Process'
 overwriting existing rules comment 'PCM Agent Copy Rules to Model Command'
Note:
Click View Rules in Mass Edit on the top to view the selected rules in the Mass Edit page, and to perform manual mass edit actions under the model 40 Plan Allocation Process.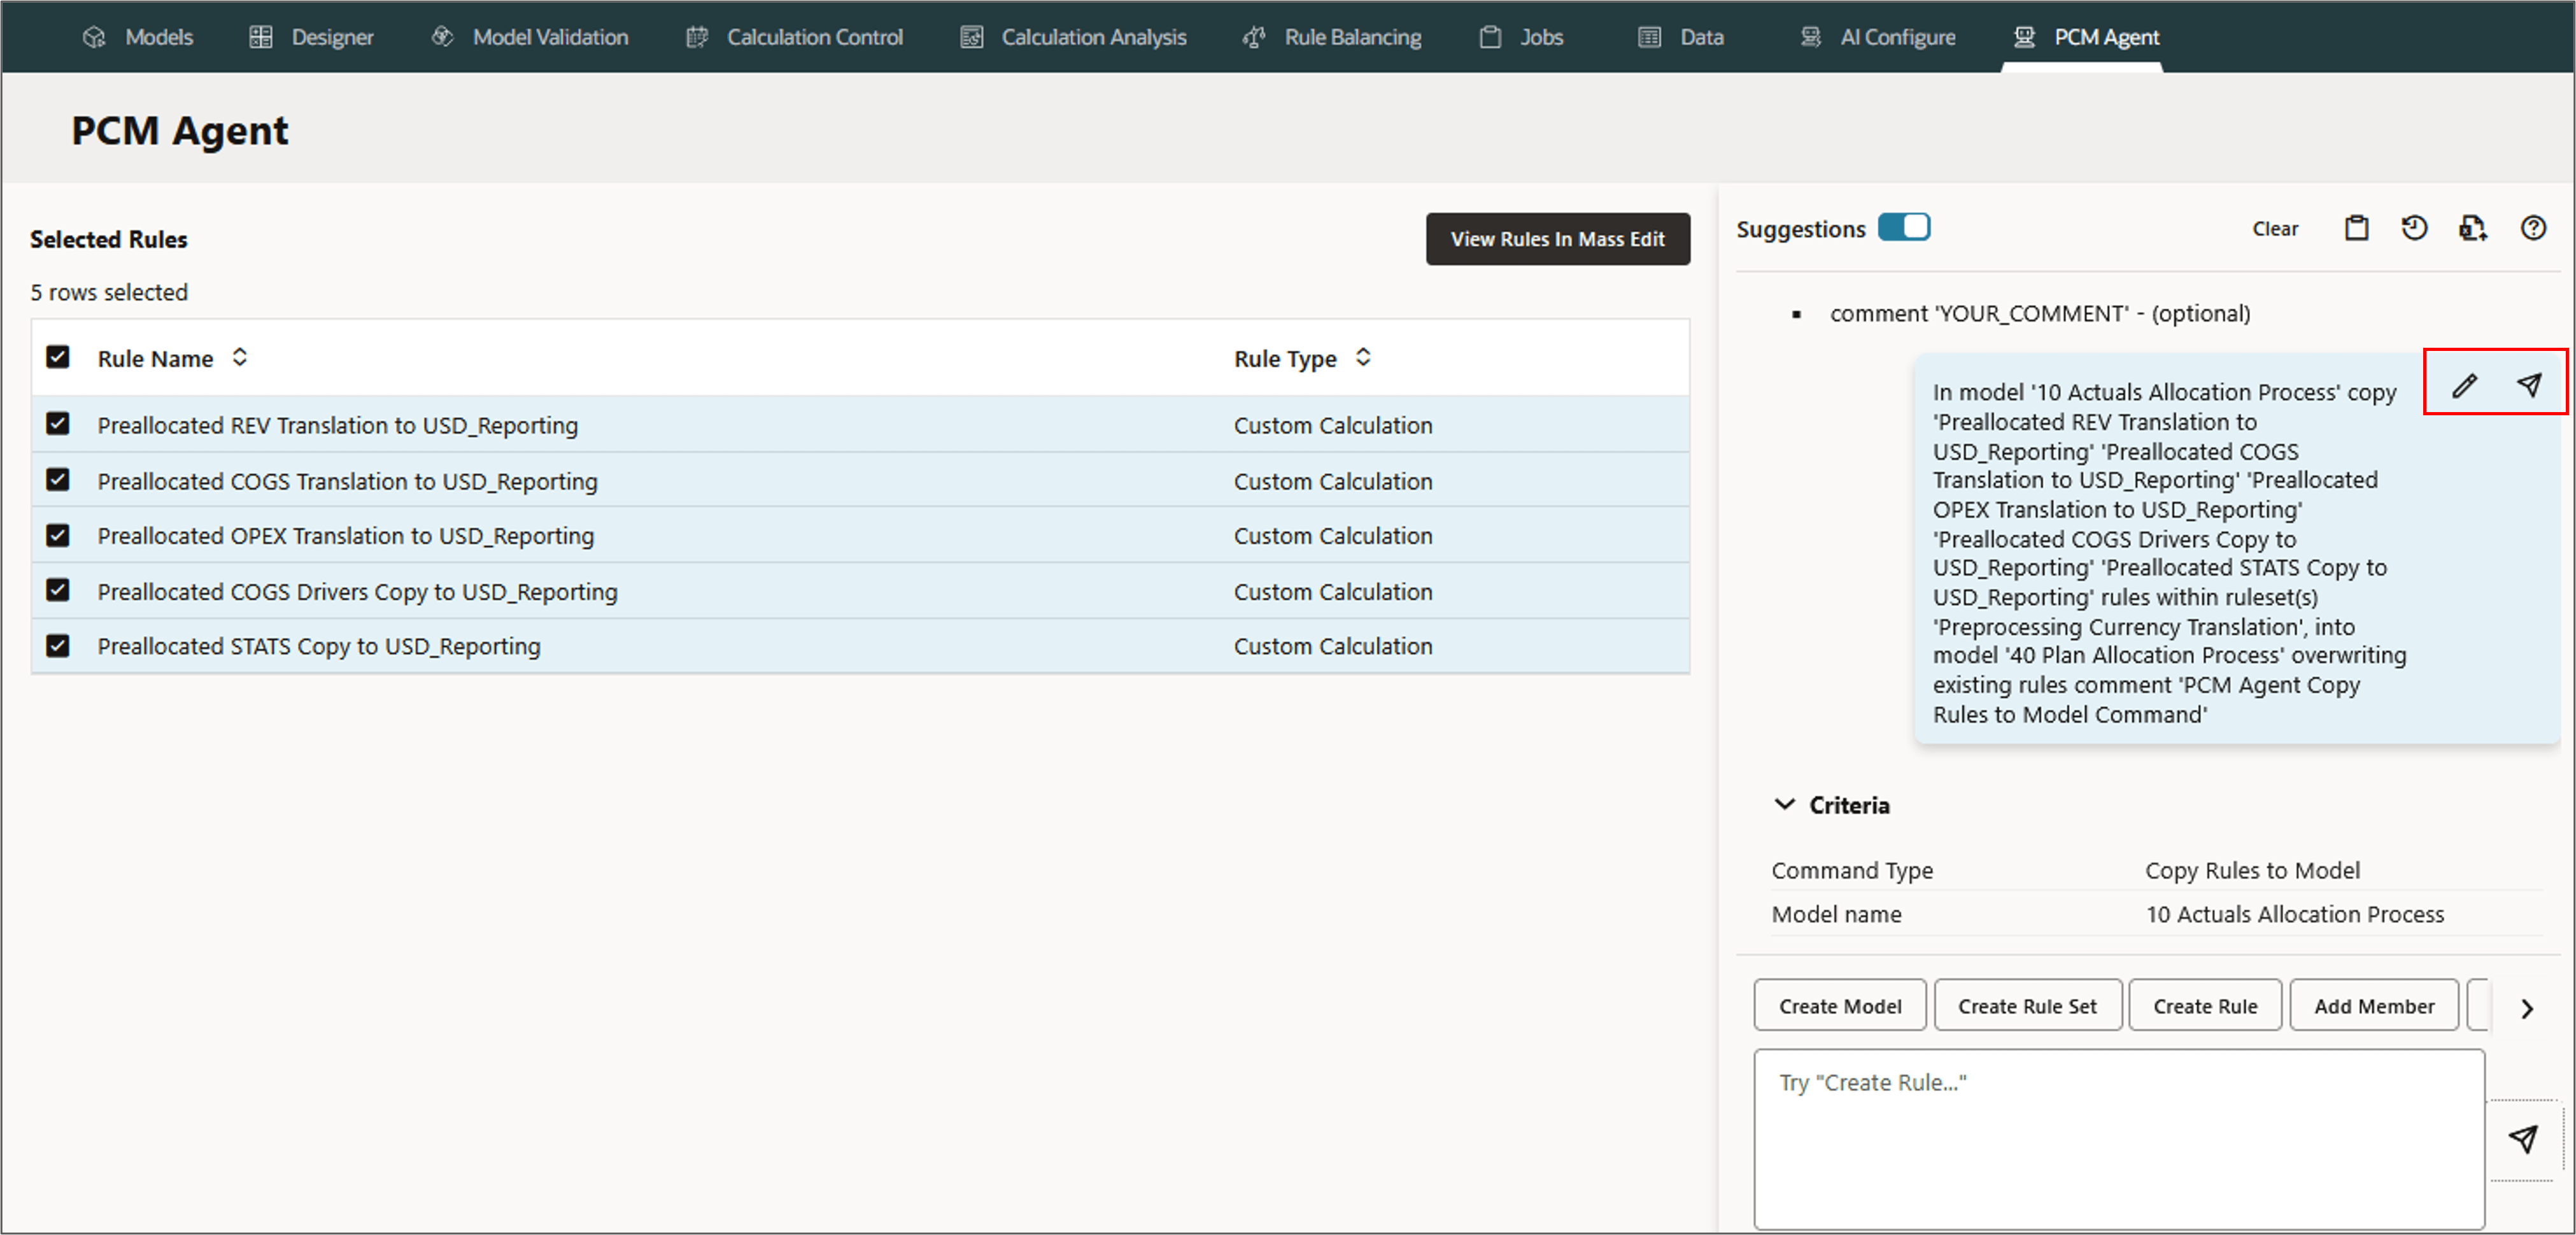
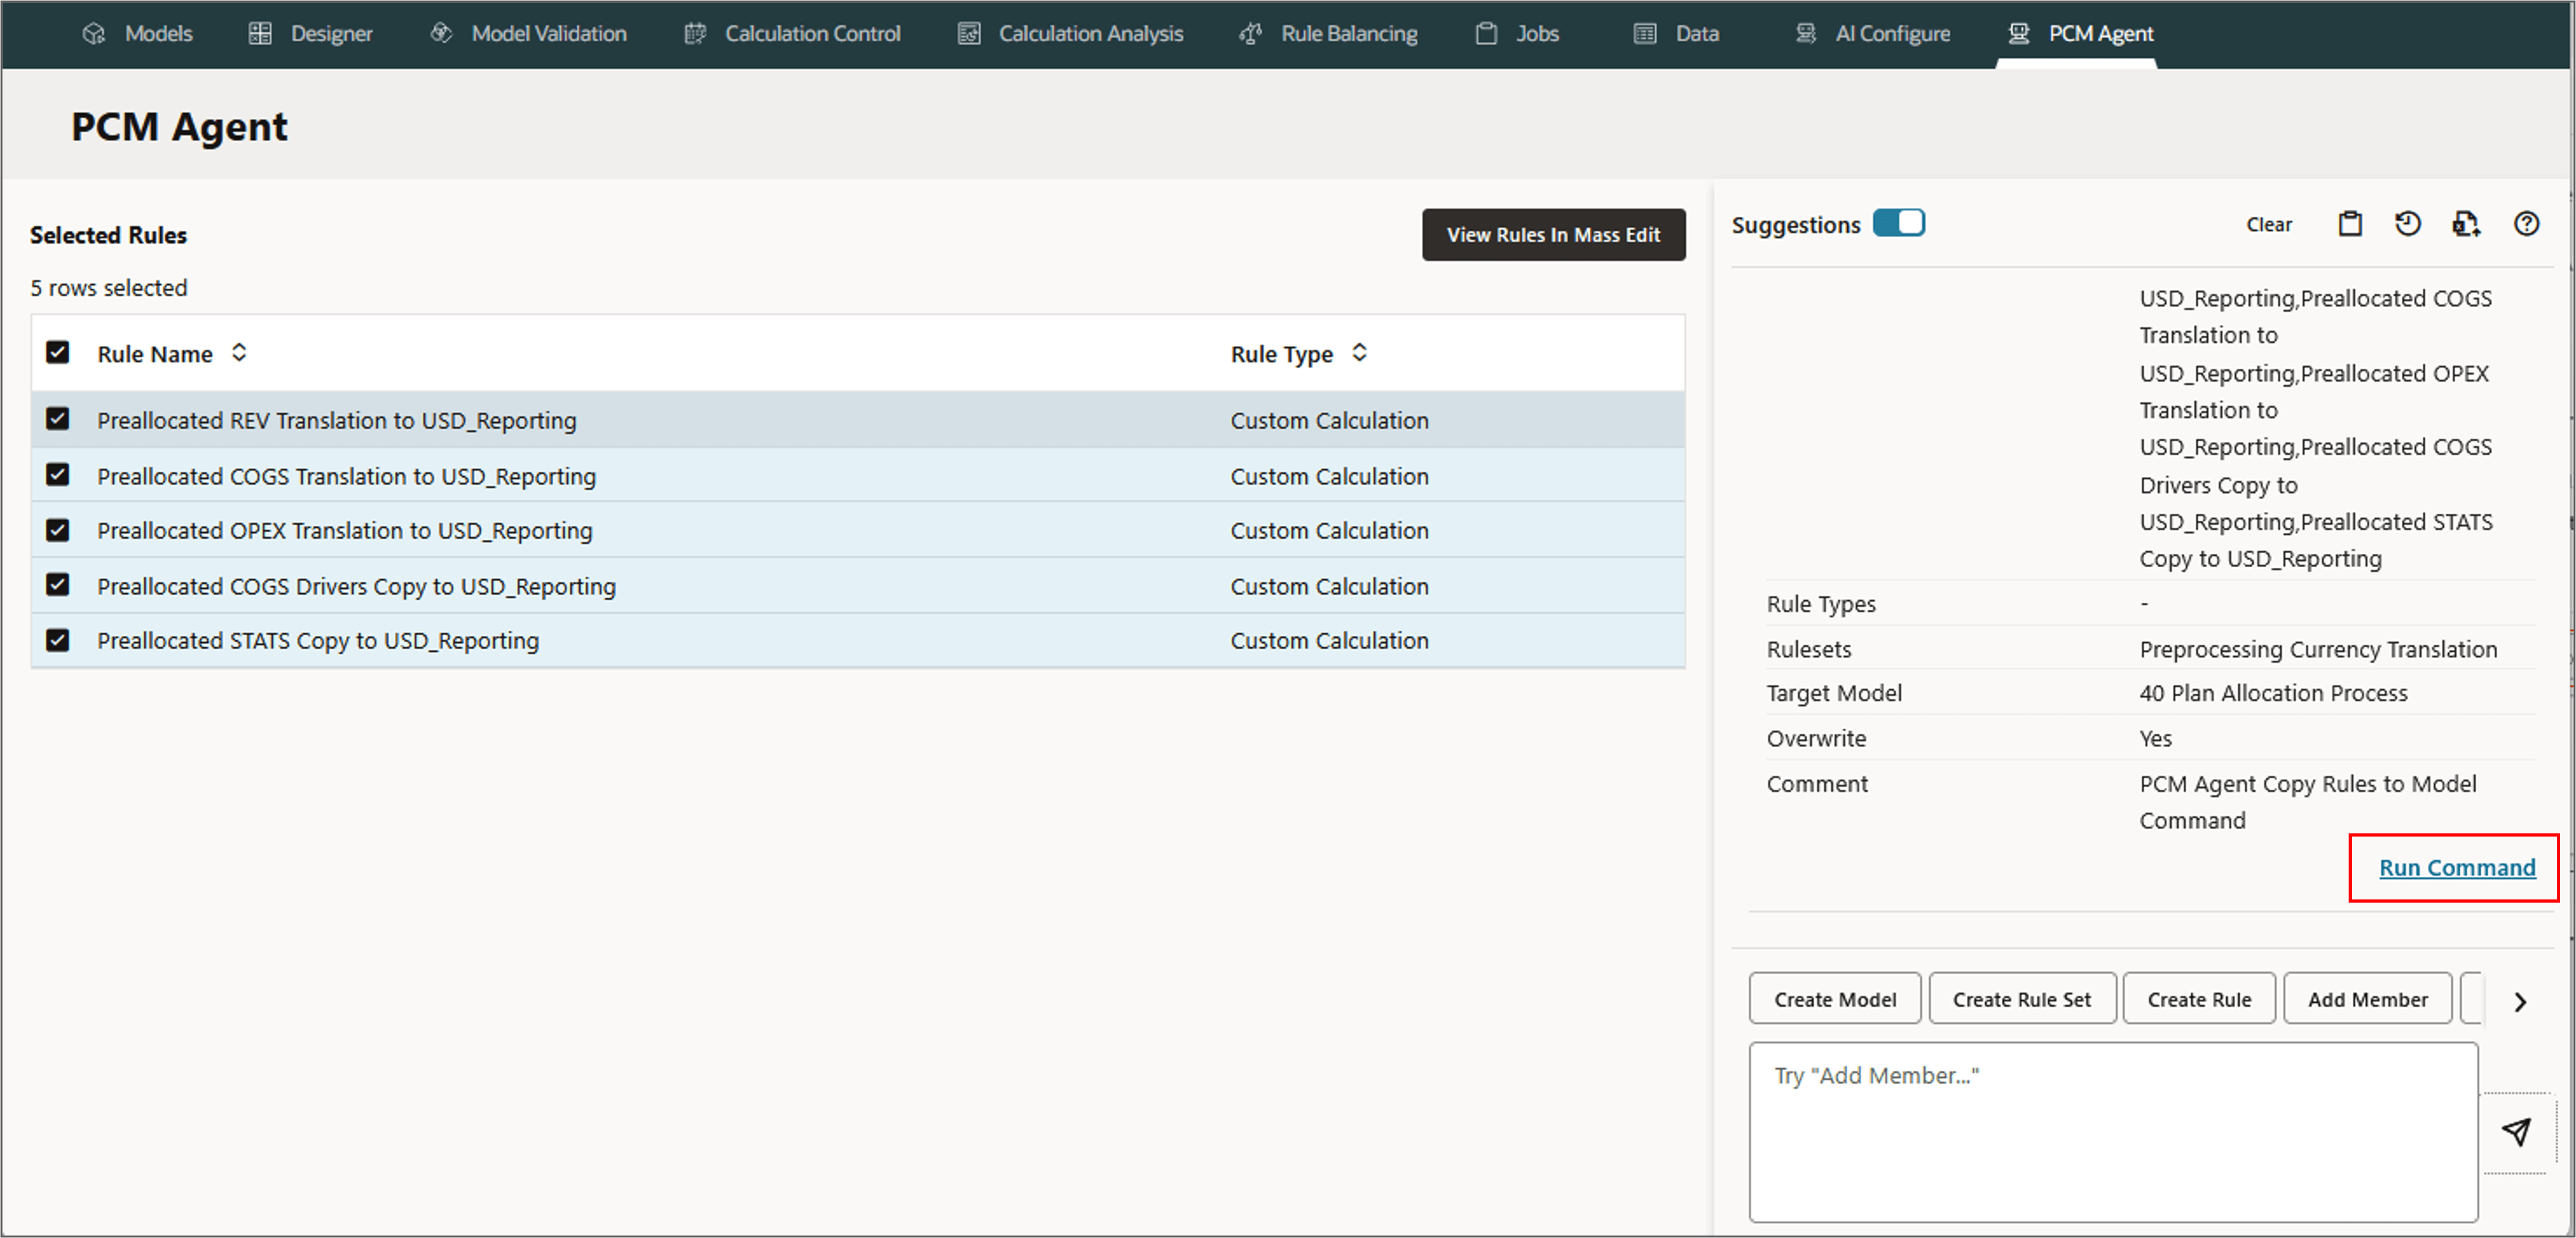
PCM Agent processes the request and displays a job ID.
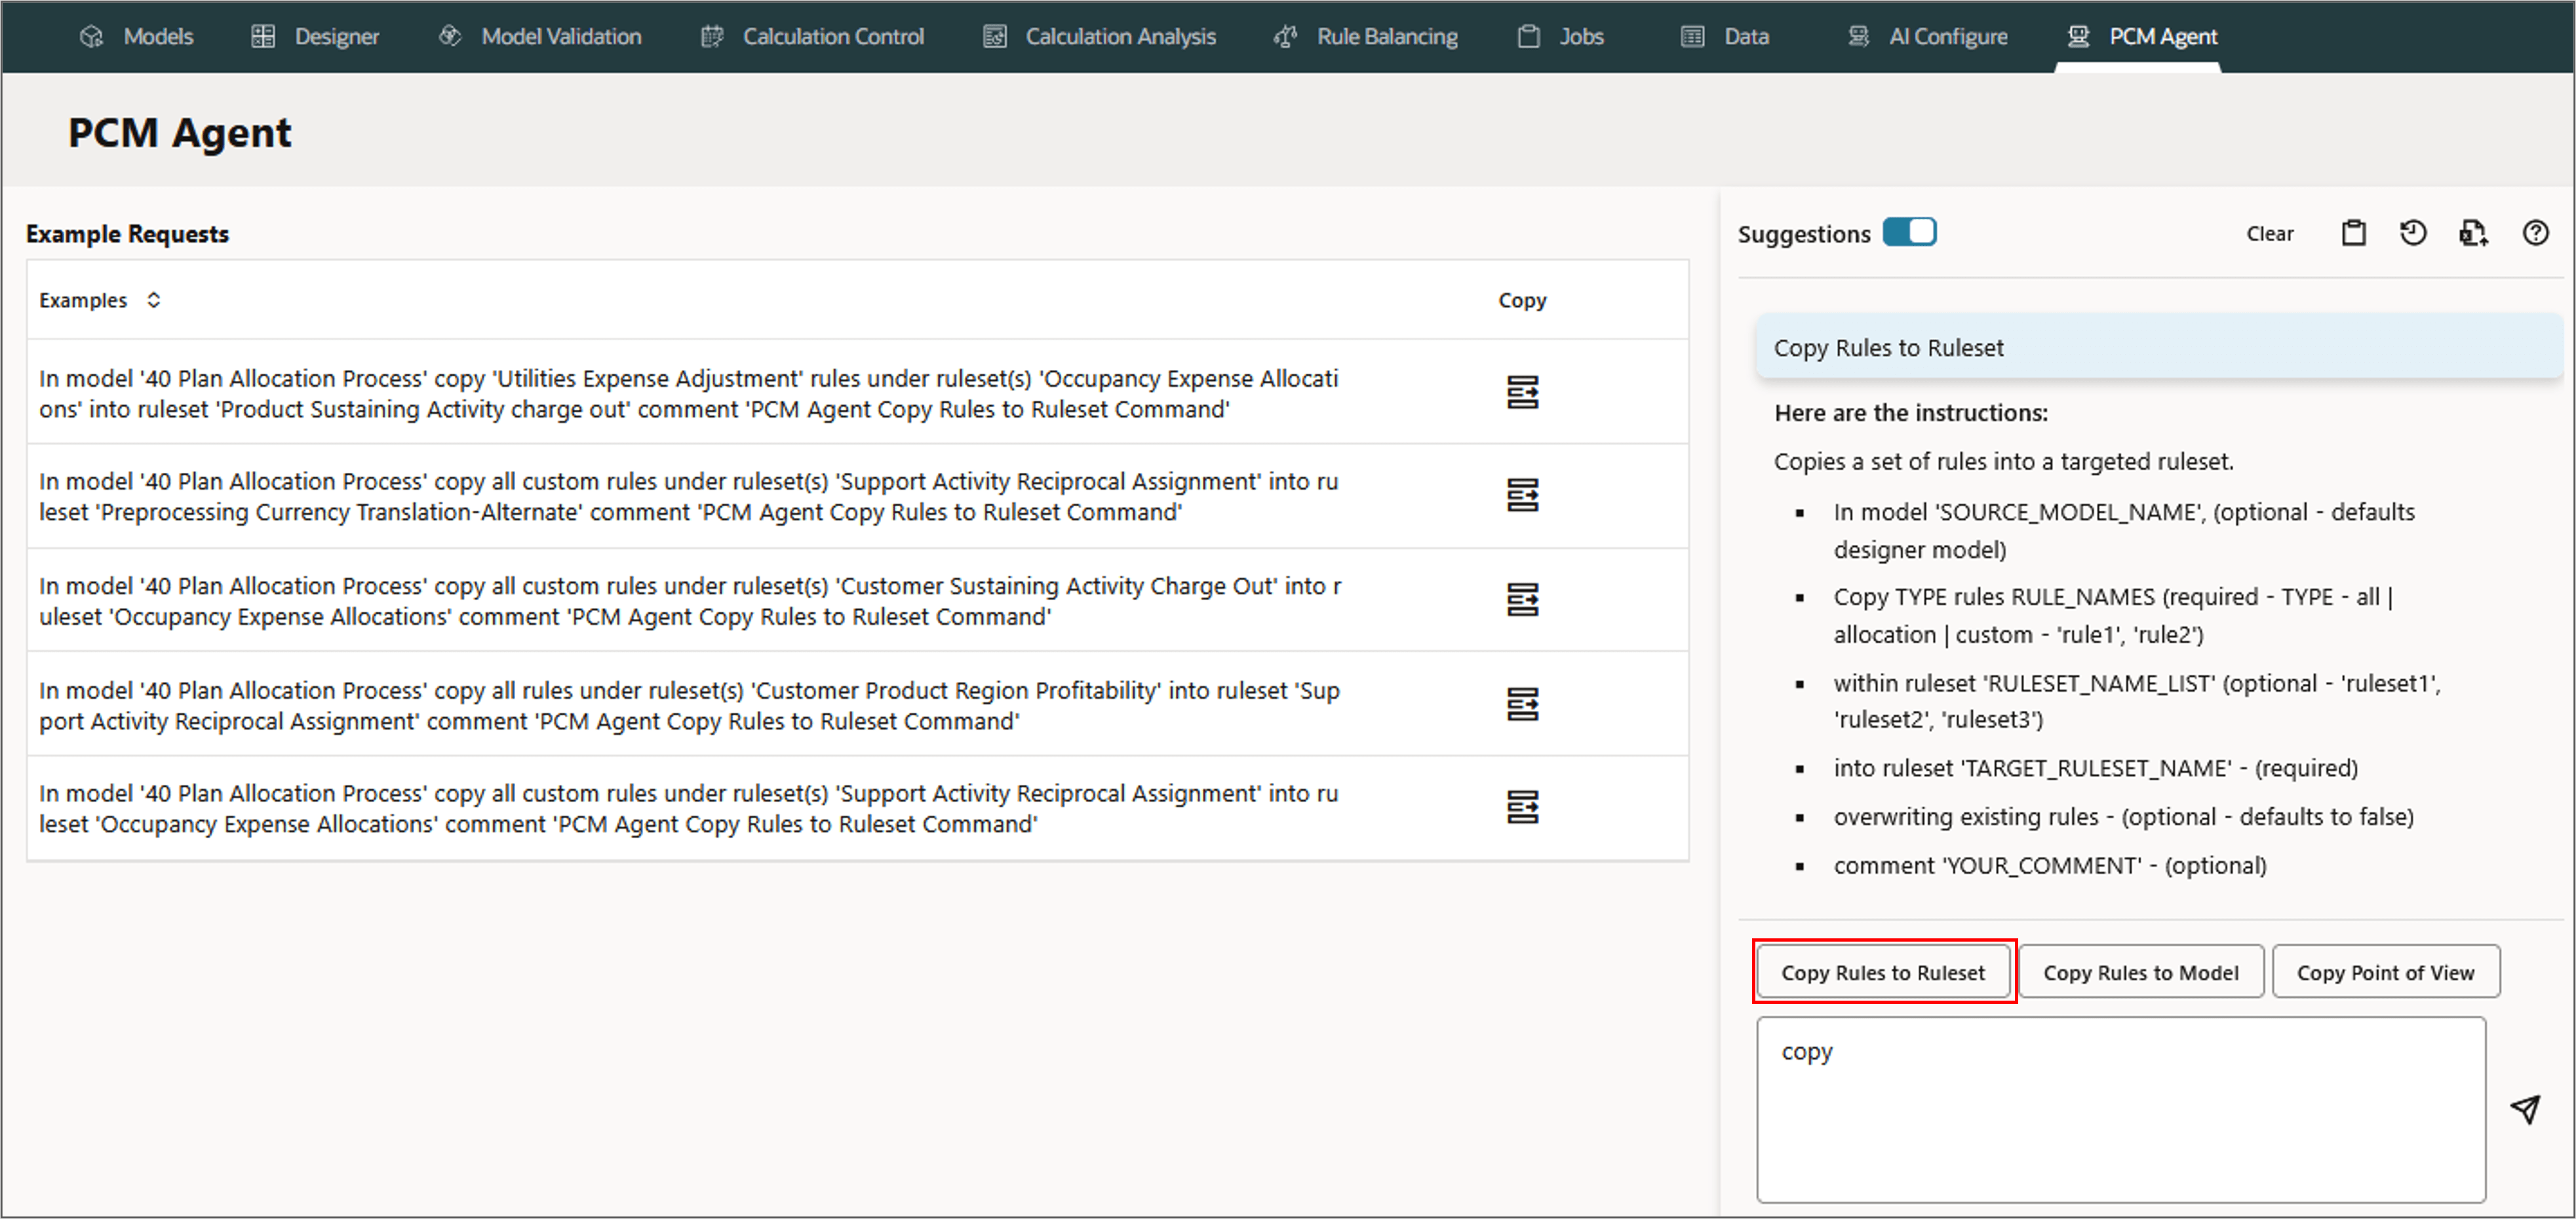
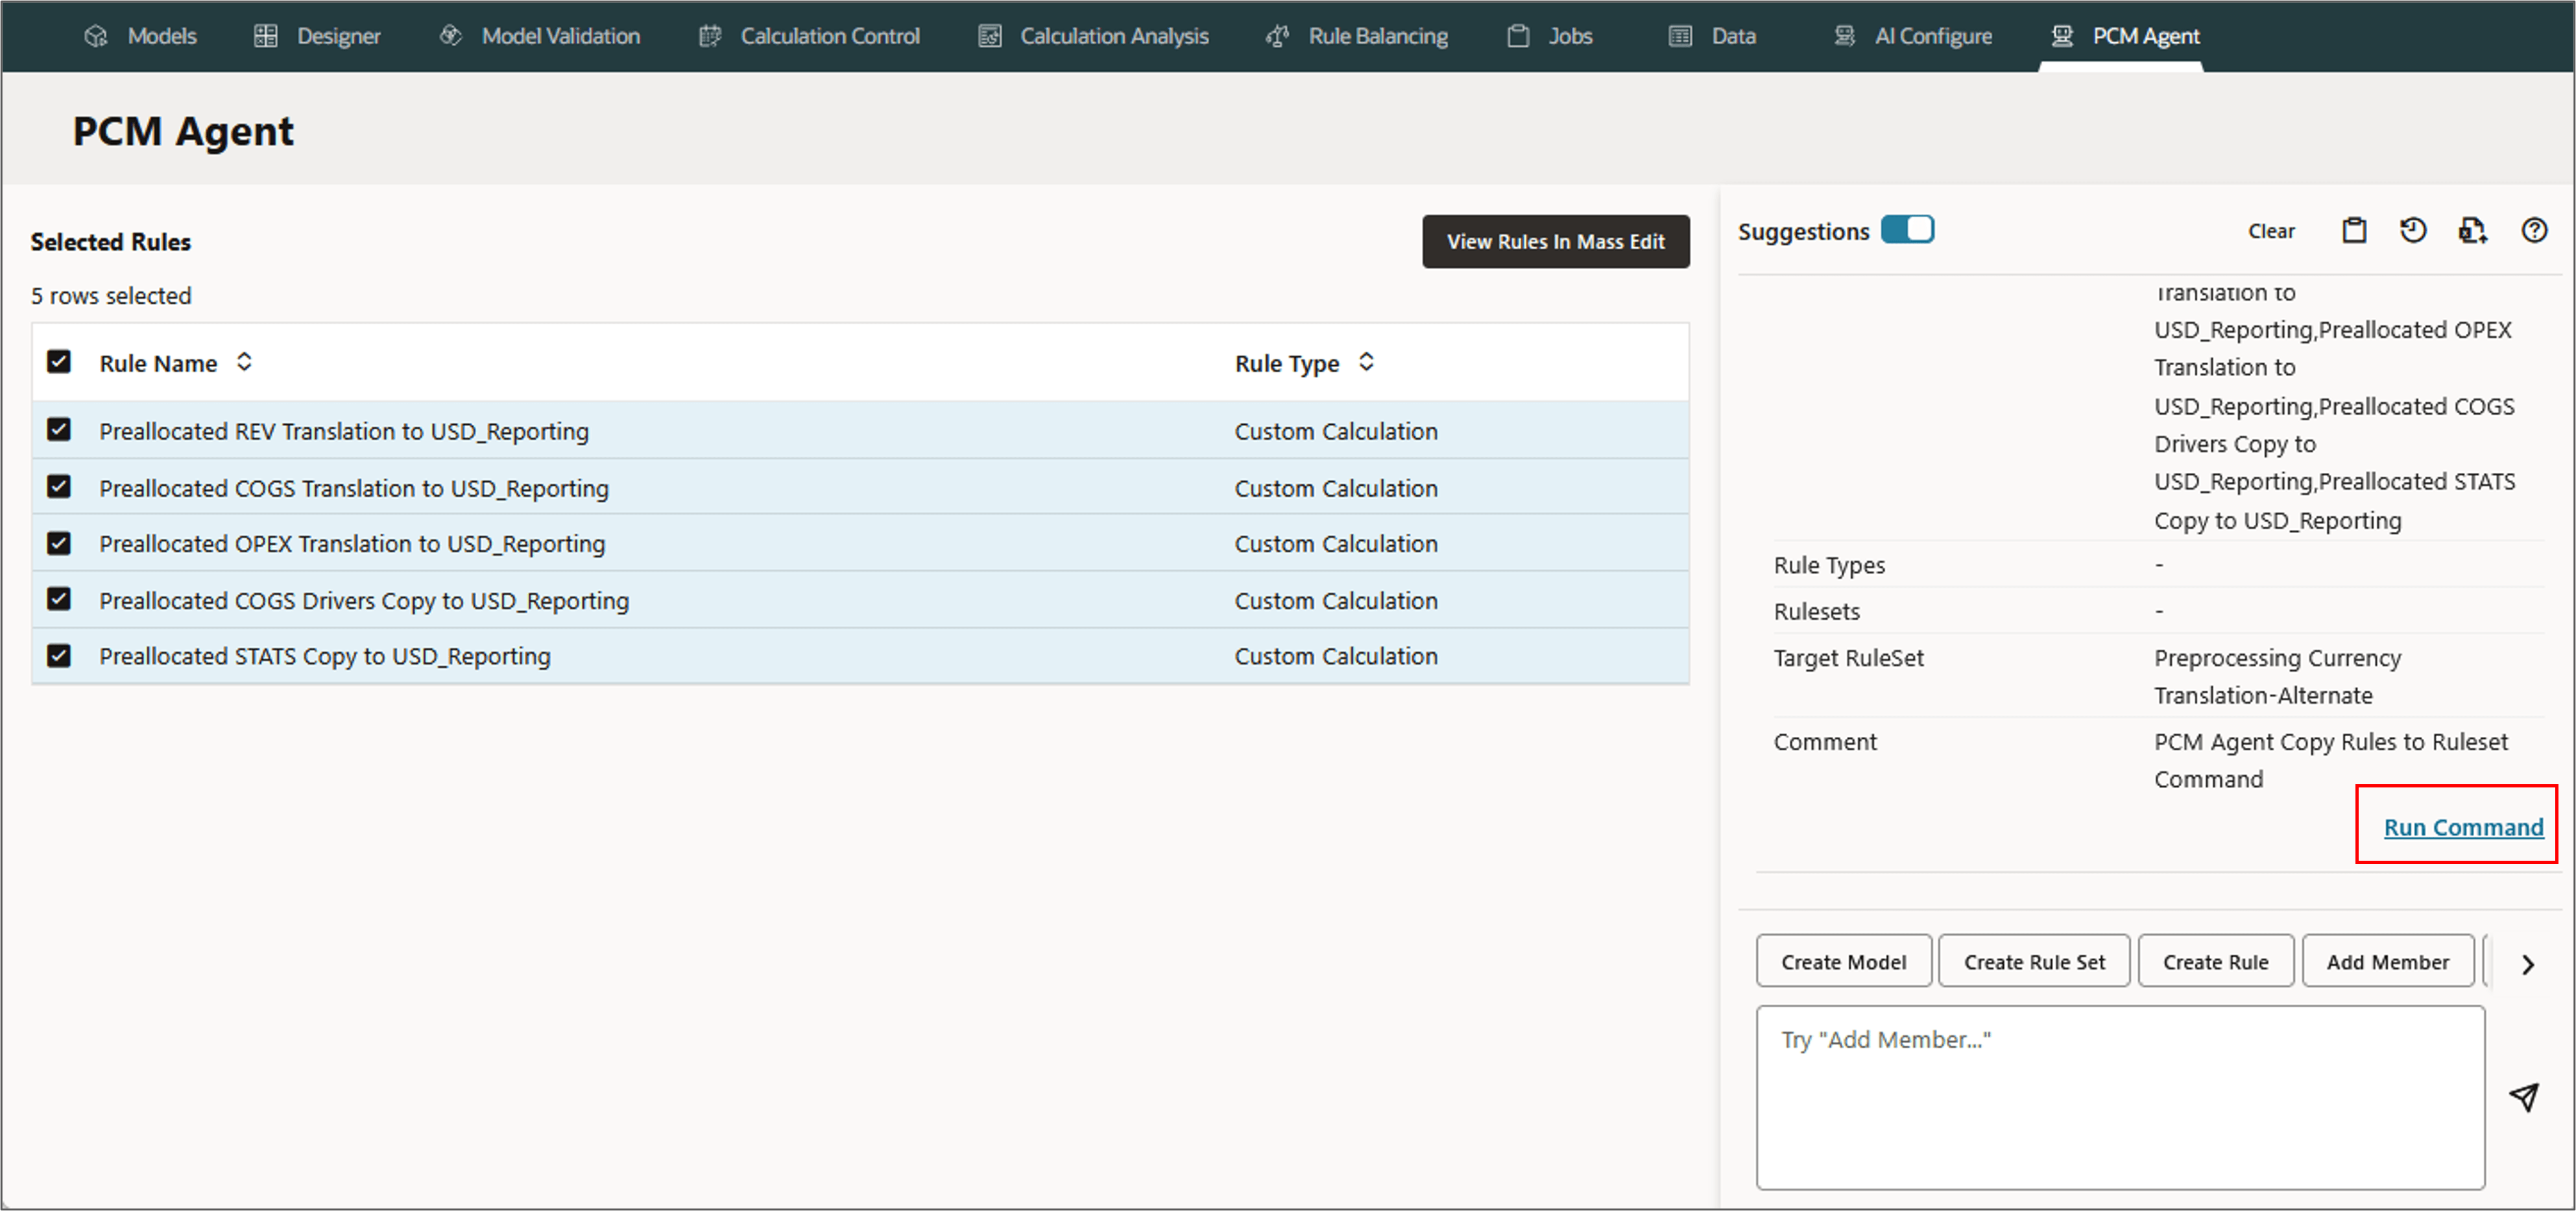
Copying Rules to Ruleset
PCM agent enables copying rules to a rule set. This feature is useful if you need to include identical or similar rules in several rule sets. You can select multiple rules to copy to a rule set.
Parameters for Copying Rules to Ruleset
- In model 'SOURCE_MODEL_NAME', (optional - defaults designer model)
- Copy TYPE rules RULE_NAMES (required - TYPE - all | allocation | custom - 'rule1', 'rule2')
- within ruleset 'RULESET_NAME_LIST' (optional - 'ruleset1', 'ruleset2', 'ruleset3')
- into model 'TARGET_RULESET_NAME' - (required)
- overwriting existing rules - (optional - defaults to false)
- comment 'YOUR_COMMENT' - (optional)
Example: Copying Rules to Ruleset
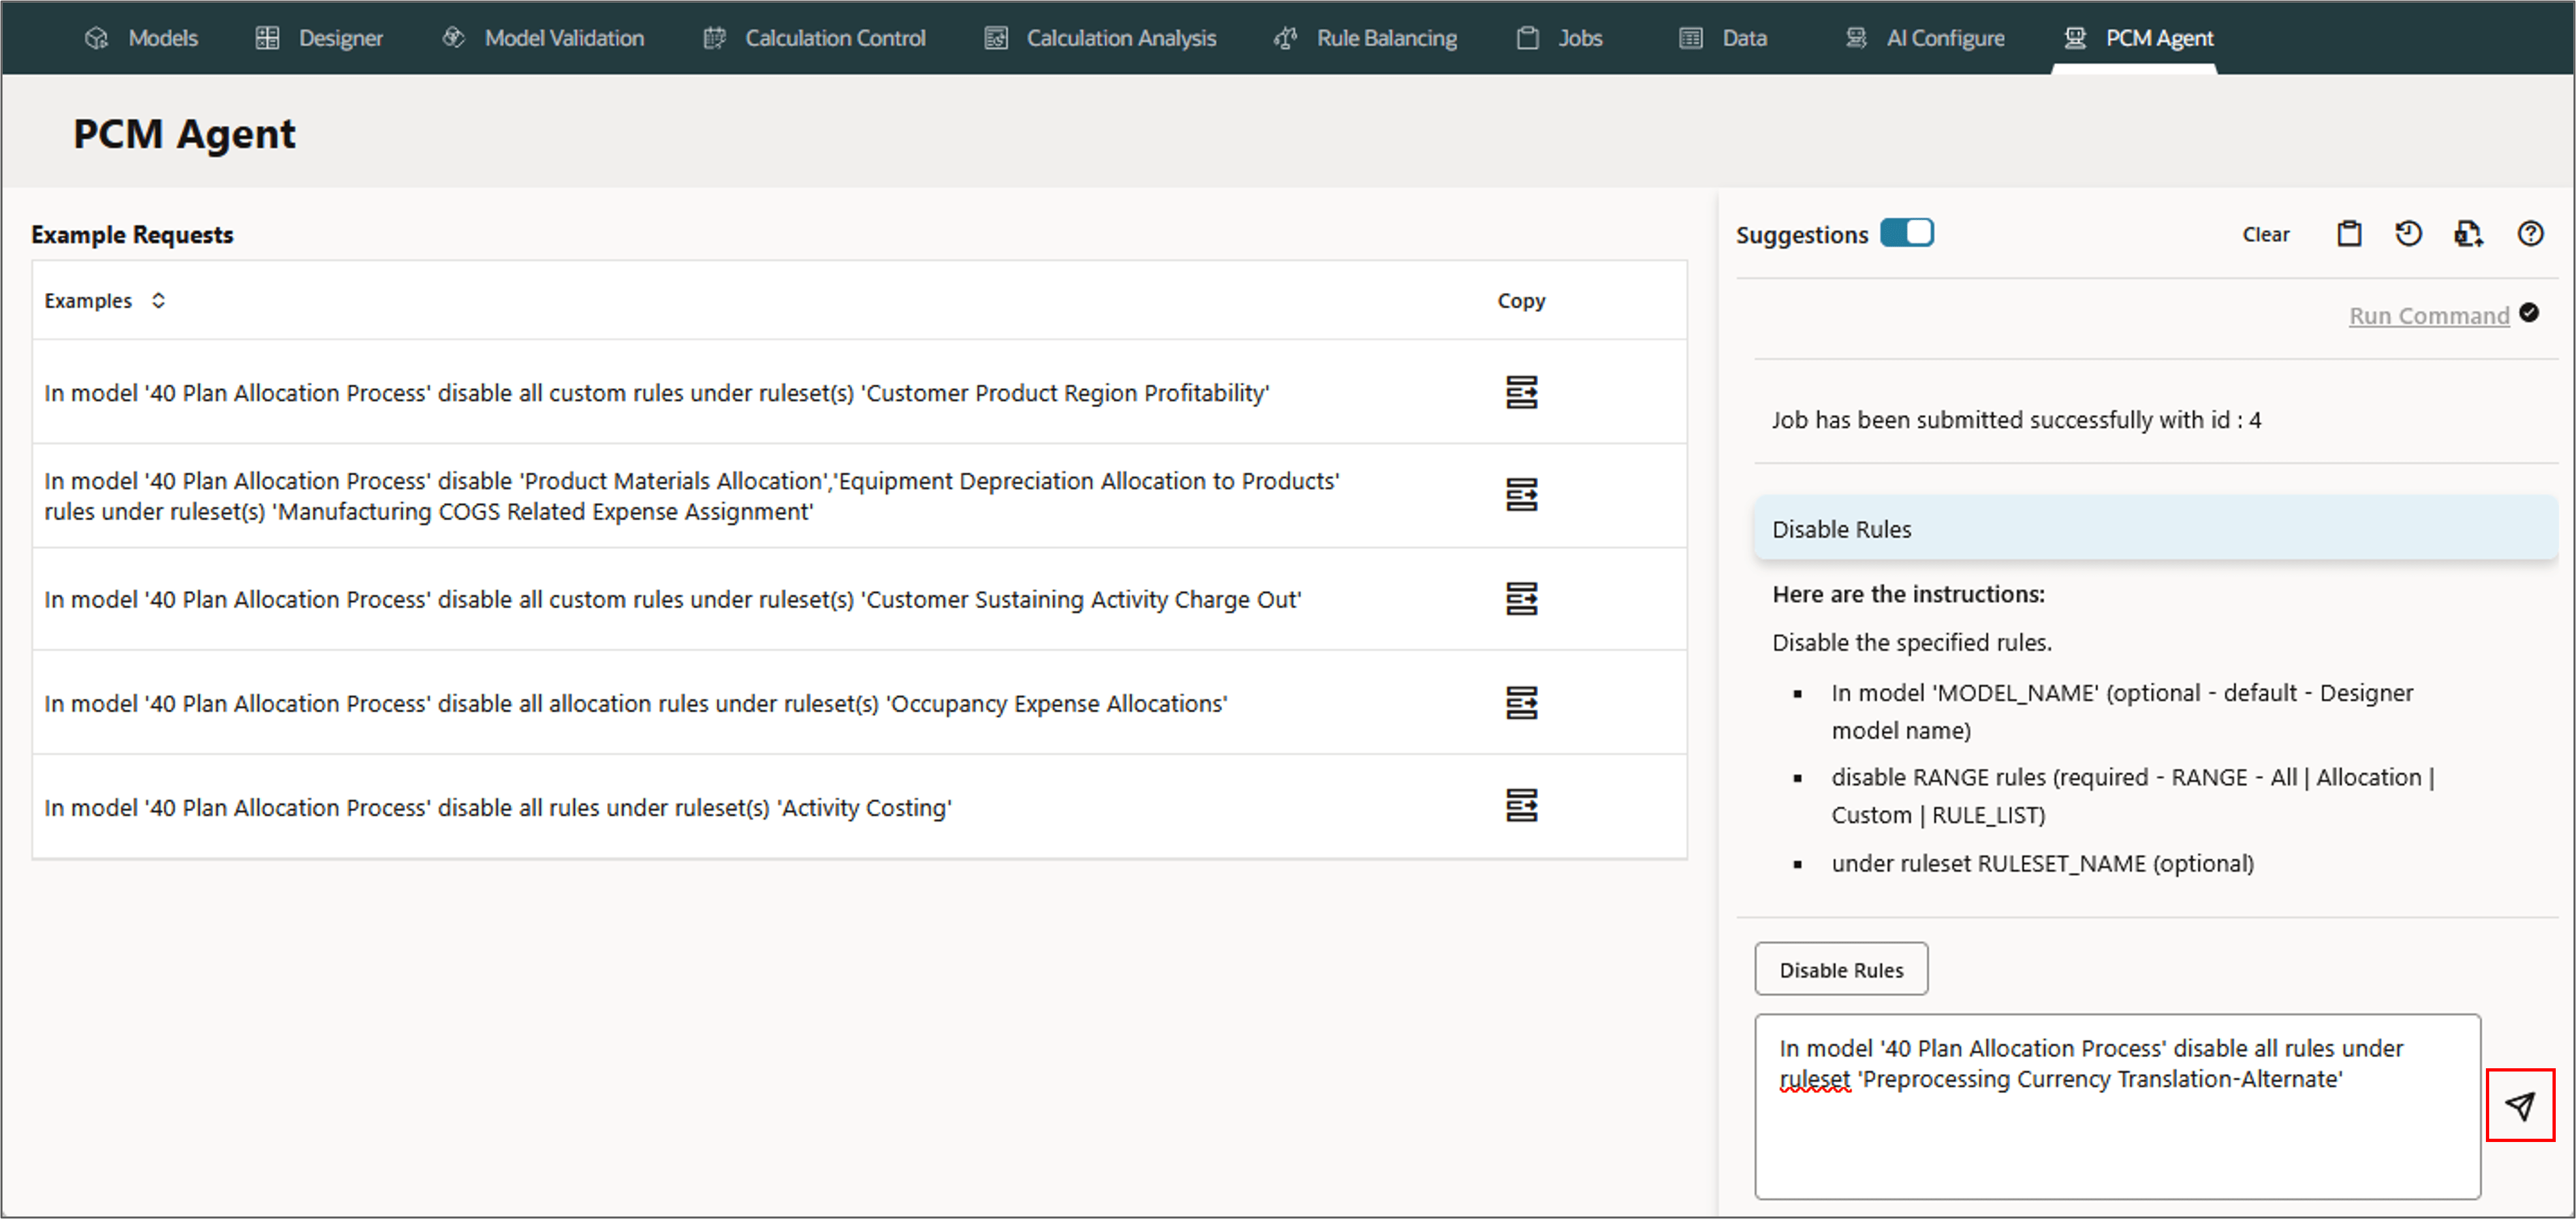
In this section, you create a rule set Preprocessing Currency Translation-Alternate with Sequence 1 in the model 40 Plan Allocation Process, and then copy the rules into it from the Preprocessing Currency Translation rule set.
- Create a new ruleset Preprocessing Currency Translation-Alternate in the model, 40 Plan Allocation Process.
- Go to PCM Agent page, and select Copy Rules to Ruleset.
- Type the following request in the PCM agent and click (Send).
- Review and refine the request if needed.
- Run the command.
- Go to Jobs to view the status.
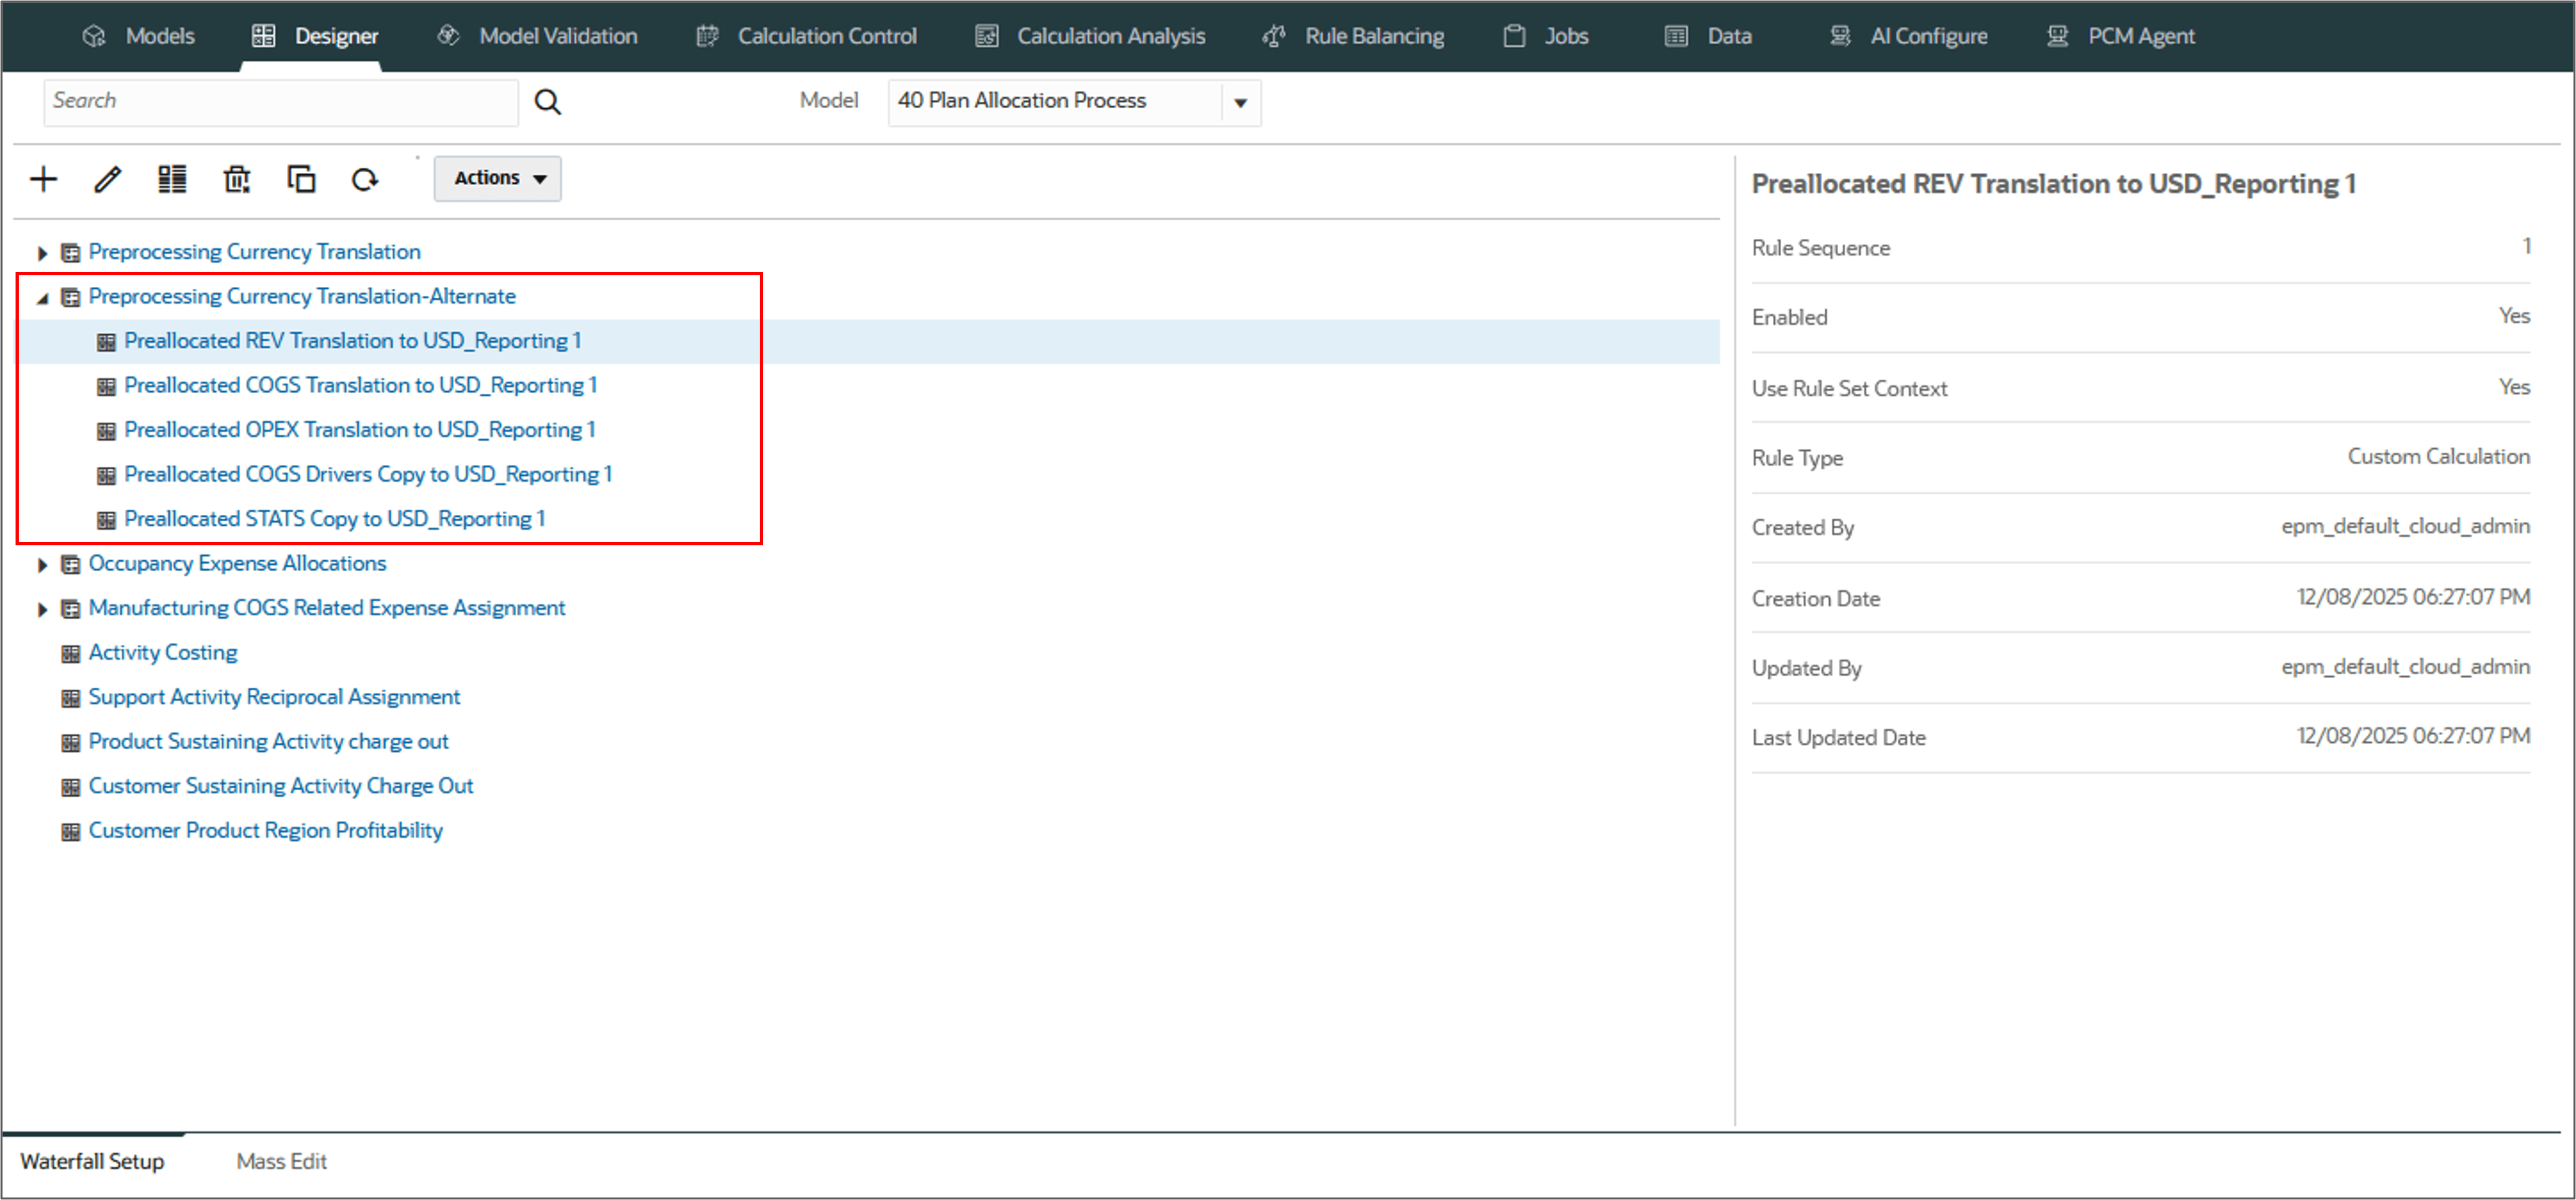
- Now, go to the Designer page and select the model 40 Plan Allocation Process to view the newly copied rules to the ruleset Preprocessing Currency Translation-Alternate.
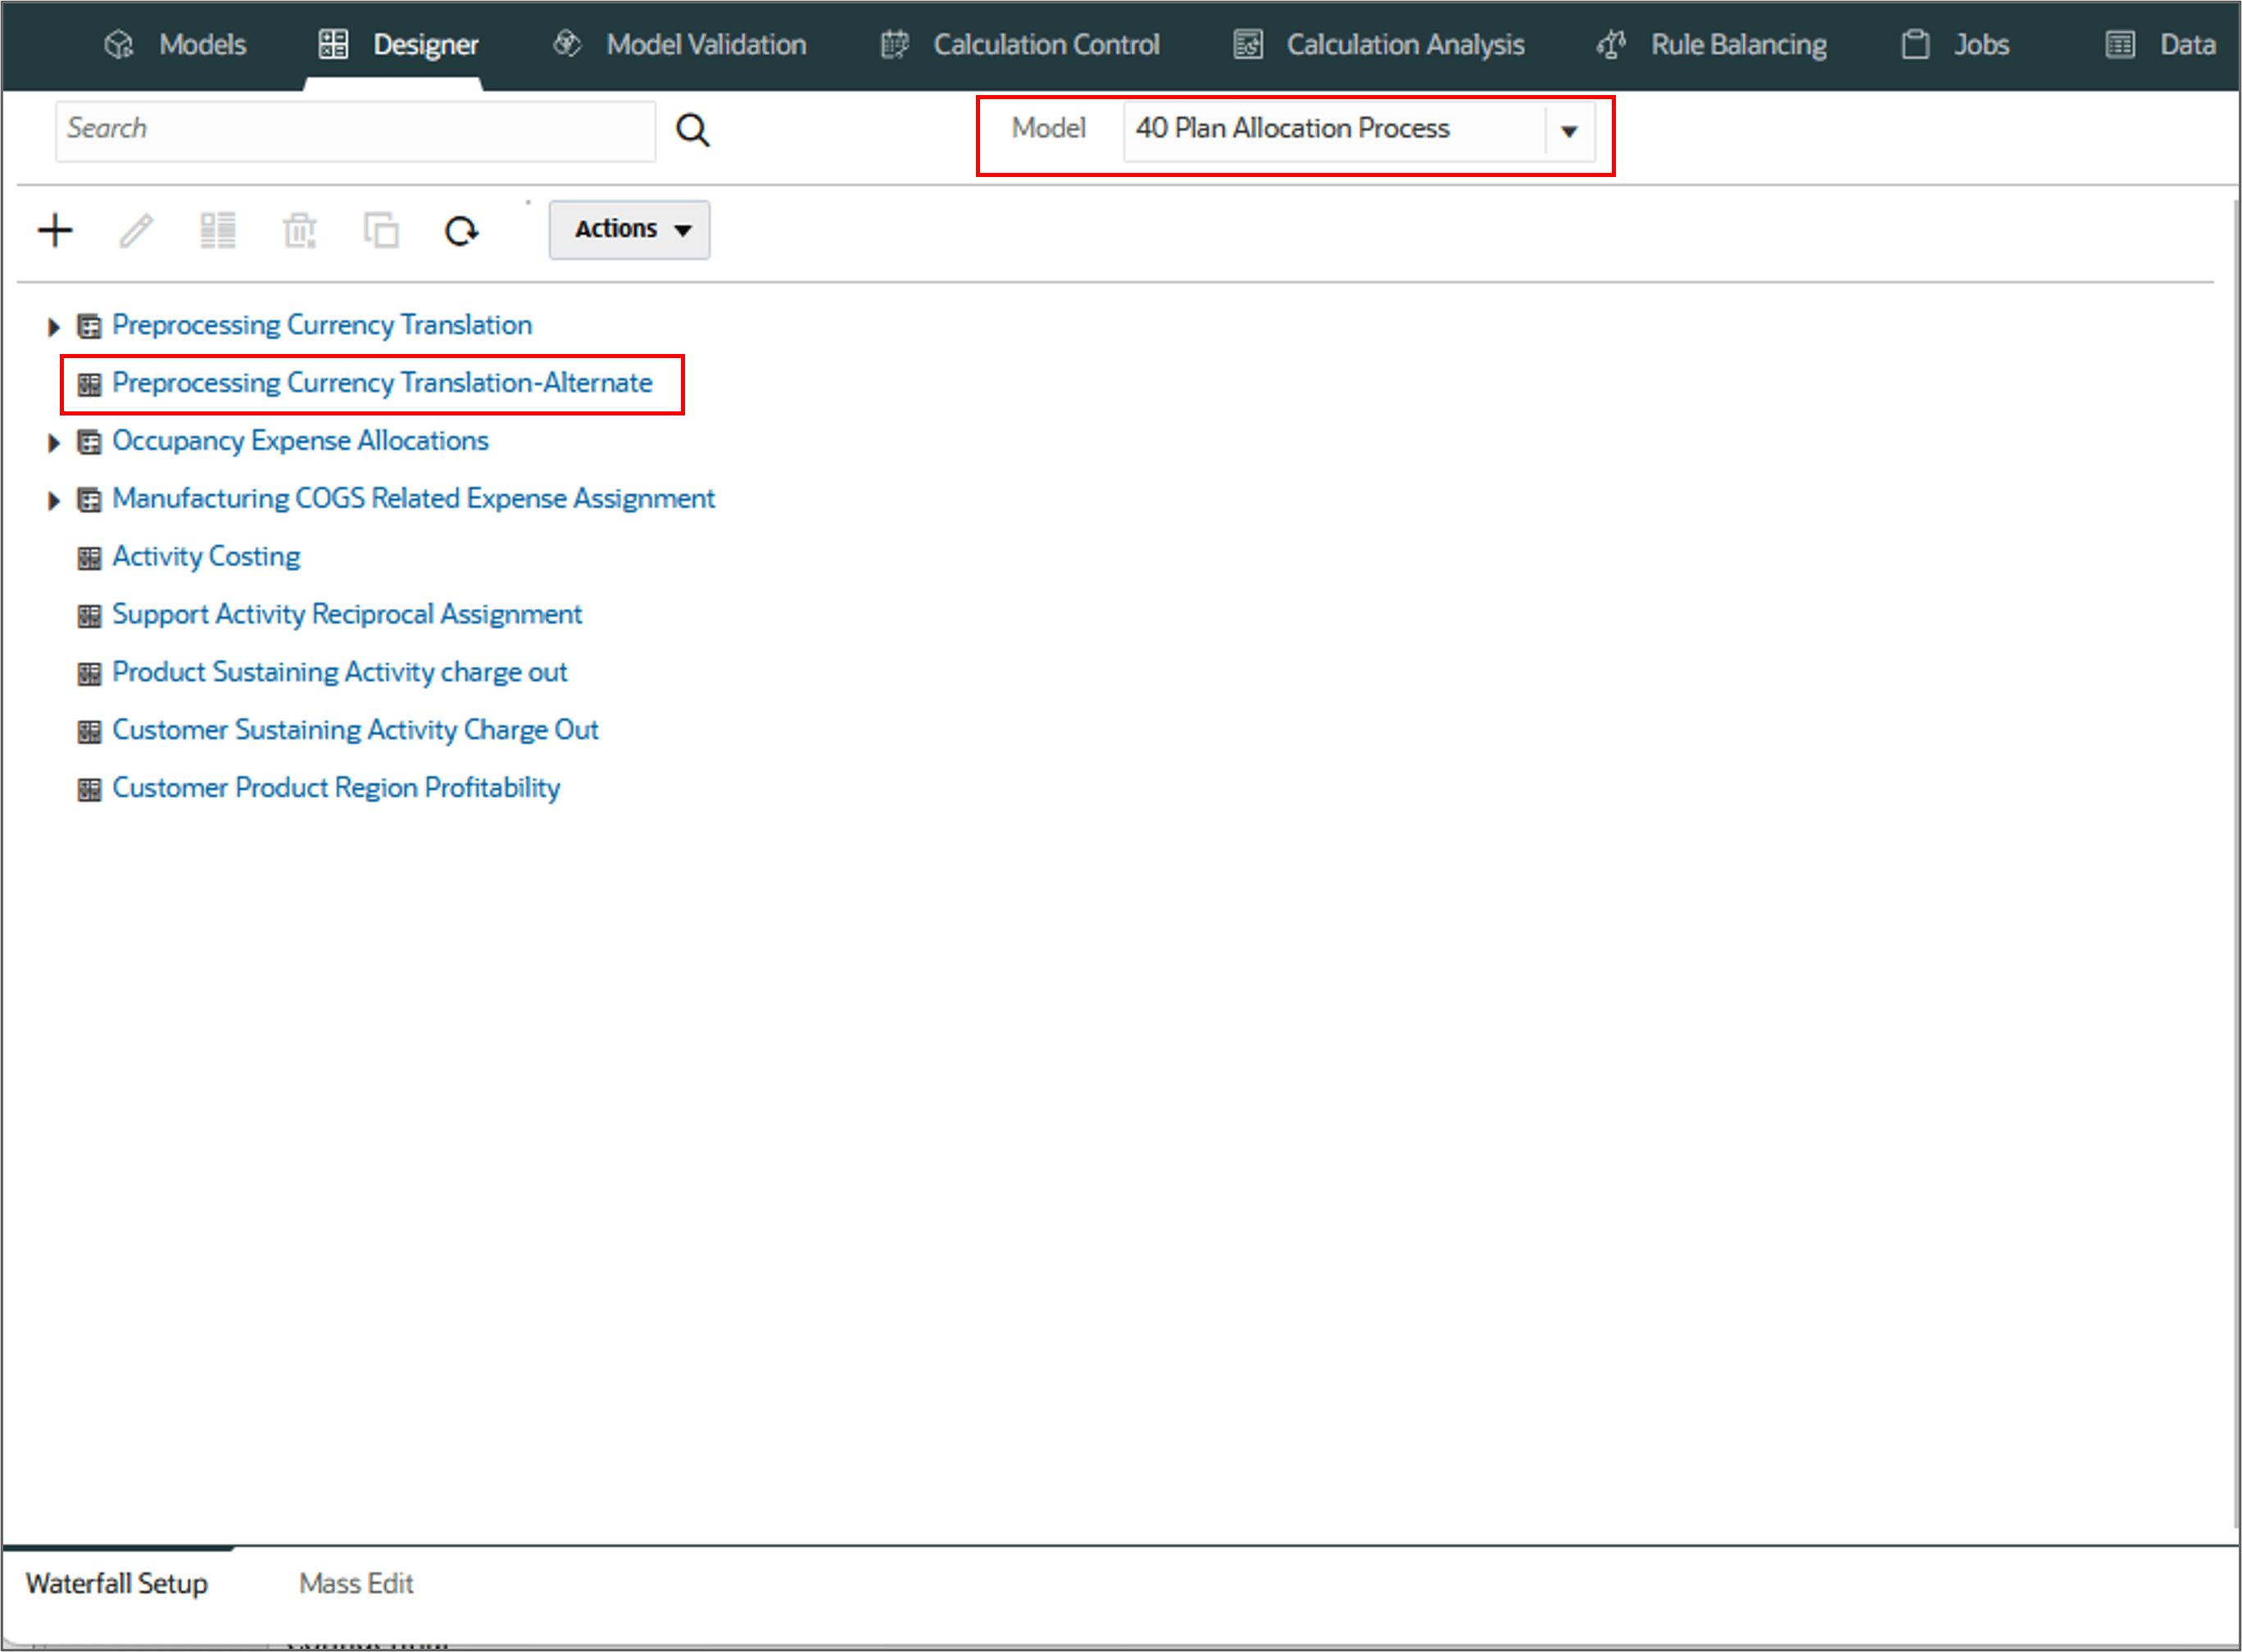
Let's now copy the rules from the ruleset Preprocessing Currency Translation to the newly created ruleset Preprocessing Currency Translation-Alternate.
In model '40 Plan Allocation Process' copy
'Preallocated REV Translation to USD_Reporting'
'Preallocated COGS Translation to USD_Reporting'
'Preallocated OPEX Translation to USD_Reporting'
'Preallocated COGS Drivers Copy to USD_Reporting'
'Preallocated STATS Copy to USD_Reporting'
rules under ruleset 'Preprocessing Currency Translation',
into ruleset 'Preprocessing Currency Translation-Alternate'
comment 'PCM Agent Copy Rules to Ruleset Command'
Note:
Click View Rules in Mass Edit on the top to go to the Mass Edit page to view, and to perform manual mass edit functions for the selected rules under the ruleset Preprocessing Currency Translation-Alternate.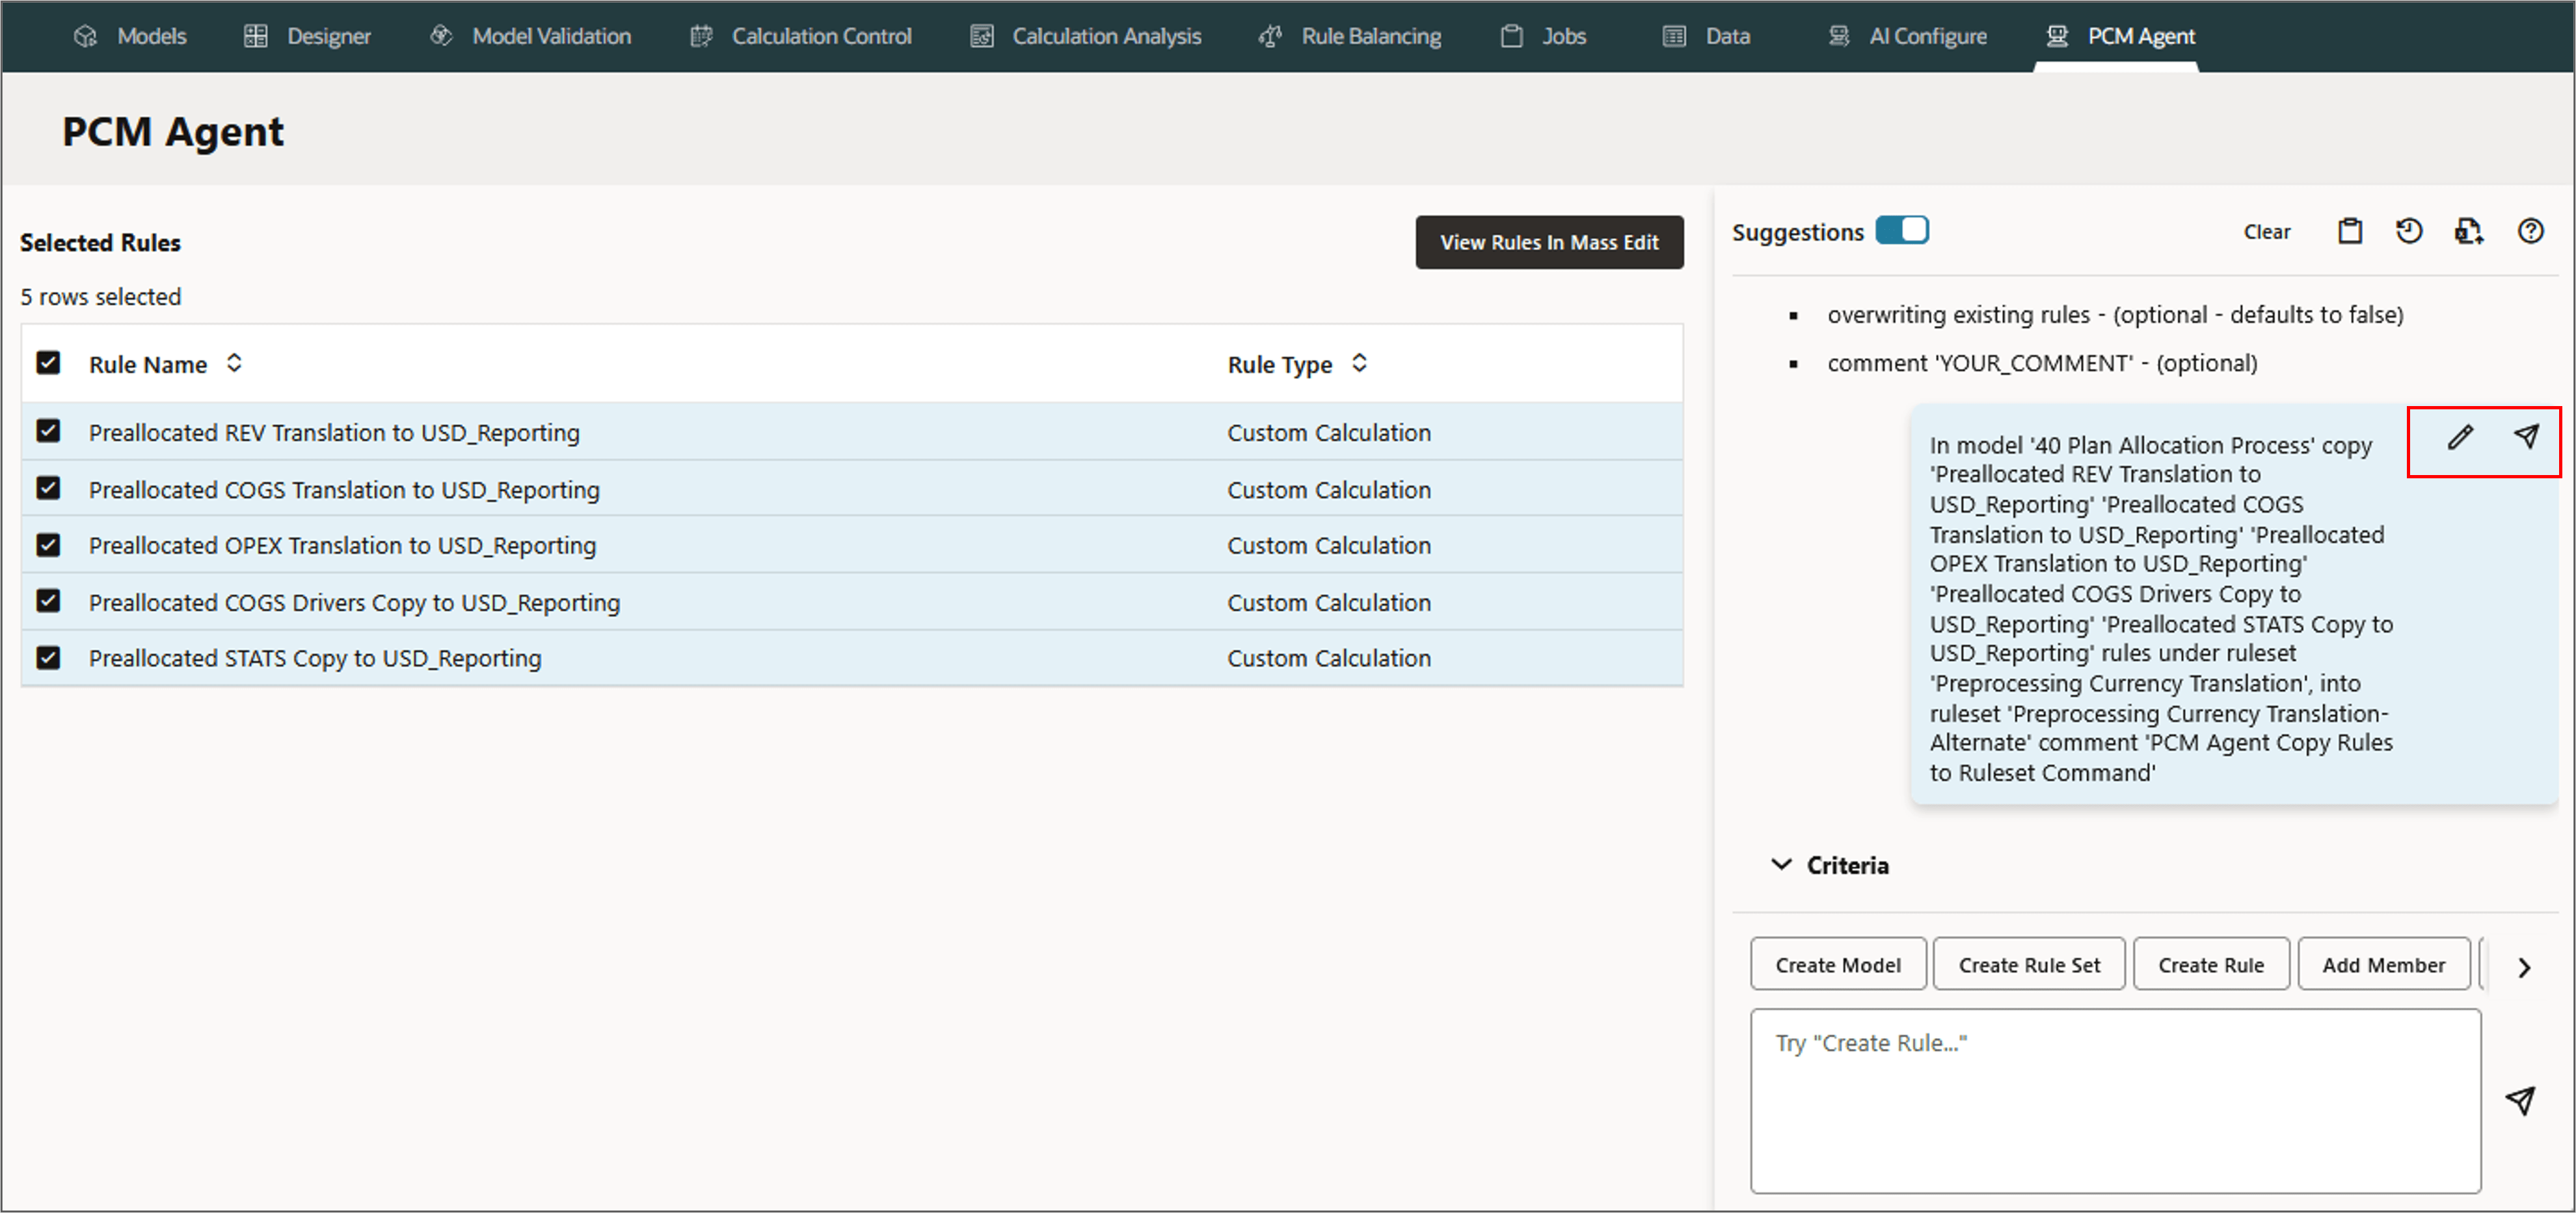
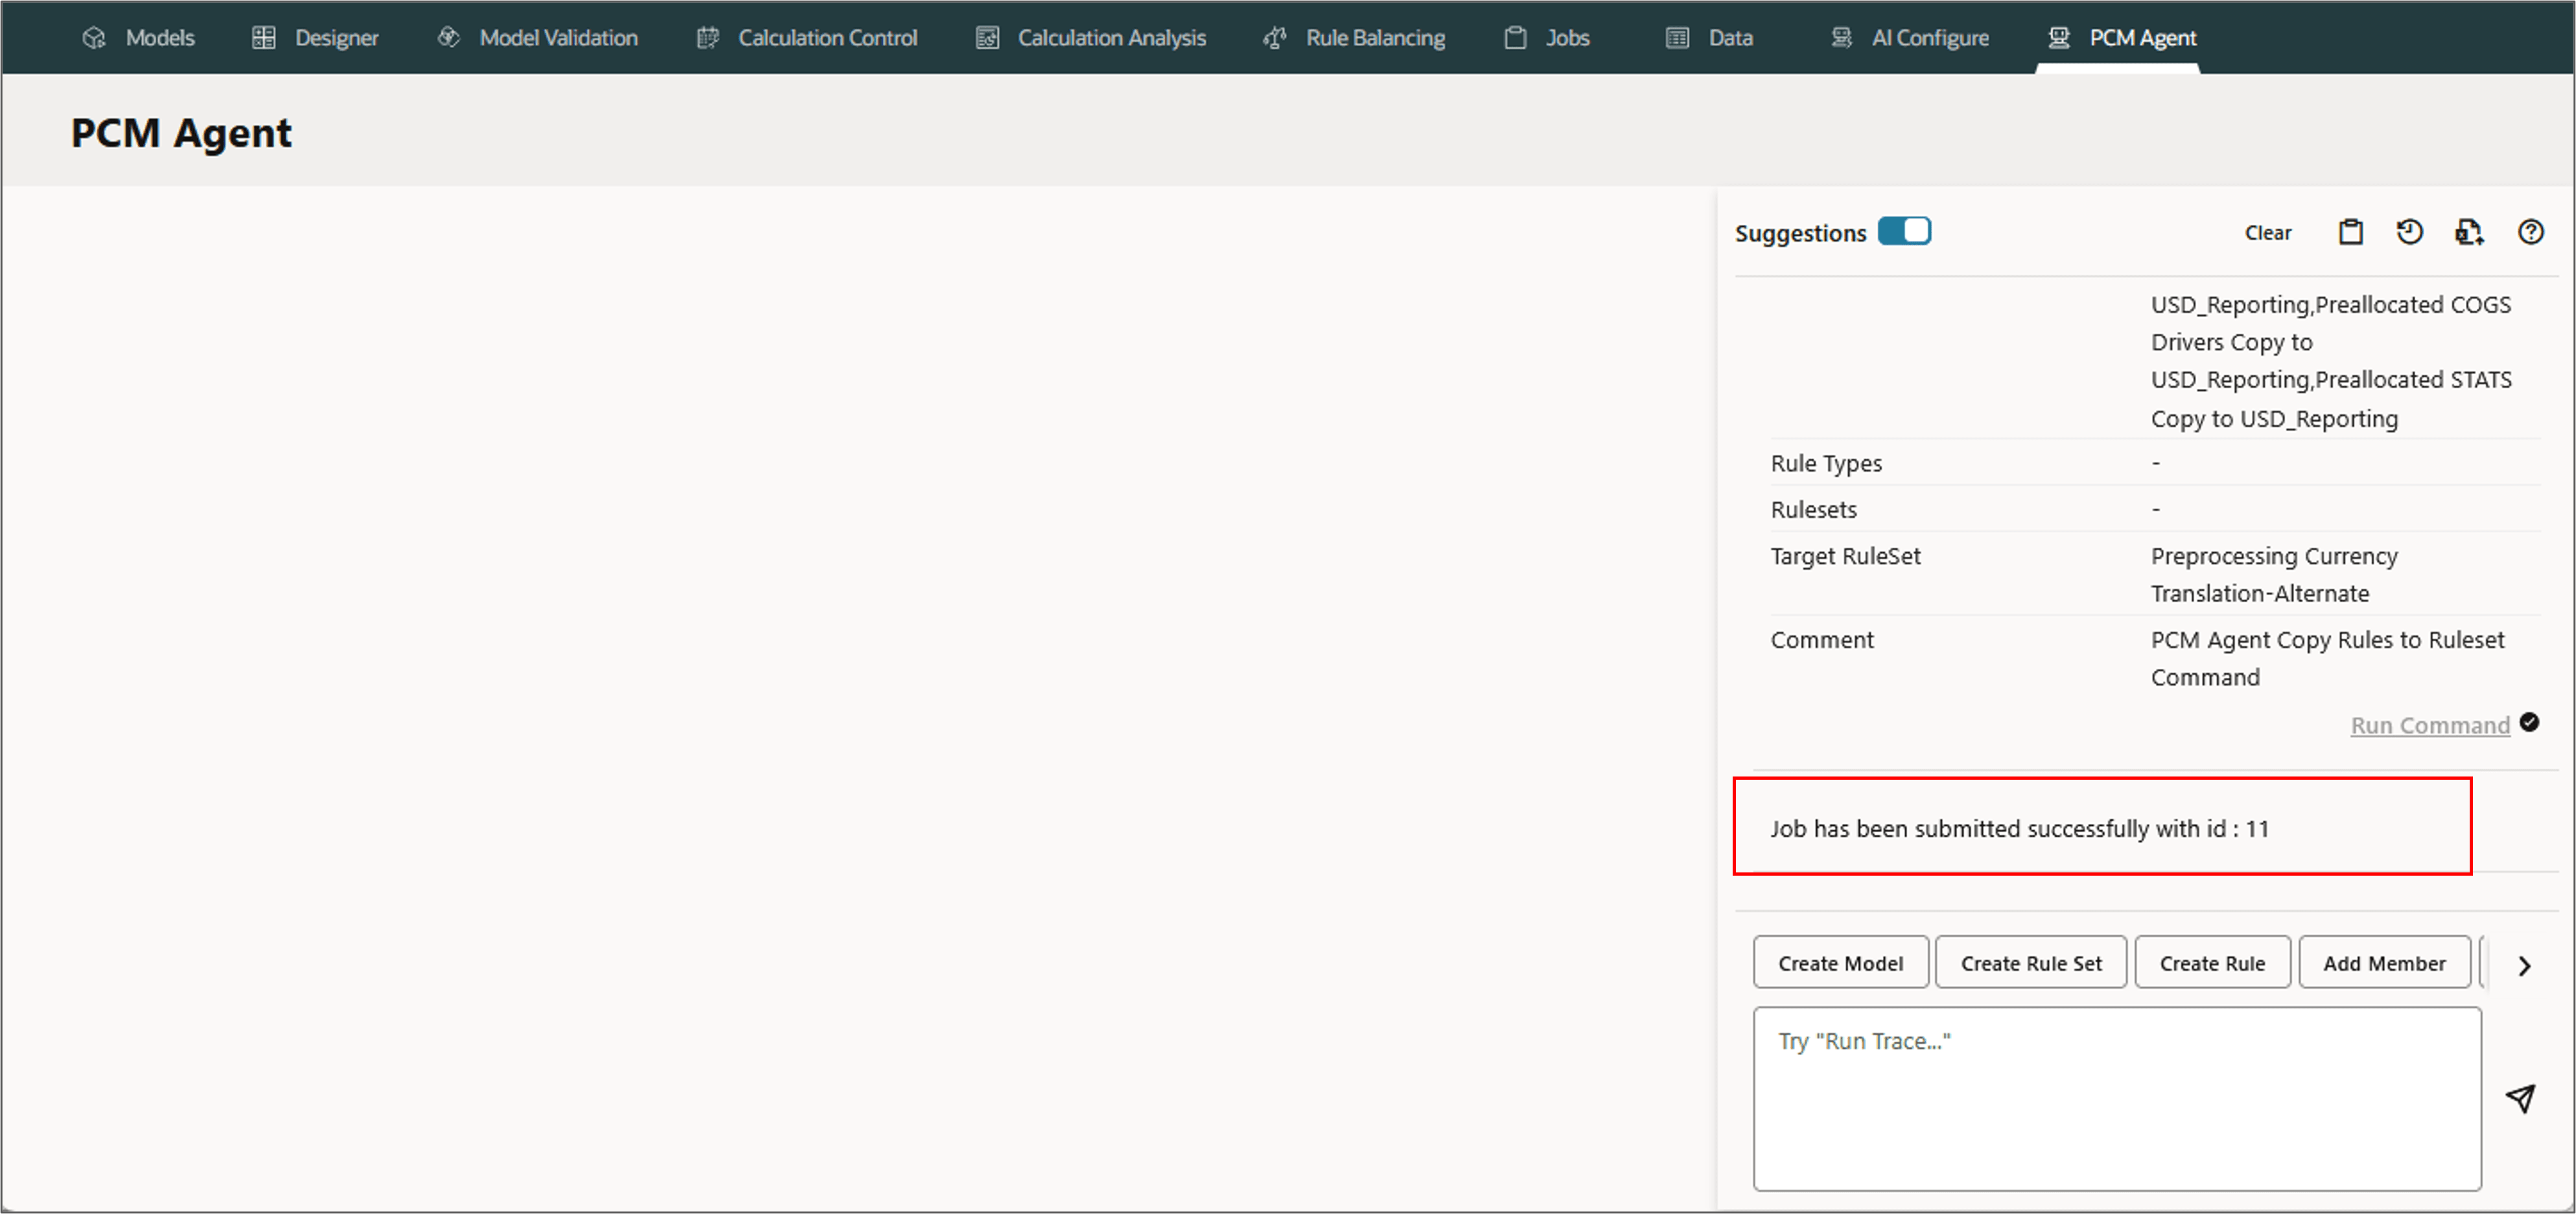
PCM Agent processes the request and displays a job ID.
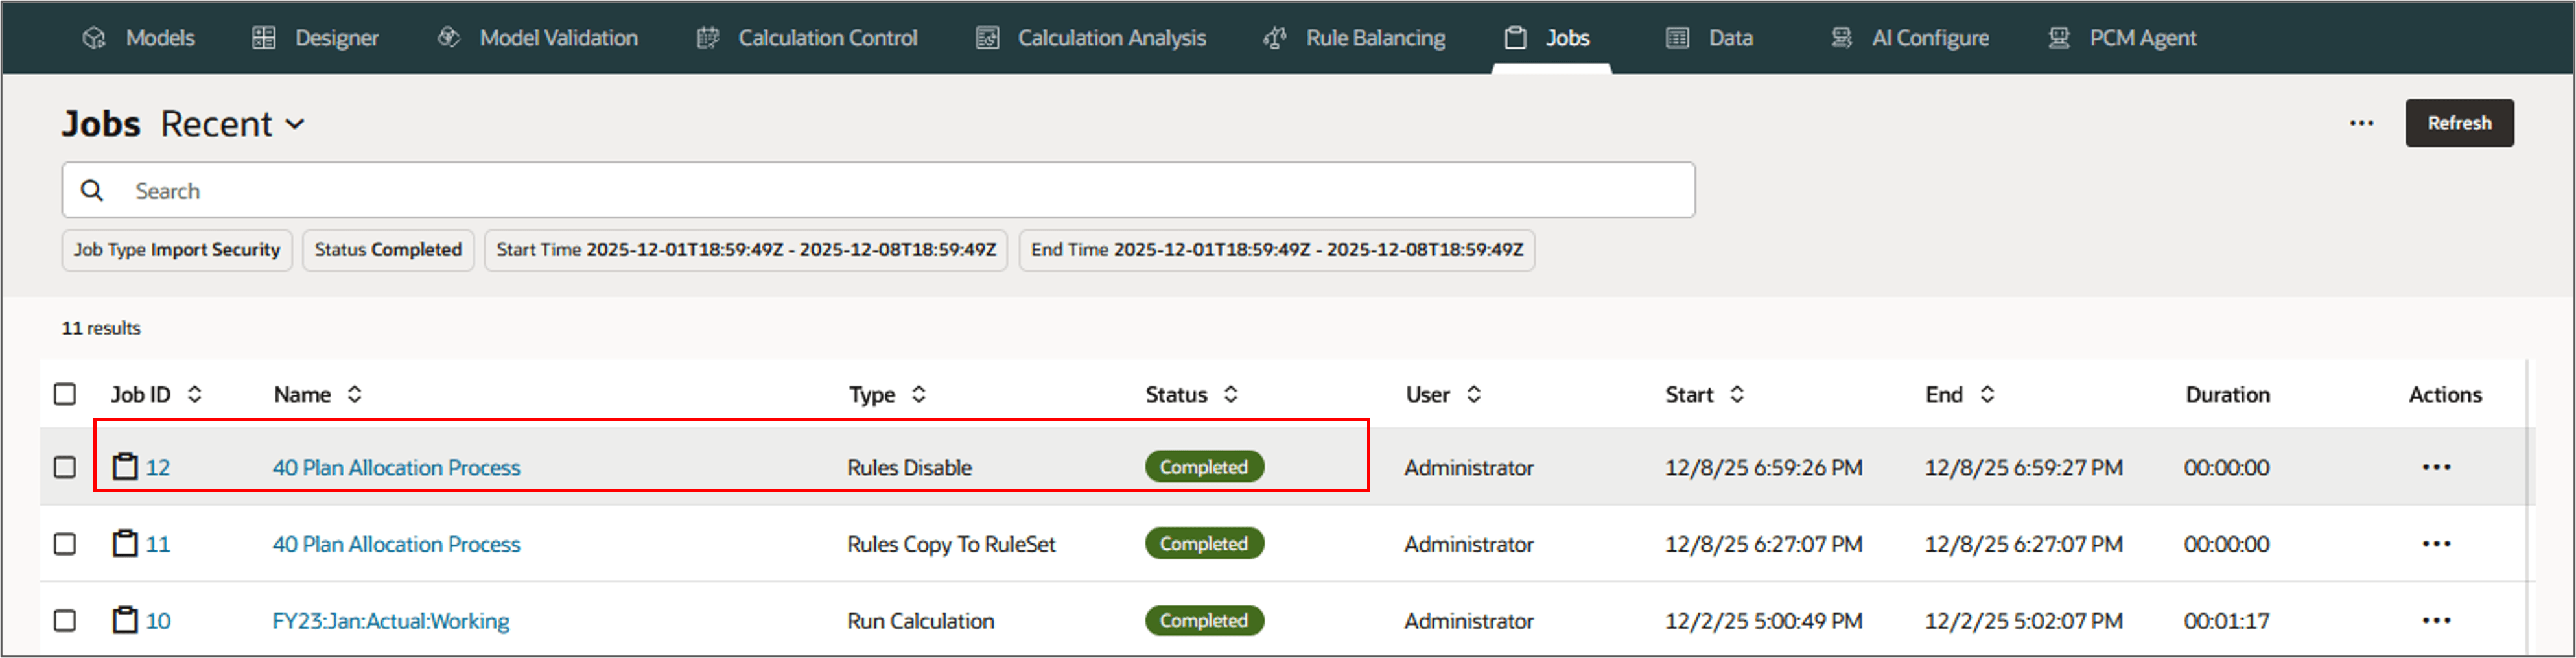
Disabling Rules
PCM Agent disables multiple rules at once time using the Mass Edit function. This feature is useful if you need to disable a number of rules at once, or make other changes that affect the validity of disabled rules.
Parameters for Disabling Rules
- In model 'MODEL_NAME' (optional - default - Designer model name)
- disable RANGE rules (required - RANGE - All | Allocation | Custom | RULE_LIST)
- under ruleset RULESET_NAME (optional)
Example: Disabling Rules
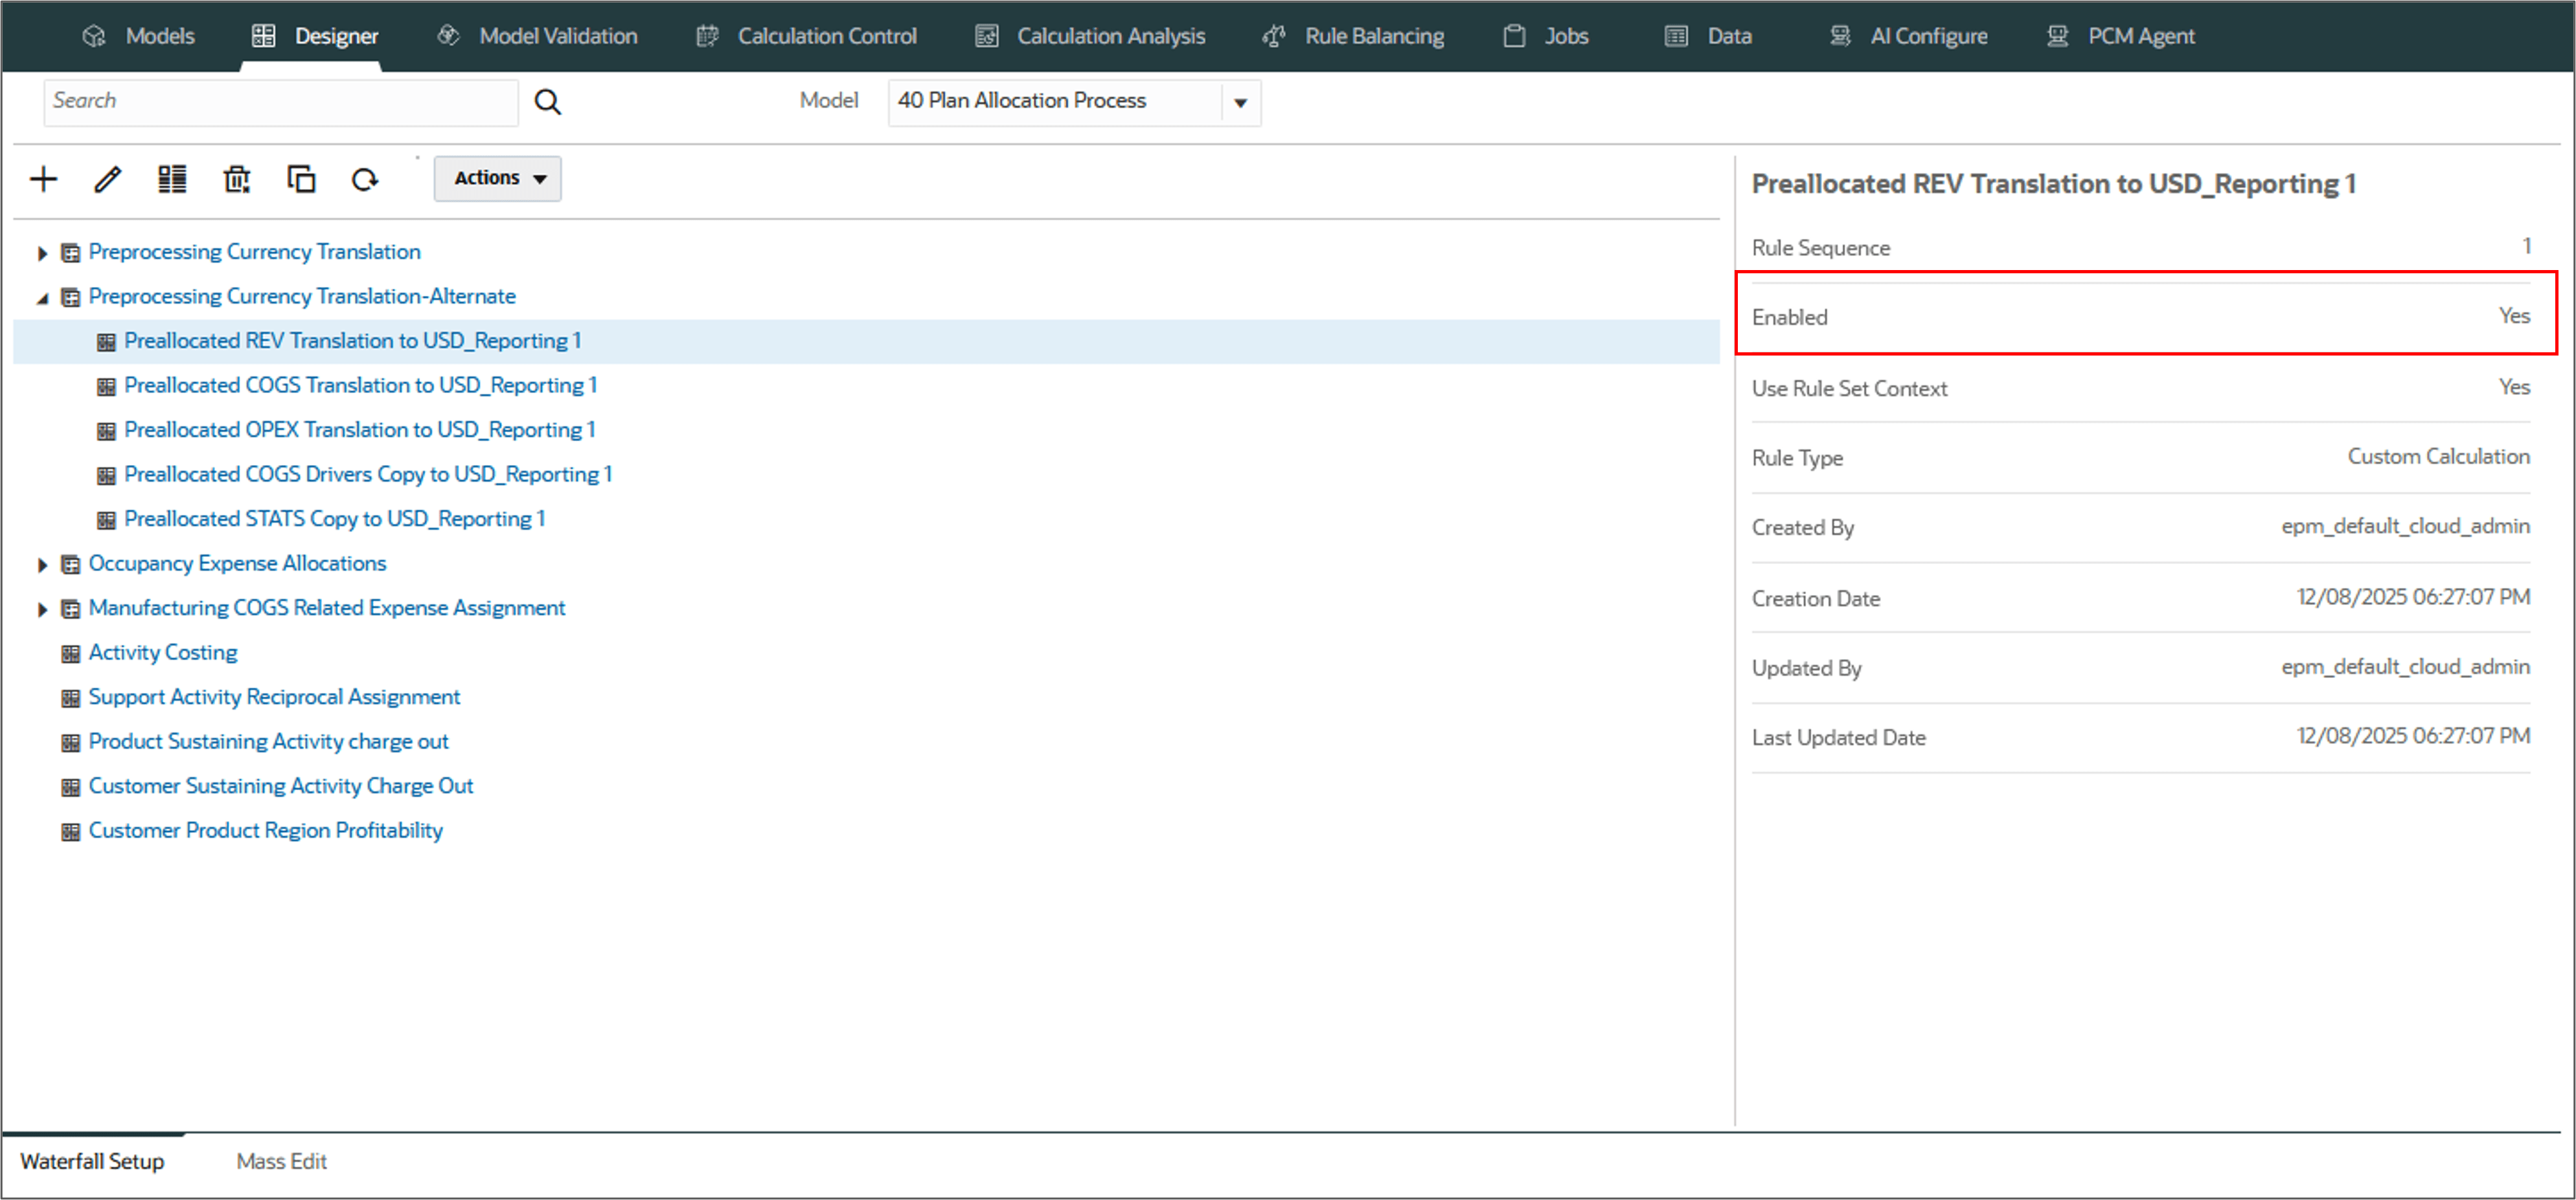
In this example, we will disable all the custom rules under the ruleset Preprocessing Currency Translation - Alternate. Notice the rules for the ruleset are enabled by default.
- On the PCM Agent page, select Disable Rules.
- Type the following in the PCM agent and click (Send).
- Review or refine the request if needed.
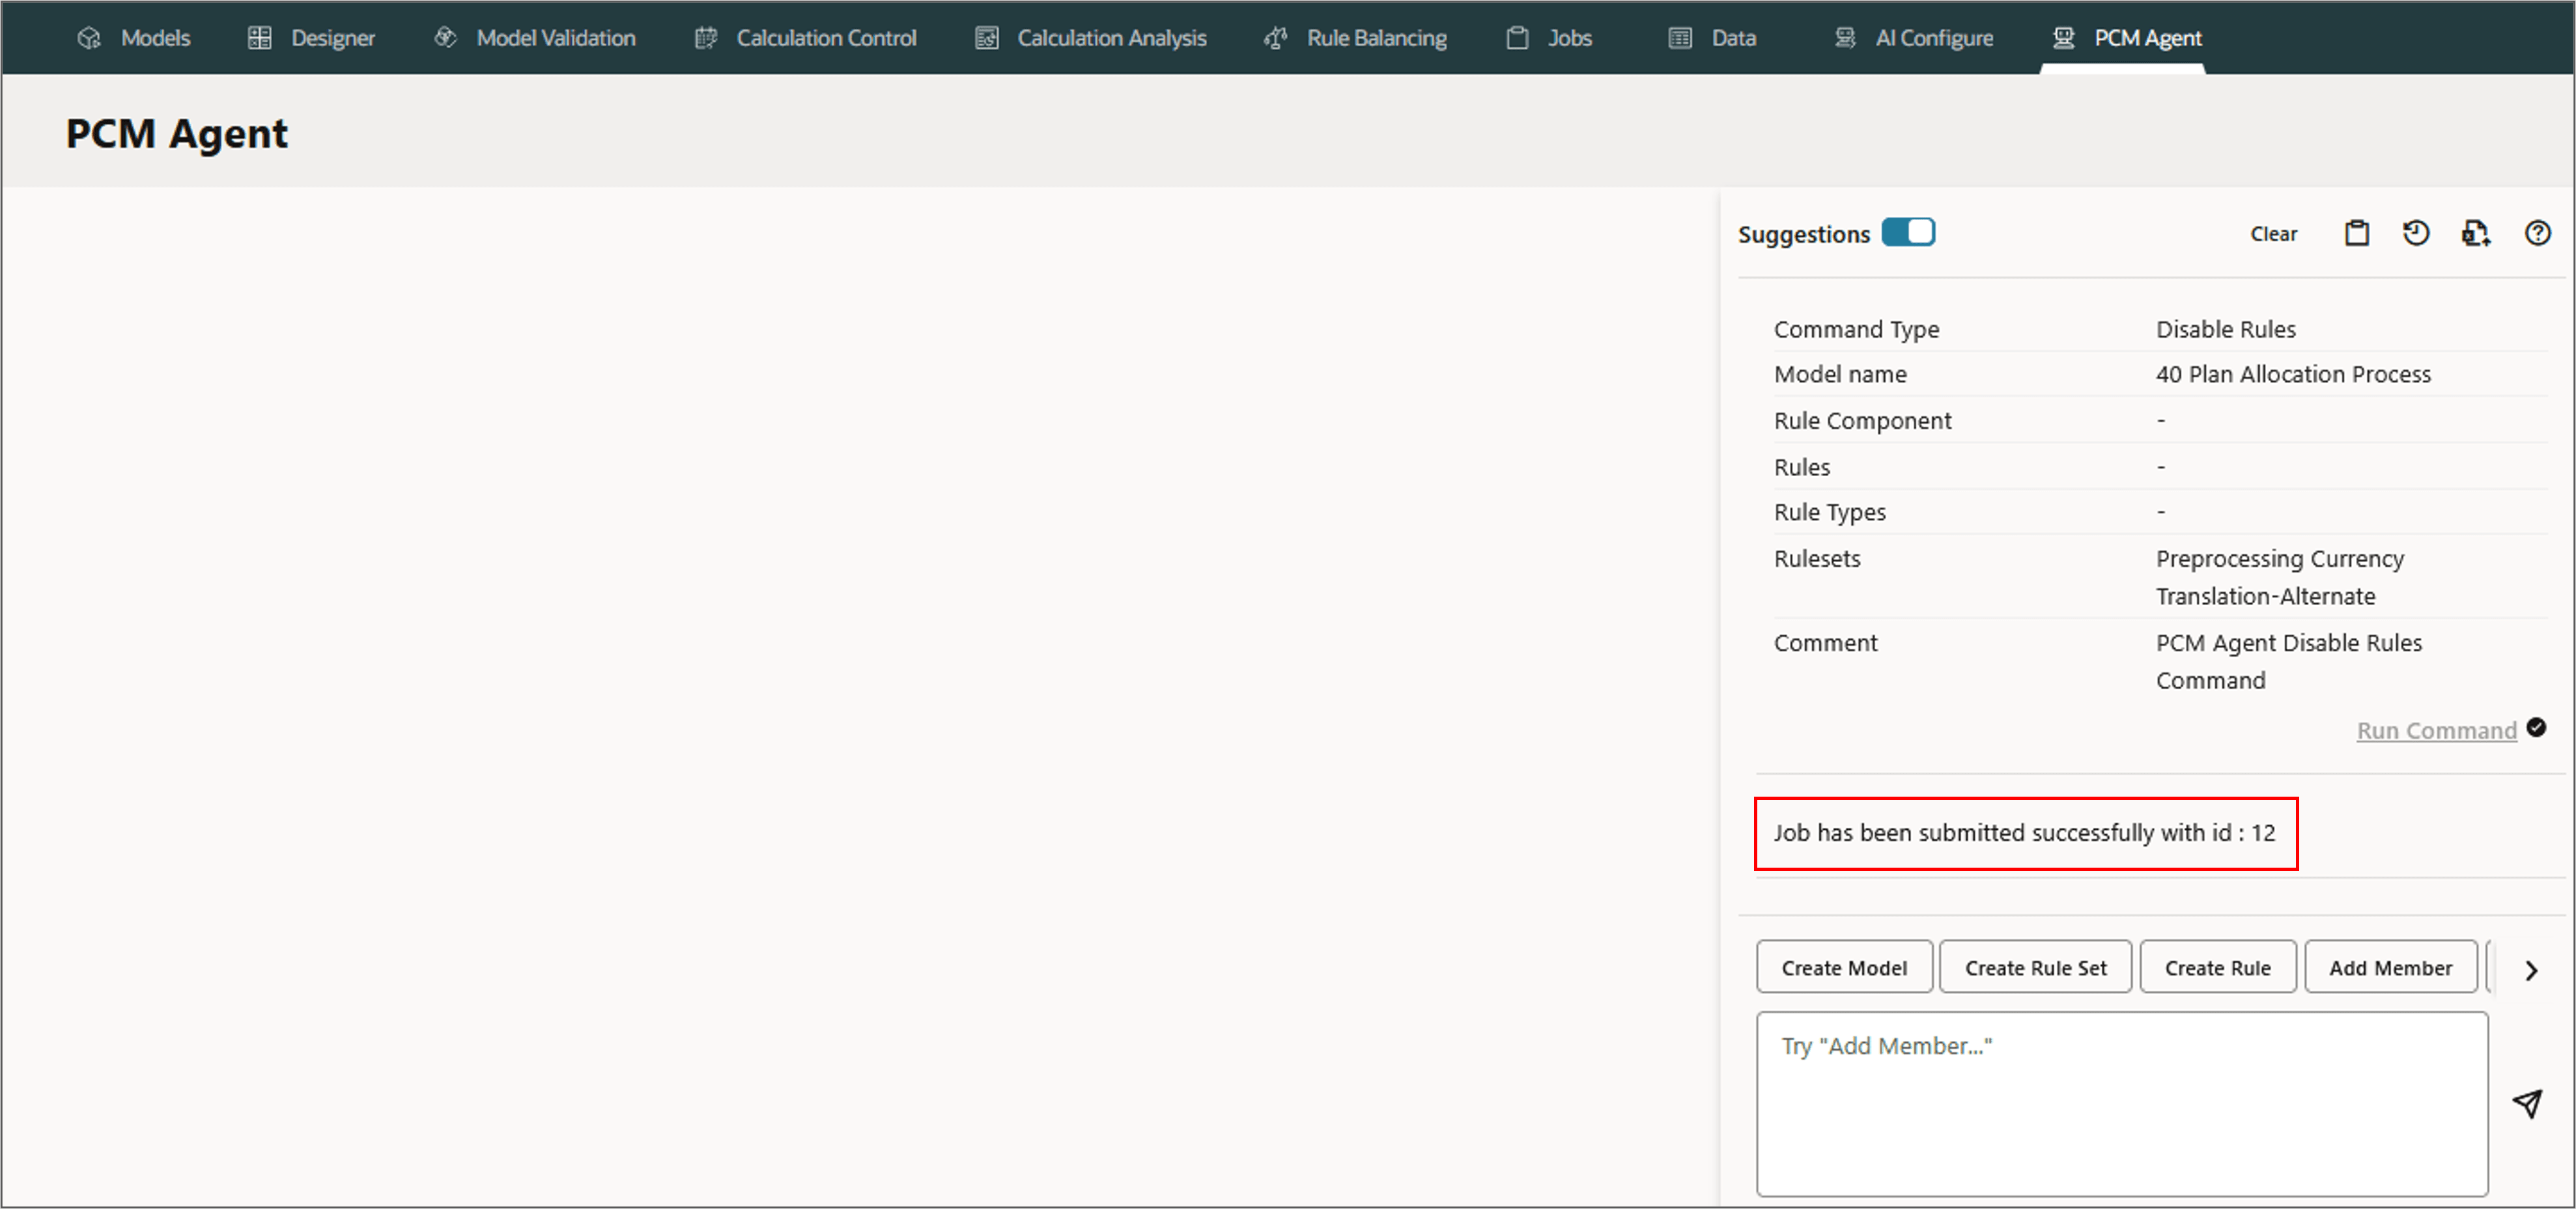
- Click Run Command.
- Go to Jobs and view the status.
- Now, go to Designer page, and select the rule Preallocated COGS Translation to USD_Reporting to verify the rule disabled.
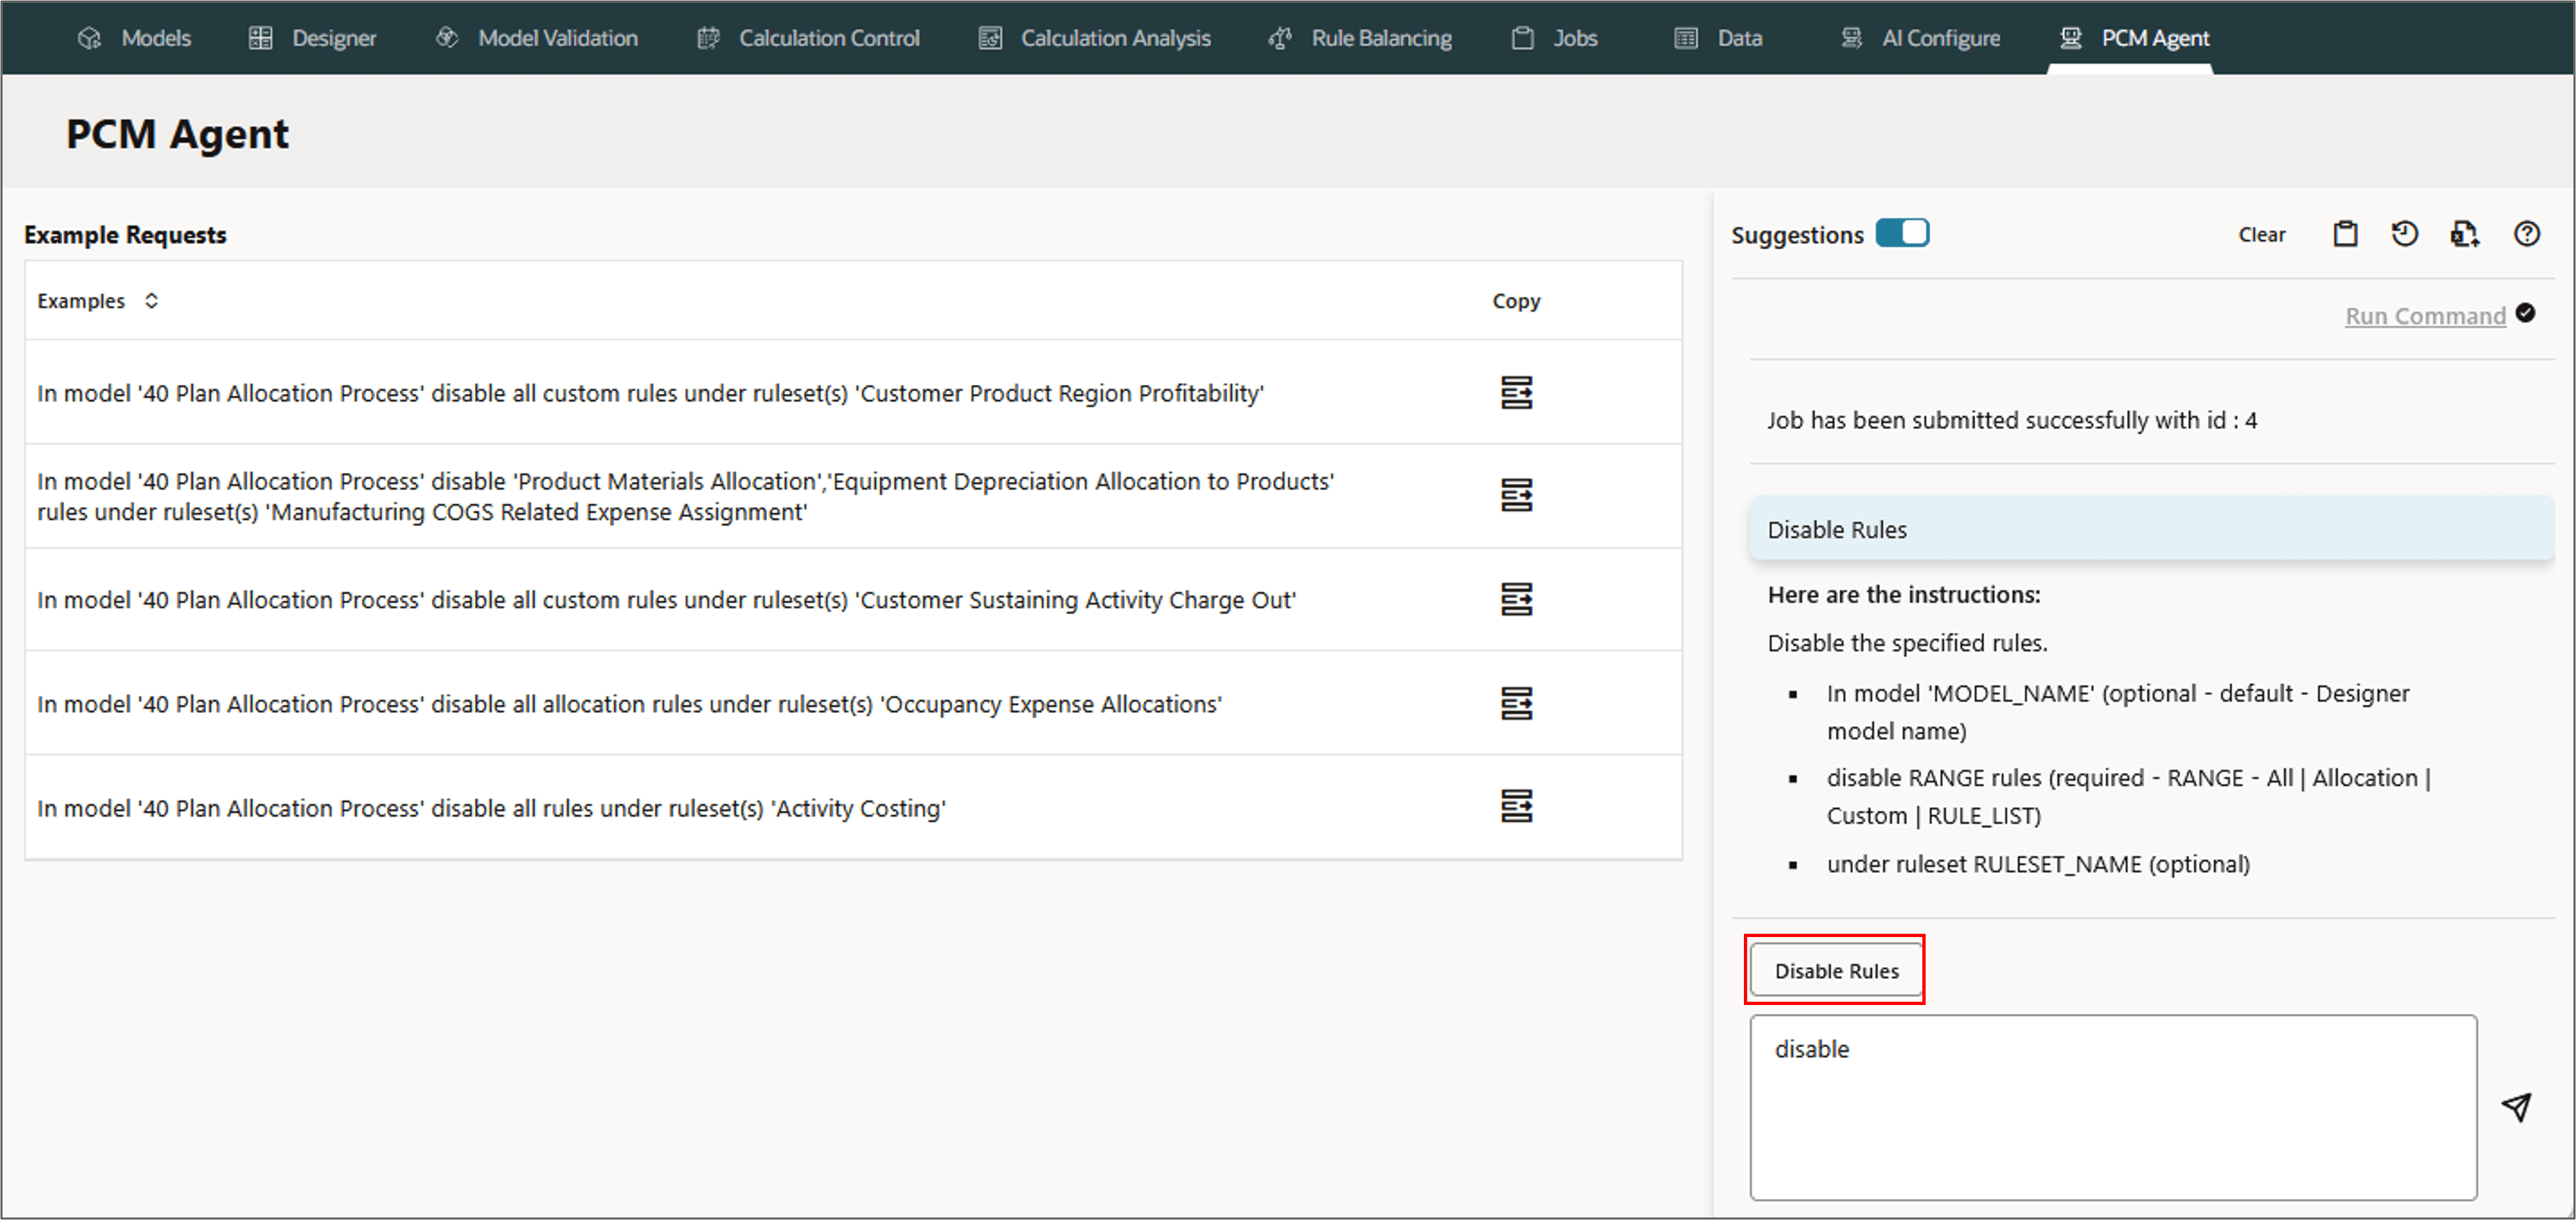
 In model '40 Plan Allocation Process'disable all rules
under ruleset 'Preprocessing Currency Translation-Alternate
Note:
Click View Rules in Mass Edit on the top to go to the Mass Edit page to view, and to perform manual mass edit functions for the selected custom rules under the ruleset Preprocessing Currency Translation - Alternate.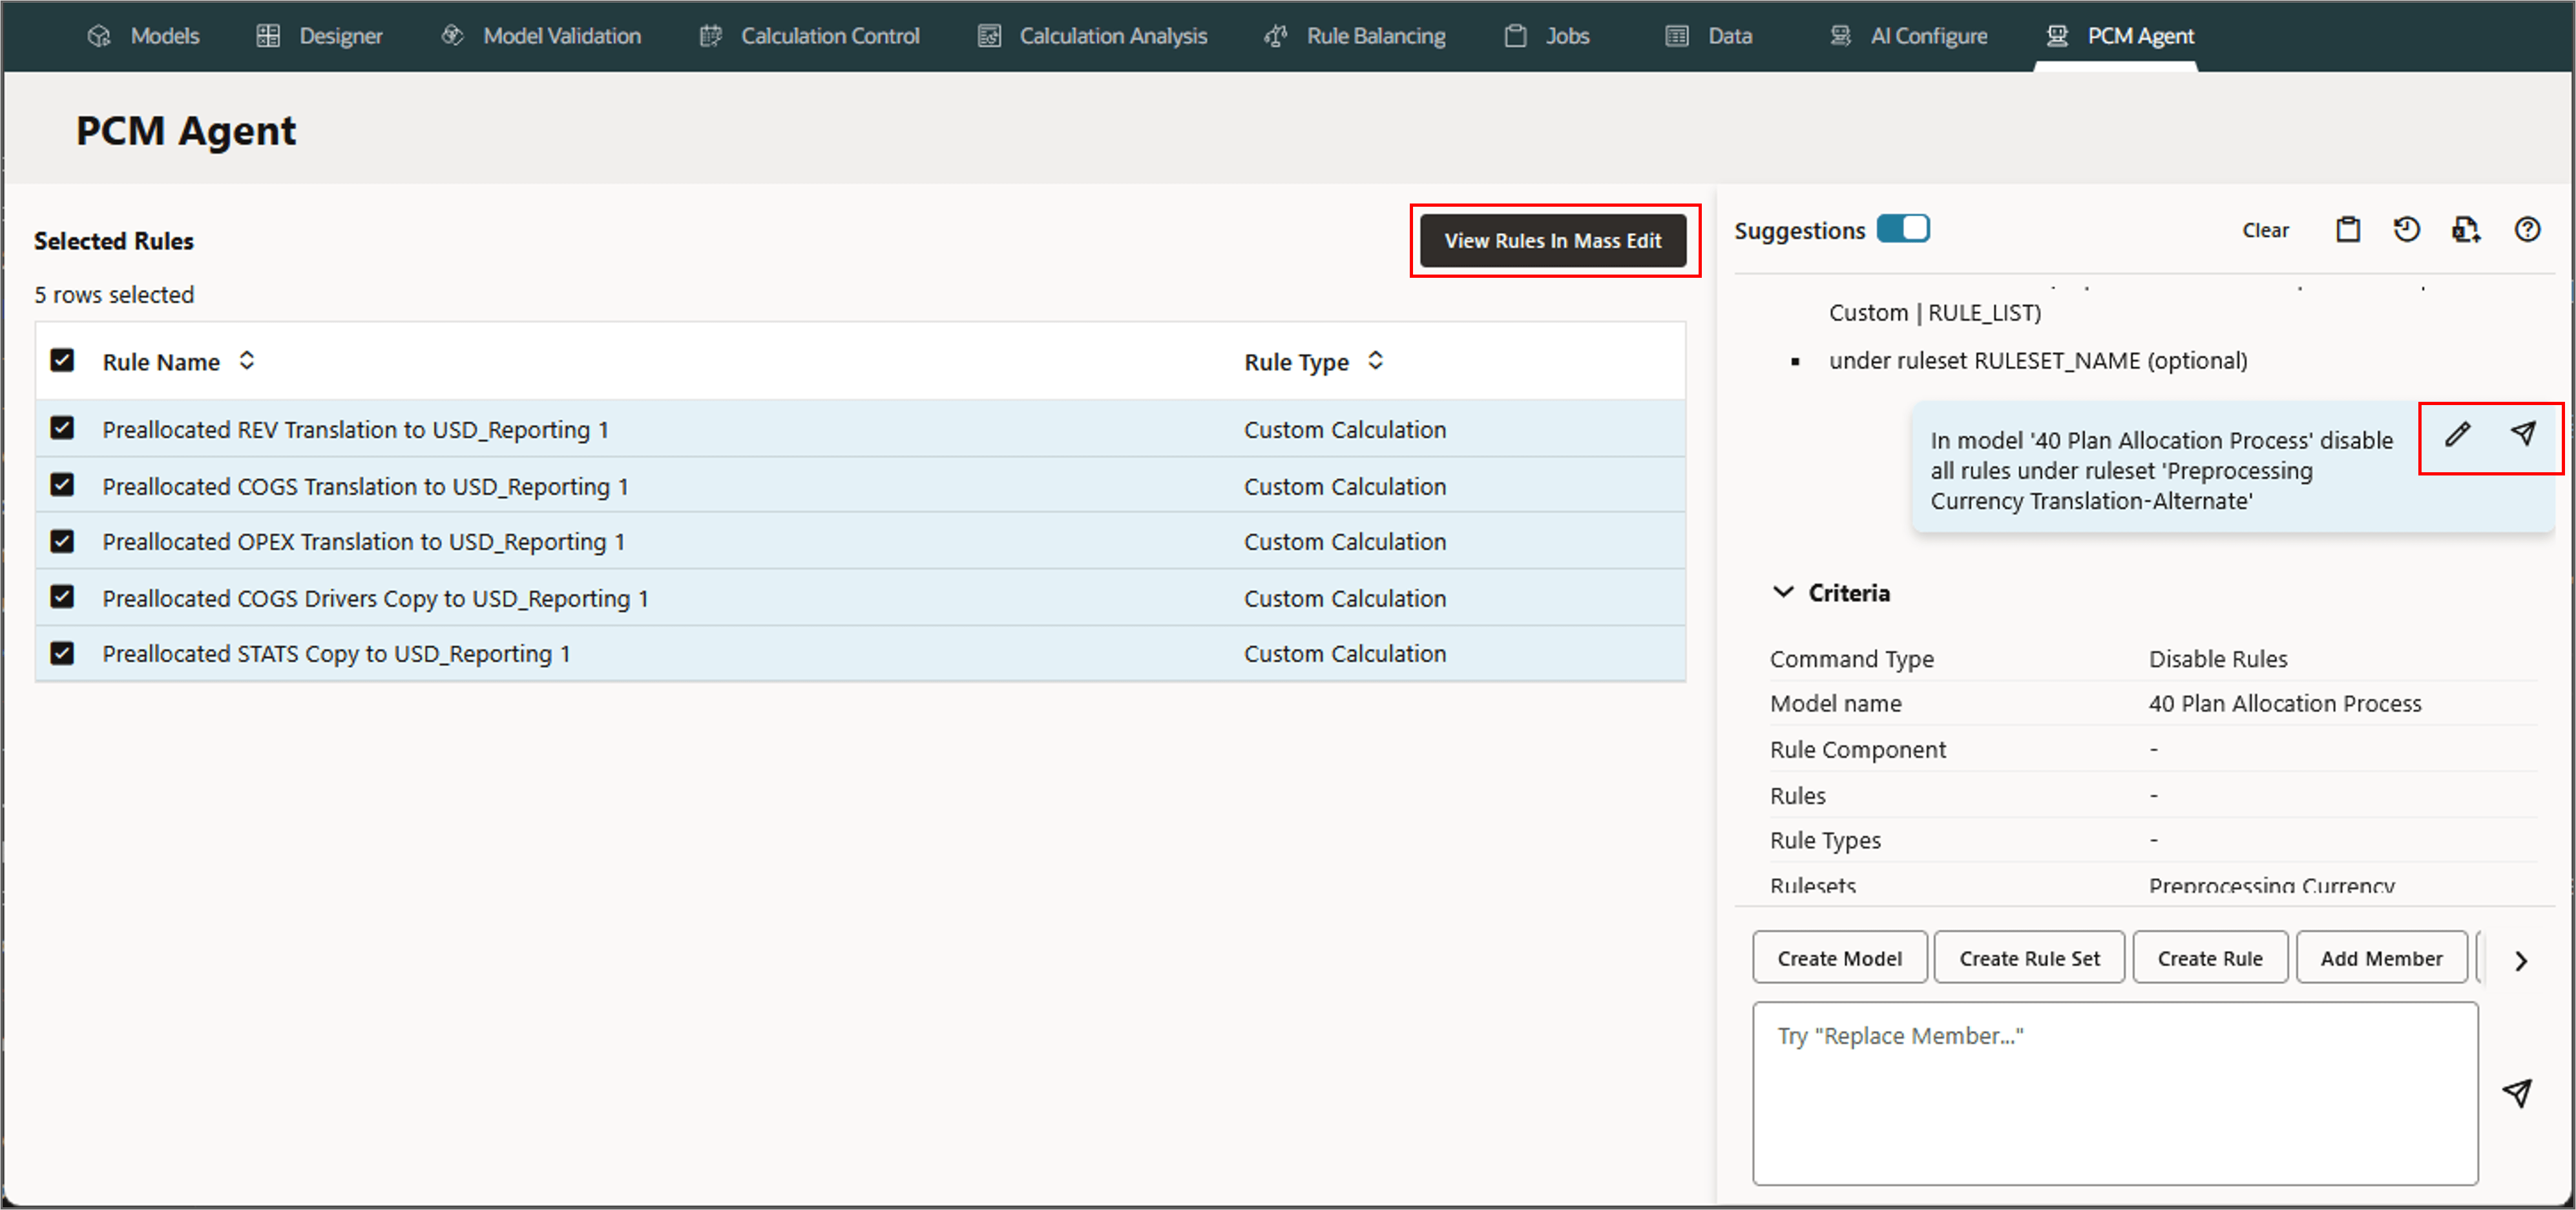
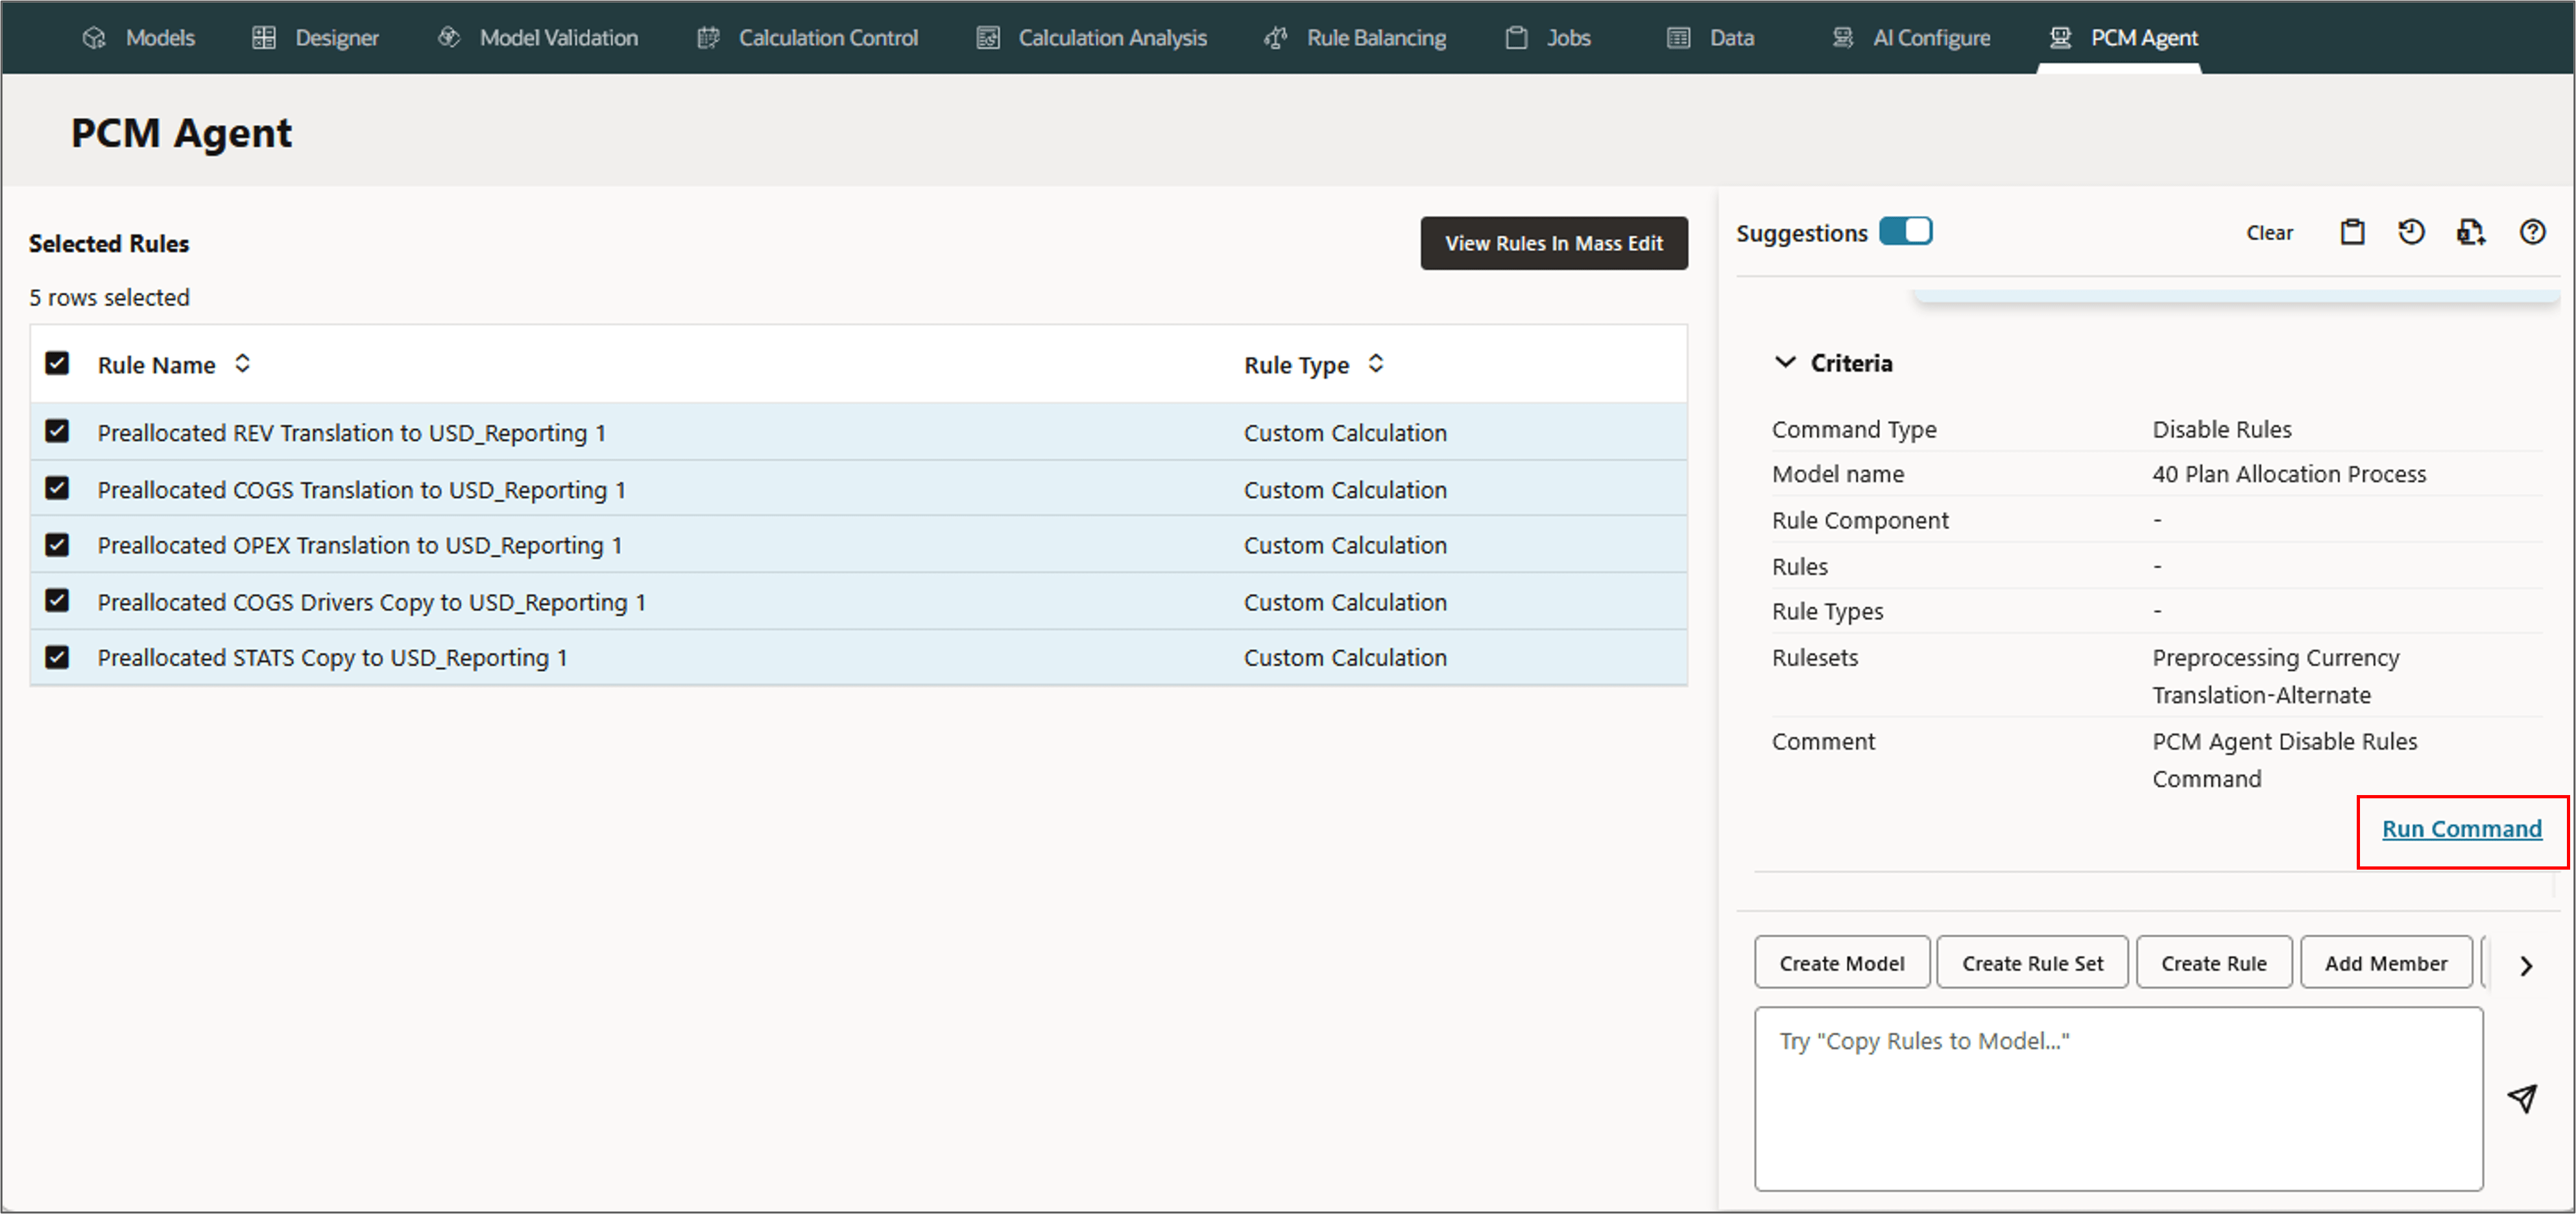
A job is created and the ID is displayed.

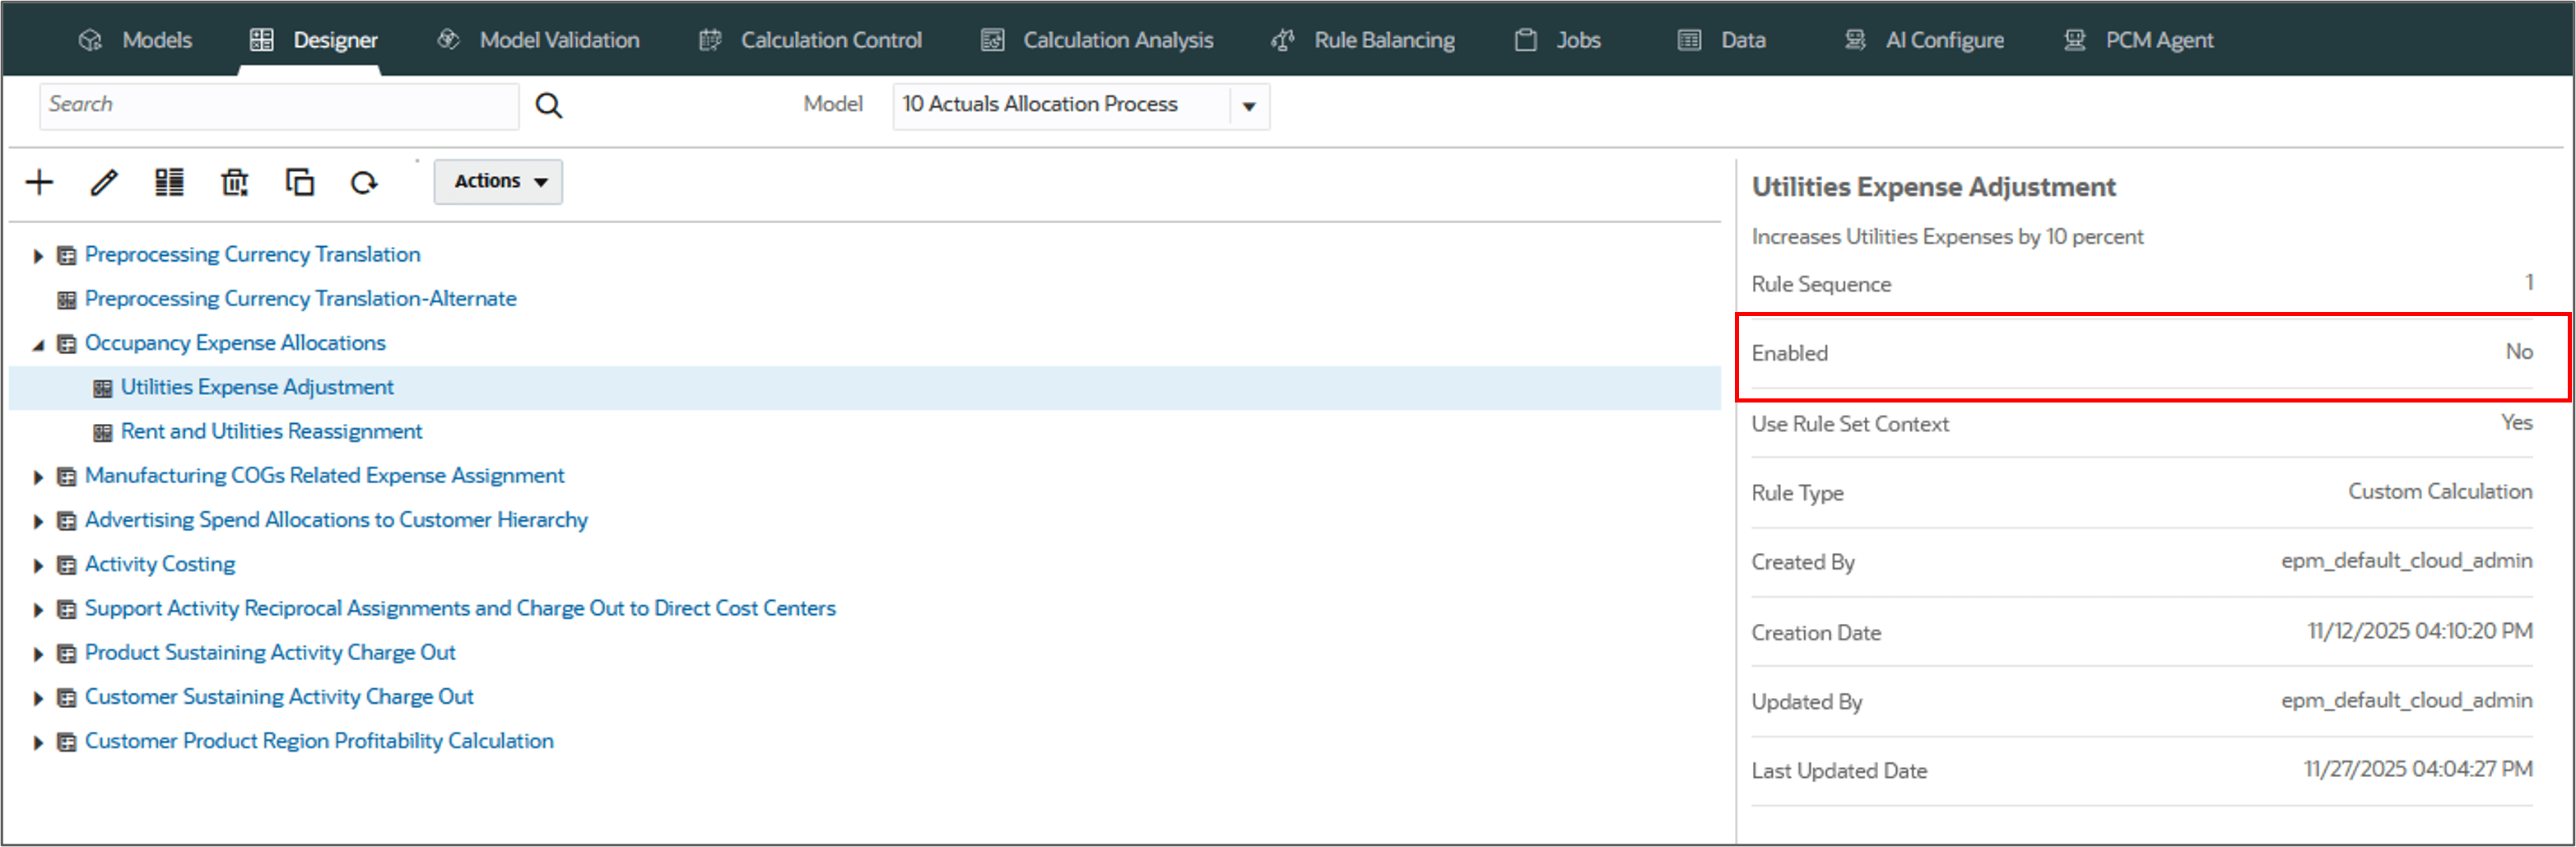
Enabling Rules
PCM Agent enables multiple rules at once time using the Mass Edit function.
Parameters for Enabling Rules
- In model 'MODEL_NAME' (optional - default - Designer model name)
- enable RANGE rules (required - RANGE - All | Allocation | Custom | RULE_LIST)
- under ruleset RULESET_NAME (optional)
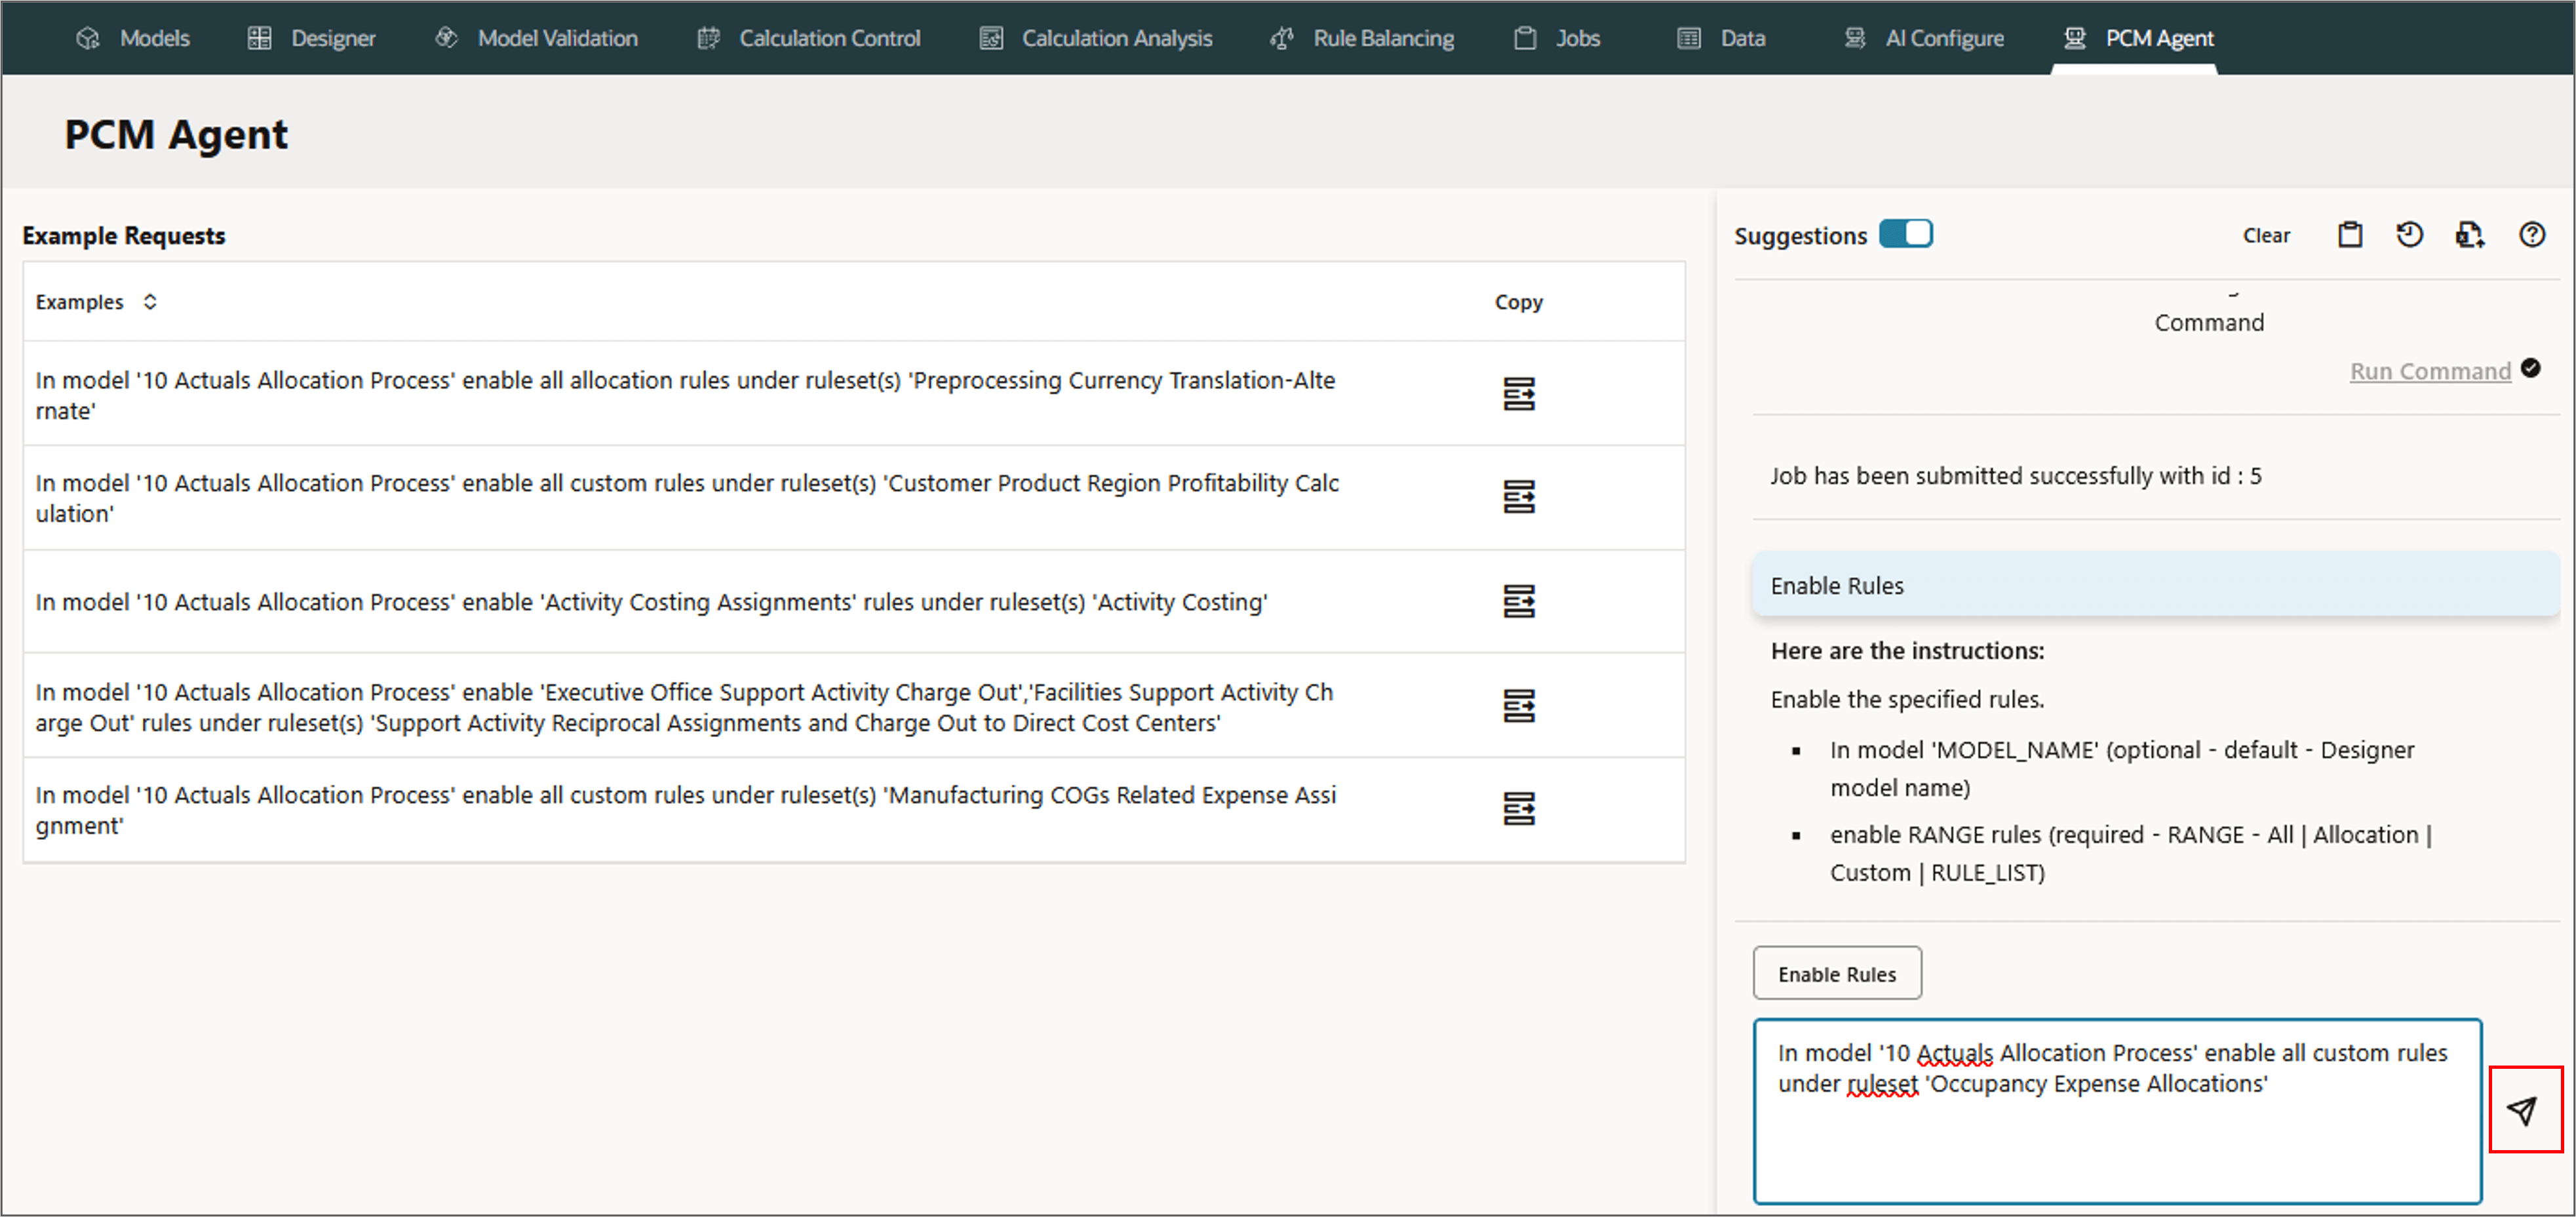
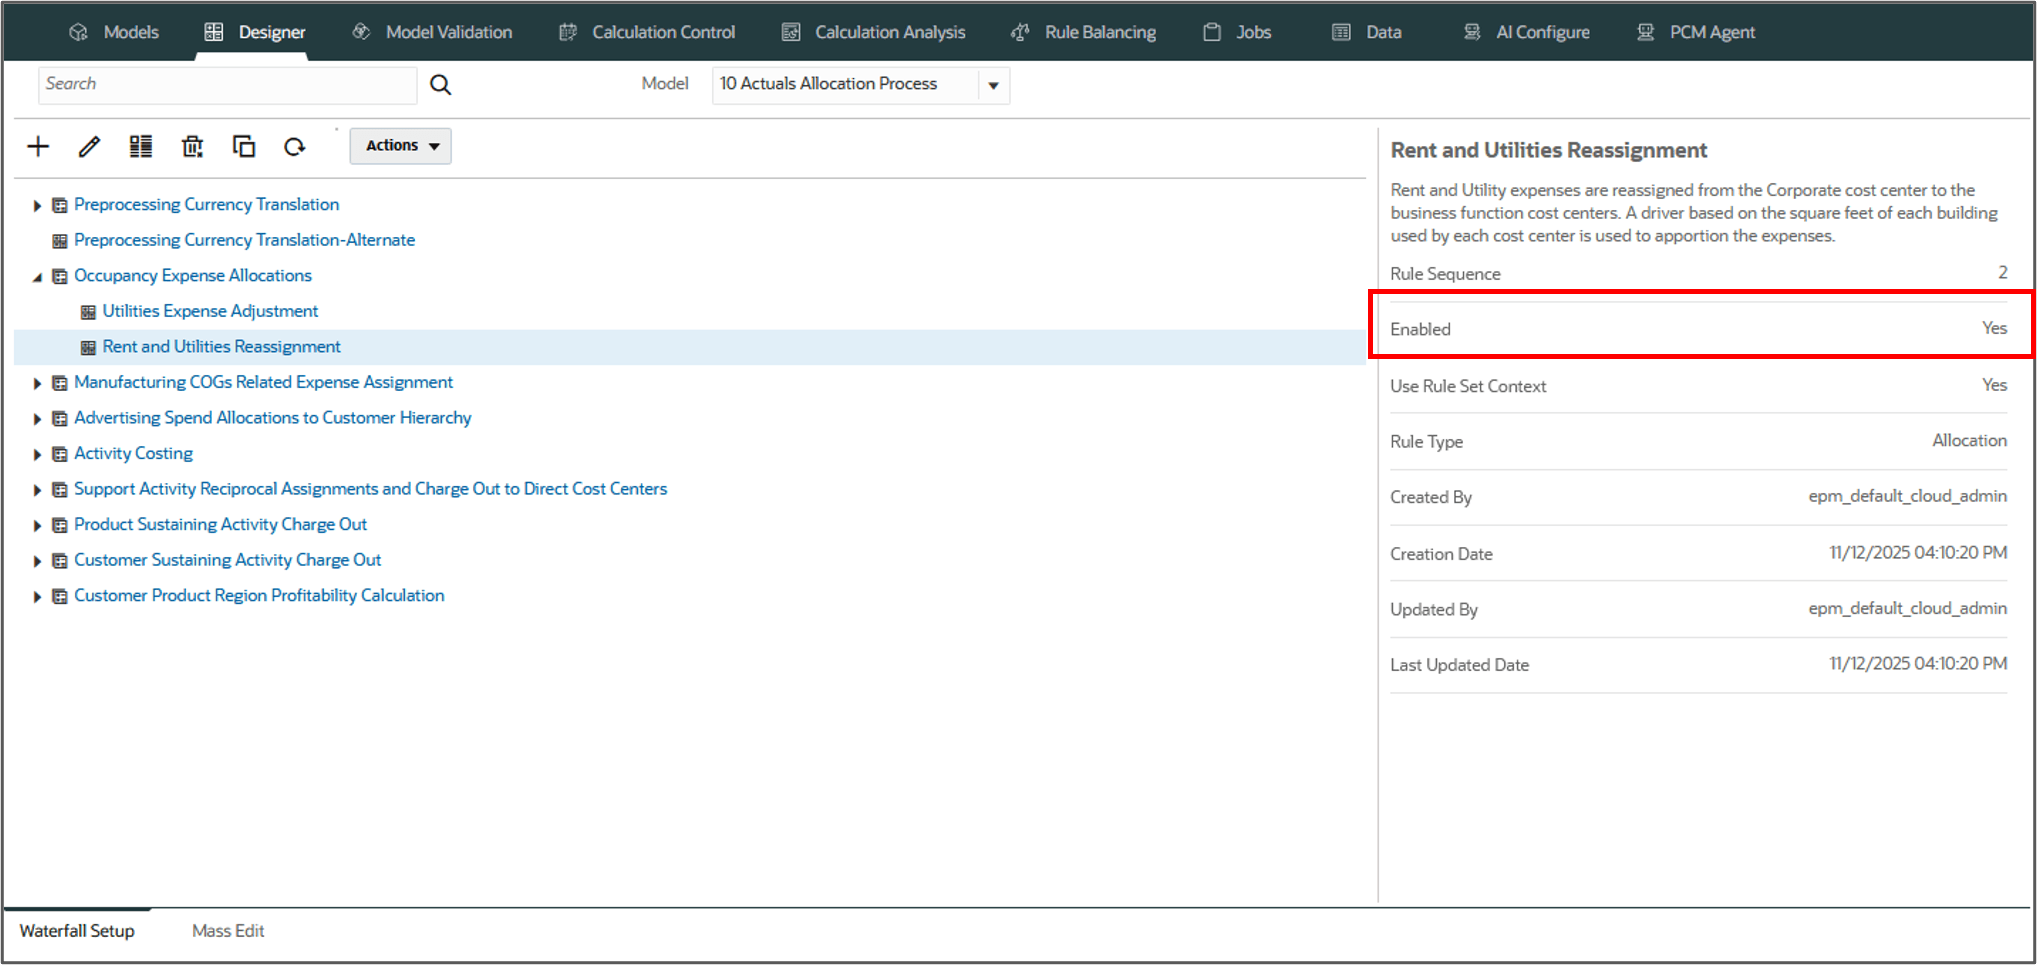
Example: Enabling Rules
In this example, you enable all the custom rules under the ruleset Occupancy Expense Allocations. notice the rule for Utilities Expense Adjustments is disabled by default.
- On the PCM Agent page, select Enable Rules.
- Type the following in the PCM agent and click (Send).
- Review or Refine the request if needed.
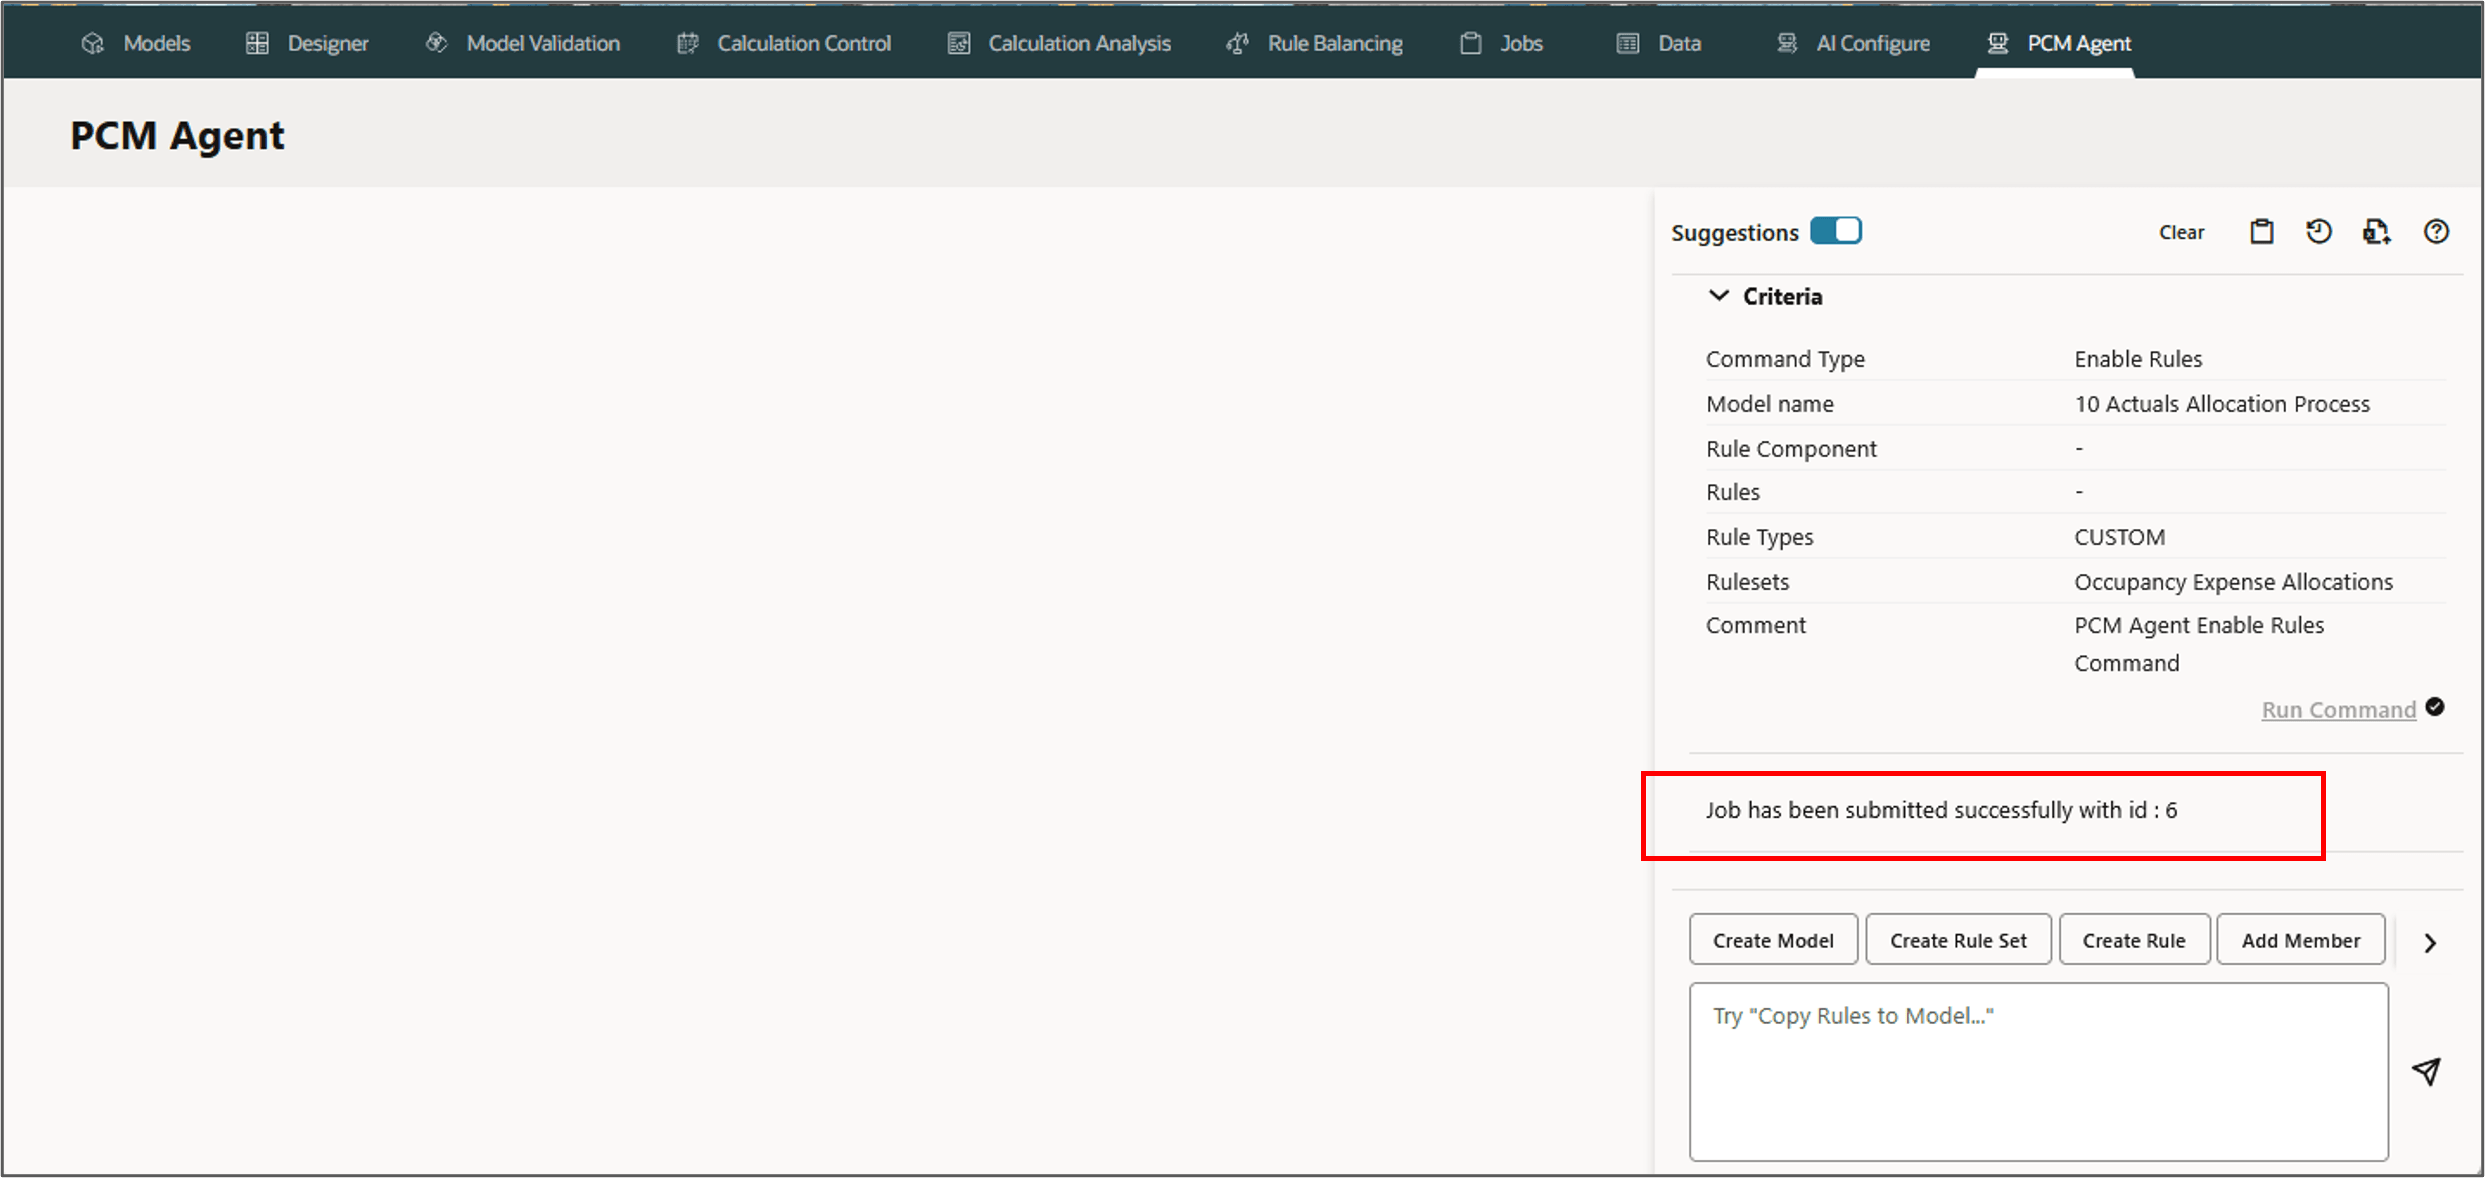
- Click Run Command.
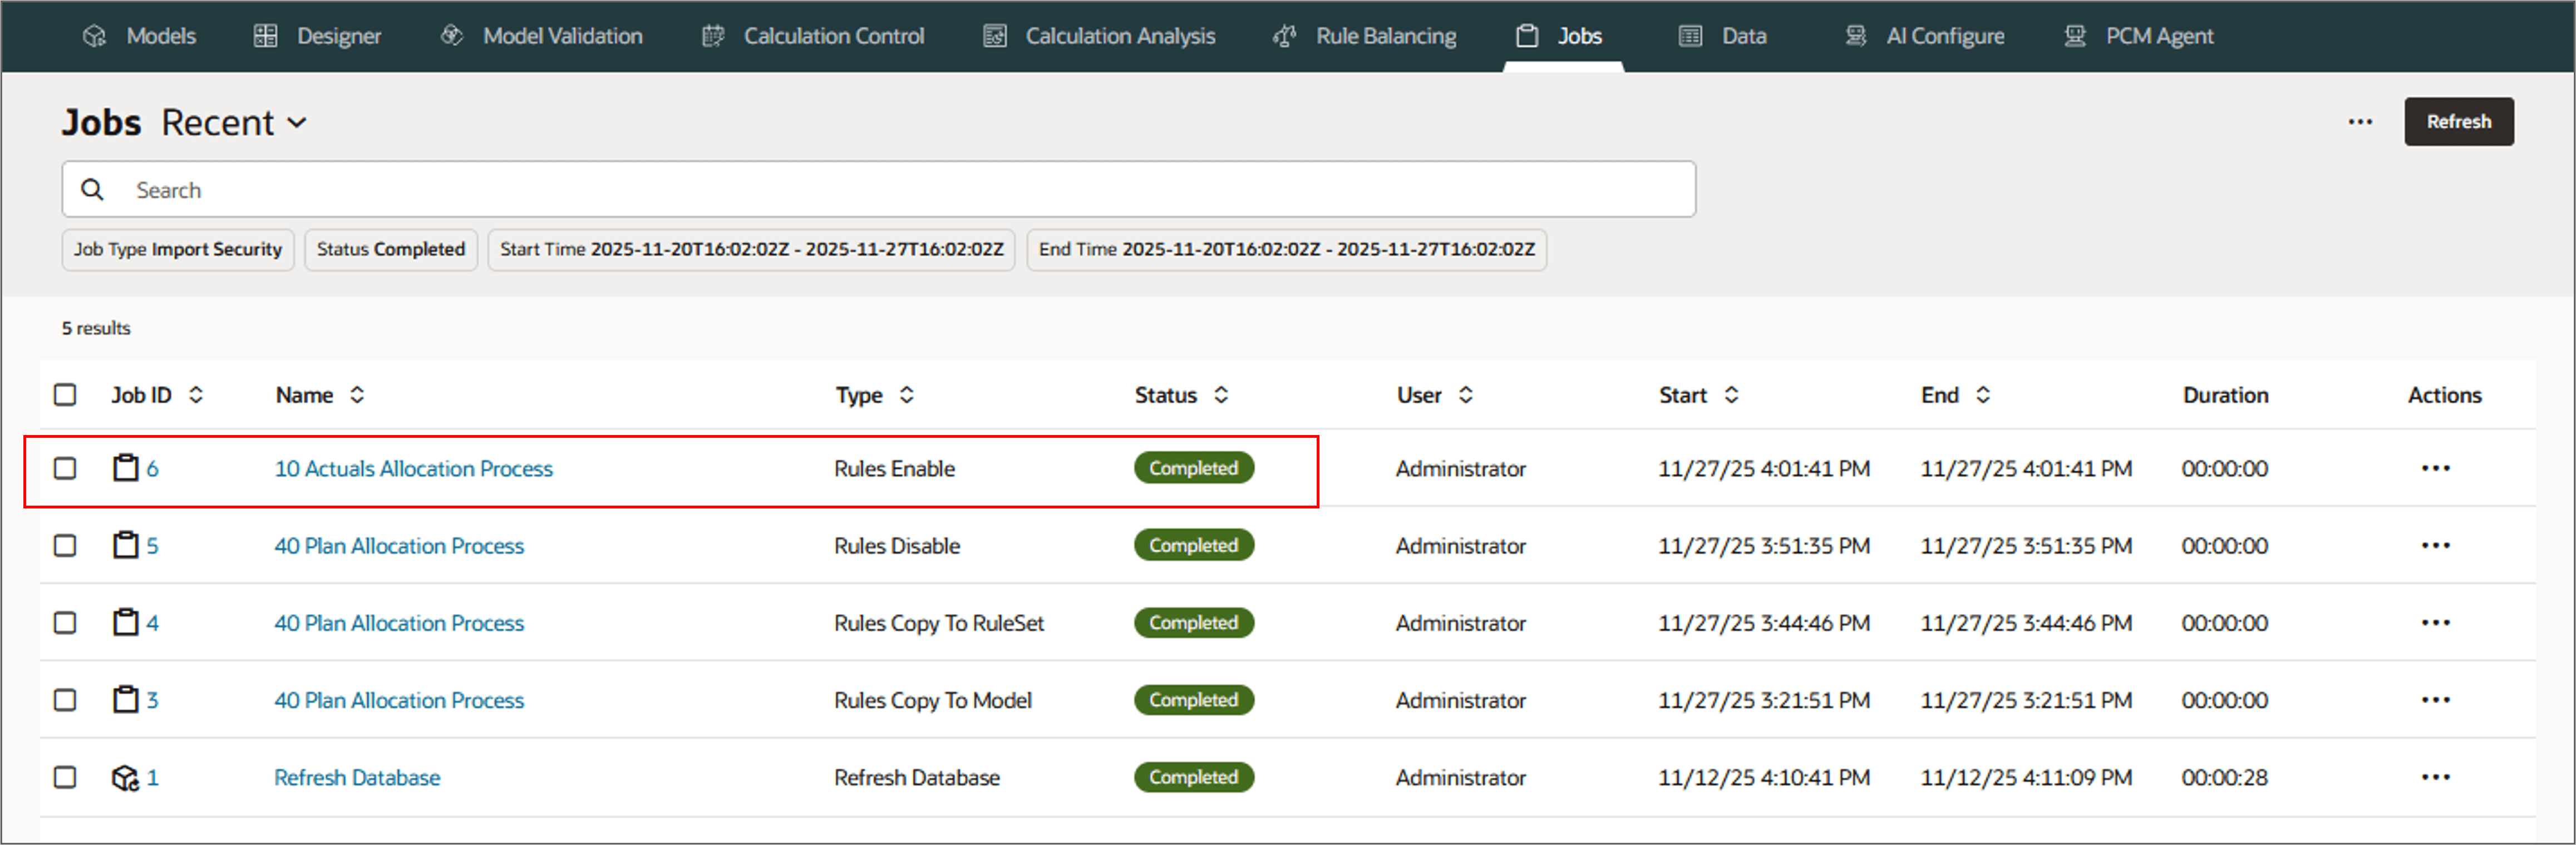
- Go to Jobs and view the status.
- Now, go to Designer page, and select the rule Utilities Expense Adjustments to verify the rule enabled.
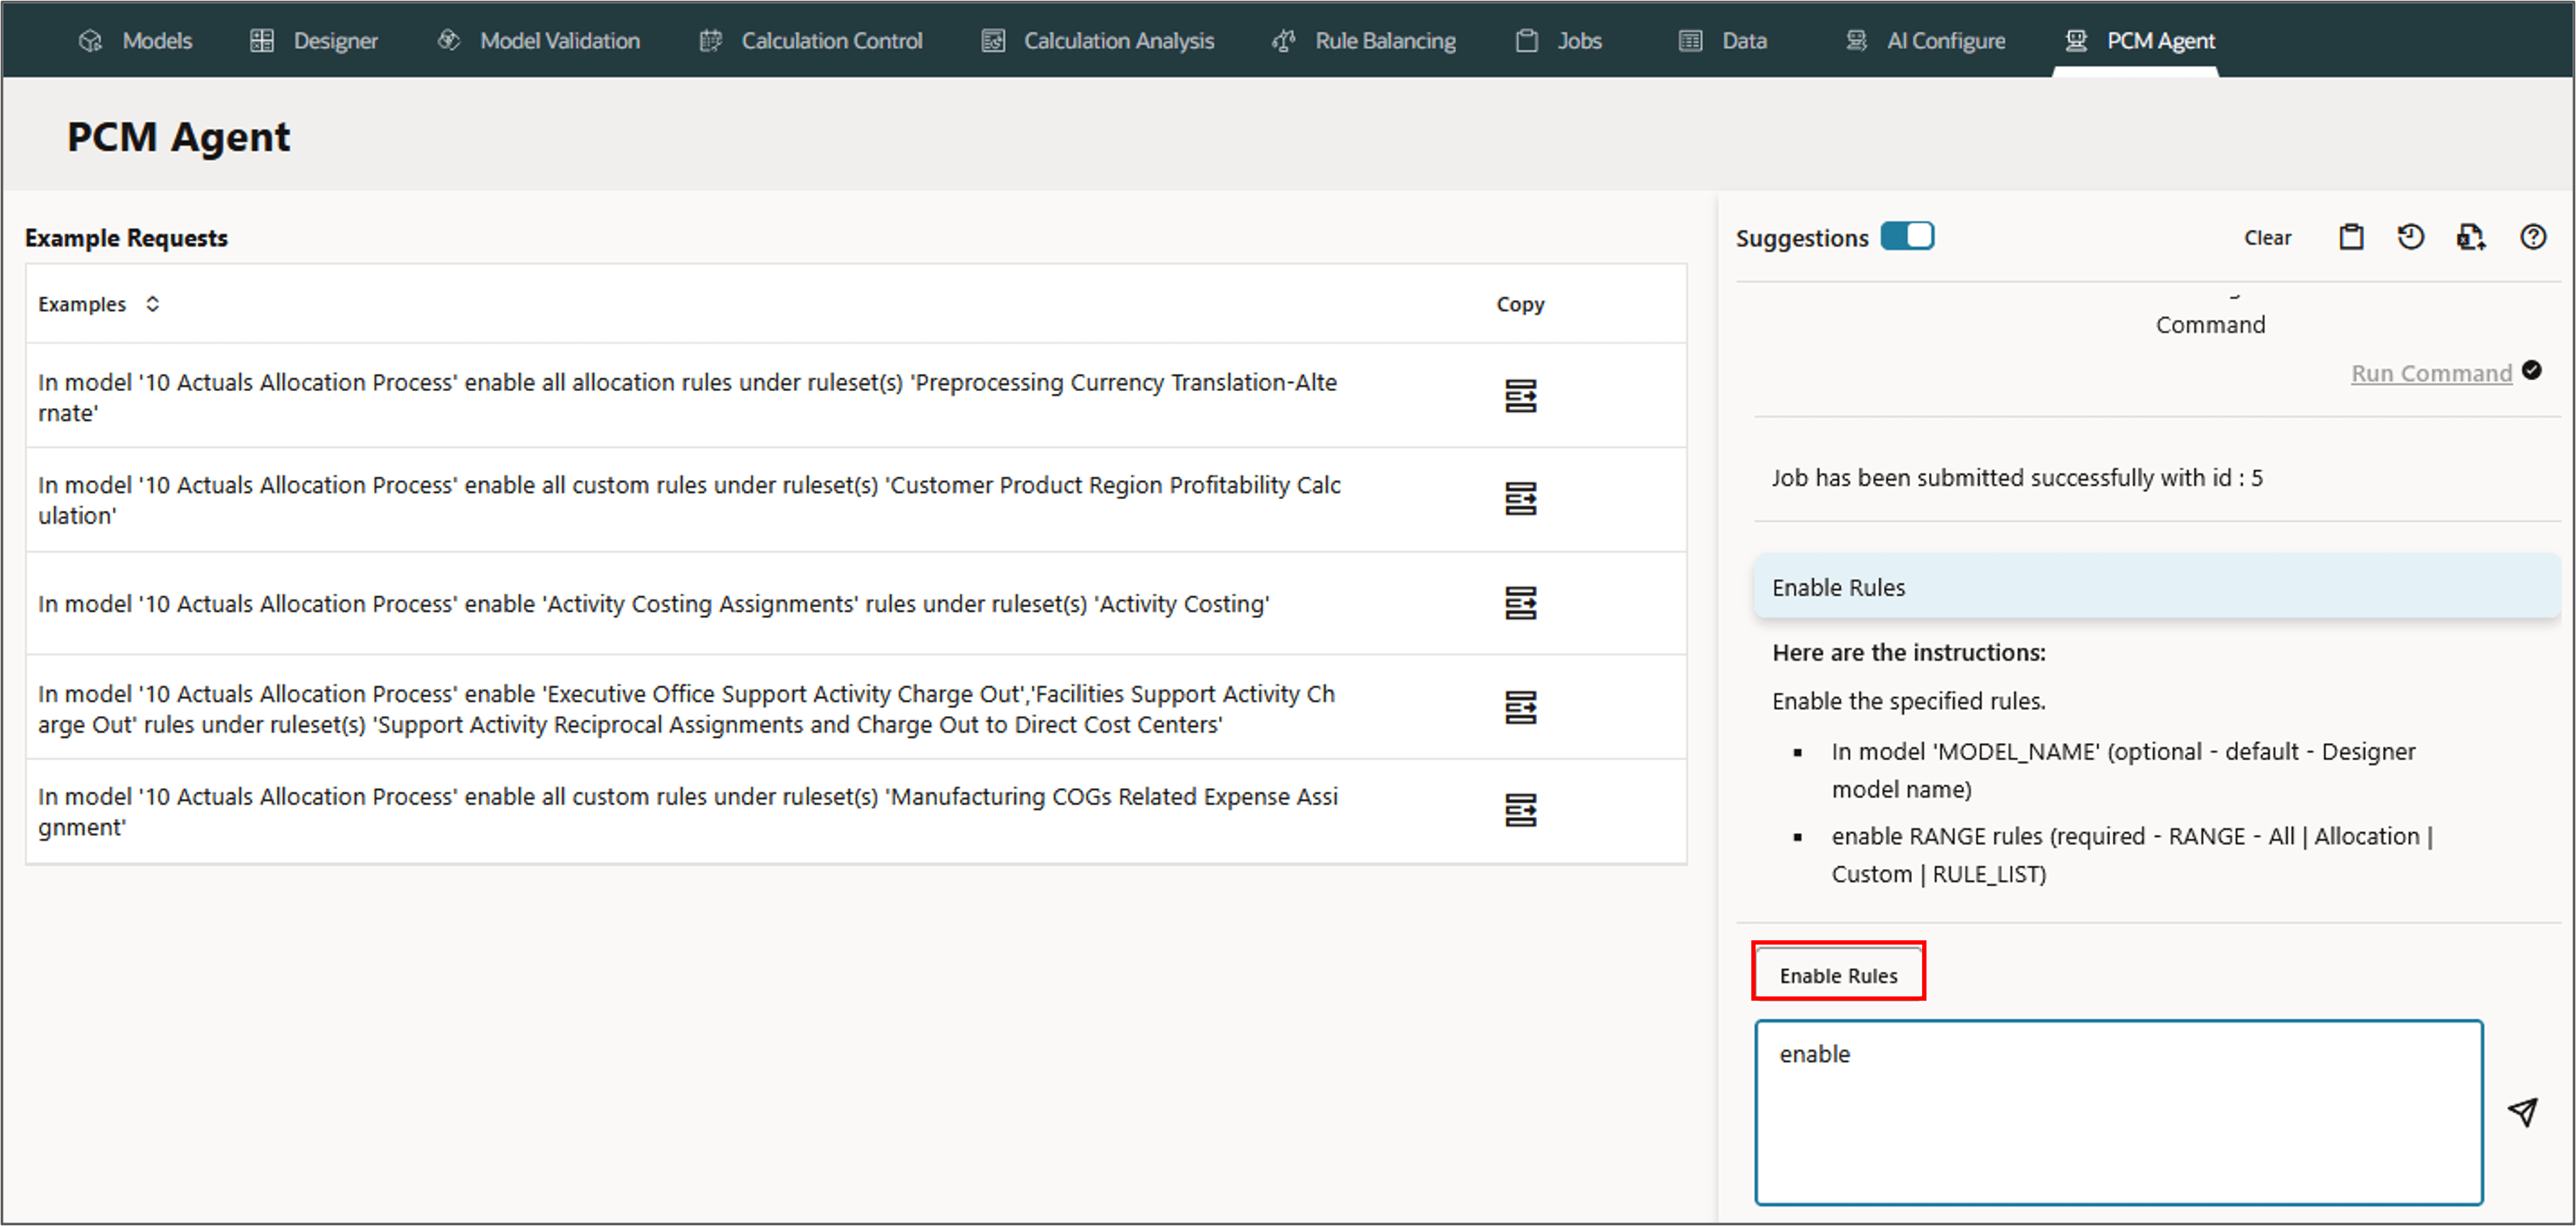
 In model '10 Actuals Allocation Process'
 enable all custom rules under ruleset 'Occupancy Expense Allocations'
Note:
Click View Rules in Mass Edit on the top to go to the Mass Edit page to view, and to perform manual mass edit functions for the selected rule Occupancy Expense Allocations.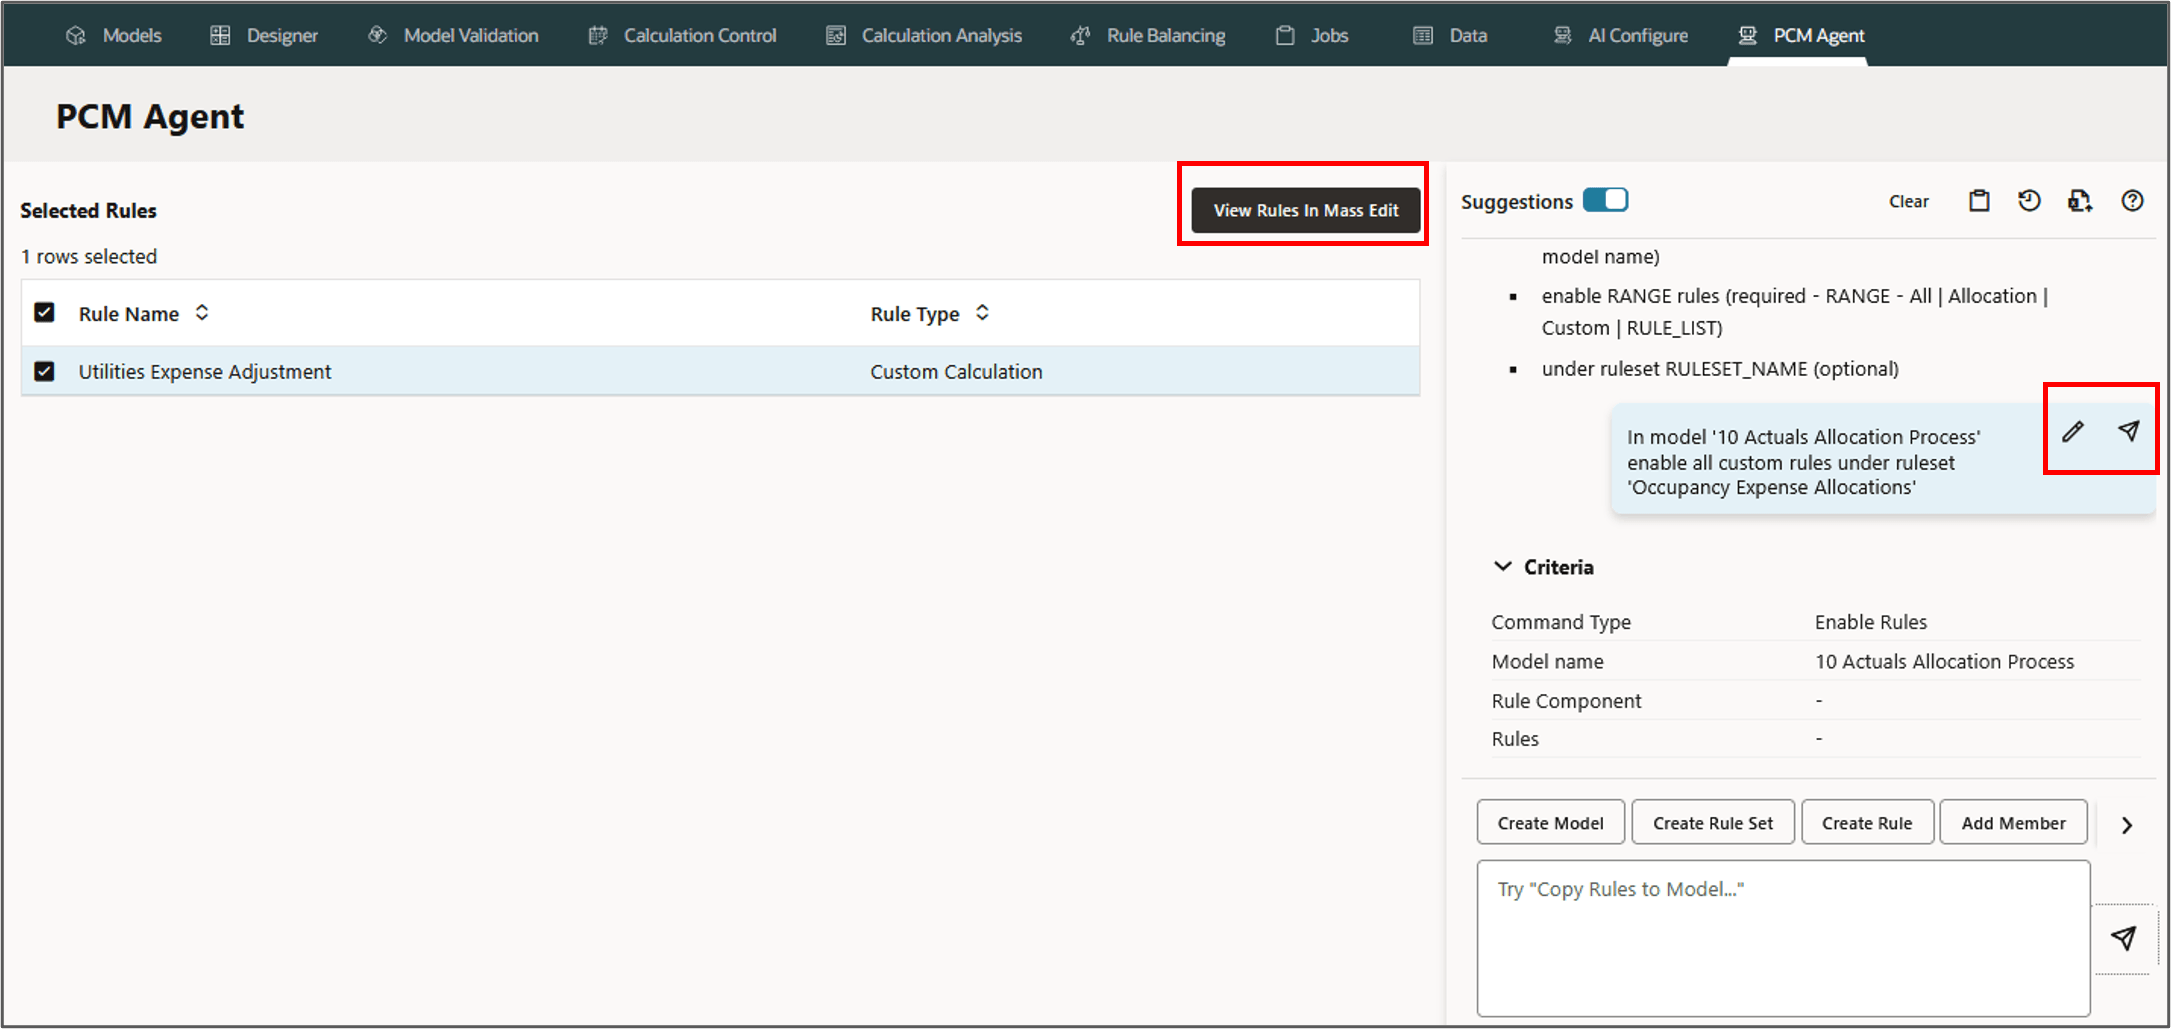
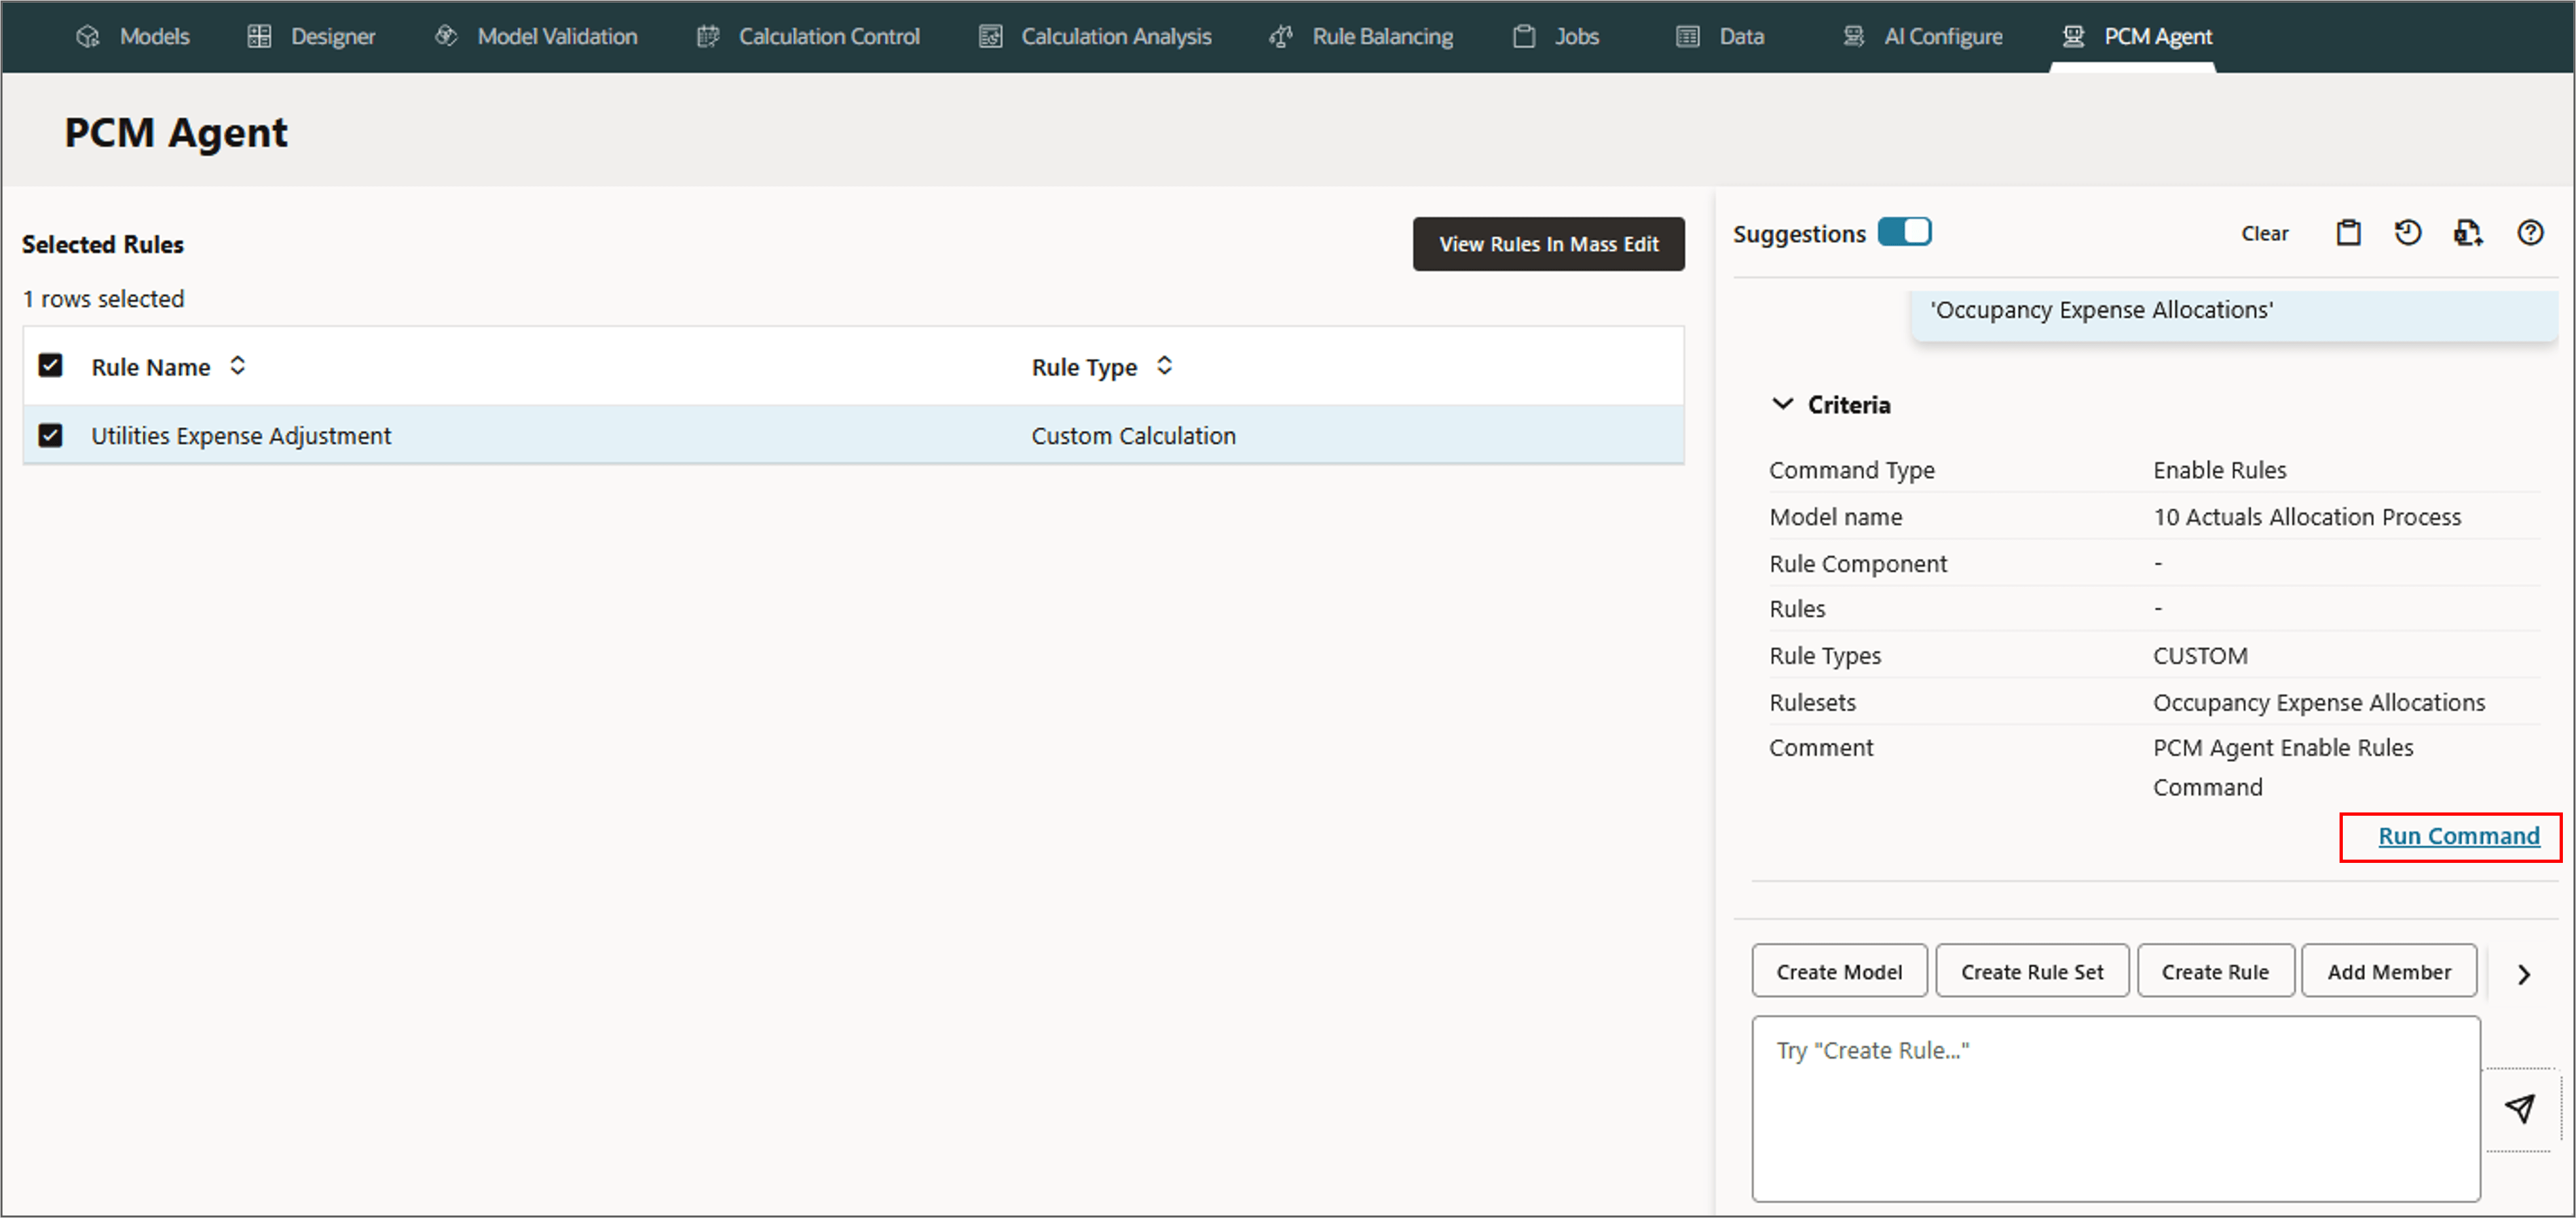
A job is created and the ID is displayed.
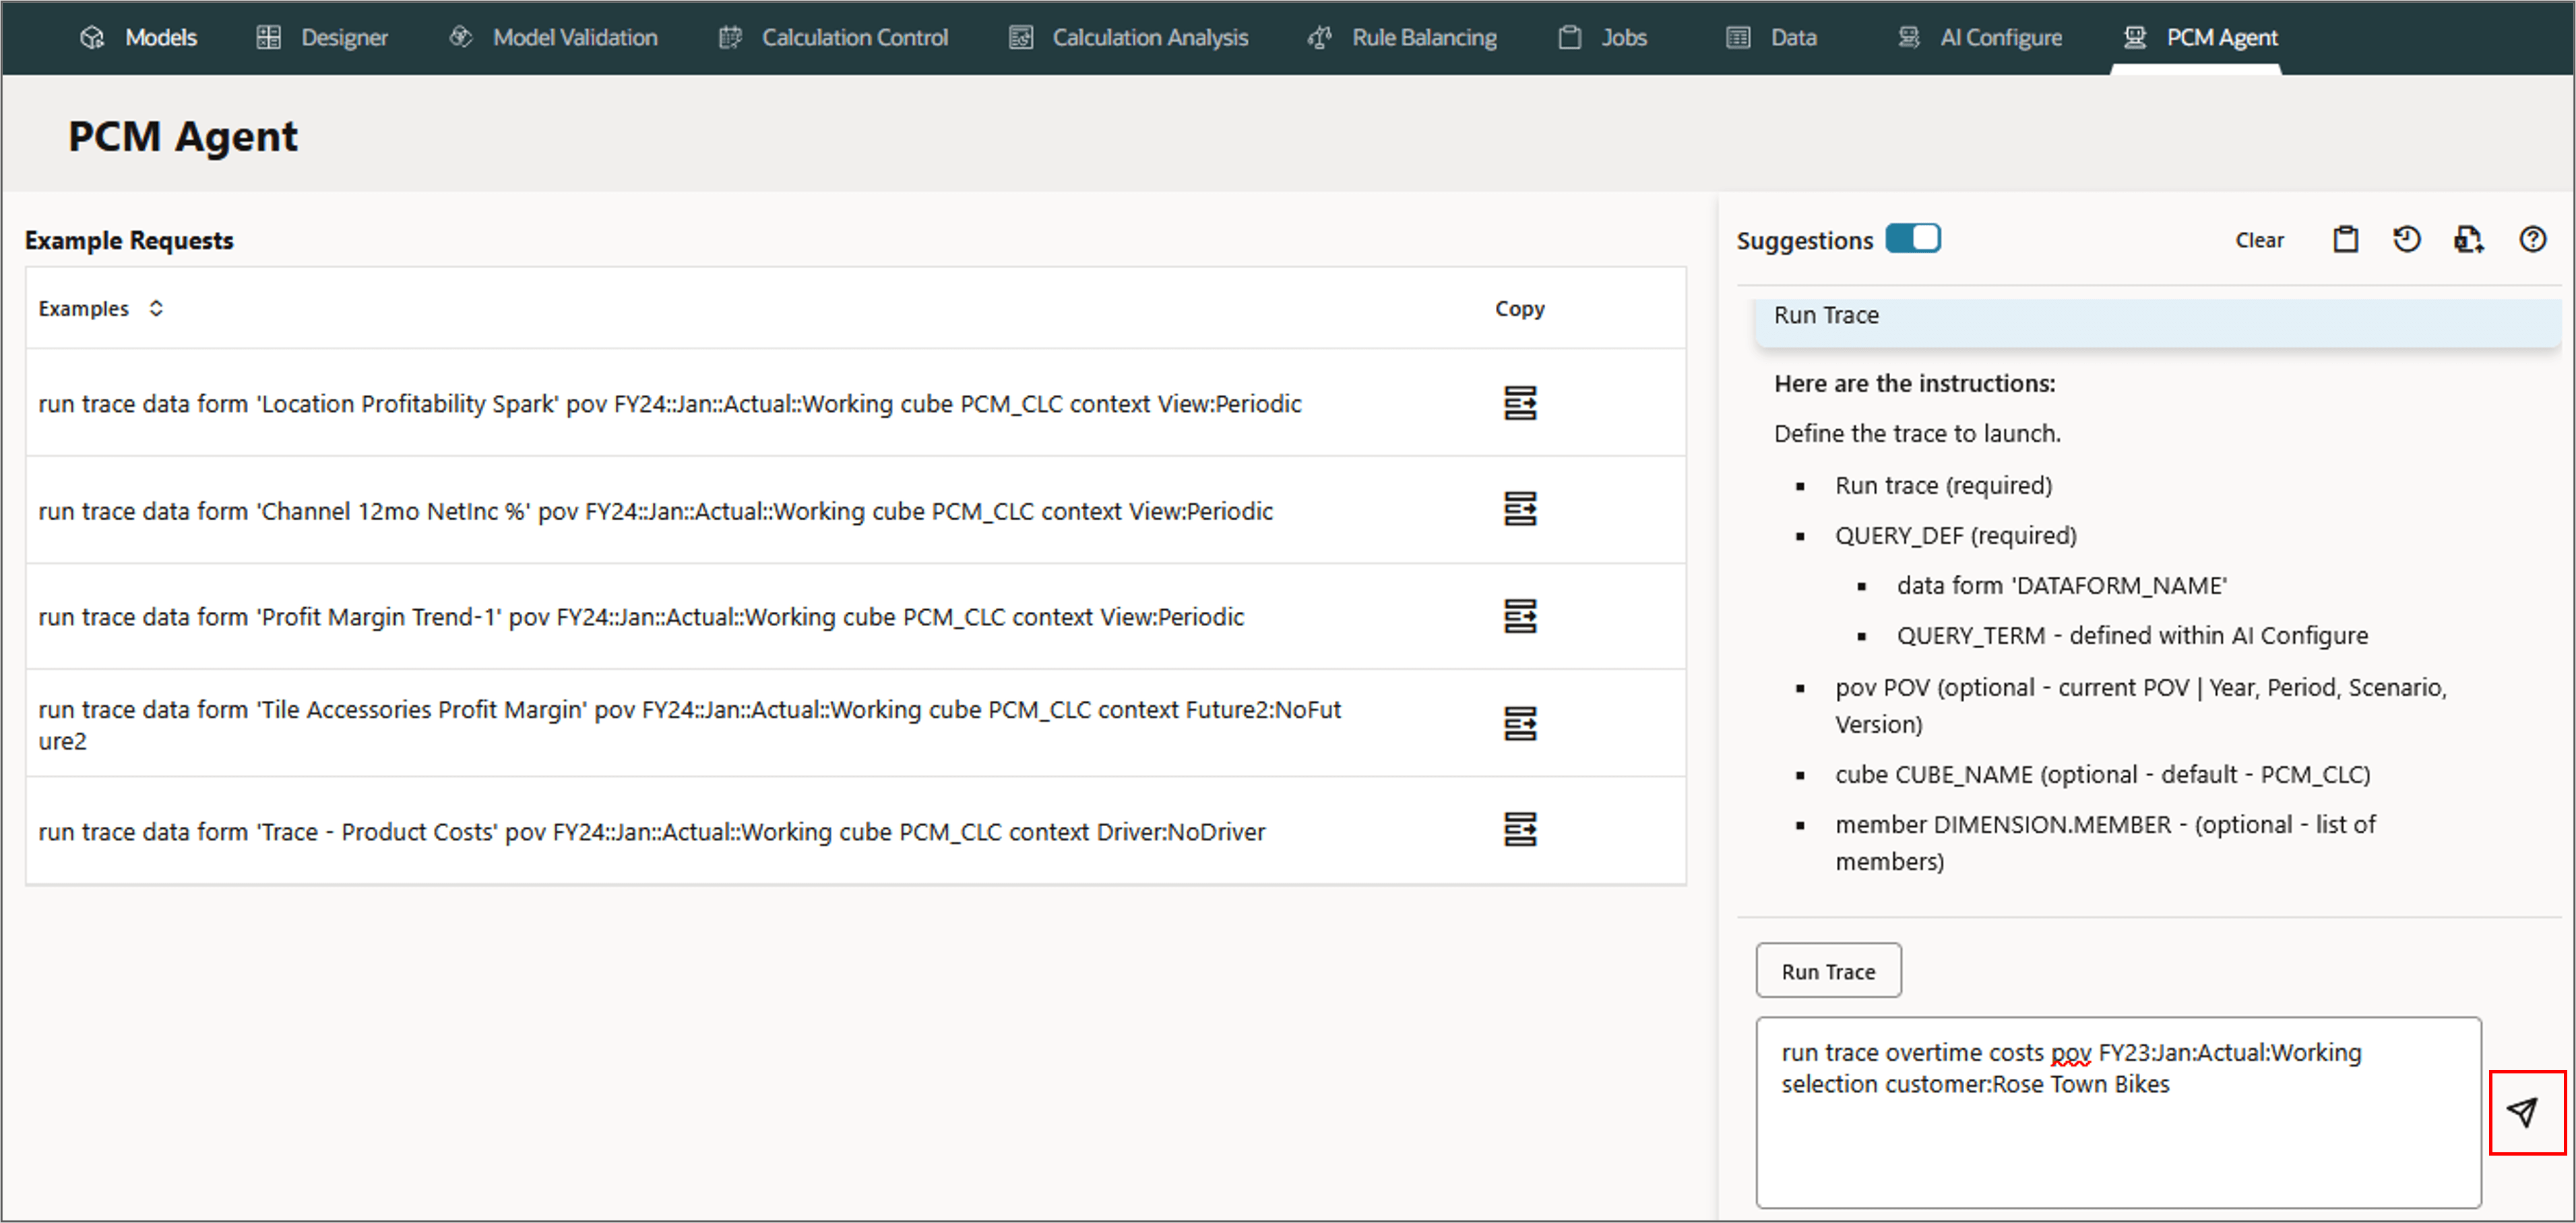
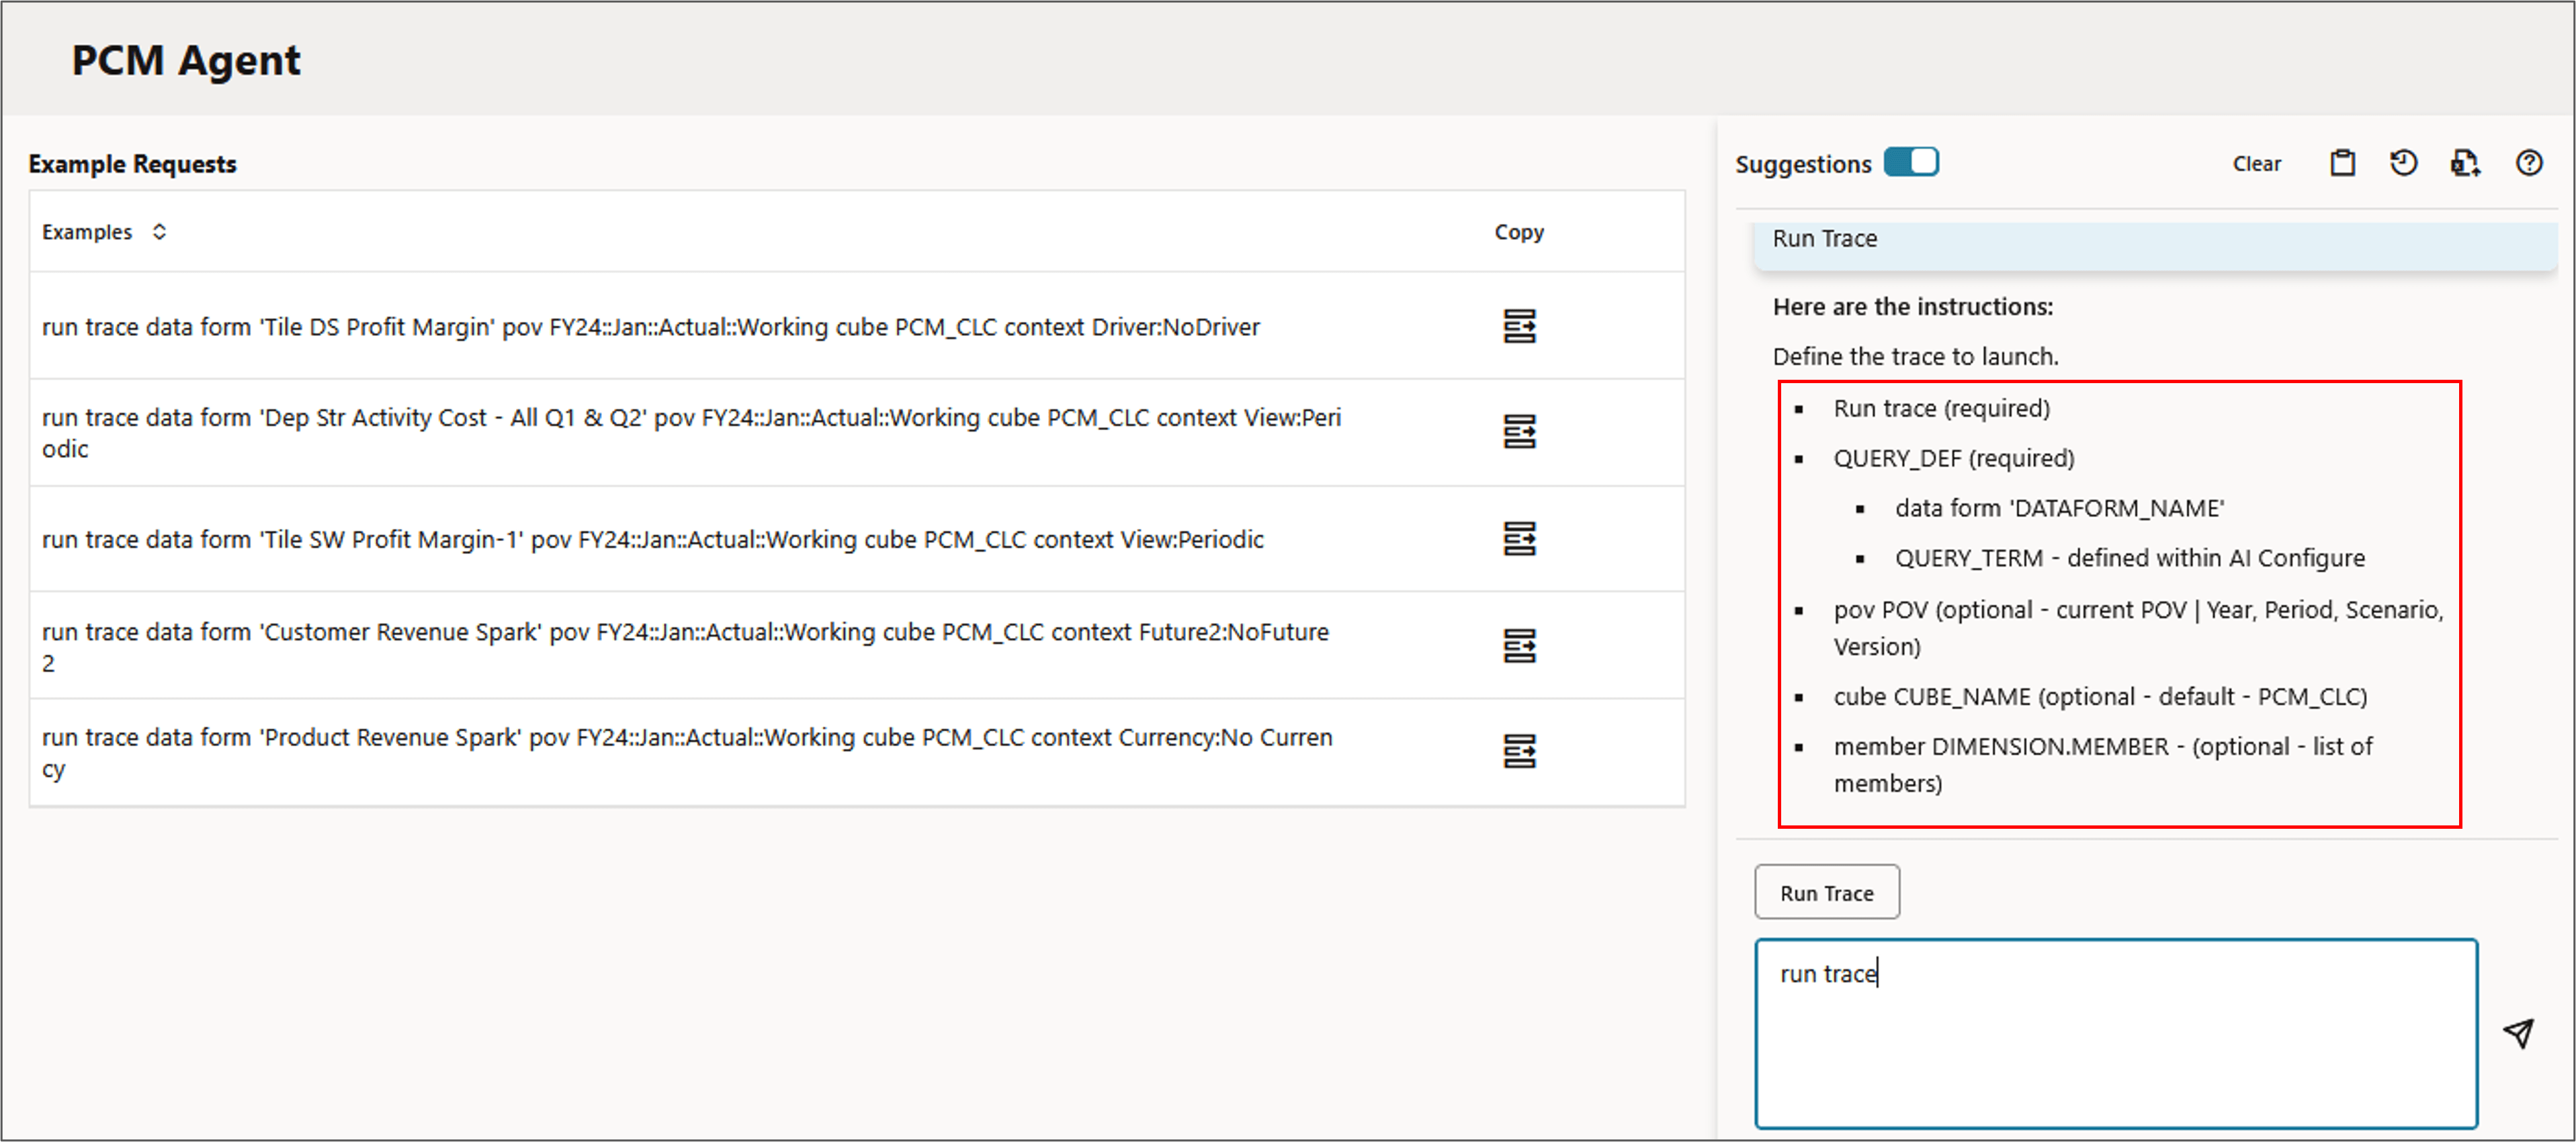
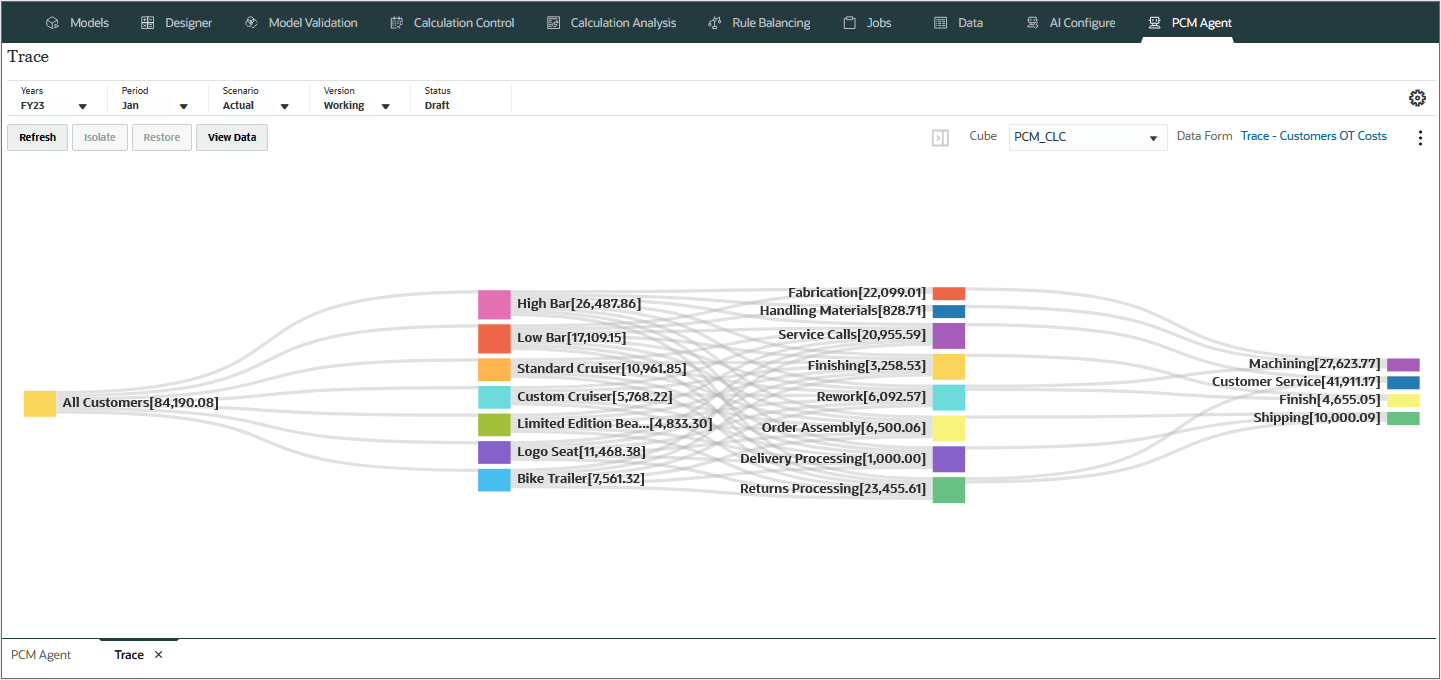
Running Trace
PCM Agent enables running analytic traces using natural language commands to execute the trace operation without manually navigating through the menus.
The Trace is a diagrammatic representation of data forms. It enables visualizing relationship of data in forms using sankey diagrams.
Parameters for Running Trace
- Run trace (required)
- QUERY_DEF (required)
- data form 'DATAFORM_NAME'
- QUERY_TERM - defined within AI Configure
- pov POV (optional - current POV | Year, Period, Scenario, Version)
- cube CUBE_NAME (optional - default - PCM_CLC)
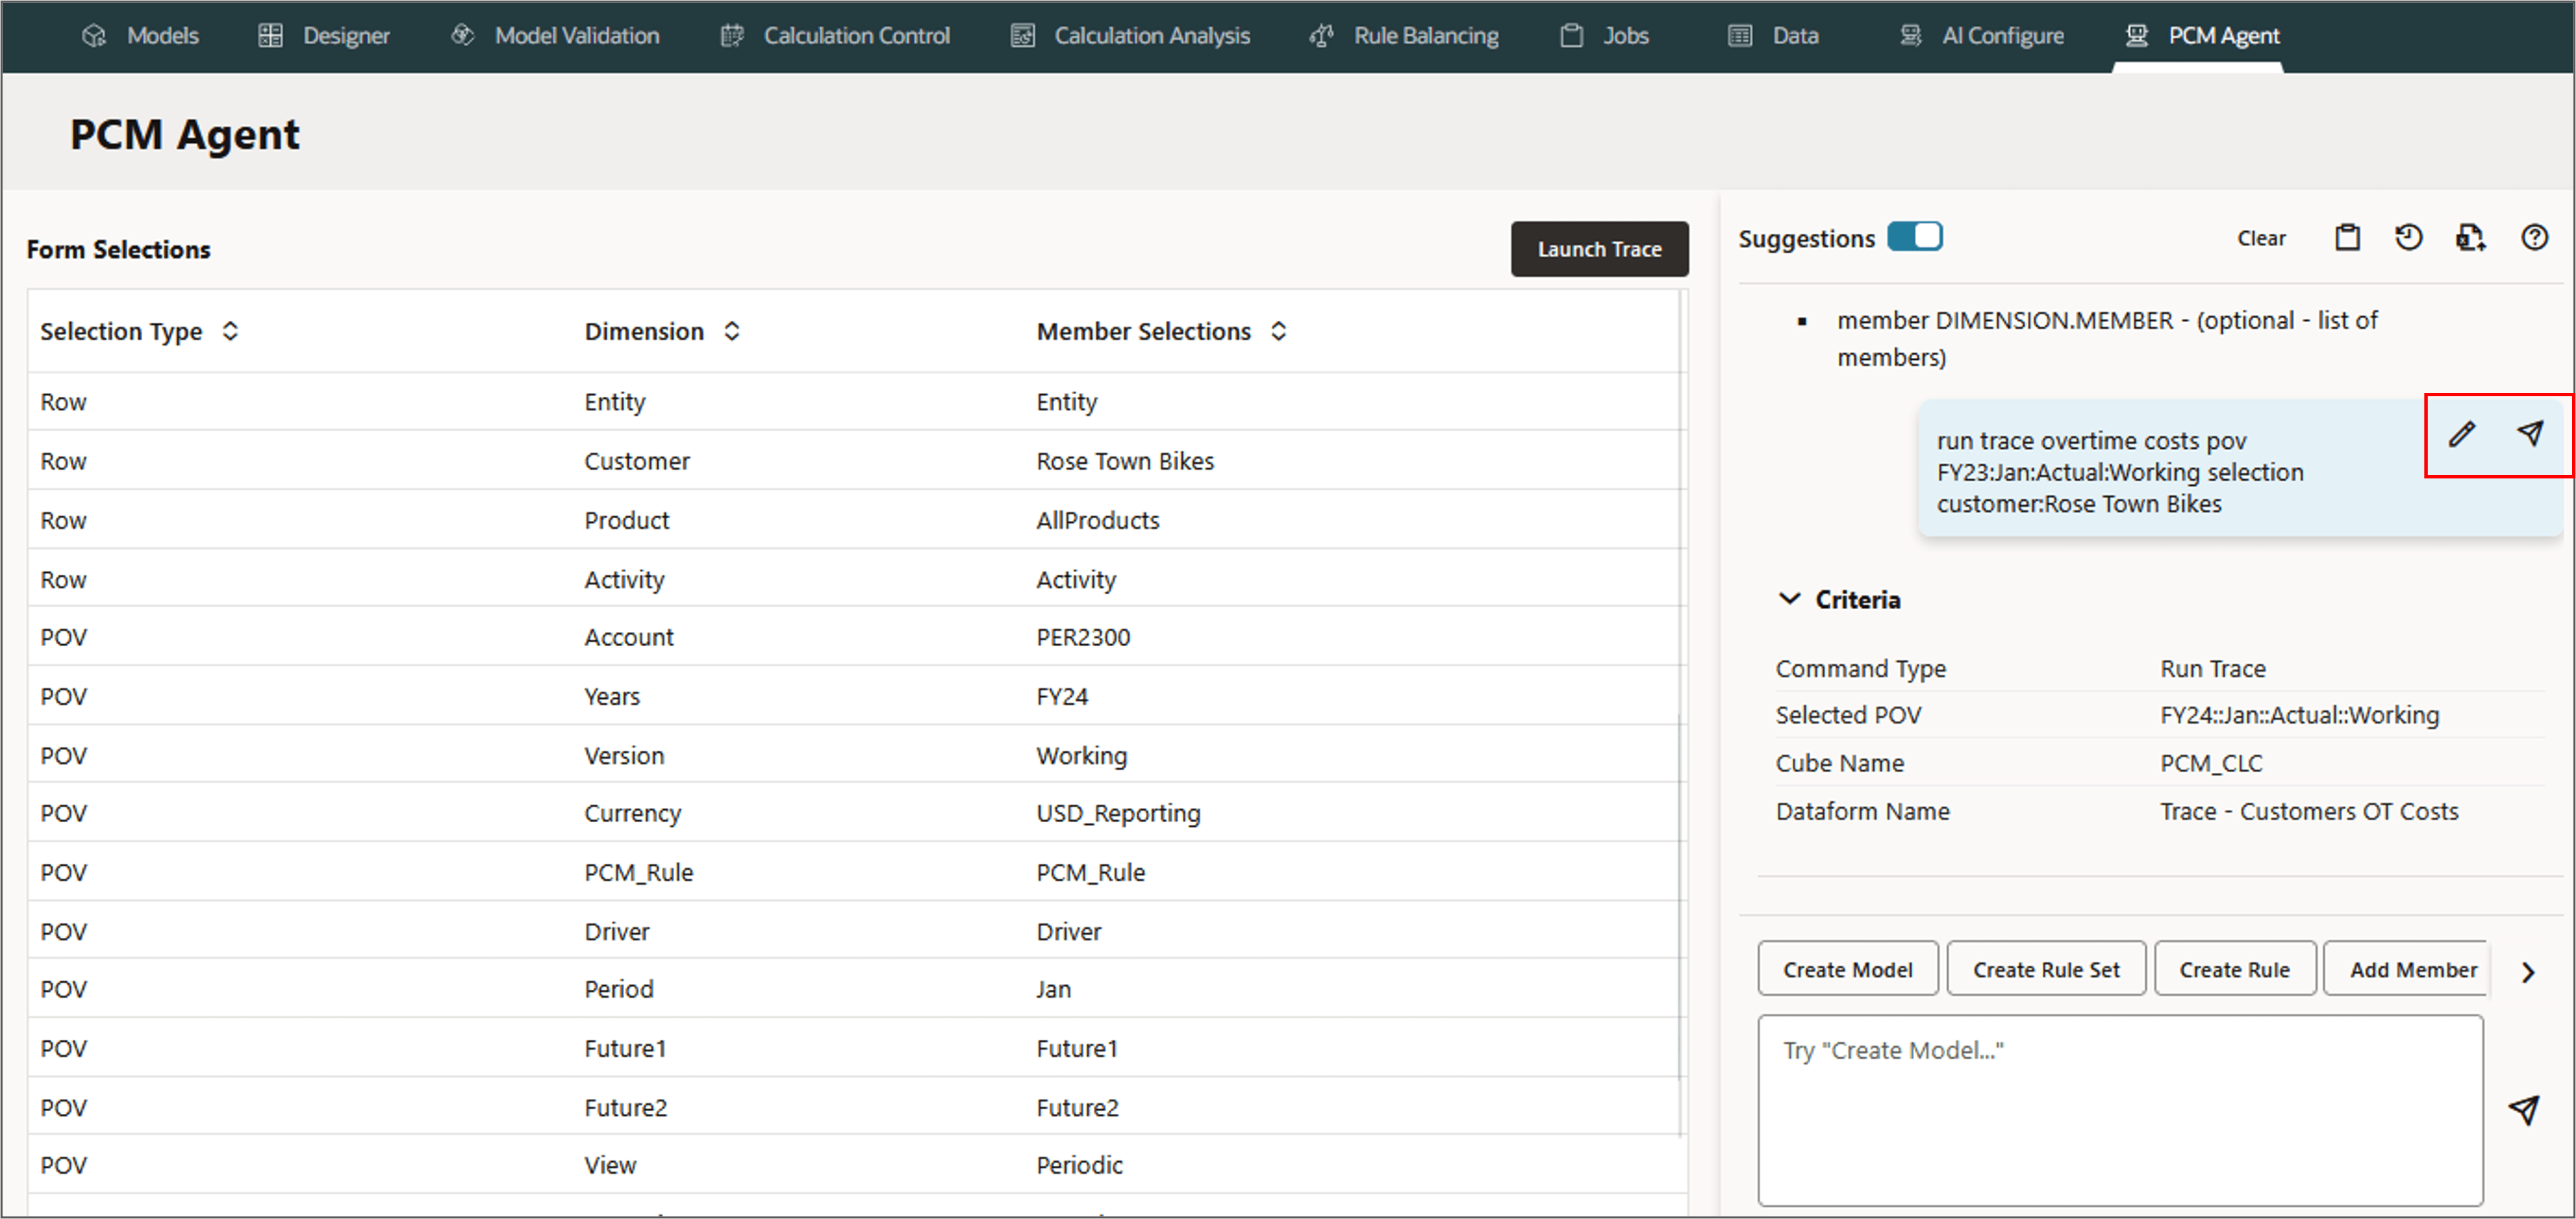
- member DIMENSION.MEMBER - (optional - list of members)
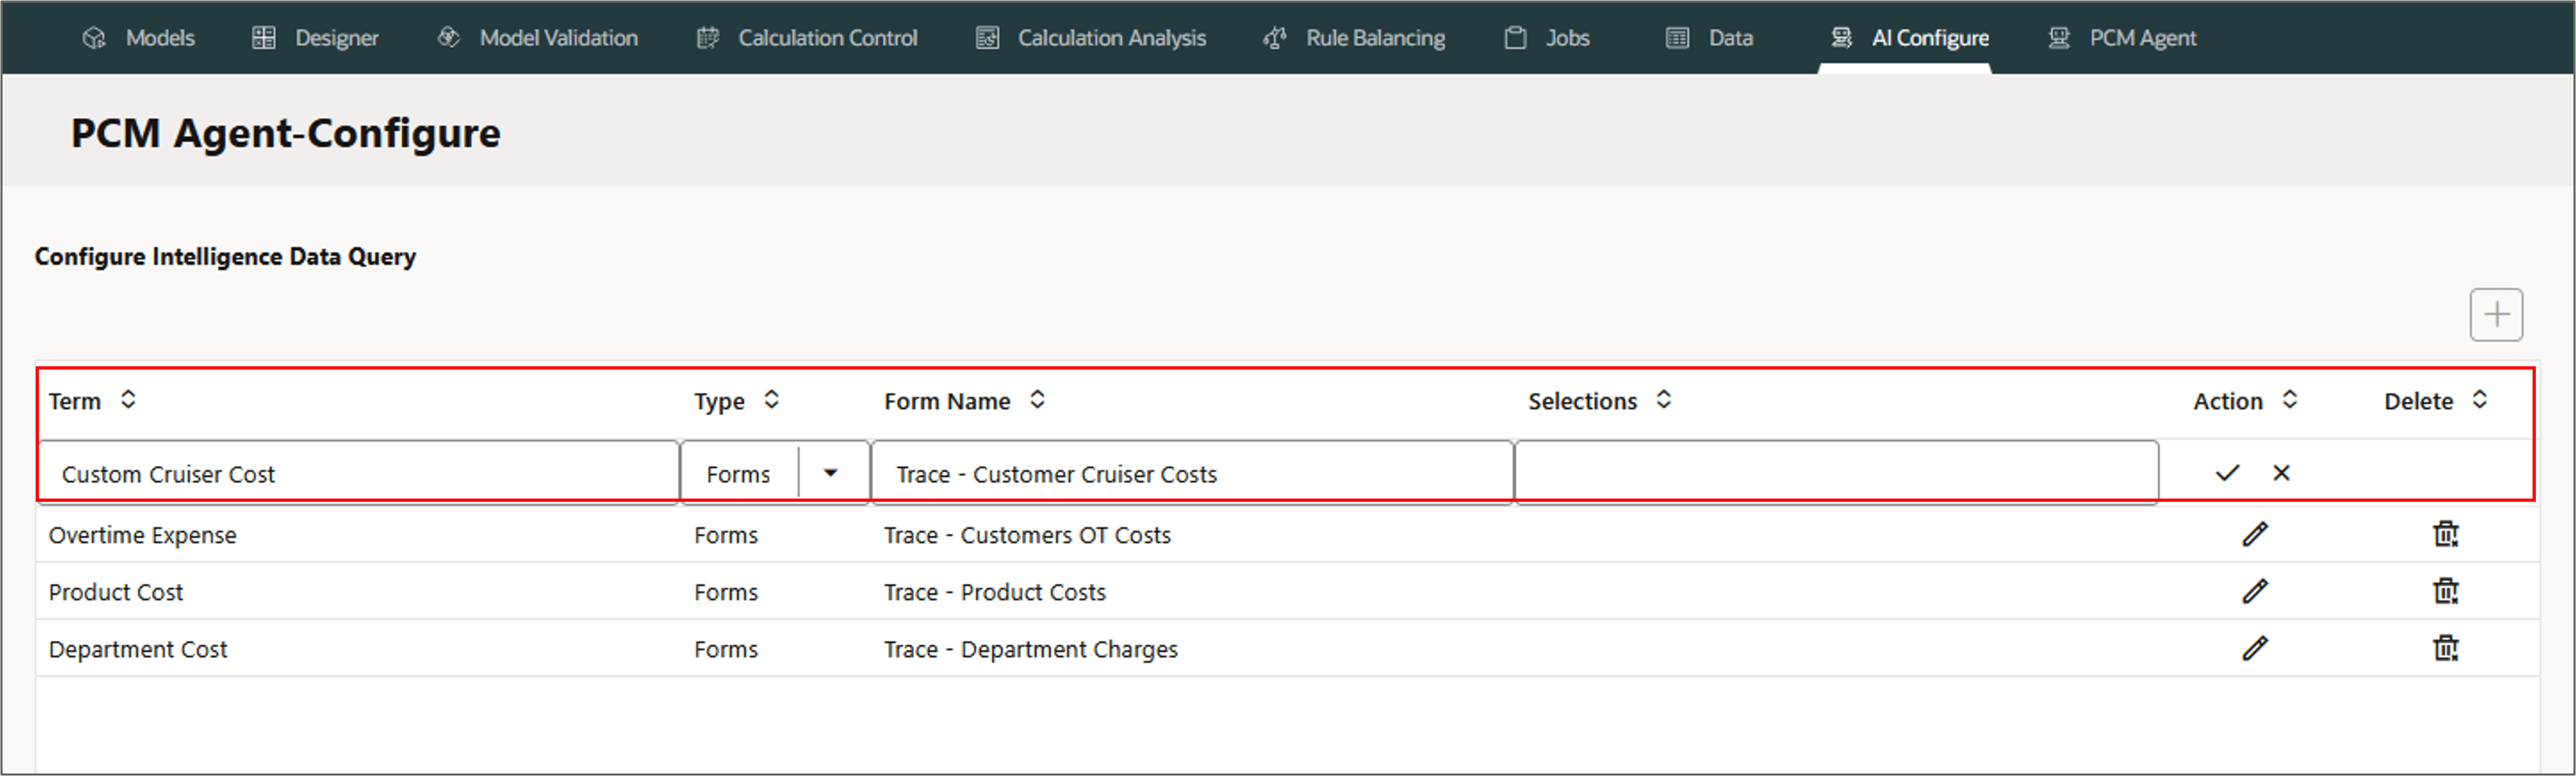
Using Query Terms
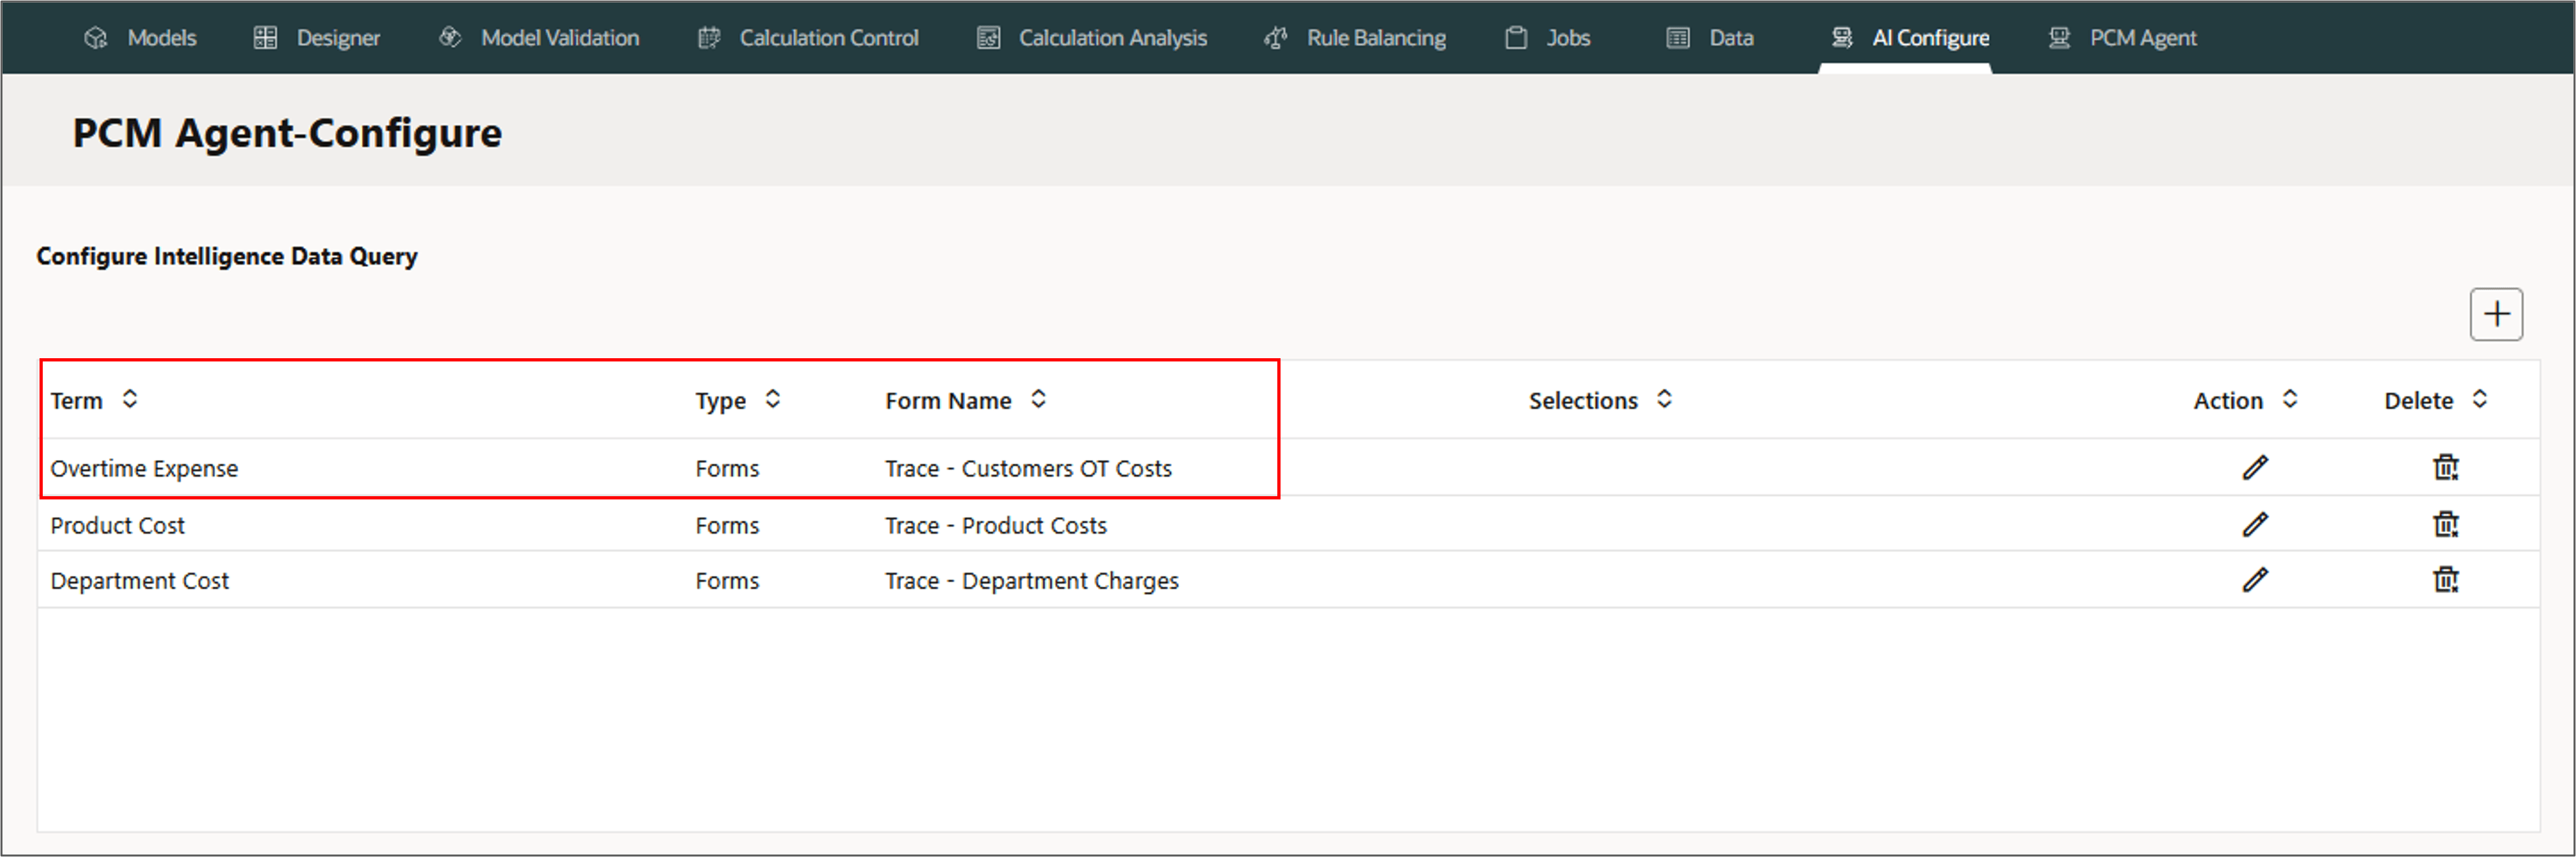
Query Term: Query Term is defined within the AI Configure and is associated with an existing trace data form. Setting up query terms for forms makes using PCM Agent easier for user requests.
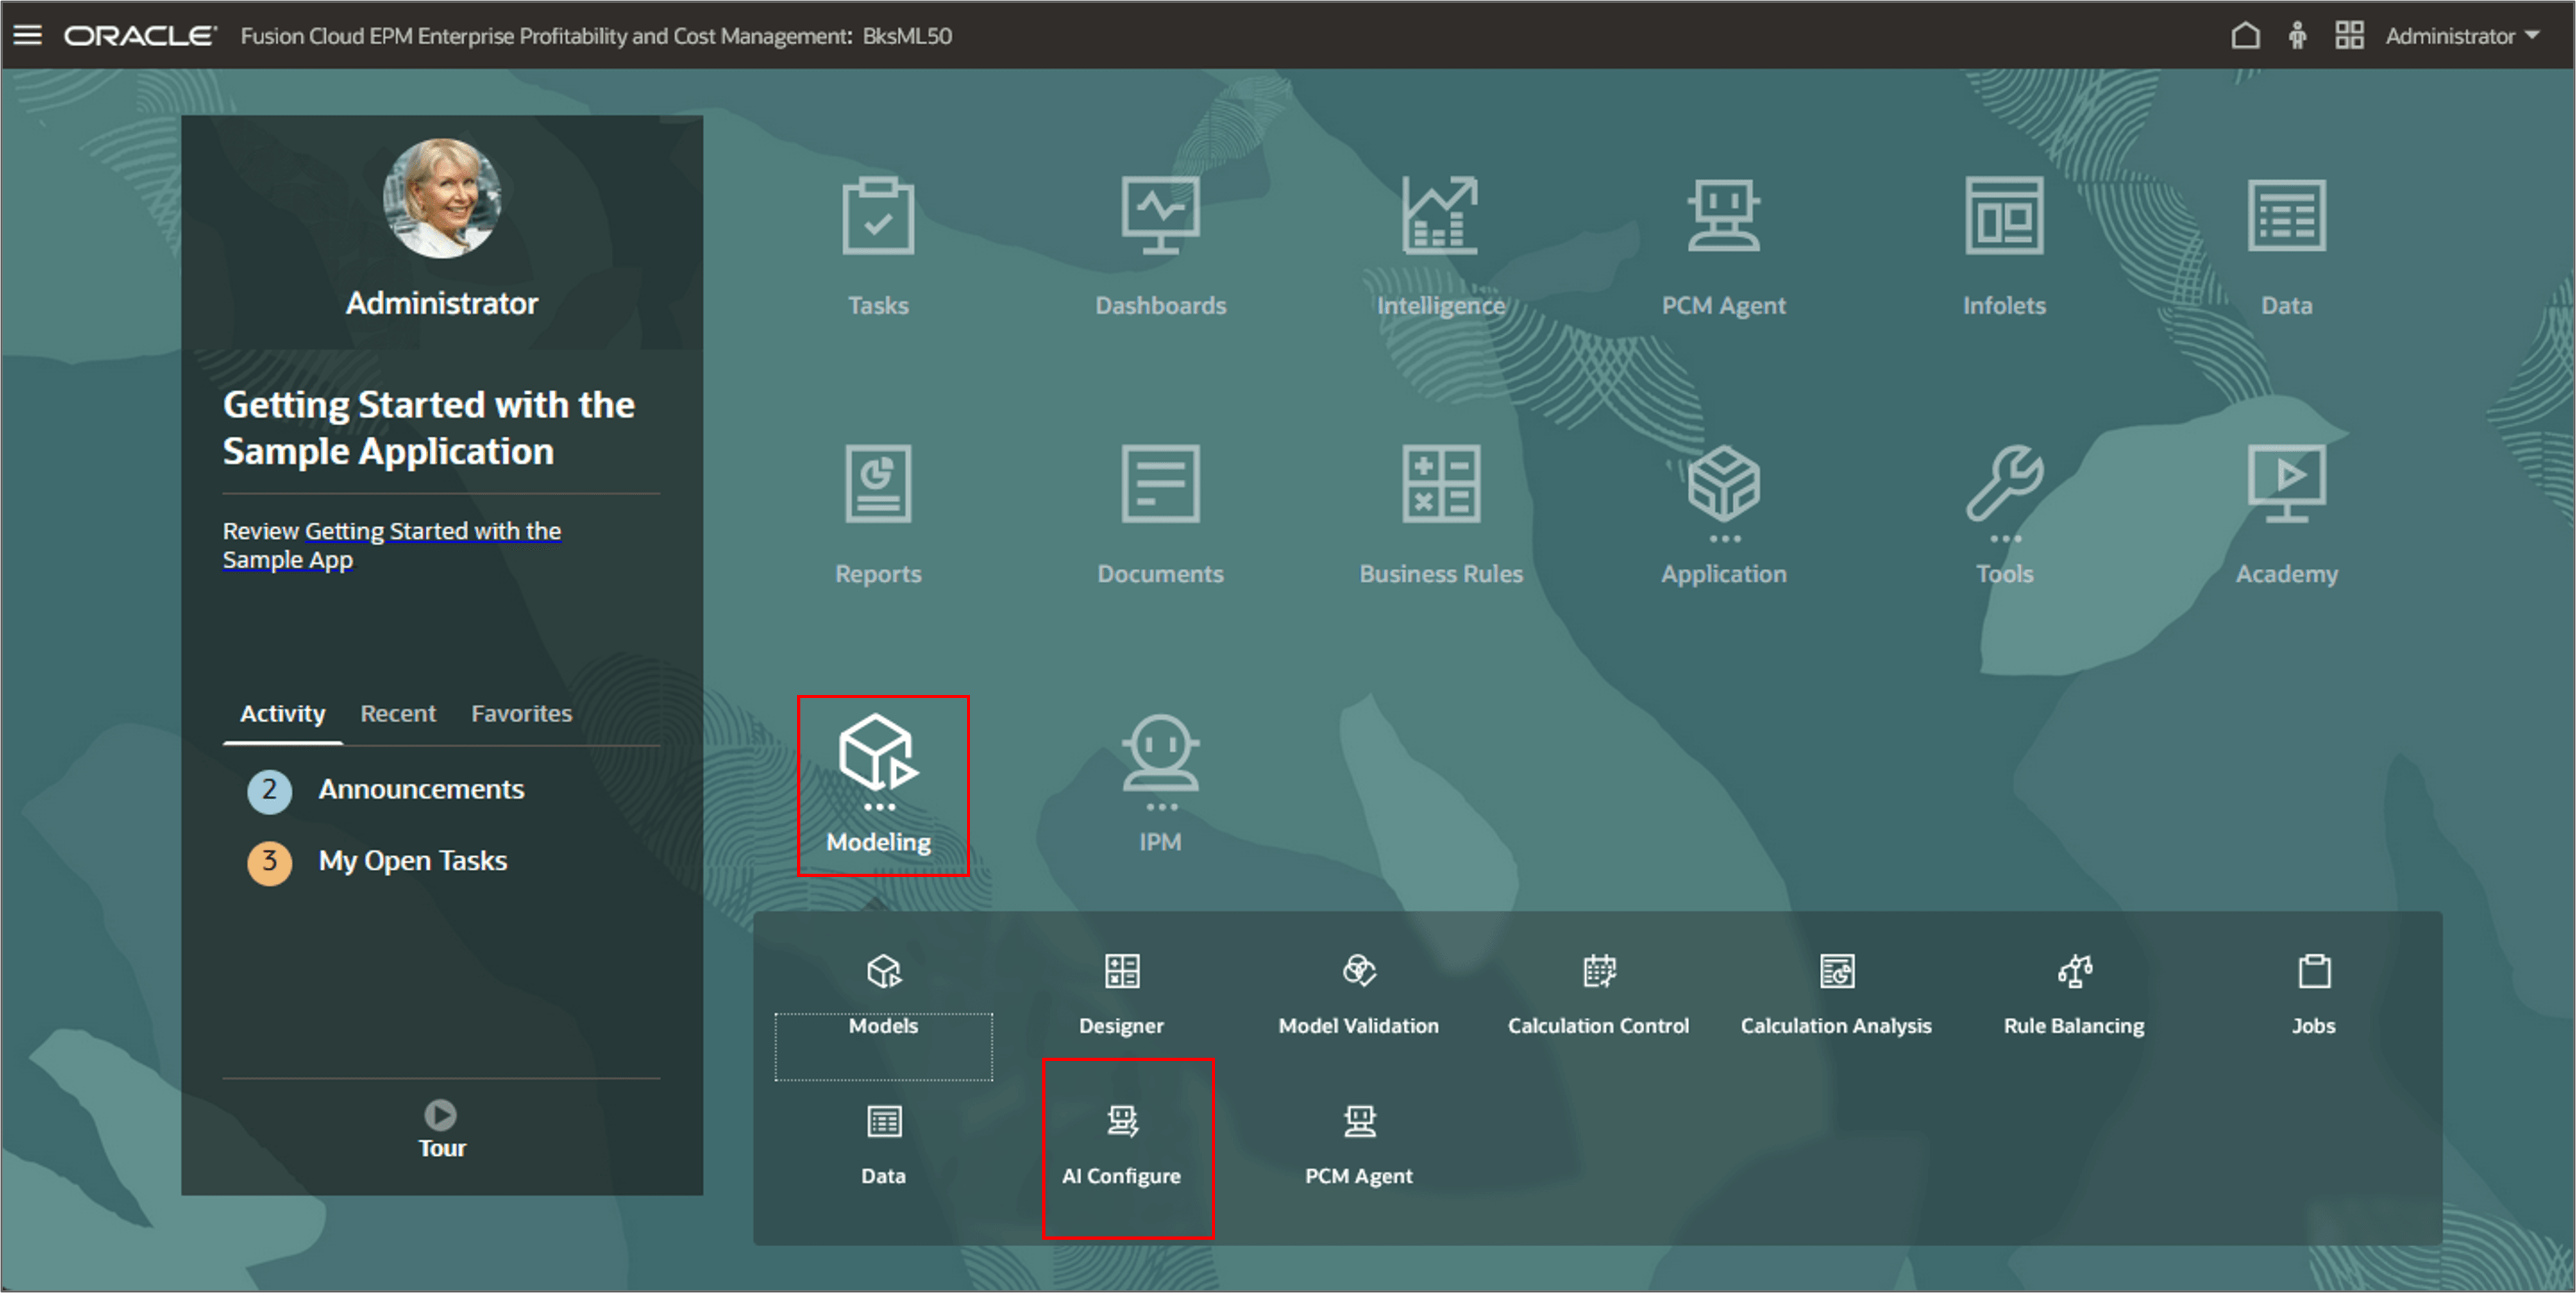
- To create or access a query term, go to Home, click Modeling and then AI Configure.
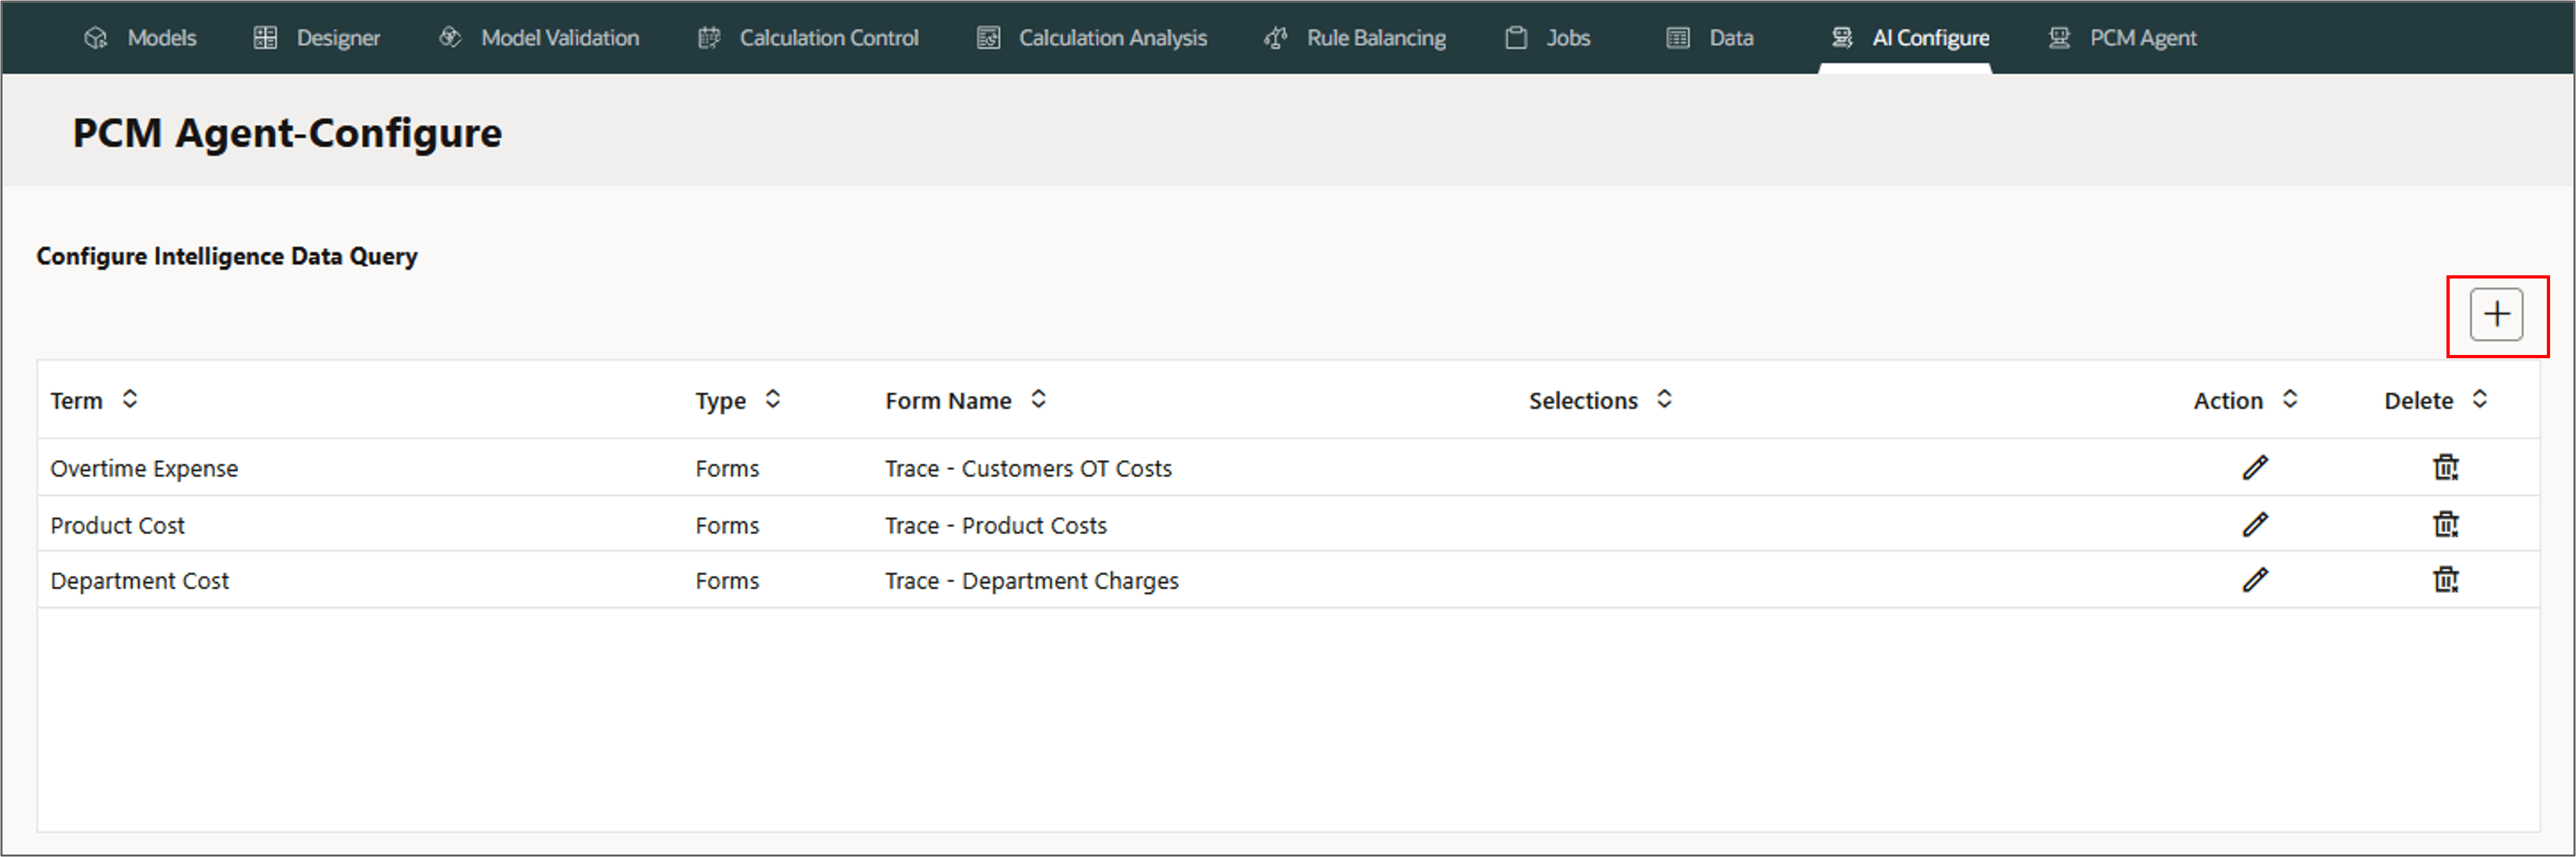
- Create a new query term by clicking the
 (Create).
 - Enter a desired term and associate it with a form. For example, create a query term Custom Cruiser Cost and associate with the form Trace - Customer Cruiser Costs, and then click
 (Save).
The list of existing query terms associated with the respective forms is displayed. For example, notice the query term Overtime Expense is associated with the form, Trace - Customers OT Costs.
Example: Running Trace Allocations
To run trace for the following example, in certain cases, you may have to calculate a model with a POV selecting the processing options in order to view a complete trace diagram.
Note:
Before running a trace diagram, the data for the POV must be calculated.- To calculate the 10 Actuals Allocation Processmodel using the POV FY23::Jan::Actual::Working or enter the following request in PCM Agent to run the calculation:
- On the PCM Agent page, select Run Trace.
- Enter the following information in the request:
- Term: Enter a term to use in the PCM Agent request that will be associated with an existing trace data form.
- Type: Select Forms.
- Form Name: Enter the name of an existing trace data form.
- Selections: Enter any overrides for the members selected in the form that defines the trace visualization. For example, in a trace that defines the path of expense for a product, overriding the product member with a different product allows a single trace definition to be used for hundreds of products.
- Review or refine the request if needed, and then click Launch Trace.
Calculate model '10 Actuals Allocation Process'
	povs FY23::Jan::Actual::Working run from
	rule 'Activity Costing Assignments'
	clear Calculated data False execute calculations False
	Capture Diagnostic Data True Capture Essbase Debug Scripts True
	optimize for reporting False
	comment 'PCM Agent Calculate Model Command'
This is the same example as run in the Calculate Model section of this tutorial. Skip this step if you have already calculated the model POV.
Type the below request in the PCM agent and click ![]() (Send).
(Send).
run trace overtime costs pov FY23:Jan:Actual:Working
Note:
In this example, the term Overtime Costs is a defined query term used for the Trace - Customer OT Costs data form. When running a trace allocation, use either a data form name, or a query term that acts as a tag name for a form. You must have a data form that contains the dimension values that you want to trace. Associating a term with a trace data form makes it easy even when the precise form name is not known when creating a trace request.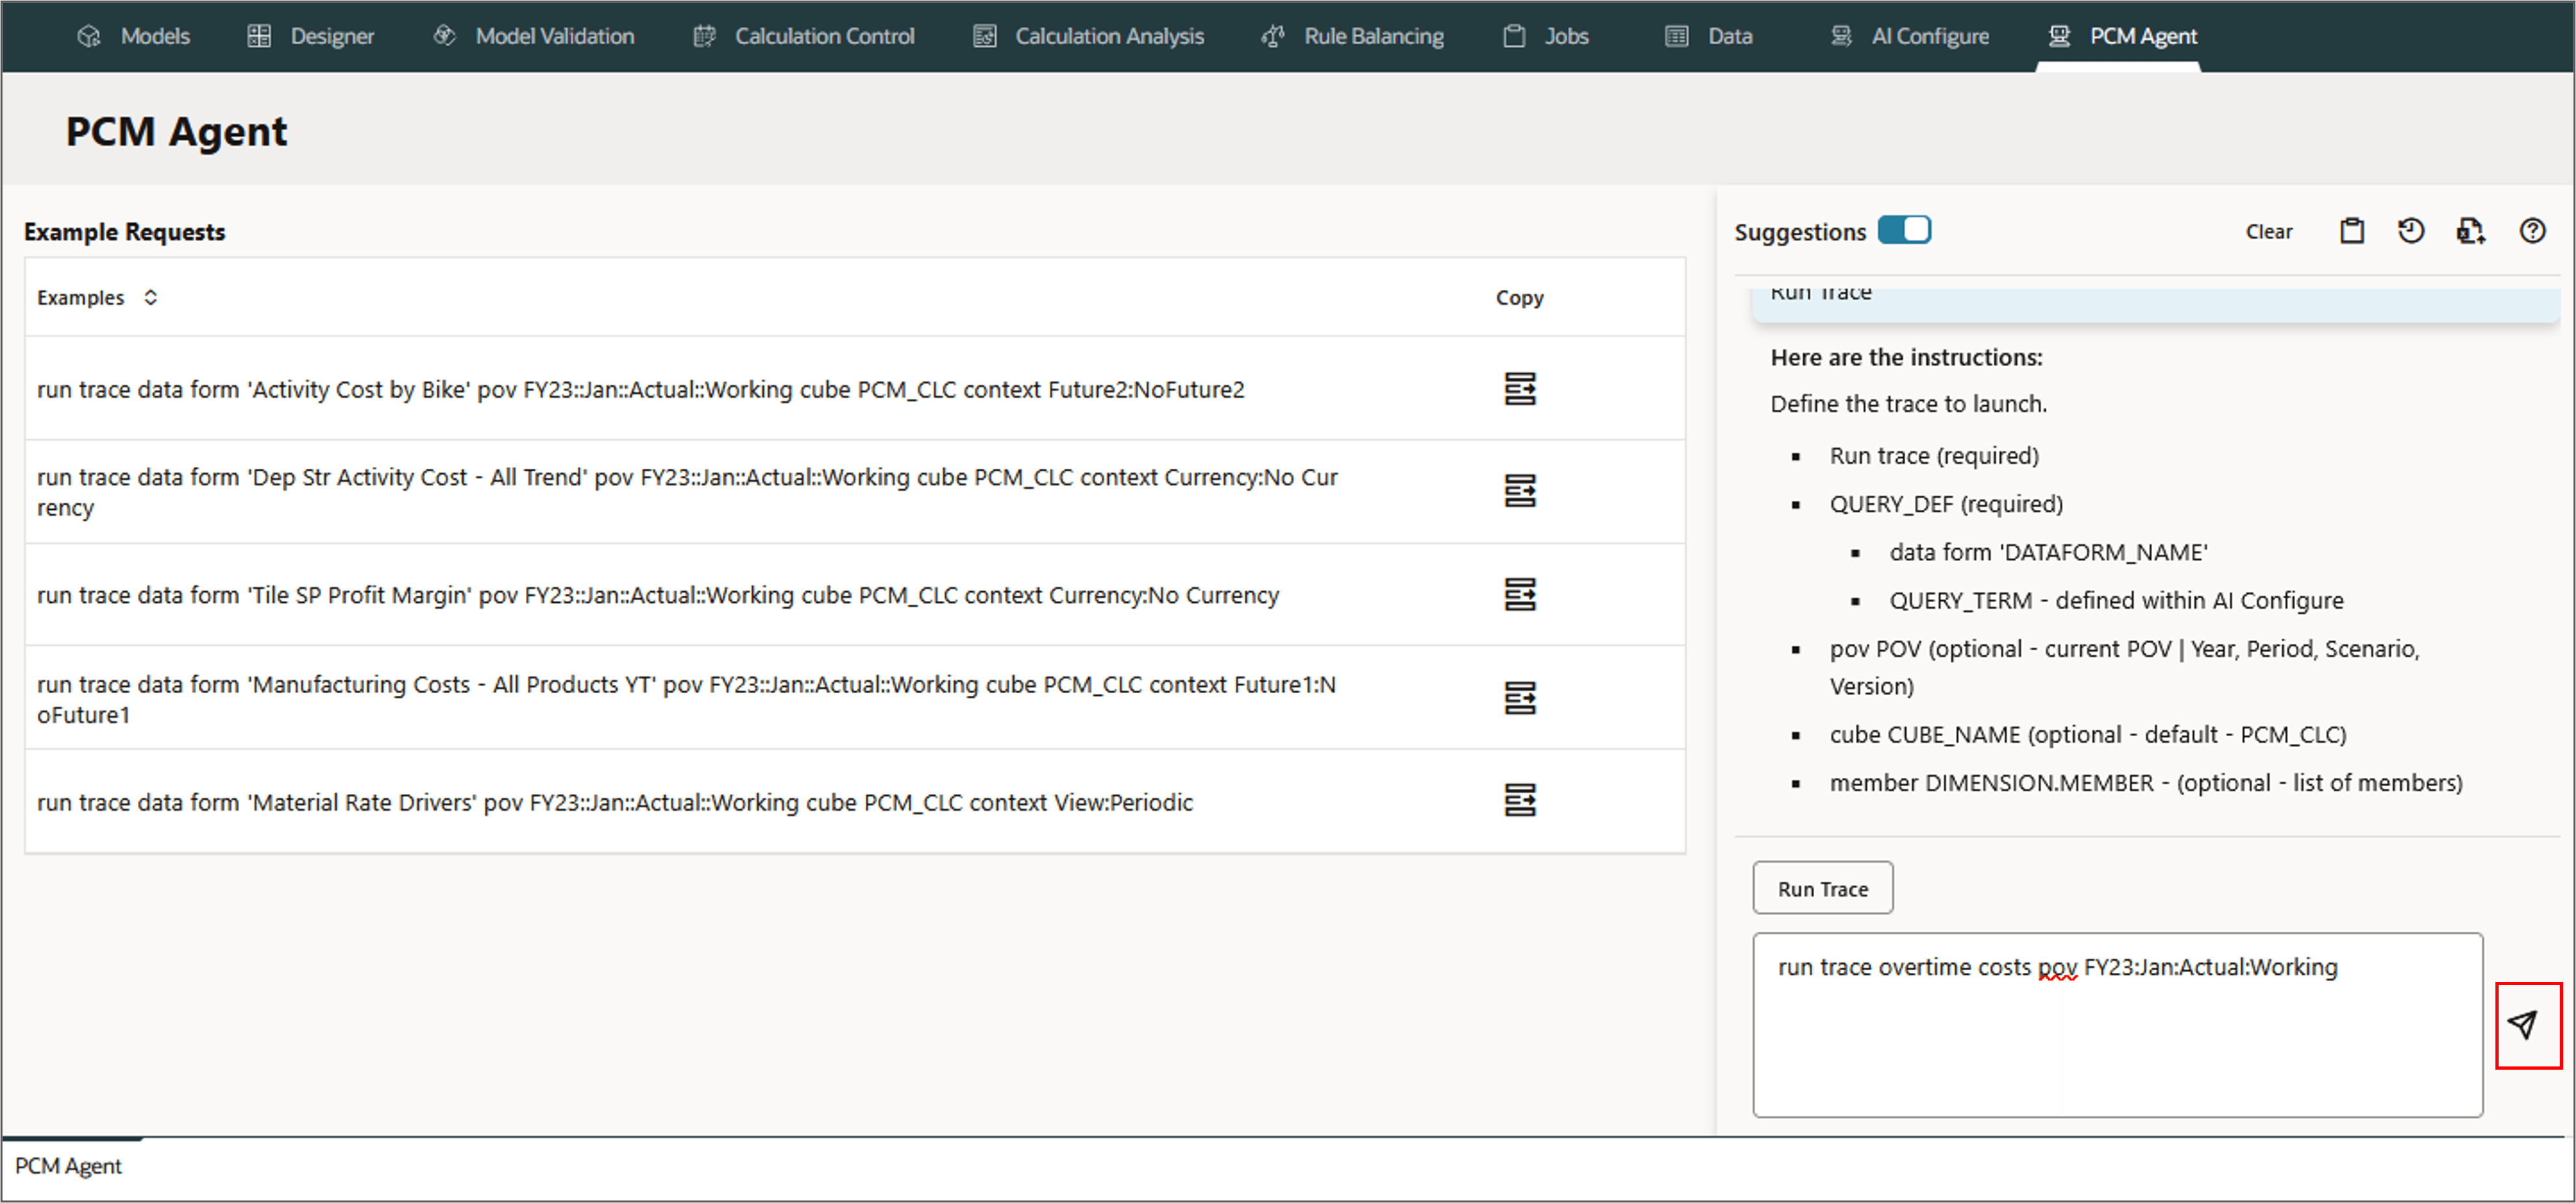
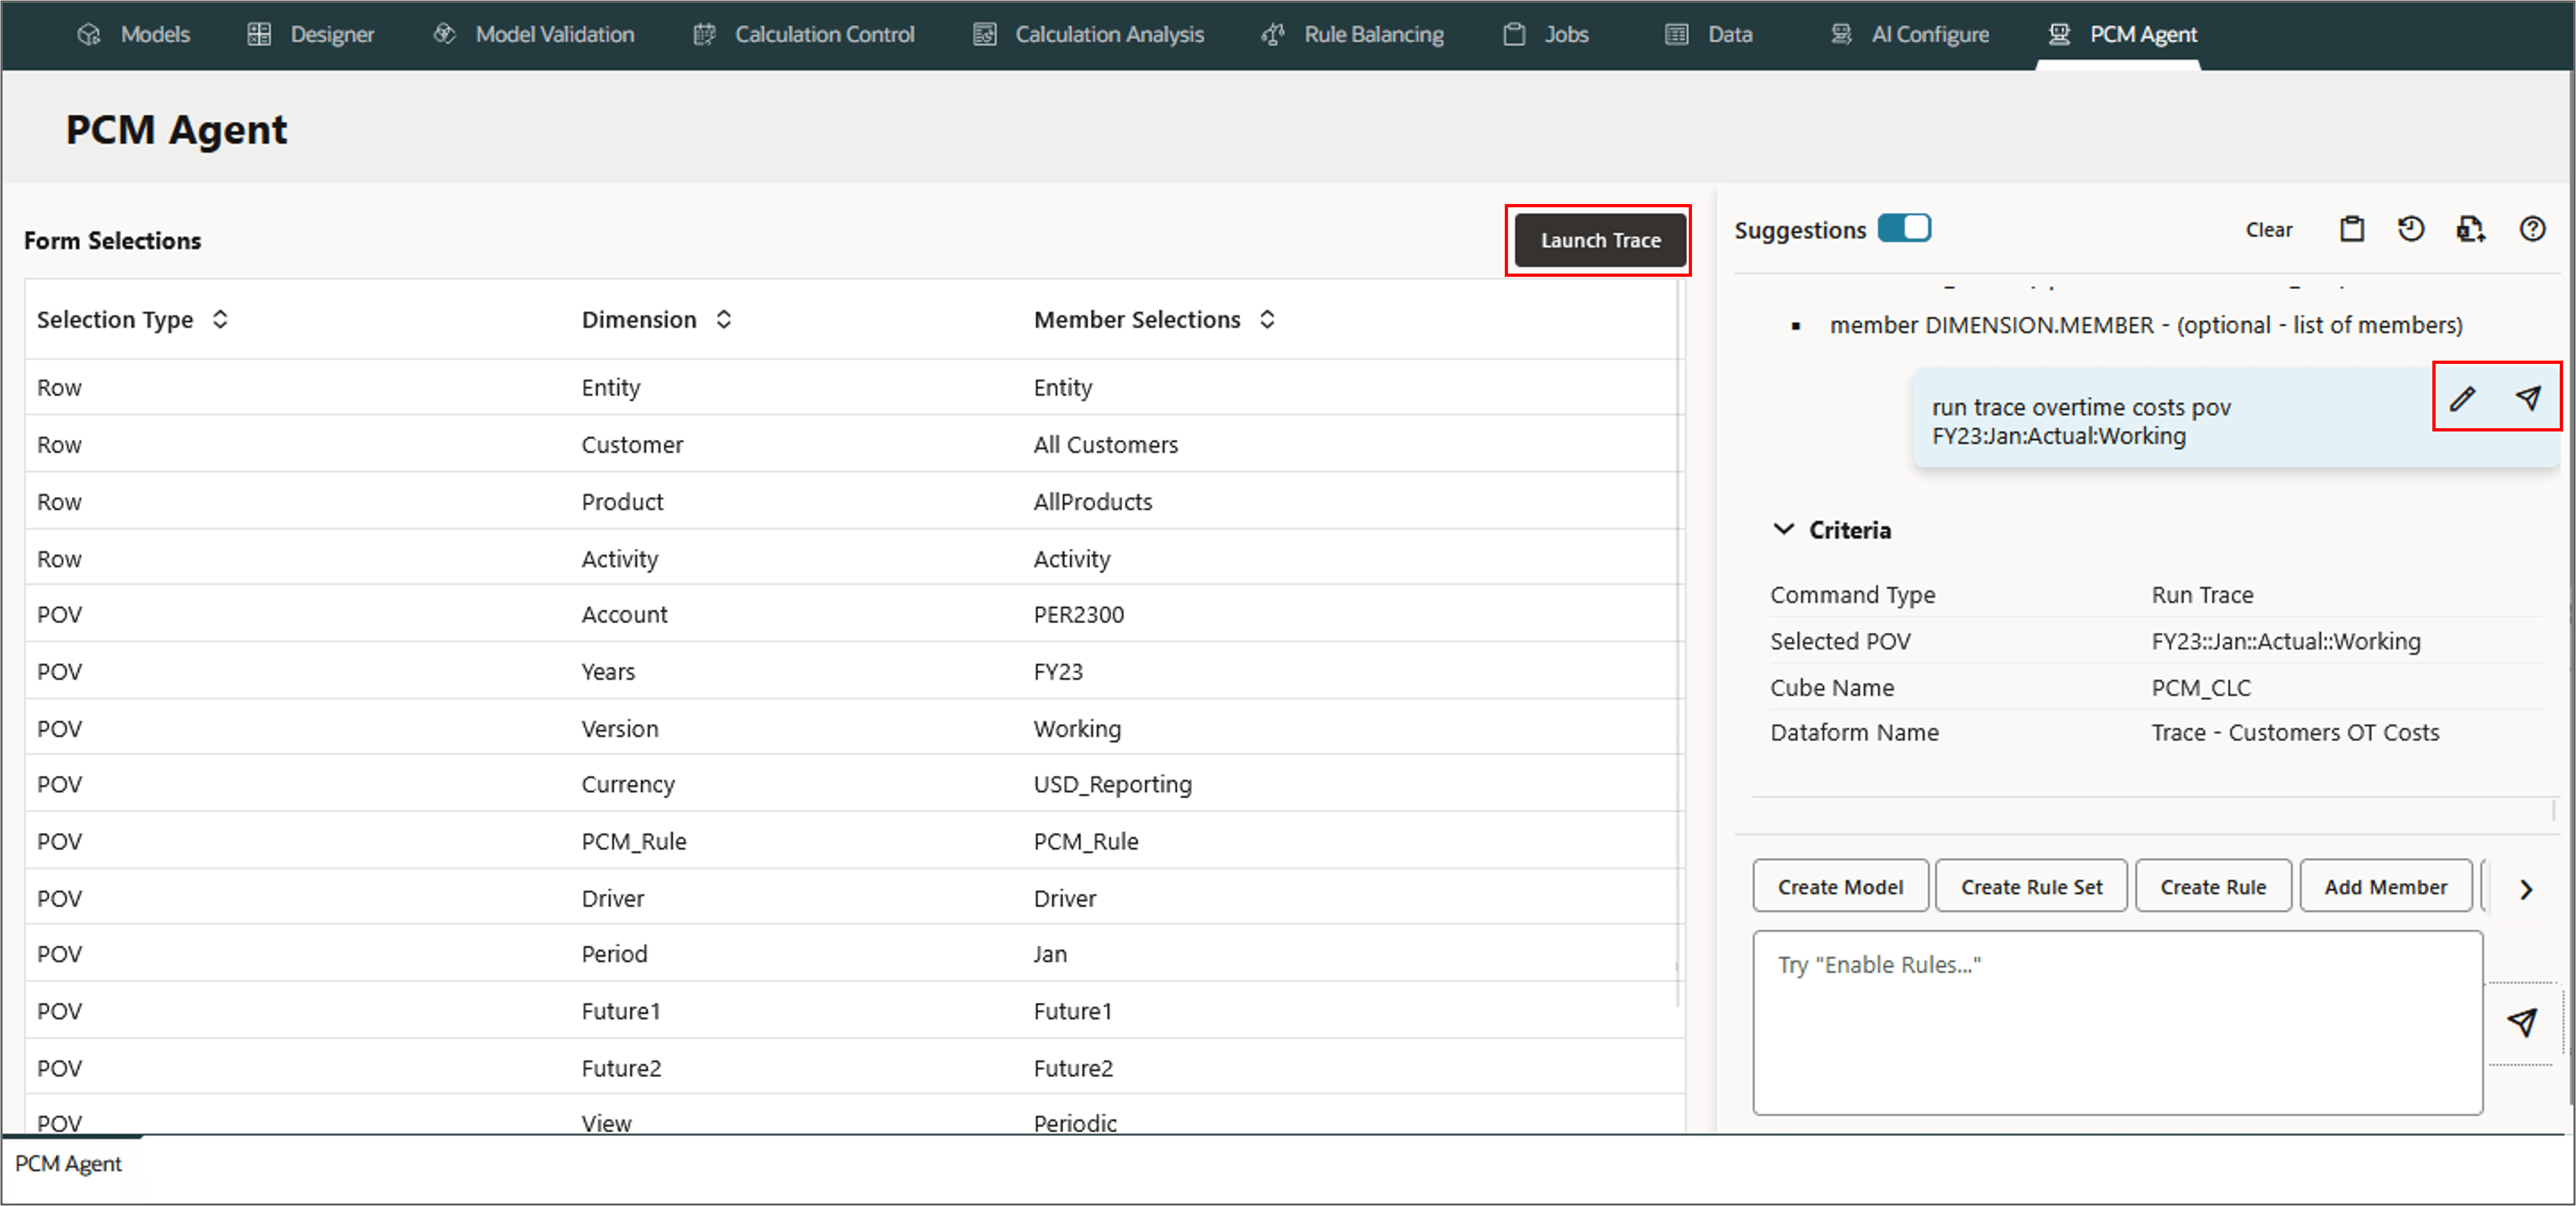
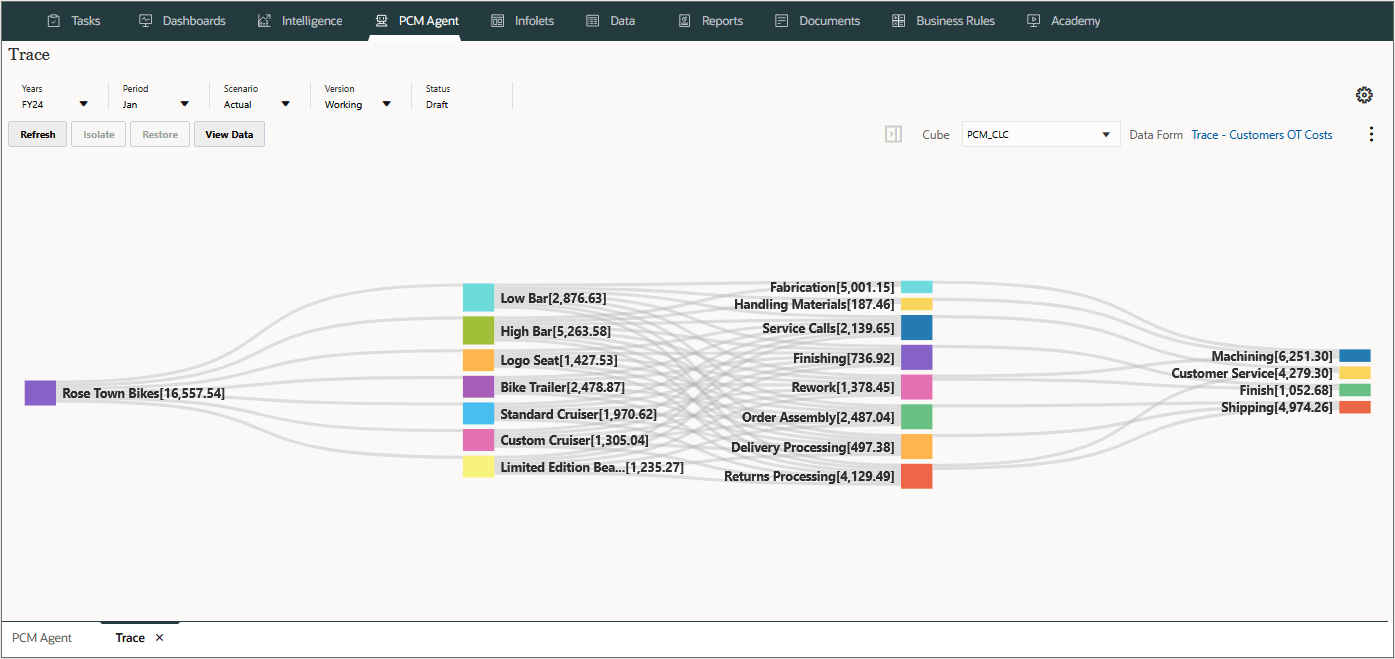
The trace diagram is displayed:
Example: Refining Trace Allocations
PCM agent enables refining the data in a trace diagram by focusing on specific nodes. Isolating portions of the diagram helps you to better understand the trace data and provides a wider range of analysis with the same base diagram.
For example, in the above trace diagram for All Customers, let's refine the data to see the allocation flow for a single customer - Rose Town Bikes.
- Add a further selection for "Activity.Rose Town Bikes" in the request for the trace to show the allocation flow for Rose Town Bikes only:
- Review or refine the request if needed, and then click Launch Trace.
- The trace is narrowed down to just the allocation in values related to the activity for the customer - Rose Town Bikes.
run trace overtime costs pov FY23:Jan:Actual:Working
	selection customer:Rose Town Bikes