Understand the Assignment Assistant User Interface
The Assignment Assistant is divided into two pages: Main page and Route details page. The Main page lists all the resources and buckets eligible to receive the activities, whereas the Route details page lists the route of a specific resource.
Main page
The Main page is displayed when you try to assign one or several regular activities. You can view up to five resources on the page and scroll to see more. The time before the shift starts and the time after the shift ends is displayed in grey, similar to the Manage page. You can scroll forward beyond midnight if activities extend into the next day. You can scroll up to 24 hours into the following day.
This table describes the UI elements on the Main page:
| Legend | UI Element | Description |
|---|---|---|
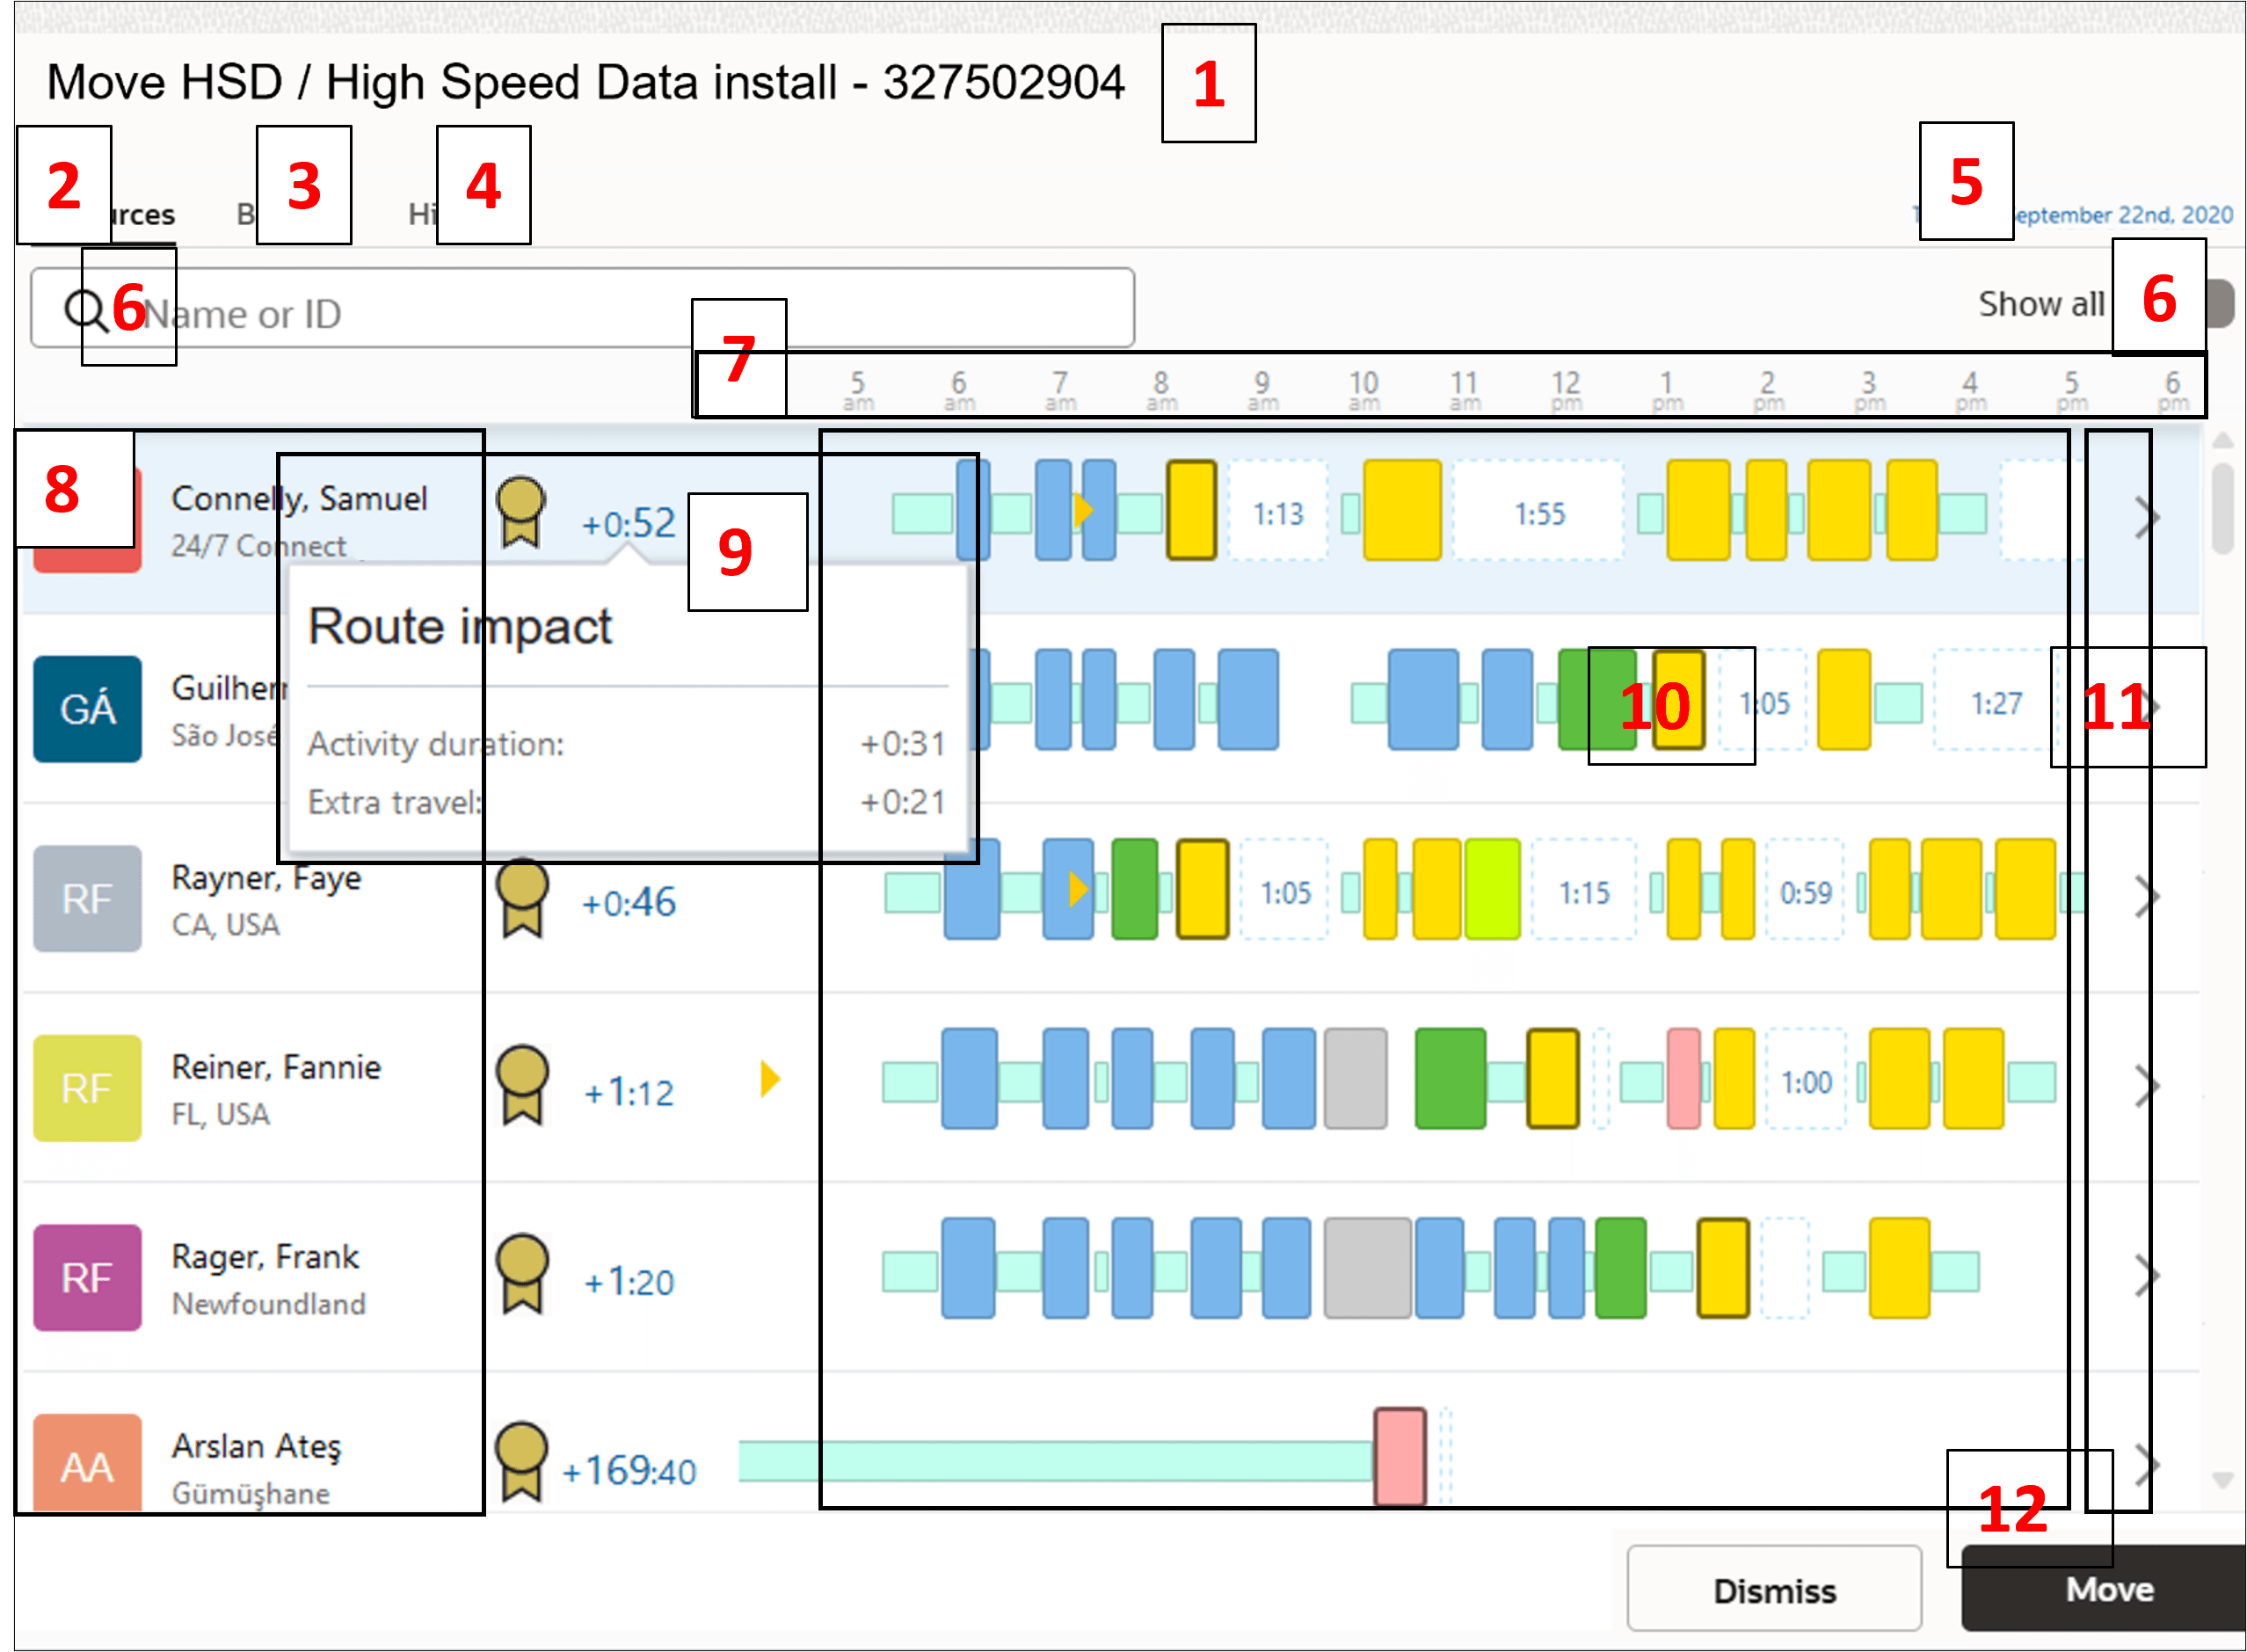
| 1 | Header | If you're moving a single activity, you can view the activity identifier. If you're moving multiple activities, you can view the count of activities. |
| 2 | Resources page |
Use the Resources page to move the activities to a resource. The resources displayed here meet these conditions:
|
| 3 | Buckets page | Use the Buckets page to move the activities to a bucket. The buckets displayed here meet the same conditions as the resources do. |
| 4 | History page | View the activities that you've moved in the current session and assign activities to a previously-used resource. |
| 5 | Date editor | Reschedule the activity to a different date, or set the activity as non-scheduled. |
| 6 | Options—Search and Show all |
Search: Search for a resource using the name or external ID. If you're on the Buckets tab, search within the buckets. Show all: Show all resources, regardless of these conditions:
If no resources meet the search criterion or if you've disabled Show all, then the message, 'No resources to display' is displayed and Assign is grayed. The message, 'No buckets to display' is shown for buckets in this case. Resource alert, if any is displayed under the resource name when you enable Show all. |
| 7 | Time scale | View the start time of the activity. |
| Current time | View the current time. | |
| 8 | Resource/bucket details | View the resource name, photo/avatar/icon, and the parent resource
name. The resources are displayed in the order of the most optimal to
the least optimal route impact. The order of resources is affected by
these factors:
|
| 9 | Suggested Resource and Route impact | View the Suggested resources along with the Route impact time. Route
impact time indicates the total increase in the duration by which the
route changes if you move the activity to this resource. On click,
displays the Route impact with a breakdown of time for Activity duration
and Extra travel. The Route impact time is calculated as
(total_activities_duration_after_assign +
total_travel_time_after_assign -
total_activities_duration_before_assign -
total_travel_time_before_assign). Click the column to view the hint.
If you move an activity between resources on the same date, the
routes impact column contains the summary impact on the routes of
both the resources (existing and target). In addition, the route
impact hint shows how both the routes are impacted:
The current resource details aren't displayed when you
move an activity:
In these cases, the route impact hint and column show how only the target resource's route is impacted. |
| 10 | Activity position |
This option is available only for the Resources tab. View the position of the activity on the resource route for each resource. If you change the date, the routes are updated accordingly. The activities that you're trying to move are displayed with a dark border. This option helps you understand:
'+N activities' is displayed instead of the route details for each resource or bucket, when you do any of these:
The message turns red when at least one of the activities being moved has an alert. |
| 11 | Details | Click the arrow to open the Route details page for the resource. |
| 12 | Assign button | Click to assign the activities to the selected resource. Activities are located in the same place as displayed on this page. You can move to the Route details page to reorder the activity or set it as not ordered. |
| Not shown | Activity hint | Click an activity to view the activity hint. |
Route Details page
The Route details page shows the activities in the route of a specific resource for the selected day for which you want to move an activity. When you move an activity, the activity that's moved is highlighted with a darker background.
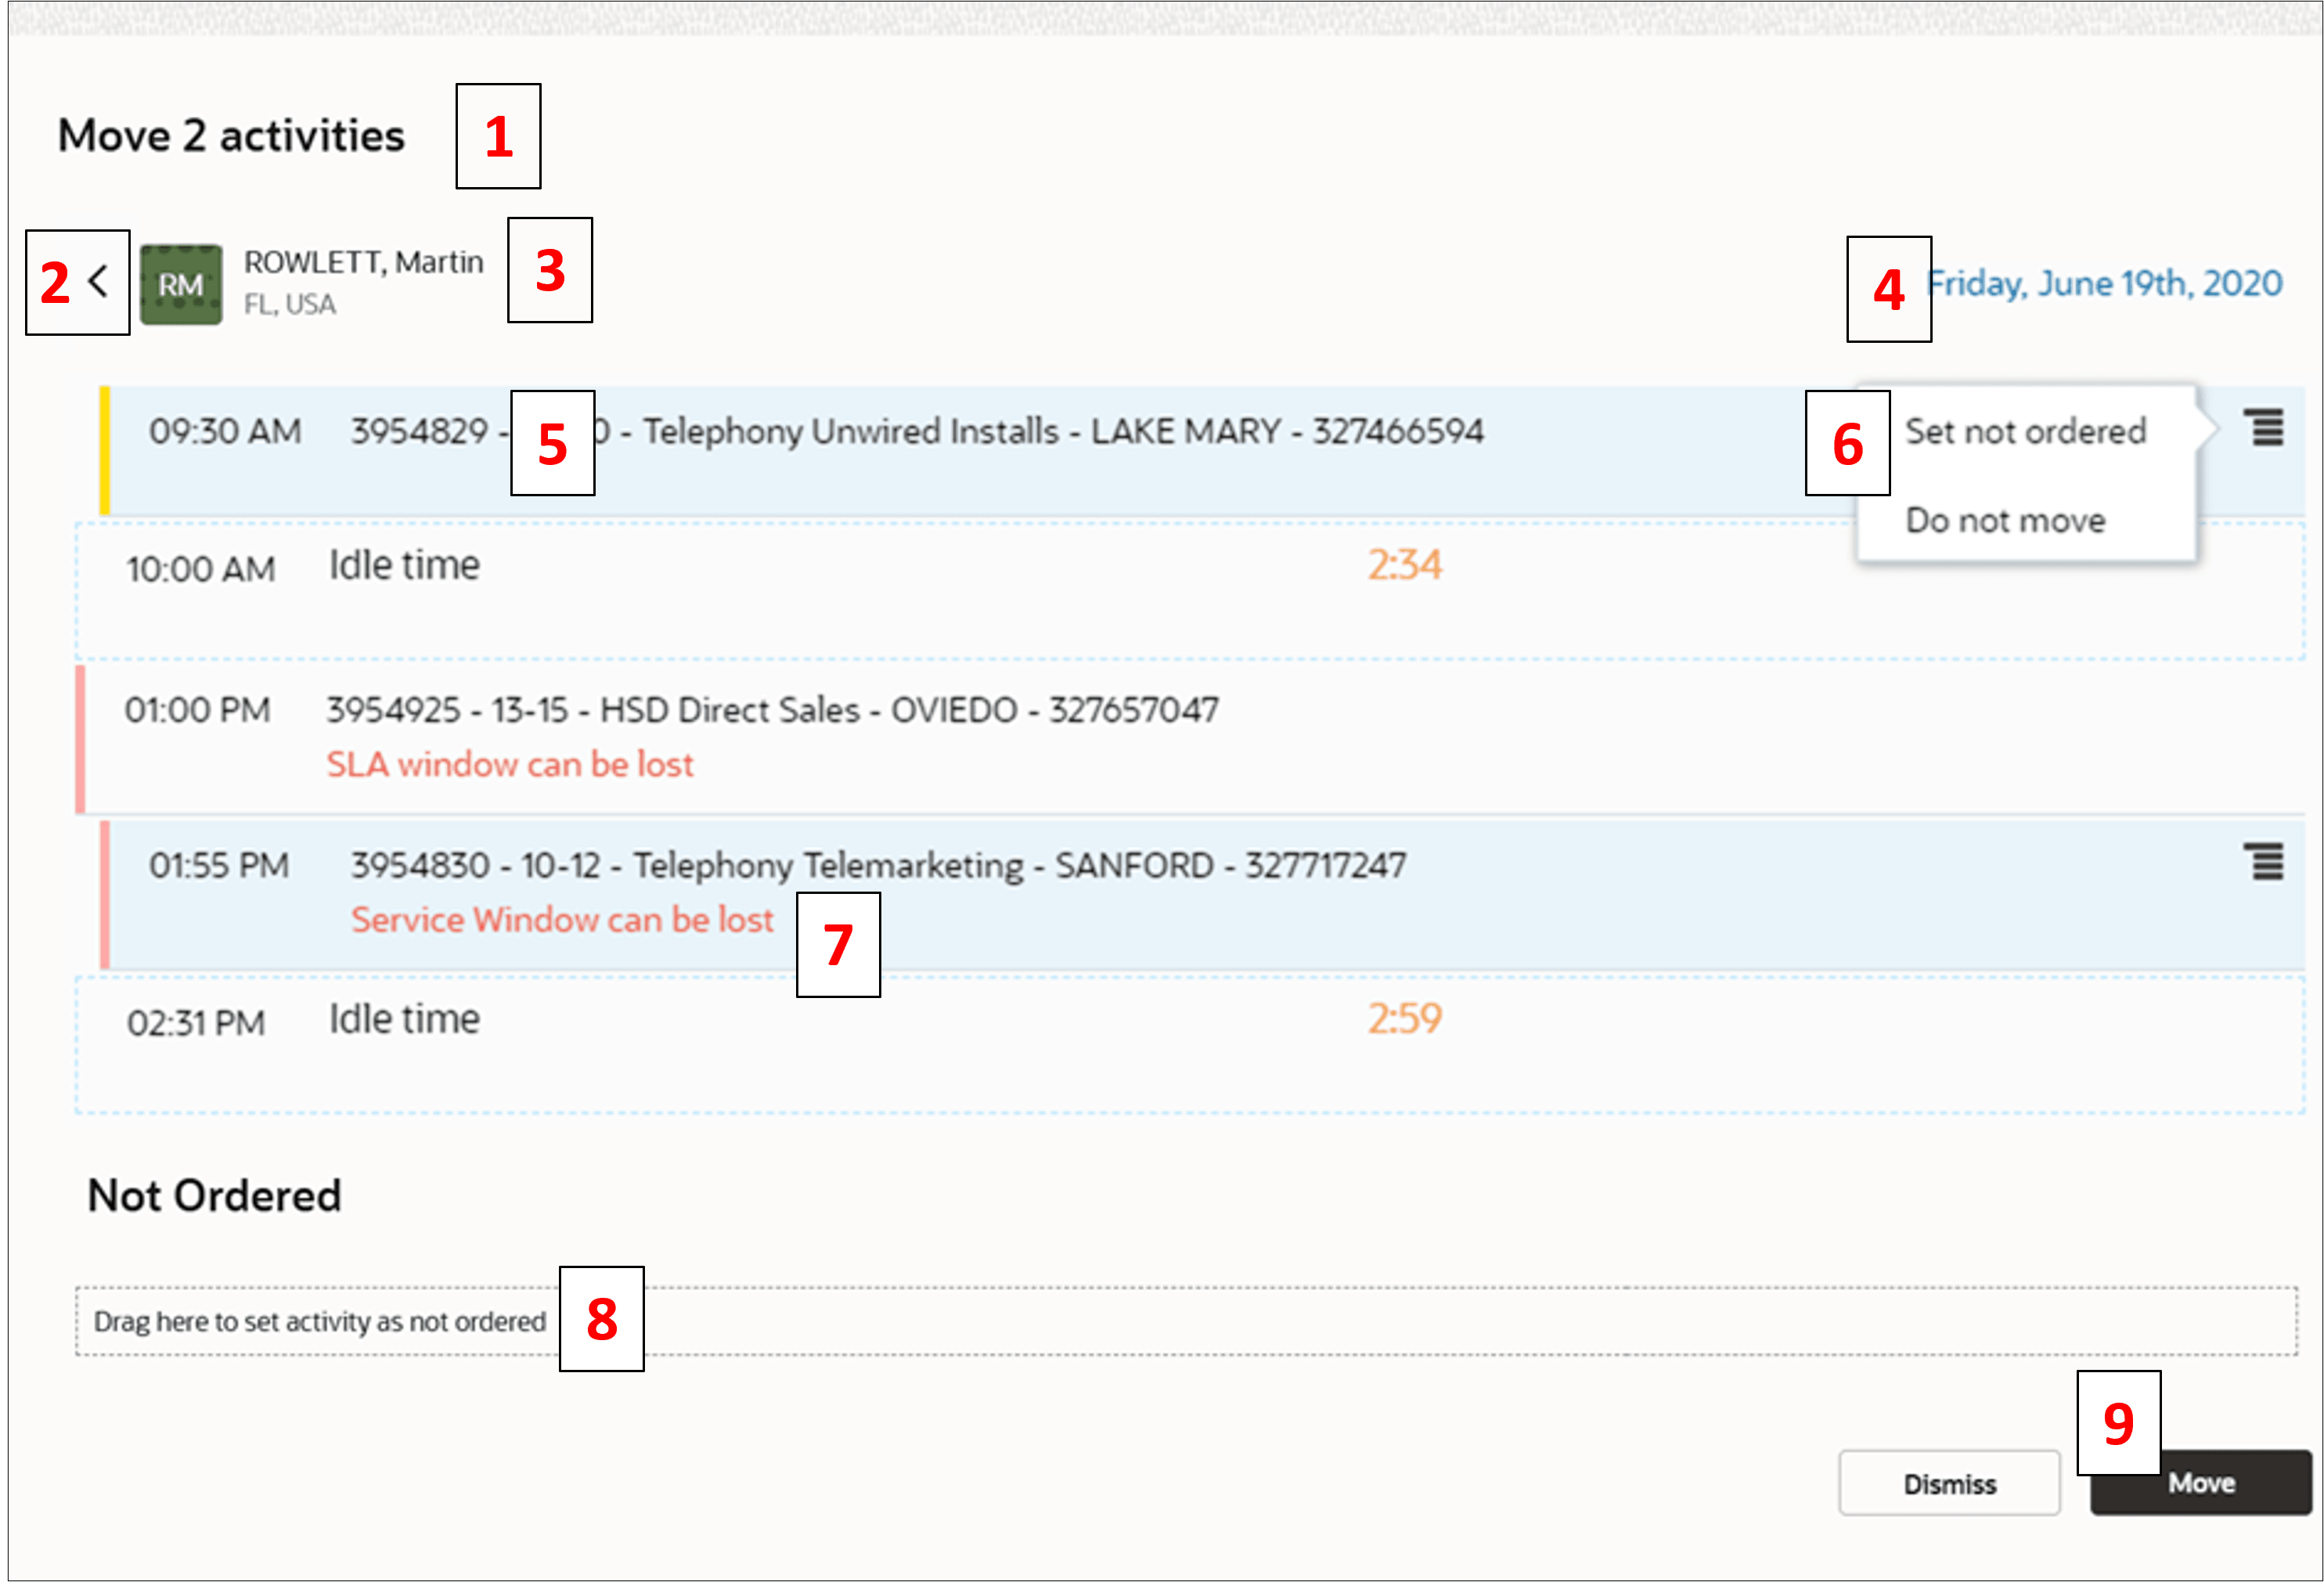
This table describes the UI elements on the Route Details page:
| Legend | Component | Action or Description |
|---|---|---|
| 1 | Header | If you're moving a single activity, you can view the activity identifier. If you're moving multiple activities, you can view the count of activities. |
| 2 | Back link | Click to go to the Main page. If you click the back link before clicking Assign on this page, you'll lose all the route changes made here. |
| 3 | Resource details | View the resource name, photo/avatar/icon, and the parent resource name. |
| 4 | Date | View the date for which you're moving the activities. You can't change the date. |
| 5 | Activity details | View the activity details such as activity identifier, activity type, location, and idle time. |
| 6 | Stack menu | Use the stack menu to set the activity as not ordered or cancel the move. |
| 7 | Warnings |
View warnings, if any, for the activity. You can see these warnings:
|
| 8 | Not ordered | Drag and drop the activity to this space to set it as not ordered. |
| 9 | Assign | Click Assign to commit the changes. |
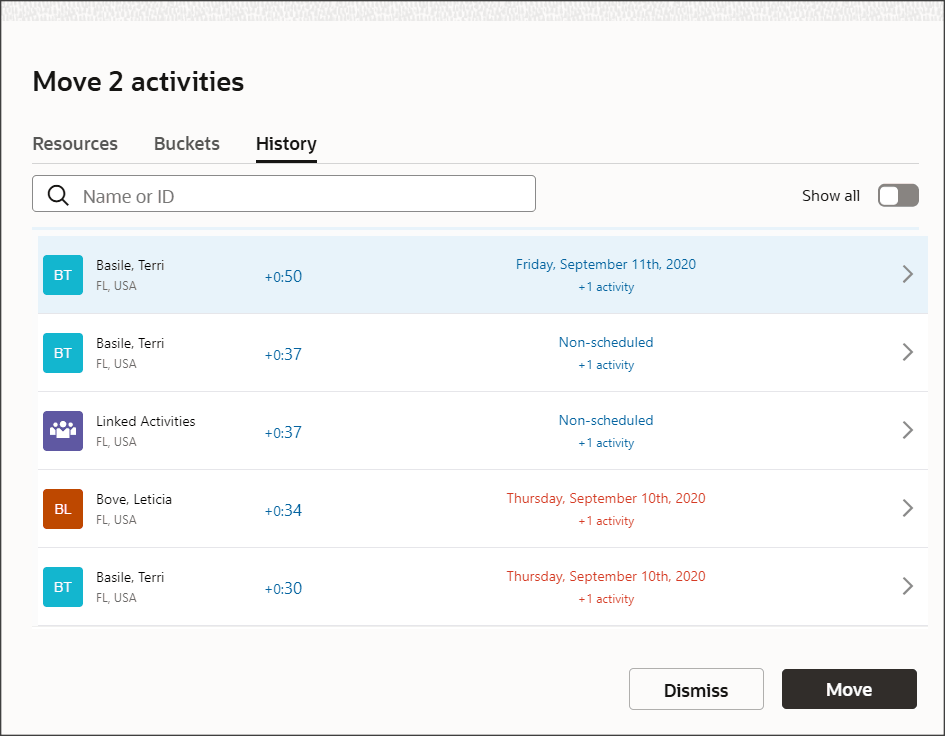
History page
If you've moved at least one activity in the current session, you can see the History page. Use the History page as a quick access page to assign activities to the same resource several times. The page contains a list of mobile workers and buckets, and is sorted by the time of move, with the last moved activity on the top. For each resource you can see the route impact, activity date, and the number of activities moved. You might see some resources listed multiple times. For example, let’s say you've moved activities to a resource twice, for different dates. Then, the resource is listed twice.
Non-movable section
You see the Non-movable section when you can't assign an activity to the current resource. For example, let’s say you try to drag-and-drop an activity to a resource that's set as 'Forbidden' for the activity. The activity is then displayed in the Non-movable section and you can't drag it to other sections.