How do I create a Form?
You create a Form so that Mobile Workers can fill it to capture statutory or business data required for an activity. This is a custom form that's available only for your organization.
-
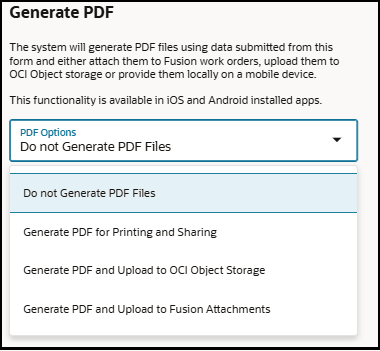
In the Generate PDF section, select any of the following PDF Options:
-
Do not Generate PDF Files : Default. Select this option if you don't want to create PDF files for this form.
-
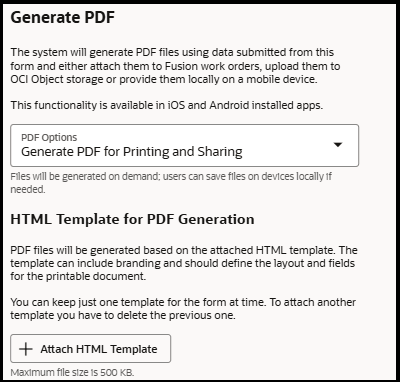
Generate PDF for Printing and Sharing: Select this option to generate PDF files and make it available on the device for printing at customer sites or sharing with clients using other applications.
- In PDF Options, when you select Generate PDF for Printing and Sharing option,
the HTML Template for PDF Generation section appears.
-
Click Attach HTML Template to attach the template that you want to be used to generate PDFs for printing and sharing.
Note: Ensure the attached template is an HTML file and its size is not more than 500 KB. Form settings are not editable until a template is attached.
- In PDF Options, when you select Generate PDF for Printing and Sharing option,
the HTML Template for PDF Generation section appears.
- Generate PDF and Upload to OCI Object Storage: Select this option to generate
and automatically upload PDF files to OCI Object Storage.
- In PDF Options, when you select Generate PDF and Upload to OCI Object Storage,
the application requires you to specify the OCI Object Application name.

- In the Application drop-down list, select the application connected to Object storage.
-
Click Attach HTML Template to attach the template that you want to be used to generate PDFs.
Note: Ensure the attached template is an HTML file and its size is not more than 500 KB. Form settings are not editable until a template is attached.
- In PDF Options, when you select Generate PDF and Upload to OCI Object Storage,
the application requires you to specify the OCI Object Application name.
-
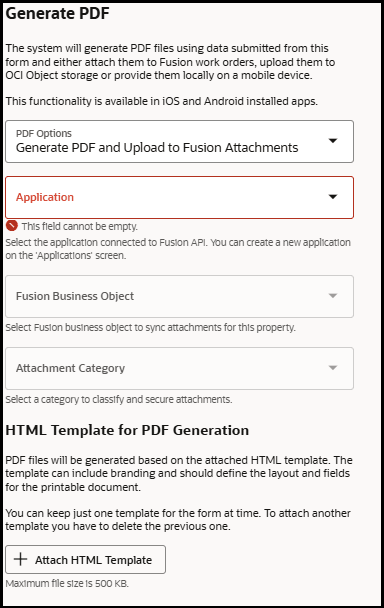
Generate PDF and Upload to Fusion Attachments: Select this option to generate PDF files upon form submission and attach the files to the associated Service or Maintenance work order in Fusion.
-
In PDF Options, when you select Generate PDF and Upload to Fusion Attachments, the application requires you to configure the following Attachments property to set up connectivity to storage.
-
In the Application drop-down list, select the application to connect to Fusion API.
-
In the Fusion Business Object drop-down list, select either Service work order or Maintenance work order.
-
In the Attachments Category drop-down list, select a category from Fusion to upload PDF files.
-
Click Attach HTML Template to attach the template that you want to be used to generate PDFs.
Note: Ensure the attached template is an HTML file and its size is not more than 500 KB. Form settings are not editable until a template is attached.
-
Note:If you are using Oracle Fusion Field Service and assigned the following roles:
- ORA_MNT_MAINTENANCE_MANAGER_JOB – for Maintenance Work Orders
- ORA_SVC_CUSTOMER_SERVICE_MANAGER_JOB – for Service Work Orders
- In PDF Options, when you select Generate PDF and Upload to Fusion
Attachments, the application requires you to configure the following Attachments property to
set up connectivity to storage.
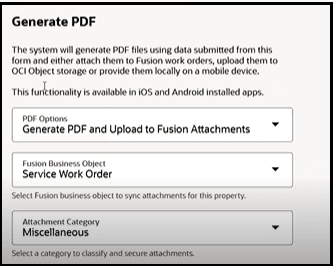
- In the Fusion Business Object drop-down list, select either Service work order or Maintenance work order.
- In the Attachments Category drop-down list, select a category from Fusion to upload PDF files.
- Click Attach HTML Template to attach the template that you want to be used to generate PDFs.
-